Movavi Video Editor Plus 2021 - image
←
→
Page content transcription
If your browser does not render page correctly, please read the page content below
Movavi Video Editor Plus 2021

                                                Don't know where to start?
                                             Perhaps these tutorials would help:

    Remove trial restrictions                      Make a quick video               Make a video from scratch
Save your video without a watermark       Have your video ready in just 5 minutes      Learn how to do basic
 and use the program after 7 days.           using the new Montage Wizard.           editing using the Timeline.

                                                    More questions?
                                         Write us an e-mail at support@movavi.com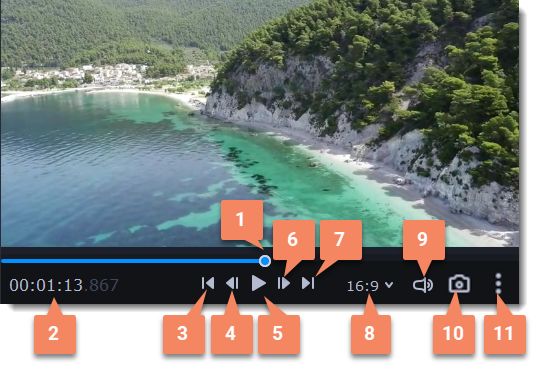
Table of contents
Activating Video Editor .........................................................................................................................................................................................2
Activating without Internet access ..................................................................................................................................................................3
Managing subscription ....................................................................................................................................................................................5
Activating and installing packages .................................................................................................................................................................5
Quick Start ............................................................................................................................................................................................................6
Quick Video mode ................................................................................................................................................................................................8
Adding media ......................................................................................................................................................................................................10
Recording video ............................................................................................................................................................................................11
Creating an intro ...........................................................................................................................................................................................12
Managing projects...............................................................................................................................................................................................13
Transferring projects .....................................................................................................................................................................................14
Appending a project......................................................................................................................................................................................15
Preview and organize clips ................................................................................................................................................................................15
Gaps on the Timeline ...................................................................................................................................................................................16
Edit and enhance clips .......................................................................................................................................................................................18
Rotating videos and images .........................................................................................................................................................................19
Cutting clips ..................................................................................................................................................................................................20
Cropping ........................................................................................................................................................................................................22
Color adjustments .........................................................................................................................................................................................23
Video speed ..................................................................................................................................................................................................24
Reversing video ............................................................................................................................................................................................25
Image duration ..............................................................................................................................................................................................26
Fading video .................................................................................................................................................................................................27
Creating overlays ..........................................................................................................................................................................................28
Adding a watermark......................................................................................................................................................................................31
Creating a freeze frame ...............................................................................................................................................................................32
Removing black bars ....................................................................................................................................................................................33
Fading effects ...............................................................................................................................................................................................34
Adding and editing audio....................................................................................................................................................................................35
Recording audio ............................................................................................................................................................................................36
Extracting audio from videos ........................................................................................................................................................................37
Looping audio ...............................................................................................................................................................................................38
Volume curves ..............................................................................................................................................................................................38
Linking audio .................................................................................................................................................................................................39
Fading audio .................................................................................................................................................................................................39
Equalizer .......................................................................................................................................................................................................40
Noise removal ...............................................................................................................................................................................................40
Audio effects .................................................................................................................................................................................................41
Beat detection ...............................................................................................................................................................................................42
Synchronization .............................................................................................................................................................................................43
Effect packages collection ..................................................................................................................................................................................44
Filters ...................................................................................................................................................................................................................46
Transitions ...........................................................................................................................................................................................................47
Titles ....................................................................................................................................................................................................................49
Timer .............................................................................................................................................................................................................50
Saving custom titles......................................................................................................................................................................................50
Stickers ................................................................................................................................................................................................................51
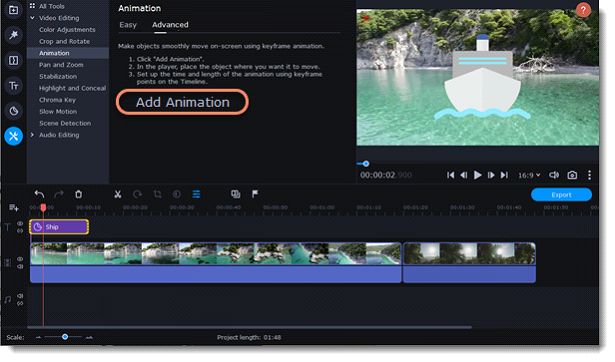
Animation ............................................................................................................................................................................................................52
Pan and zoom ....................................................................................................................................................................................................54
Stabilizing video ..................................................................................................................................................................................................56
Highlight and conceal .........................................................................................................................................................................................57
Logo ....................................................................................................................................................................................................................59
Chroma key.........................................................................................................................................................................................................60
Exporting videos .................................................................................................................................................................................................61
Export only audio ..........................................................................................................................................................................................63
Export for devices .........................................................................................................................................................................................65
Export for TVs...............................................................................................................................................................................................66
Uploading online ...........................................................................................................................................................................................68
Partial project export.....................................................................................................................................................................................71
Video Editor preferences ....................................................................................................................................................................................72
General preferences .....................................................................................................................................................................................73
File preferences ............................................................................................................................................................................................74
Sharing preferences......................................................................................................................................................................................75
Acceleration preferences ..............................................................................................................................................................................76
Help and support ................................................................................................................................................................................................77
Keyboard shortcuts .......................................................................................................................................................................................77
System requirements ....................................................................................................................................................................................77
Supported formats ........................................................................................................................................................................................78
Codec activation ...........................................................................................................................................................................................79
OpenGL troubleshooting ...............................................................................................................................................................................79
Updating the graphics card driver ................................................................................................................................................................80
Glossary ........................................................................................................................................................................................................81
Export troubleshooting ..................................................................................................................................................................................83
Creating an Instagram video ........................................................................................................................................................................84
Activating Video Editor
When you first start Movavi Video Editor Plus, it will be running in TRIAL MODE. To use the program without the trial restrictions, you will
need to buy the full version and activate Movavi Video Editor Plus. If you don't have the activation key yet, click the button below to visit the
site and purchase the key.

Activate the program
1. Launch the program.
2. Go to the Help menu and select Activate Software.
3. Copy the activation key from your e-mail and paste it in the activation window.
4. Click Activate.

Activating without Internet access
If the computer you have installed Movavi Video Editor Plus on is not connected to the Internet, you can activate the program via email.
See detailed instructions

If you haven't received your activation key within the hour:
• Check the Spam folder of your mailbox
• Contact support

I bought Movavi Video Editor Plus, but my videos already have a watermark
After you have activated the program, you can open the movie project and re-export the movie without the watermark.
How to export videos

                                        Activating without Internet access
1. Click the button below to buy an activation key. After the purchase is completed, the key will be delivered to you via e-mail. If you already
have a key, skip to the next step.

2. Open the program and go to Help > Activate software
3. Enter your activation key and select the Activate offline option. Click Activate.

4. In the next window, click Copy and transfer this information to a computer or device with an Internet connection.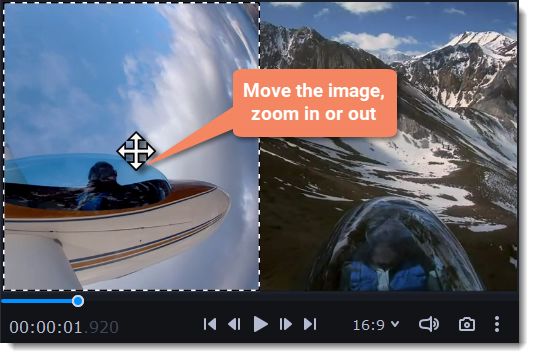
5. When you have access to the Internet, paste the information you copied into a new e-mail and send it to reg@movavi.com. You should
receive a reply within an hour. Copy the activation key from the reply and transfer it to the computer with Movavi Video Editor Plus.

6. Return to the window with offline activation. If you've closed the window, repeat steps 1-3 and enter the same activation key you used
before. Then, paste the registration key into the box and click Activate.

If the activation is not happening
• Make sure that you have used a correct activation key. There should not be any additional symbols or spaces after the last digit of the key.
• Also make sure that the key you're using is meant for the Movavi Video Editor Plus.
• Before attempting the activation, stop the antivirus software and the firewall of the computer.
• Check that your user account has the administrator rights.
• If nothing helps, email the support team.

                                                  Managing subscription
If your subscription has expired, you need to renew it to continue using the program.

To renew your subscription, click the Renew Subscription button. A web page will open, where you can buy the license. Once you've made a
purchase and received the activation key in an email, copy the key and paste it into the program window. Then click Activate.

Have troubles renewing the subscription?
• If you haven't received an e-mail with the activation key within an hour, check the Spam folder in your email box.
• Contact our support team. Our experts will help you figure out and solve any of the related problems.

                                       Activating and installing packages
Expansion packages are sets of additional content, which include transitions, titles, stickers, backgrounds, and music. The packages help
you achieve your creative goals, broaden your freedom of expression, and save time choosing the right artistic tools.

Acquiring a package
1. Go to Movavi Effects Store. You can also find this this link in the Help menu > Movavi Effects Store. Or by clicking a cart icon in effect,
transition, title or sticker collections.
2. On Movavi Effects Store web-page choose and purchase the packages you like. After the purchase is processed you will receive an e-mail
with an activation key, a link to download the package, and an instruction on how to install it.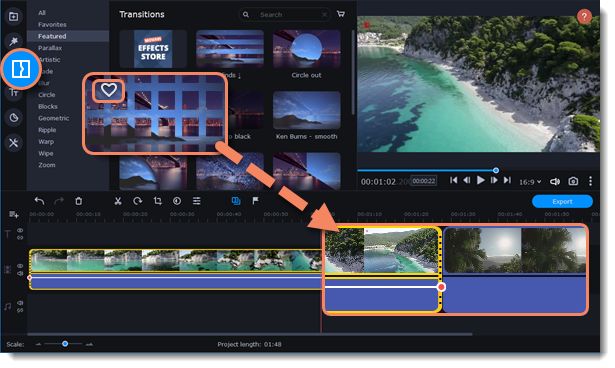
Installing a package
1. Click the link you received with the e-mail and download the package.
2. When the download is finished, open the package as you normally would open your project: double-click the file or drag and drop it in the
Video Editor. The program will run the installation process.
3. In the Installing Package window click Install and follow the instructions on the screen.

Activating a package
1. Copy the activation key from your email.
2. Paste it in the in the Activating Package window.
3. Click Activate.

Wait until the installation is finished. The new elements will appear in the corresponding categories. The categories with the new elements
will have a yellow dot on them and the elements will be marked with the NEW label.

Cannot install or activate the package? Make sure that:
• The Video Editor you have installed on your system supports the packages;
• You use the key that was sent to you after the purchase of a package and there are no additional symbols after the key;
• You have enough free disk space to install the package.

                                                              Quick Start
In this mode you can use all the tools that the Video Editor has to offer and create professional-looking videos without complicated software.

You can create a new video by creating a new project or a quick video.

1. To start creating a project just add files on the Timeline. If you want to start another project select Create New Project in the File menu.

2. Click Add Files or drag and drop your files over the import area to start working on them.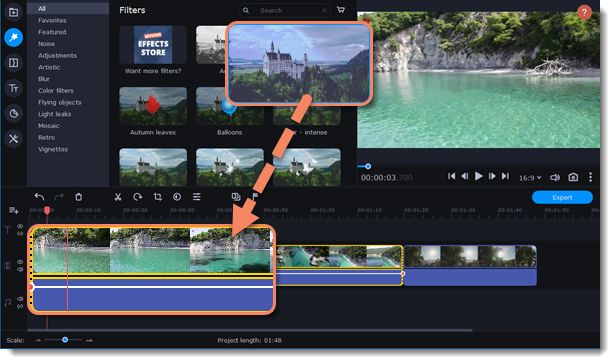
3. Change the clip layout on the Timeline, crop images, cut videos, using the toolbar.

4. Add effects, transitions, titles, and more by changing the tabs on the left-hand side of the screen.

5. To add filters and transitions to the project, drag them to the Timeline.

6. Save your video:
1) Click the Export button.
    2) Choose file format.
    3) Name the video, select a folder to save the video to and set the quality.
    4) Click Start and wait until the processing is finished.

     Make sure to save your work once in a while: choose Save from the File menu to save the project so that you can access it later.

                                                       Quick Video mode
You can use the Montage Wizard to automatically build a video for you in minutes. All you need to do is provide the Wizard with some video
clips or photos, choose a music track, and let the Wizard cut and build the video for you. You can also use the Montage Wizard to make
slideshows.

1. Click Quick Video to open the Wizard.

2. On the Files tab, click                       or drag and drop your files over the window. To remove files, click the   in the upper right-
hand corner of each file, or select the files you want to delete and click Delete Selected on the bottom panel.

3. Switch to the Templates tab or click Next.
4. Choose a theme or a transition template.
   No transitions template does not add any transitions to your video, but your pictures will still have a Pan and Zoom effect applied by
   default.
   Transitions template puts some kind of smooth transitions between the slides.
   Theme template uses the sample music tracks, a set of different transitions for each of the themes and various title styles.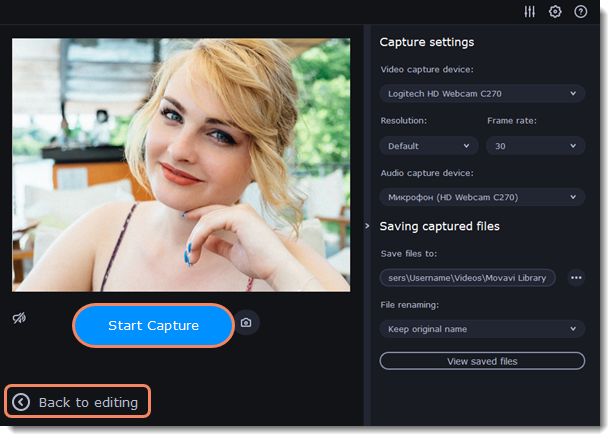
5. Switch to the Music tab or click Next.
6. Add music. Choose from the built-in tracks* or add music of your own. You can also add more than one track.
  *The audio tracks are royalty-free so you can upload these videos to YouTube and other services.

7. Switch to the Preview tab or click Next.
8. Customize the opening and ending titles, change text and click Apply.

9. Under the Advanced tab make other necessary changes.
   • Video duration
   You can set your video to be the same length as the audio by selecting the Fit to music length option or use the slider to set how long you
   want the video to be. If you opt for a shorter video, some clips may not appear in the end result.
   • Fill black bars
   If the resolution of the project and the files you've added to the video are different, black bars will appear. You can remove them by
   checking the Fit to frame option – the image resolution will be automatically fitted to the frame size.
   Learn more about frame size
   • Volume balance
   By bringing the upper slider to the right end you will turn the volume of the added video up to maximum. And by bringing the bottom slider
   to the right end, the volume of the background audio track will have its maximum volume.
   • Arranging clips
   If you have a lot of pictures and want to change their order in the video, click the Shuffle button. The Wizard automatically mixes your files
   and puts them in a different order.
Tip: You can also set a desired order of appearance of your files by returning to the Files tab and dragging the file icons in a desired order.

10. Watch the finished video in the player on the Preview tab and switch to the Export tab.
11. Select what you want to do next with your video:
  • Save the video – save the video to your disk.
  • Continue editing – add final touches to your video by adding effects, more titles, animation and more.
  • Upload online – save the video to your disk and upload it to YouTube, Vimeo, Google Drive or Movavi Cloud.

12. To save the video, choose a video format and pick a folder to save the video file.
    If you're uploading the video to YouTube, sign in with your YouTube account and fill in the details about your video. Then click Start to
    begin saving the video.

Learn more:
Adding filters
Adding titles
Color adjustments
Removing black bars

                                                           Adding media
To begin working on your video project, you first need to add some media files. Use your own files or any of the built-in media.

Add your files
1. On the File import tab click Add Files.
2. Select the files and click Open. They will appear on the Media bin tab.
3. From the Media Bin tab drag and drop the files onto the Timeline. You can remove the selection of all files by clicking on an empty space
within the bin area, or by selecting a single file.

Add built-in media
1. On the Import tab select the type of media you want: sounds, music, sample video or backgrounds.
2. Switch to a tab.
3. Click the file icon to download and see it or to listen to it.
4. Choose a media file and drag it onto the Timeline to add to the project.
Arrange the files
Once you've added the files, they will appear on the Timeline at the bottom of the window. The Timeline allows you to arrange the clips in the
order you want. To reorder the clips, select the clips you want to move and drag them to the new position.
See also:
Working with video
Working with audio
Recording video
1. Connect the camera you want to capture from to the computer. Make sure that the system recognizes the device and that it is working
correctly.
2. On the Import tab of the Video Editor Plus, click Record Video. The recording module will open in a separate window.
3. In the Video capture device box, choose the camera.
4. Then, select the resolution and frame rate. A larger resolution will be able to retain better quality, however, the video file size will be larger.
A higher frame rate is necessary for recording motion, while static scenes can be captured with a lower frame rate.
5. In the Audio capture device box, choose the microphone.6. Choose a destination folder. By default, the recordings will be saved to your Movavi Library folder. To change it, click the icon near the
Save files to box.
7. Click Start Capture to begin recording the video. During capture, you can take snapshots using the camera icon on the right.
8. When you're done, click Back to editing at the bottom of the window. The captured files will be added to the Timeline and saved to disk.
Creating an intro
Intro videos are specifically designed short video clips that use visual elements and text and can be edited or customized. If you don't know
where to start in making a unique intro, you can use the ones that are already made and pre-installed into the program. You will only need to
change the text.
Create a new intro
1. In the Titles collection go to Intro videos.
2. Find the New intro clip and drag and drop it onto the Timeline.Edit the intro
1. Click on the clip and the Timeline will switch to the intro editing mode.
2. Add your own media files (video, audio or pictures), effects, titles and other. Work as if you're working with a usual project, but keep in
mind that your making a special introductory video.
*Before you start editing, delete the instruction clip that the new intro contains.
Save changes
Click on the toolbar to save changes and go back to the main editing mode.
To save the intro and use it in other projects, select the intro clip and click . The intro will be saved with all the other items in the collection.
You can edit the intro at any time while working on the project.
Managing projects
A project keeps all the work on your video or slideshow. You can save the project to finish your work later, or restore your work if you need to
edit something after you've finished. A new project is created automatically when you start working on a video.
Creating a new project
1. On launching the Video Editor you can start making a video right away.
2. To start a new project while working on another project, go to the File menu and select Create New Project or Create Quick Video.
Saving projects
1. Go to the File menu and select Save Project. Or use a keyboard shortcut Ctrl+S.
2. Name your project. All projects are stored in the "\My Videos\Movavi Video Editor\Projects" folder of your user.
3. Click Save.
You can later open the project file and continue working on it. To avoid losing your editing progress, make sure to save your project every
once in a while. To save a project, open the File menu and select Save Project.
After that, you can save your project as a file in the *.mepx format on your computer and open it later to continue editing your movie.
Viewing videos
Project files cannot be viewed in a regular video player, and can only be opened with Movavi Video Editor. To view the final video in a player,
you need to first export your project to a common video format.
Learn how to export your projectOpening projects
1. Open the File menu and select Open Project.
2. Find the project file, select it and click Open.
You can also open projects in several different ways:
A. Find your project in Windows Explorer and drag it onto the Video Editor window or double-click it.
B. In the Import area click Add Files and select find your project.
Restoring a project from an autosave
If your computer malfunctions and you cannot save the project, some of your work may be restored using an autosave file. Rename the
"autosave.mepx" file and open it in the Video Editor to continue working on your project.
Restoring media files
When you open a recent project, you may see a message saying that a file is missing from the project. This may happen if one of the files
used in the project has been moved somewhere else or deleted from disk. In this case, click Specify Folder in the message box to find the
files in their new location, or click Skip to open the project without the missing files. You can also click the magnifying glass icon and
specify location of a single file. We recommend to copy all the files to your hard drive before editing.
Transferring projects
Saving portable project
A portable project is a kind of project that contains all the media files that comprise it. Since the program does not create copies of the files
and only refers to their location on the disk, the project will only work properly on another computer if all the media files are present there as
well. With the portable project saving option, you don't have to collect all the files manually.
1. Open the File menu and choose Save Portable Project
2. Set a path for your project folder to be saved to and click Save.
3. Then transfer the project folder to another computer with Movavi Video Editor installed.Read more:
Restoring lost files
Appending a project
If you work on a big project, you might want to separate it into several smaller ones for a more convenient editing process. Then, to combine
them back together, append other projects to the major one.
1. Open a project or create a new one.
2. Open the File menu and click Append Project.
3. In a new window, find and open the project you want to combine with your current project. The project you append will be added at the end
of all other clips in the current project.
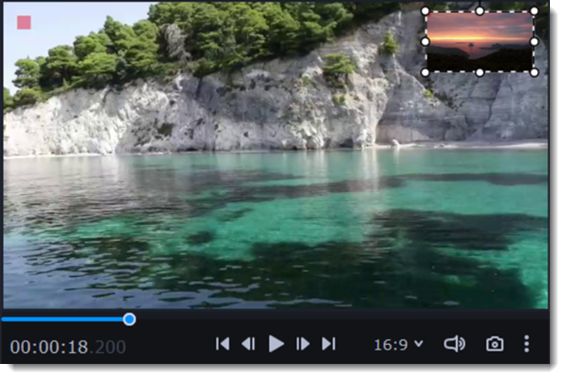
Preview and organize clips
Use the player in the upper right-hand part of the window to preview your project.
Current position
Your current playback position can be controlled using the position marker under the player and on the Timeline.
For precise positioning:
• To move in 0.5 second increments, open the Playback menu and choose Skip Forward by 0.5 Seconds (Ctrl+Shift+→) or Skip Backward by
0.5 Seconds (Ctrl+Shift+→).
• To move precisely from frame to frame, use the Previous frame (Ctrl+→) and Next frame (Ctrl+→) buttons in the player.
• To switch between clips, use the Previous clip (Shift+→) and Next frame (Shift+→) buttons in the player. This will move the position marker
exactly one frame backward or forward.
• Use the Scale slider to zoom in on the Timeline to make positioning easier.
Playing the video
1. Move the position marker to where you want to start playback.
2. Click Play or press the Space Bar key.
3. Click the Pause button or press the Space Bar again to pause playback.1 – player position marker 7 – next clip
2 – current time 8 – aspect ratio of the project
3 – previous clip 9 – player volume
4 – previous frame 10 – snapshot of the player
5 – play/pause 11 – additional settings of the player
6 – next frame
Arranging clips
By default, media files will appear on the Timeline in the same order in which you've added them. To rearrange the clips, drag them with your
mouse and drop them onto the desired position. To select multiple clips, use Ctrl+click or click and drag to draw a selection on the Timeline.
Gaps on the Timeline
Gaps on the Timeline are empty spaces between clips on the video track.
Adding of the gaps
1. To enable gaps, click the arrow icon in front of the video track.
Either right-click the area in front of the tracks and select Enable Gaps on Track in the context menu.
2. To add a gap, press the clip with the left mouse button and drag it to a distance from the other clip.Deleting the gaps 1. Right-click the gap you want to delete. 2. Select Delete Gap to remove the selected gap. Select Delete All Gaps to delete all the gaps on the track. When you delete gaps, the clips will move towards each other. Ripple delete To delete a clip on the track and move all the clips on the right side by the length of its duration, without deleting gaps, select Ripple Delete. Right-click the clip you want to delete. Disabling gaps on a track To disable gaps and move all clips to each other, click the crossed-out arrow icon in front of the video track.
Either right-click on the area in front of the tracks and select Disable Gaps on Track in the context menu.

                                                   Edit and enhance clips
Arrange, edit and enhance clips with the tools that you can find on the toolbar and on the More tab.

In a table below see what tools you can use on clips and how to apply them.

            Split                            Set the position marker on the Timeline where you want to separate your clip and cut it.

            Rotate                           Turn the clip clockwise.
            Crop                             Set on the player the space you want to keep and cut the borders.

            Adjust color                     Make the necessary color changes using presets or set them manually.
            Turn the sound up or down        Click Clip properties and use the Volume slide to change audio loudness.
            Normalize the video sound        Select the Normalize checkbox in the Clip properties to make the sound smoother.
            Change video speed               Click Clip properties and use the Speed slide to make the video faster.
            Reverse the video                Select the Reverse checkbox in the Clip properties to play the clip from the end to the
                                             start.
            Change opacity                   Move the Opacity slide to make the clip transparent.
            Change clip length               To change the clip length move the borders of the clip on the Timeline or use the Speed
                                             slide to make the clip faster.
            Make clip fade in or out         Use the Fade in and Fade out slides to make the clip appear and disappear smoothly.
Edit videos and images
Photos and videos aren't always perfect from the beginning. Use the buttons on the toolbar to fix and adjust the clips.
Picture in picture and overlays
To overlay one video or image on top of another, select the clip you want to show on top and drag it up, towards the top of the Timeline to
create an extra overlay track. Then, double-click the upper clip to set up where the overlay will be shown on the video.
Learn more about overlays
Picture and picture, side by side overlay modes.
Rotating videos and images
Nobody likes vertical videos! But don't worry, in just a few clicks, you can turn any photo or video around without having to crane your neck.
Rotating by 90 degrees
1. Select the clip you want to rotate
2. Click the Rotate button on the toolbar to rotate the clip by 90 degrees clockwise. Click the button again to rotate the video more.
Learn more: Removing black barsFixing the horizon level
1. Select the clip on the Timeline.
2. Click the Crop button on the toolbar.
3. Use the Angle slider to slightly rotate the clip inside the frame, until the horizon is level with the guides in the player.
Cutting clips
Use the scissors button on the toolbar to cut video and audio clips into parts. To delete a clip you don't need, click the trash can button.
Splitting clips into parts
1. Select the clip that you want to split.
2. Move the position marker to the moment where you want to cut the clip.
3. Click the Split button on the toolbar.How does the cut clip look like.
Cutting out fragments
Cut the clip at the beginning of the unwanted fragment
1. Select the clip you want to cut.
2. Move the position marker to the beginning of the fragment. Use the Previous Frame and Next Frame buttons on the player to catch
the moment precisely.
3. Click the Split button. The clip will be cut into two parts, with the unwanted fragment at the beginning of the second clip.
Cut the clip at the end of the fragment
1. Select the second clip the you've just cut off.
2. Move the position marker to the end of the fragment.
3. Click the Split button again. The fragment should now be in a separate clip.
Delete the unwanted fragment
1. Select the clip with the unwanted fragment.
2. Click the trash can button or press the Delete key to remove this clip. The clip will be removed, and the remaining clips on the
Timeline will move to close the gap.
Trimming clips
If you only need to cut off some parts at the beginning or at the end of a video or audio clip:
1. Place your mouse pointer over the edge of the clip.
2. Click and drag the edge towards the center of the clip to trim the clip to the desired length.
For more precise navigation:
• Open the Playback menu and use the Skip Forward by 0.5 Seconds or Skip Backward by 0.5 Seconds commands to jump half a second
forward or back.
• Use the keyboard shortcuts to move the position marker half a second back and half a second forward, respectively: Ctrl+Shift+→ and Ctrl
+Shift+→.
• Use the Previous Frame and Next Frame buttons for precise frame-by-frame navigation. You can also use the Ctrl+→ and Ctrl+→ keyboard
shortcuts.• Use the Previous Clip and Next Clip to switch between the clips in the player. You can also use the Shift+→ and Shift+→ keyboard shortcuts.
Cropping
Cropping a video can help you remove black bars, cut away the edges of the video, or permanently zoom in onto an object inside the frame.
1. Select the clip on the Timeline.
2. Click the Crop button on the toolbar to open the Crop tool, and a cropping frame will appear inside the player.
3. In the player, set the frame so that the parts you want to cut are outside it. Drag by the corners of the frame to change its size, and drag by
the center of the frame to move it.
Use the Angle slider in the Crop and Rotate section on the left to rotate the crop frame.4. Click Apply. A star icon will appear on the clip once you've applied cropping.
Removing crop
1. Click the star icon on the clip to show the list of applied effects and filters:
2. A tab will open above the toolbar. Find the Crop effect and click the cross button next to it to discard the effect.
Color adjustments
Change color settings
1. On the Timeline, select the clip that you want to adjust.
2. On the toolbar, click the color adjustments button to open the adjustments tool.
3. Select Easy mode to use color presets for quick and simple adjustment. Also you can change the color of the video using color templates.
To apply the template drag it to the clip.Or select Advanced mode to set your own settings.
If made your own adjustments to the image and want to save them for future use, click Save Adjustments and name your preset. The
new preset will appear on the Auto Adjustments tab.
Once you have used the adjustments, the clip will be marked with a star icon, denoting applied tools or filters:
Video speedSpeed up or slow down a video or audio clip with the Speed slide. This can be useful if you're working on a music video and you want the
video to match the tempo of the music.
1. On the Timeline, select the clip you want to edit.
You can also change the speed of any audio clip. If you modify the speed of a video with built-in audio, the audio speed will also be
changed.
2. Click the Clip Properties button to open the editing tools for the selected clip.
3. Drag the Speed slider to set the necessary video speed.
The clip's length on the Timeline will change to reflect the new speed. If you've changed video speed, the video clips will be marked with
a star icon:
Reversing video
Reversing the video will play the clip and its audio backwards. You can combine reversing the video with increasing speed and the VHS filter
to create a cool rewinding effect.
1. On the Timeline, select the clip that you want to reverse. You can reverse both video and audio clips.
2. On the toolbar, click the Clip Properties button to open the properties for the selected clip.3. In clip properties, select the Reverse option.
When you apply reverse, the clip will appear with a reverse icon on top of it:
Image duration
You can change how long each image appears in your video or slideshow either using the clip properties or you can set all images to the
same length.
Changing one image's length
1. On the Timeline, select the image clip that you want to edit.
2. Click the Clip Properties button to open the properties for the selected clip.3. In the Duration box, enter the new length of the image. Use the following format: hours: minutes:seconds.milliseconds. Changes will be
applied instantly.
You can also change image duration by selecting an image clip on the Timeline and dragging its borders left or right. The longer the clip
appears on the Timeline, the longer it will play in your movie or slideshow.
Setting the same length for all images
To set all of the project's images to the same length:
1. Click the Transition Wizard button on the toolbar.
2. In the Transition Wizard window, enter the preferred length into the Image slide duration box. If you don't want to use transitions to join
your clips, select No transitions in the box at the top.
3. Click OK to set all the images to the selected length.
Fading videoIn the editing tools, you can add smooth fades to the beginning or the end of a clip. For videos and images, you can use fading
simultaneously with animated transitions. For audio clips, you can create a smooth crossfade effect between songs.
1. On the Timeline, select the clip that you want to fade.
2. Click the Clip Properties button on the toolbar. The clip properties will open in the Tools panel above.
3. Set the fade length using the sliders on the Video tab.
Fade in – how long in seconds it will take to fade in to full opacity at the beginning of the clip.
Fade out – how long in seconds it will take to fade out from full opacity at the end of the clip.
See also:
Adding transitions
Fading audio
Creating overlays
Overlays are video or image clips that are shown over the main video. You can use these to create a split screen or picture in picture effect,
add a logo or watermark, create a Chroma Key effect, or insert a short clip without cutting the main video.
1. Add files to the project: a background video and a foreground video or a photo.
2. Select a clip which should go on the overlay track and drag it above the main video track.
3. Place the clip on the overlay track at the right time on the needed position. You will see a line connecting the clip on the overlay track to the
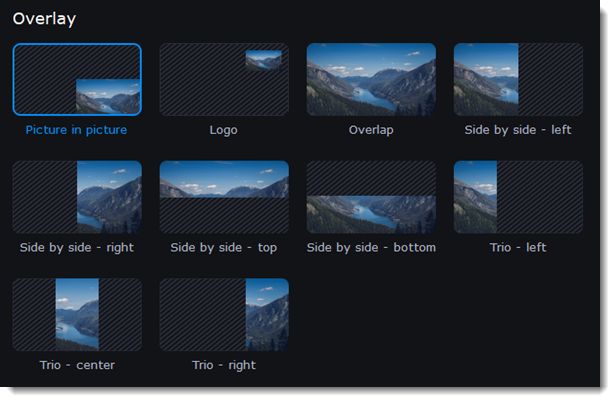
clip on the video track. When you move, cut, or delete a clip on the video track, the overlay clip will be affected as well. When you move theclip on the overlay track, an editing panel will open. If you switch to a different tool, you can go back to this panel by clicking More Tools — Video Editing — Overlay. 4. On the tool panel select overlay mode: Picture in picture, Logo, Overlap, Side by side or Trio. Picture in picture mode This is the default overlay mode. Using picture in picture mode, you can place the overlay video over any part of the screen. 1. Choose Picture in picture mode. 2. In the player, move the overlay clip to where you want it to appear in the frame. 3. To resize the overlay, drag at its corners. Clip's aspect ration will remain the same. Logo mode 1. Select Logo mode to place the overlay clip at the upper right corner and use it as a logotype. 2. Drag and move the logo to any part of the frame.
Side by side mode
This mode splits the frame into two parts.
1. Select a clip on the overlay track and then choose a side by side mode.
2. Hover the cursor over the selected clip in the player. Move the image in the frame, and zoom in or out on it with the scroll wheel.

Trio mode
With this mode you can have up to 3 videos in a single frame.
1. Select a clip on the overlay track and then choose a side by side mode.
2. Hover the cursor over the selected clip in the player. Move the image in the frame, and zoom in or out on it with the scroll wheel.
3. To add another video and get three in a single frame, add one more clip to the overlay track and repeat steps 1 and 2 for it.

Overlap mode
In Overlap mode, the video on the overlay track will cover the main video completely. You can use this mode to avoid cutting the main video,
and showing another clip instead, or to create a Chroma key effect.
How to change background (Chroma key)
                                                    Adding a watermark
Adding a watermark to your videos will protect your ownership even if it's shared all over the Internet. You can add an image overlay with
your own watermark or logo, or make a new one using text.

Image watermark
1. On the Import tab, click Add Files and add the image or video that you want to use as the watermark. For the best look, use images with
transparent areas.
2. Drag the watermark clip up to the overlay track to make it appear on top of other videos.

3. Double-click the watermark clip to edit the overlay, which you can move and resize in the player.
4. To change the opacity or duration of the watermark, click the Clip Properties button.
5. To set the opacity use Opacity slide in the properties. To make the watermark show over the whole length of the video, enter your project
length into the Duration box, or drag the right edge of the overlay clip until the end of the video track.
Text watermark
1. Click the Titles button on the left and pick a nice title style for your watermark.
2. Drag the titles you like onto the beginning of the Titles track at the top of the Timeline.
3. Double-click the titles and enter your watermark text. Pick a cool font and color on the panel above the player. Click Apply when you're
done.
4. To make the watermark show over the whole length of the video, drag the right edge of the text clip until the end of the video track.
If your movie is long, zoom out on the Timeline to make changing clip length easier.
OR: Double-click the text clip to enter text editing mode and enter the length into the Duration field. You can find the length of your whole
project at the bottom of the window.
Creating a freeze frame
A freeze frame is a single frame of a video that repeats for some time, creating an illusion of pausing the video. You can use freeze frames to
emphasize a moment or create a pause to explain things to the viewer.1. Move the position marker over the frame of the video that you want to freeze. To skip by precisely one frame at a time, use the Previous
frame and Next frame buttons under the player.
2. Once you're on the right frame, open the Edit menu or right-click on the clip and choose Insert Freeze Frame from the menu.
3. By default, a new freeze frame is four seconds long. To change the duration, drag the edges of the clip to make the clip shorter or longer.
Learn about changing image duration
Removing black bars
Sometimes, when you use videos of different aspect ratios, or if the project is set up incorrectly, some videos may have black bars around
them. You can remove black bars from videos using one of the ways below.
Use filter
1. On the Timeline, select the clip with black bars around it.
2. Click the Filters button on the left sidebar to open the Filters tab.
3. Find the Vertical fill filter in the Adjustments group and drag it onto the clip.
Learn more about filtersManual crop
If black bars appear only on one or several clips, you can cut off the edges to make the video fit better inside the frame.
1. On the Timeline, select the clip with black bars around it.
2. On the toolbar, click the Crop button.
3. A frame will appear in the player. Set this frame on the part of the video that you want to keep. Parts that are outside the frame will be cut
off.
4. In the Tools tab on the left, click Apply to accept the changes.
Learn more about crop
Fading effects
Make effects and filters fade in using the overlay track.
1. Copy the clip and paste it onto the Timeline.
2. Drag the copy of the clip on the track right above the original. Now you have two identical clips right on top of each other.
3. Double-click the clip on the overlay track and choose Overlap mode in the panel above the player.4. Apply the effects or filters you want to use onto the upper, visible clip.
Learn more: Applying filters
5. With the overlay clip selected, click the Clip Properties button and select General settings. There, use the Fade in and Fade out sliders to
set the fading time. Here you can also set Opacity if you want to reduce the effect's strength for the whole clip.
The clip with the effect will gradually appear and disappear, exposing the underlying original clip.
Adding and editing audio
Add an audio
1. To add music or other sounds to your project, open the Import tab.
2. Select File import category.
3. Click Add Files or just drag your files on the panel.
Also you can use one of the built-in music or sound tracks:
1. Click the Music or Sound category and take your pick from our royalty-free music collection.
2. Drag the tracks you liked on the Timeline.Edit an audio
To edit the audio file, double-click the audio track, the settings panel will appear.
Volume Sets the volume of the clip.
Normalize Makes quiet parts louder.
Speed Makes the audio play faster or slower.
Fade in The audio goes from complete silence to full volume in the time you set.
Fade out The audio goes from full volume to complete silence in the time you set.
Reverse Plays the audio backwards.
Recording audio
How to record an audio
1. Connect a microphone to your computer.
2. On the Timeline, place the position marker to where you want the recording to start.
3. Click the microphone button on the Import panel to open recording options.
4. Set up your recording device and volume.
5. Click Start Recording and record the audio.6. When you're finished, click Stop Recording. You'll find the recording on the Timeline.
Set start time for audio clips
After you've added the audio files, they will appear on the audio track of the Timeline as green clips. To change when the audio clip starts
playing, drag it along the Timeline, using the ruler at the top for time reference.
Extracting audio from videos
If you want to use a sound track from a movie, you can extract it from a video file and use it in your project.
On the Import tab, click Add Files and choose the video or just drag a video on the panel. The file will be added to the video track on the
Timeline.
How to trim the parts of the video if you don't need to extract the whole audio track:
1. Move the position marker to the beginning of the fragment you want to keep and click the Scissors button on the toolbar. This way you will
cut off the beginning of the video.
2. Now, move the position marker to the end of the fragment you need. Click the Scissors button again, and the fragment will now be in a
separate clip. 3. If you don't need the other fragments, select them on the Timeline and click the trash can button on the toolbar to delete them.
3. The audio that belongs to a video is shown right underneath it on the video track. To separate it from the video, drag the audio stripe down
onto the audio track. If you don't need the video clip anymore, just delete it.You can now work with the extracted audio clip separately.
If you want to save the audio clip for later use, you can export it as an audio file:
1. Click the Export button at the top of the program.
2. In the Export window, switch to the Save Audio File tab.
3. Select an audio format.
4. In the Save to field you will see where on the disk the file will be saved by default. To change that folder, click Browse and select a new
folder.
5. Finally, click Start to save the audio file.
Please respect copyright laws and stay within the boundaries of fair use of copyrighted materials.
Looping audio
If the music file is shorter than your video, you can loop the audio and have the file play over again until the end of the video.
1. To copy the audio clip, right-click the audio clip on the Timeline, and choose Copy from the pop-up menu.
2. Paste the audio clip onto the Timeline right next to the first clip. The clip will be inserted right after the position marker. Repeat until the
audio length is greater or equal to the video length.
3. Now, the audio track may be longer than the video track. To trim the audio, hold your mouse pointer over the right edge of the clip, and
drag it to the left.
Volume curves
Volume curves allow to control the volume for each part of the clip and smoothly increase or decrease the volume.
Each clip has its own volume curve that starts out at 100% volume for the entire clip, and two points at its beginning and at the end. The white
line on the image below is the volume curve before you add any points.
Set the volume level
1. Drag the white line up or down to the necessary level. The top of the clip is 100% volume and the middle of the clip is 50%.2. Points on the audio curve represent the volume peaks and lows. To add a point, right-click on the audio curve and choose Add Volume
Point from the pop-up menu.
3. Drag the audio point to the necessary volume level. You'll notice that the surrounding parts also move with the point to make the transition
smoother.
4. Make as many points as you need for each part of the clip where you'd like a peak or a drop in volume.
5. To set the volume level for a part of the clip, you'll need at least two points. Create a point at the beginning and at the end of the fragment:
6. Create as many volume points as you wish to make a necessary effect.
Linking audio
To make audio clips to stay in sync with videos or images as you edit your project, link it to each other.
To link an audio
1. Select an audio clip on the audio track at the bottom of the Timeline.
2. Drag the track under the video clip you want it to link to.
3. On the left side of the Timeline click the Link button to create the connection between audio and video clips.
Fading audio
In the editing tools, you can add smooth fades to the beginning or the end of a clip and create a crossfade effect between audio tracks.
Fade in – how long in seconds it will take to go from silence to full volume at the beginning of the clip.
Fade out – how long in seconds it will take to go from full volume to silence at the end of the clip.
Set up the fading effect
1. Select the clip on the Timeline.
2. Click the Audio Properties button on the toolbar.
3. Set the fade length using the sliders on the Clip Properties panel.You can also read