CONFIGURATION SERVER WEB REFERENCE - PORTASWITCH - MAINTENANCE RELEASE - PORTAONE
←
→
Page content transcription
If your browser does not render page correctly, please read the page content below

Maintenance Release 90

                                          PortaSwitch

         Configuration Server
           Web Reference

©2000-2021 PortaOne, Inc. All rights reserved.          www.portaone.com
PortaSwitch Configuration Server Web Reference

                      Copyright notice & disclaimers
                      Copyright © 2000–2021 PortaOne, Inc. All rights reserved

                      PortaSwitch® Configuration Server Web Reference, February 2021
                      Maintenance Release 90
                      V1.90.01

                      Please address your comments and suggestions to: Sales Department,
                      PortaOne, Inc. Suite #408, 2963 Glen Drive, Coquitlam BC V3B 2P7
                      Canada.

                      Changes may be made periodically to the information in this publication.
                      The changes will be incorporated in new editions of the guide. The
                      software described in this document is furnished under a license
                      agreement, and may be used or copied only in accordance with the terms
                      thereof. It is against the law to copy the software on any other medium,
                      except as specifically provided in the license agreement. The licensee may
                      make one copy of the software for backup purposes. No part of this
                      publication may be reproduced, stored in a retrieval system, or transmitted
                      in any form or by any means, electronic, mechanical, photocopied,
                      recorded or otherwise, without the prior written permission of PortaOne,
                      Inc.

                      The software license and limited warranty for the accompanying products
                      are set forth in the information packet supplied with the product, and are
                      incorporated herein by this reference. If you cannot locate the software
                      license, contact your PortaOne representative for a copy.

                      All product names mentioned in this manual are for identification
                      purposes only, and are either trademarks or registered trademarks of their
                      respective owners.

© 2000–2021 PortaOne, Inc. All rights Reserved. www.portaone.com
                                                                                               2
PortaSwitch Configuration Server Web Reference

                      Table of Contents
                              Preface ................................................................................................................................ 5
                              Document objectives ..................................................................................................... 6
                              Audience ............................................................................................................................. 6
                              Hardware and software requirements ................................................................... 6
                      1.      Introduction ................................................................................... 7
                              Login to the Configuration server interface ......................................................... 8
                      2.      System management ................................................................. 12
                              Servers .............................................................................................................................. 13
                              Sites .................................................................................................................................... 20
                              Configurations ................................................................................................................ 22
                              Environments.................................................................................................................. 30
                              Users .................................................................................................................................. 30
                              Update ............................................................................................................................... 32
                              Custom .............................................................................................................................. 32
                              Deposit .............................................................................................................................. 40
                              UI Plugins ......................................................................................................................... 41
                              Task monitor ................................................................................................................... 41
                      3.      Initial configuration of PortaSwitch® .................................. 44
                              Add servers...................................................................................................................... 46
                              Add IP addresses .......................................................................................................... 46
                              Create a configuration ................................................................................................ 47
                              Add instances ................................................................................................................. 48
                      4.      How to …....................................................................................... 54
                              … Add an alias to the PortaSIP® cluster’s IP address.................................. 55
                              … Change configuration options............................................................................. 57
                              ... Configure dispatching SBC? ................................................................................ 58
                              … Configure a MySQL database white list.......................................................... 65
                              … Configure several PortaSIP® clusters in PortaSwitch®.......................... 66
                              … Configure an adaptec RAID health monitoring ........................................... 69
                              … Configure a backup procedure........................................................................... 70
                              … Create new billing environments....................................................................... 70
                              … Configure site-to-site VPN tunnels for PortaSwitch®............................... 71
                              … Define new default ACLs ...................................................................................... 78
                              … Delete an active billing environment ............................................................... 79
                              …Control billing environment deletion ................................................................. 80
                              … Enable additional validation of dialing rule emergency numbers ........ 81
                              … Migrate an instance ................................................................................................ 82
                              … Migrate an IP address............................................................................................ 84
                              … Сonfigure PortaBilling® to interact with the Microsoft Active
                              Directory ........................................................................................................................... 85
                              … Display provisioning event status for ESPF on the PortaBilling® web
                              interface............................................................................................................................ 88
                      5.      Appendices ................................................................................... 91

© 2000–2021 PortaOne, Inc. All rights Reserved. www.portaone.com
                                                                                                                                                                       3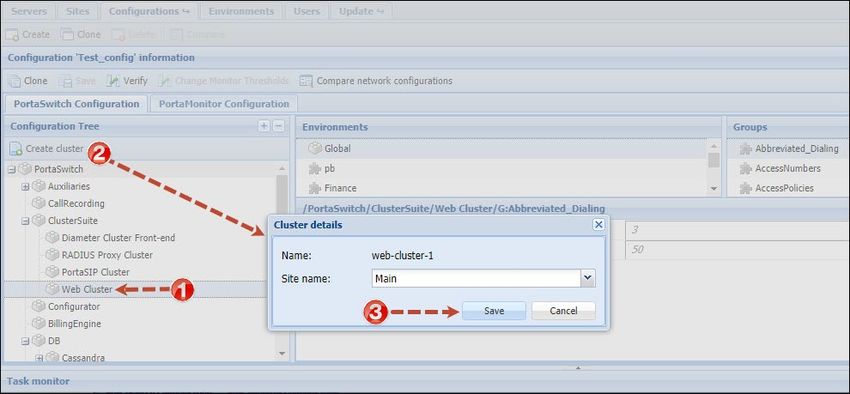
PortaSwitch Configuration Server Web Reference

                              APPENDIX A. Internal modules of the billing engine ..................................... 92
                              APPENDIX B. Paths to tops of build areas in SRPM packages ................... 94

© 2000–2021 PortaOne, Inc. All rights Reserved. www.portaone.com
                                                                                                                      4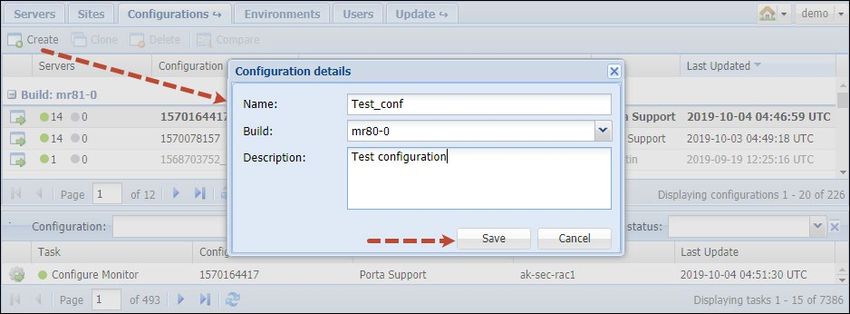
PortaSwitch Configuration Server Web Reference

Preface
                      This document provides a general overview of the web interface for the
                      PortaSwitch® Configuration server.

                      Where to get the latest version of this guide
                      The hard copy of this guide is updated upon major releases only, and does
                      not always contain the latest material on enhancements that occur in-
                      between minor releases. The online copy of this guide is always up to
                      date, and integrates the latest changes to the product. You can access the
                      latest copy of this guide at www.portaone.com/support/documentation/.

                      Conventions
                      This publication uses the following conventions:
                         • Commands and keywords are given in boldface.
                         • Terminal sessions, console screens, or system file names are
                             displayed in fixed width font.

                      Exclamation mark draws your attention to important actions that must
                      be taken for proper configuration.

                      NOTE: Notes contain additional information to supplement or accentuate important
                      points in the text.

                      Timesaver means that you can save time by taking the action described
                      here.

                      Tips provide information that might help you solve a problem.

                      Gear points out that this feature must be enabled on the Configuration
                      server.

                      Trademarks and copyrights
                      PortaBilling®, PortaSIP® and PortaSwitch® are registered trademarks of
                      PortaOne, Inc.

© 2000–2021 PortaOne, Inc. All rights Reserved. www.portaone.com
                                                                                                         5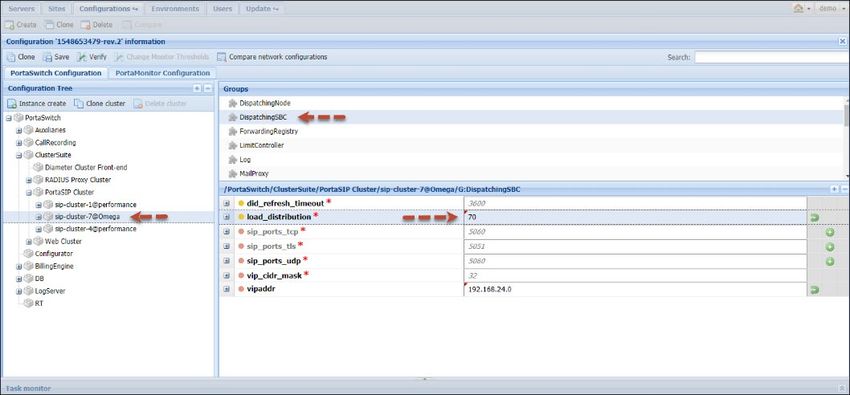
PortaSwitch Configuration Server Web Reference

Document objectives
                       This publication provides technical information on the PortaSwitch®
                       Configuration server’s web interface usage. It is designed for use either in
                       conjunction with other materials or as a standalone reference.

Audience
                       The target audience of this document is comprised of system
                       administrators, VoIP engineers and system operators who will be
                       managing your PortaSwitch® system via the web interface of the
                       configuration server.

Hardware and software requirements

                      Client system recommendations
                           •   OS: MS Windows 7 or above, Linux/BSD, macOS Sierra (version
                               10.12) or above.
                           •   Web browser:
                                   o Google Chrome 84 or above, Mozilla Firefox 78 ESR,
                                       Mozilla Firefox 80 or above.
                                   o JavaScript and cookies must be enabled.

                           •   Spreadsheet processor: MS Excel, OpenOffice Calc,
                               LibreOffice Calc, Google Sheets.
                           •   Display settings: A minimum screen resolution of 1366 × 768.

© 2000–2021 PortaOne, Inc. All rights Reserved. www.portaone.com
                                                                                                 6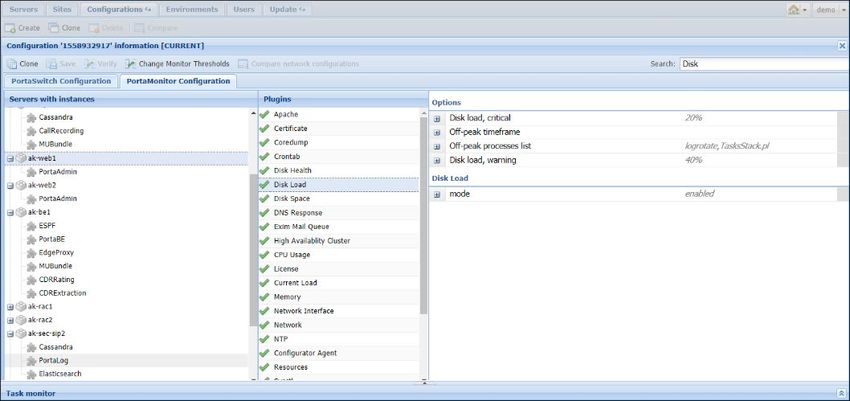
Introduction

           1. Introduction

© 2000–2021 PortaOne, Inc. All rights Reserved. www.portaone.com
                                                                             7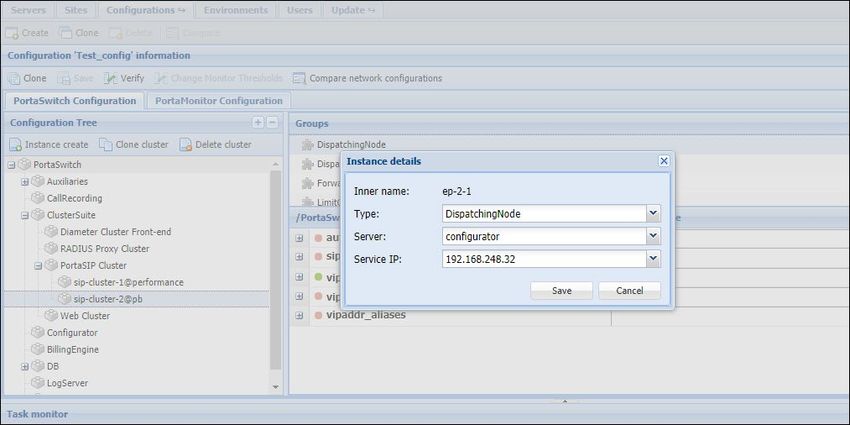
Introduction

Login to the Configuration server interface
                      Open the Configuration server web interface in a browser
                      (https://:8700 by default) and type in the
                      username and password which were provided to you.

                      The web interface of the configuration server contains:
                          • Tab selector
                          • Action buttons
                          • Toolbar
                          • Data table
                          • Task Monitor

                      Tab selector
                      In the upper left-hand corner, there are four main functional tabs and
                      three additional tabs that allow you to manage the different elements of
                      your PortaSwitch® system. The main functional tabs are: Servers,
                      Configurations, Users and Update.

                      The Environments tab becomes visible when you open the
                      Configurations tab.

                      The Custom, Deposit and UI Plugins tabs become visible when you
                      open the Update tab.

© 2000–2021 PortaOne, Inc. All rights Reserved. www.portaone.com
                                                                                                 8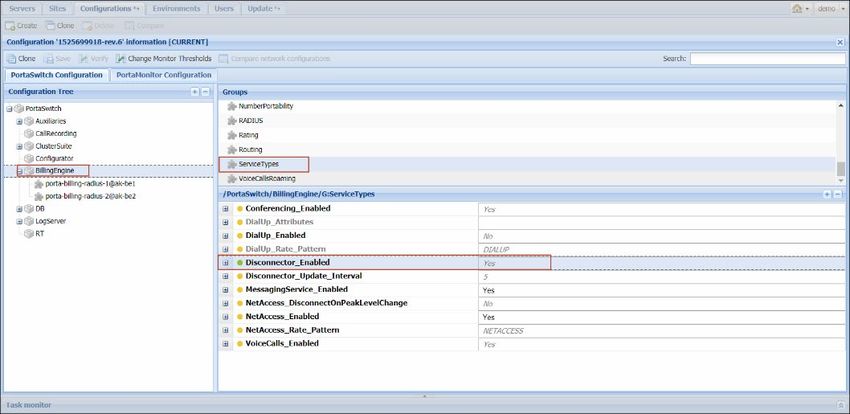
Introduction

                      The definitions of and available functionality for each tab are explained in
                      the following sections. Note that not all users have complete access to the
                      entire set of tabs.

                      Action buttons
                      The       Home icon in the right-hand corner contains a menu with
                      shortcuts to all the other PortaSwitch® interfaces:

                      The Admin button – shortcut to the administrator web interface of
                      PortaBilling:
                          • CC Staff – Customer care staff interface.
                          • Representatives – Interface for your sales agents or distributors.
                          • Customer Self-Care Portal – Interface for customers (owners
                              of IP Centrex environments).
                          • Account Self-Care Portal – Interface for account owners (end
                              users).
                          • Vendors – Interface for your termination partners.

                      The Archivist button takes you to the web interface where you can
                      configure backup for the most critical data on your installation.

                      The Monitor button takes you to the web interface of the monitoring
                      facility for your PortaSwitch installation.

                      The RT button takes you to the web interface of the trouble tickets
                      system where you can view the list of your requests and perform the
                      needed actions (e.g. close, update or create a new ticket).

                      Other buttons in the upper right-hand corner allow you to perform a
                      given action, irrespective of the current context.

© 2000–2021 PortaOne, Inc. All rights Reserved. www.portaone.com
                                                                                                9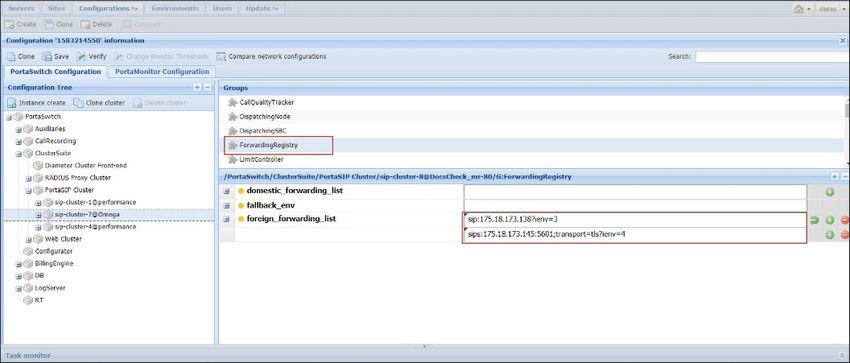
Introduction

                      The Change password button allows you to change the password for the
                      current user.

                      The Logout button terminates your current session on the web interface.

                      The My profile button allows you to fill in information about the
                      currently logged-in user:

                      Toolbar
                      The Toolbar contains buttons that allow you to perform specific
                      operations with the items displayed in the table below.

                      Item table
                      The Item Table is your main working area, since it contains the items that
                      you will edit.

© 2000–2021 PortaOne, Inc. All rights Reserved. www.portaone.com
                                                                                              10
Introduction
You can change the number of columns and sort them in ascending or
descending order by clicking your mouse on the field name of any of
these tabs. If you point your mouse at the column heading you will see a
triangle; click on it to see the menu where you can sort items and add or
remove columns by selecting or clearing corresponding check boxes.
At the bottom of the page, you can see the task monitor illustrating which
tasks were performed. You can see which user performed the task, the
server on which the task was performed and the time of the last update.
See the Task Monitor section for detailed information.
© 2000–2021 PortaOne, Inc. All rights Reserved. www.portaone.com
11System management
2. System
management
© 2000–2021 PortaOne, Inc. All rights Reserved. www.portaone.com
12System management
Servers
The information on the Servers tab shows all the servers that are part of
your installation.
Field Description
Name The name of the server.
IP address The internal IP address of the server – this address is
used on the internal LAN to manage the server from
the configuration interface.
Instances Shows all instances – services that run on your server
(e.g. “web interface” or “SIP server”) and are
assigned to a specific server.
Build The current software version which is installed and
used on the server.
Alternative Another software version currently installed on
build the server (on the inactive partition); a rollback to this
version is possible. “N/A” means that the alternative
partition does not contain any data.
Time zone The time zone in which this server is operating.
In order to provide optimal system response time for
your online users, PortaBilling® only performs
resource-intensive calculations (such as creating
statistics / invoices) during the preconfigured “off-
peak” period. This field specifies the time zone in
which the “off-peak” period is configured.
Description A short description of the server. This field is
optional.
An indicator near the name of a server shows whether a specific server is
reachable (green light) or unreachable (red light).
The Servers page provides the following activities:
© 2000–2021 PortaOne, Inc. All rights Reserved. www.portaone.com
13System management
Field Description
Add Allows you to add more servers. You will see a dialog
box where you should enter the name of the server,
its IP address, a short description and specify a time
zone; then click OK.
Delete Allows you to delete the selected server.
Ping Allows you to check the availability of the server. Just
click on the Ping button and the Configuration
server will attempt to verify that it can connect to this
server and that the server responds to management
commands. If you see a green light, the server is
available; if red, then it is not available.
Add / edit a new server
Prior to adding a new server, make sure you have installed the
PortaSwitch® software on it using the provided PortaSwitch® installation
ISO files.
To add a new server, click the Add button in the toolbar and fill in the
information about this server:
• Name – Type in the new server’s name. To avoid confusing the
system, do not use a name that begins with “porta-”.
• Cluster node name – This is the internal name for a server that’s
part of a cluster. By default, it equals the name of the server. You
can only define it when adding the server.
• IP address – When adding a server to the installation on this
page, an IP is specified. This IP is automatically considered
internal, so it (and its NIC) becomes read-only in the Network
configuration UI.
• Select the site where the server is located, a time zone in which
this server is operating and its description.
© 2000–2021 PortaOne, Inc. All rights Reserved. www.portaone.com
14System management
To edit an existing server’s attributes, double-click on the row that has the
server you want to modify.
Additional server configuration
When clicking the Server Information button, an additional block
opens. This block contains several tabs with different server properties.
© 2000–2021 PortaOne, Inc. All rights Reserved. www.portaone.com
15System management
You can switch between these tabs to access the corresponding
information.
The System tab displays basic hardware and software information about
the selected server:
The Network tab shows all the IP addresses configured for the selected
server.
© 2000–2021 PortaOne, Inc. All rights Reserved. www.portaone.com
16System management
They are grouped by network interface. The following columns
are shown:
• IP Address
• Cluster IP address (specifies if this IP address is dedicated to a
cluster)
To change either the IP address and / or the subnet mask, just double-
click on the specific list element. Edit the parameters in the pop-up
window and then press OK.
NOTE: Network interface with internal IP cannot be modified.
The Add button in the toolbar allows you to add a new IP address to a
network interface (only those network interfaces that do not have an
internal IP address are available) or to add virtual interfaces.
To add and / or modify static routes for a specific server, click the
Static routes icon.
To add a new static route, click the Add button and select the route
type (IPv4, IPv6). Specify the required parameters in the pop-up window
and click Save.
© 2000–2021 PortaOne, Inc. All rights Reserved. www.portaone.com
17System management
To change the parameters later on, double-click on the row of the static
route you wish to modify.
NOTE: To effect changes in the network interface configuration, you have to apply a
new configuration on the Configurations tab.
The Network page provides the following:
Field Description
Add Allows you to add a new IP address to a
network interface or add virtual interfaces (VLANs
for trunking) and / or network bonding (link
aggregation).
Delete Allows you to delete the selected IP address (not
available for internal IP addresses).
© 2000–2021 PortaOne, Inc. All rights Reserved. www.portaone.com
18System management
Get Gathers information about current network
configuration configurations from all servers and updates block
content accordingly.
NOTE: Any changes made on the Network tab without
applying a new configuration will be lost.
Using the Services tab you can control the services that are located on the
selected server.
The Services tab provides the following activities:
Field Description
Get statuses Updates and shows the statuses of all services on
the server.
Status Updates and shows the status of the currently selected
service.
Reconfig Re-reads certain configuration parameters without
an actual restart.
Restart Restarts the currently selected service.
Start Starts the currently selected service.
Stop Stops the currently selected service.
Services are grouped by instances created on the server. The top
Common group contains general services.
© 2000–2021 PortaOne, Inc. All rights Reserved. www.portaone.com
19System management
The RPMs tab displays RPM packages installed on the selected server.
Sites
The Sites tab displays information about all the sites configured within
your installation and enables you to manage them. Every installation has a
default main site. It is read-only and cannot be either modified or deleted.
Field Description
Name The name of the site.
Type Defines whether it is the main or secondary site.
The main site is read-only and cannot be
removed.
Defines whether the secondary site has been
Redundancy
defined as redundant.
mode
© 2000–2021 PortaOne, Inc. All rights Reserved. www.portaone.com
20System management
Failover site Shows which site serves as the failover for a given
secondary site. Only secondary sites that have
billing instances and stand-by database servers
deployed can be selected as failover ones.
Cloud mode Defines whether the site’s servers and instances
are configured in the cloud.
Description A short description of the site. This field is
optional.
The Sites page provides the following activities:
Field Description
Create Enables you to create a new site.
Delete Enables you to delete an existing secondary site. Note
that prior to deleting a site, you must reassign its
servers to another site.
Add / edit a new site
To introduce an extra degree of reliability within the network and its
applications, you can organize the servers into sites. To add a new site,
click the Create button in the toolbar and then type in the site’s name
and description. If you manage servers in a cloud, enable Cloud mode for
the site.
To edit the attributes of an existing site, double-click on the row of the
site you wish to modify.
© 2000–2021 PortaOne, Inc. All rights Reserved. www.portaone.com
21System management
Redundancy mode
For all of your installation’s secondary sites to remain operational when
the main site is unavailable, designate one of them as redundant and let
the other sites initiate failover to it. To do this, enable the Redundancy
mode option for the secondary site that contains instances of
PortaBilling® and a stand-by database. The system will check this site’s
configuration and define it in the Failover site field.
NOTE: The site, which contains instances of PortaBilling® and stand-by database, can
only be made to failover to itself.
Enable the Redundancy mode option for other secondary sites and
select the previously configured site in the Failover site field.
Apply the new configuration to save the changes.
Configurations
This tab allows you to manage the configurations used in your
PortaSwitch® system (each row represents a configuration tree).
The existing configurations are marked as follows:
• “active” (i.e. current) is bold black.
• “backup” (i.e. previous) is black.
• “inactive” (i.e. old / new) is grey.
© 2000–2021 PortaOne, Inc. All rights Reserved. www.portaone.com
22System management
Field Description
The icon The configuration information. Click the icon to open
the configuration information page.
Servers Contains clickable indicators that show the state of
applying the configuration:
• green (i.e. succeeded) indicates that a new
configuration was applied successfully,
• grey (i.e. failed) indicates the absence of
errors,
• red (i.e. failed) indicates that errors are
detected,
• a running man (i.e. running) indicates that
the configuration is now being applied,
• a number (e.g. 13) to the right of the indicator
shows the number of involved servers.
When you click the succeeded or failed indicator those
tasks are automatically displayed in the Task monitor
window.
Configuration The name of the configuration.
Description A short description of the configuration. This field is
not mandatory.
User The user who performed the configuration.
Last Updated The time when the configuration was last edited.
You can create a new configuration by clicking the Create button, typing
in its name and description and choosing which software version it applies
to.
© 2000–2021 PortaOne, Inc. All rights Reserved. www.portaone.com
23System management
If the configuration already exists, you can edit its description by double-
clicking on it.
You can clone the configuration by clicking the Clone button (to clone
a configuration means to copy it), or delete it using the Delete button.
You cannot change or delete the active (currently applied) or the backup
(previously used) configurations. This is to ensure that there is always
a “stable” configuration you can use for rollback. You can open such
a configuration for review using the Configuration Details button,
or you can create a new configuration as its exact copy (and then edit this
new configuration) by using the Clone button.
You can easily compare two configurations and see the differences
between them. Choose two configurations by holding down the Ctrl
button on your keyboard, and then click the Compare button which will
become highlighted above.
© 2000–2021 PortaOne, Inc. All rights Reserved. www.portaone.com
24System management
Click the Configuration Details button for the required option of
the corresponding configuration to open it in the configuration editing
mode. Bear in mind that you cannot change or delete the options of an
active or backup configurations.
Configuration information
On this page you can see the Configuration Tree, Environments,
Groups panels and the panel where all the configuration options for
a given service are shown.
Some options can be specified at the level of the particular instance and at
the level of the configuration tree node that holds this instance.
For example, in the Configuration Tree panel you can choose
PortaSwitchBillingEngine porta-billing-radius-1@akbilling and
set the Disconnector_Enabled option for this instance. (You can find
this option in the ServiceTypes group.)
But you can also specify the same option at the level of the configuration
tree node (PortaSwitchBillingEngine…).
© 2000–2021 PortaOne, Inc. All rights Reserved. www.portaone.com
25System management
If you specify the option value at the level of the configuration tree node,
it becomes a default value for all the instances under this configuration tree
node. The Configuration server will choose which value to use according
to the following rule:
• If you specify the option value at the level of a particular instance,
the Configuration server will use this value and ignore the data
specified at the level of the configuration tree node;
• If you leave the option value at the level of a particular instance
blank, the Configuration server will use the default value – that is,
specified at the level of the configuration tree node.
The same rule applies when you specify options for environments.
You can set up configuration options for each billing environment
separately or you can do this globally for all billing environments by
specifying a default value.
Note that it is not always correct to specify default (global) values for the
options since such settings are applied to all instances, some of which may
be located on different physical servers. For example, if you set private
LADDR (Layered-Architecture Device Driver) for PortaSIP® on the
global level, the configuration will be correct as long as all virtual
PortaSIP® instances are located on the same physical server. However, if
PortaSIP® cluster is deployed within PortaSwitch® installation, there are
two or more PortaSIP® servers. In such cases, setting a default value for
the private IP address (LADDR) may not be correct since some
PortaSIP® instances that are located on other physical servers, may adopt
the specified IP address (that doesn’t belong to their server).
Instances
A service which runs on your server (e.g. “web interface” or “SIP server”)
is called an instance. Each service requires its own IP address, so that it
can be accessed by your customers. To add a new instance, press the
© 2000–2021 PortaOne, Inc. All rights Reserved. www.portaone.com
26System management
Instance create button. In the pop-up window, choose the server which
this instance will run on, its service IP and a billing environment where
this instance will run, and then press Save.
To change these settings later on select the instance from the
configuration tree and double-click on it.
In the configuration options window, you can see instance options with
either default values (shown in grey) or explicitly defined values (shown in
black). To edit a specific option, double-click on it. You can also add one
more value by using the Add Value button.
To find additional information about the required option, click the plus
sign on the left. Once you open the required option, you will see its
description and an alert about possible action in case you change the
option value:
If you see red or yellow triangles – the option value change requires a
service restart or reload (there might be a period of service downtime
when you apply this configuration).
If you want to create one more instance with the same options as in the
existing one, use the Instance clone button.
© 2000–2021 PortaOne, Inc. All rights Reserved. www.portaone.com
27System management
After all the values have been set, click the Verify button to see the
differences between the current configuration and the intended one.
Then, click Check/Apply button to verify if the configuration is valid
(e.g. all the required options have values assigned to them); then on the
pop-up window with the status information you can choose whether to
perform a complete check or apply the configuration right away.
If you want to check whether any services will be restarted when a new
configuration is applied (e.g. for more suitable scheduling) press the
Complete Check button. The system will simulate the whole procedure
and provide a detailed log of actions that will be executed when the
configuration is applied.
NOTE: When you apply a backup PortaSwitch configuration, the backup network
configuration is simultaneously being applied.
If you are satisfied with the results of the preliminary check, press the
Apply button. As soon as the configuration has been applied, you will see
this action displayed on the Task page.
NOTE: The Check/Apply button saves the configuration before checking it.
NOTE: We strongly recommend AGAINST applying a configuration that contains
instances residing on the servers that in turn are not available (server is down
for some reason).
There is also extended Search functionality inside each configuration tree
that allows you to make a search by the option’s name or value, or
the name of the instance. Start by simply entering the target value to see
all the possible variants.
© 2000–2021 PortaOne, Inc. All rights Reserved. www.portaone.com
28System management
PortaMonitor configuration
On the PortaMonitor Configuration tab, you can see the list of
monitoring plugins enabled in your installation. A monitoring plugin is a
script in Perl, Python, Shell or a binary executor, that checks a particular
parameter of a server (e.g. Disk health, CPU usage, etc.) or service (e.g.
RADIUS cluster, number of MySQL connections, etc.), matches it with
the threshold and reports the parameter status to the PortaOne
monitoring system. Every minute each parameter is checked.
The monitoring plugins are grouped per server and per instance. To
simplify navigation and operation on the PortaMonitor Configuration tab,
it is divided into three sections:
The Servers with instances section lists all your installation’s servers and
all the instances running on those servers.
The Plugins section lists all monitoring plugins available either on a given
server or for a particular instance. The status icon shows a plugin is
enabled; the icon marks a plugin as disabled and this particular
parameter is therefore not monitored. Click the server’s name to display
its monitoring plugins. Select an instance to view the list of plugins
available for it.
Select a plugin and view its configuration thresholds in the Options
section. Here you can enable or disable the plugin and change its
thresholds. Before you make any modifications with the monitoring
plugins, we strongly recommend that you discuss them with PortaOne
support.
After you have made the changes, click the Change Monitor
Thresholds button to apply them. To ensure that monitoring thresholds
apply to the active server and / or instance, the Change Monitor
Thresholds button is only active for the currently active configuration.
© 2000–2021 PortaOne, Inc. All rights Reserved. www.portaone.com
29System management
Environments
On this page you can manage virtual environments.
Field Description
Name The name of the environment.
ID The internal ID of the environment.
Environment The unique ID of the environment. It is not
UUID editable and remains intact even if the environment
name is changed.
Description A short description of the environment. This field
is not mandatory.
NOTE: Only users with Root and Admin roles can create and delete environments.
Users
This tab is for editing information about users who have access to the
Configuration server. To edit, simply double-click on the particular user:
© 2000–2021 PortaOne, Inc. All rights Reserved. www.portaone.com
30System management
Field Description
Status The status of the user: when the button is red,
the user is offline; when it is green, the user is online.
Login Shows which name the user is logged in with.
Email The email address of the user.
Salutation Defines which greeting will appear to the user
(e.g. Mr., Ms., Mrs., etc.).
First Name The first name of the user.
Middle The middle name of the user.
Last Name The last name of the user.
Password Allows you to change the password for this user. By
clicking the Auto-generate icon, a random
password is generated.
Confirm Repeat the password defined for this user.
password
Activation The date when the user was activated.
Date
Expiration The date when the user’s rights will expire.
Date
© 2000–2021 PortaOne, Inc. All rights Reserved. www.portaone.com
31System management
Role Shows the user’s role:
• Root provides access to all options and tabs.
• Admin provides access to only the Servers
and Configurations tabs.
• Read-only users have access to all the same
tabs as Root but cannot make changes.
• Monitor only gives access to the monitoring
system web interface via the Monitor button.
• FileTransfer users are only used for file
upload from remote hosts to the server with
the xDR Extraction instance configured.
Time zone The time zone in which the user is operating.
SSH Account Indicates whether the user is allowed to log in to
servers in the current installation by using SSH.
You can create and delete users using the Create and Delete buttons,
respectively.
NOTE: The user will be able to log in only after the activation date. Likewise, the user
will not be able to log in after the expiration date.
The Re-apply SSH button allows the creation / recreation of UNIX
accounts on all servers for the selected user. This allows the user to log in
to servers in the current installation by using SSH, which is required if this
user was initially created without SSH access – or if new servers were
added to the installation.
Update
The update is performed via the Configuration server. If you wish to
update your system, please contact the PortaOne support team at
support@portaone.com, who will provide you with further assistance.
Custom
This tab allows you to manage custom software and patches on your
servers. When entering this tab you see the list of RPM packages. It is
divided into two groups:
• Porta packages – list of all PortaOne RPM packages
• Third-party packages – already installed third-party RPM
packages
An indicator on the left of the package name shows whether it contains
patches (green light), does not contain patches (grey light) or cannot
contain patches (red light).
© 2000–2021 PortaOne, Inc. All rights Reserved. www.portaone.com
32System management
The Custom tab provides the following activities:
Field Description
Upload Uploads new third-party RPM package.
Download Downloads third-party RPM package from the server.
Delete Removes selected RPM package from the repository.
This option is only active for third-party RPM
packages.
Clean Removes all patches from the selected RPM package.
Status Shows status and version of RPM package on all
servers within the installation.
If a PortaOne RPM package is patched, its name appears bold in the list.
When clicking the icon on the left of the desired package, the Patches
block opens. This block will contain the list of all patches if they are
already uploaded for a particular RPM package.
A patch can have one of three kinds of status:
© 2000–2021 PortaOne, Inc. All rights Reserved. www.portaone.com
33System management
• New (grey indicator) – a patch was uploaded and has or has not
been used before
• Applied (green indicator) – a patch is currently applied to the
RPM package. Click the icon to view logs. Note that patched
RPM must be installed to become effective
• Error (red indicator) – the application of a patch has failed. Click
the icon to view logs
The Patches block provides the following activities:
Field Description
Upload Uploads a new patch file. You will see a pop-up
window where you should choose the file to upload,
enter a description and specify a Lifetime and
Source code for a patch.
Download Downloads a patch from the server.
Build Rebuilds the selected RPM package with the uploaded
patch included. Note that changes won’t become
effective immediately – the patched RPM must be
installed to take effect. For more information see the
Patch upload section below.
Delete Removes the patch from the list.
NOTE: It is prohibited to delete a patch while in an “Applied”
state. To remove it, clean the patched RPM package first.
Clean Removes selected patch from the RPM package
or resets error status. Note that changes won’t
become effective immediately – the patched RPM
must be uninstalled for the original RPM to take
effect. For more information, see the Patch upload
section below.
Patch’s lifetime
Every uploaded patch has a lifetime parameter. This means the “finish
date” for an RPM package or patch propagation.
Why specify a lifetime for a patch
When you modify a PortaOne package, you are actually applying patches
on top of an underlying PortaOne code. Since PortaOne developers
always work on improving code and adding new functionalities, the
software (packages and files they contain) changes with every new release.
To make sure that your custom patches are up-to-date after a software
upgrade to a new release, you will always need to sync your custom patches
with the updated underlying code, and fix any hunks in your patches that
no longer apply. This is called rebasing your custom patches. By setting a
© 2000–2021 PortaOne, Inc. All rights Reserved. www.portaone.com
34System management
specific lifetime for your custom patches, you ensure that the patch will
not be applied to a new release where it hasn’t yet been tested by your
team. Another example might be when a patch is only applied to certain
releases or builds, because in later releases, it loses its viability.
How to use the lifetime of a patch
The lifetime parameter permits the specification of specific software
releases and builds. An RPM for a new version with a patch included will
automatically be rebuilt and installed (during the PortaSwitch® update
procedure).
There can be several patches with different (or the same) lifetimes for one
package but only one of them can be active. If there is an active patch
(included in a successfully built RPM package) and a new RPM package
with another patch has been successfully built, the latter patch becomes
active and the former patch becomes “new” (the RPM package with
the former patch is removed from the repository).
Lifetime can be one of the following:
• Forever – An RPM package with custom patch included will
automatically be rebuilt and installed during every PortaSwitch®
update procedure. In case of failure, the PortaOne support team
will notify you about the error.
• Release – An RPM package with custom patch included will
automatically be rebuilt and installed during a PortaSwitch®
update to any build within a specific release.
• Build – An RPM package with custom patch included will
automatically be rebuilt and installed during a PortaSwitch®
update to a specific build ONLY.
You can specify a Source code for building an RPM package. It can be
one of the following:
• Latest – defined by active configuration (e.g. latest hotfix
for current build).
• Strict – user defined build string (e.g. “39.0-2.20101213” – source
RPM package for MR39-0-1-be).
Note that the above feature is mainly used by the PortaOne support team
to manage available hotfixes for a specific RPM package. If you need the
list of available build strings, please contact the PortaOne support team at
support@portaone.com.
In case of a strict build, its string is displayed in brackets in the Life time
column of the patches list.
© 2000–2021 PortaOne, Inc. All rights Reserved. www.portaone.com
35System management
Note that for patched PortaOne packages as well as new third-party
packages to take effect, they must be installed via a software upgrade (as
a separate operation or as part of a PortaSwitch® update procedure). For
more information, see the Patch upload section below.
Patch application to an RPM package
When you introduce changes, either to PortaOne packages or to third-
party ones, you want the changes to remain effective after the software
upgrade procedure. To do this it is necessary to prepare a custom patch
(a file that describes the differences between the original and modified
files) and upload it to the Custom tab. Below you will find step-by-step
instructions on how to create and apply a custom patch and helpful hints
on how to ensure that it works with the new software release.
Note: We encourage you to review your custom patches before the software upgrade
to make sure that they can be applied to the updated software in a new release. This
is the responsibility of the customer to fix any hunks in the patches that no longer
apply.
Patch preparation
To prepare a patch we use a standard “diff” Linux command that makes a
line-by-line comparison between the original and modified files and shows
the difference in a specific format. Let’s consider this example of patching
the /home/porta-billing/site_lib/Porta/Modules/VoiceCallsRoaming.pm
file if changes were introduced into this module file and the custom
modified file was saved as /home/porta-
one/VoiceCallsRoaming.pm.patched:
Follow these steps to prepare a patch with your custom modifications.
Please note that you will need to run some of these commands with root-
level privileges (e.g. use the sudo command):
1. Go to the directory where the original file is located:
cd /home/porta-billing/site_lib/Porta/Modules
2. Rename the original file to VoiceCallsRoaming.pm.orig, and your
custom modified file to VoiceCallsRoaming.pm:
mv VoiceCallsRoaming.pm /home/porta-
one/VoiceCallsRoaming.pm.orig
mv VoiceCallsRoaming.pm.patched
VoiceCallsRoaming.pm
3. Find the name of the RPM that contains the file. The patch must
be applied to this very RPM:
rpm -qf VoiceCallsRoaming.pm
4. The command will have the following output:
porta-billing-38.0-3.20131215.el6.noarch,
where “porta-billing” is the name of the RPM and
© 2000–2021 PortaOne, Inc. All rights Reserved. www.portaone.com
36System management
38.0-3.20131215 is the build string
Go to the SRPM (Source RPM) package root folder (See
Appendix B for the most useful SRPM packages):
cd /home/porta-billing/
Now you are in the /home/porta-billing/ folder
5. Create a patch using this single command:
diff -Nau /home/porta-one/VoiceCallsRoaming.pm.orig
site_lib/Porta/Modules/VoiceCallsRoaming.pm >
/var/tmp/VoiceCallsRoaming.pm.patch
6. Check that the patch was created correctly and that it only
contains required modifications:
less /var/tmp/VoiceCallsRoaming.pm.patch
7. Download this file (/var/tmp/VoiceCallsRoaming.pm.patch)
to your local PC (if you use Windows OS you may use a program
like WinSCP for this)
Patch upload
Upload the patch to the Custom tab for the ‘porta-billing’ RPM package
and try to rebuild it:
1. Log in to the Configuration server web interface and go to the
UpdateCustom tab. On this tab, select which RPM package to
apply the patch to.
2. Click the icon on the left of the desired package to open its
Patches block.
© 2000–2021 PortaOne, Inc. All rights Reserved. www.portaone.com
37System management
3. Click Upload.
4. Specify the patch name and select the patch file to add it to the
list.
5. When the patch has been added click the Upload button.
© 2000–2021 PortaOne, Inc. All rights Reserved. www.portaone.com
38System management
6. Click the Build button to rebuild the RPM package with the
uploaded patch included.
7. If the RPM package with the patch has been rebuilt successfully,
you will see the green indicator in the patch Name column. If the
indicator is red, then the RPM hasn’t been rebuilt with this patch
and you can click the icon to find the reason in the logs.
© 2000–2021 PortaOne, Inc. All rights Reserved. www.portaone.com
39System management
8. Now the patched PortaOne package can be installed via the
software upgrade (as a separate operation or as part of a
PortaSwitch® update procedure). If you wish to install a newly
built package, please contact the PortaOne support team at
support@portaone.com, who will provide you with further
assistance.
Deposit
This tab allows you to create a list of custom files (e.g. sudo configuration
files) and directories that should remain on your servers during the
software upgrade.
When the system is being prepared for a software upgrade to a new
release, the files are automatically copied to the partition where the new
version of the code is installed, and therefore appear on the production
partition after the software upgrade.
Note that files and folders specified on the Deposit page don’t become
duplicated; they will be taken directly from specified folders during a
software upgrade. Therefore, all changes made to these files after adding
them on the Deposit page (including removal) will be preserved. For
© 2000–2021 PortaOne, Inc. All rights Reserved. www.portaone.com
40System management
example, if files are physically deleted from the file system, they will be
lost despite the fact that they were added on the Deposit page.
UI Plugins
Using plug-ins, you can integrate PortaBilling® with external systems and
manage all of the data via the PortaBilling® web interface.
The UI Plugins tab allows you to add plug-ins only once and automatically
have them installed on all web servers. Upon adding new web servers, the
plug-ins are automatically installed there. They are preserved after a
system update to a new release as well.
Plugin upload
Upload the plug-in to the UI Plugins tab:
1. Log in to the Configuration server web interface and go to the
Update UI Plugins tab.
2. Click Upload Plugin.
3. Specify the plug-in name and configuration string (JSON string).
4. Select the plug-in file.
5. Click the Upload Plugin button.
Task monitor
When you apply a new configuration, the system performs the following
tasks:
• Check configuration
• Apply configuration
• Commit configuration
• Configure monitor
Using this tab, you can view information about how configuration
changes are applied to the system.
© 2000–2021 PortaOne, Inc. All rights Reserved. www.portaone.com
41System management
Field Description
Configuration Filters the tasks based on the configuration name.
search
Administrators can also make a search by internal
parameters such as: i_configuration, i_conf, apply_id and
i_server and their combinations.
e.g: i_configuration:1,2,3;i_server:1,2,3;
Note: use commas to separate several values, use semicolon
to separate several parameters
Task type Filters the tasks based on the type of the task (e.g.
search Commit configuration)
Task status Filters the tasks based on the success of the task:
search • failed – tasks that have not been completed
due to errors
• succeeded – tasks that have been completed
successfully
• running – tasks that are in progress
• new – tasks that will start later
The icon The log for configuration changes. Click the icon to
see the log.
State Indicates the state of the task:
indicator • grey indicates that the task has started.
• blinking green indicates that the task is in
progress.
• green indicates that the task has been
completed successfully.
• red indicates that an error has appeared.
Check logs to obtain additional information.
Task Shows the action to be performed to apply a new
configuration.
Configuration Shows the name of the configuration that is applied.
User Shows who applies the configuration.
Server Shows the server where the task is performed.
Last Update Shows the time when the tasks have been performed.
© 2000–2021 PortaOne, Inc. All rights Reserved. www.portaone.com
42System management
At the bottom of the page, below the Task monitor, you can see the
page related options. You can go to the next page or the previous one,
jump to the first or last page, or use the Refresh button to update any
of the pages.
© 2000–2021 PortaOne, Inc. All rights Reserved. www.portaone.com
43Initial configuration of PortaSwitch®
3. Initial
configuration of
PortaSwitch®
Once you have installed the software on the servers, you have a blank
system which can be configured in various ways to meet your business
requirements. The Configuration server allows you to specify a role or
even a set of roles to be assigned to each server. This chapter will
demonstrate how to set up the initial configuration of the system.
© 2000–2021 PortaOne, Inc. All rights Reserved. www.portaone.com
44Initial configuration of PortaSwitch®
Checklist
Print the following page and perform the system setup by following the
instructions, using them to check off the operations you complete. Please
be sure to perform all of the operations (all of the boxes should be
checked); otherwise the system will not work as desired.
Operation Done
Add servers [ ]
Create configuration [ ]
* Add main instances [ ]
Add three Cassandra instances [ ]
Add MasterDB instance [ ]
Apply the configuration [ ]
Add StandByDB instance (optional) [ ]
Apply the configuration [ ]
Add ReplicaDB instance [ ]
Apply the configuration [ ]
Add BillingEngine instance [ ]
Add web cluster instance [ ]
** Add a SIP cluster and define its virtual IP address [ ]
*** Add two DispatchingNode instances [ ]
Add two ProcessingNode instances [ ]
Add VoiceMailDB instance [ ]
Add Elasticsearch instance [ ]
Add LogServer instance [ ]
Add additional instances (optional)
Add RTDB instance [ ]
Add RT instance [ ]
Add CallRecording instance [ ]
Create Auxiliaries such as SMSTrigger, STUN Server and / or
XDRImport [ ]
Apply the configuration [ ]
Create new billing environments as needed [ ]
* Adding the main instances should be performed in the foregoing order.
** Virtual IP address can only be an address that is not assigned to any
instance or server as the service IP.
*** DispatchingNode instances must each be added on their own
physical servers.
We recommend that you follow all the above steps in the suggested order
in order to avoid issues during configuration. Some components may have
external prerequisites that must be satisfied in order to be configured
properly. For instance, to correctly set up database replication, the
MasterDB must be configured before the ReplicaDB.
© 2000–2021 PortaOne, Inc. All rights Reserved. www.portaone.com
45Initial configuration of PortaSwitch®
Add servers
Adding servers is the first step of your initial system configuration
(depending on your specific type of installation, the number of servers can
vary).
1. Go to the Servers tab.
2. Click the Add button on the toolbar, and fill in the fields in the
Server details dialog box:
NOTE: When adding a server to the installation on this page an IP is specified. This
IP is automatically considered internal so it and its NIC become read-only in Network
configuration UI.
3. Click Save.
Add IP addresses
Once you have added servers, you can add public IP addresses that will be
assigned to the particular instances in the later steps of the PortaSwitch®
configuration.
1. On the Servers tab, choose the server for which you wish to add
a public IP address, and click Change server configuration.
2. Go to the Network tab, click Add, and choose IP address.
© 2000–2021 PortaOne, Inc. All rights Reserved. www.portaone.com
46Initial configuration of PortaSwitch®
3. In the IP address dialog box, specify the following information:
• Interface – You can select only public interface here
• IP address
• Netmask
4. Click Save.
In case you want to run several service instances on one physical server,
you need to first associate the additional IP addresses with the public
network interface of the server (this process is called “IP aliasing”). To do
this, repeat steps 1–4, and specify the required IP alias in step 3.
Create a configuration
After you have added all the required servers, go to the Configurations
tab. Here you can create a configuration to fit your needs.
To create one, press the Create button and then specify its name and
description and choose which software version it applies to.
© 2000–2021 PortaOne, Inc. All rights Reserved. www.portaone.com
47Initial configuration of PortaSwitch®
You will see a Configuration Tree, Environments, Groups panels, and the
panel where all the information about a given service is shown.
Add instances
Interaction specifics
When adding instances, keep in mind the following idiosyncrasies of their
interaction:
• If there are two or more instances that depend on the Apache
web server (at the moment these are: Web, SMSTrigger, RT),
they must be configured with different IP addresses (‘service IP’)
or ports. Otherwise, the Configuration server will display warnings
during the configuration check and the configuration will not be
applied.
• In order to keep the system working efficiently, do not, under any
circumstances, put the following instances on the same server:
o MasterDB and ReplicaDB
o BillingEngine and LogServer
Instances necessary for a secondary site
Note that for a secondary site to provide all the necessary services in
standalone mode, the following minimum set of instances must be
configured on it:
• BillingEngine – This instance calculates applicable charges
according to product, tariff and other billing parameters.
• PortaSIP® Cluster instances: one Dispatching Node and one
Processing Node – Each of these instances is necessary for voice
termination, transmission of instant messages and Media Server
functionality. These instances are not required if you do not
provide any of these services (for example, if you exclusively
provide Internet access).
• OracleDB or StandByDB (depending on what type of database
you use, Oracle or MySQL) – StandByDB is an actual replica of
© 2000–2021 PortaOne, Inc. All rights Reserved. www.portaone.com
48You can also read