QGIS Server 3.16 User Guide - QGIS Project 25.10.2021
←
→
Page content transcription
If your browser does not render page correctly, please read the page content below
QGIS Server 3.16 User Guide

                  QGIS Project

                       25.10.2021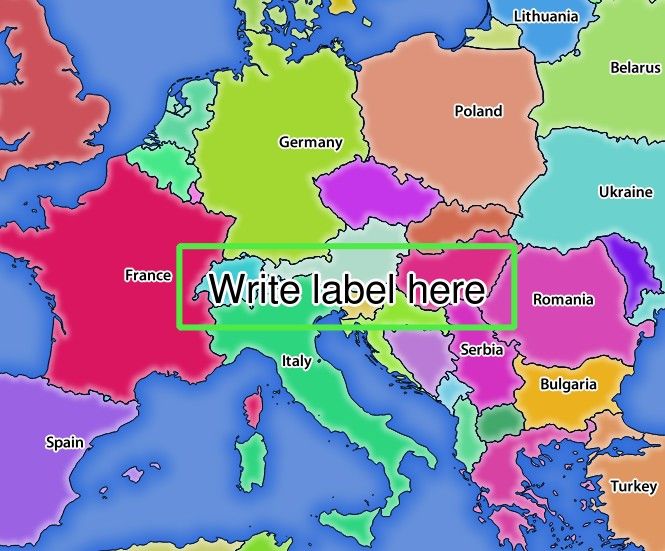

Obsah

1 Úvod                                                                                                                                                                         1

2 Začínáme                                                                                                                                                                      3
  2.1 Installation on Debian-based systems . .     .   .   .   .   .   .   .   .   .   .   .   .   .   .   .   .   .   .   .   .   .   .   .   .   .   .   .   .   .   .   .    3
       2.1.1 Apache HTTP Server . . . . .          .   .   .   .   .   .   .   .   .   .   .   .   .   .   .   .   .   .   .   .   .   .   .   .   .   .   .   .   .   .   .    4
       2.1.2 NGINX HTTP Server . . . . .           .   .   .   .   .   .   .   .   .   .   .   .   .   .   .   .   .   .   .   .   .   .   .   .   .   .   .   .   .   .   .    6
       2.1.3 Xvfb . . . . . . . . . . . . . .      .   .   .   .   .   .   .   .   .   .   .   .   .   .   .   .   .   .   .   .   .   .   .   .   .   .   .   .   .   .   .   11
  2.2 Installation on Windows . . . . . . . .      .   .   .   .   .   .   .   .   .   .   .   .   .   .   .   .   .   .   .   .   .   .   .   .   .   .   .   .   .   .   .   12
  2.3 Serve a project . . . . . . . . . . . . .    .   .   .   .   .   .   .   .   .   .   .   .   .   .   .   .   .   .   .   .   .   .   .   .   .   .   .   .   .   .   .   14
  2.4 Configure your project . . . . . . . . .      .   .   .   .   .   .   .   .   .   .   .   .   .   .   .   .   .   .   .   .   .   .   .   .   .   .   .   .   .   .   .   15
       2.4.1 WMS capabilities . . . . . . .        .   .   .   .   .   .   .   .   .   .   .   .   .   .   .   .   .   .   .   .   .   .   .   .   .   .   .   .   .   .   .   17
       2.4.2 WFS capabilities . . . . . . .        .   .   .   .   .   .   .   .   .   .   .   .   .   .   .   .   .   .   .   .   .   .   .   .   .   .   .   .   .   .   .   18
       2.4.3 WCS capabilities . . . . . . .        .   .   .   .   .   .   .   .   .   .   .   .   .   .   .   .   .   .   .   .   .   .   .   .   .   .   .   .   .   .   .   18
       2.4.4 Fine tuning your OWS . . . .          .   .   .   .   .   .   .   .   .   .   .   .   .   .   .   .   .   .   .   .   .   .   .   .   .   .   .   .   .   .   .   18
  2.5 Integration with third parties . . . . . .   .   .   .   .   .   .   .   .   .   .   .   .   .   .   .   .   .   .   .   .   .   .   .   .   .   .   .   .   .   .   .   18
       2.5.1 Integration with QGIS Desktop         .   .   .   .   .   .   .   .   .   .   .   .   .   .   .   .   .   .   .   .   .   .   .   .   .   .   .   .   .   .   .   18
       2.5.2 Integration with MapProxy . .         .   .   .   .   .   .   .   .   .   .   .   .   .   .   .   .   .   .   .   .   .   .   .   .   .   .   .   .   .   .   .   18
       2.5.3 Integration with QWC2 . . . .         .   .   .   .   .   .   .   .   .   .   .   .   .   .   .   .   .   .   .   .   .   .   .   .   .   .   .   .   .   .   .   19

3 Services                                                                                                                                                                     21
  3.1 Web Map Service (WMS) . . . . . . . . . . .                  .   .   .   .   .   .   .   .   .   .   .   .   .   .   .   .   .   .   .   .   .   .   .   .   .   .   .   21
        3.1.1 GetMap . . . . . . . . . . . . . . . .               .   .   .   .   .   .   .   .   .   .   .   .   .   .   .   .   .   .   .   .   .   .   .   .   .   .   .   22
        3.1.2 GetFeatureInfo . . . . . . . . . . . .               .   .   .   .   .   .   .   .   .   .   .   .   .   .   .   .   .   .   .   .   .   .   .   .   .   .   .   29
        3.1.3 GetPrint . . . . . . . . . . . . . . . .             .   .   .   .   .   .   .   .   .   .   .   .   .   .   .   .   .   .   .   .   .   .   .   .   .   .   .   32
        3.1.4 GetLegendGraphics . . . . . . . . . .                .   .   .   .   .   .   .   .   .   .   .   .   .   .   .   .   .   .   .   .   .   .   .   .   .   .   .   34
        3.1.5 GetProjectSettings . . . . . . . . . . .             .   .   .   .   .   .   .   .   .   .   .   .   .   .   .   .   .   .   .   .   .   .   .   .   .   .   .   35
  3.2 Web Feature Service (WFS) . . . . . . . . . .                .   .   .   .   .   .   .   .   .   .   .   .   .   .   .   .   .   .   .   .   .   .   .   .   .   .   .   35
        3.2.1 GetFeature . . . . . . . . . . . . . . .             .   .   .   .   .   .   .   .   .   .   .   .   .   .   .   .   .   .   .   .   .   .   .   .   .   .   .   36
  3.3 Web Map Tile Service (WMTS) . . . . . . . .                  .   .   .   .   .   .   .   .   .   .   .   .   .   .   .   .   .   .   .   .   .   .   .   .   .   .   .   38
        3.3.1 GetCapabilities . . . . . . . . . . . .              .   .   .   .   .   .   .   .   .   .   .   .   .   .   .   .   .   .   .   .   .   .   .   .   .   .   .   38
        3.3.2 GetTile . . . . . . . . . . . . . . . .              .   .   .   .   .   .   .   .   .   .   .   .   .   .   .   .   .   .   .   .   .   .   .   .   .   .   .   39
        3.3.3 GetFeatureInfo . . . . . . . . . . . .               .   .   .   .   .   .   .   .   .   .   .   .   .   .   .   .   .   .   .   .   .   .   .   .   .   .   .   41
  3.4 WFS3 (OGC API Features) . . . . . . . . . .                  .   .   .   .   .   .   .   .   .   .   .   .   .   .   .   .   .   .   .   .   .   .   .   .   .   .   .   43
        3.4.1 Resource representation . . . . . . . .              .   .   .   .   .   .   .   .   .   .   .   .   .   .   .   .   .   .   .   .   .   .   .   .   .   .   .   43
        3.4.2 Endpoints . . . . . . . . . . . . . . .              .   .   .   .   .   .   .   .   .   .   .   .   .   .   .   .   .   .   .   .   .   .   .   .   .   .   .   44
        3.4.3 Pagination . . . . . . . . . . . . . . .             .   .   .   .   .   .   .   .   .   .   .   .   .   .   .   .   .   .   .   .   .   .   .   .   .   .   .   48
        3.4.4 Feature filtering . . . . . . . . . . . .             .   .   .   .   .   .   .   .   .   .   .   .   .   .   .   .   .   .   .   .   .   .   .   .   .   .   .   48
        3.4.5 Feature sorting . . . . . . . . . . . .              .   .   .   .   .   .   .   .   .   .   .   .   .   .   .   .   .   .   .   .   .   .   .   .   .   .   .   49
        3.4.6 Attribute selection . . . . . . . . . . .            .   .   .   .   .   .   .   .   .   .   .   .   .   .   .   .   .   .   .   .   .   .   .   .   .   .   .   49
        3.4.7 Customize the HTML pages . . . . . .                 .   .   .   .   .   .   .   .   .   .   .   .   .   .   .   .   .   .   .   .   .   .   .   .   .   .   .   50
  3.5 Extra parameters supported by all request types              .   .   .   .   .   .   .   .   .   .   .   .   .   .   .   .   .   .   .   .   .   .   .   .   .   .   .   51

                                                                                                                                                                                i
3.6 REDLINING . . . . . . . . . . . . . . . . . . . . . . . . . . . . . . . . . . . . . . . . . . . . . 51
3.7 External WMS layers . . . . . . . . . . . . . . . . . . . . . . . . . . . . . . . . . . . . . . . . . 53
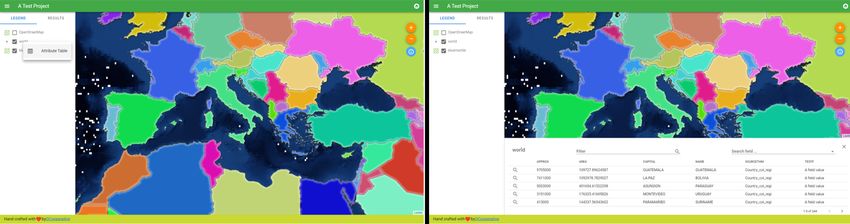
3.8 QGIS Server catalog . . . . . . . . . . . . . . . . . . . . . . . . . . . . . . . . . . . . . . . . . 53
4 Zásuvné moduly 57
4.1 Instalace . . . . . . . . . . . . . . . . . . . . . . . . . . . . . . . . . . . . . . . . . . . . . . . 57
4.2 HTTP Server configuration . . . . . . . . . . . . . . . . . . . . . . . . . . . . . . . . . . . . . . 57
4.2.1 Apache . . . . . . . . . . . . . . . . . . . . . . . . . . . . . . . . . . . . . . . . . . . 57
4.3 How to use a plugin . . . . . . . . . . . . . . . . . . . . . . . . . . . . . . . . . . . . . . . . . . 58
5 Advanced configuration 59
5.1 Logging . . . . . . . . . . . . . . . . . . . . . . . . . . . . . . . . . . . . . . . . . . . . . . . . 59
5.2 Environment variables . . . . . . . . . . . . . . . . . . . . . . . . . . . . . . . . . . . . . . . . 59
5.3 Settings summary . . . . . . . . . . . . . . . . . . . . . . . . . . . . . . . . . . . . . . . . . . . 61
5.4 Short name for layers, groups and project . . . . . . . . . . . . . . . . . . . . . . . . . . . . . . 62
5.5 Connection to service file . . . . . . . . . . . . . . . . . . . . . . . . . . . . . . . . . . . . . . . 62
5.6 Add fonts to your linux server . . . . . . . . . . . . . . . . . . . . . . . . . . . . . . . . . . . . 62
6 Development Server 65
7 Kontejnerové nasazení 67
7.1 Jednoduché docker images . . . . . . . . . . . . . . . . . . . . . . . . . . . . . . . . . . . . . . 67
7.1.1 First run . . . . . . . . . . . . . . . . . . . . . . . . . . . . . . . . . . . . . . . . . . . 69
7.1.2 Použitelný vzorek . . . . . . . . . . . . . . . . . . . . . . . . . . . . . . . . . . . . . . 69
7.1.3 Cleanup . . . . . . . . . . . . . . . . . . . . . . . . . . . . . . . . . . . . . . . . . . . 70
7.2 Docker stacks . . . . . . . . . . . . . . . . . . . . . . . . . . . . . . . . . . . . . . . . . . . . . 70
7.2.1 Swarm/docker-compose . . . . . . . . . . . . . . . . . . . . . . . . . . . . . . . . . . . 70
7.2.2 Kubernetes . . . . . . . . . . . . . . . . . . . . . . . . . . . . . . . . . . . . . . . . . 71
7.3 Cloud deployment . . . . . . . . . . . . . . . . . . . . . . . . . . . . . . . . . . . . . . . . . . 75
7.3.1 AWS usecase . . . . . . . . . . . . . . . . . . . . . . . . . . . . . . . . . . . . . . . . 75
8 Často kladené otázky 77
ii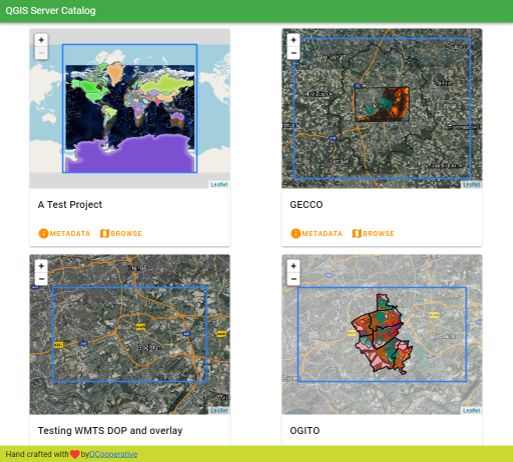
KAPITOLA           1

                                                                                                           Úvod

QGIS Server is an open source WMS, WFS, OGC API for Features 1.0 (WFS3) and WCS implementation that, in
addition, implements advanced cartographic features for thematic mapping. QGIS Server is a FastCGI/CGI (Common
Gateway Interface) application written in C++ that works together with a web server (e.g., Apache, Nginx). It has
Python plugin support allowing for fast and efficient development and deployment of new features.
QGIS Server uses QGIS as back end for the GIS logic and for map rendering. Furthermore, the Qt library is used for
graphics and for platform-independent C++ programming. In contrast to other WMS software, the QGIS Server uses
cartographic rules as a configuration language, both for the server configuration and for the user-defined cartographic
rules.
As QGIS desktop and QGIS Server use the same visualization libraries, the maps that are published on the web look
the same as in desktop GIS.
In the following sections, we will provide a sample configuration to set up a QGIS Server on Linux (Debian, Ubuntu
and derivatives) and on Windows. For more information about server plugin development, please read server_plugins.

                                                                                                                  1
QGIS Server 3.16 User Guide

2                             Kapitola 1. Úvod
KAPITOLA           2

                                                                                                     Začínáme

2.1 Installation on Debian-based systems

We will give a short and simple installation how-to for a minimal working configuration on Debian based systems
(including Ubuntu and derivatives). However, many other distributions and OSs provide packages for QGIS Server.

Poznámka: In Ubuntu you can use your regular user, prepending sudo to commands requiring admin permissions.
In Debian you can work as admin (root), without using sudo.

Requirements and steps to add official QGIS repositories to install QGIS Server on a Debian based system are provided
in QGIS installers page. You may want to install at least the latest Long Term Release.
Once the target version repository is configured and QGIS Server installed, you can test the installation with:

/usr/lib/cgi-bin/qgis_mapserv.fcgi

If you get the following output, the server is correctly installed.

Poznámka: Depending on the version of QGIS, you might see slightly different output reported when you run
qgis_mapserv.fcgi.

QFSFileEngine::open: No file name specified
Warning 1: Unable to find driver ECW to unload from GDAL_SKIP environment variable.
Warning 1: Unable to find driver ECW to unload from GDAL_SKIP environment variable.
Warning 1: Unable to find driver JP2ECW to unload from GDAL_SKIP environment␣
 ,→variable.

Warning 1: Unable to find driver ECW to unload from GDAL_SKIP environment variable.
Warning 1: Unable to find driver JP2ECW to unload from GDAL_SKIP environment␣
 ,→variable.

Content-Length: 206
Content-Type: text/xml; charset=utf-8

  Service unknown or␣
 ,→unsupported

                                                                                                                 3
QGIS Server 3.16 User Guide

Poznámka: As seen below, QGIS reports a Status 400 code, which correctly identifies the request has failed because
there is no active http session. This is not a bug and indicates the server is functioning properly.

Application path not initialized
Application path not initialized
Warning 1: Unable to find driver ECW to unload from GDAL_SKIP environment variable.
Warning 1: Unable to find driver ECW to unload from GDAL_SKIP environment variable.
Warning 1: Unable to find driver JP2ECW to unload from GDAL_SKIP environment␣
 ,→variable.

"Loading native module /usr/lib/qgis/server/libdummy.so"
"Loading native module /usr/lib/qgis/server/liblandingpage.so"
"Loading native module /usr/lib/qgis/server/libwcs.so"
"Loading native module /usr/lib/qgis/server/libwfs.so"
"Loading native module /usr/lib/qgis/server/libwfs3.so"
"Loading native module /usr/lib/qgis/server/libwms.so"
"Loading native module /usr/lib/qgis/server/libwmts.so"
QFSFileEngine::open: No file name specified
Content-Length: 102
Content-Type: application/json
Server: QGIS FCGI server - QGIS version 3.16.6-Hannover
Status: 400
[{"code":"Bad request error","description":"Requested URI does not match any␣
 ,→registered API handler"}]

Let’s add a sample project. You can use your own, or one from Training demo data:

mkdir /home/qgis/projects/
cd /home/qgis/projects/
wget https://github.com/qgis/QGIS-Training-Data/archive/release_3.16.zip
unzip release_3.16.zip
mv QGIS-Training-Data-release_3.16/exercise_data/qgis-server-tutorial-data/world.
 ,→qgs .

mv QGIS-Training-Data-release_3.16/exercise_data/qgis-server-tutorial-data/
 ,→naturalearth.sqlite .

Of course, you can use your favorite GIS software to open this file and take a look at the configuration and available
layers.
To properly deploy QGIS server you need a HTTP server. Recommended choices are Apache or NGINX.

2.1.1 Apache HTTP Server

Poznámka: In the following, please replace qgis.demo with the name or IP address of your server.

Install Apache and mod_fcgid:

apt install apache2 libapache2-mod-fcgid

You can run QGIS Server on your default website, or configure a virtualhost specifically for this, as follows.
In the /etc/apache2/sites-available directory let’s create a file called qgis.demo.conf, with this
content:

  ServerAdmin webmaster@localhost
  ServerName qgis.demo

                                                                                                (continues on next page)

4                                                                                        Kapitola 2. Začínáme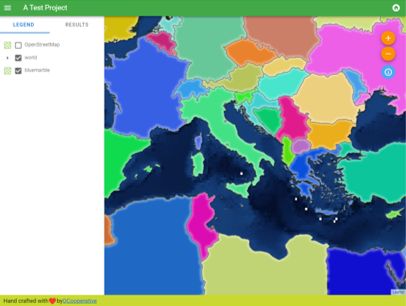
QGIS Server 3.16 User Guide

                                                                                          (pokračujte na předchozí stránce)
     DocumentRoot /var/www/html

     # Apache logs (different than QGIS Server log)
     ErrorLog ${APACHE_LOG_DIR}/qgis.demo.error.log
     CustomLog ${APACHE_LOG_DIR}/qgis.demo.access.log combined

     # Longer timeout for WPS... default = 40
     FcgidIOTimeout 120

     FcgidInitialEnv LC_ALL "en_US.UTF-8"
     FcgidInitialEnv PYTHONIOENCODING UTF-8
     FcgidInitialEnv LANG "en_US.UTF-8"

     # QGIS log
     FcgidInitialEnv QGIS_SERVER_LOG_STDERR 1
     FcgidInitialEnv QGIS_SERVER_LOG_LEVEL 0

     # default QGIS project
     SetEnv QGIS_PROJECT_FILE /home/qgis/projects/world.qgs

     # QGIS_AUTH_DB_DIR_PATH must lead to a directory writeable by the Server's FCGI␣
,→   process user
     FcgidInitialEnv QGIS_AUTH_DB_DIR_PATH "/home/qgis/qgisserverdb/"
     FcgidInitialEnv QGIS_AUTH_PASSWORD_FILE "/home/qgis/qgisserverdb/qgis-auth.db"

     # Set pg access via pg_service file
     SetEnv PGSERVICEFILE /home/qgis/.pg_service.conf
     FcgidInitialEnv PGPASSFILE "/home/qgis/.pgpass"

     # if qgis-server is installed from packages in debian based distros this is␣
,→   usually /usr/lib/cgi-bin/
     # run "locate qgis_mapserv.fcgi" if you don't know where qgis_mapserv.fcgi is
     ScriptAlias /cgi-bin/ /usr/lib/cgi-bin/

       AllowOverride None
       Options +ExecCGI -MultiViews -SymLinksIfOwnerMatch
       Order allow,deny
       Allow from all
       Require all granted

 FcgidMaxRequestLen 26214400
 FcgidConnectTimeout 60

Further readings:
     • QGIS Server logging
     • pg-service-file in QGIS Server
You can do the above in a linux Desktop system by pasting and saving the above configuration after doing:

nano /etc/apache2/sites-available/qgis.demo.conf

Poznámka: Some of the configuration options are explained in the Server environment variables section.

Let’s now create the directories that will store the QGIS Server logs and the authentication database:

2.1. Installation on Debian-based systems                                                                                5
QGIS Server 3.16 User Guide

mkdir   -p /var/log/qgis/
chown   www-data:www-data /var/log/qgis
mkdir   -p /home/qgis/qgisserverdb
chown   www-data:www-data /home/qgis/qgisserverdb

Poznámka: www-data is the Apache user on Debian based systems and we need Apache to have access to those
locations or files. The chown www-data... commands change the owner of the respective directories and files
to www-data.

We can now enable the virtual host, enable the fcgid mod if it’s not already enabled:

a2enmod fcgid
a2ensite qgis.demo

Now restart Apache for the new configuration to be taken into account:

systemctl restart apache2

Now that Apache knows that he should answer requests to http://qgis.demo we also need to setup the client system
so that it knows who qgis.demo is. We do that by adding 127.0.0.1 qgis.demo in the hosts file. We can
do it with sh -c "echo '127.0.0.1 qgis.demo' >> /etc/hosts". Replace 127.0.0.1 with the
IP of your server.

Poznámka: Remember that both the qgis.demo.conf and /etc/hosts files should be configured for your
setup to work. You can also test the access to your QGIS Server from other clients on the network (e.g. Windows
or macOS machines) by going to their /etc/hosts file and point the myhost name to whatever IP the server
machine has on the network (not 127.0.0.1 as it is the local IP, only accessible from the local machine). On
*nix machines the hosts file is located in /etc, while on Windows it’s under the C:\Windows\System32\
drivers\etc directory. Under Windows you need to start your text editor with administrator privileges before
opening the hosts file.

QGIS Server is now available at http://qgis.demo. To check, type in a browser, as in the simple case:

http://qgis.demo/cgi-bin/qgis_mapserv.fcgi?SERVICE=WMS&VERSION=1.3.0&
 ,→REQUEST=GetCapabilities

2.1.2 NGINX HTTP Server

Poznámka: In the following, please replace qgis.demo with the name or IP address of your server.

You can also use QGIS Server with NGINX. Unlike Apache, NGINX does not automatically spawn FastCGI
processes. The FastCGI processes are to be started by something else.
Install NGINX:

apt install nginx

    • As a first option, you can use spawn-fcgi or fcgiwrap to start and manage the QGIS Server processes. Official
      Debian packages exist for both. When you have no X server running and you need, for example, printing, you
      can use xvfb.
    • Another option is to rely on Systemd, the init system for GNU/Linux that most Linux distributions use today.
      One of the advantages of this method is that it requires no other components or processes. It’s meant to be
      simple, yet robust and efficient for production deployments.

6                                                                                        Kapitola 2. Začínáme
QGIS Server 3.16 User Guide
NGINX Configuration
The include fastcgi_params; used in the previous configuration is important, as it adds the parameters from /etc/
nginx/fastcgi_params:
fastcgi_param QUERY_STRING $query_string;
fastcgi_param REQUEST_METHOD $request_method;
fastcgi_param CONTENT_TYPE $content_type;
fastcgi_param CONTENT_LENGTH $content_length;
fastcgi_param SCRIPT_NAME $fastcgi_script_name;
fastcgi_param REQUEST_URI $request_uri;
fastcgi_param DOCUMENT_URI $document_uri;
fastcgi_param DOCUMENT_ROOT $document_root;
fastcgi_param SERVER_PROTOCOL $server_protocol;
fastcgi_param REQUEST_SCHEME $scheme;
fastcgi_param HTTPS $https if_not_empty;
fastcgi_param GATEWAY_INTERFACE CGI/1.1;
fastcgi_param SERVER_SOFTWARE nginx/$nginx_version;
fastcgi_param REMOTE_ADDR $remote_addr;
fastcgi_param REMOTE_PORT $remote_port;
fastcgi_param SERVER_ADDR $server_addr;
fastcgi_param SERVER_PORT $server_port;
fastcgi_param SERVER_NAME $server_name;
# PHP only, required if PHP was built with --enable-force-cgi-redirect
fastcgi_param REDIRECT_STATUS 200;
Moreover, you can use some Environment variables to configure QGIS Server. In the NGINX configuration file, /
etc/nginx/nginx.conf, you have to use fastcgi_param instruction to define these variables as shown
below:
location /qgisserver {
gzip off;
include fastcgi_params;
fastcgi_param QGIS_SERVER_LOG_STDERR 1;
fastcgi_param QGIS_SERVER_LOG_LEVEL 0;
fastcgi_pass unix:/var/run/qgisserver.socket;
}
FastCGI wrappers
Varování: fcgiwrap is easier to set up than spawn-fcgi, because it’s already wrapped in a Systemd service. But
it also leads to a solution that is much slower than using spawn-fcgi. With fcgiwrap, a new QGIS Server process is
created on each request, meaning that the QGIS Server initialization process, which includes reading and parsing
the QGIS project file, is done on each request. With spawn-fcgi, the QGIS Server process remains alive between
requests, resulting in much better performance. For that reason, spawn-fcgi is recommended for production use.
spawn-fcgi
If you want to use spawn-fcgi, the first step is to install the package:
apt install spawn-fcgi
Then, introduce the following block in your NGINX server configuration:
2.1. Installation on Debian-based systems 7QGIS Server 3.16 User Guide
location /qgisserver {
gzip off;
include fastcgi_params;
fastcgi_pass unix:/var/run/qgisserver.socket;
}
And restart NGINX to take into account the new configuration:
systemctl restart nginx
Finally, considering that there is no default service file for spawn-fcgi, you have to manually start QGIS Server in
your terminal:
spawn-fcgi -s /var/run/qgisserver.socket \
-U www-data -G www-data -n \
/usr/lib/cgi-bin/qgis_mapserv.fcgi
QGIS Server is now available at http://qgis.demo/qgisserver.
Poznámka: When using spawn-fcgi, you may directly define environment variables before running the server. For
example: export QGIS_SERVER_LOG_STDERR=1
Of course, you can add an init script to start QGIS Server at boot time or whenever you want. For example with
systemd, edit the file /etc/systemd/system/qgis-server.service with this content:
[Unit]
Description=QGIS server
After=network.target
[Service]
;; set env var as needed
;Environment="LANG=en_EN.UTF-8"
;Environment="QGIS_SERVER_PARALLEL_RENDERING=1"
;Environment="QGIS_SERVER_MAX_THREADS=12"
;Environment="QGIS_SERVER_LOG_LEVEL=0"
;Environment="QGIS_SERVER_LOG_STDERR=1"
;; or use a file:
;EnvironmentFile=/etc/qgis-server/env
ExecStart=spawn-fcgi -s /var/run/qgisserver.socket -U www-data -G www-data -n /usr/
,→lib/cgi-bin/qgis_mapserv.fcgi
[Install]
WantedBy=multi-user.target
Then enable and start the service:
systemctl enable --now qgis-server
Varování: With the above commands spawn-fcgi spawns only one QGIS Server process.
8 Kapitola 2. ZačínámeQGIS Server 3.16 User Guide
fcgiwrap
Using fcgiwrap is much easier to setup than spawn-fcgi but it’s much slower. You first have to install the corresponding
package:
apt install fcgiwrap
Then, introduce the following block in your NGINX server configuration:
1 location /qgisserver {
2 gzip off;
3 include fastcgi_params;
4 fastcgi_pass unix:/var/run/fcgiwrap.socket;
5 fastcgi_param SCRIPT_FILENAME /usr/lib/cgi-bin/qgis_mapserv.fcgi;
6 }
Finally, restart NGINX and fcgiwrap to take into account the new configuration:
systemctl restart nginx
systemctl restart fcgiwrap
QGIS Server is now available at http://qgis.demo/qgisserver.
Systemd
QGIS Server needs a running X Server to be fully usable, in particular for printing. In the case you already have a
running X Server, you can use systemd services.
This method, to deploy QGIS Server, relies on two Systemd units:
• a Socket unit
• and a Service unit.
The QGIS Server Socket unit defines and creates a file system socket, used by NGINX to start and communicate with
QGIS Server. The Socket unit has to be configured with Accept=false, meaning that the calls to the accept()
system call are delegated to the process created by the Service unit. It is located in /etc/systemd/system/
qgis-server@.socket, which is actually a template:
[Unit]
Description=QGIS Server Listen Socket (instance %i)
[Socket]
Accept=false
ListenStream=/var/run/qgis-server-%i.sock
SocketUser=www-data
SocketGroup=www-data
SocketMode=0600
[Install]
WantedBy=sockets.target
Now enable and start sockets:
for i in 1 2 3 4; do systemctl enable --now qgis-server@$i.socket; done
The QGIS Server Service unit defines and starts the QGIS Server process. The important part is that the Service
process’ standard input is connected to the socket defined by the Socket unit. This has to be configured using
StandardInput=socket in the Service unit configuration located in /etc/systemd/system/qgis-
server@.service:
2.1. Installation on Debian-based systems 9QGIS Server 3.16 User Guide
[Unit]
Description=QGIS Server Service (instance %i)
[Service]
User=www-data
Group=www-data
StandardOutput=null
StandardError=journal
StandardInput=socket
ExecStart=/usr/lib/cgi-bin/qgis_mapserv.fcgi
EnvironmentFile=/etc/qgis-server/env
[Install]
WantedBy=multi-user.target
Poznámka: The QGIS Server environment variables are defined in a separate file, /etc/qgis-server/env.
It could look like this:
QGIS_PROJECT_FILE=/etc/qgis/myproject.qgs
QGIS_SERVER_LOG_STDERR=1
QGIS_SERVER_LOG_LEVEL=3
Now start socket service:
for i in 1 2 3 4; do systemctl enable --now qgis-server@$i.service; done
Finally, for the NGINX HTTP server, lets introduce the configuration for this setup:
upstream qgis-server_backend {
server unix:/var/run/qgis-server-1.sock;
server unix:/var/run/qgis-server-2.sock;
server unix:/var/run/qgis-server-3.sock;
server unix:/var/run/qgis-server-4.sock;
}
server {
…
location /qgis-server {
gzip off;
include fastcgi_params;
fastcgi_pass qgis-server_backend;
}
}
Now restart NGINX for the new configuration to be taken into account:
systemctl restart nginx
Thanks to Oslandia for sharing their tutorial.
10 Kapitola 2. ZačínámeQGIS Server 3.16 User Guide
2.1.3 Xvfb
QGIS Server needs a running X Server to be fully usable, in particular for printing. On servers it is usually
recommended not to install it, so you may use xvfb to have a virtual X environment.
If you’re running the Server in graphic/X11 environment then there is no need to install xvfb. More info at https:
//www.itopen.it/qgis-server-setup-notes/.
To install the package:
apt install xvfb
Create the service file, /etc/systemd/system/xvfb.service, with this content:
[Unit]
Description=X Virtual Frame Buffer Service
After=network.target
[Service]
ExecStart=/usr/bin/Xvfb :99 -screen 0 1024x768x24 -ac +extension GLX +render -
,→noreset
[Install]
WantedBy=multi-user.target
Enable, start and check the status of the xvfb.service:
systemctl enable --now xvfb.service
systemctl status xvfb.service
Then, according to your HTTP server, you should configure the DISPLAY parameter or directly use xvfb-run.
With Apache
Then you can configure the DISPLAY parameter.
With Apache you just add to your FastCGI configuration (see above):
FcgidInitialEnv DISPLAY ":99"
Now restart Apache for the new configuration to be taken into account:
systemctl restart apache2
With NGINX
Then you can directly use xvfb-run or configure the DISPLAY parameter.
• With spawn-fcgi using xvfb-run:
xvfb-run /usr/bin/spawn-fcgi -f /usr/lib/cgi-bin/qgis_mapserv.fcgi \
-s /tmp/qgisserver.socket \
-G www-data -U www-data -n
• With the DISPLAY environment variable in the HTTP server configuration.
fastcgi_param DISPLAY ":99";
2.1. Installation on Debian-based systems 11QGIS Server 3.16 User Guide
2.2 Installation on Windows
QGIS Server can also be installed on Windows systems. While the QGIS Server package is available in the 64 bit
version of the OSGeo4W network installer (https://qgis.org/en/site/forusers/download.html) there is no Apache (or
other web server) package available, so this must be installed by other means.
A simple procedure is the following:
1. Download the XAMPP installer (https://www.apachefriends.org/download.html) for Windows and install
Apache
2. Download the OSGeo4W installer, follow the „Advanced Install“ and install both the QGIS Desktop and QGIS
Server packages
12 Kapitola 2. ZačínámeQGIS Server 3.16 User Guide
3. Edit the httpd.conf file (C:\xampp\apache\conf\httpd.conf if the default installation paths have
been used) and make the following changes:
From:
ScriptAlias /cgi-bin/ "C:/xampp/cgi-bin/"
To:
ScriptAlias /cgi-bin/ "C:/OSGeo4W64/apps/qgis/bin/"
From:
AllowOverride None
Options None
Require all granted
To:
SetHandler cgi-script
AllowOverride None
Options ExecCGI
Order allow,deny
Allow from all
Require all granted
From:
AddHandler cgi-script .cgi .pl .asp
To:
AddHandler cgi-script .cgi .pl .asp .exe
4. Then at the bottom of httpd.conf add:
2.2. Installation on Windows 13QGIS Server 3.16 User Guide
SetEnv GDAL_DATA "C:\OSGeo4W64\share\gdal"
SetEnv QGIS_AUTH_DB_DIR_PATH "C:\OSGeo4W64\apps\qgis\resources"
SetEnv PYTHONHOME "C:\OSGeo4W64\apps\Python37"
SetEnv PATH "C:\OSGeo4W64\bin;C:\OSGeo4W64\apps\qgis\bin;C:\OSGeo4W64\apps\Qt5\
,→bin;C:\WINDOWS\system32;C:\WINDOWS;C:\WINDOWS\System32\Wbem"
SetEnv QGIS_PREFIX_PATH "C:\OSGeo4W64\apps\qgis"
SetEnv QT_PLUGIN_PATH "C:\OSGeo4W64\apps\qgis\qtplugins;C:\OSGeo4W64\apps\Qt5\
,→plugins"
5. Restart the Apache web server from the XAMPP Control Panel and open browser window to testing a
GetCapabilities request to QGIS Server
http://qgis.demo/cgi-bin/qgis_mapserv.fcgi.exe?SERVICE=WMS&VERSION=1.3.0&
,→REQUEST=GetCapabilities
2.3 Serve a project
Now that QGIS Server is installed and running, we just have to use it.
Obviously, we need a QGIS project to work on. Of course, you can fully customize your project by defining contact
information, precise some restrictions on CRS or even exclude some layers. Everything you need to know about that
is described later in Configure your project.
But for now, we are going to use a simple project already configured and previously downloaded in /home/qgis/
projects/world.qgs, as described above.
By opening the project and taking a quick look on layers, we know that 4 layers are currently available:
• airports
• places
• countries
• countries_shapeburst
You don’t have to understand the full request for now but you may retrieve a map with some of the previous layers
thanks to QGIS Server by doing something like this in your web browser to retrieve the countries layer:
http://qgis.demo/qgisserver?
MAP=/home/qgis/projects/world.qgs&
LAYERS=countries&
SERVICE=WMS&
VERSION=1.3.0&
REQUEST=GetMap&
CRS=EPSG:4326&
WIDTH=400&
HEIGHT=200&
BBOX=-90,-180,90,180
If you obtain the next image, then QGIS Server is running correctly:
14 Kapitola 2. ZačínámeQGIS Server 3.16 User Guide
Obr. 2.1: Server response to a basic GetMap request
Note that you may define QGIS_PROJECT_FILE environment variable to use a project by default instead of giving
a MAP parameter (see Environment variables).
For example with spawn-fcgi:
export QGIS_PROJECT_FILE=/home/qgis/projects/world.qgs
spawn-fcgi -f /usr/lib/bin/cgi-bin/qgis_mapserv.fcgi \
-s /var/run/qgisserver.socket \
-U www-data -G www-data -n
2.4 Configure your project
To provide a new QGIS Server WMS, WFS or WCS, you have to create a QGIS project file with some data or use
one of your current project. Define the colors and styles of the layers in QGIS and the project CRS, if not already
defined.
2.4. Configure your project 15QGIS Server 3.16 User Guide
Obr. 2.2: Definitions for a QGIS Server WMS/WFS/WCS project
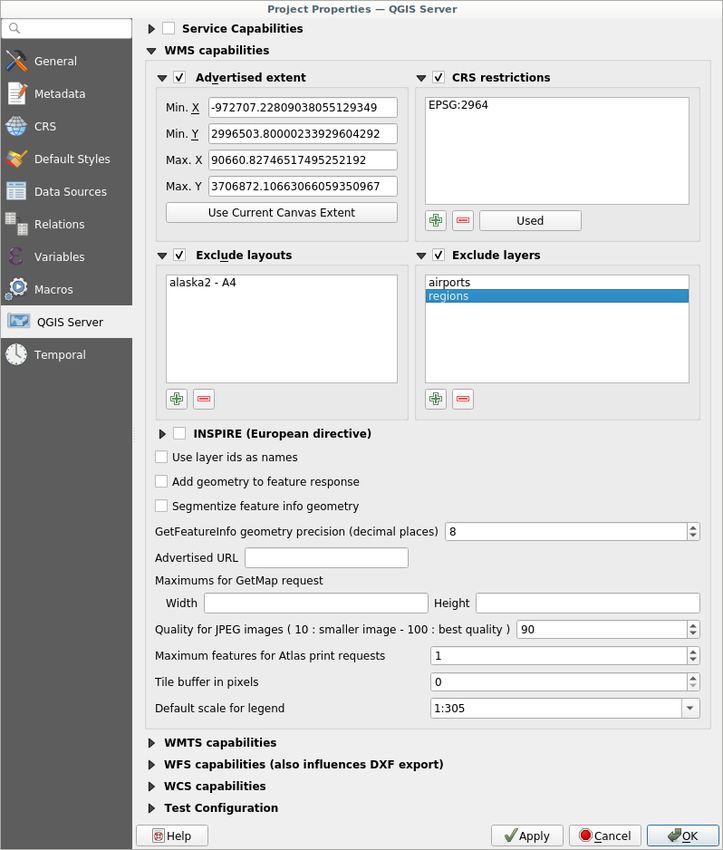
Then, go to the QGIS Server menu of the Project ► Properties… dialog and provide some information about the OWS
in the fields under Service Capabilities. This will appear in the GetCapabilities response of the WMS, WFS or WCS.
If you don’t check Service capabilities, QGIS Server will use the information given in the wms_metadata.xml
file located in the cgi-bin folder.
16 Kapitola 2. ZačínámeQGIS Server 3.16 User Guide 2.4.1 WMS capabilities In the WMS capabilities section, you can define the extent advertised in the WMS GetCapabilities response by entering the minimum and maximum X and Y values in the fields under Advertised extent. Clicking Use Current Canvas Extent sets these values to the extent currently displayed in the QGIS map canvas. By checking CRS restrictions, you can restrict in which coordinate reference systems (CRS) QGIS Server will offer to render maps. It is recommended that you restrict the offered CRS as this reduces the size of the WMS GetCapabilities response. Use the button below to select those CRSs from the Coordinate Reference System Selector, or click Used to add the CRSs used in the QGIS project to the list. If you have print layouts defined in your project, they will be listed in the GetProjectSettings response, and they can be used by the GetPrint request to create prints, using one of the print layouts as a template. This is a QGIS- specific extension to the WMS 1.3.0 specification. If you want to exclude any print layout from being published by the WMS, check Exclude layouts and click the button below. Then, select a print layout from the Select print layout dialog in order to add it to the excluded layouts list. If you want to exclude any layer or layer group from being published by the WMS, check Exclude Layers and click the button below. This opens the Select restricted layers and groups dialog, which allows you to choose the layers and groups that you don’t want to be published. Use the Shift or Ctrl key if you want to select multiple entries. It is recommended that you exclude from publishing the layers that you don’t need as this reduces the size of the WMS GetCapabilities response which leads to faster loading times on the client side. If you check Use layer ids as name, layer ids will be used to reference layers in the GetCapabilities response or GetMap LAYERS parameter. If not, layer name or short name if defined (see vectorservermenu) is used. You can receive requested GetFeatureInfo as plain text, XML and GML. The default is XML. If you wish, you can check Add geometry to feature response. This will include the bounding box for each feature in the GetFeatureInfo response. See also the WITH_GEOMETRY parameter. As many web clients can’t display circular arcs in geometries you have the option to segmentize the geometry before sending it to the client in a GetFeatureInfo response. This allows such clients to still display a feature’s geometry (e.g. for highlighting the feature). You need to check the Segmentize feature info geometry to activate the option. You can also use the GetFeatureInfo geometry precision option to set the precision of the GetFeatureInfo geometry. This enables you to save bandwidth when you don’t need the full precision. If you want QGIS Server to advertise specific request URLs in the WMS GetCapabilities response, enter the corresponding URL in the Advertised URL field. Furthermore, you can restrict the maximum size of the maps returned by the GetMap request by entering the maximum width and height into the respective fields under Maximums for GetMap request. You can change the Quality for JPEG images factor. The quality factor must be in the range 0 to 100. Specify 0 for maximum compression, 100 for no compression. You can change the limit for atlas features to be printed in one request by setting the Maximum features for Atlas print requests field. When QGIS Server is used in tiled mode (see TILED parameter), you can set the Tile buffer in pixels. The recommended value is the size of the largest symbol or line width in your QGIS project. If one of your layers uses the Map Tip display (i.e. to show text using expressions) this will be listed inside the GetFeatureInfo output. If the layer uses a Value Map for one of its attributes, this information will also be shown in the GetFeatureInfo output. 2.4. Configure your project 17
QGIS Server 3.16 User Guide

2.4.2 WFS capabilities

In the WFS capabilities area you can select the layers you want to publish as WFS, and specify if they will allow
update, insert and delete operations. If you enter a URL in the Advertised URL field of the WFS capabilities section,
QGIS Server will advertise this specific URL in the WFS GetCapabilities response.

2.4.3 WCS capabilities

In the WCS capabilities area, you can select the layers that you want to publish as WCS. If you enter a URL in
the Advertised URL field of the WCS capabilities section, QGIS Server will advertise this specific URL in the WCS
GetCapabilities response.

2.4.4 Fine tuning your OWS

For vector layers, the Fields menu of the Layer ► Layer Properties dialog allows you to define for each attribute if
it will be published or not. By default, all the attributes are published by your WMS and WFS. If you don’t want a
specific attribute to be published, uncheck the corresponding checkbox in the WMS or WFS column.
You can overlay watermarks over the maps produced by your WMS by adding text annotations or SVG annotations
to the project file. See the sec_annotations section for instructions on creating annotations. For annotations to be
displayed as watermarks on the WMS output, the Fixed map position checkbox in the Annotation text dialog must be
unchecked. This can be accessed by double clicking the annotation while one of the annotation tools is active. For
SVG annotations, you will need either to set the project to save absolute paths (in the General menu of the Project ►
Properties… dialog) or to manually modify the path to the SVG image so that it represents a valid relative path.

2.5 Integration with third parties

QGIS Server provides standard OGC web services like WMS, WFS, etc. thus it can be used by a wide variety of end
user tools.

2.5.1 Integration with QGIS Desktop

QGIS Desktop is the map designer where QGIS Server is the map server. The maps or QGIS projects will be served
by the QGIS Server to provide OGC standards. These QGIS projects can either be files or entries in a database (by
using Project ► Save to ► PostgreSQL in QGIS Desktop).
Furthermore, dedicated update workflow must be established to refresh a project used by a QGIS Server (ie. copy
project files into server location and restart QGIS Server). For now, automated processes (as server reloading over
message queue service) are not implemented yet.

2.5.2 Integration with MapProxy

MapProxy is a tile cache server and as it can read and serve any WMS/WMTS map server, it can be directly connected
to QGIS server web services and improve end user experience.

18                                                                                        Kapitola 2. Začínáme
QGIS Server 3.16 User Guide

2.5.3 Integration with QWC2

QWC2 is a responsive web application dedicated to QGIS Server. It helps you to build a highly customized map
viewer with layer selection, feature info, etc.. Also many plugins are available like authentication or print service, the
full list is available is this repository.

2.5. Integration with third parties                                                                                    19
QGIS Server 3.16 User Guide

20                            Kapitola 2. Začínáme
KAPITOLA          3

                                                                                                  Services

QGIS Server is able to serve data according to standard protocols as described by the Open Geospatial Consortium
(OGC):
   • WMS 1.1.1 and 1.3.0
   • WFS 1.0.0 and 1.1.0
   • OGC API - Features (WFS3)
   • WCS 1.1.1
   • WMTS 1.0.0
Extra vendor parameters and requests are supported in addition to the original standard that greatly enhance the
possibilities of customizing its behavior thanks to the QGIS rendering engine.

3.1 Web Map Service (WMS)

The 1.1.1 and 1.3.0 WMS standards implemented in QGIS Server provide a HTTP interface to request map or legend
images generated from a QGIS project. A typical WMS request defines the QGIS project to use, the layers to render
as well as the image format to generate. Basic support is also available for Styled Layer Descriptor (SLD).
Specifications:
   • WMS 1.1.1
   • WMS 1.3.0
   • SLD 1.1.0 WMS profile
Standard requests provided by QGIS Server:

                 Request              Popis
                 GetCapabilities      Returns XML metadata with information about the server
                 GetMap               Returns a map
                 GetFeatureInfo       Retrieves data (geometry and values) for a pixel location
                 GetLegendGraphics    Returns legend symbols

Vendor requests provided by QGIS Server:

                                                                                                             21
QGIS Server 3.16 User Guide
Request Popis
GetPrint Returns a QGIS composition
GetProjectSettings Returns specific information about QGIS Server
3.1.1 GetMap
Standard parameters for the GetMap request according to the OGC WMS 1.1.1 and 1.3.0 specifications:
Parameter Required Popis
SERVICE Yes Name of the service (WMS)
VERSION Yes Version of the service
REQUEST Yes Name of the request (GetMap)
LAYERS No Layers to display
STYLES No Layers‘ style
SRS / CRS Yes Coordinate reference system
BBOX No Map extent
WIDTH Yes Width of the image in pixels
HEIGHT Yes Height of the image in pixels
FORMAT No Image format
TRANSPARENT No Transparent background
SLD No URL of an SLD to be used for styling
SLD_BODY No In-line SLD (XML) to be used for styling
In addition to the standard ones, QGIS Server supports the following extra parameters:
Parameter Required Popis
MAP Yes Specify the QGIS project file
BGCOLOR No Specify the background color
DPI No Specify the output resolution
IMAGE_QUALITY No JPEG compression
OPACITIES No Opacity for layer or group
FILTER No Subset of features
SELECTION No Highlight features
FILE_NAME No File name of the downloaded file
Only for FORMAT=application/dxf
FORMAT_OPTIONS No Options of the specified file format
Only for FORMAT=application/dxf
TILED No Working in tiled mode
URL example:
http://localhost/qgis_server?
SERVICE=WMS
&VERSION=1.3.0
&REQUEST=GetMap
&MAP=/home/qgis/projects/world.qgs
&LAYERS=mylayer1,mylayer2,mylayer3
&STYLES=style1,default,style3
&OPACITIES=125,200,125
&CRS=EPSG:4326
&WIDTH=400
&HEIGHT=400
&FORMAT=image/png
&TRANSPARENT=TRUE
(continues on next page)
22 Kapitola 3. ServicesQGIS Server 3.16 User Guide
(pokračujte na předchozí stránce)
&DPI=300
&TILED=TRUE
SERVICE
This parameter has to be WMS.
For example:
http://localhost/qgisserver?
SERVICE=WMS
&...
VERSION
This parameter allows to specify the version of the service to use. Available values for the VERSION parameter are:
• 1.1.1
• 1.3.0
According to the version number, slight differences have to be expected as explained later for the next parameters:
• CRS / SRS
• BBOX
REQUEST
This parameter is GetMap in case of the GetMap request.
LAYERS
This parameter allows to specify the layers to display on the map. Names have to be separated by a comma.
In addition, QGIS Server introduced some options to select layers by:
• a short name
• the layer id
The short name of a layer may be configured through Properties ► Metadata in layer menu. If the short name is
defined, then it’s used by default instead of the layer’s name:
http://localhost/qgisserver?
SERVICE=WMS
&REQUEST=GetMap
&LAYERS=mynickname1,mynickname2
&...
Moreover, there’s a project option allowing to select layers by their id in OWS Server ► WMS capabilities menu of the
Project ► Properties… dialog. To activate this option, the checkbox Use layer ids as names has to be selected.
http://localhost/qgisserver?
SERVICE=WMS
&REQUEST=GetMap
&LAYERS=mylayerid1,mylayerid2
&...
3.1. Web Map Service (WMS) 23QGIS Server 3.16 User Guide
STYLES
This parameter can be used to specify a layer’s style for the rendering step. Styles have to be separated by a comma.
The name of the default style is default.
SRS / CRS
This parameter allows to indicate the map output Spatial Reference System in WMS 1.1.1 and has to be formed like
EPSG:XXXX. Note that CRS is also supported if current version is 1.1.1.
For WMS 1.3.0, CRS parameter is preferable but SRS is also supported.
Note that if both CRS and SRS parameters are indicated in the request, then it’s the current version indicated in
VERSION parameter which is decisive.
In the next case, the SRS parameter is kept whatever the VERSION parameter because CRS is not indicated:
http://localhost/qgisserver?
SERVICE=WMS
&REQUEST=GetMap
&VERSION=1.3.0
&SRS=EPSG:2854
&...
In the next case, the SRS parameter is kept instead of CRS because of the VERSION parameter:
http://localhost/qgisserver?
SERVICE=WMS
&REQUEST=GetMap
&VERSION=1.1.1
&CRS=EPSG:4326
&SRS=EPSG:2854
&...
In the next case, the CRS parameter is kept instead of SRS because of the VERSION parameter:
http://localhost/qgisserver?
SERVICE=WMS
&REQUEST=GetMap
&VERSION=1.3.0
&CRS=EPSG:4326
&SRS=EPSG:2854
&...
BBOX
This parameter allows to specify the map extent with units according to the current CRS. Coordinates have to be
separated by a comma.
The BBOX parameter is formed like min_a,min_b,max_a,max_b but a and b axis definition is different
according to the current VERSION parameter:
• in WMS 1.1.1, the axis ordering is always east/north
• in WMS 1.3.0, the axis ordering depends on the CRS authority
For example in case of EPSG:4326 and WMS 1.1.1, a is the longitude (east) and b the latitude (north), leading to
a request like:
24 Kapitola 3. ServicesQGIS Server 3.16 User Guide
http://localhost/qgisserver?
SERVICE=WMS
&REQUEST=GetMap
&VERSION=1.1.1
&SRS=epsg:4326
&BBOX=-180,-90,180,90
&...
But in case of WMS 1.3.0, the axis ordering defined in the EPSG database is north/east so a is the latitude and b the
longitude:
http://localhost/qgisserver?
SERVICE=WMS
&REQUEST=GetMap
&VERSION=1.3.0
&CRS=epsg:4326
&BBOX=-90,-180,90,180
&...
WIDTH
This parameter allows to specify the width in pixels of the output image.
HEIGHT
This parameter allows to specify the height in pixels of the output image.
FORMAT
This parameter may be used to specify the format of map image. Available values are:
• jpg
• jpeg
• image/jpeg
• image/png
• image/png; mode=1bit
• image/png; mode=8bit
• image/png; mode=16bit
• application/dxf Only layers that have read access in the WFS service are exported in the DXF format.
URL example:
http://localhost/qgisserver?
SERVICE=WMS&VERSION=1.3.0
&REQUEST=GetMap
&FORMAT=application/dxf
&LAYERS=Haltungen,Normschacht,Spezialbauwerke
&STYLES=
&CRS=EPSG%3A21781&BBOX=696136.28844801,245797.12108743,696318.91114315,245939.
,→25832905
&WIDTH=1042
&HEIGHT=811
&FORMAT_OPTIONS=MODE:SYMBOLLAYERSYMBOLOGY;SCALE:250&FILE_NAME=plan.dxf
3.1. Web Map Service (WMS) 25QGIS Server 3.16 User Guide
TRANSPARENT
This boolean parameter can be used to specify the background transparency. Available values are (not case sensitive):
• TRUE
• FALSE
However, this parameter is ignored if the format of the map image indicated with FORMAT is different from PNG.
MAP
This parameter allows to define the QGIS project file to use.
As mentioned in GetMap parameters table, MAP is mandatory because a request needs a QGIS project to actually
work. However, the QGIS_PROJECT_FILE environment variable may be used to define a default QGIS project.
In this specific case, MAP is not longer a required parameter. For further information you may refer to Advanced
configuration.
BGCOLOR
This parameter allows to indicate a background color for the map image. However it cannot be combined with
TRANSPARENT parameter in case of PNG images (transparency takes priority). The colour may be literal or in
hexadecimal notation.
URL example with the literal notation:
http://localhost/qgisserver?
SERVICE=WMS
&REQUEST=GetMap
&VERSION=1.3.0
&BGCOLOR=green
&...
URL example with the hexadecimal notation:
http://localhost/qgisserver?
SERVICE=WMS
&REQUEST=GetMap
&VERSION=1.3.0
&BGCOLOR=0x00FF00
&...
DPI
This parameter can be used to specify the requested output resolution.
IMAGE_QUALITY
This parameter is only used for JPEG images. By default, the JPEG compression is -1.
You can change the default per QGIS project in the OWS Server ► WMS capabilities menu of the Project ► Properties…
dialog. If you want to override it in a GetMap request you can do it using the IMAGE_QUALITY parameter.
26 Kapitola 3. ServicesQGIS Server 3.16 User Guide OPACITIES Comma separated list of opacity values. Opacity can be set on layer or group level. Allowed values range from 0 (fully transparent) to 255 (fully opaque). FILTER A subset of layers can be selected with the FILTER parameter. The syntax is basically the same as for the QGIS subset string. However, there are some restrictions to avoid SQL injections into databases via QGIS Server. If a dangerous string is found in the parameter, QGIS Server will return the next error: The filter string XXXXXXXXX has been rejected␣ ,→because of security reasons. Note: Text strings have to be enclosed in single or double quotes. A space␣ ,→between each word / special character is mandatory. Allowed Keywords and special characters are IS,NOT,NULL,AND,OR,IN,=,=,!=, ,→',',(,),DMETAPHONE,SOUNDEX. Not allowed are semicolons in the filter expression. URL example: http://localhost/qgisserver? SERVICE=WMS &REQUEST=GetMap &LAYERS=mylayer1,mylayer2,mylayer3 &FILTER=mylayer1:"col1";mylayer1,mylayer2:"col2" = 'blabla' &... In this example, the same filter (field col2 equals the string blabla) is applied to layers mylayer1 and mylayer2, while the filter on col1 is only applied to mylayer1. Poznámka: It is possible to make attribute searches via GetFeatureInfo and omit the X/Y parameter if a FILTER is there. QGIS Server then returns info about the matching features and generates a combined bounding box in the XML output. SELECTION The SELECTION parameter can highlight features from one or more layers. Vector features can be selected by passing comma separated lists with feature ids. http://localhost/qgisserver? SERVICE=WMS &REQUEST=GetMap &LAYERS=mylayer1,mylayer2 &SELECTION=mylayer1:3,6,9;mylayer2:1,5,6 &... The following image presents the response from a GetMap request using the SELECTION option e.g. http:// myserver.com/...&SELECTION=countries:171,65. As those features id’s correspond in the source dataset to France and Romania they’re highlighted in yellow. 3.1. Web Map Service (WMS) 27
QGIS Server 3.16 User Guide

                    Obr. 3.1: Server response to a GetMap request with SELECTION parameter

FORMAT-OPTIONS

This parameter can be used to specify options for the selected format. Only for FORMAT=application/dxf. A
list of key:value pairs separated by semicolon:
     • SCALE: to be used for symbology rules, filters and styles (not actual scaling of the data - data remains in the
       original scale).
     • MODE: corresponds to the export options offered in the QGIS Desktop DXF export dialog. Possible values
       are NOSYMBOLOGY, FEATURESYMBOLOGY and SYMBOLLAYERSYMBOLOGY.
     • LAYERSATTRIBUTES: specify a field that contains values for DXF layer names - if not specified, the original
       QGIS layer names are used.
     • USE_TITLE_AS_LAYERNAME: if enabled, the title of the layer will be used as layer name.
     • CODEC: specify a codec to be used for encoding. Default is ISO-8859-1 check the QGIS desktop DXF
       export dialog for valid values.
     • NO_MTEXT: Use TEXT instead of MTEXT for labels.
     • FORCE_2D: Force 2D output. This is required for polyline width.

28                                                                                         Kapitola 3. Services
QGIS Server 3.16 User Guide
TILED
For performance reasons, QGIS Server can be used in tiled mode. In this mode, the client requests several small fixed
size tiles, and assembles them to form the whole map. Doing this, symbols at or near the boundary between two tiles
may appeared cut, because they are only present in one of the tile.
Set the TILED parameter to TRUE to tell QGIS Server to work in tiled mode, and to apply the Tile buffer configured
in the QGIS project (see Configure your project).
When TILED is TRUE and when a non-zero Tile buffer is configured in the QGIS project, features outside the tile
extent are drawn to avoid cut symbols at tile boundaries.
TILED defaults to FALSE.
3.1.2 GetFeatureInfo
Standard parameters for the GetFeatureInfo request according to the OGC WMS 1.1.1 and 1.3.0 specifications:
Parameter Required
Popis
SERVICE Yes Name of the service (WMS)
VERSION No Version of the service
REQUEST Yes Name of the request (GetFeatureInfo)
QUERY_LAYERS
Yes Layers to query
LAYERS Yes Layers to display (identical to QUERY_LAYERS)
STYLES No Layers‘ style
SRS / Yes Coordinate reference system
CRS
BBOX No Map extent
WIDTH Yes Width of the image in pixels
HEIGHT Yes Height of the image in pixels
TRANSPARENT
No Transparent background
INFO_FORMAT
No Output format
FEATURE_COUNT
No Maximum number of features to return
I No Pixel column of the point to query
X No Same as I parameter, but in WMS 1.1.1
J No Pixel row of the point to query
Y No Same as J parameter, but in WMS 1.1.1
WMS_PRECISION
No The precision (number of digits) to be used when returning geometry (see how to add
geometry to feature response). The default value is -1 meaning that the precision defined
in the project is used.
In addition to the standard ones, QGIS Server supports the following extra parameters:
Parameter Required Popis
MAP Yes Specify the QGIS project file
FILTER No Subset of features
FI_POINT_TOLERANCE No Tolerance in pixels for point layers
FI_LINE_TOLERANCE No Tolerance in pixels for line layers
FI_POLYGON_TOLERANCE No Tolerance in pixels for polygon layers
FILTER_GEOM No Geometry filtering
WITH_MAPTIP No Add map tips to the output
WITH_GEOMETRY No Add geometry to the output
URL example:
3.1. Web Map Service (WMS) 29QGIS Server 3.16 User Guide
http://localhost/qgisserver?
SERVICE=WMS
&VERSION=1.3.0
&REQUEST=GetMap
&MAP=/home/qgis/projects/world.qgs
&LAYERS=mylayer1,mylayer2,mylayer3
&CRS=EPSG:4326
&WIDTH=400
&HEIGHT=400
&INFO_FORMAT=text/xml
&TRANSPARENT=TRUE
&QUERY_LAYERS=mylayer1
&FEATURE_COUNT=3
&I=250
&J=250
REQUEST
This parameter is GetFeatureInfo in case of the GetFeatureInfo request.
INFO_FORMAT
This parameter may be used to specify the format of the result. Available values are:
• text/xml
• text/html
• text/plain
• application/vnd.ogc.gml
• application/json
QUERY_LAYERS
This parameter specifies the layers to display on the map. Names are separated by a comma.
In addition, QGIS Server introduces options to select layers by:
• short name
• layer id
See the LAYERS parameter defined in GetMap for more information.
FEATURE_COUNT
This parameter specifies the maximum number of features per layer to return. For example if QUERY_LAYERS is
set to layer1,layer2 and FEATURE_COUNT is set to 3 then a maximum of 3 features from layer1 will be
returned. Likewise a maximun of 3 features from layer2 will be returned.
By default, only 1 feature per layer is returned.
30 Kapitola 3. ServicesQGIS Server 3.16 User Guide
I
This parameter, defined in WMS 1.3.0, allows you to specify the pixel column of the query point.
X
Same parameter as I, but defined in WMS 1.1.1.
J
This parameter, defined in WMS 1.3.0, allows you to specify the pixel row of the query point.
A
Same parameter as J, but defined in WMS 1.1.1.
FI_POINT_TOLERANCE
This parameter specifies the tolerance in pixels for point layers.
FI_LINE_TOLERANCE
This parameter specifies the tolerance in pixels for line layers.
FI_POLYGON_TOLERANCE
This parameter specifies the tolerance in pixels for polygon layers.
FILTER_GEOM
This parameter specifies a WKT geometry with which features have to intersect.
WITH_MAPTIP
This parameter specifies whether to add map tips to the output.
Available values are (not case sensitive):
• TRUE
• FALSE
WITH_GEOMETRY
This parameter specifies whether to add geometries to the output. To use this feature you must first enable the Add
geometry to feature response option in the QGIS project. See Configure your project.
Available values are (not case sensitive):
• TRUE
• FALSE
3.1. Web Map Service (WMS) 31QGIS Server 3.16 User Guide
3.1.3 GetPrint
QGIS Server has the capability to create print layout output in pdf or pixel format. Print layout windows in the
published project are used as templates. In the GetPrint request, the client has the possibility to specify parameters
of the contained layout maps and labels.
Parameters for the GetPrint request:
Parameter Required Popis
MAP Yes Specify the QGIS project file
SERVICE Yes Name of the service (WMS)
VERSION No Version of the service
REQUEST Yes Name of the request (GetPrint)
LAYERS No Layers to display
TEMPLATE Yes Layout template to use
SRS / CRS Yes Coordinate reference system
FORMAT No Output format
ATLAS_PK No Atlas features
STYLES No Layers‘ style
TRANSPARENT No Transparent background
OPACITIES No Opacity for layer or group
SELECTION No Highlight features
mapX:EXTENT No Extent of the map ‚X‘
mapX:LAYERS No Layers of the map ‚X‘
mapX:STYLES No Layers‘ style of the map ‚X‘
mapX:SCALE No Layers‘ scale of the map ‚X‘
mapX:ROTATION No Rotation of the map ‚X‘
mapX:GRID_INTERVAL_X No Grid interval on x axis of the map ‚X‘
mapX:GRID_INTERVAL_Y No Grid interval on y axis of the map ‚X‘
URL example:
http://localhost/qgisserver?
SERVICE=WMS
&VERSION=1.3.0
&REQUEST=GetPrint
&MAP=/home/qgis/projects/world.qgs
&CRS=EPSG:4326
&FORMAT=png
&TEMPLATE=Layout%201
&map0:EXTENT=-180,-90,180,90
&map0:LAYERS=mylayer1,mylayer2,mylayer3
&map0:OPACITIES=125,200,125
&map0:ROTATION=45
Note that the layout template may contain more than one map. In this way, if you want to configure a specific map, you
have to use mapX: parameters where X is a positive number that you can retrieve thanks to the GetProjectSettings
request.
For example:
...
...
32 Kapitola 3. ServicesQGIS Server 3.16 User Guide
REQUEST
This parameter has to be GetPrint for the GetPrint request.
TEMPLATE
This parameter can be used to specify the name of a layout template to use for printing.
FORMAT
This parameter specifies the format of map image. Available values are:
• png (default value)
• image/png
• jpg
• jpeg
• image/jpeg
• svg
• image/svg
• image/svg+xml
• pdf
• application/pdf
If the FORMAT parameter is different from one of these values, then an exception is returned.
ATLAS_PK
This parameter allows activation of Atlas rendering by indicating which features we want to print. In order to retrieve
an atlas with all features, the * symbol may be used (according to the maximum number of features allowed in the
project configuration).
When FORMAT is pdf, a single PDF document combining the feature pages is returned. For all other formats, a
single page is returned.
mapX:EXTENT
This parameter specifies the extent for a layout map item as xmin,ymin,xmax,ymax.
mapX:ROTATION
This parameter specifies the map rotation in degrees.
3.1. Web Map Service (WMS) 33QGIS Server 3.16 User Guide
mapX:GRID_INTERVAL_X
This parameter specifies the grid line density in the X direction.
mapX:GRID_INTERVAL_Y
This parameter specifies the grid line density in the Y direction.
mapX:SCALE
This parameter specifies the map scale for a layout map item. This is useful to ensure scale based visibility of layers
and labels even if client and server may have different algorithms to calculate the scale denominator.
mapX:LAYERS
This parameter specifies the layers for a layout map item. See GetMap Layers for more information on this parameter.
mapX:STYLES
This parameter specifies the layers‘ styles defined in a specific layout map item. See GetMap Styles for more
information on this parameter.
3.1.4 GetLegendGraphics
Several additional parameters are available to change the size of the legend elements:
• BOXSPACE space between legend frame and content (mm)
• FORMAT, image/jpeg, image/png or application/json. For JSON, symbols are encoded with
Base64 and most other options related to layout or fonts are not taken into account because the legend must be
built on the client side.
• LAYERSPACE vertical space between layers (mm)
• LAYERTITLESPACE vertical space between layer title and items following (mm)
• SYMBOLSPACE vertical space between symbol and item following (mm)
• ICONLABELSPACE horizontal space between symbol and label text (mm)
• SYMBOLWIDTH width of the symbol preview (mm)
• SYMBOLHEIGHT height of the symbol preview (mm)
These parameters change the font properties for layer titles and item labels:
• LAYERFONTFAMILY / ITEMFONTFAMILY font family for layer title / item text
• LAYERFONTBOLD / ITEMFONTBOLD TRUE to use a bold font
• LAYERFONTSIZE / ITEMFONTSIZE Font size in point
• LAYERFONTITALIC / ITEMFONTITALIC TRUE to use italic font
• LAYERFONTCOLOR / ITEMFONTCOLOR Hex color code (e.g. #FF0000 for red)
• LAYERTITLE FALSE to get only the legend graphics without layer title
• RULELABEL:
– FALSE legend graphics without item labels
– AUTO hide item label for layers with Single symbol rendering
34 Kapitola 3. ServicesYou can also read