Acronis Cyber Protect - Home Office - User Guide
←
→
Page content transcription
If your browser does not render page correctly, please read the page content below
acronis.com

Acronis Cyber Protect
Home Office

User Guide        REVISION: 10/25/2021
Table of contents
1 Introduction                                                                                  7
    1.1 What is Acronis Cyber Protect Home Office?                                              7
    1.2 System requirements                                                                     7
    1.3 Install, update, or remove Acronis Cyber Protect Home Office                            9
    1.4 Activating Acronis Cyber Protect Home Office                                           10
     1.4.1 Too many activations                                                                11
     1.4.2 Managing your subscription licenses manually                                        11
    1.5 Trial version information                                                              12
    1.6 Acronis Customer Experience Program                                                    12
    1.7 Sending feedback to Acronis                                                            13
    1.8 Application preferences                                                                14
    1.9 Keyboard shortcuts                                                                     14
    1.10 Integration with Touch Bar                                                            16
    1.11 Technical Support                                                                     16
2 Backup                                                                                       18
    2.1 Basic concepts                                                                         18
    2.2 Backing up to local or network storage                                                 19
    2.3 What is Acronis Cloud?                                                                 20
     2.3.1 Creating an Acronis account                                                         21
     2.3.2 Subscription to Acronis Cloud                                                       21
    2.4 Backing up to Acronis Cloud                                                            22
    2.5 Replicating local backups to Acronis Cloud                                             24
     2.5.1 Why replicate?                                                                      24
     2.5.2 Replication activation                                                              24
    2.6 Notarized backup                                                                       24
     2.6.1 Using Blockchain technology                                                         26
     2.6.2 Verifying file authenticity                                                         27
     2.6.3 Manual verification of a file's authenticity                                        27
    2.7 Backing up mobile devices                                                              28
     2.7.1 Acronis Mobile                                                                      29
     2.7.2 Local destination of mobile backups                                                 30
    2.8 Backing up Office 365 data                                                             30
     2.8.1 Why back up Office 365 data?                                                        30
     2.8.2 Backing up Office 365 data                                                          31
    2.9 Scheduling                                                                             31

2                                                          © Acronis International GmbH, 2003-2021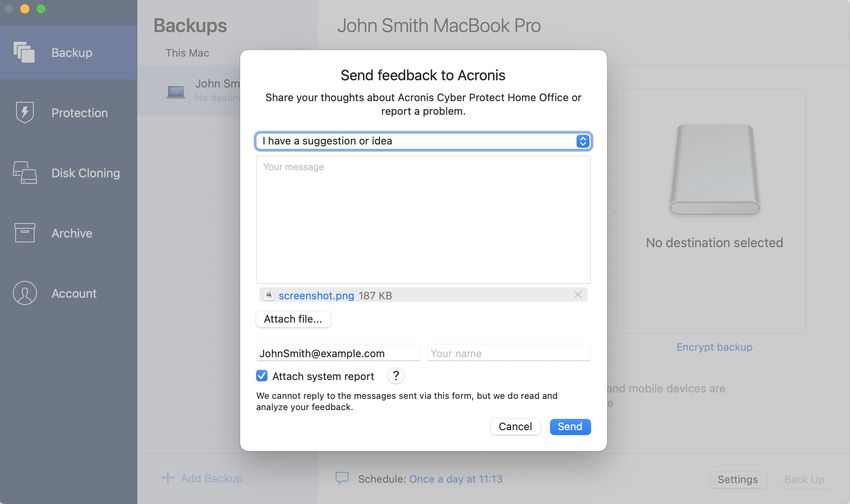
2.9.1 To use Mac Power Nap                                                                     33
    2.10 Backup encryption                                                                          33
    2.11 Cleaning up backups, backup versions, and replicas                                         33
    2.12 Cleaning up space on Acronis Cloud                                                         35
    2.13 Adding an existing backup to the list                                                      35
    2.14 Excluding items from backups                                                               36
     2.14.1 Excluding items manually                                                                37
     2.14.2 Excluding recoverable data from online backups                                          38
    2.15 Connection settings                                                                        38
    2.16 Network settings for backup                                                                39
     2.16.1 Data upload speed                                                                       40
    2.17 Backup activity and statistics                                                             40
     2.17.1 The Activity tab                                                                        40
     2.17.2 The Backup tab                                                                          41
    2.18 Laptop power settings                                                                      41
    2.19 Wi-Fi networks for backup to Acronis Cloud                                                 42
    2.20 Notifications                                                                              42
     2.20.1 Notifications in macOS Notification Center                                              42
     2.20.2 Notifications in Acronis Tray Notification Center                                       43
     2.20.3 Email notifications about backup status                                                 43
    2.21 Parallels Desktop support                                                                  43
     2.21.1 What is Parallels Desktop?                                                              43
     2.21.2 How does Acronis Cyber Protect Home Office handle Parallels Desktop virtual
     machines?                                                                                      44
     2.21.3 How does it work?                                                                       44
     2.21.4 Which virtual machines are backed up?                                                   44
     2.21.5 How do I recover virtual machines?                                                      44
     2.21.6 Limitations                                                                             45
    2.22 Backup list                                                                                45
     2.22.1 Backup states                                                                           46
     2.22.2 Sorting backups in the list                                                             46
3 Creating bootable media                                                                           47
    3.1 Creating Acronis bootable media                                                             47
    3.2 Creating an Acronis Survival Kit                                                            48
     3.2.1 What is an Acronis Survival Kit?                                                         48
     3.2.2 How do I create an Acronis Survival Kit?                                                 49
4 Recovery                                                                                          51

3                                                               © Acronis International GmbH, 2003-2021
4.1 When do I recover my Mac?                                                   51
    4.2 Recovering your Mac                                                         51
     4.2.1 FAQ about Boot Camp partition                                            53
    4.3 Recovering your files and folders                                           53
    4.4 Recovering Office 365 data                                                  55
     4.4.1 What items can be recovered?                                             55
     4.4.2 Recovering Office 365 data                                               55
    4.5 Searching backup content                                                    56
    4.6 File recovery options                                                       56
5 Disk cloning                                                                      58
    5.1 Clone disk utility                                                          58
    5.2 Cloning disks                                                               58
     5.2.1 Cloning a Fusion Drive                                                   60
    5.3 Connecting two Macs                                                         60
6 Protecting family data                                                            62
    6.1 What is family data protection?                                             62
    6.2 Adding a new device                                                         62
    6.3 Backing up any computer                                                     62
    6.4 Recovering data with Online Dashboard                                       63
7 Archiving data                                                                    64
    7.1 What is data archiving?                                                     64
    7.2 What is excluded from archives?                                             65
    7.3 Cloud archiving vs. Online backup                                           65
    7.4 Archiving your data                                                         66
     7.4.1 Network settings for archiving                                           67
     7.4.2 Archive encryption                                                       68
    7.5 Accessing your archived files                                               68
8 Sharing data                                                                      69
9 Protection                                                                        70
    9.1 The Protection dashboard                                                    70
    9.2 Active Protection                                                           70
     9.2.1 Anti-ransomware Protection                                               71
     9.2.2 Real-time Protection                                                     71
     9.2.3 Configuring Active Protection                                            72
    9.3 Antivirus Scans                                                             72
     9.3.1 Configuring Antivirus Scans                                              73
    9.4 Vulnerability assessment                                                    74

4                                               © Acronis International GmbH, 2003-2021
Index                                       76

5       © Acronis International GmbH, 2003-2021
Copyright statement
© Acronis International GmbH, 2003-2021. All rights reserved.

All trademarks and copyrights referred to are the property of their respective owners.

Distribution of substantively modified versions of this document is prohibited without the explicit
permission of the copyright holder.

Distribution of this work or derivative work in any standard (paper) book form for commercial
purposes is prohibited unless prior permission is obtained from the copyright holder.

DOCUMENTATION IS PROVIDED “AS IS” AND ALL EXPRESS OR IMPLIED CONDITIONS,
REPRESENTATIONS AND WARRANTIES, INCLUDING ANY IMPLIED WARRANTY OF MERCHANTABILITY,
FITNESS FOR A PARTICULAR PURPOSE OR NON-INFRINGEMENT, ARE DISCLAIMED, EXCEPT TO THE
EXTENT THAT SUCH DISCLAIMERS ARE HELD TO BE LEGALLY INVALID.

Third party code may be provided with the Software and/or Service. The license terms for such
third-parties are detailed in the license.txt file located in the root installation directory. You can
always find the latest up-to-date list of the third party code and the associated license terms used
with the Software and/or Service at https://kb.acronis.com/content/7696

Acronis patented technologies
Technologies, used in this product, are covered and protected by one or more U.S. Patent Numbers:
7,047,380; 7,246,211; 7,275,139; 7,281,104; 7,318,135; 7,353,355; 7,366,859; 7,383,327; 7,475,282;
7,603,533; 7,636,824; 7,650,473; 7,721,138; 7,779,221; 7,831,789; 7,836,053; 7,886,120; 7,895,403;
7,934,064; 7,937,612; 7,941,510; 7,949,635; 7,953,948; 7,979,690; 8,005,797; 8,051,044; 8,069,320;
8,073,815; 8,074,035; 8,074,276; 8,145,607; 8,180,984; 8,225,133; 8,261,035; 8,296,264; 8,312,259;
8,347,137; 8,484,427; 8,645,748; 8,732,121; 8,850,060; 8,856,927; 8,996,830; 9,213,697; 9,400,886;
9,424,678; 9,436,558; 9,471,441; 9,501,234; and patent pending applications.

6                                                             © Acronis International GmbH, 2003-2021
1 Introduction

1.1 What is Acronis Cyber Protect Home Office?
Acronis Cyber Protect Home Office is an application that protects all information on your Mac,
including the operating system, applications, settings, and all of your data.

To protect your Mac, you need to perform two easy operations:

1. Create a complete backup of your Mac.
    This saves your operating system files and all your data to a file called backup. You can store this
    file in local or network storage or upload it on Acronis Cloud. Refer to Backing up to local or
    network storage and Backing up to Acronis Cloud.
2. Create Acronis bootable media.
    This is a removable drive containing boot files. When your Mac cannot start up, this media allows
    you to start an Acronis recovery environment and use your backup to rollback your Mac to a
    healthy state. Refer to Creating Acronis bootable media for details.

After performing these two steps, you can be sure that you will be able to repair your macOS and
recover your lost documents in a few minutes.

Key features:

l   Backup of selected disks or entire Mac contents to local or network storage or to Acronis Cloud
l   Backup of selected files and folders to local or network storage or to Acronis Cloud
l   Antivirus Protection
l   Data archiving
l   Family data protection
l   Creating Acronis bootable media
l   macOS recovery in the bootable media environment
l   Recovery of specific files and folders under macOS

1.2 System requirements
Supported operating systems

l   macOS Monterey 12
l   macOS Big Sur 11
l   macOS Catalina 10.15
l   macOS Mojave 10.14
l   macOS High Sierra 10.13

Note
Mac machines with Intel Core 2 Duo processors are not supported.

7                                                            © Acronis International GmbH, 2003-2021
Supported file systems
l APFS
l HFS+ (including Core Storage)
l FAT32
l NTFS (including Boot Camp)
Note
You cannot back up data to a disk with an NTFS file system. However, you can recover data from
a backup located on this type of file system.
Requirements for Acronis bootable media
l To create a bootable media, you can use any removable drive with 4 GB (or more) of free space
and that is formatted with the Mac OS Extended file system.
l The version of macOS Recovery must match the version of macOS installed on your Mac.
l CD and DVD media are not supported.
Supported storage media
l Internal drives (HDD, SSD, RAID)
l USB drives
l FireWire drives
l Thunderbolt drives
l Network share, NAS
l Acronis Cloud
Supported processors
l Apple silicon
l Intel (x86)
General requirements
l You need to have administrator privileges to run Acronis Cyber Protect Home Office.
l [On an Intel-based Mac, except macOS Big Sur 11 and Monterey 12] If your Mac includes the
Apple T2 chip, select "Medium Security" and "Allow booting from external media" in the Secure
boot settings. For more information, refer to https://support.apple.com/en-us/HT208330.
l [On an Intel-based Mac, for macOS Big Sur 11 and Monterey 12] If your Mac includes the Apple T2
chip, select "No Security" and "Allow booting from external media" in the Secure boot settings.
For more information, refer to https://support.apple.com/en-us/HT208330.
Dark Mode support
Dark Mode is available in macOS Mojave or later. Acronis Cyber Protect Home Office switches to the
dark appearance when Dark Mode is turned on in macOS.
8 © Acronis International GmbH, 2003-20211.3 Install, update, or remove Acronis Cyber Protect
Home Office
To install Acronis Cyber Protect Home Office
1. Download the Acronis Cyber Protect Home Office setup file from the Acronis website at
http://go.acronis.com/home-office.
2. Double-click the Acronis Cyber Protect Home Office setup file (the file has a .dmg extension).
3. Double-click Install Acronis Cyber Protect Home Office in the Acronis Cyber Protect Home
Office window.
4. Follow the installer steps. When prompted, provide administrator credentials.
5. Read and accept the terms of the license agreement and the Acronis Customer Experience
Program.
6. When you start Acronis Cyber Protect Home Office for the first time, you can do one of the
following in the Activation window:
l To activate Acronis Cyber Protect Home Office, enter your serial number, and then click
Activate. The product will be activated.
l To sign in to your Acronis account, click Sign in. Refer to "Activating Acronis Cyber Protect
Home Office" (p. 10) for details.
l To start trial, click Start trial.
On macOS High Sierra 10.13, Mojave 10.14, or Catalina 10.15, you need to grant access to Acronis
International GmbH after the installation. It is required for loading kernel extensions in order to
have all the protection features. Please do the following:
1. Open System Preferences.
2. Go to the General tab of Security & Privacy.
3. Click Allow to accept the prompt that appears.
You also need to grant full disk access to Acronis Cyber Protect Home Office. On macOS Mojave
10.14 or Catalina 10.15, backup, cloning, and protection will not work properly without the full disk
access. On macOS Big Sur 11 and Monterey 12, backup and cloning will not work properly, and
protection will be disabled without the full disk access. To grant the access, when the window
requesting Full Disk Access appears, follow the on-screen instructions. Refer to
https://kb.acronis.com/content/61832 for details.
To update Acronis Cyber Protect Home Office
When an update for Acronis Cyber Protect Home Office is available from the Acronis website, you
will be notified. Then you can download it. Then, install it over your version of Acronis Cyber Protect
Home Office. All your backups and settings will be kept.
To turn on an automatic check, in the Acronis Cyber Protect Home Office menu, click Preferences,
and then select the Automatically check for updates at startup check box (selected by default).
9 © Acronis International GmbH, 2003-2021To check for updates manually, in the Acronis Cyber Protect Home Office menu, click Check for
Updates.
To remove Acronis Cyber Protect Home Office
1. Download the Acronis Cyber Protect Home Office setup file from the Acronis website.
2. Double-click the Acronis Cyber Protect Home Office setup file (the file has a .dmg extension).
3. Double-click Uninstall Acronis Cyber Protect Home Office in the Acronis Cyber Protect
Home Office window, and confirm uninstalling.
4. When prompted, provide administrator credentials.
1.4 Activating Acronis Cyber Protect Home Office
To use Acronis Cyber Protect Home Office, you need to activate it via the internet. Without activation
the fully functional product works for 30 days. If you do not activate it during that period, all the
program functions become unavailable except the recovery.
You can activate Acronis Cyber Protect Home Office either on your computer or from another
computer, if your computer is not connected to the internet.
Activation on a computer connected to the internet
If your computer is connected to the internet, the product will be activated automatically.
If the computer where you install Acronis Cyber Protect Home Office does not have internet
connection or if the program cannot connect to Acronis Activation Server, click Account on the
sidebar, and then select one of the following actions:
l Try again - Select this option to try to connect to the Acronis Activation Server again.
l Activate offline - You can activate the program manually from another computer that is
connected to the internet (see below).
Activation from another computer
If your computer is not connected to the internet, you may activate Acronis Cyber Protect Home
Office by using another computer which has connection to the internet.
To activate the product from another computer
1. On your computer, install and start Acronis Cyber Protect Home Office.
2. On the sidebar, click Account, and then click Activate offline.
3. In the Acronis Cyber Protect Home Officeactivation window, perform the following simple steps:
a. Save your installation code to a file by clicking the Save to file button, and specify a
removable media as the file location (for example, a USB flash drive). You may also simply
write down this code on a piece of paper.
b. On another computer which has an internet connection, go to
https://www.acronis.com/activation/. The instructions on the screen will help you to get your
activation code by using the installation code. Save the obtained activation code to a file on a
removable media, or write it down on paper.
10 © Acronis International GmbH, 2003-2021c. On your computer, click the Load from file button and specify a path to the file with the
activation code; or, simply type it into the box from the piece of paper.
4. Click Activate.
Additionally, watch the English-language video instructions at https://goo.gl/DHd1h5.
1.4.1 Too many activations
Possible reasons for the "Too many activations" issue:
l You exceed the maximum number of computers with installed Acronis Cyber Protect
Home Office.
For example, you have one license or a serial number for one computer and you install Acronis
Cyber Protect Home Office on a second computer.
Solutions:
o Enter a new serial number. If you do not have one, you can buy it in the Acronis built-in store
or at the Acronis website.
o Move the license from another computer on which the product is already activated to your
new computer. To do this, select the computer from which you want to move the license. Note
that Acronis Cyber Protect Home Office will be deactivated on that computer.
l You reinstall macOS or change hardware in your computer.
For example, you might upgrade the motherboard or processor in your computer. Activation will
be lost, because Acronis Cyber Protect Home Office sees your altered computer as a new one.
Solution:
To reactivate Acronis Cyber Protect Home Office on your computer, choose the same computer
identified by its old name from the list.
1.4.2 Managing your subscription licenses manually
If you use the subscription-based version of Acronis Cyber Protect Home Office, you can manage
the licenses manually at the Acronis website. You can do the following:
l Move licenses between your computers
l Transfer licenses between your accounts
l Remove a license from a computer
l Resolve product activation conflicts, including the "Too many activations" issue
l Buy new licenses
To manage licenses
1. Go to https://account.acronis.com/, and then sign in with your Acronis account.
2. In the Products section, find Acronis Cyber Protect Home Office, and then click Manage.
11 © Acronis International GmbH, 2003-20211.5 Trial version information
If you want first to try and evaluate Acronis Cyber Protect Home Office, you can install the free, 30-
day trial version of the product. After the trial period, the program functionality is blocked and you
will need to upgrade to the full version if you wish to continue using Acronis Cyber Protect Home
Office. Note that Disk cloning is disabled in the trial version.
After the trial period expires, your local and network backups are not deleted and can be used for
recovery in the full version of Acronis Cyber Protect Home Office.
You have 1000 GB of storage space on the cloud during the trial period. You can use this space to
store your online backups. After the trial period is over, Acronis Cloud works in recovery-only mode
for 30 days. After this period, you won't be able to use the Acronis Cloud service and all your data
will be deleted.
To install the trial version
To start using the trial version, install the product, and then click Start Trial in the Activation
window. Refer to Install, update or remove Acronis Cyber Protect Home Office for details.
To upgrade to the full version of the product
1. Purchase the full version at the Acronis website: https://go.acronis.com/mac/getfullversion.
2. Open Acronis Cyber Protect Home Office.
3. On the Acronis Cyber Protect Home Office menu bar, click Enter Serial Number.
4. Insert the full serial number in the appropriate box, and then click Activate.
1.6 Acronis Customer Experience Program
Acronis Customer Experience Program (CEP) is a new way to allow Acronis customers to contribute
to the features, design and development of Acronis products. This program enables our customers
to provide us with various information, including information about the hardware configuration of
your host computer and/or virtual machines, the features you use most (and least), and the nature
of the problems you face. Based on this information, we will be able to improve the Acronis
products and the features you use most often.
To join or leave Acronis Customer Experience Program
1. In the Acronis Cyber Protect Home Office menu, click Preferences.
2. To leave the program, clear the Participate in the Acronis Customer Experience Program
check box.
If you choose to participate, the technical information will be automatically collected every week. We
will not collect any personal data, like your name, address, phone number, or keyboard input.
Participation in the CEP is voluntary, but the end results are intended to provide software
improvements and enhanced functionality to better meet the needs of our customers.
12 © Acronis International GmbH, 2003-20211.7 Sending feedback to Acronis
We frequently improve our products and services by making them more functional, reliable, and
fast. Via the feedback form, you can point out inconveniences and defects that we should resolve to
make Acronis Cyber Protect Home Office even better. Please spend a couple of minutes to tell us
what you think about our product, suggest a new feature, or report a problem. We do read and
analyze all feedback.
Note
We do not reply to all feedback messages. If you need assistance with Acronis Cyber Protect Home
Office, contact Technical Support.
To send feedback to Acronis
1. In the Acronis Cyber Protect Home Office menu, click Send feedback. The feedback form opens.
2. Choose a feedback reason from the list.
3. Type your message.
4. Provide your name and email.
5. [Optional step] By default, Acronis Cyber Protect Home Office attaches a screenshot of the
console window. You can delete it if you think it will not help us investigate your issue or
understand your idea.
6. [Optional step] You can also attach a file and Acronis system report.
An Acronis system report contains various technical information, including information about
your hardware configuration, macOS version, system log, event log of Acronis Cyber Protect
Home Office, and your backup settings.
13 © Acronis International GmbH, 2003-2021Note
An Acronis system report does not contain any personal data, like your name, address, phone
number, or keyboard input.
We recommend that you attach the system report when you faced a serious error, for example,
when Acronis Cyber Protect Home Office stopped responding.
7. Click Send.
1.8 Application preferences
The Preferences window contains general settings of Acronis Cyber Protect Home Office. To open it:
1. Open Acronis Cyber Protect Home Office.
2. In the Acronis Cyber Protect Home Office menu, click Preferences.
The following settings are available on the General tab:
l Back up when your Mac is in Power Nap
The backup may be executed when your Mac is sleeping. Refer to Scheduling for details.
l Automatically check for updates at startup
Refer to Install, update, or remove Acronis Cyber Protect Home Office for details.
l Participate in the Acronis Customer Experience Program
Refer to Acronis Customer Experience Program for details.
l Show notifications in Notification Center
Refer to Notifications for details.
l Show personalized offers
Select this check box to receive personalized offers about products and features.
The following settings are available on the Battery Saver tab:
l Do not back up when working on battery power
Refer to Laptop power settings for details.
The following settings are available on the Wi-Fi Networks tab:
l Back up using only selected Wi-Fi networks
Refer to Wi-Fi networks for backup to Acronis Cloud for details.
1.9 Keyboard shortcuts
In Acronis Cyber Protect Home Office, you can use the keyboard shortcuts to navigate the user
interface in a more comfortable and fast way. To apply a shortcut, press two or more keys of a key
combination simultaneously. Some of the Acronis Cyber Protect Home Office shortcuts are specified
in the application menu. In menus, some key names are replaced with the following icons:
14 © Acronis International GmbH, 2003-2021Key name Icon
Command
Option
Shift
Keyboard shortcuts in Acronis Cyber Protect Home Office:
Shortcut Description
Command + U Check for the product updates
Shift + Command + E Enter serial number
Command + , Open the application preferences window
Shift + Command + L Sign in to your account
Shift + Command + O Sign out from your account
Command + N Create new backup
Command + 1 Open the Backup section
Command + 2 Open the Protection section
Command + 3 Open the Disk Cloning section
Command + 4 Open the Archive section
Command + 5 Open the Account section
Backup section
Command + S Open the backup source dialog
Command + D Open the backup destination dialog
Command + Shift + S Open the backup settings dialog
Disk Cloning section
Command + S Open the cloning source dialog
Command + D Open the cloning destination dialog
Archive section
Command + O Open the file selection dialog to add files to an archive
Command + D Open the archive destination dialog
Command + I Open the archiving tutorial window
Command + Shift + S Open the archiving settings dialog
15 © Acronis International GmbH, 2003-20211.10 Integration with Touch Bar
Starting from models of 2016, on 15-inch MacBook Pro and 13-inch MacBook Pro with four
Thunderbolt 3 ports, there is a special interaction area, called Touch Bar, on the upper part of the
keyboard. Touch Bar displays the most appropriate set of controls depending on the currently
active window or the task that you are working on at this or that moment. This technology simplifies
your interaction with user interface and allows you to perform a wide range of operations, for
example, click buttons, switch between websites, use search, change text formatting, and use
standard Mac system controls. See more information about Touch Bar at the Apple website:
https://support.apple.com/en-us/HT207055.
Acronis Cyber Protect Home Office supports the functionality of Touch Bar. You can use it to switch
between different application sections, configure backups, recover data, and other operations. For
example when you select a backup from the list, the Touch Bar looks like this:
The Esc button and the icons to the right are Mac's system controls. The left part contains icons for
navigating between the sections of Acronis Cyber Protect Home Office:
Icon Description
Backup
Disk Cloning
Archive
Protection
Account
The controls that refer to the current window are located in the central part. In this example you can
change the backup source, destination, settings ( ), and start the backup.
You can also create a new backup or archive by using the Touch Bar icons:
Icon Description
Create a new backup
Create a new archive or add files to an existing one
1.11 Technical Support
If you need assistance with your Acronis product, please go to https://www.acronis.com/support/.
16 © Acronis International GmbH, 2003-2021You can download the latest updates for all your registered Acronis software products from our website at any time after logging into your Account (https://account.acronis.com/) and registering the product. See Registering Acronis Products at the Website (https://kb.acronis.com/content/4834) and Acronis Website User Guide (https://kb.acronis.com/content/8128). 17 © Acronis International GmbH, 2003-2021
2 Backup

2.1 Basic concepts
Backup and recovery

Backup refers to making copies of data so that they can be used to recover the original data after a
data loss event.

Backups are useful primarily for two purposes:

l    To recover an operating system when it is corrupted or cannot start. This process is called
     disaster recovery. For information about protecting your Mac from a disaster, refer to Backing up
     to local or network storage, Backing up to Acronis Cloud.
l    To recover specific files and folders after they have been accidentally deleted or corrupted.

Recovery methods:

l    Full recovery can be performed to the original location or to a new one.
     When the original location is selected, the data in the location is completely overwritten with the
     data from the backup. In case of a new location, the data is just copied to the new location from
     the backup.
l    Incremental recovery is performed only to the original location and only from a cloud backup.
     Before the recovery starts, the files in the original location are compared with the files in the
     backup by file attributes, such as file size and date of last modification. Those files that do not
     match are marked for recovery, the remaining files will be skipped during recovery. In that way,
     as opposed to the full recovery, Acronis Cyber Protect Home Office recovers only changed files.
     This method significantly reduces the recovery time and saves Internet traffic while recovering
     from Acronis Cloud.

Backup versions

A backup version is created during a backup operation. Each version represents a point in time to
which the system or data can be restored. The first backup version contains all the data selected for
backup. The second and subsequent versions contain only data changes that occurred since the
previous backup version. All the backup versions are stored in a single backup file.

Backup file format

When you back up your Mac to a local storage or a network place, Acronis Cyber Protect Home
Office saves backup data in the proprietary .tib or .tibx format, by using compression. The data from
.tib or .tibx file backups can be recovered only through Acronis Cyber Protect Home Office.

When you back up your Mac to Acronis Cloud, Acronis Cyber Protect Home Office saves your data
"as is". You can recover the data in the product or via the Acronis Cloud web application on any Mac
computer that has an Internet connection.

Schedule

18                                                              © Acronis International GmbH, 2003-2021
For your backups to be really helpful, they must be as up-to-date as possible. Schedule your
backups to run on a regular basis.
Backup retention rules
Every time you run a backup operation, manually or on a schedule, Acronis Cyber Protect Home
Office creates a new backup version in the backup location. To delete obsolete backup versions
automatically, you can set the backup retention rules. Refer to Cleaning up backups, backup
versions, and replicas for details.
2.2 Backing up to local or network storage
1. Open Acronis Cyber Protect Home Office.
2. Perform one of the following:
l If this is your first backup, skip this step.
l If you already have a backup and you want to create a new one, click Add Backup at the
bottom of the backup list.
Note
To delete a backup, right-click it, and then click Delete. The backup will be removed from the
list and the backup files and the files of the backup replica will be permanently deleted from
the backup storage. These files cannot be ever recovered.
3. Click the backup source icon, and then select what you want to back up:
l Entire Mac
When you select this option, Acronis Cyber Protect Home Office backs up all your internal
hard drives in disk mode. The backup contains the operating system, installed programs,
system settings, and all your personal data including your photos, music, and documents.
l Disks
l Files and folders
l Mobile device
Refer to Backing up mobile devices for details.
l Files to notarize
Refer to Notarized backup for details.
19 © Acronis International GmbH, 2003-2021l NAS (if any connected)
4. Click the backup destination icon, select where you want to save the backup file to, and then click
OK. If the location is not listed, click Browse, and then select a location.
If you have an NAS device, it will be automatically detected and listed along with other locations.
5. [Optional step] Configure additional settings. You can:
l Exclude files and folders manually at Settings —> Exclusions. Refer to Excluding items from
backups for details.
l Configure the backup schedule at Settings —> Schedule. Refer to Scheduling for details.
l Set the backup retention rules at Settings —> Cleanup. Refer to Cleaning up backups, backup
versions, and replicas for details.
l Protect your backup with a password and encryption at Settings —> Encryption. Refer to
Backup encryption for details.
6. After you have configured all settings and you are ready to start a backup, click Back Up.
To recover your Mac from a Acronis Cyber Protect Home Office backup, you must have an Acronis
bootable media. If you do not have one, please create it. Refer to Creating Acronis bootable media
for details.
2.3 What is Acronis Cloud?
Acronis Cloud is a secure remote storage which you can use to store your backups and archives.
Because files are stored in a remote storage, you can recover the entire contents of your Mac if a
disaster or data corruption event occurs.
If you use Acronis Cyber Protect Home Office for Windows, you can also store file backups, disk
images, and versions of your synchronized files in Acronis Cloud.
To start using Acronis Cloud
20 © Acronis International GmbH, 2003-20211. Open Acronis Cyber Protect Home Office.
2. Create Acronis account, if you do not have one.
3. [optional] If Acronis Cloud doesn't not make part of your subscription, activate it as follows: on
the left sidebar, click Account. Then, click Activate Acronis Cloud. In Acronis Cloud Storage,
click Try now or Buy.
The Acronis Cloud website allows you to recover and manage the data that you store on Acronis
Cloud. To access the website, go to https://www.acronis.com/my/online-backup/webrestore/, and
log in to your account. .
2.3.1 Creating an Acronis account
To use the Acronis Cloud service, you need an Acronis account.
To create an Acronis account
1. Open Acronis Cyber Protect Home Office.
2. Select Acronis Cloud as a destination for your backup. The login window will open.
3. Click Create Account.
4. Fill in the registration form. Provide the required data, accept the Terms of Use, and, optionally,
subscribe to receive news and promotional offers occasionally.
Note
To keep your personal data secure, choose a strong password for your account, guard it from
falling into the wrong hands, and change it from time to time.
5. Click Create Account.
6. A message will be sent to the email address that you specified. Open this message and confirm
that you wish to create an account.
2.3.2 Subscription to Acronis Cloud
The Acronis Cyber Protect Home Office features that use Acronis Cloud (such as online backup,
cloud archiving, and data synchronization) require a subscription to Acronis Cloud Storage. To
subscribe, open Acronis Cyber Protect Home Office, click Account on the left sidebar, and then
choose the required subscription.
Note
Please note that Acronis Cloud is subject to our Fair Usage Policy. See more details at
https://kb.acronis.com/ati/fairusage.
Trial version
When you activate the trial version of the product, a 1000 GB storage and free subscription to
Acronis Cloud for the Acronis Cyber Protect Home Office trial period is assigned to your account
automatically. After the trial subscription expires, Acronis Cloud works in recovery-only mode for 30
21 © Acronis International GmbH, 2003-2021days. After this period, you won't be able to use the Acronis Cloud service and all your data on the
Cloud will be deleted.
To purchase the full Acronis Cloud Storage subscription
1. Open Acronis Cyber Protect Home Office.
2. On the left sidebar, click Account. Then, click Buy Now.
3. Select the required subscription, and click Buy Now.
4. Follow the on-screen instructions to proceed with the purchase.
You can also buy the full subscription at the Acronis website.
2.4 Backing up to Acronis Cloud
1. Open Acronis Cyber Protect Home Office.
2. Perform one of the following:
l If this is your first backup, skip this step.
l If you already have a backup and you want to create a new one, click the plus sign at the
bottom of the backup list.
Note
To delete a backup, right-click it, and then click Delete. The backup will be removed from the
list and the backup files will be permanently deleted from the backup storage. These files
cannot be ever recovered.
3. Click the backup source icon, and then select what you want to back up:
l Entire Mac
When you select this option, Acronis Cyber Protect Home Office backs up all your internal
hard drives in disk mode. The backup contains the operating system, installed programs,
system settings, and all your personal data including your photos, music, and documents.
l Disks
l Files and folders
l Mobile device
Refer to Backing up mobile devices for details.
l Cloud service
Used to back up Office 365 data.
l Files to notarize
Refer to Notarized backup for details.
22 © Acronis International GmbH, 2003-2021l NAS device (if any connected)
4. Click the backup destination icon, select Acronis Cloud, and then click OK.
If you are not signed in yet, enter the email address and password of your Acronis account, and
then click Sign In.
If you do not have an Acronis account, click Create Account, type your email address, password,
and then click the Create Account button. Refer to Creating an Acronis account for details.
5. [Optional step] Configure additional settings. You can:
l Exclude data protected with third-party services, if you use any. Click Optimize backup and
specify the data to exclude. Refer to Excluding items from backups for details.
l Exclude files and folders manually at Settings —> Exclusions. Refer to Excluding items from
backups for details.
l Configure the backup schedule at Settings —> Schedule. Refer to Scheduling for details.
l Set the backup retention rules at Settings —> Cleanup. Refer to Cleaning up backups, backup
versions, and replicas for details.
l Protect your backup with a password and encryption at Settings —> Encryption. Refer to
Backup encryption for details.
l Select a preferred data center and configure the upload speed at Settings —> Network.
Refer to Network settings for backup for details.
l Configure the backups attempts at Settings —> Error Handling.
6. After you have configured all settings and you are ready to start a backup, click Back Up.
Note
The first online backup may take a considerable amount of time to complete. Future backup
processes will likely be much faster, because only changes to files will be transferred.
23 © Acronis International GmbH, 2003-2021To recover your Mac from a Acronis Cyber Protect Home Office backup, you must have an Acronis
bootable media. If you do not have one, please create it. Refer to Creating Acronis bootable media
for details.
2.5 Replicating local backups to Acronis Cloud
2.5.1 Why replicate?
Even though backing up your data provides protection, we recommend that you also replicate all
local backups to Acronis Cloud, to protect from incidental corruption of your computer. Of course,
you can create two backup plans, one to backup to your local computer and another one to Acronis
Cloud. But automatic replication saves time when setting up the backup plans and creating a replica
is faster than creating another backup. A replica is a copy of your backup and it can be used as a
safeguard and accessed from anywhere.
2.5.2 Replication activation
Replication is not activated by default. You can activate it for any backup of a disk, partition or entire
computer that uses the local destination (to an external or internal disk) that you configured in
Acronis True Image (2020 or 2021) or Acronis Cyber Protect Home Office. You can activate the
replication in a special tab of a backup plan.
To activate the replication of a backup to Acronis Cloud
1. From the backup list, select the backup that you want to replicate, and then open the Replica
tab.
2. Click Replicate. Now, replication is activated and will start once the normal backup is created.
You are free to close Acronis Cyber Protect Home Office. Both the backup and replication
processes will continue in background mode.
3. [optional step] Open the Backup tab, click Settings, and then click Replication to configure the
cleanup settings for Acronis Cloud to optimize usage of its space.
2.6 Notarized backup
By using Blockchain technology, Acronis Cyber Protect Home Office can protect your files from
unauthorized modification. This gives you a guarantee that you can recover your data from the
same file that was backed up. We recommend that you use this type of backup to protect your legal
document files or any other files that require proved authenticity. Refer to Using Blockchain
technology for details.
To create a notarized backup of your files and folders
1. Open Acronis Cyber Protect Home Office.
2. Perform one of the following:
24 © Acronis International GmbH, 2003-2021l If this is your first backup, skip this step.
l If you already have a backup and you want to create a new one, click Add Backup at the
bottom of the backup list.
Note
To delete a backup, right-click it, and then click Delete. The backup will be removed from the
list, and the backup files will be deleted from the backup storage.
3. Click the backup source icon, click Files to notarize, and then select the files and folders that
you want to back up.
4. Click the backup destination icon, select where you want to save the backup file to, and then click
OK. If the location is not listed, click Browse, and then select a location.
If you have an NAS device, it will be automatically detected and listed along with other locations.
5. [Optional step] Configure additional settings. You can:
l Exclude files and folders manually at Settings —> Exclusions. Refer to Excluding items from
backups for details.
To exclude files with a digital signature from the backup, select the Do not notarize digitally
signed files check box. Refer to Excluding items from backups for details.
l Configure the backup schedule at Settings —> Schedule. Refer to Scheduling for details.
l Protect your backup with a password and encryption at Settings —> Encryption. Refer to
Backup encryption for details.
l Select a preferred data center and configure the upload speed at Settings —> Network.
Refer to Network settings for backup for details.
6. After you have configured all settings and you are ready to start a backup, click Back Up.
25 © Acronis International GmbH, 2003-20212.6.1 Using Blockchain technology Acronis Cyber Protect Home Office uses the Blockchain technology to provide top-level security for your backed-up files. This technology gives you the guarantee that your files have not been modified by fraudulent software, and when it is time to recover, you recover data from exactly the same file that was backed up. What is Blockchain? Blockchain is a database that contains information about transactions and their sequence. In general, a transaction represents an event, such as a financial operation or an operation with different kinds of assets. The transactions are united in blocks, which are written to the database one by one and form a block chain. Every transaction and every block has its own unique identification number. What is very important is that every block stores information about all previous blocks of the chain. Once written to the database, the information about a transaction cannot be changed in any way or by anyone, and the transaction sequence cannot be modified either. Any attempt to change any piece of information in the database can be easily identified by any user of the database, because there would be no information about the false transaction or false block in all subsequent blocks. This technology guarantees that data stored in the database is valid, belongs to a specific person, and has not been modified by anyone. See more information about Blockchain at https://en.wikipedia.org/wiki/Blockchain_(database). How Acronis Cyber Protect Home Office uses the Blockchain technology To protect your files from unauthorized modification, Acronis Cyber Protect Home Office uses the Acronis Notary technology. This is a universal solution for timestamping and fingerprinting any data objects and streams. Since it is impractical to store large amount of data in a Blockchain database, Acronis Cyber Protect Home Office sends only file hash codes to the Acronis Notary service. A hash code is a unique number of fixed size that is produced by a hash function. The code mathematically defines an arbitrary set of data, for example, a backup file. Any change of the backup file leads to a change of its hash code. Therefore, to check if the file was changed, you only need to compare the hash codes generated in the initial and current states of the file. If the codes match, this is a guarantee that the file has not been modified by anyone. When Acronis Notary receives hash codes of your files, it calculates a new single hash code and sends it to the Ethereum Blockchain-based database. See more information about Ethereum at https://www.ethereum.org/. Once the hash code is in the database, the files that were used to calculate this hash code are notarized by Acronis Notary. You can easily verify the file authenticity at any time by using the procedure described in Verifying file authenticity. Every notarized file has a notarization certificate, which is documentary proof that the file is protected with the Blockchain technology. A certificate contains general information about the file and technical details that allow you to manually verify the file authenticity. Refer to Manual verification of a file's authenticity for details. 26 © Acronis International GmbH, 2003-2021
2.6.2 Verifying file authenticity
By using Blockchain technology, Acronis Cyber Protect Home Office can protect your backed-up files
from unauthorized modification. This gives you a guarantee that you can recover data from exactly
the same file that was backed up.

To verify a file's authenticity in Acronis Cyber Protect Home Office

1. Open Acronis Cyber Protect Home Office.
2. On the sidebar, click Backup.
3. From the backup list, select the notarized backup which contains the file that you want to verify.
4. On the right panel, open the Recovery tab.
5. Browse to the required file, click the arrow icon, and then click one of the following:
     l   View certificate—The certificate containing the detailed information about the file security
         will be opened in the web browser.
     l   Verify—Acronis Cyber Protect Home Office will check the file authenticity.

To verify a file's authenticity in File verification tool

1. Open the File verification tool with one of the following methods:
     l   In a web browser, open https://notary.acronis.com/verify.
     l   On the sidebar of Acronis Cyber Protect Home Office, click Backup, select a notarized backup,
         and then click Open File verification tool on the right panel.
2. In Finder, browse to the file that you want to verify, and then drag it to the web browser window.

To verify a file's authenticity in Acronis Cloud

1. Go to https://www.acronis.com/my/online-backup/webrestore/, and then log in to your Acronis
     account.
2. On the sidebar, click Backups.
3. From the backup list, select the notarized backup which contains the file that you want to verify.
4. Browse to the required file and select it with a check mark. Then, click Verify on the right
     sidebar.

2.6.3 Manual verification of a file's authenticity
The easiest way to verify a file's authenticity is to use the Verify command in Acronis Cyber Protect
Home Office or in the Acronis Cloud web application. Refer to Verifying file authenticity for details.
In addition to this easy method, you can perform the verification procedure yourself, step by step.

To verify a file's authenticity manually

Step 1. Calculate MD5 hash of the file

1. Open Terminal.
2. For example, to calculate the md5 hash for the picture.png file, type:

27                                                           © Acronis International GmbH, 2003-2021
$ md5 'picture.png'
Example of an md5 hash: eea16ade1edf2750a46bb6bffb2e45a2
3. Check that the calculated md5 hash is equal to an eTag in the DATA field in your notarization
certificate. Refer to Verifying file authenticity for details about obtaining a file certificate.
Step 2. Check that a ROOT is stored in the blockchain
1. Open a blockchain explorer, for example https://etherscan.io/.
2. Enter the TRANSACTION ID from the certificate into the search field.
3. Check that the Data field in the Event Logs tab is equal to the ROOT value in your certificate.
Step 3. Check that the hash is included in the tree
1. Download the command line utility from the GitHub repository:
https://github.com/acronis/notary-verifyhash/releases.
2. Follow the instructions at: https://github.com/acronis/notary-verifyhash.
2.7 Backing up mobile devices
If you have an iOS or Android smartphone, you can use Acronis Cyber Protect Home Office to
protect your mobile data such as photos, video files, contacts, and calendars. Refer to Acronis
Mobile documentation for details.
To back up mobile data to local storage on your computer
1. Make sure that:
l Acronis True Image (2017 or later) or Acronis Cyber Protect Home Office, is installed on your
computer.
l The Acronis Mobile app is installed on your mobile device.
l Your mobile device and your computer are connected to the same Wi-Fi network.
2. On your computer:
a. Start Acronis True Image (2017 or later) or Acronis Cyber Protect Home Office.
b. On the sidebar, click Backup, and then click Add Backup.
c. Click the Backup source area, and then select Mobile device.
A QR code will be displayed. Please do not close this window.
3. On your mobile device:
a. Start Acronis Mobile.
b. Tap a plus icon to create a backup. Note that this step does not occur the first time you back
up your mobile device.
c. Select computer as a backup destination.
d. Tap Scan QR code, point your camera at the QR code on the computer screen, and then wait
until the mobile device is connected to the computer.
e. Select the data categories that you want to back up, or tap Confirm if you want to back up all
of them.
28 © Acronis International GmbH, 2003-2021f. Allow Acronis Mobile to access to your personal data.
g. [optional step] Enter a password to encrypt the backup and protect it. Otherwise, tap Skip
Encryption.
h. Tap Start Backup.
When the backup is started, you can track the progress in any application - on the computer or
mobile device, but the errors and warning messages are displayed in the mobile app only.
You can close Acronis True Image or Acronis Cyber Protect Home Office on your computer and the
Acronis Mobile app. The backup will continue in the background mode.
When the backup is complete, your data is uploaded to your computer. If you want data changes
(for example, new photographs) to be backed up automatically, make sure the Continuous backup
setting is turned on. If this setting is turned off, the new data is backed up only when you tap Back
up.
The connection between your computer and mobile device may be lost because of an error. To
restore it, select the mobile backup in the backup list of Acronis Cyber Protect Home Office, click
Reconnect, and then scan the QR code with your mobile device. After that, the backup will continue
normally with the same settings.
2.7.1 Acronis Mobile
Note
Acronis Cloud might be unavailable in your region. For more information, click here:
https://kb.acronis.com/content/4541
Acronis Mobile allows you to back up your data to Acronis Cloud, to local storage on your computer,
and then recover it in case of loss or corruption. Note that backup to the cloud storage requires an
Acronis Cloud subscription.
Which devices does the mobile app support?
You can install Acronis Mobile on any mobile devices that runs one of the following operating
systems:
l iOS 11 and later (iPhone, iPad, iPod)
l Android 6.0 and later (mobile phones only)
Key features
Acronis Mobile allows you to:
l Back up your personal data, including:
o Photos
o Videos
o Contacts
29 © Acronis International GmbH, 2003-2021o Calendars
o Messages (Android only)
o Reminders (iOS only)
l Choose the following locations as a backup destination:
o Acronis Cloud
o Local storage on your PC or Mac
l Encrypt backups with the AES-256 cryptographic algorithm
l Automatically back up new and changed data
l Access cloud backups from all your mobile devices and recover data from these backups
Where can I find these apps?
You can view additional information and download Acronis Mobile from the Apple App Store or
Google Play:
l Acronis Mobile for iOS devices: https://go.acronis.com/atimobile/download/iOS
l Acronis Mobile for Android devices: https://go.acronis.com/atimobile/download/Android
2.7.2 Local destination of mobile backups
When you back up your mobile data to a computer, Acronis Cyber Protect Home Office stores the
backups in the default folder /Library/Application Support/Acronis Mobile Backup Data/acronis-local-
data/. When you change the default folder, the acronis-local-data folder is moved to the location that
you selected. All new mobile data will be backed up to the new location.
Note
All mobile backups are always stored in the same folder and cannot be separated.
To change the local destination for mobile backups
1. In the Backup section, right-click a mobile backup, and then click Move.
2. Click Select location, and then select a new location for the backups. Note, you can select a
location only on your internal hard drives.
To change the new location to the initial one, click Reset to default.
2.8 Backing up Office 365 data
2.8.1 Why back up Office 365 data?
Even though Microsoft Office 365 for Home is a set of cloud services, regular backups provide an
additional layer of protection from user errors and intentional malicious actions. With Acronis Cyber
Protect Home Office, you can protect your Microsoft Outlook mailboxes and Microsoft OneDrive
data by backing up them to secure Acronis Cloud. After uploading to Acronis Cloud, all of the
30 © Acronis International GmbH, 2003-2021content is available from any device, any time. You can recover deleted items from a backup even
after the Office 365 retention period has expired.
2.8.2 Backing up Office 365 data
Data that you can back up in your Outlook mailbox:
l All folders
l E-mail messages
l Attachments
Note
You cannot back up shared or group mailboxes.
Data that you can back up in your OneDrive:
l All files and folders
To back up Office 365 data:
1. Open Online Dashboard by doing one of the following:
l Follow the link: https://cloud.acronis.com.
l On the sidebar of Acronis Cyber Protect Home Office, click Backup, click Add backup, click
the Backup source area, and then select Cloud service.
2. Sign in to your Acronis account.
3. On the sidebar, click Resources, click Add, and then choose Microsoft Office 365 for Home.
4. Log in to your Microsoft account, if prompted.
5. At the Backup source area, select items to backup:
l Entire account
l Outlook
l OneDrive
6. Click Done.
7. You can configure cleanup rules for the backup via the Cleanup pane. You can also encrypt the
backup and protect it with a password. When done, click Apply.
8. To start the backup, click Run now.
2.9 Scheduling
For your backups to be really helpful, they should be as up to date as possible. Schedule your
backups to run on a regular basis. By default, your Mac is backed up daily.
31 © Acronis International GmbH, 2003-2021To schedule the backup
1. Click Settings, choose backup frequency, and then specify the start time.
l Do not schedule
This option turns scheduling off.
l Daily
The backup starts once or twice a day at the specified time or with a time interval that you
select.
l Weekly
The backup starts every week on the selected days and at the specified time.
l Monthly
The backup starts every month on the selected dates and at the specified time.
l When an external device is connected (available for backups to external destination only)
If you schedule a task for performing backup to a USB flash drive or external HDD, the backup
starts every time the same external device is attached. Select the Once a day check box if you
want the backup to be performed only once a day for the device.
l Nonstop (available for file-level cloud backup only)
The initial full backup contains all of the data selected for protection. Acronis Cyber Protect
Home Office then continually monitors the protected files (including open ones). Once a
32 © Acronis International GmbH, 2003-2021modification is detected, the changed data is backed up. The shortest interval between the
incremental backup operations is five minutes. This allows you to recover your data to an
exact point in time.
2. After you have configured all settings, click OK.
If your Mac is switched off or it is in the sleep mode when the scheduled time comes, the backup will
run the next time the Mac starts or when it wakes up. You can use Mac Power Nap to avoid gaps in
backing up your data.
2.9.1 To use Mac Power Nap
l Turn on the Power Nap in your mac Energy Saver > Power Adapter parameters.
l In the Acronis Cyber Protect Home Office menu, click Preferences, click General, and then select
the Back up when your Mac is in Power Nap check box. Click OK.
When this setting in turned on, and your Mac is in the sleep mode when the scheduled time comes,
the backup will run in the next Power Nap. Please be aware that backing up during Power Nap
works only if your computer is connected to the power supply.
2.10 Backup encryption
To protect the backed up data from unauthorized access, you can encrypt the backup with industry-
standard AES (Advanced Encryption Standard) cryptographic algorithm with a 256-bit long key.
Note
You cannot change the backup encryption option for a pre-existing backup.
To encrypt a backup
1. When configuring the first backup process, click the Settings icon, and then click Encryption.
2. Enter the password for the backup into the corresponding field, and then click OK.
We recommend that you use a password longer than seven symbols and containing both letters
(in upper and lower cases preferably) and numbers to make it more difficult to guess.
A password cannot be retrieved. Please memorize the password that you specify for a backup
protection.
2.11 Cleaning up backups, backup versions, and replicas
Every time you run a backup operation, manually or on a schedule, Acronis Cyber Protect Home
Office creates a new backup version in the backup location.
When you want to delete backup versions that you no longer need, use the tools provided in the
application. If you delete backup version files outside Acronis Cyber Protect Home Office, for
example in File Explorer, this will result in errors during operations with the backups.
Versions of the following backups cannot be deleted manually:
33 © Acronis International GmbH, 2003-2021l Backups stored on CD, DVD, BD, or Acronis Secure Zone
l Nonstop backups
l Notarized backups
Nonstop backup retention rules
When you back up files and folders to Acronis Cloud, you can select the nonstop scheduling setting.
Refer to Scheduling for details.
Because Acronis Cyber Protect Home Office permanently monitors the backed-up data and uploads
the changes to Acronis Cloud, the backup could consume storage space quite fast. To reduce the
number of backup versions and optimize the cloud space consumption, Acronis Cyber Protect
Home Office keeps only the following backup versions:
l All versions for the last hour
l The first versions of every hour for the last 24 hours
l The first version of every day for the last week
l The first version of every week for the last month
l The first version of every month
All other versions are automatically deleted. The retention rules are pre-set and cannot be changed.
Replica retention rules
Every time you run a backup operation that has replication turned on, Acronis Cyber Protect Home
Office creates a new backup version locally and a new replica version in the cloud. Sometimes the
number of replica versions is slightly less that the number of the backup versions; that is done to
optimize your Internet usage. Nevertheless, the replicas may take quite a lot of space. To save
space, use the replica retention rules:
1. In the Backup section, click the required backup, and then click Settings in the lower-right
corner.
2. Click Settings, choose Replication.
You can set a limit on the number of replica versions. In addition to the number of replicas, you can
limit their age. Select the Delete versions older than check box, and then specify how long to store
a version. All versions that are older than the specified period will be automatically deleted.
To delete an entire backup and its replica
In the Backup section, right-click the backup with the replica to delete, and then click Delete
backup and replica.
Depending on the backup type, this command completely deletes the backup from its location, or
allows you to choose whether you want to delete the backup completely or delete the backup box
only. When you delete a backup box only, the backup files remain in the location and you will be
able to add the backup to the list later. Note that if you delete a backup completely, the deletion
cannot be undone.
34 © Acronis International GmbH, 2003-2021You can also read