CA ARCserve Backup for Linux - Agent for Oracle Guide r16
←
→
Page content transcription
If your browser does not render page correctly, please read the page content below
CA ARCserve® Backup for Linux

       Agent for Oracle Guide
                r16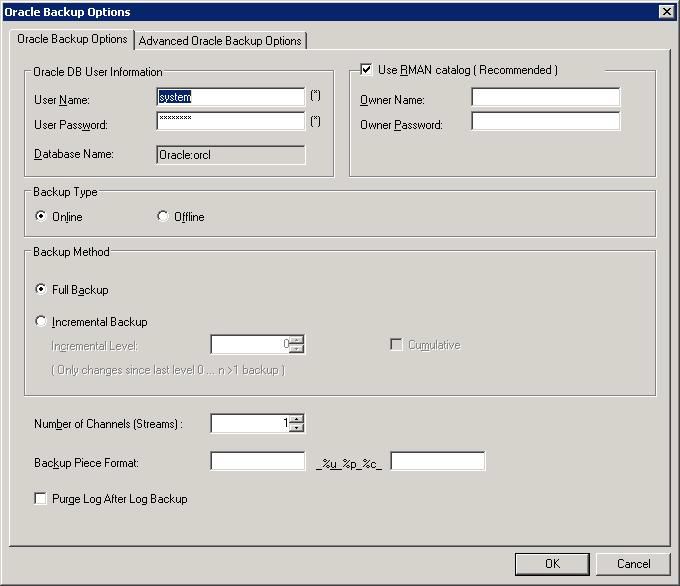
This Documentation, which includes embedded help systems and electronically distributed materials, (hereinafter referred to
as the “Documentation”) is for your informational purposes only and is subject to change or withdrawal by CA at any time.
This Documentation may not be copied, transferred, reproduced, disclosed, modified or duplicated, in whole or in part, without
the prior written consent of CA. This Documentation is confidential and proprietary information of CA and may not be disclosed
by you or used for any purpose other than as may be permitted in (i) a separate agreement between you and CA governing
your use of the CA software to which the Documentation relates; or (ii) a separate confidentiality agreement between you and
CA.
Notwithstanding the foregoing, if you are a licensed user of the software product(s) addressed in the Documentation, you may
print or otherwise make available a reasonable number of copies of the Documentation for internal use by you and your
employees in connection with that software, provided that all CA copyright notices and legends are affixed to each reproduced
copy.
The right to print or otherwise make available copies of the Documentation is limited to the period during which the applicable
license for such software remains in full force and effect. Should the license terminate for any reason, it is your responsibility to
certify in writing to CA that all copies and partial copies of the Documentation have been returned to CA or destroyed.
TO THE EXTENT PERMITTED BY APPLICABLE LAW, CA PROVIDES THIS DOCUMENTATION “AS IS” WITHOUT WARRANTY OF ANY
KIND, INCLUDING WITHOUT LIMITATION, ANY IMPLIED WARRANTIES OF MERCHANTABILITY, FITNESS FOR A PARTICULAR
PURPOSE, OR NONINFRINGEMENT. IN NO EVENT WILL CA BE LIABLE TO YOU OR ANY THIRD PARTY FOR ANY LOSS OR DAMAGE,
DIRECT OR INDIRECT, FROM THE USE OF THIS DOCUMENTATION, INCLUDING WITHOUT LIMITATION, LOST PROFITS, LOST
INVESTMENT, BUSINESS INTERRUPTION, GOODWILL, OR LOST DATA, EVEN IF CA IS EXPRESSLY ADVISED IN ADVANCE OF THE
POSSIBILITY OF SUCH LOSS OR DAMAGE.
The use of any software product referenced in the Documentation is governed by the applicable license agreement and such
license agreement is not modified in any way by the terms of this notice.
The manufacturer of this Documentation is CA.
Provided with “Restricted Rights.” Use, duplication or disclosure by the United States Government is subject to the restrictions
set forth in FAR Sections 12.212, 52.227-14, and 52.227-19(c)(1) - (2) and DFARS Section 252.227-7014(b)(3), as applicable, or
their successors.
Copyright © 2011 CA. All rights reserved. All trademarks, trade names, service marks, and logos referenced herein belong to
their respective companies.
CA Technologies Product References
             This document references the following CA Technologies products:
             ■   BrightStor® Enterprise Backup
             ■   CA Antivirus
             ■   CA ARCserve® Assured Recovery™
             ■   CA ARCserve® Backup Agent for Advantage™ Ingres®
             ■   CA ARCserve® Backup Agent for Novell Open Enterprise Server for Linux
             ■   CA ARCserve® Backup Agent for Open Files on Windows
             ■   CA ARCserve® Backup Client Agent for FreeBSD
             ■   CA ARCserve® Backup Client Agent for Linux
             ■   CA ARCserve® Backup Client Agent for Mainframe Linux
             ■   CA ARCserve® Backup Client Agent for UNIX
             ■   CA ARCserve® Backup Client Agent for Windows
             ■   CA ARCserve® Backup Enterprise Option for AS/400
             ■   CA ARCserve® Backup Enterprise Option for Open VMS
             ■   CA ARCserve® Backup for Linux Enterprise Option for SAP R/3 for Oracle
             ■   CA ARCserve® Backup for Microsoft Windows Essential Business Server
             ■   CA ARCserve® Backup for UNIX Enterprise Option for SAP R/3 for Oracle
             ■   CA ARCserve® Backup for Windows
             ■   CA ARCserve® Backup for Windows Agent for IBM Informix
             ■   CA ARCserve® Backup for Windows Agent for Lotus Domino
             ■   CA ARCserve® Backup for Windows Agent for Microsoft Exchange Server
             ■   CA ARCserve® Backup for Windows Agent for Microsoft SharePoint Server
             ■   CA ARCserve® Backup for Windows Agent for Microsoft SQL Server
             ■   CA ARCserve® Backup for Windows Agent for Oracle
             ■   CA ARCserve® Backup for Windows Agent for Sybase
             ■   CA ARCserve® Backup for Windows Agent for Virtual Machines
             ■   CA ARCserve® Backup for Windows Disaster Recovery Option
             ■   CA ARCserve® Backup for Windows Enterprise Module
■ CA ARCserve® Backup for Windows Enterprise Option for IBM 3494 ■ CA ARCserve® Backup for Windows Enterprise Option for SAP R/3 for Oracle ■ CA ARCserve® Backup for Windows Enterprise Option for StorageTek ACSLS ■ CA ARCserve® Backup for Windows Image Option ■ CA ARCserve® Backup for Windows Microsoft Volume Shadow Copy Service ■ CA ARCserve® Backup for Windows NDMP NAS Option ■ CA ARCserve® Backup for Windows Storage Area Network (SAN) Option ■ CA ARCserve® Backup for Windows Tape Library Option ■ CA ARCserve® Backup Patch Manager ■ CA ARCserve® Backup UNIX and Linux Data Mover ■ CA ARCserve® Central Host-Based VM Backup ■ CA ARCserve® Central Protection Manager ■ CA ARCserve® Central Reporting ■ CA ARCserve® Central Virtual Standby ■ CA ARCserve® D2D ■ CA ARCserve® D2D On Demand ■ CA ARCserve® High Availability ■ CA ARCserve® Replication ■ CA VM:Tape for z/VM ■ CA 1® Tape Management ■ Common Services™ ■ eTrust® Firewall ■ Unicenter® Network and Systems Management ■ Unicenter® Software Delivery ■ Unicenter® VM:Operator®
Contact CA
             Contact CA Support

             For your convenience, CA Technologies provides one site where you can access the
             information that you need for your Home Office, Small Business, and Enterprise CA
             Technologies products. At http://ca.com/support, you can access the following
             resources:
             ■   Online and telephone contact information for technical assistance and customer
                 services
             ■   Information about user communities and forums
             ■   Product and documentation downloads
             ■   CA Support policies and guidelines
             ■   Other helpful resources appropriate for your product

             Providing Feedback About Product Documentation

             If you have comments or questions about CA Technologies product documentation, you
             can send a message to techpubs@ca.com.

             To provide feedback about CA Technologies product documentation, complete our
             short customer survey which is available on the CA Support website at
             http://ca.com/docs.
Documentation Changes
The following documentation updates have been made since the last release of this
documentation:
■ Rebranded to CA Technologies.
■ Updated to include user feedback, enhancements, corrections, and other minor
changes to help improve the usability and understanding of the product or the
documentation itself.Contents
Chapter 1: Introducing the Agent for Oracle 11
Agent Features ........................................................................................................................................................... 11
Agent Functionality .................................................................................................................................................... 12
Database Backups ............................................................................................................................................... 12
Chapter 2: Installing the Agent 13
Installation Prerequisites ........................................................................................................................................... 13
The Agent in a RAC Environment ............................................................................................................................... 13
Install the Agent ......................................................................................................................................................... 14
Perform Post-Installation Tasks ................................................................................................................................. 15
Check ARCHIVELOG Mode .................................................................................................................................. 16
Start ARCHIVELOG Mode .................................................................................................................................... 17
Automatic Archiving ............................................................................................................................................ 17
ARCHIVELOG to NOARCHIVELOG Mode Comparison ......................................................................................... 19
Configure the Agent ............................................................................................................................................ 20
Create an RMAN Catalog..................................................................................................................................... 22
Post-Installation Tasks Required for Recovery Manager ........................................................................................... 24
The SBT 1.1 and SBT 2.0 Interfaces ..................................................................................................................... 24
How the SBT Library Uses the sbt.cfg Parameter File ......................................................................................... 25
How the SBT Inteface Uses libobk Library Files .................................................................................................. 25
Oracle and CA libobk Library Files ....................................................................................................................... 26
Add the Oracle User as a CA ARCserve Backup User Equivalency ...................................................................... 27
Registering the Agent for Oracle ................................................................................................................................ 27
Remove the Agent ...................................................................................................................................................... 28
Chapter 3: Backing Up Data 29
Backup Basics ............................................................................................................................................................. 29
Backup Strategy .................................................................................................................................................. 29
Oracle Server Organization ................................................................................................................................. 30
Online Redo Log Files .......................................................................................................................................... 31
Multiple Databases ............................................................................................................................................. 31
Backups ...................................................................................................................................................................... 32
Recovery Manager (RMAN) ................................................................................................................................ 32
Types of Backups ................................................................................................................................................. 33
Back Up Oracle Database Offline ........................................................................................................................ 33
Back Up Oracle Database Online......................................................................................................................... 37
Contents 7Multistreaming Backups ..................................................................................................................................... 41
Back Up with the Number of Channels (Streams) Option ................................................................................... 41
Back Up Using RMAN Scripts in the Agent .......................................................................................................... 42
Back Up Manually with RMAN ............................................................................................................................ 43
RMAN Command Line Scripts ............................................................................................................................. 43
Backup Limitations ..................................................................................................................................................... 44
Chapter 4: Restoring and Recovering Data 45
Restore and Recovery Basics ...................................................................................................................................... 45
Restore ....................................................................................................................................................................... 45
Restore Types ...................................................................................................................................................... 46
Restore Manager ........................................................................................................................................................ 46
Restore Options .................................................................................................................................................. 48
Restore Views...................................................................................................................................................... 50
Restore Databases and Database Objects .......................................................................................................... 50
Restore Archived Logs and Control Files ............................................................................................................. 52
Restore Parameter File ....................................................................................................................................... 53
Restore Point-in-Time ......................................................................................................................................... 53
Recovery Manager (RMAN) and Restoring a Database to Another Host ............................................................ 54
Database Recovery ..................................................................................................................................................... 56
Restore Manager Recovery ................................................................................................................................. 56
Files the Agent Cannot Recover .......................................................................................................................... 57
Oracle Constraints on Recovery Operations ....................................................................................................... 58
Manual Recovery ................................................................................................................................................ 58
Recover from Offline Full Backups ...................................................................................................................... 60
Restore and Recovery Limitations .............................................................................................................................. 60
Appendix A: Locating Directories and Files 61
Agent Directory Locations .......................................................................................................................................... 61
Agent File Locations ................................................................................................................................................... 61
Agent Files Under Data Directory ....................................................................................................................... 62
Agent Files Under Logs Directory ........................................................................................................................ 62
Appendix B: Troubleshooting 63
Assign Alias Name ...................................................................................................................................................... 63
RMAN script back up for multiple channels fails ....................................................................................................... 63
Tips ............................................................................................................................................................................. 64
Messages .................................................................................................................................................................... 64
RMAN Messages ........................................................................................................................................................ 69
Unable to run ARCHIVELOG Mode ...................................................................................................................... 70
8 Agent for Oracle GuideRMAN Exits With an Error during Backup or Restore ......................................................................................... 70
RMAN Job Exits with Agent Error ........................................................................................................................ 71
Until End of Logs Option Does Not Work ............................................................................................................ 71
Backup or Restore Fails ....................................................................................................................................... 71
Too Many oragentd_ Log Files are Accumulating .................................................................................. 72
Oracle Permission Errors During Restore Operation .......................................................................................... 72
Restore Oracle Data Files in a Different Directory .............................................................................................. 72
Agent Fails with Oracle Password is Missing in the Job Message ....................................................................... 73
Error Messages While Trying to Run Concurrent Backups on the Same Database ............................................ 73
Appendix C: Configuring the agent.cfg and sbt.cfg Files 75
The agent.cfg Configuration File ................................................................................................................................ 75
Enable Debug Option .......................................................................................................................................... 76
Restore Old Backup to an Alternate Location ..................................................................................................... 77
The sbt.cfg Parameter File ......................................................................................................................................... 77
Set the NLS_LANG Parameter .................................................................................................................................... 83
Glossary 85
Index 87
Contents 9Chapter 1: Introducing the Agent for Oracle
This section contains the following topics:
Agent Features (see page 11)
Agent Functionality (see page 12)
Agent Features
The agent offers the following features that help improve backup and restore
performance:
■ Fully Integrated with RMAN--The agent is fully integrated with Recovery Manager
(RMAN), an Oracle utility that lets you back up, restore, and recover databases.
Using the agent user interface, you can access all RMAN options for the backup,
restore, and recovery operations. The agent generates RMAN scripts to perform the
desired operation, and lets you save and identify the RMAN scripts that are
generated. For more information about Recovery Manager, see the Oracle
documentation.
■ Cross Product Interoperability--The agent lets you perform a restore through
RMAN even if you performed a backup using the agent. Alternatively, you can
perform a restore using the agent if you had performed the backup using RMAN.
■ Multistreaming--The agent uses the RMAN parallel input/output capabilities,
namely multistreaming through multiple channels. In addition, the agent derives
other capabilities from RMAN such as load-balancing among channels and node
affinity and channel failover in RAC environments.
■ Staging--The agent lets you perform a staging backup job of multiple Oracle RMAN
database instances in a single job.
■ Media Maximization--The agent uses media maximization to help optimize tape
usage in GFS Rotation jobs and ensure that any wasted space on these tapes will be
minimized.
■ Cross Platform Backups--The agent can back up Oracle databases on Linux
platforms to CA ARCserve Backup servers running on Windows platforms. This
capability provides centralized backups.
Chapter 1: Introducing the Agent for Oracle 11Agent Functionality
Agent Functionality
The agent and Oracle reside on the same computer. When CA ARCserve Backup starts to
back up a database object, it sends a request to the agent. The agent retrieves the
object from Oracle and sends it to CA ARCserve Backup, where the object is backed up
to media. Similarly, the agent transfers the database object when the file is restored
from media.
For more information about backing up databases and database objects, see the
chapter Backing Up Data. For more information about Oracle backup and recovery
procedures, see the Oracle documentation.
Note: In a Real Application Cluster (RAC) environment, a copy of the agent must reside
on at least one node in the environment. In addition, this node must have access to all
archive logs. Otherwise, the backup operation is essentially the same.
Database Backups
You can perform an online database backup using the following method:
■ To perform a database back up, the Agent for Oracle generates an RMAN script
based on the options you select in the agent user interface (that is, the Backup
Manager).
■ The agent then calls RMAN to execute this script.
■ When RMAN starts, it generates other agent jobs to perform the actual backup.
These agent jobs receive data blocks from the RMAN and then sends them to CA
ARCserve Backup for backup to the media drive.
Note: The agent and CA ARCserve Backup can back up a complete database or objects
within the database.
You can also perform an offline backup with the agent using the following procedure:
■ To perform offline database backups, the agent puts the database in a quiescent
state before beginning the backup process.
■ This quiescent state allows the database to remain accessible to RMAN throughout
the backup process, but does not let anyone access the database or run
transactions.
12 Agent for Oracle GuideChapter 2: Installing the Agent
This section contains the following topics:
Installation Prerequisites (see page 13)
The Agent in a RAC Environment (see page 13)
Install the Agent (see page 14)
Perform Post-Installation Tasks (see page 15)
Post-Installation Tasks Required for Recovery Manager (see page 24)
Registering the Agent for Oracle (see page 27)
Remove the Agent (see page 28)
Installation Prerequisites
Before installing the Agent for Oracle, verify that the following applications are installed
and working properly:
■ This release of the CA ARCserve Backup base product
■ Appropriate variety and version of Linux
■ Appropriate version of Oracle Server
Note: For information about the appropriate version of Linux and the appropriate
version of Oracle Server for your environment, see the Readme.
Before you start installing the agent, you must have administrator privileges with root
access to install software on the machines on which you plan to install the agent.
Note: Contact your CA ARCserve Backup administrator to obtain the proper privileges if
you do not have them.
The Agent in a RAC Environment
To configure the agent in a Real Application Cluster (RAC) environment, you must install
and configure the agent on at least one node that is a part of the RAC cluster and that
has access to all archive logs. You can install the agent on more than one node in the
RAC, but each node must also have access to all the archive logs. If you do install the
agent on multiple nodes, note that the backup is executed from the node selected in the
Backup Manager.
Chapter 2: Installing the Agent 13Install the Agent
To enable the Agent for Oracle to access all archive logs for the recovery process similar
to the way Oracle accesses them, you need to follow Oracle’s recommendation for
building a RAC environment. Oracle requires access to all required archive logs,
whatever their origin, in the RAC environment during recovery. To allow the Agent for
Oracle access to all the archived logs, you should do one of the following:
■ Put all required archive logs on a shared disk
■ Put all required archive logs on a mounted NSF disk
■ Use the replication of the archive logs
Install the Agent
The Agent for Oracle is a client program you install on one of the following:
■ The server on which Oracle Server resides
■ At least one node in a Real Application Cluster (RAC) environment that has access to
all archive logs
The Agent for Oracle follows the standard installation procedure for the CA ARCserve
Backup system components, agents, and options. For information about installing CA
ARCserve Backup, see the Implementation Guide.
This section describes the installation prerequisites and considerations for the agent,
and provides detailed instructions for all post installation tasks.
Note: You must install the agent on all Oracle database servers managed by CA
ARCserve Backup.
14 Agent for Oracle GuidePerform Post-Installation Tasks
Perform Post-Installation Tasks
After you have installed the agent, complete the following post-installation tasks:
1. Check whether Oracle Server is operating in ARCHIVELOG mode.
2. Start ARCHIVELOG mode if it is not running.
3. Enable the database for automatic archiving.
Note: For an Oracle 10g and 11g database, after you start archivelog mode, Oracle
enables automatic archiving for you. For all other databases, you must follow all the
steps in the Automatic Archiving section to enable automatic archiving.
4. Configure the agent by running the orasetup program.
5. Although optional, we strongly recommend that you create an RMAN catalog. We
also recommend that you create this catalog in a database other than the one
RMAN manages.
Important! You must perform these post-installation tasks on each machine on which
you have installed the agent, including when the agent is installed on a RAC node.
More information:
Enable Automatic Archiving for Oracle Installation Using PFILE (see page 18)
Configure the Agent (see page 20)
Create an RMAN Catalog (see page 22)
Chapter 2: Installing the Agent 15Perform Post-Installation Tasks
Check ARCHIVELOG Mode
You must enable the ARCHIVELOG mode to archive the redo logs.Use the following
procedure to check if the ARCHIVELOG mode is enabled.
To check if the ARCHIVELOG mode is enabled
1. Log into Oracle server as an Oracle user with SYSDBA equivalent privileges.
2. Enter the following command at the SQL*Plus prompt:
ARCHIVE LOG LIST;
This command displays Oracle's archive log settings for this instance. For the agent
to function properly the following should be set:
Database log mode: Archive Mode
Automatic archival: Enabled
16 Agent for Oracle GuidePerform Post-Installation Tasks
Start ARCHIVELOG Mode
You must start the ARCHIVELOG MODE to backup the database after installing the
agent.
To start ARCHIVELOG mode
1. Shut down Oracle Server.
2. Execute the following statements in Oracle:
At the SQL*Plus prompt in Oracle:
CONNECT SYS/SYS_PASSWORD AS SYSDBA
STARTUP MOUNT EXCLUSIVE
ALTER DATABASE ARCHIVELOG;
ALTER DATABASE OPEN;
ARCHIVE LOG START;
If you are not using a flash recovery area with your Oracle 10g or Oracle 11g server, you
must include the following entries in either the PFILE or the SPFILE:
LOG_ARCHIVE_DEST_1="/opt/Oracle/oradata/ORCL/archive"
LOG_ARCHIVE_FORMAT="ARC%S_%R.%T"
Note: With Oracle 10g or Oracle 11g, the LOG_ARCHIVE_START and
LOG_ARCHIVE_DEST entries are considered obsolete and should not be made, in either
the PFILE or the SPFILE.
For more information about why to start the Archive Log Mode, see the Oracle
documentation.
Automatic Archiving
To back up tablespaces from an online or offline database, you must configure the
database for automatic archiving.
Note: For an Oracle 10g and 11g database, Oracle enables automatic archiving after you
start archivelog mode. For all other databases, you must follow all the appropriate steps
in this section to enable automatic archiving.
More information:
Perform a Backup in Offline Mode (see page 34)
Perform a Backup in Online Mode (see page 38)
Chapter 2: Installing the Agent 17Perform Post-Installation Tasks
Enable Automatic Archiving for Oracle Installation Using PFILE
To configure the database for automatic archiving if your Oracle installation is
configured to use PFILE, add the following log parameter lines to the INIT(SID).ORA file
in your $ORACLE_HOME/dbs directory:
LOG_ARCHIVE_START=TRUE
LOG_ARCHIVE_DEST=
LOG_ARCHIVE_FORMAT=%t_%s.dbf
Some of the log parameters include the following:
■ LOG_ARCHIVE_START--Enables automatic archiving.
■ LOG_ARCHIVE_DEST--Specifies the path to the archived redo log files. The Agent
for Oracle queries Oracle Server parameters for the archive log destination in the
following order: LOG_ARCHIV_DEST, LOG_ARCHIVE_DEST_1 and so on through
LOG_ARCHIVE_DEST_10. The agent backs up the archive logs from the first local
destination it finds.
■ LOG_ARCHIVE_FORMAT--Specifies the filename format for the archived redo log
files where %S specifies the log sequence number and %T specifies the thread
number. For example, “ARC%S.%T” is acceptable.
Important! Use a separator between numerical values. For example, %S.%T. If you
omit the separator, archive log file names cannot be parsed because there is no
way to determine which part is %S and which part is %T. In addition, this could
inadvertently create multiple archive logs with the same name.
18 Agent for Oracle GuidePerform Post-Installation Tasks
Enable Automatic Archiving for Oracle Installation Using SPFILE
You can enable automatic archiving for the Oracle installation using SPFILE.
To enable automatic archiving for Oracle installation using SPFILE
1. Verify the value of the log parameters by entering the following command at the
SQL*Plus prompt:
show parameter log
2. If the parameters do not have the correct values, change them by entering the
following commands at the SQL*Plus prompt after you shut down the server:
CONNECT SYS/SYS_PASSWORD AS SYSDBA
STARTUP MOUNT EXCLUSIVE
ALTER SYSTEM SET LOG_ARCHIVE_START = TRUE SCOPE = SPFILE;
ALTER SYSTEM SET LOG_ARCHIVE_DEST="/opt/Oracle/oradata/ORCL/archive"
SCOPE = SPFILE;
ALTER SYSTEM SET LOG_ARCHIVE_FORMAT="ARC%S.%T" SCOPE = SPFILE;
Note: The actual value of LOG_ARCHIVE_DEST is specific to your environment.
3. Restart the Oracle instance to make the changes effective.
For more information about setting automatic archiving, see the Oracle documentation.
ARCHIVELOG to NOARCHIVELOG Mode Comparison
The following table explains the advantages and disadvantages of ARCHIVELOG mode
and NOARCHIVELOG mode.
Mode Advantages Disadvantages
ARCHIVELOG You can perform hot It requires additional disk space to
mode backups (backups when the store archived log files. However, the
database is online). agent offers the option to purge the
logs after they have been backed up,
giving you the opportunity to free
The archive logs and the
disk space if you need it.
last full backup (offline or
online) or an older backup
can completely recover the
database without losing any
data because all changes
made in the database are
stored in the log file.
Chapter 2: Installing the Agent 19Perform Post-Installation Tasks
Mode Advantages Disadvantages
NOARCHIVELOG It requires no additional If you must recover a database, you
mode disk space to store archived can only restore the last full offline
log files. backup. As a result, any changes
made to the database after the last
full offline backup are lost.
Database downtime is significant
because you cannot back up the
database online. This limitation
becomes a very serious
consideration for large databases.
Important! Because NOARCHIVELOG mode does not guarantee Oracle database
recovery if there is a disaster, the Agent for Oracle does not support this mode. If you
need to maintain Oracle Server in NOARCHIVELOG mode, then you must backup full
Oracle database files without the agent using CA ARCserve Backup while the database is
offline to ensure disaster recovery.
When you are working with RMAN, ensure that the database runs in ARCHIVELOG
mode.
Configure the Agent
After installing the agent, you must run the orasetup program to configure the agent
properly as mentioned in the instructions.
To run the orasetup program
1. Change to the agent home directory.
2. Enter the following command to start the orasetup program:
./orasetup
3. The orasetup program prompts you to enter the agent home directory. The default
setting is the current directory.
■ If you want to select the default, press Enter.
■ If the agent home directory differs from the current directory, enter the path
name for that directory, and then press Enter.
20 Agent for Oracle GuidePerform Post-Installation Tasks
4. The orasetup program asks you if you are planning to back up data on the local Data
Mover.
■ If Data Mover is installed locally and you are planning to back up data on the
local Data Mover, enter y and press Enter.
■ If Data Mover is not installed locally or you are not planning to back up data on
the local Data Mover, enter n and press Enter.
5. The orasetup program asks you if Oracle is installed on this machine. Enter y, and
then press Enter.
6. The orasetup program asks you if a Recovery Manager catalog will be used to
handle the database backups. If you intend to do this, enter y, and then press Enter.
Note: We recommend using an RMAN catalog when performing a backup because
RMAN stores all relative backup information in this catalog, providing your data
with the best protection possible.
7. If this is a new configuration, the orasetup program asks you to register all of the
Oracle System IDs (SIDs) to be used with CA ARCserve Backup. If this is not a new
installation, the orasetup program asks you if the existing configuration files should
be recreated. If you want to keep your existing instance.cfg and sbt.cfg files, enter
n.
Note: The orasetup program creates two configuration files: instance.cfg and
sbt.cfg.
■ If these files already exist when you run orasetup and you do not want to
overwrite them, enter n. The instance.cfg file and sbt.cfg file remain unchanged
and orasetup creates sbt.cfg.tmpl, a template file. You can then use this
template file to adjust the sbt.cfg file manually.
■ If you select to overwrite the configuration files, orasetup creates new
instance.cfg and sbt.cfg files that overwrite your existing instance.cfg and
sbt.cfg files.
■ The agent uses the instance.cfg file to register new instances of Oracle or to
make modifications. You can configure the instance.cfg file at any time.
8. The orasetup program prompts you to print the content of the oratab file. You then
choose the ones you want to configure.
9. The orasetup program prompts you to provide the Oracle instance ID to be used by
the agent (for example, Database1, Database2). When finished, click Enter.
10. Enter the ORACLE_HOME environment value for the Oracle instance you entered in
the previous step. When finished, press Enter.
11. If you answered yes to the question about whether you will be using an RMAN
catalog to handle the database backups, enter the name of the Oracle Net service
that will access the database containing the RMAN catalog for this instance.
Chapter 2: Installing the Agent 21Perform Post-Installation Tasks
12. The orasetup program asks you to enter the number of days the Oracle agent log
files should be kept before being automatically deleted. The default value is 30
days. In response, do one of the following:
■ If the default is acceptable, press Enter.
■ If you want to set the number of days to a number other than 30, enter that
number, and then press Enter.
■ If you do not want to have the log files deleted automatically, enter 0.
13. The orasetup program asks you enter the number of days the RMAN scripts
generated by the agent should be kept before being automatically deleted. The
default value is 30 days. In response, do one of the following:
■ If the default is acceptable, press Enter.
■ If you want to set the number of days to a number other than 30, enter that
number, and then click Enter.
■ If you do not want to have the RMAN scripts deleted automatically, enter 0.
14. The orasetup program asks you to enter the name of a user who can connect to this
host.
15. The orasetup program asks you to enter the password for that user.
Create an RMAN Catalog
Recovery Manager (RMAN) is an Oracle utility that you can use to back up, restore, and
recover database files. RMAN performs important backup and recovery procedures, and
greatly simplifies the task that administrators perform during these procedures.
Using RMAN and CA ARCserve Backup, you specify your own RMAN scripts to perform
backups. You can also use RMAN directly to back up any online database object by
connecting directly to RMAN with or without a recovery catalog at the command line.
Note: When using the agent or RMAN to back up, we recommend that you use a
recovery catalog installed in a separate database. After backing up an Oracle database
using RMAN, you can restore the database using either the agent or RMAN. Similarly, if
you back up an Oracle database using the Agent for Oracle, you can restore the
database using either RMAN or the agent.
22 Agent for Oracle GuidePerform Post-Installation Tasks
For more information about the Recovery Manager, see the Oracle documentation.
You can use the RMAN catalog when performing a backup as RMAN stores all relative
backup information in this catalog. Without the catalog, RMAN will rely only on control
files to manage backups. This is very risky because if all the control files are lost, RMAN
will not be able to restore the database. In addition, you will not be able to restore your
control files and your database will be lost.
Note: Ensure that the Catalog Database is available while performing backup and
restore jobs using RMAN catalog.
To create an RMAN catalog
Note: Because RMAN relies heavily on this catalog when restoring, you should create it
in a separate database (that is, a database other than the one being backed up).
1. Create a new tablespace using this SQL*Plus command:
* create tablespace datafile size m;
2. Create the user who will be the owner of the RMAN catalog by entering this
command:
* create user identified by default tablespace quota unlimited on ;
3. Assign the correct privileges to this user by using the following command:
* grant recovery_catalog_owner to ;
4. Open a new command prompt and run the following command to connect to the
catalog database of RMAN:
rman catalog /@rmandb
where rmandb is the TNS Name for the RMAN catalog database.
5. Create a catalog using this command:
create catalog;
Chapter 2: Installing the Agent 23Post-Installation Tasks Required for Recovery Manager
6. Connect to the catalog database and target database of RMAN.
*rman target /< password for user(sys)>@targetdb catalog /@rmandb
where rmandb is the TNS Name for the RMAN catalog Database and the targetdb is
the TNS Name for the Target Database.
7. Execute the following command.
register database;
For more information about using the Recovery Manager, see the Oracle
Documentation.
Important! If you are not using an RMAN catalog, you need to manage your control files
on your own either by using a file system backup or by mirroring the control files for
fault tolerance.
Post-Installation Tasks Required for Recovery Manager
To use Oracle Recovery Manager (RMAN), you must perform the following
post-installation tasks:
■ Use library files by performing one of these actions:
– Relink Oracle to use the CA Technologies® libobk library files.
– Create the $ORACLE_HOME/lib/libobk.s* symbolic link to point to the CA
Technologies libobk library.
– Use the SBT_LIBRARY parameter in the RMAN script.
■ Add the client host definition in the CA ARCserve Backup database if not done
already.
■ Add the Oracle user who owns the Oracle database files as a CA ARCserve Backup
user equivalency.
■ Set the RMAN environment variables.
The SBT 1.1 and SBT 2.0 Interfaces
The SBT (Systems Backup to Tape) 1.1 and SBT 2.0 interfaces are the Oracle APIs
(Application Programming Interfaces) that enable CA ARCserve Backup to provide
backup and restore capabilities to RMAN. These interfaces use the sbt.cfg parameter file
and the CA ARCserve Backup ca_backup and ca_restore commands to initiate backup
and restore operations from RMAN.
24 Agent for Oracle GuidePost-Installation Tasks Required for Recovery Manager
How the SBT Library Uses the sbt.cfg Parameter File
The SBT library uses the sbt.cfg parameter file to interact with the agent. This file
contains various user-defined parameters that are passed to CA ARCserve Backup when
you submit backup and restore jobs through the ca_backup and ca_restore commands.
The orasetup program creates the initial sbt.cfg configuration file during agent setup.
In addition, orasetup automatically encrypts the password and puts it in the sbt.cfg file
(SBT_PASSWORD). If you want to modify the password, you must first execute cas_encr
to receive the ASCII encrypted value. An example result of the cas_encr
command looks similar to this:
# cas_encr password
CAcrypt:HGJD92748HNNCJSFDHD764
After you receive this value, you must copy the entire value including the CAcrypt string
as the value for the SBT_PASSWORD variable in the sbt.cfg file.
Important! Before using cas_encr, you must modify the library path to include the
common agent directory. For example,
#LD_LIBRARY_PATH=$LD_LIBRARY_PATH:/opt/CA/ABcmagt
To set the library path for your Linux operating system follow this guideline:
LD_LIBRARY_PATH=opt/CA/ABcmagt:$LD_LIBRARY_PATH
Note: The sbt.cfg file provides default values if you choose to use RMAN directly.
How the SBT Inteface Uses libobk Library Files
The SBT interface is implemented through libobk library files. Oracle Server provides a
default libobk.* library file. However, for your RMAN backup and restore jobs to be
successful, RMAN must use one of the following CA Technologies versions of libobk.*
instead of the default Oracle version:
■ libobk.*.1.32 (32-bit implementation of the SBT 1.1 interface)
■ libobk.*.2.32 (32-bit implementation of the SBT 2.0 interface)
■ libobk.*.1.64 (64-bit implementation of the SBT 1.1 interface)
■ libobk.*.2.64 (64-bit implementation of the SBT 2.0 interface)
Chapter 2: Installing the Agent 25Post-Installation Tasks Required for Recovery Manager
Some other considerations include:
■ Oracle 8.0 supports only SBT 1.1. It does not support SBT 2.0.
■ Oracle 8i, 9i, and 10g support both SBT 1.1 and SBT 2.0. We recommend using SBT
2.0 with Oracle 8i, 9i, and 10g.
■ When the agent is installed, the libobk32.* and libobk64.* symbolic links are
created in the agent home directory. These symbolic links are used in the RMAN
scripts generated by the agent as a value to the SBT_LIBRARY parameter. You can
also use these links when you create your own scripts.
Oracle and CA libobk Library Files
For RMAN to use one of the CA Technologies versions of libobk, you may need to relink
Oracle.
The following section contains the procedure for re-linking Oracle. To re-link Oracle, go
to the section for your operating system and perform the procedure that is appropriate
for your Linux operating system and your version of Oracle Server.
Important! By default, the symbolic link $ORACLE_HOME/lib/libobk.s* exists and points
to an existing Oracle library. Before you relink, you must redirect this link to
$CAORA_HOME/libobk.s*. For information about redirecting a link that is appropriate
for your environment, see your Oracle documentation.
Relink on Linux
To relink Oracle running on Linux, follow these steps:
1. Log on as oracle.
2. Perform one of the following actions:
■ If you are using Oracle 9i or 10g, switch to the $ORACLE_HOME/lib directory,
and enter the following command:
ln -s /opt/CA/ABoraagt/libobk32.so $ORACLE_HOME/lib/libobk.so
■ If you are using Oracle 8.0.6 or 8i, switch to the $ORACLE_HOME/rdbms/lib
directory, and enter the following command:
make -f ins_rdbms.mk ioracle LLIBOBK=$CAORA_HOME/libobk library
26 Agent for Oracle GuideRegistering the Agent for Oracle
Considerations
■ To ensure that the Oracle executable is linked properly with the CA
Technologies library, switch to the $ORACLE_HOME/bin directory and enter the
ldd –r command to list the libraries with which the executable is linked.
■ In all the actions in Step 2, libobk library is the fully qualified path where the
following libraries are located:
– libobk.so.1.32 (32 bit x86 SBT 1 version)
– libobk.so.2.32 (32 bit x86 SBT 2 version)
– libobk.so.2.64_IA64 (64 bit Itanium SBT 2 version; no SBT 1 )
– libobk.so.2.64_AMD64 (64 bit AMD64 SBT 2 version ; no SBT 1)
The default location is the agent home directory.
Add the Oracle User as a CA ARCserve Backup User Equivalency
To back up, you must add the Oracle user who owns the Oracle database files as a CA
ARCserve Backup user equivalency.
To add the user, follow these steps:
1. Ensure CA ARCserve Backup is loaded and running.
2. Go to the CA ARCserve Backup home folder and enter the following command:
ca_auth [-cahost CAAB_hostname] –equiv add CAAB_username
[CAAB_username] [CAAB_userpassword]
CAAB_username must be a CA ARCserve Backup administrator.
Note: If you have installed the agent in a Real Application Cluster (RAC) environment,
you must also add the Oracle user who owns the Oracle database files as a CA ARCserve
Backup user equivalency on each node that is a part of the RAC cluster.
Registering the Agent for Oracle
When registering the machine where the Agent for Oracle is installed within CA
ARCserve Backup, enter only the actual hostname for the machine. The hostname can
be accessed by running the hostname command from the command line on the
machine where the Agent for Oracle is installed.
When registering an Agent for Oracle, the Oracle user on the Linux server must be given
the equivalence of caroot on the Windows server where the base product is installed,
with the following command :
ca_auth [-cahost BABhost] -equiv add caroot [caroot_username]
[caroot_password]
Chapter 2: Installing the Agent 27Remove the Agent
After running this command on the server side, the following error still appears in the
activity log during a backup job:
CA ARCserve Backup server on xxx.xxx.xxx.xxx failed to authenticate user Oracle. Create
a caroot equivalency using ca_auth
In this scenario, run the following command on the server where the Agent for Oracle is
installed:
[root@rhelu4 BABoraagt]# ./ca_auth -cahost babserver -equiv add Oracle rhelu4 caroot caroot caroot_password
[root@rhelu4 BABoraagt]# ./ca_auth -cahost babserver -equiv getequiv Oracle rhelu4
Equivalent ARCserve user for Oracle@rhelu4: caroot
Remove the Agent
To remove the Agent for Oracle from your server, follow the steps on the Installation
CD.
Important! You must stop Oracle and unlink the libobk libraries before attempting to
remove the agent. These steps are appropriate whether you linked Oracle with the CA
Technologies libraries or whether you created a softlink in the Oracle lib subdirectory as
specified in the post installation tasks.
28 Agent for Oracle GuideChapter 3: Backing Up Data
This section contains the following topics:
Backup Basics (see page 29)
Backups (see page 32)
Backup Limitations (see page 44)
Backup Basics
To back up is to create a copy of a database or database objects on another device
(typically a tape drive). Backups are performed using CA ARCserve Backup, the Agent for
Oracle, and the Oracle RMAN backup features.
Using CA ARCserve Backup, the agent, and Oracle RMAN, you can back up a complete
Oracle Server database or individual objects within the database. To back up a complete
database, you configure the backup to include all of the objects contained in the
database. Typically, you must back up a complete database when you first create the
database or when you change the database structure. Tablespaces and other database
objects require more frequent backups.
Backup Strategy
You should plan your backup strategy for a database before you create the database. If
you do not plan these strategies before you create a database, database recovery may
not be possible in certain cases.
You should check your backup strategy in a test environment before and after you move
to a production system. Testing can minimize problems before they occur in a real
situation.
Chapter 3: Backing Up Data 29Backup Basics
Develop a Backup Strategy
To have a backup strategy, you should:
■ Perform a full online backup of your Oracle databases.
■ Perform a cold database backup on a regular basis by shutting down the database
and performing a file system backup of the Oracle environment.
■ Back up database objects to update the full database backup. Heavily used
tablespaces should be backed up frequently to reduce database recovery time.
■ Back up the database control files each time you make a structural change to the
database.
■ Mirror Oracle online redo logs. The agent does not perform this procedure. For
more information about mirroring online redo logs, see the Oracle Documentation.
For more information about Oracle backup and recovery procedures, see the Oracle
documentation.
Oracle Server Organization
Oracle Server is organized into databases that are subdivided into database objects. An
Oracle database contains the following types of objects:
■ Tablespaces that contain data. Tablespaces can consist of multiple data files.
■ Data files that contain the database data. Data files are the physical files that define
a tablespace.
■ Online redo log files that contain records of transactions applied to the tablespaces.
■ Control files that describe the structure of the database, including the tablespaces.
There can be more than one control file copy for the database.
■ Parameter files that contain the various initialization parameters the database uses
when it starts up.
■ Recovery area (for latest Oracle versions) that organizes all recovery-related files
and activities for an Oracle database.
30 Agent for Oracle GuideBackup Basics
Online Redo Log Files
Oracle Server uses online redo log files to record all entries to the Oracle tablespaces.
However, the Agent for Oracle requires archived online redo log files to function
properly. For Oracle to create archived redo log files, you must set Oracle to operate in
ARCHIVELOG mode. Also, for the agent to back up and restore properly, you must set
Oracle to automatically archive online redo log files.
Note: For information about setting Oracle so that it operates in ARHIVELOG mode and
automatically archives online redo log files, see Perform Post-Installation Tasks (see
page 15).
Multiple Databases
If your Oracle configuration has more than one database you can:
■ View and log in to the databases
■ View and log in to the databases you specified if you reconfigured the agent by
running orasetup from the agent home directory.
■ Configure the agent so that the Backup Manager window displays the objects from
any specified database.
■ Quickly find the database objects that you want to back up.
Configure a Backup Session for Multiple Database Environment
To set up your backup session to view and log in to the databases you specified during
installation on an Oracle configuration containing multiple databases.
To configure a backup session for multiple database environment
1. Start CA ARCserve Backup and open the Backup Manager.
The Backup Manager opens.
2. On the Source tab, expand the Linux Agent.
3. Under the Linux Agent, click the green square to the left of the host on which
Oracle is installed.
The Login dialog opens.
4. Enter the system user name and password, and then click OK.
5. Expand the host.
6. Click the green square to the left of the Oracle database.
The Database Login dialog opens.
Chapter 3: Backing Up Data 31Backups
7. Enter the Oracle dba user name and password.
8. Click OK.
You can now expand the database and select the database objects you want to back
up.
Backups
Using the agent, you can back up complete Oracle databases and individual Oracle
database objects, such as tablespaces, data files, archived redo log files, control files,
parameter files, and the recovery area.
You should back up all of the objects in a database immediately after you create the
database and maintain a regular backup schedule to ensure smooth recovery in case of
database or media failure. CA ARCserve Backup allows you to set and maintain a
schedule of automatic backups.
Agent backups are performed through scripts the agent sends to the Oracle Recovery
Manager (RMAN). These scripts are generated automatically based on the options you
choose on the Backup Manager, and are saved under /rman_scripts. They are saved for the amount of time you specify in the
environment variable in the agent.cfg file.
Recovery Manager (RMAN)
Recovery Manager (RMAN) is an Oracle utility used to back up, restore, and recover
database files. RMAN performs important backup and recovery procedures and greatly
simplifies the tasks that administrators perform during these procedures. For more
information about the Recovery Manager, see the Oracle Backup and Recovery Guide.
Using RMAN and CA ARCserve Backup, you specify your own RMAN scripts to perform
backups. You can also use RMAN directly to back up any online database object by
connecting directly to RMAN with or without a recovery catalog at the command line.
Note: When using the agent or RMAN to back up, we recommend you use a recovery
catalog installed in a separate database.
After backing up an Oracle database using RMAN, you can restore the database using
either the agent or RMAN. Similarly, if you back up an Oracle database using the Agent
for Oracle, you can restore the database using either RMAN or the agent.
32 Agent for Oracle GuideBackups
RMAN Prerequisites
Before you can back up with RMAN and the agent, you must:
■ Use the Computer Associates libobk library files by performing one of these actions:
– Relink Oracle
– Create the $ORACLE_HOME/lib/libobk.* symbolic link
– Use SBT_LIBRARY in the RMAN script (depending on the platform and Oracle
version)
■ Add the Oracle user who owns the Oracle database files as a CA ARCserve Backup
user equivalency.
Note: For information about performing these tasks, see Post-Installation Tasks
Required for Recovery Manager (see page 24).
Types of Backups
Using CA ARCserve Backup and the agent, you can perform several types of backups:
■ Offline backups
■ Online backups
■ Staging backups
■ Multistreaming (or multi-channels) backups
■ Launch backups by loading your own RMAN scripts in the Backup Manager
Note: You can also use RMAN directly to launch backups at the command line level.
Back Up Oracle Database Offline
Performing an offline backup through the agent puts the database in a quiescent state
before the backup process begins. The reason for this is that RMAN must be able to
connect to the database; therefore, the database processes must be running and
accepting connection. Performing a true offline backup does not allow this connection
to occur. The only way to allow RMAN to connect to the database and not have it online
is to use the quiescent state, which prevents all user transactions from occurring.
Note: To perform a true offline backup, use the agent to back up your database after
manually shutting it down. To restore your database, use the agent again, and then
manually start up your database.
Chapter 3: Backing Up Data 33You can also read