Norton Internet Security - Product Manual - Symantec
←
→
Page content transcription
If your browser does not render page correctly, please read the page content below
Norton™ Internet Security

Product Manual
Norton™ Internet Security Product Manual
     The software described in this book is furnished under a license agreement and may be used only in
     accordance with the terms of the agreement.

     Documentation version 22.17

     Copyright © 2019 Symantec Corporation. All rights reserved.

     Symantec, the Symantec Logo, the Checkmark Logo, Norton, Norton by Symantec, Norton Secured Logo,
     LifeLock, and the LockMan Logo are trademarks or registered trademarks of Symantec Corporation or its
     affiliates in the U. S. and other countries. Other names may be trademarks of their respective owners.

     The product described in this document is distributed under licenses restricting its use, copying, distribution,
     and decompilation/reverse engineering. No part of this document may be reproduced in any form by any
     means without prior written authorization of Symantec Corporation and its licensors, if any.

     THE DOCUMENTATION IS PROVIDED "AS IS" AND ALL EXPRESS OR IMPLIED CONDITIONS,
     REPRESENTATIONS AND WARRANTIES, INCLUDING ANY IMPLIED WARRANTY OF
     MERCHANTABILITY, FITNESS FOR A PARTICULAR PURPOSE OR NON-INFRINGEMENT, ARE
     DISCLAIMED, EXCEPT TO THE EXTENT THAT SUCH DISCLAIMERS ARE HELD TO BE LEGALLY
     INVALID. SYMANTEC CORPORATION SHALL NOT BE LIABLE FOR INCIDENTAL OR CONSEQUENTIAL
     DAMAGES IN CONNECTION WITH THE FURNISHING, PERFORMANCE, OR USE OF THIS
     DOCUMENTATION. THE INFORMATION CONTAINED IN THIS DOCUMENTATION IS SUBJECT TO
     CHANGE WITHOUT NOTICE.

     The Licensed Software and Documentation are deemed to be commercial computer software as defined
     in FAR 12.212 and subject to restricted rights as defined in FAR Section 52.227-19 "Commercial Computer
     Software - Restricted Rights" and DFARS 227.7202, et seq. "Commercial Computer Software and
     Commercial Computer Software Documentation," as applicable, and any successor regulations, whether
     delivered by Symantec as on premises or hosted services. Any use, modification, reproduction release,
     performance, display or disclosure of the Licensed Software and Documentation by the U.S. Government
     shall be solely in accordance with the terms of this Agreement.

     Symantec Corporation
     350 Ellis Street,
     Mountain View, CA 94043

     http://www.symantec.com

     Printed in the United States of America.

     10 9 8 7 6 5 4 3 2 1
Contents

Chapter 1   Welcome to Norton ............................................................... 6
            About your Norton product ............................................................... 6
            System requirements for Norton Internet Security ................................. 7
            Create a Norton account .................................................................. 8
            Sign in to your Norton account .......................................................... 8
            Norton Early Adopter Program .......................................................... 9
                Join the Norton Early Adopter Program ....................................... 10
                Leave the Norton Early Adopter Program .................................... 11

Chapter 2   Download and install Norton ............................................ 12
            Download and install Norton ...........................................................      12
            Install Norton on additional devices ..................................................      14
            Transfer your Norton license to a new device .....................................           15
            Activation protects you ..................................................................   16
            Troubleshoot with Norton Bootable Recovery Tool ...............................              18

Chapter 3   Understand and respond to threats ................................ 21
            What to do when your device is at risk ..............................................        21
            Run LiveUpdate ...........................................................................   22
            View or fix threats detected by Norton Security ...................................          22
            Act on quarantined risks or threats ...................................................      24

Chapter 4   Manage your security ......................................................... 27
            View details of your system activities ................................................ 27
            Check the trust level of a file ........................................................... 28
            View the Report Card .................................................................... 29

Chapter 5   Scan your computer ........................................................... 30
            Run a Quick Scan ........................................................................    30
            Run a Full System Scan ................................................................      31
            Scan selected drives, folders, or files ................................................     31
            Run a custom scan .......................................................................    32
            Schedule a scan ..........................................................................   33
Contents 4
Scan your computer with Norton Power Eraser ................................... 34
Customize Real Time Protection settings .......................................... 35
Turn SONAR Protection off or on ..................................................... 37
Exclude files and folders from Norton Auto-Protect, SONAR, and
Download Intelligence scans .................................................... 37
Add items to the Signature Exclusions ............................................. 38
Clear file IDs excluded during scans ................................................. 39
Turn on or turn off automatic tasks ................................................... 39
Run custom tasks ......................................................................... 40
Schedule security and performance scans ......................................... 40
Chapter 6 Keep secure on the Internet .............................................. 42
Turn Norton Firewall on or off .......................................................... 43
Customize Program Rules .............................................................. 43
Change the order of firewall rules .................................................... 44
Turn off a Traffic rule temporarily ..................................................... 45
Allow a blocked program ................................................................ 45
Turn off Firewall Block Notification ................................................... 46
Browser Protection ....................................................................... 47
Intrusion Prevention exclusion list .................................................... 48
Set Norton to protect you from exploits, cybercriminals, and zero-day
attacks ................................................................................ 49
Turn off or turn on AutoBlock .......................................................... 50
Unblock AutoBlocked computers ..................................................... 51
Add a device to Device Trust .......................................................... 52
Turn off or turn on Download Intelligence ........................................... 53
Turn off or turn on spam filtering ...................................................... 54
Define the Internet usage for Norton ................................................ 54
Turn off or turn on Network Cost Awareness ...................................... 55
Wi-Fi Security .............................................................................. 56
Chapter 7 Secure your sensitive data ................................................ 57
Add the Norton browser extensions .................................................. 57
Turn off or turn on Norton Safe Web ................................................. 61
Search the web using Norton Safe Search ......................................... 62
Scam Insight ............................................................................... 63
Antiphishing ................................................................................ 64
Access Norton Password Manager .................................................. 64
Turn off or turn on Norton Password Manager .................................... 64
Create Norton Password Manager cloud vault .................................... 65
Delete your Norton Password Manager cloud vault .............................. 67
Export your Norton Password Manager data ...................................... 68Contents 5
Import your Norton Password Manager data ...................................... 69
Enable or disable the Norton toolbar ................................................. 71
Chapter 8 Keep your PC tuned up ...................................................... 72
Optimize your permanent disks manually .......................................... 72
Configure performance alerts .......................................................... 73
Run a scan to clean up disk clutter ................................................... 74
Run Diagnostic Report .................................................................. 74
Manage startup items .................................................................... 75
Optimize your boot volume ............................................................. 75
Chapter 9 Customize settings ............................................................. 77
Configure Network Proxy Settings .................................................... 77
Configure Norton for best battery use ............................................... 78
Turn Remote Management off or on ................................................. 79
Secure your Norton product settings using a password ........................ 79
Reset your Norton product settings password ..................................... 80
Turn off or turn on Norton Product Tamper Protection ........................... 81
How do I use the Search tool? ........................................................ 82
Set a Search Shortcut Key ....................................................... 82
Chapter 10 Find additional solutions ................................................... 84
Find the version number of your product ........................................... 84
Upgrade your Norton product .......................................................... 84
Run Norton Autofix to detect and repair problems with Norton Internet
Security ................................................................................ 85
Fix common issues if Norton Fix Now fails ......................................... 86
Uninstall your Norton product .......................................................... 90Chapter 1
Welcome to Norton
This chapter includes the following topics:
■ About your Norton product
■ System requirements for Norton Internet Security
■ Create a Norton account
■ Sign in to your Norton account
■ Norton Early Adopter Program
About your Norton product
Thank you for buying the latest Norton product!
Norton combines superior security and fast performance with an easy-to-use design to protect
your devices from today’s advanced threats. It safeguards your passwords, protects your data,
and keeps your computer running at peak performance.
Norton protects you whether you have a single computer or multiple devices to connect your
family. Securing your data and information is our only concern. It’s why Norton makes this
bold promise: From the moment you subscribe, a Norton expert can help keep your devices
virus-free or refund your money.
A single Norton subscription can protect all your computers, smartphones, or tablets across
Windows, Mac, Android, and iOS operating systems. LiveUpdate automatically installs the
latest virus definitions and product features on your devices to assure that you always have
the best protection available.
If you have trouble configuring your Norton product, additional help is available. Your Norton
product provides easy-to-use support options.Welcome to Norton 7
System requirements for Norton Internet Security
System requirements for Norton Internet Security
To install Norton Internet Security on your PCs, Macs®, smartphones, or tablets, make sure
that they meet the minimum system requirements.
Windows
◆ Operating systems
■ Microsoft Windows® 10 and Windows® 10 Pro (32-bit and 64-bit)
■ Microsoft Windows® 8.1 or later (32-bit and 64-bit)
■ Microsoft Windows® 8 and Windows® 8 Pro (32-bit and 64-bit)
■ Microsoft Windows® 7 (32-bit and 64-bit) with Service Pack 1 or later
Hardware
■ Processor
For Windows 10/8/7: 1 GHz
■ RAM
For Windows 10: 2 GB (minimum of 512 MB RAM required for Recovery Tool)
For Windows 8/7: 1 GB (32-bit) (minimum of 512 MB RAM required for Recovery Tool)
■ Hard disk space
300 MB of available hard disk space
Browser support for Vulnerability Protection
The following browsers are supported for Vulnerability Protection.
■ Microsoft Internet Explorer® 8.0 or higher (32-bit and 64-bit)1,2
■ Mozilla Firefox® (32-bit and 64-bit)2
■ Google Chrome™ (32-bit and 64-bit)2
Browser support for Phishing Protection, Safe Search, and Password Management
The following browsers are supported for Phishing Protection, Safe Search, and Password
Management.
■ Microsoft Internet Explorer® 8.0 or higher (32-bit and 64-bit)1,2
■ Mozilla Firefox® (32-bit and 64-bit)2
■ Google Chrome™ (32-bit and 64-bit)2
Email clients
Norton Internet Security supports email scanning on all POP3 compatible email clients.
Support for AntispamWelcome to Norton 8
Create a Norton account
The following email client is supported for Antispam:
■ Microsoft Outlook 2003 and later
1 Some protection features are not available in Microsoft Internet Explorer 10.0 or later.
2 As made available by Symantec within your service period.
Create a Norton account
Your Norton account is where you monitor your connected devices and update your profile.
You can also change your billing preferences or renew your product from your Norton account.
You created a Norton account if you made a purchase from the Norton Online Store or if you
already downloaded and installed your product.
If you signed up for Norton Family, Norton Online Backup, or Norton Safe Web, you may also
have a Norton account. Ensure that this account also has the Norton Security license associated
with it.
To create a Norton account
1 Go to https://my.norton.com
2 Click Sign In and then click Create an Account tab.
3 Enter a valid email address and password for your account. You need to use these
credentials to sign in to Norton in the future.
4 Choose your region.
5 Read the privacy policy and agree to it, and then click Create Account.
Sign in to your Norton account
Sign in to your Norton account to monitor your devices, update your profile, or change your
billing preferences.
To sign in to your Norton account
1 Go to https://my.norton.com
2 Click Sign In.Welcome to Norton 9
Norton Early Adopter Program
3 Enter the email address and password that you used when you created your Norton
account and click Sign In.
4 If you do not know your password, click Forgot password?.
Follow the instructions to receive an email with a new password link.
Note: If you have opted for the Two-Step Verification to access your Norton account, you
have to use the verification code in addition to your password. For more information, see
Two-Step Verification for Norton account
Norton Early Adopter Program
The Norton Early Adopter Program lets you download Norton pre-release software and be
among the first to try out new features. You don’t need to create a separate Norton account
or uninstall Norton to upgrade to the pre-release software. When you join the Norton Early
Adopter Program, Norton LiveUpdate downloads the latest pre-release software on your
computer.
What are the benefits of joining the Norton Early Adopter Program?
■ Gives you a sneak peak at the latest Norton Security features.
■ Allows you to give feedback that helps shape the final version of the product.
Who is eligible to join the Norton Early Adopter Program?
A limited number of paid or active users will receive an in-product invitation to join the Norton
Early Adopter Program. This is the only way to join the program for the first time.
How do I enroll in the Norton Early Adopter Program?
If you receive an in-product invitation for the Norton Early Adopter Program, you can enroll.
You can decide to leave the Norton Early Adopter Program at any time.
For more information, see Join the Norton Early Adopter Program.
Can I rollback to my previous version if I leave the Norton Early Adopter
Program?
You can leave the Norton Early Adopter program at any time and roll back to your previous
version of Norton product.Welcome to Norton 10
Norton Early Adopter Program
For more information, see Leave the Norton Early Adopter Program.
Do I need to back up my Norton local backup drive before opting for
Norton Early Adopter Program?
You are not required to back up your data. Norton LiveUpdate installs the latest Norton
pre-release software. However, you lose your Norton local settings when you leave the Norton
Early Adopter Program.
Let us know your feedback on the Norton Early Adopter Program.
Provide Feedback
Join the Norton Early Adopter Program
If you receive an in-product invitation to join the Norton Early Adopter Program, you can enroll.
You can decide to leave the Norton Early Adopter Program at any time.
Join Norton Early Adopter Program from the invitation
1 In the Norton Early Adopter Program invitation, click Learn More.
2 Read the About Norton EAP page, and then click Join.
3 Read the Norton License Agreement, and then click Agree.
4 Enter your Norton account password, and then click Sign In.
5 In the Enrollment Complete window, click Close. Norton downloads the pre-release
software on your computer in the next LiveUpdate session.
Join Norton Early Adopter Program from the Norton Administrative Settings window
If you have declined or ignored the in-product invitation, you can still join the Norton Early
Adopter Program using your Norton product.
1 Start Norton.
If you see the My Norton window, next to Device Security, click Open.
2 In the Norton main window, click Settings.
3 In the Settings window, click Administrative Settings.
4 In the Administrative Settings window, in the Norton Early Adopter Program row, click
Join.
5 Read the About Norton EAP page, and then click Join.
6 Read the Norton License Agreement, and then click Agree.Welcome to Norton 11
Norton Early Adopter Program
7 Enter your Norton account password, and then click Sign In.
8 In the Enrollment Complete window, click Close. Norton downloads the pre-release
software on your computer in the next LiveUpdate session.
Leave the Norton Early Adopter Program
You can leave Norton Early Adopter Program at any time from the Norton Administrative
Settings window.
Leave Norton Early Adopter Program
1 Start Norton.
If you see the My Norton window, next to Device Security, click Open.
2 In the Norton main window, click Settings.
3 In the Settings window, click Administrative Settings.
4 In the Administrative Settings window, in the Norton Early Adopter Program row, click
Unenroll.
5 Your Norton product initiates Norton Remove and Reinstall tool to rollback to your previous
Norton product version.
6 Read the license agreement, and click Agree.
7 Click Remove & Reinstall.
8 Click Restart Now.
After the computer restarts, follow the on-screen instructions to reinstall the previous
version of your Norton product.Chapter 2
Download and install
Norton
This chapter includes the following topics:
■ Download and install Norton
■ Install Norton on additional devices
■ Transfer your Norton license to a new device
■ Activation protects you
■ Troubleshoot with Norton Bootable Recovery Tool
Download and install Norton
Protecting your devices and managing your Norton product is as easy as adding a new device
to your Norton account.
To download and install Norton on your computer
1 Go to norton.com/setup.
2 If you are not signed in to your Norton account, click Sign In and enter your email address
and Norton account password.
If you do not have an account, click Create an Account, and then complete the sign-up
process.Download and install Norton 13
Download and install Norton
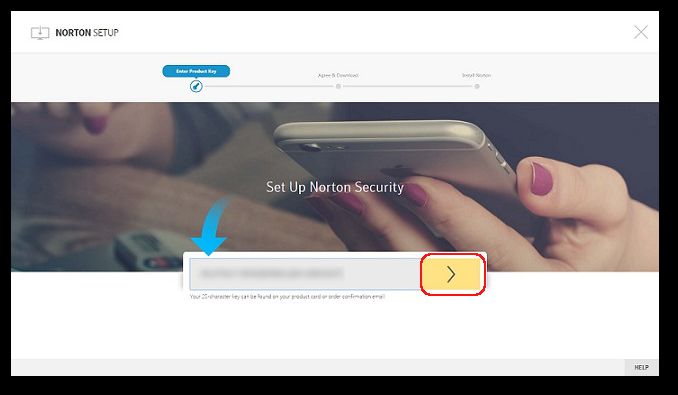
3 In the Norton Setup window, click Download Norton.
To install a new product that is not yet registered to your Norton account, click Enter a
New Product Key.
Enter your product key and click the next (>) icon.Download and install Norton 14
Install Norton on additional devices
4 Click Agree & Download.
5 Click the area pointed by the on-screen blue arrow and follow the on-screen instructions.
■ For Internet Explorer or Microsoft Edge browser: Click Run.
■ For Firefox or Safari: On the top-right corner of the browser, click the Download option
to view the downloaded files, and double-click the file that you downloaded.
■ For Chrome: On the bottom-left corner, double-click the file that you downloaded.
6 If the User Account Control window appears, click Continue.
7 Your Norton product gets downloaded, installed, and activated.
Install Norton on additional devices
From your Norton account, you can send emails to additional devices and install Norton on
the devices. The email contains the install link and instructions to install Norton.
To install Norton on a different device
1 Sign in to Norton.
2 If you are not signed in to your Norton account, click Sign In and enter your email address
and Norton account password and sign in.Download and install Norton 15
Transfer your Norton license to a new device
3 In the Norton Setup window, click Send a download link.
4 Enter an email address that you can access on your additional device and click the send
button, and then click Done.
An email is sent to the email address with instructions to install the Norton product.
5 On the device where you want to download Norton, locate and open the email that you
received from The Norton Team.
6 Click Download Now.
7 Click Agree & Download.
8 Save the file on your computer and double-click the file to install Norton. By default, the
file is saved in the Downloads folder on both Mac and Windows computers.
Follow the on-screen instructions.
Note: Norton AntiVirus for Mac cannot be managed through your Norton account.
Transfer your Norton license to a new device
If your Norton product is installed on a device that you no longer use, you can transfer your
Norton product from that device to another device using your Norton account.Download and install Norton 16
Activation protects you
Transfer the Norton license
1 Sign in to your Norton account.
2 In the Devices page, identify the device that you no longer want to protect.
Note: The device must appear with a green status. If the device that you no longer use
appears with a red or an orange status, you can remove the device from your Norton
account and free a license.
3 Click the ellipse icon available below the device.
4 In the menu that appears, click Manage License.
5 In the Manage Device page, do the following:
■ Click on the device name.
■ Under What would you like to do, click Remove Norton.
■ Click Next.
6 In the Remove Norton window that appears, click Yes.
7 In the page that appears, click Install Now.
8 In the Install on New Device page, select one of the following:
■ To install Norton on the current device, click Download.
■ To install Norton on a different device, click Send Link.
9 Click Next.
10 Follow the on-screen instructions to complete the installation.
Activation protects you
Product activation initiates your subscription. It ensures that you have a genuine Norton product
installed and allows you to receive regular product updates and support.
You can activate your product by:
■ Using a product key or code, or
■ Using a subscription license already associated with your Norton account
■ Buying a new subscription
Your computer must be connected to the Internet to complete the activation. If you have
problems with the Internet connection, see Resolve your Internet connection.
Depending on your situation, choose the section below to complete the activation process:Download and install Norton 17
Activation protects you
Activate the product using a product key or code
Note: For help on finding your product key, see How to find your product key, PIN, or renewal
code?
1 Start Norton.
If you see the My Norton window, next to Device Security, click Open.
2 In the Norton product main window, click Activate Now.
You can also click Activate Now from the activation alert.
3 If you get a sign-in prompt, provide your Norton account credentials.
4 Type the product key or code in the space provided.
5 Click Next.
Symantec validates the product key or code, and activates your product.
Activate the product using a subscription license associated with your
Norton account
Note: Your license is automatically stored in your Norton account if you buy your subscription
from the Norton Online Store or if you have already activated your product. You can also follow
these steps if you did not download and install the product after your purchase from the Norton
Online Store.
1 Start Norton.
If you see the My Norton window, next to Device Security, click Open.
2 In the Norton product main window, click Activate Now.
You can also click Activate Now from the activation alert.
3 If you get a sign-in prompt, provide your Norton account credentials.
4 Choose the Norton Internet Security license and then click Next. If prompted, enter the
product key that you received from Norton.
Activate the product by buying a new subscription
1 Start Norton.
If you see the My Norton window, next to Device Security, click Open.
2 In the Norton product main window, click Activate Now.
You can also click Activate Now from the activation alert.Download and install Norton 18
Troubleshoot with Norton Bootable Recovery Tool
3 If you get a sign-in prompt, provide your Norton account credentials.
4 Click Buy a subscription.
You are redirected to the Norton Online Store where you can complete your purchase.
Your Norton product gets activated after successful purchase.
5 If you purchase a different product subscription, you need to download and install the
product that you have purchased. You can do this immediately after your purchase or by
signing into your Norton account. In this case, your current product is removed and the
purchased product is seamlessly installed on your device.
Troubleshoot with Norton Bootable Recovery Tool
If you are unable to install Norton Internet Security, open Norton Internet Security, or you
cannot start your computer, you can use Norton Bootable Recovery Tool to resolve the issue.
Norton Bootable Recovery Tool scans and removes viruses, spyware, and other security risks.
You can run Norton Bootable Recovery Tool only from a DVD or a USB drive.
Note: Norton Bootable Recovery Tool is not a replacement for real-time protection from viruses
and security risks.
Step 1: Download the Norton Bootable Recovery Tool ISO file on a
computer that is not infected
To download the ISO file
1 Open the browser and go to the following URL:
http://norton.com/nbrt
2 Click Download.
3 Follow the on-screen instructions to download and save the Norton Bootable Recovery
Tool ISO file.
Step 2: Create a Norton Bootable Recovery Tool bootable media
You can use any tool to burn the Norton Bootable Recovery Tool ISO file on a DVD or a USB
drive as a bootable media. You can then run Norton Bootable Recovery Tool on any infected
computer. You can also use this DVD as a recovery DVD on any computer.
Warning: If you create Norton Bootable Recovery Tool on a re-writable DVD or USB drive, all
the files on DVD or USB drive are permanently deleted. Back up your data before you create
Norton Bootable Recovery Tool on a re-writable DVD or USB drive.Download and install Norton 19
Troubleshoot with Norton Bootable Recovery Tool
Note: If you create Norton Bootable Recovery Tool on a USB drive, the USB drive should have
a minimum space of 1 GB and should be formatted in FAT32 file system.
Step 3: Launch Norton Bootable Recovery Tool
After you create Norton Bootable Recovery Tool on a DVD or a USB drive, use the media to
run Norton Bootable Recovery Tool.
To launch Norton Bootable Recovery Tool
1 Insert the Norton Bootable Recovery Tool DVD or USB drive that you created.
2 Turn on or restart the infected computer, then enter the BIOS mode by pressing the key
that appears on the screen immediately after your computer restarts.
3 Select the DVD or the USB drive on which you created Norton Bootable Recovery Tool,
and then press Enter. If you use a UEFI-enabled computer, select the recovery media
under the Legacy Boot option instead of the UEFI Boot option. The recovery media is
the Norton Bootable Recovery Tool DVD or USB drive.
4 In the Welcome to NBRT page, select the Boot option. If the booting fails, then select
Boot (Basic Video) option.
5 In the Select Language drop-down list, select your preferred language, and then click
OK.
6 Read the Norton license agreement and then click Agree to launch the tool.
Step 4: Scan and resolve threats
Norton Bootable Recovery Tool identifies and lists all the known security threats. You can
choose what to do with the items that are identified as potential risks.
To scan and resolve threats
1 Read the Norton license agreement and then click Agree to launch the tool.
2 In the Scan your computer section, click Start Scan.
When the scan is complete, the Scan Completed window lists the following:
■ The total number of files scanned
■ The total number of threats detected
3 In the Scan Completed window, review the scan results, and do one of the following:
■ To fix all of the threats that are found on your computer, select the Action column.
■ To perform appropriate actions for each of the threats, select the relevant threat that
you want to resolve under the Action column.Download and install Norton 20
Troubleshoot with Norton Bootable Recovery Tool
Note: Review the scan results carefully before resolving the threats, since the files that
are removed cannot be restored on your computer.
4 Click Fix.
5 In the confirmation dialog box, click OK.
6 The Remediation window displays the status of each threat under the Action column.
7 Click Continue.
8 In the Reboot your computer window, click Reboot to restart your computer.
If you want to run the scan again, click Scan Again.
Norton Bootable Recovery Tool automatically downloads and updates the latest virus definitions
from the Symantec servers when you initiate the scan and are connected to the Internet. The
latest virus definitions helps you secure your computer from the latest viruses and security
threats.Chapter 3
Understand and respond to
threats
This chapter includes the following topics:
■ What to do when your device is at risk
■ Run LiveUpdate
■ View or fix threats detected by Norton Security
■ Act on quarantined risks or threats
What to do when your device is at risk
In the Norton main window, the color of Security, Online Safety, Backup, and Performance
tiles indicates the status of each category as follows:
■ Green: You are Protected.
■ Orange: Your computer needs attention.
■ Red: Your computer is at risk.
Note: The backup category is available only with Deluxe+ and Premium subscriptions.
Norton automatically fixes most issues that reduce your protection or system performance and
displays the status as Protected in the main window. Norton displays issues that require your
attention as At Risk or Attention.Understand and respond to threats 22
Run LiveUpdate
Respond to Attention or At Risk status indicators
1 Start Norton.
If you see the My Norton window, next to Device Security, click Open.
2 In the Norton main window, click the red or orange tile of the category that indicates At
Risk or Attention.
3 Click Fix Now and follow the on-screen instructions.
If you still have issues, click Help > Get Support to run the diagnostic tool.
You can also try using Norton Rescue Tools if you think your computer is severely infected.
Run LiveUpdate
Symantec recommends that you run LiveUpdate at regular intervals in the following cases:
■ If you have turned off Automatic LiveUpdate option
■ If your computer is not connected to the Internet for a long time
Note: To run LiveUpdate, you need a valid subscription and an Internet connection.
Run LiveUpdate manually
1 Start Norton.
If you see the My Norton window, next to Device Security, click Open.
2 In the Norton product main window, double-click Security, and then click LiveUpdate.
3 In the Norton LiveUpdate window, when the LiveUpdate is completed successfully, click
OK.
View or fix threats detected by Norton Security
When a risk is detected, Norton removes the threat and quarantines it. In some cases, Norton
requires your attention to manually resolve a detected security risk. If you receive a Threats
Detected alert or a Security Risks alert, follow the instructions in the alert to fix unresolved
threats.Understand and respond to threats 23
View or fix threats detected by Norton Security
View risks that were automatically resolved during a scan
View risks automatically resolved during a scan
1 Start Norton.
If you see the My Norton window, next to Device Security, click Open.
2 In the Norton main window, double-click Security, and then click History.
3 In the Security History window, in the Show drop-down list, select Resolved Security
Risks.
4 Select a risk in the list, then in the Details pane, view the action that was taken.
Fix unresolved risks detected during a scan
In some cases, Norton does not automatically resolve a risk, but recommends an action for
you to take to resolve the risk.
Fix unresolved risks detected during a scan
1 Start Norton.
If you see the My Norton window, next to Device Security, click Open.
2 In the Norton main window, double-click Security, and then click History.
3 In the Security History window, in the Show drop-down list, select Unresolved Security
Risks.
4 Select a risk in the list if there are unresolved risks displayed.
5 Follow the Recommended Action in the Details pane.
Run Norton Power Eraser if you can’t fix an unresolved risk
Run Norton Power Eraser if you think your system is infected. Norton Power Eraser is a
powerful malware removal tool that eliminates the security risks that are difficult to remove.
Run Norton Power Eraser
1 Start Norton.
If you see the My Norton window, next to Device Security, click Open.
2 In the Norton main window, click Security, and then click Scans.
3 In the Scans window, click Norton Power Eraser.
4 Click Go.Understand and respond to threats 24
Act on quarantined risks or threats
Note: Norton Power Eraser is an aggressive malware removal tool. Sometimes Norton Power
Eraser may remove legitimate files along with malware, so you need to review the scan results
thoroughly before you delete any file.
Restore a file that was mistakenly identified as a security risk
By default, Norton removes security risks from your computer and quarantines them. If you
think a file was mistakenly removed, you can restore the file from Quarantine to its original
location and exclude it from future scans.
Restore a file from Quarantine
1 Start Norton.
If you see the My Norton window, next to Device Security, click Open.
2 In the Norton main window, click Security, and then click History.
3 In the Security History window, under Show drop-down menu, select Quarantine.
4 Select the file that you want to restore.
5 In the Details pane, click Options.
6 In the Threat Detected window, click Restore & exclude this file.
7 In the Quarantine Restore window, click Yes.
8 In the Browse for Folder dialog, select the folder or drive where you want to restore the
file and then click OK.
Note: Exclude a program from the Norton scans only if you are confident that the program is
safe. For example, if another program relies on a security risk program to function, you might
decide to keep the program on your computer.
Act on quarantined risks or threats
Quarantined items are isolated from the rest of your computer so that they cannot spread or
reinfect your computer. If you have an item that you think is infected, but is not identified as a
risk by Norton, you can manually put the item in Quarantine.
You cannot open quarantined items accidentally and spread the virus, but you can evaluate
the quarantined items for possible submission to Symantec.
Types of quarantined items:Understand and respond to threats 25
Act on quarantined risks or threats
Security risks Items such as spyware and adware that are generally low risk and that
another program requires to function properly.
You can restore these items if necessary.
Security threats Viruses and other high-risk items.
Perform an action on a quarantined item
1 Start Norton.
If you see the My Norton window, next to Device Security, click Open.
2 In the Norton main window, double-click Security, and then click History.
3 In the Details pane, click Options.
You can use the More Options link to view more details about the item before you select
an action for it. The link opens the File Insight window that contains more information
about the risk.Understand and respond to threats 26
Act on quarantined risks or threats
4 In the Threat Detected window, select the action that you want to perform. Some of the
options are:
Restore Returns the security risk that is quarantined to
the original location on your computer.
This option is available only for manually
quarantined items.
Restore & exclude this file Returns the selected Quarantine item to its
original location without repairing it and excludes
the item from being detected in the future scans
This option is available for the detected viral and
non-viral threats.
Remove from history Removes the selected item from the Security
History log
Submit to Symantec Sends the selected item to Symantec for
evaluation of the security risk
In some cases, Norton might not identify an item
as a security threat, but you might suspect that
the item is infected. In such cases, you can use
this option to submit the item to Symantec for
further analysis.
You can also navigate to this window by using the Options link in the File Insight window
for some risks.
5 Follow the on-screen instructions.Chapter 4
Manage your security
This chapter includes the following topics:
■ View details of your system activities
■ Check the trust level of a file
■ View the Report Card
View details of your system activities
System Insight lets you view details of the system activities that you performed or that occurred
over the last three months in the Graphs window. The activities include application installations,
application downloads, disk optimizations, threat detections, performance alerts, or Quick
Scans.
You can use the tabs at the top of the Events graph to obtain details for the current month and
for the last two months. The Graphs window displays each activity as icon or stripe. The
description for each icon or stripe appears at the bottom of the graph. The pop-up that appears
when you move the mouse pointer over an icon provides you the details about the activity.
The details include the date on which an activity was performed and the number of such
activities that you performed on that date. The View Details link provides additional details of
the activity in the Security History window.
View details of your system activities
1 Start Norton.
If you see the My Norton window, next to Device Security, click Open.
2 In the Norton main window, double-click Performance, and then click Graphs.
3 In the Graphs window, click the tab for a month to view the details.
4 In the Events graph, move the mouse pointer over the icon or the stripe for an activity.Manage your security 28
Check the trust level of a file
5 In the pop-up that appears, view the details of the activity.
6 If the View Details option appears in the pop-up, click View Details to view additional
details in the Security History window.
Check the trust level of a file
Norton Insight shows the reputation of Files of Interest on your computer. You can view a
file’s signature and the date when the file was installed. You can also view the trust level,
community usage, resource usage, and the source of the file.
Note: Norton displays the File Insight option only when you right-click a File of Interest. In
Windows Safe mode, you cannot access this option for any file. Norton also categorizes any
file for which you open the File Insight window to view details as a File of Interest.
From the File Insight window, you can update the trust value of a file or manually trust any file.
Check the trust level or location of a file
1 Start Norton.
If you see the My Norton window, next to Device Security, click Open.
2 In the Norton main window, double-click Security, and then click Scans.
3 In the Scans window, select Norton Insight, and then click Go.
4 In the Norton Insight window, view the file’s details or perform the following actions:
■ To find the location of the file, click Locate.
■ In the Details tab, click Trust Now to manually trust the file.
You can manually trust files that are poor, unproven, or not Norton trusted
5 Click Close.
Check the trust level of a specific file
1 Start Norton.
If you see the My Norton window, next to Device Security, click Open.
2 In the Norton main window, double-click Security, and then click Scans.
3 In the Scans window, select Norton Insight, and then click Go.
4 In the Norton Insight window, click Check a Specific File.
5 Browse to the location of the file for which you want to check the details.
6 Select the file, and then click Open.Manage your security 29
View the Report Card
7 In the File Insight window, view the details of the file.
8 Click Close.
View the Report Card
The Report Card automatically displays all the activities that Norton performs each month. In
the Norton main window, you can also click Report Card to manually open the report.
Every time Norton scans files, runs LiveUpdate, analyzes downloads, blocks intrusions, or
fixes infected files, information about the activity is logged on the Report Card. The Details
option in the Report Card window shows the complete list of activities that Norton has performed.
If you do not want the Report Card to automatically display each month, you can turn off the
option. You can still manually open the report.
Turn off Report Card
1 Start Norton.
If you see the My Norton window, next to Device Security, click Open.
2 In the Norton main window, click Settings.
3 In the Settings window, click Administrative Settings.
4 In the Report Card row, move the On/Off switch to Off.
How do I manually view the Report Card?
You can also manually view the report using the Report Card option in the Norton main window.
The Report Card option is available only when Norton has performed any activity on your
computer.Chapter 5
Scan your computer
This chapter includes the following topics:
■ Run a Quick Scan
■ Run a Full System Scan
■ Scan selected drives, folders, or files
■ Run a custom scan
■ Schedule a scan
■ Scan your computer with Norton Power Eraser
■ Customize Real Time Protection settings
■ Turn SONAR Protection off or on
■ Exclude files and folders from Norton Auto-Protect, SONAR, and Download Intelligence
scans
■ Add items to the Signature Exclusions
■ Clear file IDs excluded during scans
■ Turn on or turn off automatic tasks
■ Run custom tasks
■ Schedule security and performance scans
Run a Quick Scan
A Quick Scan helps you to scan the possible virus-infected areas of a computer that the viruses
and other security risks often targets. Because this scan does not scan your entire computer,
it takes less time to run than a Full System Scan.Scan your computer 31
Run a Full System Scan
During idle time, your Norton service runs a Quick Scan when there is a definition update.
Run a Quick Scan
1 Start Norton.
If you see the My Norton window, next to Device Security, click Open.
2 In the Norton main window, double-click Security, and then click Scans.
3 In the Scans window, under Scans and Tasks, click Quick Scan.
4 Click Go.
5 On the Results Summary window, do one of the following:
■ If no items require attention, click Finish.
■ If there are items require attention, review the risks in the Threats Detected window.
Run a Full System Scan
Full System Scan checks all boot records, files, and running processes to which the user has
access. This scans your computer thoroughly and takes longer time.
Run a Full System Scan
1 Start Norton.
If you see the My Norton window, next to Device Security, click Open.
2 In the Norton main window, double-click Security, and then click Scans.
3 In the Scans window, under Scans and Tasks, click Full System Scan.
4 Click Go.
Scan selected drives, folders, or files
Occasionally, you might want to scan a particular file, removable drives, any of your computer's
drives, or any folders or files on your computer. For example, when you work with removable
media and suspect a virus, you can scan that particular disk. Also, if you have received a
compressed file in an email message and you suspect a virus, you can scan that individual
element.
Scan individual elements
1 Start Norton.
If you see the My Norton window, next to Device Security, click Open.
2 In the Norton main window, double-click Security, and then click Scans.Scan your computer 32
Run a custom scan
3 In the Scans window, under Scans and Tasks, click Custom Scan.
4 Click Go.
5 In the Scans window, do one of the following:
■ To scan specific drives, click Run next to Drive Scan, select the drives that you want
to scan, and then click Scan.
■ To scan specific folders, click Run next to Folder Scan, select the folders that you
want to scan, and then click Scan.
■ To scan specific files, click Run next to File Scan, select the files that you want to
scan, and then click Add.
You can also press Ctrl, and select multiple files to scan.
You can use the following options to suspend a scan:
Pause Suspends a custom scan temporarily.
Click Resume to continue the scan.
Stop Terminates the scan.
6 In the Results Summary window, do one of the following:
■ If no items require attention, click Finish.
■ If any items require attention, review them on the Threats Detected window.
Run a custom scan
When you run a custom scan, you do not have to redefine what you want to scan.
You can run a custom scan from the Scans window.
Run a custom scan
1 Start Norton.
If you see the My Norton window, next to Device Security, click Open.
2 In the Norton main window, double-click Security, and then click Scans.
3 In the Scans window, under Scans and Tasks, click Custom Scan.
4 Click Go.Scan your computer 33
Schedule a scan
5 In the Scans window, click Run next to the custom scan that you want to run.
You can use the following options to suspend a custom scan:
Pause Suspends a custom scan temporarily.
Click Resume to continue the scan.
Stop Terminates a custom scan.
Click Yes to confirm.
6 In the Results Summary window, do one of the following:
■ If no items require attention, click Finish.
■ If any items require attention, review the risks on the Threats Detected window.
Schedule a scan
Norton automatically detects the idle state of your computer and runs Quick Scans. However,
you can schedule a Full System Scan according to your preferences. You can also set up a
schedule for a Quick Scan and for the custom scans that you create.
You have complete flexibility in scheduling custom scans. When you select how frequently
you want a scan to run (daily, weekly, or monthly), you are presented with additional options.
For example, you can request a monthly scan, and then schedule it to occur on multiple days
instead.
In addition to the custom scans that you create, Norton lets you schedule the Full System Scan
and Quick Scan.
You can also schedule the scan to run in specific time intervals (hours or days).
Note: Norton lets you select multiple dates if you schedule a monthly scan.
Schedule a custom scan
1 Start Norton.
If you see the My Norton window, next to Device Security, click Open.
2 In the Norton main window, double-click Security, and then click Scans.
3 In the Scans window, under Scans and Tasks, click Custom Scan.
4 Click Go.
5 In the Scans window, in the Edit Scan column, click the edit icon next to the custom scan
that you want to schedule.Scan your computer 34
Scan your computer with Norton Power Eraser
6 In the Edit Scan window, on the Scan Schedule tab, do one of the following:
■ If you do not want to run the scan at any particular time, but want to keep the scan
options and scan items saved, select Do not schedule this scan.
■ To run the scan at specific time intervals, select Run at a specific time interval.
■ To run the scan at specific time every day, select Daily.
■ To run the scan on a specific day on a week, select Weekly.
■ To run the scan on a specific day on a month, select Monthly.
These frequency options include the additional options that you can use to refine the
schedule. Set the additional options as required.
7 Under Run the scan, do the following:
■ To run the scan only at idle time, check Only at idle time.
■ To run the scan only when your computer is connected with external power source,
check Only on AC power.
■ To prevent your computer from going to a Sleep or Standby mode, check Prevent
standby.
8 Under After scan completion, select the state at which your computer should be after
the scan is complete. Your options are:
■ Stay On
■ Turn Off
■ Sleep
This option works only if you have configured the power options in your computer
using the Windows Control Panel.
■ Hibernate
This option works only if you have configured the power options in your computer
using the Windows Control Panel.
9 Click Next.
10 In the Scan Options tab, click Save.
Scan your computer with Norton Power Eraser
Norton Power Eraser is a powerful malware removal tool that can help you eradicate the
security risks that are difficult to remove. If a program hijacked your computer and you have
difficulty detecting or removing it, Norton Power Eraser may remove that security risk from
your computer. It takes on difficult to detect crimeware known as scareware or rogueware that
cybercriminals use to trick you into unknowingly download threats onto your computer.Scan your computer 35
Customize Real Time Protection settings
Norton Power Eraser includes detection and removal capabilities for the security risks that
impersonate legitimate applications (fake antivirus software), often known as scareware,
rogueware, or scamware. The tool uses more aggressive techniques than your Norton product;
hence there is a risk that it flags legitimate programs for removal. You should carefully review
the scan results before removing any files.
When you scan and fix threats, Norton Power Eraser creates a system restore point. If you
removed any essential files, Norton Power Eraser lets you restore the files using the Undo
Previous Fix option. Norton Power Eraser lists the recent repair sessions where you can view
and restore the essential files.
Scan using Norton Power Eraser
1 Start Norton.
If you see the My Norton window, next to Device Security, click Open.
2 In the Norton product main window, double-click Security, and then click Scans.
3 In the Scans window, under Norton Power Eraser, click Norton Power Eraser.
4 Click Go.
5 In the Norton Power Eraser window, click OK.
6 In the Norton Power Eraser main window, click Advanced Scans.
7 Click System Scan.
8 Review the scan results and follow the on-screen instructions to fix the security risks
detected.
Customize Real Time Protection settings
Real Time Protection detects unknown security risks on your computer and lets you determine
what action to take if it finds a risk.
Note: Default settings are recommended for most users. If you want to turn off a feature
temporarily, turn it on as soon as possible. If you want low-risk items removed automatically,
configure SONAR Advanced mode. Auto-Protect checks for viruses and other security risks
every time that you run programs on your computer. Always keep Auto-Protect on.
Set Auto-Protect to scan removable media
A removable media scan takes a few seconds to complete. Quickly inserting and ejecting
removable media may create a warning that the device is in use. The first time that you access
removable media from your computer, wait a few seconds before ejecting it.Scan your computer 36
Customize Real Time Protection settings
Customize Automatic Protection settings
1 Start Norton.
If you see the My Norton window, next to Device Security, click Open.
2 In the Norton main window, click Settings.
3 In the Settings window, click Antivirus.
4 Under Removable Media Scan, set the slider to On.
Set SONAR to remove threats automatically
Symantec Online Network for Advanced Response (SONAR) provides real-time protection
against threats and proactively detects unknown security risks on your computer. SONAR
identifies emerging threats based on the behavior of applications. You can configure how
SONAR removes a threat using SONAR Advanced Mode settings.
Set SONAR to remove threats automatically
1 Start Norton.
If you see the My Norton window, next to Device Security, click Open.
2 In the Norton main window, click Settings.
3 In the Settings window, click Antivirus.
4 Under Remove Risks Automatically, set the slider to Always.
5 Under Remove Risks if I Am Away, set the slider to Always.
6 Click Apply.
Set Auto-Protect to exclude known good files from Norton scans
If you think Norton identifies a valid application as a security risk, you can exclude the file from
Norton scans.
Exclude files from Norton scans
1 Start Norton.
If you see the My Norton window, next to Device Security, click Open.
2 In the Norton main window, click Settings.
3 In the Settings window, click Antivirus.
4 In the Antivirus settings window, click the Scans and Risks tab.
5 Under Exclusions / Low Risks, do one of the following:
■ In the Items to Exclude from Scans row, click Configure.Scan your computer 37
Turn SONAR Protection off or on
■ In the Items to Exclude from Auto-Protect, SONAR and Download Intelligence
Detection row, click Configure.
6 In the window that appears, click Add Folders or Add Files.
7 In the Add Item dialog box, click the browse icon. In the dialog box that appears, select
the item that you want to exclude from scans.
8 Click OK.
Turn SONAR Protection off or on
SONAR is real-time protection that detects potentially malicious applications when they run.
It provides "zero-day" protection because it detects threats before traditional virus and spyware
detection definitions have been created to address the threats.
When you turn off SONAR, a protection alert prompts you to turn SONAR back on after a
specified time.
Note: When Auto-Protect is turned off, SONAR Protection is also disabled and your computer
is not protected against emerging threats.
Turn SONAR Protection off or on
1 Start Norton.
If you see the My Norton window, next to Device Security, click Open.
2 In the Norton main window, click Settings.
3 In the Settings window, click Antivirus.
4 On the Automatic Protection tab, under Real Time Protection, move the SONAR
Protection switch to Off or On.
5 Click Apply.
6 If prompted, select the duration until when you want the SONAR feature to be turned off,
and click OK.
7 In the Settings window, click Close.
Exclude files and folders from Norton Auto-Protect,
SONAR, and Download Intelligence scans
You can use Scan Exclusions window and Real Time Exclusions window to exclude viruses
and other high-risk security threats from scanning.Scan your computer 38
Add items to the Signature Exclusions
Exclude high-risk security threats from scanning
1 Start Norton.
If you see the My Norton window, next to Device Security, click Open.
2 In the Norton main window, click Settings.
3 In the Settings window, click Antivirus.
4 In the Antivirus settings window, click the Scans and Risks tab.
5 Under Exclusions / Low Risks, do one of the following:
■ In the Items to Exclude from Scans row, click Configure.
■ In the Items to Exclude from Auto-Protect, SONAR and Download Intelligence
Detection row, click Configure.
6 In the window that appears, click Add Folders or Add Files.
7 In the Add Item dialog box, click the browse icon.
8 In the dialog box that appears, select the item that you want to exclude from the scan.
9 Click OK.
10 In the Add Item dialog box, click OK.
11 In the window that appears, click Apply, and then click OK.
Add items to the Signature Exclusions
To exclude a security risk from scans, you must add the specific security risk to the Signature
Exclusions window. You can select a known risk by name and add it to the list.
Note: When you exclude a known security risk from Norton scans, the protection level of your
computer reduces. You should exclude items only if you are confident that they are not infected.
Add a signature to the Signature Exclusions
1 Start Norton.
If you see the My Norton window, next to Device Security, click Open.
2 In the Norton main window, click Settings.
3 In the Settings window, click Antivirus.
4 In the Antivirus settings window, click the Scans and Risks tab.
5 Under Exclusions / Low Risks, in the Signatures to Exclude from All Detections row,
click Configure.You can also read