Army Enterprise Service Desk (AESD) Skype for Business Helpdesk Troubleshooting Guide - Version 4 February 22, 2020
←
→
Page content transcription
If your browser does not render page correctly, please read the page content below
Army Enterprise Service Desk (AESD)
                     Skype for Business Helpdesk
                        Troubleshooting Guide

                                Version 4

                            February 22, 2020

                                                       1|Page
ATTAP-A018-1-A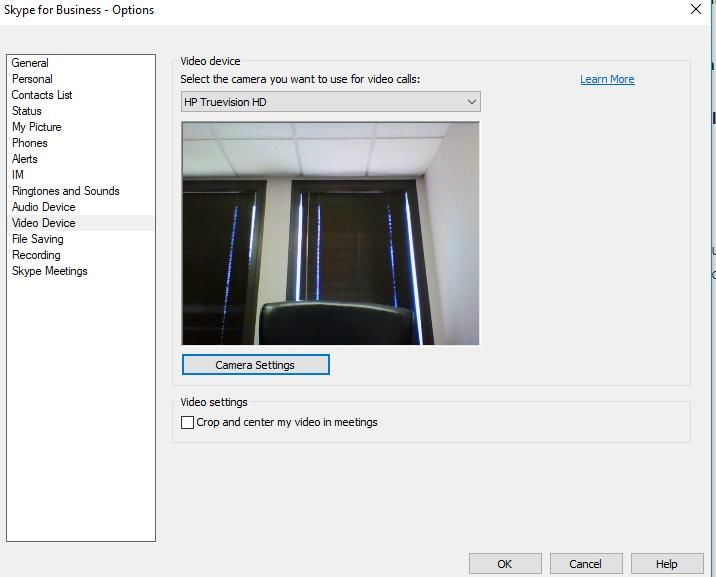
Table of Contents
Revision History ............................................................................................................................. 7
Forward ........................................................................................................................................... 8
Section 1 - Signing into Skype for Business ................................................................................... 9
   1.1 Sign into Local or Telework Personal Computer (PC) ......................................................... 9
   1.2 Verify installation of Skype for Business on PC .................................................................. 9
   1.3 Adding Exception Site List in JAVA .................................................................................... 9
   1.4 Activating your PIV Certificate .......................................................................................... 10
   1.5 Signing into Skype for Business ......................................................................................... 12
   1.6 Verify Entries in Registry ................................................................................................... 12
   1.7 Check DLL File Version ..................................................................................................... 13
   1.8 Running Repair on an Installed Copy of Skype .................................................................. 13
   1.9 Check Communication with Port 49443 ............................................................................. 14
   1.10 Resetting the Sign in password ......................................................................................... 14
   1.11 Checking Installed Version of Skype for Business ........................................................... 17
Section 2 - Checking Skype for Business Settings ....................................................................... 18
   2.1 General ................................................................................................................................ 18
      Accessing the General options window: ............................................................................... 18
      Conversation window preferences......................................................................................... 19
      Help improve Skype for Business ......................................................................................... 19
      Set logging options to help your support team ...................................................................... 19
      Set Application window ........................................................................................................ 20
   2.2 Personal ............................................................................................................................... 20
      To change the sign-in address ............................................................................................... 20
      To automatically sign in and start Skype for Business .......................................................... 20
      Stop automatically sign-in and start Skype for Business ...................................................... 20
      Start the app in the foreground .............................................................................................. 20
      Exchange and Outlook integration options ........................................................................... 21
      Update my presence automatically show when you are in a meeting ................................... 21
      To show this information to contacts in your Workgroup..................................................... 21
      To show your Outlook Out of Office information to contacts .............................................. 21
      To save your conversation history or phone call history in Outlook..................................... 21

                                                                                                                                     2|Page
ATTAP-A018-1-A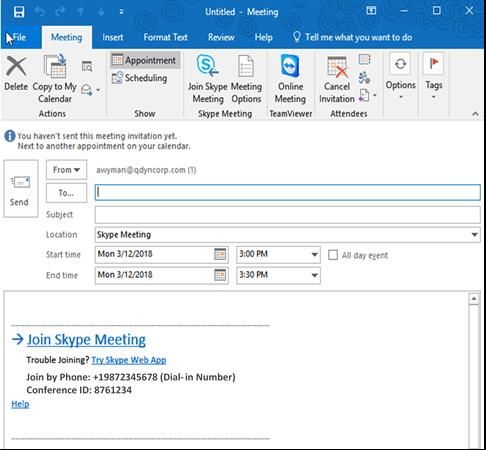
Location options .................................................................................................................... 21
     Show picture options ............................................................................................................. 22
     Advanced Connection Settings .............................................................................................. 22
  2.3 Contacts Lists ...................................................................................................................... 24
     Display my contact with ........................................................................................................ 24
     Order my list .......................................................................................................................... 24
     Show this information ........................................................................................................... 24
  2.4 Status ................................................................................................................................... 25
     Show me Inactive or change my Status ................................................................................. 25
  2.5 My picture ........................................................................................................................... 26
     Show or Hide My Picture ...................................................................................................... 26
  2.6 Phones ................................................................................................................................. 27
     My phone numbers ................................................................................................................ 28
     Who can see my phone number? ........................................................................................... 28
     Phone Integration ................................................................................................................... 28
     Use a text telephone (TTY) device ........................................................................................ 29
  2.7 Alerts ................................................................................................................................... 29
     General alerts ......................................................................................................................... 30
     When my status is Do Not Disturb ........................................................................................ 30
     Contacts not using Skype for Business.................................................................................. 31
  2.8 IM (Instant Message) .......................................................................................................... 31
  2.9 Ringtones and Sound........................................................................................................... 33
     Ringtones ............................................................................................................................... 33
     Sounds ................................................................................................................................... 33
     Set specific sounds................................................................................................................. 34
  2.10 Audio Device..................................................................................................................... 34
     Check Device Manager ......................................................................................................... 35
     Check Sound to Enable Speakers .......................................................................................... 36
     Check Sound to Enable Microphone ..................................................................................... 37
     Skype Audio Device Options ................................................................................................ 37
  2.11 Video Device ..................................................................................................................... 38
     Check Device Manager ......................................................................................................... 39

                                                                                                                                   3|Page
ATTAP-A018-1-A
Skype Video Device Options ................................................................................................ 39
      Video Keeps Moving Around................................................................................................ 40
   2.12 File Saving......................................................................................................................... 40
   2.13 Recording .......................................................................................................................... 40
      Save your recorded meetings ................................................................................................. 40
   2.14 Skype Meetings ................................................................................................................. 41
      Set Skype for Business Meeting options ............................................................................... 41
Section 3 – Using Skype for Business .......................................................................................... 42
   3.1 Add a contact to list............................................................................................................. 42
      Add a contact who is in your organization ............................................................................ 42
      Add a contact who has a Skype account................................................................................ 42
      Add an external contact (someone not in your organization or using Skype) ....................... 43
   3.2 Send and respond to Instant Message (IM) ......................................................................... 44
      Send IM to one person ........................................................................................................... 44
      Send an instant message to several people at once ................................................................ 45
      Send an instant message to a group ....................................................................................... 46
      Send an IM to one of your contact list groups ....................................................................... 46
      Respond to an incoming message alert.................................................................................. 46
   3.3 Make and receive calls ........................................................................................................ 47
      To make a Call ....................................................................................................................... 47
      Call Forward Options ............................................................................................................ 48
      Use the Dial Pad .................................................................................................................... 48
      Receive a call ......................................................................................................................... 49
   3.4 Cannot see video from other participants ............................................................................ 49
      Other participants cannot see my video ................................................................................. 50
   3.5 Cannot Hear Participants ..................................................................................................... 50
      Background noise .................................................................................................................. 50
   3.6 Connection Problems .......................................................................................................... 50
      Troubleshoot connection issues in Skype for Business ......................................................... 50
      If you have a slow connection, the following tips might help. .............................................. 51
   3.7 Attach a File ........................................................................................................................ 52
      Attach a file while in the meeting .......................................................................................... 52

                                                                                                                                 4|Page
ATTAP-A018-1-A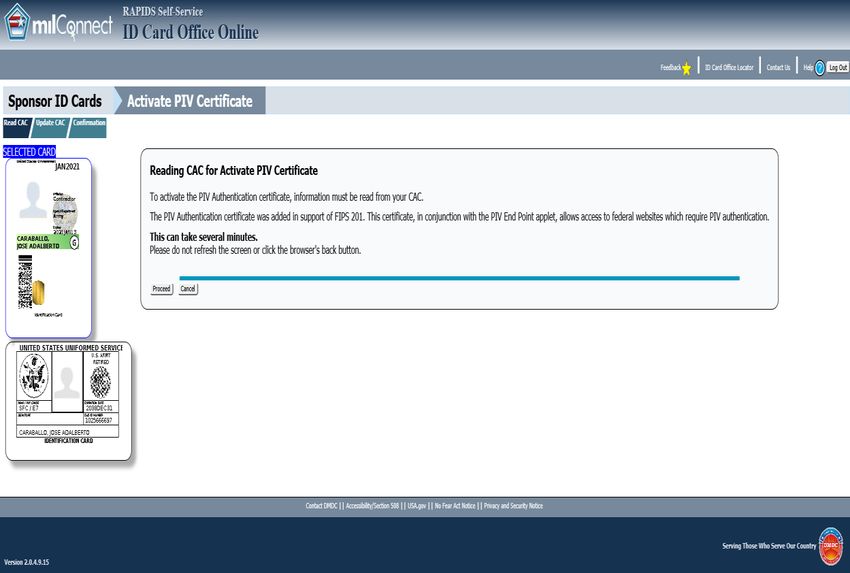
Preload attachments for a Skype for Business meeting ......................................................... 52
     View the attachments in the meeting ..................................................................................... 53
  3.8 Setup Skype Meeting in Outlook ........................................................................................ 55
     Schedule a Skype for Business meeting using Outlook ........................................................ 55
     Set up an online meeting using Office 365............................................................................ 56
  3.9 Join Skype for Business Meeting ........................................................................................ 58
     Join a Skype for Business meeting from a Windows PC ...................................................... 58
  3.10 Record and Playback a Skype for Business Meeting ........................................................ 60
     Play and share a recording ..................................................................................................... 61
  3.11 Present Your Screen .......................................................................................................... 62
     Present Desktop ..................................................................................................................... 62
     Present Programs ................................................................................................................... 62
     Share your screen or program ................................................................................................ 62
     Share primary, secondary or all monitors .............................................................................. 63
     Presenting a PowerPoint slide show in a multiple monitors scenario ................................... 63
     Give and take control of a presentation ................................................................................. 64
  3.12 Find a Conversation Log ................................................................................................... 65
     Find a previous conversation with a specific person ............................................................. 65
     Browse your conversation history ......................................................................................... 65
  3.13 Persistent Chat (Chat Rooms) (SIPR & European Only) .................................................. 66
     Chat Room Privacy Settings .................................................................................................. 66
     Find and Enter a Chat Room ................................................................................................. 67
     Create a Chat Room ............................................................................................................... 67
     Create a Topic Feeds to Track Activity ................................................................................. 67
     See Participants in a Chat Room ........................................................................................... 68
     Read Chat Rooms Messages.................................................................................................. 68
     Follow a Chat Room .............................................................................................................. 69
     Use Custom Notifications ...................................................................................................... 70
  3.14 Using Polling ..................................................................................................................... 70
     Create a Poll during a meeting .............................................................................................. 70
  3.15 Using the Whiteboard........................................................................................................ 73
     Using whiteboard as a presenter ............................................................................................ 73

                                                                                                                              5|Page
ATTAP-A018-1-A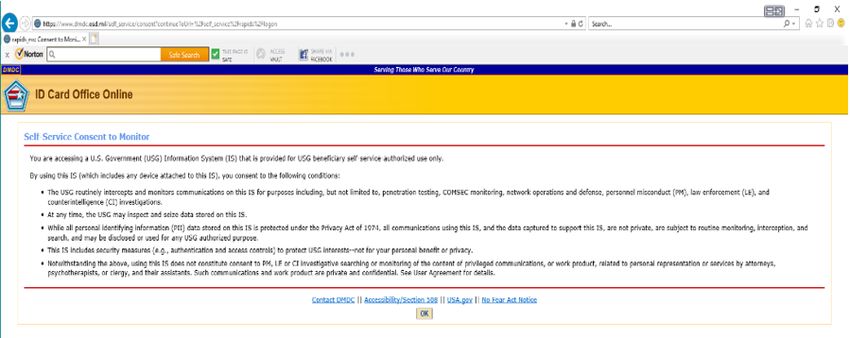
Use the annotation tools ........................................................................................................ 74
     Move or Delete drawings ...................................................................................................... 74
     Who added or changed content? ............................................................................................ 75
     Manage your whiteboard ....................................................................................................... 75
  3.16 Using Question and Answer (Q&A) ................................................................................. 75
     Start the Q&A session as the presenter ................................................................................. 75
     Participate in the Q&A session as an attendee ...................................................................... 77
  3.17 Skype for Business Conference Call ................................................................................. 78
     Start an SfB Conference Call................................................................................................. 78
     Add more people to the SfB Conference Call ....................................................................... 78
  3.18 PSTN Conferencing and Calling (CONUS & European Theater Only) ........................... 79
     Make a PSTN Call ................................................................................................................. 79
     Start a PSTN Conference Call ............................................................................................... 79
  Appendices ................................................................................................................................ 84
     Appendix 1 – Abbreviations .................................................................................................. 84
     Appendix 2 – UC SCSS Concept of Operations ................................................................... 85
     Appendix 3 - NOC Incident Management Process ............................................................... 86

                                                                                                                      Back to Table of Contents

                                                                                                                                6|Page
ATTAP-A018-1-A
Revision History

 Revision Number       Date          Description

 Draft A               2/22/18       First draft
 Draft B               4/17/18       Updated Section 3.8 to include using conferencing numbers.
                                     Added Section 3.13 Persistent Chat
 Version 1             6/7/18        Changed status from Draft to Version 1
 Version 2             6/14/18       Added Appendices and Table of Figures. Updated content
                                     with suggestions from feedback of course. Added in Section
                                     3 Polling, Q&A, and Whiteboard
 Version 2.1           10/10/18      Update page 10 to use sign-in address for new users of SfB
                                     in welcome letter/email. Noted to set SfB to start
                                     automatically and referenced 2.2 Personal section to verify.
 Version 2.1.1         1/1/19        Minor font corrections
 Version 2.2           1/1/19        PSTN section added for the European Theater
 Version 3             2/28/19       Small structural modifications to document for European
                                     theater and SIPR.
 Version 3.1           3/12/19       Updated SIP sign in address
 Version 3.2           4/1/19        Added activating PIV certificate instructions and adding
                                     exceptions site list in JAVA.
 Version 3.3           6/13/19       Changed enter password to CAC PIN on slides 13 & 15
 Version 3.4           10/30/19      Changed PSTN section to CONUS and European Theater
 Version 3.4.1         1/15/20       Updated section 3.3 to include call dialing prefix for PSTN
                                     and Call Forward Options.
 Version 3.4.2         2/4/20        Format corrections and verbiage.
 Version 4             2/24/20       Added Section 1.6 – 1.10 for SfB Client System
                                     Remediation
Send document corrections, additions, and suggestions to ArmyUC@att.com.

                                                                            Back to Table of Contents

                                                                                      7|Page
ATTAP-A018-1-A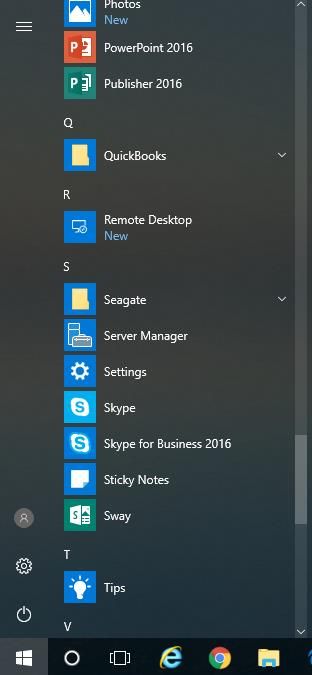
Forward

This guide supports the Army Enterprise Service Desk (AESD) helpdesk to troubleshoot and
diagnose problems that users may have with Skype for Business Online or Client. This guide
offers recommended practices as a strategy to resolve the user’s problems. This document
supports the mission of “The Service Desk to provide a strategic central point of contact between
the Army IT users and the Army IT services being provided.”
Some of the content in this document was retrieved from the Microsoft support website for
Skype for Business 2015 at https://support.office.com/en-us/skype-for-business. Utilization of
the Skype for Business application is considered a government information system and as such,
is subject to monitoring and recording per AR 25-2 and DoDI 8500.01.

                                                                              Back to Table of Contents

                                                                                          8|Page
ATTAP-A018-1-A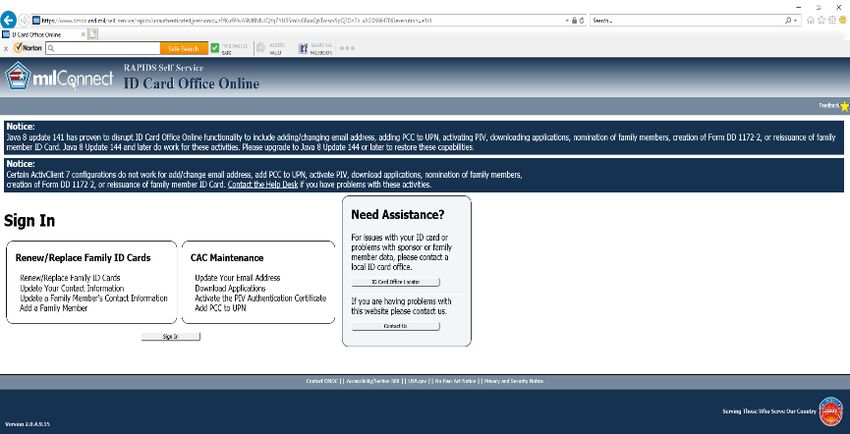
Section 1 - Signing into Skype for Business

 1.1 Sign into Local or Telework Personal Computer (PC)
 The Army Enterprise Service Desk (AESD) uses the Single Sign-On (SSO) of the user to log
 into local desktop PCs or remote teleworking PC’s. If you are unable to login with your SSO,
 please contact AESD for assistance.

 1.2 Verify installation of Skype for Business on PC
 1. Navigate to Windows Symbol on Task Bar located on the bottom (most cases), left, right,
 or top of the screen.

 2. Click on      to show Programs and Applications. Scroll down with mouse to “S” category
 to find Skype for Business. If missing, contact your PC support team to install it.

 1.3 Adding Exception Site List in JAVA
   1. Open the “Control Panel” on your computer and then double-click the Java icon to
   open the Java Control Panel or Programs and Click on JAVA → Configure JAVA.
   2. Once in the JAVA Control Panel, select Security Tab
   3. Add the 3 sites below to the Exception Site List
    a. https://www.dmdc.osd.mil
    b. https://pki.dmdc.osd.mil
    c. https://idco.dmdc.osd.mil
   4. Click Apply/OK                                                       Back to Table of Contents

                                                                                          9|Page
ATTAP-A018-1-A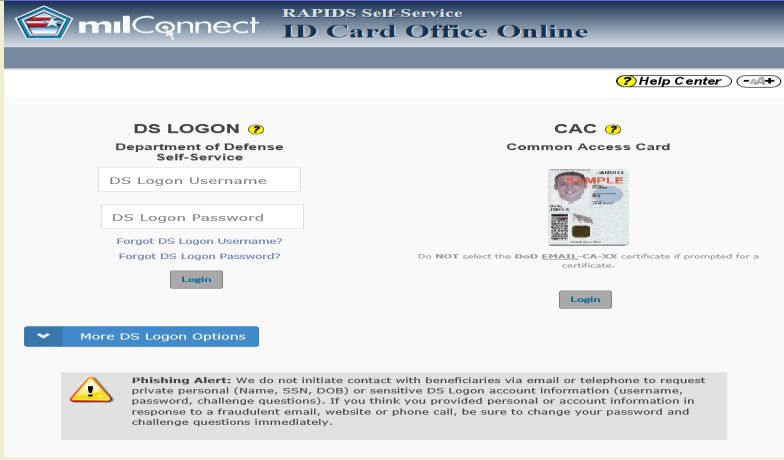
1.4 Activating your PIV Certificate
1. Before accessing Skype for Business, you must first download your PIV certificate.
Go to: https://www.dmdc.osd.mil/self_service/
1. Click Sign
in
1
2. Click
OK
2
3. Select CAC Login
and follow
directions
3
Back to Table of Contents
10 | P a g e
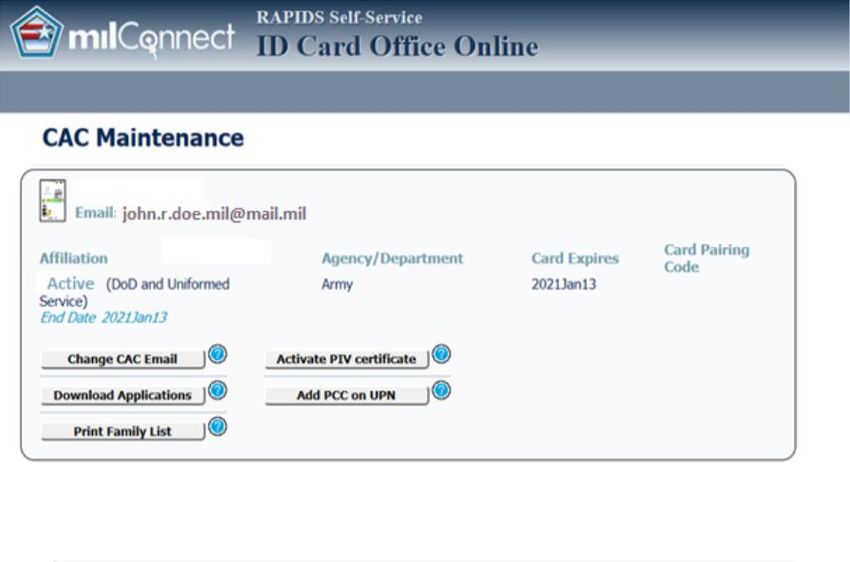
ATTAP-A018-1-A4. From the “Home” page,
click Activate PIV
Certificate
Note that if you have
more than one CAC (i.e.
Civil Service and
Reserve), multiple CAC
information boxes will
display. Click the action
in the box associate with
the CAC that you want to
update.
5
5. Click Proceed to continue activating the PIV Authentication
certificate associated with your CAC. Click Update CAC if
prompted. The progress of your task is displayed. Once IDCO
has completed process, the screen will notify you of successful
completion.
Back to Table of Contents
11 | P a g e
ATTAP-A018-1-A1.5 Signing into Skype for Business
Enter the email address from the Welcome letter/email for a new user of SfB in the proper
format. It should look something like first.last.mil@usa.army.mil. Be sure to use your
organization credentials, not your personal Skype Name or Microsoft account. Enter it in the
Sign-in address block.
Note: If you are signing into Skype for Business for the first time, enter your sign-in
address, click Sign In, enter your CAC PIN, and click Sign In again. Make sure that SfB
starts automatically when you log on to Windows (see 2.2 Personal to verify).
1. Enter sign-in address in the
first.last.mil@usa.army.mil
Sign-in address block
2. Enter CAC PIN in the
Password block
Ck
3. Click Sign In.
Make sure that SfB starts automatically when you log on to Windows (see 2.2 Personal to verify).
1.6 Verify Entries in Registry
Check for the following two registry keys entries on the user’s equipment.
REG ADD HKCU\SOFTWARE\Microsoft\Office\15.0\Common\Identity /v EnableADAL
/t REG_DWORD /d 1
REG ADD HKCU\SOFTWARE\Microsoft\Office\15.0\Common\Identity /v Version /t
REG_DWORD /d 1
If the entries are missing, use PowerShell to enter the following commands and then reboot.
Back to Table of Contents
12 | P a g e
ATTAP-A018-1-A1.7 Check DLL File Version
The client version of Skype for Business requires DLL versions 15.0.4771.1001 and above for
Modern Auth. This applies to MSO.DLL, CSI.DLL, Lynce.exe, and ADAL.DLL requires
version 1.0.2016.624 and above.
The DLL files are located in the following.
MSO.DLL
C:\ Program Files \Common Files\Microsoft Shared\OFFICE15 \MSO. DLL
CSI.DLL
C:\ Program Files \Common Files\Microsoft Shared\OFFICE15\CSI.DLL
ADAL.DLL
C:\ Program Files \Common Files\Microsoft Shared \OFFICE15\ADAL.
DLL
Lync.exe
C:\Program Files \Microsoft Office\Office15\lync.exe
• You can verify the version numbers of each file using Windows Explorer and hovering
your mouse over the file to display file details or by right-clicking the file, selecting
“properties” and then going to the “details” tab.
• If your file versions are above the minimal requirement, please consult your designated
IT Support Staff.
• If the file versions ARE NOT above the minimum requirement, your designated IT
Support Staff will need to push updated .DLL versions to the PC.
• You must reboot the equipment when the.DLL files are updated.
1.8 Running Repair on an Installed Copy of Skype
• Your IT Support staff must log in to equipment as an admin to complete this task.
• Open Control Panel and select “Programs and Features.”
• Select the Skype program and select “Repair.”
• Once completed, reboot the equipment.
Back to Table of Contents
13 | P a g e
ATTAP-A018-1-A1.9 Check Communication with Port 49443
• Open Windows PowerShell and run the following command to check port 49443.
• Test-NetConnection -ComputerName sts.usa.army.mil -Port 49443
• You want to get a return of TRUE for “PingSucceeded” if you get a reply of FALSE, this
needs to be reported to AESD or your local NEC and they will act accordingly.
• Once AESD or your local NEC reports this issue is remediated, please go to section 1 and
try to sign back into skype.
1.10 Resetting the Sign in password
If you recently changed your CAC PIN, you will need to enter your new CAC PIN in Skype for
Business. As a standard requirement for companies, employees must change passwords
periodically for security purposes.
1. Open the Skype for Business sign in screen.
Note: If you are stuck at "Contacting server and signing in," click Cancel Sign-In.
Back to Table of Contents
14 | P a g e
ATTAP-A018-1-Afirst.last.mil@usa.army.mil
2. Click on Delete my
sign-in info
3. In the window that
appears, click Yes.
Back to Table of Contents
15 | P a g e
ATTAP-A018-1-Afirst.last.mil@usa.army.mil
4. Click Sign In.
first.last.mil@usa.army.mil
5. Under Password,
enter your CAC PIN.
6. Click Sign In.
Back to Table of Contents
16 | P a g e
ATTAP-A018-1-A1.11 Checking Installed Version of Skype for Business
1. Open the Skype for Business main window, click the Options button and select Help,
then About Skype for Business.
Back to Table of Contents
17 | P a g e
ATTAP-A018-1-ASection 2 - Checking Skype for Business Settings
2.1 General
In General options, the window allows setting up formatting for instant messages, help
Microsoft improve Skype for Business, help your support staff troubleshoot issues, and set
where Skype for Business is available from when closed.
Accessing the General options window:
1. In the Skype for Business main window, click the Options button and select General.
Or click the arrow next to the Options button on the right and select Tools > Options.
Or
2. On the Options page, select General.
Back to Table of Contents
18 | P a g e
ATTAP-A018-1-AConversation window preferences
The conversation window selections determine whether Skype for Business preserves your
conversation display between sessions and what happens when Skype for Business moves to
the background during an active conversation.
• If you want Skype for Business to remember which conversations are in the tabbed display
whenever you sign out and automatically redisplay those conversations the next time you sign
in, select Reopen my conversations when I sign in.
• To display shortcut call controls if your active Skype for Business meeting is moved to the
background, select Show call controls when Skype for Business is in the background.
Help improve Skype for Business
Selecting this option automatically sends error information to Microsoft specifically about
Skype for Business, such as error logs, device configuration, and info about how the
application is used. This information can help fix problems and improve the product.
• To contribute Skype for Business error information, select Send Skype for Business
Improvement Program info to Microsoft.
Set logging options to help your support team
System logs help to analyze problems. The organization's technical support team might
occasionally ask you to collect logs to help with troubleshooting. If they want you to collect log
information about Skype for Business, the Help your support team help you section is where
you can initiate log collections.
• To change the logging level, in the Logging in Skype for Business list, select Full creates a
log file that contains detailed information, Light (default) records summary information and
gathers info about specific errors, or Off. Ask your technical support person which to
choose.
• Sometimes Windows event logs can provide clues to issues with Skype for Business. To
turn Windows Event logging on, select Also collect troubleshooting info using Windows
Event logging.
Back to Table of Contents
19 | P a g e
ATTAP-A018-1-ASet Application window
In Skype for Business, when you click the Close (X) button in the upper right corner of the
main window, Skype for Business keeps running so that you can receive alerts of incoming
calls or messages. By default, clicking the Close button minimizes Skype for Business to the
taskbar. However, you can choose to have the Skype for Business window minimized to the
notification area (located at the far right of the taskbar) instead of the taskbar by
selecting Minimize to the notification area instead of the taskbar.
Note: If you choose this option, it does not take effect until you exit and then open Skype
for Business. In the Skype for Business main window, click the Options menu, click File,
click Exit, and then sign back into Skype for Business.
2.2 Personal
The Personal options window in Skype for Business allows you to change your sign-in settings
to speed up the sign-in process, specify presence and calendar meeting information to display
to others in Skype for Business and tell Skype for Business how you want it to interact with
other Office programs.
1. In the Skype for Business main window, click the Options button and select Personal.
Or click the arrow next to the Options button on the right and select Tools > Options.
To change the sign-in address
Under My account, in the Sign-in address box, type the name of your user account.
First.last.mil@usa.army.mil
Note: If your organization uses Office 365, do not change the Advanced setting, because
Office 365 requires Automatic configuration.
To automatically sign in and start Skype for Business
Under My account, select the Automatically start the app when I log on to Windows
checkbox.
Stop automatically sign-in and start Skype for Business
Under My account, clear the Automatically start the app when I log on to Windows
checkbox.
Start the app in the foreground
If you want the Skype for Business main window to open in front of other open windows when
it starts, select the Start the app in the foreground check box. If this option is not selected,
the Skype for Business icon appears in the Windows notification area (system tray) when
Skype for Business starts.
Back to Table of Contents
20 | P a g e
ATTAP-A018-1-AExchange and Outlook integration options
Select Sync contact info between Skype for Business and Exchange option to engage the
sync of contacts between the two applications.
Update my presence automatically show when you are in a meeting
Under Exchange and Outlook integration, select the Update my presence based on my
calendar information check box. To specify who can see this information, use the following
settings.
To show this information to contacts in your Workgroup
Select the Show meeting subject and location to contacts in my Workgroup privacy
relationship checkbox.
To show your Outlook Out of Office information to contacts
Select the Show my Out of Office information to contacts in my Friends and Family,
Workgroup, and Colleagues privacy relationships checkbox. Clear the check box to hide
your Out of Office information from all your contacts.
To save your conversation history or phone call history in Outlook
Under Exchange and Outlook integration, select Save IM conversations in my email
Conversation History folder checkbox allows storage of instant message history and phone
call history. Clearing checkbox disables this feature.
Location options
Use the options under Location to specify whether Skype for Business shares your current
location on your contact card and with other Office programs.
Back to Table of Contents
21 | P a g e
ATTAP-A018-1-AUnder Location, select the Share my location information with other programs I
use checkbox.
Note: If you choose this setting, all contacts (other than external contacts) can see your
location.
Show picture options
Use the options under Show pictures to specify whether you want to see other peoples’
pictures.
Under Show pictures, select or clear the Show pictures of contacts check box. The default is
to show pictures. Pictures take more screen real estate, so if seeing more contacts in the list is
more important to you then clear this option.
Note: Clearing this box also means others cannot see pictures of you on Skype for
Business and you can not see pictures of senders and receivers in IMs and group
conversations.
Advanced Connection Settings
The Advanced Connection Settings dialog box next to Sign-in address provides optional
configuration settings for Skype to connect to Skype for Business servers.
Important: Normally, you do not need to change your Skype for Business sign-in
settings. Do not choose manual configuration unless your support team tells you to and
provides detailed guidance on the correct values to use.
Back to Table of Contents
22 | P a g e
ATTAP-A018-1-A1. In the Skype for Business main window, click Options and select Personal.
2. Under My account, select Advanced.
3. In the Advanced Connection Settings dialog box, select one of the two methods:
1. first.last.mil@usa.army.mil
2.
3.
Automatic configuration
Skype for Business Server automatically configure your connection settings.
Manual configuration
Caution: choose this if instructed by the support team and only if given the server names.
• Internal server name
type the FQDN (fully qualified domain name) of your Skype for Business Server.
• External server name
Type the FQDN (fully qualified domain name) of your Skype for Business Server
or Edge Server.
Back to Table of Contents
23 | P a g e
ATTAP-A018-1-A2.3 Contacts Lists
In the Skype for Business main window, click Options and select Contacts List.
These options change the display of your contacts in the main window.
Contacts List
Display my contact with
Under Display my contacts with, select Contact name and picture (two lines) to see a
display in this format or select Contact name only (one line) to see contact list displayed in
this format.
Order my list
Under Order my list, select By name to display only the names of contacts or By availability
to display in availability groups.
Show this information
Under Show this information, select Contact name (instead of email address) to display
only the contacts name.
Select Contact status to display that status of the contact.
Select Shows contacts with away, offline and unknown presences in a separate group to
display in a different group than where it usually appears.
Select Favorites group to display this group.
Back to Table of Contents
24 | P a g e
ATTAP-A018-1-A2.4 Status
In the Skype for Business main window, click Options and select Status.
These options change the display of your contacts in the main window.
Show me Inactive or change my Status
Under Status, Show me as Inactive when my computer has been idle for the many
minutes is a time that changes yours to Inactive. To change the time, use the up or down
arrow next to the number. Idle is when you have not used the mouse or struck any keys on
the keyboard for a specified period.
Change my status from Inactive to Away after this many minutes is changed by using the
up or down arrow next to the number.
Select I want everyone to be able to see my presence regardless of system settings
(override default settings). This overrides settings by the system administrator.
Select I want the system administrator to decide – currently everyone can see my
presence, but this could change in the future. The system administrator has control over
your status setting.
Select Show me as Do Not Disturb when I present my desktop. This changes your status
when actively presenting during a Skype for Business session.
Select Show me as Do Not Disturb when my monitor is duplicated. If during the
presentation, you select to present using a monitor attached to your computer.
Back to Table of Contents
25 | P a g e
ATTAP-A018-1-A2.5 My picture
In the Skype for Business main window, click Options and select My picture.
These options impact how your picture is displayed, adding or removing it on Skype for
Business.
Show or Hide My Picture
Under My picture, selecting Hide my picture prevents your picture from showing on contact
card and in the Preview window also.
Under My picture, selecting Show my picture allows people to see your picture if it is
loaded and visible in Outlook or Office 365. This shows your picture in the Preview window.
Click Edit or Remove Picture to upload a picture if
If it is greyed out the POP and IMAP settings of the email address may be incorrect. Contact
the appropriate department that has the correct settings for email accounts.
Office 365 Outlook appears in a new window
Back to Table of Contents
26 | P a g e
ATTAP-A018-1-AThe picture option box to delete, change or upload
a photo appears. To remove a picture in place,
click Delete, then click Save to keep the current
selection. To change a photo or load a photo for
the first time click Upload photo and explore
your computer files to find a photo, then
click Save to keep the current selection.
Click Cancel to close photo edit remove picture
option box.
To reopen the picture option box, Click Edit or Remove Picture to change, upload, or delete a
picture
Or, from Outlook window click on the edit pen
to reopen the picture option box
2.6 Phones
In the Skype for Business main window, click Options and select Phones.
These options allow you to change your phone number and how it is displayed in Skype for
Business.
IMPORTANT: If you want to change your phone number but cannot because it is
grayed out, it means your admin has set it for you and is blocking you from changing it.
Contact your admin (the person who gave you your account information) and ask them
for permissions to change your work phone number.
Back to Table of Contents
27 | P a g e
ATTAP-A018-1-AMy phone numbers
1. Click the box for the type of number
you want to add or change and enter
the number.
Use only the digits 0123456789,
and no parentheses or hyphens.
When adding international numbers,
type the + sign, then the country
code followed by the local number.
2. To make this number visible to contacts, select the Include in my contact card check
box next to the number.
Who can see my phone number?
Your phone numbers show up on your contact card and are visible to your Skype for Business
contacts based on the privacy relationship they have with you. Your number is visible as
follows:
• Work Phone is visible to all contacts except your External Contacts and Blocked
Contacts.
Note: Some companies do not allow you to clear the Include in my contact card checkbox
for your work phone.
• Mobile Phone is visible only to your Workgroup, Friends, and Family.
• Home Phone is visible only to your Friends and Family.
• Other Phone is visible only to your Friends and Family. Use this option to add or
modify additional numbers, like for a temporary office or an alternate cell phone.
Phone Integration
This option is grayed out and set by your administrator.
Back to Table of Contents
28 | P a g e
ATTAP-A018-1-AUse a text telephone (TTY) device
The Text telephone (TTY) mode is used for text communication over a telephone line. A TTY
device must be connected to the computer to interpret the modified audio. Using TTY mode
in a conference call may also cause audio quality issues.
TTY mode is off by default. To turn it on:
1. Connect a TTY device to your computer.
2. Under Phone accessibility,
select Turn on TTY mode.
3. Sign out of Skype for Business, and then sign in again.
2.7 Alerts
Skype for Business shows alerts in several situations such as when someone adds you to their
contacts list, or when someone initiates a conversation. The Skype for Business Alerts page
lets you decide when, where, and from whom you see alerts.
In the Skype for Business main window, click Options and select Alerts to display options
available.
Back to Table of Contents
29 | P a g e
ATTAP-A018-1-AGeneral alerts
Select the Tell me when someone adds me to his or her contact list check box. Then, from
the Display and Position fields, specify on which monitor and where you want this alert to
appear.
When you select this setting, and someone adds you as a contact to their contacts list, in
addition to an alert, Skype for Business adds that person to a running list of people you might
consider adding to your own contacts list. You can review this list by clicking the New tab on
the contacts view of the Skype for Business main window. Look at the list of potential
contacts, decide whom to add to your own contacts list and can assign privacy relationships to
those new contacts.
Clear the Tell me when someone adds me to his or her contact list checkbox if you do not
want an alert when someone adds you as a contact and do not want to automatically add
people to your contact list if they have added you to theirs.
By selecting this option, you do not see contacts on your New list. Anyone who adds you to
their list is automatically added to your contacts list and is assigned the same privacy
relationship of a colleague.
When my status is Do Not Disturb
Setting your status to Do Not Disturb reduces the number of interruptions you get. However,
you may still want to keep in touch with key contacts. You can make exceptions for contacts
to whom you have assigned the Workgroup relationship (typically your closest co-workers).
Under When my status is Do Not Disturb, select one of the following options:
• Click Don’t show alerts to hide all Skype for Business alerts so that you cannot be
interrupted.
Back to Table of Contents
30 | P a g e
ATTAP-A018-1-A• Click Show only conversation alerts from people in my Workgroup privacy
relationship to see only conversation requests from Workgroup members and hide all
other alerts.
• Click Show all alerts, but only conversation alerts from people in my Workgroup
privacy relationship to see all alerts, but limit conversation requests to those sent by
Workgroup members.
Contacts not using Skype for Business
Skype for Business supports having Skype users as contacts (when the Skype user is signed in
with their Microsoft account) if your company is configured to support external contacts. For
details, contact your workplace technical support. To be alerted to all, some, or no Skype for
Business communications from Skype contacts, select the appropriate option under Contacts
not using Skype for Business.
2.8 IM (Instant Message)
The IM options window in Skype for Business is where you can apply settings for spell-
checking, changing fonts, and showing emoticons in your instant messages.
In the Skype for Business main window, click the Options button and select IM.
Back to Table of Contents
31 | P a g e
ATTAP-A018-1-AThe IM options page allow you can choose the following options.
• Check spelling as I type
Select this option if you want Skype for Business to flag misspelled words with a red
squiggly underline.
• Hide pictures in IM
Select this option to show only your conversation in the IM window or tabbed panes, not
pictures.
• When copying IMs
Choose whether you want to copy the message, name, and time, or to copy the
message only.
• Show emoticons in messages
Select to show emoticons in instant messages. To display the typographical equivalents
instead of emoticons, clear the checkbox. The emoticons are animated by default. If that
is distracting, you can turn them off by clicking Turn off emoticon animations.
• Enabled tabbed conversations
Select to enable tabbed conversations. This option lets you keep track of several IM
conversations at the same time. When you have more than one active conversation, you
see a tab for each one in the upper-left corner of the conversation window. Just click the
tabs to move back and forth among conversations. To limit the display of each tabbed
conversation to one line, select the Make tabs one line only checkbox.
• Change Font
Click to change the default font size, style, and color of the instant messages you send.
To apply those font preferences to the instant messages you receive, select the Apply
settings to incoming messages check box.
Back to Table of Contents
32 | P a g e
ATTAP-A018-1-A2.9 Ringtones and Sound
In the Skype for Business main window, click the Options button and select Ringtones
and Sounds. This option allows you to assign tones and sounds for different events that
happen.
Ringtones
You can assign different ringtones to different groups of people if you would like.
• In the Calls to box, select My work number, My team, People I manage calls for,
or My Response Group calls then select a ringtone. Make sure the volume on your
speakers is up so you can listen and decide if you enjoy that ringtone. Your selections are
saved when you click OK.
Sounds
By default, Skype for Business plays sounds with specific events. However, there may be
times when you do not want to hear sounds, like when your status is Do Not Disturb.
• To stop all Skype for Business sounds, clear the Play sounds in Skype for Business
(including ringtones for incoming alerts and IM alerts) check box.
• To hear Skype for Business sounds, select the Play sounds in Skype for Business
(including ringtones for incoming alerts and IM alerts) check box, then if you would
like you can mute the sounds if you are in an IM conversation, or if your status is Busy or
Do Not Disturb.
• Your organization may also give you the option to listen to specific music while you are
on hold during a phone call. Select Play music on hold if this option is available and you
would like to hear music while on hold. Then click the Browse button to navigate to the
music file you'd like to hear.
Back to Table of Contents
33 | P a g e
ATTAP-A018-1-ASet specific sounds
1. Click the Sound Settings button.
2. In the Sound dialog box, click the Sounds tab.
3. Under Program Events, scroll down to Skype for Business.
4. Click on an event (like Call Ended, for example).
5. In the Sounds list, click a sound file. To hear it, click Test
2.10 Audio Device
In the Skype for Business main window, click the Options button and select Audio Device.
This option allows you to set up and use your computer’s built-in mic and speakers, a headset,
or another device for Skype for Business audio.
Important: If either the microphone or speakers are disabled, this error screen appears
when selecting the Audio Device option. Follow these troubleshooting steps to resolve the
problem. If you are unable to perform the following steps, contact your computer
administrator to assist.
Back to Table of Contents
34 | P a g e
ATTAP-A018-1-ACheck Device Manager
1. Open Start , type Device Manager, and select Sound, video and game controllers,
select your sound card and open it.
2. Make sure the device is enabled. If it is not, Enable Device.
Each computer has a different name for audio devices such as a Basic Generic Audio Device.
1.
2.
If that did not work, try this:
1. Open Start, then type Sound, then hit Enter.
2. Select the Playback tab
3. Select Speakers and make sure they are Enabled
Back to Table of Contents
35 | P a g e
ATTAP-A018-1-ACheck Sound to Enable Speakers
4. To Enable Speakers, highlight speakers, and right or left click to display options to
Enable.
5. Then Set Default Device.
6. Then click OK.
7. Speakers are Enabled and Set Default
as indicated by the green check in a circle.
Back to Table of Contents
36 | P a g e
ATTAP-A018-1-ACheck Sound to Enable Microphone
8. Select the Recording tab.
9. Check if the microphone is Enabled.
10. Set Default.
Skype Audio Device Options
In the Skype for Business main window, click the Options button and select Audio
Device.
1. Under Audio device, choose the device you want.
2. Click the green arrow next to Speaker to hear a sample tone and drag the slider if you
need to adjust the volume.
3. To test your Microphone volume, speak for a few seconds. The volume is optimal when
the progress bar reaches the middle of the test area. Drag the slider next to Microphone to
adjust the mic volume.
4. Click the green arrow button next to Ringer to hear a sample ring when you get a call and
drag the slider to adjust the ringer volume.
Back to Table of Contents
37 | P a g e
ATTAP-A018-1-A5. If you have more than one audio device, you can choose to set both to ring when you get a
call. Under Secondary Ringer, select Also ring, and then select an additional device.
You can also select Unmute when my phone rings; automatically unmute your speakers
when you receive a Skype for Business call.
6. Select Allow stereo audio playback when available to make sure that the best audio
quality is available during a meeting.
7. Click OK.
Tip: You can select different devices for microphone and speakers under each section.
However, to avoid echoing, it is better to use the same device for both. If you must use
separate devices, minimize possible echoing by lowering your speaker's volume. If you do
not see your device in the list, make sure it is connected directly to your computer and
follow the instructions that came with the device to install it.
2.11 Video Device
In the Skype for Business main window, click the Options button and select Video Device.
This option allows you to set up and use your computer’s camera to make a video call or share
your video in a meeting, but you do not need one to receive a video call or see other people’s
videos.
Important: If the video camera is disabled, this error screen appears when selecting the
Video Device option. Follow these troubleshooting steps to resolve the problem. If you
cannot perform the following steps, contact your computer administrator to assist.
Back to Table of Contents
38 | P a g e
ATTAP-A018-1-ACheck Device Manager
1. Open Start, then type Device Manager, and select double click on Cameras select
your camera, and double-click to open options.
2. Make sure the device is enabled. Each computer has a different name for camera devices
such as a Basic Generic Video Device. If not, Enable Device.
1.
2.
Skype Video Device Options
1. In the Skype for Business main window, click the Options button select Video
Device. You see what your camera sees in the window.
2. If you have more than one
camera and want to switch, select it
from the drop-down list.
3. For advanced settings like color
balance, contrast, brightness, and
black-and-white mode and more
click the Camera Settings button.
4. Click OK when done.
Back to Table of Contents
39 | P a g e
ATTAP-A018-1-AVideo Keeps Moving Around
If your video is moving around during a meeting, Skype for Business is trying to keep you in
the center of the sent video with the Crop and center my video in meetings feature that, by
default, is turned on.
1. If you want to disable this functionality, go to Options > Video Device settings.
2. Clear the Crop and center my video in meetings check box.
2.12 File Saving
Sometimes, during a Skype for Business meeting--either the presenter or another participant
may share a file (PowerPoint, Word, Publisher or others). You can specify a location to save
these files in one convenient place.
1. In the Skype for Business main window, click the Options button and select File
Saving.
2. Under File transfer, click Browse to select the folder that you want to save received files.
3. Click OK.
2.13 Recording
One of the neat things about Skype for Business is that you can record meetings. People who
may have missed the meeting can watch the recording later and are caught up. Alternatively,
an attendee can review the recording if, for example, she cannot recall one of her action items.
You can specify a location to save these files. Once you have set the location, future
recordings are saved to that same place.
Save your recorded meetings
1. Under Options, choose Recording, and then click Browse to select a folder that you want
to store recorded meeting files.
2. You can also select the image resolution (480p, 720P HD, or 1080P Full HD) --keeping in
mind that the higher the resolution, the larger the meeting recording file size will be.
Back to Table of Contents
40 | P a g e
ATTAP-A018-1-A2.14 Skype Meetings
You can use the same audio selections with all your Skype for Business meetings or set up
Skype for Business to give you options every time you join. The latter is handy if you need to
use a different audio connection, depending on the meeting or location you join from.
Set Skype for Business Meeting options
1. Under When I join meetings, select Show IM automatically opens the IM pane. If you
want to see the participant list, select Show the participant list.
2. Under Meeting default, click the Change button if you want to use an app other than
Skype for Business for meetings, or if you want to use a different version of Skype for
meetings.
3. Under Joining conference calls, click the drop-down menu next to Join meeting audio
from, and do one of the following:
• To use computer audio and video (via your computer microphone and speakers or
a headset) for the meeting, select Skype for Business.
• To call into the meeting, if the meeting request includes a call-in number,
select Do not join audio, join the meeting, and then use a phone to call in.
• (Optional) If you join from different locations or devices and want to choose how
you connect to meetings each time you join, select the Before I join meetings,
ask me which audio device I want to use checkbox.
4. (Optional) Under Meeting reminders, by default, Don't show notifications when
Outlook is running is selected. To change that, clear the checkbox.
Note: You can have Skype for Business call you (and set up Skype for Business
meetings that include call-in details) only if dial-in conferencing is enabled for your
account. For more details, contact your workplace technical support.
Back to Table of Contents
41 | P a g e
ATTAP-A018-1-AYou can also read