Leostream and Third-Party Display Protocols - Connecting Leostream users to desktops with client-based display protocols
←
→
Page content transcription
If your browser does not render page correctly, please read the page content below
Leostream and Third-Party Display Protocols
Connecting Leostream users to desktops with client-based display protocols

Version 9.1
October 2021
Contacting Leostream

Leostream Corporation
271 Waverley Oaks Rd.
Suite 204
Waltham, MA 02452
USA

http://www.leostream.com
Telephone: +1 781 890 2019

To submit an enhancement request, email features@leostream.com.
To request product information or inquire about our future direction, email sales@leostream.com.

Copyright

© Copyright 2002-2021 by Leostream Corporation

This software program and documentation are copyrighted by Leostream. The software described in this
document is provided under a license agreement and may be used or copied only under the terms of this
agreement. No part of this manual may be copied or reproduced in any form without prior written consent
from Leostream.

Trademarks

The following are trademarks of Leostream Corporation.
  Leostream™
  The Leostream graphical logo™

The absence of a product name or logo from this list does not constitute a waiver of the trademark or other
intellectual property rights concerning that product, name, or logo by Leostream.

HP is a registered trademark that belong to Hewlett-Packard Development Company, L.P. Oracle and Java
are registered trademarks of Oracle and/or its affiliates. Linux is the registered trademark of Linus Torvalds
in the U.S. and other countries. UNIX is a registered trademark of The Open Group. OpenLDAP is a
trademark of The OpenLDAP Foundation. Microsoft, Active Directory, SQL Server, Excel, Hyper-V, Windows,
and the Windows logo are trademarks or registered trademarks of Microsoft Corporation in the United
States and/or other countries. Other brand and product names are trademarks or registered trademarks of
their respective holders. Leostream claims no right to use of these marks.

Patents

Leostream software is protected by U.S. Patent 8,417,796.
Contents
 CONTENTS ......................................................................................................................................................... 3
 SUPPORTED DISPLAY PROTOCOLS ............................................................................................................ 5
 CHOOSING A DISPLAY PROTOCOL .............................................................................................................. 5
 CONFIGURING DISPLAY PROTOCOLS IN LEOSTREAM ........................................................................... 7
       USING PROTOCOL PLANS ...................................................................................................................................... 7
           How Protocol Plans Work ........................................................................................................................... 7
           Building Protocol Plans ............................................................................................................................... 9
       SPECIFYING CONFIGURATION FILES AND COMMAND LINE ARGUMENTS ............................................................ 10
           Using Dynamic Tags in Configuration Files ............................................................................................ 10
           Example: Using Different Login Names for User Connections ........................................................... 13
           Example: Specifying Subnet for Desktop Connections ........................................................................ 14
           Dynamic Remapping of Desktop IP Address ......................................................................................... 14
           Setting Configuration File Parameters Based on Client IP .................................................................. 16
 HP® ZCENTRAL REMOTE BOOST (RGS) ................................................................................................... 16
       HP ZCENTRAL REMOTE BOOST (RGS) PROTOCOL PLAN OPTIONS ................................................................. 16
           Launching HP ZCentral Remote Boost Connections through the Leostream Gateway .................. 18
           Multi-Monitor Support with HP ZCentral Remote Boost ....................................................................... 18
           Activating HP Velocity and Advanced Video Compression Features ................................................. 18
           Setting User Configurable HP ZCentral Remote Boost Parameters .................................................. 20
       SINGLE SIGN-ON WITH HP ZCENTRAL REMOTE BOOST .................................................................................... 21
       USB PASSTHROUGH WITH HP ZCENTRAL REMOTE BOOST .............................................................................. 22
       SESSION SHADOWING AND COLLABORATION ...................................................................................................... 23
       USING THE HP ZCENTRAL REMOTE BOOST RECEIVER FOR MACOS ................................................................ 23
 MICROSOFT® RDP AND REMOTEFX .......................................................................................................... 24
             Options for Encoding Desktop Login Credentials into RDP Configuration Files............................... 24
             Launching RDP Connections from the Leostream Web client ............................................................ 24
             Microsoft RDP Viewer Command Line Parameters .............................................................................. 25
             Microsoft RDP Viewer Configuration File Variables .............................................................................. 25
             Connecting to RemoteApp Servers ......................................................................................................... 31
             Integrating with a Microsoft Remote Desktop Gateway ....................................................................... 32
 MECHDYNE TGX ............................................................................................................................................. 33
       LAUNCHING MECHDYNE TGX CONNECTIONS..................................................................................................... 33
       SETTING USER-CONFIGURABLE TGX PARAMETERS .......................................................................................... 34
 NICE DCV.......................................................................................................................................................... 36
       SPECIFYING SESSION IDS IN NICE DCV CONFIGURATION FILES ..................................................................... 36
       LAUNCHING NICE DCV CONSOLE CONNECTIONS ............................................................................................. 37
       LAUNCHING NICE DCV VIRTUAL SESSIONS ...................................................................................................... 38
       USING THE NICE DCV HTML5 VIEWER ............................................................................................................ 39
       USING THE DCV EXTERNAL AUTHENTICATOR .................................................................................................... 40
           Enabling the RESTful API on Leostream Connection Broker 9.0 ....................................................... 40
           Configuring DCV Servers to use the External Authenticator ............................................................... 41
           Configuring Protocol Plans when Using the External Authenticator ................................................... 42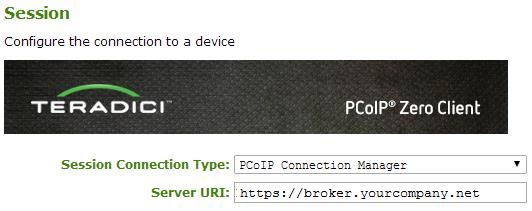
NOMACHINE AND FREENX ........................................................................................................................... 43
     LAUNCHING THE NOMACHINE CLIENT ................................................................................................................. 43
     LAUNCHING NOMACHINE HTML5 CONNECTIONS FROM THE WEB CLIENT ....................................................... 43
     NOMACHINE CONFIGURATION FILE ..................................................................................................................... 44
     SESSION SHADOWING AND COLLABORATION ...................................................................................................... 45
     SETTING USER-CONFIGURABLE NOMACHINE PARAMETERS ............................................................................. 45
TERADICI® PCOIP® TECHNOLOGY............................................................................................................ 48
     USING PCOIP CLIENTS WITH LEOSTREAM ......................................................................................................... 48
     ENABLING PCOIP CONNECTION MANAGEMENT IN LEOSTREAM ........................................................................ 50
     PCOIP CONNECTIONS TO VMWARE VIRTUAL MACHINES WITH A VIEW DIRECT-CONNECTION PLUG-IN .......... 50
         Establishing Connections using Leostream Connect ........................................................................... 50
         Establishing Connections using the Leostream Web Client ................................................................ 51
         Establishing Connections using a PCoIP Zero Client ........................................................................... 52
RDESKTOP RDP REMOTE VIEWER ............................................................................................................ 53
VNC REMOTE VIEWER .................................................................................................................................. 54
           Setting up the Connection Broker to Use VNC ...................................................................................... 54
           VNC Command Line Parameters ............................................................................................................ 54
SESSION SHADOWING AND COLLABORATION ....................................................................................... 57
     CONFIGURING COLLABORATION IN THE CONNECTION BROKER ......................................................................... 57
        Limiting Collaboration to Groups of Users .............................................................................................. 58
        Sending Email Notifications Related to Collaboration Invitations ....................................................... 59
     WORKING WITH INVITATIONS IN THE LEOSTREAM WEB CLIENT .......................................................................... 59
        Sending a Collaboration Invitation ........................................................................................................... 59
        Cancelling an Invitation ............................................................................................................................. 62
        Accepting a Collaboration Invitation ........................................................................................................ 62
     WORKING WITH INVITATIONS USING LEOSTREAM CONNECT............................................................................... 63
        Sending a Collaboration Invitation ........................................................................................................... 63
        Viewing and Cancelling Invitations .......................................................................................................... 64
        Accepting a Collaboration Invitation ........................................................................................................ 64
     MANAGING INVITATIONS IN THE CONNECTION BROKER ...................................................................................... 64
USER CONFIGURABLE PROTOCOL PLAN PARAMETERS..................................................................... 66
     DEFINING SCOPE OF THE CONFIGURED PARAMETER ......................................................................................... 66
     END-USER INTERFACE FOR CONFIGURING PARAMETERS .................................................................................. 67
        Leostream Web Client ............................................................................................................................... 67
        Leostream Connect .................................................................................................................................... 68
     SETTING GLOBAL USER-CONFIGURABLE PARAMETERS ..................................................................................... 68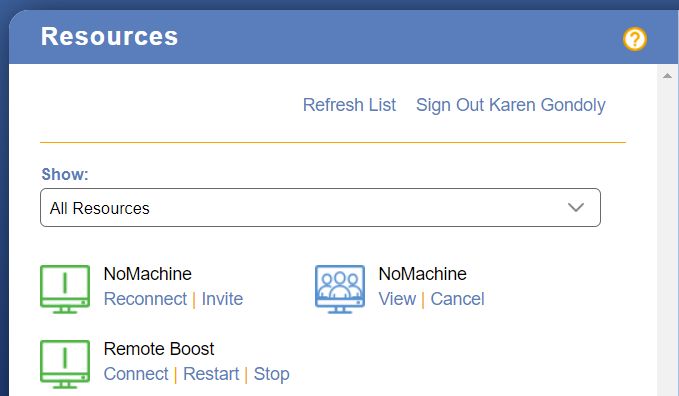
Working with Display Protocols

Supported Display Protocols
  The Leostream Connection Broker supports a wide range of display protocols that allow you to provide the
  required end-user experience throughout your entire organization. The Leostream Connection Broker can
  launch desktop connections using the following display protocols.

     •    HP ZCentral Remote Boost (RGS)
     •    Leostream HTML5-based RDP, VNC, and SSH (covered in the Leostream Gateway guide)
     •    Microsoft RDP and RemoteFX (including FreeRDP, xrdp, and rdesktop clients)
     •    Mechdyne TGX
     •    NICE DCV
     •    NoMachine
     •    Teradici PCoIP (Cloud Access Software and Remote Workstation Cards)
     •    Scyld Cloud Workstation
     •    VNC (RealVNC, TigerVNC, TightVNC, and UltraVNC)

  Connection Broker protocol plans define which display protocols are used and how the remote session is
  launched. Defining protocol plans is covered in Configuring Display Protocols in Leostream.

  Before you build your protocol plans, you must choose the display protocols you will use in your
  environment. The next chapter provides general guidelines when considering different display protocols.

Choosing a Display Protocol
  Leostream establishes a connection to a remote desktop using a variety of supported display protocols.
  After the connection is established, the Connection Broker is no longer in the data path of the user’s
  desktop connection. For remote users, however, the Leostream Gateway may be in the data path of the
  user’s connection.

  The performance and requirements of the remote session are determined by the display protocol you
  select. This chapter provides some food-for-thought when investigating and choosing from the available
  display protocols.

  Choosing the right protocol requires a balance between good end-user experience, the bandwidth available
  on the network, and the compute power supplied by the hardware. Every display protocol balances these
  requirements, with the ultimate goal being:

      •   Low bandwidth requirement
      •   Low computational requirements
      •   High-quality end-user experience

  These three factors make up the protocol triangle, depicted in the following figure. As with any triangle,
  changing the angle for one corner has repercussions for the other angles.

                                                                                                               5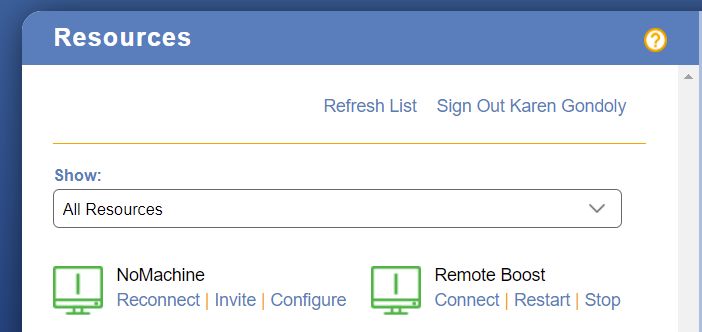
Working with Display Protocols

You can achieve any two of your display-protocol goals, but will likely have to compromise on the third. For
example, if your users accept a less performant viewing experience, you can choose a protocol that requires
lower bandwidth and requires lower computing power. However, if you must provide a high-performance
viewing experience, you need either higher bandwidth, higher computing power, or ideally both.

Each available display protocol handles the corners of the protocol triangle differently; each has its benefits
and its drawbacks. When picking one or more display protocols, determine which protocol characteristics
you need, and which trade-offs you can accept.

The following questions may help you define your display protocol requirements. Outline as many
requirements as possible, and test different display protocols in your environment before committing to a
particular protocol. Leostream can leverage multiple protocols in a single environment, so do not feel like
you must commit to a single display protocol.

    •   What are your end-user requirements for multi-media, USB device redirection, response time, etc.?

    •   Do you have different types of users, for example task workers that run word processing
        applications and power users running graphic-intensive applications?

    •   What operating systems are you planning to deliver on your remote desktops or use on your client
        devices? Are you planning to support BYOD? If so, make sure your chosen display protocol handles
        all possible client device types.

    •   Do you want to use Zero or thin clients? If you are using Zero clients, which display protocol does it
        natively support? If using thin clients, what operating system does it use and can you install
        additional client software?

    •   Are your users accessing an entire desktop or only an application?

    •   Is single sign-on a requirement, or just nice-to-have?

    •   Do you need a display protocol that supports collaboration, where two users are simultaneously
        logged into the same session?

    •   How large will your deployment grow? (High computing power requirements affect scalability.)

    •   Do users connect to workstation with a GPU or are you using a virtual environment that supports
        GPU passthrough or vGPU?

                                                                                                                 6
Working with Display Protocols

Configuring Display Protocols in Leostream
Using Protocol Plans
   Connection Broker protocol plans define which display protocol the Connection Broker uses when
   connecting a user to their desktop. Protocol plans define the order in which the Connection Broker tries to
   use the available protocols when connecting to a desktop and the configuration file or command line
   parameters used for the connection.

   The Connection Broker provides one default protocol plan, which is shown on the > Configuration >
   Protocol Plans page, shown in the following figure.

   Each protocol plan defines the display protocol used when the user logs in using different client types, such
   as Leostream Connect and thin clients, the Leostream Web client, and PCoIP clients. You configure the
   display protocol for each of these client types separately, using the appropriate section in the protocol plan.

       Your Leostream license determines which display protocols are included in your Connection Broker.
   Please, contact sales@leostream.com if you need access to a display protocol that is not currently listed in
   your Connection Broker.

   How Protocol Plans Work

   Protocol plans give you the flexibility to configure which display protocol to use for each pool used in a
   policy. A protocol plan tells the Connection Broker:

      •    Which display protocols are allowed for this pool

      •    What priority each protocol has, i.e., which protocol should the Connection Broker try first, second,
           etc.

      •    What, if any, command line parameters and configuration file should the Connection Broker use
           when establishing the connection

                                                                                                                 7
Working with Display Protocols
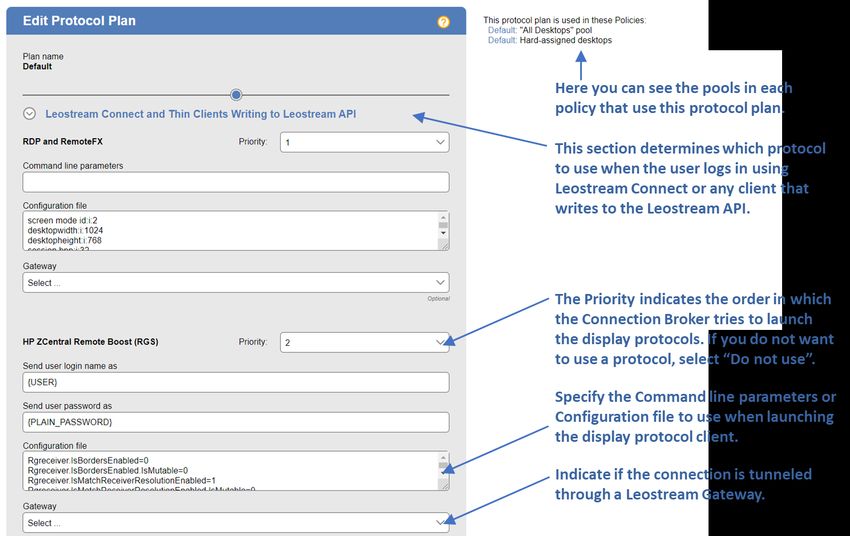
The following figure shows a portion of the Leostream Connect and Thin Clients Writing to Leostream API
section of a protocol plan.
The selection in the Priority drop-down menu indicates the order in which the Connection Broker checks if
the remote desktop supports a particular display protocol. The Connection Broker performs a port check
on the remote desktop to determine if it supports particular display protocol. For example, by default,
Microsoft RDP communicates over port 3389. For the above example, if port 3389 is open on the remote
desktop, the Connection Broker connects to the desktop using RDP. If port 3389 is not open, the
Connection Broker checks the default HP ZCentral Remote Boost Sender port 42966.
For this example, if the HP ZCentral Remote Boost port is also closed, the Connection Broker looks for a
protocol with a Priority of 3. If the Priority drop-down menu for all other display protocols is set to Do not
use, the Connection Broker returns a warning that it cannot establish a connection to the remote desktop.
The Connection Broker cannot distinguish between sections of the protocol plan that use the same
port, for example Microsoft RDP and rdesktop. Therefore, if a protocol plan sets the priority for Microsoft
RDP to 1 and the priority of rdesktop to 2, the Connection Broker always uses the Microsoft RDP section of
the Protocol Plan if port 3389 is open on the remote desktop, even if you are connecting from a Linux client
that supports only rdesktop. For this example, you need a second protocol plan that assigns a priority of 1
to rdesktop, to support users logging in from a Linux client.
The Connection Broker does not consider the client device’s capabilities when choosing the display
protocol. For example, if the protocol plan sets the priority of HP ZCentral Remote Boost to 1 and the port
check passes on the remote desktop, the Connection Broker instructs the client device to launch a Remote
Boost connection, even if the client does not have an installed Remote Boost Receiver.
8Working with Display Protocols
After the Connection Broker has selected the display protocol, it uses the Configuration file and Command
line parameters to define how to launch the software client associated with that protocol. For example, for
Microsoft RDP the mstsc.exe client is launched using the RDP-file parameters entered in the
Configuration file. If the file or parameters contain any dynamic tags, the Connection Broker replaces those
tags with the appropriate information before handing the file or command line parameters to the client
device.
Building Protocol Plans
To determine how many protocol plans you need and how they should be configured, think about all the
different ways your end users will connect to their desktops. Things to consider include:
• Do all users access their desktops using the same display protocol? If not, which protocols will they
use? If these protocols communicate over the same port, you will need a protocol plan for each
protocol.
• For each display protocol that you use, will the command line parameters and configuration file be
the same for all users? If not, you will need a protocol plan for each configuration.
• Do your remote desktops support multiple protocols, such as RDP, TGX, and VNC? If so, and
different users will launch connections with different protocols, you need a protocol plan that
defines the appropriate priorities for each remote viewer.
After you define the different protocols you want to use and how you want to launch them, you create
protocol plans as follows.
1. Go to the > Configuration > Protocol Plans page.
2. Click the Create Protocol Plan at the top of the page. The Create Protocol Plan form opens.
3. In the Plan name edit field, enter the name to use when referring to this protocol plan.
4. In the Leostream Connect and Thin Clients Writing to Leostream API section, shown in the
previous figure, configure the protocols to use when a user logs in using one of the following client
devices:
• The Windows or Java version of Leostream Connect, installed on a Windows, Linux, or
macOS device.
• A thin client with an installed Leostream Connect client
• A thin client with a customized Leostream client
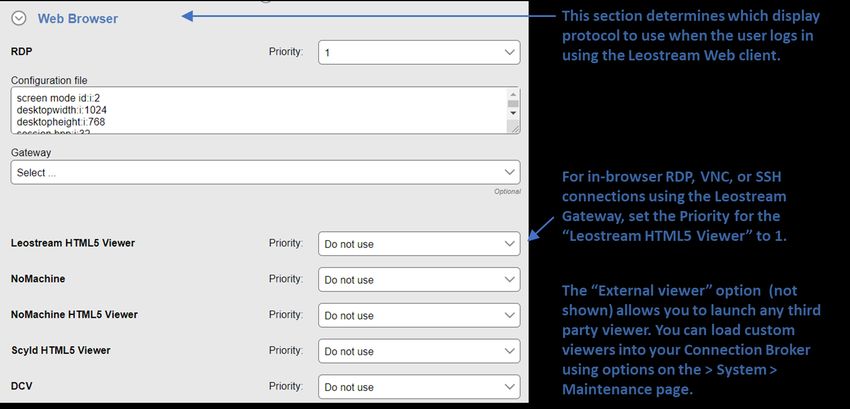
5. In the Web Browser section, shown in the following figure, configure the protocol to use when a
user logs in through the Leostream Web client.
9Working with Display Protocols
6. Configure the Teradici PCoIP Client Configuration section of the protocol plan if your end users log
in using a PCoIP software, mobile, or zero client.
7. Use the Notes field to store any additional information with your protocol plan.
8. Click Save to store any changes to the plan.
Specifying Configuration Files and Command Line Arguments
Configuration files and command line parameters allow you to customize the remote session. The format
and contents of these fields differs for each display protocol. The following chapters discuss each display
protocol and provide example syntax. The remainder of this chapter discusses Connection Broker concepts
pertaining to using dynamic tags in a configuration file or command line parameter
Using Dynamic Tags in Configuration Files
Configuration files and command line parameters allow you to customize how the display protocol’s
software client establishes the desktop connection, for example, if the connection opens in full screen or
windowed mode. The Connection Broker supports dynamic tags in the Command line parameters and
Configuration file fields for any of the protocol. Before passing the command line parameters or
configuration file to the client device, the Connection Broker replaces dynamic tags with the appropriate
information, allowing you to reuse protocol plans for multiple users.
The following table contains a complete list of the supported dynamic tags. If the configuration file contains
text enclosed in braces that is not included in the list of supported dynamic tags, the Connection Broker
ignores the tag and it remains in the configuration file.
10Working with Display Protocols
Dynamic Tags Purpose
The IP address of the Leostream Agent on the desktop. If
no Leostream Agent is installed on the desktop, {IP} is
{IP}
replaced with the hostname of the desktop or, if the
hostname is not available, the IP address of the desktop.
For cloud-hosted desktops, the internal IP address seen by
{IP_PRIVATE}
the operating system.
For cloud-hosted desktops, the external IP address, if
{IP_PUBLIC}
allocated, that is accessible from the outside network.
The private IP address of a cloud-hosted desktop or, if no
{IP_PRIVATE-or-IP_PUBLIC} private IP address exists, the public IP address of the
desktop.
The public IP address of a cloud-hosted desktop or, if no
{IP_PUBLIC-or-IP_PRIVATE} public IP address exists, the private IP address of the
desktop.
The Leostream Agent hostname or IP address. (If not
{IP_AGENT}
available, {IP_ADDRESS} is returned.)
{IP_ADDRESS} The IP address of the desktop.
{HOSTNAME} The hostname of the desktop.
The IP address of the desktop or, if the IP address is not
{IP_ADDRESS-or-HOSTNAME}
available, the hostname of the desktop.
The hostname of the desktop or, if the hostname is not
{HOSTNAME-or-IP_ADDRESS}
available, the IP address of the desktop.
The short hostname of the desktop, or the hostname cut at
the first dot. For example, if the hostname is
{SHORT_HOSTNAME}
desktop.example.com, the {SHORT_HOSTNAME}
tag returns desktop.
For DCV and VNC connections, the port for the VNC
{DCV_PORT}, {VNC_PORT}
session, as returned by the Leostream Agent.
The user’s login name. This value corresponds to the value
shown in the Login name column on the > Resources >
{USER}, {USER:USER}, Users page. To force the login name on the remote desktop
{USER:LOGIN_NAME}, or to upper or lower case, include the :lowercase or
{LOGIN)NAME} :uppercase modifier, for example
{USER:lowercase} or
{USER:LOGIN_NAME:uppercase}.
The value found in the user's Active Directory attribute
given by attribute_name. Use this dynamic tag if you
need to replace the user’s login name for their remote
{AD:USER:attribute_name}
session with a value different from the login name used for
their Leostream session. See “Using Dynamic Tags” in the
Connection Broker Administrator’s Guide.
The user's display name, corresponding to the value shown
{NAME} or {USER:NAME}
in the Name column on the > Resources > Users page.
11Working with Display Protocols
Dynamic Tags Purpose
The user's Active Directory Distinguished Name. This value
{AD_DN} or {USER:AD_DN} corresponds to the value shown in the AD Distinguished
Name column on the > Resources > Users page.
The user's email address. This value corresponds to the
{EMAIL} or {USER:EMAIL} value shown in the Email column on the > Resources >
Users page.
The portion of the user's email address before the @
{PRE_EMAIL} or {USER:PRE_EMAIL}
symbol.
{POST_EMAIL} or
The portion of the user's email address after the @ symbol.
{USER:POST_EMAIL}
The name entered into the Domain field for the
authentication server that authenticated a user. If the
{DOMAIN} Domain field is empty, the Connection Broker replaces this
dynamic tag with the value entered or selected in the
Domain field of the user’s client.
The name entered in the Authentication server name field
{AUTH_DOMAIN} of the authentication server that authenticated the current
user.
{PLAIN_PASSWORD} The user’s password, in plain text
For Leostream Connect, the user’s password encrypted for
{RDP_PASSWORD}
RDP usage
For NoMachine, only, the user’s password scrambled to
{SCRAMBLED_PASSWORD}
prevent casual eavesdropping.
{CREDENTIALS_MECHDYNE} Encrypted user credentials to pass to the TGX Sender to
provide single sign-on.
For Leostream Connect, a specific password encrypted for
{STANDARD_RDP_PASSWORD:xxxx}
RDP usage
The name of the user's client device used to log into the
Connection Broker. This value corresponds to the value
{CLIENT} or {CLIENT:NAME}
shown in the Name column on the > Resources > Clients
page.
The IP address of the user's client device used to log into
the Connection Broker. This value corresponds to the value
{CLIENT:IP}
shown in the IP Address column on the > Resources >
Clients page.
The MAC address of the user's client device used to log
into the Connection Broker. This value corresponds to the
{CLIENT:MAC}
value shown in the MAC Address column on the >
Resources > Clients page.
The type of client used to log into the Connection Broker.
{CLIENT:TYPE} This value corresponds to the value shown in the Type
column on the > Resources > Clients page.
The manufacturer of client used to log into the Connection
{CLIENT:MANUFACTURER} Broker. This value corresponds to the value shown in the
Manufacturer column on the > Resources > Clients page.
12Working with Display Protocols
Dynamic Tags Purpose
The UUID of the client used to log into the Connection
{CLIENT:UUID} Broker. This value corresponds to the value shown for the
Client UUID on the Edit Client page.
The last know IP address of the Teradici PCoIP Remote
Workstation Card associated with the desktop for the
{PCOIP_HOST1} or {PCOIP_HOST2} connection. If the Connection Broker does not have an IP
address for the card, then the dynamic tag is replaced with
the card’s hostname.
The name of the pool that contains the desktop that the
{POOL:NAME}
user is connecting to
The name of the desktop the user is connecting to, as
{VM:NAME} shown in the Name field on the > Resources > Desktops
page.
The guest host name of a desktop, as returned by the
{WINDOWS_NAME}
Leostream Agent
If the user authenticated against an authentication server,
{FQDN} the fully qualified name, e.g.,
cn=Fred,ou=Users,o=Company
For the RDP configuration file, use
{DRIVE:CD} drivestoredirect:s:{DRIVE:CD} to redirect all
CD drives found on system. No other drives are directed.
For the RDP configuration file, use
{DRIVE:DVD} drivestoredirect:s:{DRIVE:DVD} to redirect all
DVD drives found on system. No other drives are directed.
{LOGOUT_URL} The URL to log the user out of the session.
{LIST_URL} The URL to view the list of desktops.
The value of the client side variable specified in *. So
{ENV:*}
{ENV: HTTP_COOKIE} might return uid=25157202.
Re-maps IP addresses by replacing the non-X portion of the
{REMAPPED_IP:X.X.X.X}
IP address with the specified tag.
{REMAPPED_IP:subnet_mask} Re-maps IP addresses on different subnets.
For use with the Java version of Leostream Connect. The
{SESSION} session ID associated with session-based HP ZCentral
Remote Boost Receiver configuration file parameters.
Indicates that the Java version of Leostream Connect
{USB_SESSION} should manage which remote HP ZCentral Remote Boost
session has access to USB devices.
Example: Using Different Login Names for User Connections
In some cases, you may need to use a login name for the user’s remote desktop that is different from the
login name used for the Leostream session. One example is the case where the user logs into Leostream
with their Windows Active Directory credential, but needs to use their Linux username to connect to their
Linux desktop. For these cases, you can use custom Active Directory attributes and dynamic tags to change
the default user login.
13Working with Display Protocols
First, you must populate an Active Directory attributes in the user’s account with the value of the user’s
alternate login name. The Active Directory attribute can be a standard attribute, or you can create a custom
attribute. For example, create a custom attribute named linuxLogin.
Second, in the protocol plan, replace the {USER} dynamic tag with the {AD:USER:attribute_name}
dynamic tag. For example, when using the custom attribute named linuxLogin the dynamic tag is
{AD:USER:linuxLogin }.
If the username varies only by case, you can use the lowercase and uppercase dynamic tag modifiers,
instead of specifying a new Active Directory attribute. For example, if the user’s Windows login is JSmith,
but their Linux login is jsmith, use the {USER:lowercase} dynamic tag.
Example: Specifying Subnet for Desktop Connections
When a remote desktop has multiple network interfaces, the Leostream Agent and Connection Broker
negotiate which IP address to use for remote connections. You can alternatively use the {MATCHED_IP}
dynamic tag to specify a preferred IP address for the Connection Broker to use when establishing the
remote connection. For example, you can modify the default line in the RDP configuration file to the
following:
full address:s:{MATCHED_IP:partial_IP_address}
Where partial_IP_address indicates the beginning of the IP address that the Connection Broker should
favor for the connection. When specifying partial_IP_address, trailing zeros are optional, for example,
{MATCHED_IP:172.29.0.0} is equivalent to{MATCHED_IP:172.29}.
The MATCHED_IP dynamic tag instructs the Connection Broker to favor a specific IP address. For example, if
the desktop returns two IP addresses of 172.29.229.151 and 10.110.1.14 and the tag
is {MATCHED_IP:10.110.1} the IP address used for the connection is 10.110.1.14.
If the desktop does not have an IP address beginning with the values to match, the Connection Broker will
not establish a remote connection to the desktop. To allow the Connection Broker to fail over to any
available IP address, use the following syntax:
{MATCHED_IP:partial_IP_address-or-IP}
For example, if the tag is {MATCHED_IP:10.110.1-or-IP} and the desktop returned a single IP address
of 172.29.229.151 the Connection Broker uses the 172.29.229.151 for the connection even though it does
not match the preferred IP address.
Dynamic Remapping of Desktop IP Address
You can enable display protocol traffic to traverse one or more NAT firewalls by dynamically changing the IP
address provided to the display protocol’s client to reflect the address of the desktop seen from the client’s
perspective as opposed to that seen by the desktop.
14Working with Display Protocols
To do this, use the {REMAPPED_IP} dynamic tag in place of the {IP} dynamic tag. The Connection
Broker applies the IP address mask specified in the dynamic tag to the IP address of the desktop, so that the
address is modified.
As an example, imagine an offshore development center than runs on a 192.168.1.xxx network. One of its
customers has a series of desktops running on a 172.29.229.xxx network. A NAT firewall makes the
transition between the two networks. Therefore, a desktop at 172.29.229.131 appears to the offshore
development center as a desktop at 192.168.1.131.
To accomplish this transition, in the configuration file, change instances of the {IP} tag to
{REMAPPED_IP:192.168.1.X}.
To remap IP addresses on multiple subnets, use the advanced form of the {REMAPPED_IP} dynamic tag.
This version of the {REMAPPED_IP} dynamic tag specifies a network mask length and a target range for
the source and destination.
Use the {REMAPPED_IP:X.X.X.X} syntax to perform DNS resolution without remapping the IP
address.
Use the wildcard (*) to map all subnets. For example:
• {REMAPPED_IP:*/24->192.168.1.0} replaces the first 24 bits of the IP address on all
subnets with 192.168.1. Therefore, the IP address 10.153.172.5 maps to 192.168.1.5.
• {REMAPPED_IP:*/8->194.0.0.0} replaces the first 8 bits of the IP address on all subnets
with 194. Therefore, the IP address 10.153.174.9 maps to 194.153.174.9.
To map different subnets to different IP address ranges, use the syntax in the following example.
{REMAPPED_IP:10.153.174.0/24 -> 192.168.204.0, 10.153.172.0/24 ->
192.168.201.0}
Each subnet map is separated by a comma. A subnet map can be defined using a wildcard, as described in
the earlier {REMAPPED_IP} examples.
In this example, the first 24 bits of IP addresses in the subnet 10.153.174 are mapped to 192.168.204, while
the first 24 bits of the IP addresses in the subnet 10.153.172 are mapped to 192.168.201. Therefore:
10.153.174.9 maps to 192.168.204.9
10.153.172.5 maps to 192.168.201.5
10.153.173.7 remains 10.153.173.7
In cases where multiple subnet maps are included, the order of the maps is irrelevant. The more specific
map takes precedence over the less specific map. When a wildcard is provided, any IP addresses that are
not mapped by one of the other rules will be mapped by the wildcard. The Connection Broker always
performs wildcard mappings last.
15Working with Display Protocols
Do not specify multiple wildcard mappings. If multiple wildcards are specified, the Connection Broker
uses one of the mappings and ignores all other maps.
Setting Configuration File Parameters Based on Client IP
You can use the client’s IP address to determine if a particular client configuration variable is sent to the
client. You can also differentiate between users connecting locally and the same user connecting remotely.
To do this, wrap the configuration file parameter in a logic statement. These logic statements contain three
parts. They can all be together, or on different lines. For example:
{NETWORK:10.0.0.0/255.255.255.0}
compression:1
{END_NETWORK}
• {NETWORK:10.0.0.0/255.255.255.0} defines a network IP address range. The client IP
address must fall within this range for the logic statement to be true.
• compression:1 defines the configuration setting to be used if the logic statement is true. You can
include multiple parameters spread across multiple lines.
• {END_NETWORK} closes the logic statement and must be present.
If you use multiple logic statements, the Connection Broker evaluates the statements in order and includes
the parameter for the first statement that evaluates to true. For example:
{NETWORK:10.0.0.0/255.255.255.0} compression:0{END_NETWORK}
{NETWORK:192.168.10.0/255.255.255.128} compression:1{END_NETWORK}
{NETWORK:0.0.0.0/0.0.0.0}
compression:0
{END_NETWORK}
In this example, if the client's IP address is 10.0.0.* they have data compression turned off. If the address is
between 192.168.10.1 and 192.168.10.127 (VPN connected users), compression is turned on. If the address
is anything else, compression is turned off.
HP® ZCentral Remote Boost (RGS)
HP® ZCentral Remote Boost (RGS) is a high-performance remote graphics system that renders the graphics
on the desktop and sends the resulting screen image to the remote client.
HP ZCentral Remote Boost (RGS) Protocol Plan Options
The HP ZCentral Remote Boost (RGS) section of protocol plans, shown in the following figure, allows you to
specify the user login name, password, and HP ZCentral Remote Boost Receiver parameters for the user’s
desktop connection. To ensure that the Connection Broker establishes an HP ZCentral Remote Boost
16Working with Display Protocols
connection, switch the Priority for HP ZCentral Remote Boost to 1, as shown for Leostream Connect logins
in the following figure.
The HP ZCentral Remote Boost Receiver requires a username and password to authorize the session, unless
you enable Easy Login on the HP ZCentral Remote Boost Sender. Your Connection Broker does not know if it
is connecting your user to a HP ZCentral Remote Boost Sender with Easy Login enabled, however, therefore
the Connection Broker always sends a username and password to the client. By default, the Connection
Broker sends the username and password used to log into Leostream. In some cases, you may need to send
different credentials, for example:
• If the user logs into Leostream with their Active Directory credentials, but logs into a Linux desktop
using a different username.
• If the user logs into their remote desktop using a generic account, not their account.
To satisfy these and other use cases, edit the Send user login name as edit field to launch the HP ZCentral
Remote Boost session using a different login name than used for the Leostream session. You can use any of
the dynamic tags associated with the user’s account described in Using Dynamic Tags in Configuration Files,
including {USER}, {EMAIL}, {AD:USER:attribute_name}, etc.
If the password for the user specified in the Send user login name as edit field is different from the
Leostream user’s password, enter the new password in the Send user password as edit field.
Use the Configuration file field associated with HP ZCentral Remote Boost to specify the Remote Boost
Receiver properties. The text you enter into the Configuration file field is analogous to the
rgreceiverconfig file that sets Remote Boost Receiver parameters on the client computer when
making native Remote Boost connections to a remote desktop.
The default configuration file is:
Rgreceiver.IsBordersEnabled=0
Rgreceiver.IsBordersEnabled.IsMutable=0
Rgreceiver.IsMatchReceiverResolutionEnabled=1
Rgreceiver.IsMatchReceiverResolutionEnabled.IsMutable=0
Rgreceiver.IsMatchReceiverPhysicalDisplaysEnabled=1
Rgreceiver.IsMatchReceiverPhysicalDisplaysEnabled.IsMutable=0
17Working with Display Protocols
See the HP ZCentral Remote Boost User Guide for a complete description of the available Remote Boost
Receiver properties. Every HP ZCentral Remote Boost Receiver installation provides a documented example
rgreceiverconfig file in the installation directory, for example:
C:\Program Files\HP\Remote Graphics Receiver\rgreceiverconfig
The Connection Broker does not provide separate command line parameters for the Remote Boost
connection. All command line parameters must be set using their configuration file equivalents.
Launching HP ZCentral Remote Boost Connections through the Leostream Gateway
The Leostream Gateway can proxy HP ZCentral Remote Boost connections, allowing you to establish
Remote Boost connections from clients on different networks than the Remote Boost Sender. For a
complete description of using the Leostream Gateway for HP ZCentral Remote Boost connections, consult
the Leostream Gateway Guide.
Multi-Monitor Support with HP ZCentral Remote Boost
The HP ZCentral Remote Boost Sender can automatically change the display settings on the remote desktop
to match the monitor layout and resolution used on the client device running the Remote Boost Receiver.
The default configuration file in new protocol plans enables the following parameters:
IsMatchReceiverResolutionEnabled
IsMatchReceiverPhysicalDisplaysEnabled
to tell the HP ZCentral Remote Boost Sender to match the resolution and display layout of the client device.
The configuration file also sets the IsMutable value for these parameters to 0, so the user’s local Remote
Boost Receiver does not override the protocol plan.
When the user establishes a connection, the HP ZCentral Remote Boost Sender attempts to match the
resolution and display layout. If the Remote Boost Sender cannot perform the match, it reverts to its
previous resolution.
When launching the connection using Leostream Connect, the user receives no warning that the HP
ZCentral Remote Boost Sender is unable to match the desired resolution. Instead, the session opens using
its last resolution without warning the user. Users who log into Leostream using the Leostream Web client
receive a warning that their desired resolution cannot be matched.
Activating HP Velocity and Advanced Video Compression Features
The HP Velocity and Advanced Video Compression features improve HP ZCentral Remote Boost
performance over WAN connections. You can utilize these new features when establishing Remote Boost
connections using Leostream. The HP Velocity feature does not require additional configuration. To
configure advanced video compression, include the following parameters in the HP ZCentral Remote Boost
configuration file in your protocol plan.
18Working with Display Protocols
• Rgreceiver.ImageCodec.IsH264Enable: Set to 1 to enable advanced video compression.
• Rgreceiver.ImageCodec.IsCPUEncode: Set to 1 to cause the Remote Boost Sender to use
CPU encoding for h.264. If this parameter is set to zero, the Remote Boost Sender uses the GPU for
encoding, if available.
The advanced video compression and HP Velocity functionality available in HP ZCentral Remote Boost
require activation the first time the Remote Boost Receiver connects to the Remote Boost Sender. When
connecting natively from the HP ZCentral Remote Boost Receiver to the Remote Boost Sender, activation
dialogs open, indicating if the activation succeeded or failed. Leostream Connect suppresses the activation
dialogs, however the activation continues to take place.
If you configured a proxy within Remote Boost to perform the activation, include the following three
parameters in the HP ZCentral Remote Boost configuration file in your protocol plan.
• Rgreceiver.Network.ProxyEnabled: Set to 1 to enable the proxy, if required, in the
environment
• Rgreceiver.Network.ProxyPort: Specify the proxy port
• Rgreceiver.Network.ProxyAddress: Specify the proxy hostname or IP address
HP ZCentral Remote Boost uses the system proxy settings, but only when manual proxy configuration is
enabled. HP ZCentral Remote Boost does not support the use of use PAC, WPAD, or proxy authentication. If
there is no internet access and no proxy possible, the Remote Boost session fails to activate and disables
the HP Velocity and Advanced Video Compression features.
If the activation fails, use the following Rgreceiver parameters to configure the resultant behavior.
• Rgreceiver.Activation.AutomationMode: Specifies the path to take if the activation
fails, either:
o 0 – Continue without activation: in this mode, the Remote Boost Receiver silently disables
features requiring activation (HP Velocity and Advanced Video Compression) for the current
session and continues with the connection. The next Remote Boost connection triggers
activation again.
o 1 – Retry the activation: in this mode, the Remote Boost Receiver retries activation before
falling back. The number of retries is controlled by the
Rgreceiver.Activation.RetryAttempts parameter.
o 2 – (default) Do not activate: in this mode, the Remote Boost Receiver disables the features
that require activation. On the next connection if the user has not re-enabled those
features, no activation attempt will occur.
• Rgreceiver.Activation.RetryAttempts: (default = 5) The number of reactivation
attempts before disabling features that require activation
19Working with Display Protocols
Setting User Configurable HP ZCentral Remote Boost Parameters
The configuration file in the HP ZCentral Remote Boost section of the protocol plan defines the
characteristics of the user’s Remote Boost session. These settings may override any parameter settings
made on the user’s Remote Boost Receiver.
In some cases, you may want the user to customize certain Remote Boost connection parameters,
including:
• Borders
• Resolution, including resolution and display layout
• Image quality
• Setup mode sequence
To allow users to set values for these parameters, select the Allow users to modify configuration file
parameters option in the protocol plan.
To configure which parameters the user is allowed to modify:
1. Select the checkbox before each parameter that the user can customize.
2. After selecting the parameters the user can control, modify the text in the protocol plan’s
Configuration file field to use pre-defined dynamic tags, described in the following table, which the
Connection Broker replaces at connection time with the values specified by the user.
If you do not place the dynamic tags in the Configuration file, the user-specified settings will
not be applied. Consult the HP ZCentral Remote Boost user’s guide for more information on the
proper syntax for configuring RGreceiver parameters.
Parameter RGreceiver Parameter in the Protocol Plan Leostream Dynamic Tag
Setup
mode .Hotkeys.SetupModeSequence {SETUP_MODE_SEQUENCE}
sequence
Show .IsBordersEnabled {BORDERS}
borders
Match .IsMatchReceiverResolutionEnabled {MATCH_RESOLUTION}
resolution
Match .IsMatchReceiverPhysicalDisplaysEnabled {MATCH_DISPLAYS}
layout
.Session.{SESSION}.VirtualDisplay.IsPreferredResolutionEnabled {RESOLUTION_ENABLED}
Resolution .Session.{SESSION}.VirtualDisplay.PreferredResolutionHeight {RESOLUTION_HEIGHT}
.Session.{SESSION}.VirtualDisplay.PreferredResolutionWidth {RESOLUTION_WIDTH}
Image .ImageCodec.Quality {IMAGE_QUALITY}
quality
20Working with Display Protocols
For example, to allow the user to configure borders, image quality, and the setup mode sequence,
you must add the following lines to your configuration file.
Rgreceiver.IsBordersEnabled={BORDERS}
Rgreceiver.ImageCodec.Quality={IMAGE_QUALITY}
Rgreceiver.Hotkeys.SetupModeSequence={SETUP_MODE_SEQUENCE}
The Connection Broker does not replace the {SESSION} dynamic tag. Instead, Leostream
Connect automatically adjusts the value for the {SESSION} dynamic tag when the user connects
to desktops using HP Remote Boost.
3. From the Default value drop-down menus, indicate the value to use if the user has not customized
the parameter.
4. If you select Custom for the default value for resolution, enter the custom value into the Default
custom value edit field. Enter the value as heightxwidth where height and width are in
pixels and there is no space between the numbers and the x.
5. The drop-down menus in the end-user dialog display the values shown in the Default value drop-
down menu on the Administrator interface. You can choose to show user-friendly descriptions of
these items by defining display values. To define display values:
a. Click the Edit link in the Display value column
b. In the Edit Display Values form that opens, enter user-friendly names into the Display
value edit field for each possible internal value.
c. Click Save on the Edit Display Values form. The new display values are shown in the Default
value drop-down menu, as they will be displayed to users.
If the user never opts to customize values for the configurable protocol plan parameters, their connections
open using the default values specified in the protocol plan. If the user does specify a customized value for
a parameter, the scope of that parameter is determined by the user’s policy. See User Configurable
Protocol Plan Parameters for information on how to define the scope of user-configurable parameters, as
well as for instructions on using the end-user interfaces to define parameter values.
Single Sign-On with HP ZCentral Remote Boost
The Leostream Agent is not responsible for signing the user onto the remote desktop. Instead, to achieve
single sign-on with HP ZCentral Remote Boost:
• When installing the Remote Boost Sender on a Windows desktop, ensure that the HP ZCentral
Remote Boost Single Sign-on option is configured.
• For Linux remote desktop, single sign-on is not currently supported.
21Working with Display Protocols
USB Passthrough with HP ZCentral Remote Boost
To connect USB devices to the remote Windows desktop, use either the HP USB redirector or Leostream
Connect USB management. For predictable behavior, do not use these two features, simultaneously. If you
use Leostream Connect USB management, you cannot use the Assign to active desktop USB option in the
When Device is Plugged In section (see USB Device Management).
When using the Java version of Leostream Connect and the HP USB redirector, you can use the Leostream
Connect sidebar to select which active remote session has access to all USB devices.
To turn on the sidebar for USB access:
1. Enable the sidebar by adding the following line to the lc.conf file on the client device.
sidebar_enabled = true
2. In the protocol plan assigned to users that connect to desktops using HP ZCentral Remote Boost,
add the following line to the Configuration file field for HP ZCentral Remote Boost.
Rgreceiver.Usb.ActiveSession={USB_SESSION}
The Windows version of Leostream Connect does not support the {USB_SESSION} tag.
When a user logs in through Leostream Connect, by default, the first desktop they connect to using Remote
Boost has access to all USB devices. The sidebar menu for this desktop, shown in the following figure,
displays a USB On menu item.
When you attach a USB device to your client device, the USB device appears in the remote desktop that
indicates USB On. You can switch all USB devices to another desktop by selecting the Turn USB On menu
associated with that desktop, as shown in the following figure.
You must be connected to the desktop using Remote Boost before you can connect USB devices. Leostream
Connect prompts you to confirm that all USB devices should be switched to the new desktop. Click Yes in
the confirmation dialog, shown in the following figure to move USB devices to the new desktop. Click No to
keep the USB devices attached to the current desktop.
22Working with Display Protocols
HP ZCentral Remote Boost simultaneously allows access to USB devices from a single desktop.
If you disconnect from the Remote Boost session that has access to USB devices, Leostream Connect
automatically switches all USB devices to the next active Remote Boost session.
Session Shadowing and Collaboration
The Connection Broker allows users that connect to desktops using the HP ZCentral Remote Boost protocol
to collaborate by inviting a second shadow user to connect to their session. You must configure the HP
ZCentral Remote Boost Sender to accept collaborators before using Leostream to send invitations
For information on enabling collaboration in the Connection Broker and sending invitations, see Session
Shadowing and Collaboration.
Using the HP ZCentral Remote Boost Receiver for macOS
You can install the Java version of Leostream Connect on an Apple macOS device and use the HP ZCentral
Remote Boost Receiver for Mac to establish Remote Boost connections. See the Leostream Installation
Guide for information on installing Leostream Connect on a Mac.
Leostream Connect does not automatically discover the location of the HP ZCentral Remote Boost Receiver
app. Specify the full path to the HP Remote Boost Receiver executable in the Viewers tab of the Leostream
Connect Options dialog. Do not enter the path to the .app directory, for example:
/Applications/HP RGS Receiver.app/Contents/MacOS/HP RGS Receiver
23Working with Display Protocols
Microsoft® RDP and RemoteFX
The RDP and RemoteFX section of the protocol plan allows you to enter command line parameters and/or
a configuration file to use when launching a Microsoft remote desktop connection. The Connection Broker
uses the standard Microsoft RDP configuration file format for RDP sessions controlled by Leostream
Connect. You can verify the configuration file you enter in the Configuration file edit field of the protocol
plan using a standard Microsoft RDP client.
Options for Encoding Desktop Login Credentials into RDP Configuration Files
RDP requires an encrypted password in order to perform single sign-on. Typically, the Configuration file for
RDP contains the following line:
password 51:b:{RDP_PASSWORD}
Using the {RDP_PASSWORD} dynamic tag in the protocol plan encodes the user’s desktop login
credentials into the RDP configuration file. The Connection Broker replaces the {RDP_PASSWORD}
dynamic tag with the user’s password encrypted for RDP connections before passing the RDP configuration
file to the client.
Do not use the password 51:b parameter in the configuration file. The Web client cannot encrypt
the user’s password.
If the user’s desktop requires a different password than what the user provided to Leostream Connect, you
can use the {STANDARD_RDP_PASSWORD:password} dynamic tag to pass the desktop password down to the
Leostream Connect client in order to enable single sign-on. In your configuration file, replace password
with the password to log into the desktop. Leostream Connect then encrypts the password and places the
encrypted password in the configuration file before launching the RDP connection.
Launching RDP Connections from the Leostream Web client
When launching an RDP connection from the Leostream Web client, the Connection Broker downloads an
RDP configuration file in the same way as any other server-initiated file download. If your Web browser
blocks the download, modify the browser’s security settings to allow downloads from your Connection
Broker. After the browser downloads the file, it prompts the user to open or save the file. Opening the file
launches the RDP session, where the user must enter their password.
Single sign-on is not available when using the native RDP client from a Web browser.
Some Web browsers prompt users to download the RDP file used to launch the Connection to the desktop.
To avoid this prompt, the first time the Connection Broker tries to download an RDP file, right-click on the
download tab associated with that file and select Always open this kind of file. When the user
subsequently launches additional desktops, the Web browser automatically launches the connection
without prompting the user.
24You can also read