Open Enterprise Server 2018 - NSS AD Administration Guide November 2017 - Novell
←
→
Page content transcription
If your browser does not render page correctly, please read the page content below
Open Enterprise Server 2018
     NSS AD Administration Guide
                        November 2017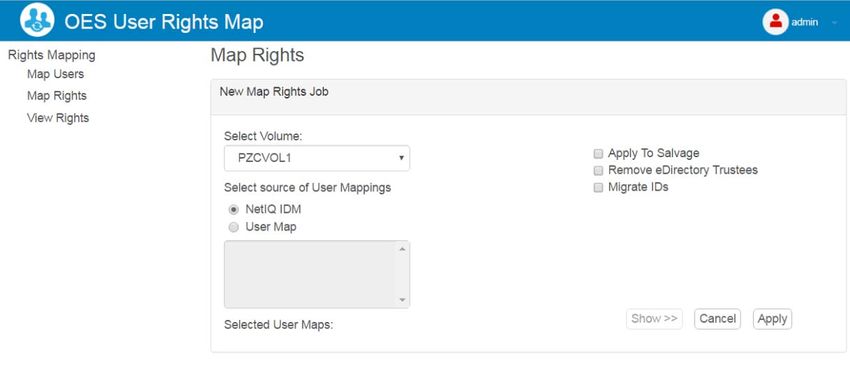
Legal Notices
For information about legal notices, trademarks, disclaimers, warranties, export and other use restrictions, U.S. Government
rights, patent policy, and FIPS compliance, see https://www.microfocus.com/about/legal/.

Copyright © 2017 Micro Focus. All Rights Reserved.
Contents

  About This Guide                                                                                                                                   5

1 Overview of NSS AD Support                                                                                                                         7
  1.1   Understanding What Changed to Enable NSS AD Support in OES . . . . . . . . . . . . . . . . . . . . . . . . . . 7
        1.1.1   Novell CIFS Access Changes . . . . . . . . . . . . . . . . . . . . . . . . . . . . . . . . . . . . . . . . . . . . . . . . 8
        1.1.2   OES Service Changes For NSS AD . . . . . . . . . . . . . . . . . . . . . . . . . . . . . . . . . . . . . . . . . . . 9
        1.1.3   Multi-Forest Support for AD Users . . . . . . . . . . . . . . . . . . . . . . . . . . . . . . . . . . . . . . . . . . . . . 9
        1.1.4   Utility and Management Tool Changes . . . . . . . . . . . . . . . . . . . . . . . . . . . . . . . . . . . . . . . . 10

2 Preparing to Deploy NSS AD                                                                                                                       11
  2.1   Software and Hardware Requirements . . . . . . . . . . . . . . . . . . . . . . . . . . . . . . . . . . . . . . . . . . . . . . . 11
  2.2   Meeting NSS AD Infrastructure Requirements. . . . . . . . . . . . . . . . . . . . . . . . . . . . . . . . . . . . . . . . . . 11
  2.3   Joining OES to AD Domain When OES and AD are Present in Different DNS Domain . . . . . . . . . . 12
  2.4   Planning to Assign AD User and Group Trustee Rights . . . . . . . . . . . . . . . . . . . . . . . . . . . . . . . . . . . 13
  2.5   Coexistence with NSS AD . . . . . . . . . . . . . . . . . . . . . . . . . . . . . . . . . . . . . . . . . . . . . . . . . . . . . . . . . 13
        2.5.1    Incompatiblities at a Server Level . . . . . . . . . . . . . . . . . . . . . . . . . . . . . . . . . . . . . . . . . . . . 13
        2.5.2    NSS AD Is Network-Compatible with All OES Services. . . . . . . . . . . . . . . . . . . . . . . . . . . . 14
        2.5.3    NSS AD Doesn’t Affect Backward Compatibility . . . . . . . . . . . . . . . . . . . . . . . . . . . . . . . . . 14
        2.5.4    Ensuring DST Support for NSS AD . . . . . . . . . . . . . . . . . . . . . . . . . . . . . . . . . . . . . . . . . . . 14
        2.5.5    DFS Deployment with NSS AD . . . . . . . . . . . . . . . . . . . . . . . . . . . . . . . . . . . . . . . . . . . . . . 14
  2.6   Caveats for Deploying NSS AD . . . . . . . . . . . . . . . . . . . . . . . . . . . . . . . . . . . . . . . . . . . . . . . . . . . . . 15
        2.6.1    Clustered Node Issue . . . . . . . . . . . . . . . . . . . . . . . . . . . . . . . . . . . . . . . . . . . . . . . . . . . . . 15
        2.6.2    Recommendations During Upgrade . . . . . . . . . . . . . . . . . . . . . . . . . . . . . . . . . . . . . . . . . . 16

3 Installing and Configuring NSS AD Support                                                                                                        17
  3.1   Installing a New OES Server and Deploying NSS AD . . . . . . . . . . . . . . . . . . . . . . . . . . . . . . . . . . . . 18
  3.2   Upgrading to OES 2018 and Deploying NSS AD (Non-Clustered Environment) . . . . . . . . . . . . . . . . 25
  3.3   Upgrading to OES 2018 and Deploying NSS AD (Clustered Environment) . . . . . . . . . . . . . . . . . . . . 31
  3.4   Leave a AD Domain . . . . . . . . . . . . . . . . . . . . . . . . . . . . . . . . . . . . . . . . . . . . . . . . . . . . . . . . . . . . . . 37
  3.5   Reconfiguring NSS AD . . . . . . . . . . . . . . . . . . . . . . . . . . . . . . . . . . . . . . . . . . . . . . . . . . . . . . . . . . . . 38
  3.6   Renaming the Netbios Name of OES Host or Cluster Resource . . . . . . . . . . . . . . . . . . . . . . . . . . . . 38

4 Assigning NSS Trustee Rights for AD Users and Groups                                                                                             39
  4.1   Overview of the Provisioning Process . . . . . . . . . . . . . . . . . . . . . . . . . . . . . . . . . . . . . . . . . . . . . . . . 39
  4.2   NURM Provisioning Caveats . . . . . . . . . . . . . . . . . . . . . . . . . . . . . . . . . . . . . . . . . . . . . . . . . . . . . . . 40
        4.2.1   iManager Created NetIQ IDM Map Files Do Not Work with NURM. . . . . . . . . . . . . . . . . . . 40
        4.2.2   NURM eDirectory User Must Have a CIFS Universal Password Policy . . . . . . . . . . . . . . . 40

5 Managing NSS AD                                                                                                                                  41

6 NSS AD Utilities and Tools                                                                                                                       45
  6.1   List of NSS AD Supported Tools . . . . . . . . . . . . . . . . . . . . . . . . . . . . . . . . . . . . . . . . . . . . . . . . . . . . 45
  6.2   NIT (Novell Identity Translator). . . . . . . . . . . . . . . . . . . . . . . . . . . . . . . . . . . . . . . . . . . . . . . . . . . . . . 46
        6.2.1     A New NSS Authorization Model . . . . . . . . . . . . . . . . . . . . . . . . . . . . . . . . . . . . . . . . . . . . . 47

                                                                                                                               Contents                    3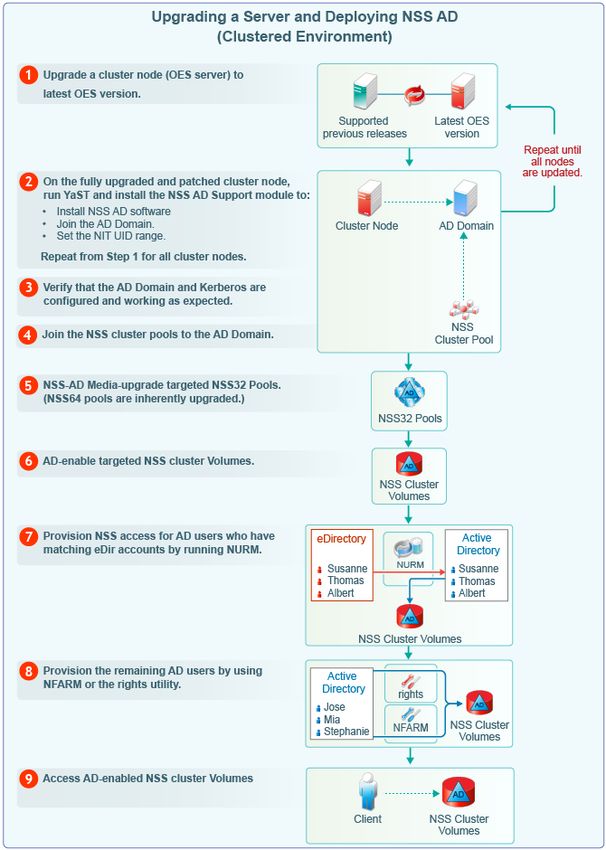
6.2.2 Not All Users Have UIDs by Default . . . . . . . . . . . . . . . . . . . . . . . . . . . . . . . . . . . . . . . . . . 47
6.2.3 Ensuring that Your CIFS-NSS Users Have UIDs . . . . . . . . . . . . . . . . . . . . . . . . . . . . . . . . . 47
6.2.4 Which OES Components Rely on NIT . . . . . . . . . . . . . . . . . . . . . . . . . . . . . . . . . . . . . . . . . 48
6.2.5 What NIT Does . . . . . . . . . . . . . . . . . . . . . . . . . . . . . . . . . . . . . . . . . . . . . . . . . . . . . . . . . . 48
6.2.6 Prerequisites . . . . . . . . . . . . . . . . . . . . . . . . . . . . . . . . . . . . . . . . . . . . . . . . . . . . . . . . . . . . 48
6.2.7 NIT Components . . . . . . . . . . . . . . . . . . . . . . . . . . . . . . . . . . . . . . . . . . . . . . . . . . . . . . . . . 49
6.2.8 NIT Log Files . . . . . . . . . . . . . . . . . . . . . . . . . . . . . . . . . . . . . . . . . . . . . . . . . . . . . . . . . . . . 49
6.2.9 Interactions With eDirectory and Active Directory . . . . . . . . . . . . . . . . . . . . . . . . . . . . . . . . 49
6.2.10 How NIT Works . . . . . . . . . . . . . . . . . . . . . . . . . . . . . . . . . . . . . . . . . . . . . . . . . . . . . . . . . . 50
6.2.11 Active Directory users: . . . . . . . . . . . . . . . . . . . . . . . . . . . . . . . . . . . . . . . . . . . . . . . . . . . . . 50
6.2.12 eDirectory users: . . . . . . . . . . . . . . . . . . . . . . . . . . . . . . . . . . . . . . . . . . . . . . . . . . . . . . . . . 51
6.2.13 Task FAQ . . . . . . . . . . . . . . . . . . . . . . . . . . . . . . . . . . . . . . . . . . . . . . . . . . . . . . . . . . . . . . . 51
6.2.14 Administrative Access Restrictions . . . . . . . . . . . . . . . . . . . . . . . . . . . . . . . . . . . . . . . . . . . 52
6.2.15 Performance and Tuning . . . . . . . . . . . . . . . . . . . . . . . . . . . . . . . . . . . . . . . . . . . . . . . . . . . 52
6.3 novell-ad-util . . . . . . . . . . . . . . . . . . . . . . . . . . . . . . . . . . . . . . . . . . . . . . . . . . . . . . . . . . . . . . . . . . . . 53
6.3.1 novell-ad-util Command Line Utility . . . . . . . . . . . . . . . . . . . . . . . . . . . . . . . . . . . . . . . . . . . 53
6.4 NURM (OES User Rights Management) . . . . . . . . . . . . . . . . . . . . . . . . . . . . . . . . . . . . . . . . . . . . . . 57
6.4.1 Prerequisites . . . . . . . . . . . . . . . . . . . . . . . . . . . . . . . . . . . . . . . . . . . . . . . . . . . . . . . . . . . . 58
6.4.2 Accessing OES User Rights Map Utility (NURM) . . . . . . . . . . . . . . . . . . . . . . . . . . . . . . . . 58
6.4.3 Mapping Users. . . . . . . . . . . . . . . . . . . . . . . . . . . . . . . . . . . . . . . . . . . . . . . . . . . . . . . . . . . 59
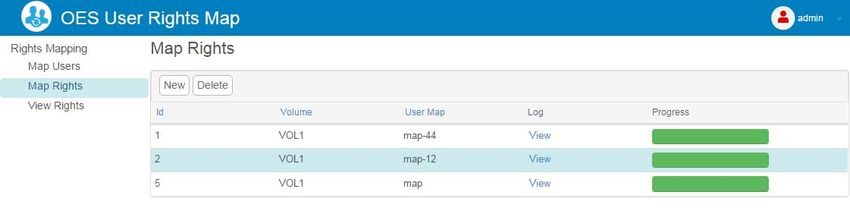
6.4.4 Mapping Rights . . . . . . . . . . . . . . . . . . . . . . . . . . . . . . . . . . . . . . . . . . . . . . . . . . . . . . . . . . 62
6.4.5 Viewing Rights . . . . . . . . . . . . . . . . . . . . . . . . . . . . . . . . . . . . . . . . . . . . . . . . . . . . . . . . . . . 63
6.4.6 NURM Command Line Utility . . . . . . . . . . . . . . . . . . . . . . . . . . . . . . . . . . . . . . . . . . . . . . . 63
6.5 NFARM (OES File Access Rights Management) . . . . . . . . . . . . . . . . . . . . . . . . . . . . . . . . . . . . . . . . 67
6.5.1 NFARM Support Matrix . . . . . . . . . . . . . . . . . . . . . . . . . . . . . . . . . . . . . . . . . . . . . . . . . . . . 68
6.5.2 Prerequisites for Installing NFARM . . . . . . . . . . . . . . . . . . . . . . . . . . . . . . . . . . . . . . . . . . . 68
6.5.3 Installing and Accessing NFARM . . . . . . . . . . . . . . . . . . . . . . . . . . . . . . . . . . . . . . . . . . . . . 69
6.5.4 Managing the Trustee Rights in the NSS File System . . . . . . . . . . . . . . . . . . . . . . . . . . . . . 69
6.5.5 Information. . . . . . . . . . . . . . . . . . . . . . . . . . . . . . . . . . . . . . . . . . . . . . . . . . . . . . . . . . . . . . 72
6.5.6 User Quota . . . . . . . . . . . . . . . . . . . . . . . . . . . . . . . . . . . . . . . . . . . . . . . . . . . . . . . . . . . . . 73
6.5.7 File System Rights . . . . . . . . . . . . . . . . . . . . . . . . . . . . . . . . . . . . . . . . . . . . . . . . . . . . . . . . 73
6.5.8 Salvage and Purge . . . . . . . . . . . . . . . . . . . . . . . . . . . . . . . . . . . . . . . . . . . . . . . . . . . . . . . 73
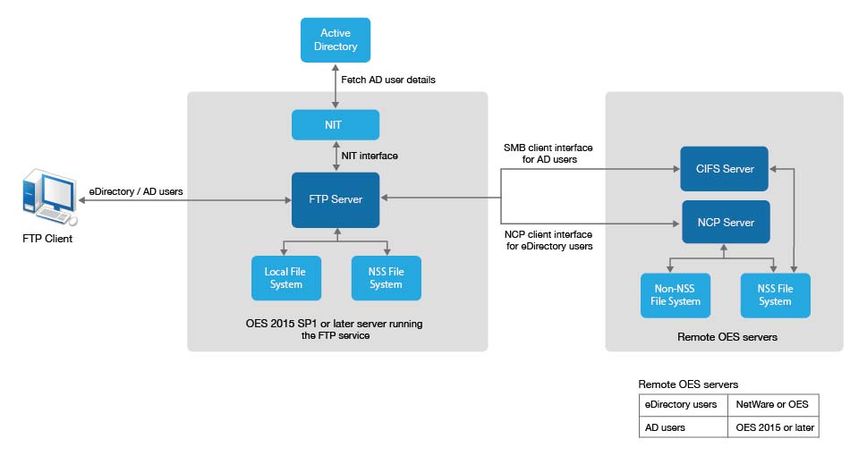
6.6 FTP (Pure-FTPd) and OES for AD Users. . . . . . . . . . . . . . . . . . . . . . . . . . . . . . . . . . . . . . . . . . . . . . 74
6.6.1 Planning for Pure-FTPd . . . . . . . . . . . . . . . . . . . . . . . . . . . . . . . . . . . . . . . . . . . . . . . . . . . . 74
6.6.2 Installing Pure-FTPd . . . . . . . . . . . . . . . . . . . . . . . . . . . . . . . . . . . . . . . . . . . . . . . . . . . . . . 74
6.6.3 Home Directory Support in Pure-FTPd . . . . . . . . . . . . . . . . . . . . . . . . . . . . . . . . . . . . . . . . 74
6.6.4 Prerequisites . . . . . . . . . . . . . . . . . . . . . . . . . . . . . . . . . . . . . . . . . . . . . . . . . . . . . . . . . . . . 75
6.6.5 Configuring Pure-FTPd on an OES Server . . . . . . . . . . . . . . . . . . . . . . . . . . . . . . . . . . . . . 75
6.6.6 Administering and Managing Pure-FTPd on an OES Server . . . . . . . . . . . . . . . . . . . . . . . 75
6.6.7 Limitations . . . . . . . . . . . . . . . . . . . . . . . . . . . . . . . . . . . . . . . . . . . . . . . . . . . . . . . . . . . . . . 79
7 Troubleshooting 81
7.1 Novell Storage Services AD Configuration is Greyed Out . . . . . . . . . . . . . . . . . . . . . . . . . . . . . . . . . 81
7.2 Domain Leave Fails Using the novell-ad-util . . . . . . . . . . . . . . . . . . . . . . . . . . . . . . . . . . . . . . . . . . . 81
7.3 Verification of the Container Object Fails During the AD Domain Join Process. . . . . . . . . . . . . . . . . 82
7.4 Troubleshooting NURM . . . . . . . . . . . . . . . . . . . . . . . . . . . . . . . . . . . . . . . . . . . . . . . . . . . . . . . . . . . 82
7.4.1 Volumes are not Listed in the View Rights and Map Rights Pages . . . . . . . . . . . . . . . . . . . 82
7.4.2 Active Directory User Names With Special Characters are Ignored . . . . . . . . . . . . . . . . . . 82
7.4.3 View Rights Option Does Not Work in NURM When There are 200K Users . . . . . . . . . . . 83
7.5 Troubleshooting NIT . . . . . . . . . . . . . . . . . . . . . . . . . . . . . . . . . . . . . . . . . . . . . . . . . . . . . . . . . . . . . 83
A Reference Information 85
A.1 NIT Error Codes . . . . . . . . . . . . . . . . . . . . . . . . . . . . . . . . . . . . . . . . . . . . . . . . . . . . . . . . . . . . . . . . . 85
4 Contents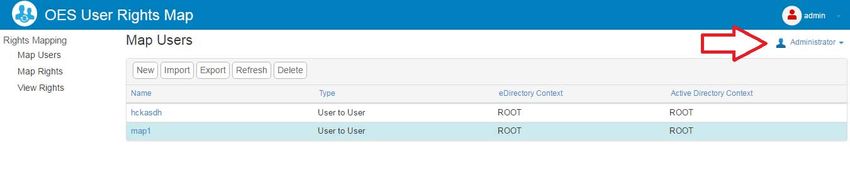
About This Guide
This documentation describes how to install, deploy, and administer the NSS AD service included
with OES 2018.
Chapter 1, “Overview of NSS AD Support,” on page 7
Chapter 2, “Preparing to Deploy NSS AD,” on page 11
Chapter 3, “Installing and Configuring NSS AD Support,” on page 17
Chapter 4, “Assigning NSS Trustee Rights for AD Users and Groups,” on page 39
Chapter 5, “Managing NSS AD,” on page 41
Chapter 6, “NSS AD Utilities and Tools,” on page 45
Chapter 7, “Troubleshooting,” on page 81
Appendix A, “Reference Information,” on page 85
Feedback
We want to hear your comments and suggestions about this manual and the other documentation
included with this product. Please use the User Comment feature at the bottom of each page of the
online documentation.
Additional Documentation
For information about other OES products, see the OES 2018 Documentation Web Site.
About This Guide 5
6 About This Guide
1 Overview of NSS AD Support
1
Beginning with OES 2015 or later, you can provide Active Directory users with the ability to
seamlessly access NSS resources and administer them. AD users and groups do not need to move
to eDirectory; NSS resources can be accessed by both AD and eDirectory users at the same time.
Integration of NSS and Active Directory
1. eDirectory user and group access to OES file services on NSS volumes
is unchanged.
AFP
NetStorage
NCP
eDirectory FTP
Users and Groups
Samba
NFS
CIFS
2. Active Directory users and groups can now be granted
native Windows (CIFS) and FTP access to NSS volumes.
NSS Volumes on
CIFS OES Servers
FTP
Active Directory
Users and Groups
1.1 Understanding What Changed to Enable NSS AD
Support in OES
Section 1.1.1, “Novell CIFS Access Changes,” on page 8
Section 1.1.2, “OES Service Changes For NSS AD,” on page 9
Section 1.1.3, “Multi-Forest Support for AD Users,” on page 9
Section 1.1.4, “Utility and Management Tool Changes,” on page 10
Overview of NSS AD Support 7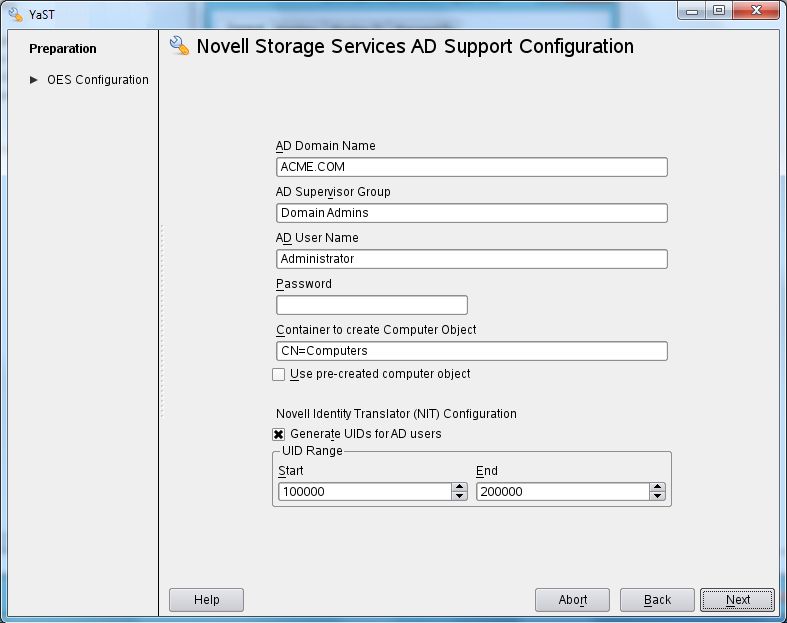
1.1.1   Novell CIFS Access Changes
            Figure 1-1 Novell CIFS Access Changes in OES

                     USERS           WORKSTATIONS          AUTHENTICATION          FILE SERVICE          AUTHORIZATION

                                        Windows                Active
                                                              Directory
                Active Directory                                                    Novell CIFS
                      User
                                         Linux
                                                                                                                NSS

                    eDirectory                                                      Novell FTP
                      User                                    eDirectory
                                          Mac

            Table 1-1 Summary of Novell CIFS Access Changes

            CIFS Access            OES 11 SP2 and Earlier                     OES 2015 and Later
            Component

            Users                  eDirectory users access NSS using their    eDirectory and Active Directory users can
                                   eDirectory credentials.                    access NSS using their eDirectory and
                                                                              Active Directory credentials, respectively.

            Workstations           Windows, Linux and Macintosh are           No changes in platform support.
                                   supported.

            Authentication         Only eDirectory is supported as an         Both eDirectory and Active Directory are
                                   identity source.                           supported as identity sources.

                                   All file service access is controlled by   For eDirectory users, NMAS authentication
                                   eDirectory authentication through NMAS.    is still used.

                                                                              For Active Directory users, Novell CIFS
                                                                              interacts with Active Directory and the
                                                                              Kerberos service is used to authenticate the
                                                                              Active Directory users.

            File Service           Novell CIFS is among the many file      Novell CIFS offers support for Active
                                   services offered, which also include    Directory users.
                                   Novell AFP, NetStorage, NCP, and Novell
                                   FTP.                                    Beginning with OES 2015 SP1, Novell FTP
                                                                           offers support for Active directory users.

                                                                              No other file services are enabled for AD
                                                                              user access at this point.

            Authorization          Authorization to access NSS is handled     Authorization to access NSS through Novell
                                   by Novell CIFS working in cooperation      CIFS is handled by NSS alone. This
                                   with NSS.                                  increases both the efficiency and the
                                                                              reliability of the authorization process.

8      Overview of NSS AD Support
1.1.2 OES Service Changes For NSS AD
Table 1-2 OES Service Changes
Service OES Changes and Information
Novell CIFS You can grant AD users native CIFS access to NSS volumes with Novell trustee
model.
Active Directory and eDirectory users can perform salvage and purge operation
on Windows through NFARM (OES File Access Rights Management) utility.
AD users can access NSS resources in a multi-forest environment.
Beginning with OES 2018, Active Directory and eDirectory users can perform
salvage and purge operation on Mac using NFARM (OES File Access Rights
Management).
Novell Cluster Services Cluster resources can now join to AD domains.
(NCS)
Distributed File DFS is supported in NSS AD environment.
Services (DFS)
Dynamic Storage DST is supported in NSS AD environment.
Technology (DST)
FTP Server FTP server is supported in NSS AD environment.
Novell Identity NIT lets you ensure that eDirectory and AD users requiring NSS authorization have
Translator (NIT) the required UIDs. It supports AD users in multi-forest environment.
NSS (Novell Storage AD users can now access NSS through CIFS.
Services)
Storage Management SMS now supports backing up AD trustee information in NSS AD environment.
Services (SMS)
NSS Auditing Client Audit all file operations for AD users.
Logger (VLOG)
VLOG is enhanced to filter based on user names and application names.
1.1.3 Multi-Forest Support for AD Users
Beginning with OES 2015 SP1, multi-forest support allows access to NSS resources from Active
Directory users belonging to AD forests having bi-directional trust with OES joined forest or AD
domains having bi-directional external trust with OES joined forest.
The following OES components supports multi-forest for AD users: NSS, CIFS, DFS, DST, Migration
Tool, NIT, SMS, and VLOG.
Overview of NSS AD Support 91.1.4 Utility and Management Tool Changes
Table 1-3 OES Utility Changes
Utility Changes and Information
NFARM Beginning with OES 2018, Active Directory and eDirectory users can perform salvage
and purge operation on Mac.
For more information, see NFARM Installer for Mac in the OES 2018: NSS File
System Administration Guide for Linux.
nsscon Options are added to update the SEV interval for AD users. Also, provided options to
force update the SEV interval for AD users and for a single AD user.
For more information, see Security Equivalence Vector Update Commands in the
OES 2018: NSS File System Administration Guide for Linux.
10 Overview of NSS AD Support2 Preparing to Deploy NSS AD
2
Use the information in the following sections as you plan your NSS AD deployment.
Section 2.1, “Software and Hardware Requirements,” on page 11
Section 2.2, “Meeting NSS AD Infrastructure Requirements,” on page 11
Section 2.3, “Joining OES to AD Domain When OES and AD are Present in Different DNS
Domain,” on page 12
Section 2.4, “Planning to Assign AD User and Group Trustee Rights,” on page 13
Section 2.5, “Coexistence with NSS AD,” on page 13
Section 2.6, “Caveats for Deploying NSS AD,” on page 15
2.1 Software and Hardware Requirements
NSS AD has no additional requirements beyond those outlined in “Meeting All Server Software and
Hardware Requirements” in the OES 2018: Installation Guide.
2.2 Meeting NSS AD Infrastructure Requirements
You can select NSS AD pattern during OES installation or after the OES server is installed and
running.
Table 2-1 Preparing Your Infrastructure for OES
Selecting NSS AD pattern with OES Installing NSS AD post OES Server
Server installation installation
OES 2018 Ensure to select the NSS AD pattern Ensure the OES server that will run NSS AD is
Server during OES server installation. fully patched (including SLES 12 SP2 patches)
before you install NSS AD.
Active Ensure that your Active Directory deployment meets the following constraints:
Directory
The Domain Controller for the domain your OES server will join is a Windows 2008,
Windows 2008 R2, Windows 2012, or Windows 2012 R2 server.
Your NSS AD deployment targets can be a Single AD forest or Multi-forest environment.
Single Forest Environment: Create a Universal Group with the
sAMAccountName "OESAccessGrp" anywhere in the AD forest. Only the
members of this group will have access to the NSS resources based on their
trustee assignments. In absence of this group, all the AD users in the forest can
access the NSS resources based on their trustee assignments.
Multi-Forest Environment: Create a Domain Local Group (DLG) with the
sAMAccountName "DLOESAccessGrp" in the AD domain to which this OES
server is joined. Only the members of this group (OES forest and across forest) will
have access to the NSS resources based on their trustee assignments. In absence
of this group, the AD users across the forest cannot access the NSS resources.
Preparing to Deploy NSS AD 11Selecting NSS AD pattern with OES Installing NSS AD post OES Server
Server installation installation
AD Rights Identify the username and password of an AD user who has rights to join the OES server to
the domain.
The following rights are required on the container where the OES server object will be
located:
Reset password
Create computer objects
Delete computer objects
Read and write the msDs-supportedEncryptionTypes attribute
DNS 1. Ensure that the DNS service that the 1. Ensure that the OES server can resolve the
OES server will use is configured DNS name of the AD domain controller for
such that the server will be able to the domain that the server will join.
resolve the DNS name of the AD
2. Ensure that the DNS service includes a
domain controller for the domain to
reverse lookup entry for the AD domain
which the server will be joined.
controller.
2. Ensure that the DNS service
includes a reverse lookup entry for
the AD domain controller.
Novell CIFS Install and configure Novell CIFS at the Ensure that the Novell CIFS service that AD
same time as you install OES and NSS users will access is configured and operational
AD Support. on the OES server.
Time Ensure that the date and time settings that Ensure that the date and time for the OES server
Synchronizati you specify for the OES server match match the AD domain controller’s date and time.
on those of the AD domain controller.
2.3 Joining OES to AD Domain When OES and AD are
Present in Different DNS Domain
Consider the scenario where OES server is present in one DNS domain and AD server is present in
another DNS domain. Before joining OES to AD domain, do the following:
Ensure to meet the NSS AD requirements. For more information, see Prerequisites for Installing
and Configuring NSS AD in the OES 2018: Installation Guide.
The OES server should be able to resolve the DNS queries for the AD domain.
The example provides how to successfully join OES server to AD domain when OES and AD servers
are in two different domains:
1. OES server is in oesdomain.com with the DNS server IP address 192.168.1.2
2. AD server is joined to addomain.com with the DNS server IP address 192.168.20.22
3. The DNS server with the IP address 192.168.1.2 should resolve the DNS queries on
addomain.com. There are different ways to resolve the DNS queries, we have considered using
DNS forwarder in this example:
a. Configure the forwarder on 192.168.1.2 that points to 192.168.20.22
b. Ensure all the PTR records exists for all Domain Controller (DC) and Global Catalog (GC) in
192.168.20.22
12 Preparing to Deploy NSS ADc. From the OES server console, verify if the AD DC server and AD domain is resolvable.
nslookup adserver1.addomain.com
nslookup addomain.com
The command should execute successfully and display details of the AD server and
domain.
NOTE: For FTP AD remote navigation, ensure that the search attribute present in /etc/
resolv.conf is configured with all the AD domain entries of the OES servers.
2.4 Planning to Assign AD User and Group Trustee
Rights
Do the following:
1 Identify the Active Directory users and groups that need access to NSS resources.
2 You can assign the NSS trustee rights to your AD users and groups in two ways:
Using NFARM (Windows explorer shell extension) or rights utility on the OES server. For
more information about NFARM, see Section 6.5, “NFARM (OES File Access Rights
Management),” on page 67 and rights in OES 2018: NSS File System Administration Guide
for Linux.
Using the NURM utility. This method assumes that at least some of your network users and
groups have identities in both eDirectory and Active Directory that can be mapped to each
other. For more information about NURM, see Section 6.4, “NURM (OES User Rights
Management),” on page 57.
NOTE: If an AD user group membership is modified between the user login to AD domain and
mapping to OES CIFS server, the AD user must logout and login again to the AD domain to
perform the file operations on OES server.
2.5 Coexistence with NSS AD
The following sections cover NSS AD coexistence.
Section 2.5.1, “Incompatiblities at a Server Level,” on page 13
Section 2.5.2, “NSS AD Is Network-Compatible with All OES Services,” on page 14
Section 2.5.3, “NSS AD Doesn’t Affect Backward Compatibility,” on page 14
Section 2.5.4, “Ensuring DST Support for NSS AD,” on page 14
Section 2.5.5, “DFS Deployment with NSS AD,” on page 14
2.5.1 Incompatiblities at a Server Level
Do not install the following services on the same server as NSS AD:
Novell Samba
DSfW
Preparing to Deploy NSS AD 132.5.2 NSS AD Is Network-Compatible with All OES Services
Introducing NSS AD into your OES service mix will not cause any conflicts with existing OES services
on your network.
2.5.3 NSS AD Doesn’t Affect Backward Compatibility
The following services and components, which were modified to support NSS AD, are compatible
with pre-OES 2015 servers, with important exceptions noted.
Access Control Lists
Backup (SMS)
Novell CIFS
Novell Distributed File Services (DFS)
Novell Dynamic Storage Technology (DST)
Novell Cluster Services (NCS)
IMPORTANT: Pre-OES 2015 nodes cannot mount NSS-AD enabled pools and volumes. For
more information, see Section 2.6.1, “Clustered Node Issue,” on page 15.
NSS (Novell Storage Services)
Salvage
2.5.4 Ensuring DST Support for NSS AD
To provide NSS AD support in an environment that contains Dynamic Storage Technology (DST), you
must do the following:
Ensure that the OES server or the cluster node where the primary and shadow volumes exist,
has joined the Active Directory domain as part of the normal NSS AD deployment process.
Ensure that both the primary and the secondary (shadow) volumes are AD-enabled.
The primary and secondary volumes can be of the same type (NSS32 or NSS64) or mixed
(NSS32 and NSS64).
For more information on DST, see OES 2018: Dynamic Storage Technology Administration Guide.
2.5.5 DFS Deployment with NSS AD
“DFS Source and Target Is NSS AD Enabled” on page 14
“DFS in Heterogeneous Environment” on page 15
DFS Source and Target Is NSS AD Enabled
The DFS source and target server are configured with OES 2015 or later with NSS AD support. For
AD users to access a DFS junction using the CIFS client, the following is required:
The DFS source and the target server must have joined the AD domain.
14 Preparing to Deploy NSS AD The pools and volumes present in DFS source and target server should be media-upgraded and
AD-enabled respectively.
AD users must have trustee rights on the files and folders they need to access.
DFS in Heterogeneous Environment
During the NSS AD deployment process, there is, of course, a period of time during which some
servers are running NSS AD and some are not.
If the DFS source is NSS AD configured and the target is a pre-OES 2015 server, then for seamless
access of data on the pre-OES 2015 server, ensure that both the Active Directory and eDirectory
credentials have same usernames and passwords.
When the AD user accesses the pre-OES 2015 server, the CIFS client authenticates with the AD
credentials and fails. CIFS then falls back to use eDirectory credentials and the user is able to access
the data.
2.6 Caveats for Deploying NSS AD
Be aware of the following caveats before installing and configuring NSS AD.
Section 2.6.1, “Clustered Node Issue,” on page 15
Section 2.6.2, “Recommendations During Upgrade,” on page 16
2.6.1 Clustered Node Issue
Pre-OES 2015 servers cannot mount NSS-AD media-upgraded pools.
1 If possible, you should upgrade all cluster nodes to OES 2015 or later as part of your NSS-AD
deployment.
2 If you cannot upgrade your cluster nodes at the same time, ensure the following:
A mixed node cluster environment can contain OES 11 SP2, OES 2015, OES 2015 SP1 and
OES 2018 nodes. The AD media upgraded NSS32 and NSS64 pools cannot be loaded in OES
11 SP2 nodes.
When a resource comes online, it tries to load on a node based on the preferred node
assignment (OES 2015 or later nodes), and the older OES cluster nodes are skipped from the
preferred node list. If OES 2015 or later nodes are not available in the cluster, the resources are
moved to “unassigned” state.
However, if the upgraded (OES 2015 or later) node comes up or any new OES (OES 2015 or
later) node is added to the cluster, the resource will automatically loads on the OES 2015 or later
node.
IMPORTANT
All nodes in the cluster must be patched with the latest OES patches. Otherwise, the AD
media resource goes to comatose state on nodes earlier than OES 2015.
All nodes in the cluster must belong to OES 11 SP2 or later. If any OES node in the cluster
is older than OES 11 SP2, this feature does not work.
For more information, see “Configuring Preferred Nodes and Node Failover Order for a
Resource” in the OES 2018: Novell Cluster Services for Linux Administration Guide.
Preparing to Deploy NSS AD 152.6.2 Recommendations During Upgrade
When upgrading the OES server, if NSS AD pattern is selected, then any misconfiguration in joining
the domain can result in upgrade failure. Hence, it is recommended not to install NSS AD Support as
part of the upgrade process. Instead, you must do the following:
1 Complete the upgrade/migration processes as documented in “Upgrading to OES 2018” in the
OES 2018: Installation Guide
2 Ensure that all of the NSS AD Infrastructure Requirements are met.
3 Run the YaST OES Installation module (or the NSS AD Support module) on the OES server and
complete the applicable instructions in Chapter 3, “Installing and Configuring NSS AD Support,”
on page 17.
For information on planning a migration to OES 2018, see the OES 2018: Migration Tool
Administration Guide.
16 Preparing to Deploy NSS AD3 Installing and Configuring NSS AD
3
Support
IMPORTANT: The information in this section supplements but does not replace the official OES
installation and upgrade instructions that are contained in the OES 2018: Installation Guide.
This section covers the following topics:
Section 3.1, “Installing a New OES Server and Deploying NSS AD,” on page 18
Section 3.2, “Upgrading to OES 2018 and Deploying NSS AD (Non-Clustered Environment),” on
page 25
Section 3.3, “Upgrading to OES 2018 and Deploying NSS AD (Clustered Environment),” on
page 31
Section 3.4, “Leave a AD Domain,” on page 37
Section 3.5, “Reconfiguring NSS AD,” on page 38
Section 3.6, “Renaming the Netbios Name of OES Host or Cluster Resource,” on page 38
Installing and Configuring NSS AD Support 173.1 Installing a New OES Server and Deploying NSS
AD
Figure 3-1 Installing OES as a New Server and Deploying NSS AD
18 Installing and Configuring NSS AD SupportInstalling and Configuring NSS AD Support 19
IMPORTANT: Before proceeding, ensure that you have met all the prerequisites specified in
          Section 2.2, “Meeting NSS AD Infrastructure Requirements,” on page 11.

          If you want to install NSS AD after your OES server is installed and running, follow the instructions in
          Section 3.2, “Upgrading to OES 2018 and Deploying NSS AD (Non-Clustered Environment),” on
          page 25, starting with Step 2.

20   Installing and Configuring NSS AD Support
Table 3-1 Installing OES and Deploying NSS AD
Installing and Configuring NSS AD Support 21Process Information and Links
1. Using the instructions in the installation guide, install only one OES server at a time in your
1 eDirectory tree.
For detailed instructions, see “Installing OES 2018 as a New Installation” in the OES 2018:
Installation Guide.
2. When you reach the Software Selections screen, select the Novell Storage Service AD
Support pattern along with the other services that you are installing.
3. Specify the required details:
AD Domain Name: Is the domain that the OES server is joining.
AD Supervisor Group: Is the AD supervisor group name. The AD users belonging to
this group will have supervisory rights for all the volumes associated with that OES server.
AD User Name: Specify an AD administrator or user with the following privileges required
to join the domain:
Reset password
Create computer objects
Delete computer objects
Read and write the msDs-supportedEncryptionTypes attribute.
Password: Is the password of the AD user who is used for the domain join operation.
Container to Create Computer Object: The container where the OES 2018 computer
object will live.
If you have already created a computer object in Active Directory for the OES server,
select Use pre-created computer object and include the object name in the
specification.
Novell Identity Translator (NIT) Configuration: NIT manages UIDs as required for
data access on a Linux server. For more information, see “Section 6.2, “NIT (Novell
Identity Translator),” on page 46”.
4. When you click Next, you should receive a message that The domain join is in
progress.
22 Installing and Configuring NSS AD SupportProcess Information and Links
1. Ensure that the OES computer object is created in the AD domain you specified.
2
2. Verify that the default keytab entries for the OES server are created by entering the following
command at the server’s terminal prompt:
klist -k
For example:
tstsrv:~/Desktop #klist -k
Keytab name: FILE:/etc/krb5.keytab
KVNO Principal
---- ----------------------------------
2 tstsrv$@ACME.COM
2 tstsrv$@ACME.COM
2 tstsrv$@ACME.COM
2 cifs/tstsrv.acme.com@ACME.COM
2 cifs/tstsrv.acme.com@ACME.COM
2 cifs/tstsrv.acme.com@ACME.COM
2 cifs/tstsrv@ACME.COM
2 cifs/tstsrv@ACME.COM
2 cifs/tstsrv@ACME.COM
2 host/tstsrv.acme.com@ACME.COM
2 host/tstsrv.acme.com@ACME.COM
2 host/tstsrv.acme.com@ACME.COM
tstsrv:~/Desktop #
The 12 keytab entries represents the Service Principals of the OES server.
3. You can also execute kinit -k $ to ensure that the OES
server is joined to the AD domain successfully.
For example, kinit -k tstsrv$
On successful execution of the above command, it does not display any output message and
returns to terminal.
1. Media-upgrade the NSS32 pools that your AD users need access to.
3
The following is a simple, GUI-driven method.
a. At a terminal prompt, enter nssmu.
b. Select Pools
c. Select a pool.
d. Type g, then type Y(es) > O(kay).
e. Select another pool and continue until all of the NSS32 pools that AD users need access
to are media-upgraded
For more information on the NSS Media upgrade options and processes, see “NSS Media Upgrade
Commands” in the OES 2018: NSS File System Administration Guide for Linux.
Installing and Configuring NSS AD Support 23Process Information and Links
1. AD-enable the NSS volumes that your AD users need access to.
4
The following is a simple, GUI-driven method.
a. At a terminal prompt, enter nssmu.
b. Select Volumes
c. Select a volume.
d. Type G, then type Y(es) > O(kay).
e. Select another volume and continue until all of the volumes that AD users need access to
are AD-enabled.
For more information on the NSS Media upgrade options and processes, see “NSS Media Upgrade
Commands” in the OES 2018: NSS File System Administration Guide for Linux.
See also, “AD-enable the Volume” in the OES 2018: NSS File System Administration Guide for
Linux.
1. Review the information in Chapter 4, “Assigning NSS Trustee Rights for AD Users and
5 Groups,” on page 39 to ensure that you understand the trustee-assignment processes and the
associated caveats, then continue with Step 2.
2. Assess whether the OES User Rights Map utility (NURM) applies to your organization by
considering the following questions:
a. Do any of your AD users and groups have matching eDirectory accounts?
If so, you can use the OES User Rights Map utility (NURM) to map the rights between
eDirectory and Active Directory users and groups and then apply NSS trustee
assignments based on the mapping.
If not, skip to process 6.
b. Do you use NetIQ Identify Manager 4.5 or later to coordinate identities and passwords
between Active Directory and eDirectory, and do you have a user map that was created
using IDM Designer?
If so, NURM can leverage that map.
If not, you can create a map using NURM.
c. Do you want to consolidate your overlapping eDirectory and Active Directory accounts to
only Active Directory?
If so, you can have NURM delete the eDirectory trustee assignments.
3. If applicable, run NURM to assign NSS trustee rights to your AD users.
For more information, see Section 6.4, “NURM (OES User Rights Management),” on page 57.
1. For AD users and groups who need NSS access and do not have matching eDirectory
6 accounts, you can grant trustee assignments using either the NFARM Windows shell extension
or the rights utility.
2. Use other NSS tools to manage file and directory ownership, usage quotas and the other
things that you manage for eDirectory users and groups.
For more information, see “OES File Access Rights Management (NFARM)”, “rights”,
“nsschown”, and “nssquota” in the OES 2018: NSS File System Administration Guide for Linux.
To access the AD enabled NSS volumes, do the following:
Ensure to create a forward lookup DNS entry for OES server where AD enabled NSS volumes
are available.
Map the NSS volume with the complete DNS name of the OES server or host name (not with
the IP address).
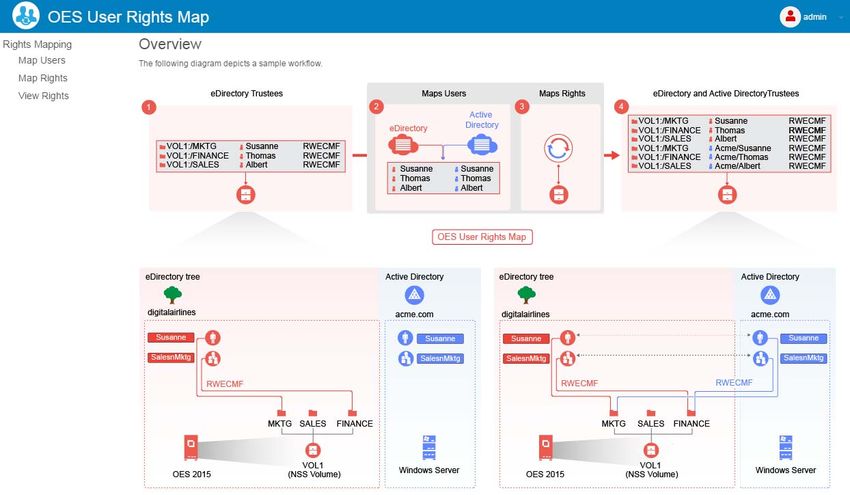
24 Installing and Configuring NSS AD Support3.2 Upgrading to OES 2018 and Deploying NSS AD
(Non-Clustered Environment)
Figure 3-2 Upgrading to OES 2018 and Deploying NSS AD in a Non-Clustered Environment
Installing and Configuring NSS AD Support 25Upgrading a Server and Deploying NSS AD
(Non-Clustered Environment)
11 Upgrade the OES server to latest OES version.
Supported Latest OES
previous releases version
22 On the fully upgraded and patched server, run
YaST and install the NSS AD Support module to:
Install NSS AD software
Join the AD Domain. OES server AD Domain
Set the NIT UID range.
36 Verify that the AD Domain and Kerberos are
configured and working as expected.
Kerberos Active Directory
43 NSS-AD Media-upgrade targeted NSS32 Pools.
AD
(NSS64 pools are inherently upgraded.)
NSS32 Pools
54 AD-enable targeted NSS Volumes.
AD
NSS Volumes
65 Provision NSS access for AD users who have eDirectory Active
matching eDir accounts by running NURM. Directory
Susanne NURM Susanne
Thomas Thomas
Albert Albert
AD
NSS Volumes
76 Provision the remaining AD users by using
NFARM or the rights utility. Active
Directory rights
AD
Jose
Mia
NFARM NSS
Stephanie Volumes
86 Access AD-enabled NSS Volumes
AD
Client NSS Volumes
26 Installing and Configuring NSS AD SupportIMPORTANT: Before proceeding, ensure that you have met all the prerequisites specified in
Section 2.2, “Meeting NSS AD Infrastructure Requirements,” on page 11.
Table 3-2 Upgrading to OES 2018 and Deploying NSS AD
Process Information and Links
Using the instructions in the installation guide, upgrade only one server in your tree at a time.
1
IMPORTANT: When upgrading the OES server, if NSS AD pattern is selected, then any
misconfiguration in joining the domain can result in upgrade failure. Hence, it is recommended not to
install NSS AD Support as part of the upgrade process.
For detailed instructions, see “Upgrading to OES 2018” in the OES 2018: Installation Guide.
Installing and Configuring NSS AD Support 27Process Information and Links
1. On the OES server, run YaST and when you reach the Software Selections screen, select the
2 Novell Storage Service AD Support pattern.
2. When you reach the YaST OES Patterns screen, select the Novell Storage Service AD
Support pattern.
3. Specify the required details:
AD Domain Name: Is the domain that the OES server is joining.
AD Supervisor Group: Is the AD supervisor group name. The AD users belonging to
this group will have supervisory rights for all the volumes associated with that OES server.
AD User Name: Specify an AD administrator or user with the following privileges required
to join the domain:
Reset password
Create computer objects
Delete computer objects
Read and write the msDs-supportedEncryptionTypes attribute.
Password: Is the password of the AD user who is used for the domain join operation.
Container to Create Computer Object: The container where the OES 2018 computer
object will live.
If you have already created a computer object in Active Directory for the OES server,
select Use pre-created computer object and include the object name in the
specification.
Novell Identity Translator (NIT) Configuration: NIT manages UIDs as required for
data access on a Linux server. For more information, see “Section 6.2, “NIT (Novell
Identity Translator),” on page 46”.
4. When you click Next, you should receive a message that The domain join is in
progress.
28 Installing and Configuring NSS AD SupportProcess Information and Links
1. Ensure that the OES computer object is created in the AD domain you specified.
3
2. Verify that the default keytab entries for the OES server are created by entering the following
command at the server’s terminal prompt:
klist -k
For example:
tstsrv:~/Desktop #klist -k
Keytab name: FILE:/etc/krb5.keytab
KVNO Principal
---- ----------------------------------
2 tstsrv$@ACME.COM
2 tstsrv$@ACME.COM
2 tstsrv$@ACME.COM
2 cifs/tstsrv.acme.com@ACME.COM
2 cifs/tstsrv.acme.com@ACME.COM
2 cifs/tstsrv.acme.com@ACME.COM
2 cifs/tstsrv@ACME.COM
2 cifs/tstsrv@ACME.COM
2 cifs/tstsrv@ACME.COM
2 host/tstsrv.acme.com@ACME.COM
2 host/tstsrv.acme.com@ACME.COM
2 host/tstsrv.acme.com@ACME.COM
tstsrv:~/Desktop #
The 12 keytab entries represents the Service Principals of the OES server.
3. You can also execute kinit -k $ to ensure that the OES
server is joined to the AD domain successfully.
For example, kinit -k tstsrv$
On successful execution of the above command, it does not display any output message and
returns to terminal.
1. Media-upgrade the NSS32 pools that your AD users need access to.
4
The following is a simple, GUI-driven method.
a. At a terminal prompt, enter nssmu.
b. Select Pools
c. Select a pool.
d. Type g, then type Y(es) > O(kay).
e. Select another pool and continue until all of the NSS32 pools that AD users need access
to are media-upgrated
For more information on the NSS Media upgrade options and processes, see “NSS Media Upgrade
Commands” in the OES 2018: NSS File System Administration Guide for Linux.
Installing and Configuring NSS AD Support 29Process Information and Links
1. AD-enable the NSS volumes that your AD users need access to.
5
The following is a simple, GUI-driven method.
a. At a terminal prompt, enter nssmu.
b. Select Volumes
c. Select a volume.
d. Type G, then type Y(es) > O(kay).
e. Select another volume and continue until all of the volumes that AD users need access to
are AD-enabled.
For more information on the NSS Media upgrade options and processes, see “NSS Media Upgrade
Commands” in the OES 2018: NSS File System Administration Guide for Linux.
See also, “AD-enable the Volume” in the OES 2018: NSS File System Administration Guide for
Linux.
1. Review the information in Chapter 4, “Assigning NSS Trustee Rights for AD Users and
6 Groups,” on page 39 to ensure that you understand the trustee-assignment processes and the
associated caveats, then continue with Step 2.
2. Assess whether the OES User Rights Map utility (NURM) applies to your organization by
considering the following questions:
a. Do any of your AD users and groups have matching eDirectory accounts?
If so, you can use the OES User Rights Map utility (NURM) to map the rights between
eDirectory and Active Directory users and groups and then apply NSS trustee
assignments based on the mapping.
If not, skip to process 7.
b. Do you use NetIQ Identify Manager 4.5 or later to coordinate identities and passwords
between Active Directory and eDirectory, and do you have a user map that was created
using IDM Designer?
If so, NURM can leverage that map.
If not, you can create a map using NURM.
c. Do you want to consolidate your overlapping eDirectory and Active Directory accounts to
only Active Directory?
If so, you can have NURM delete the eDirectory trustee assignments.
3. If applicable, run NURM to assign NSS trustee rights to your AD users.
For more information, see Section 6.4, “NURM (OES User Rights Management),” on page 57.
1. For AD users and groups who need NSS access and do not have matching eDirectory
7 accounts, you can grant trustee assignments using either the NFARM Windows shell extension
or the rights utility.
2. Use other NSS tools to manage file and directory ownership, usage quotas and the other
things that you manage for eDirectory users and groups.
For more information, see “OES File Access Rights Management (NFARM)”, “rights”,
“nsschown”, and “nssquota” in the OES 2018: NSS File System Administration Guide for Linux.
To access the AD enabled NSS volumes, do the following:
Ensure to create a forward lookup DNS entry for OES server where AD enabled NSS volumes
are available.
Map the NSS volume with the complete DNS name of the OES server or host name (not with
the IP address).
30 Installing and Configuring NSS AD Support3.3 Upgrading to OES 2018 and Deploying NSS AD
(Clustered Environment)
Figure 3-3 Upgrading to OES 2018 and Deploying NSS AD in a Clustered Environment
Installing and Configuring NSS AD Support 3132 Installing and Configuring NSS AD Support
IMPORTANT: Before proceeding, ensure that you have met all the prerequisites specified in
Section 2.2, “Meeting NSS AD Infrastructure Requirements,” on page 11.

Table 3-3 Upgrading to OES 2018 and Deploying NSS AD

Process Information and Links

           1. Using the instructions in the installation guide, upgrade only one cluster node in your tree at a
   1          time.

              IMPORTANT: When upgrading the OES server, if NSS AD pattern is selected, then any
              misconfiguration in joining the domain can result in upgrade failure. Hence, it is recommended
              not to install NSS AD Support as part of the upgrade process.

         For more information about upgrading OES 11 Clusters, see “Upgrading OES Clusters” in the OES
         2018: Novell Cluster Services for Linux Administration Guide.

         For more information about upgrading OES 2 SP3 clusters, see Upgrading Clusters from OES 2
         SP3 to OES 2018 in the OES 2018: Novell Cluster Services for Linux Administration Guide.

                                                        Installing and Configuring NSS AD Support                 33
Process Information and Links
1. On the cluster node (OES 2018 server), run YaST and when you reach the Software
2 Selections screen, select the Novell Storage Service AD Support pattern.
2. Specify the following details:
AD Domain Name: The AD domain that the OES server is joining.
AD Supervisor Group: Is the AD supervisor group name. The AD users belonging to
this group will have supervisory rights for all the volumes associated with that OES server.
AD User Name: Specify an AD administrator or user with the following privileges required
to join the domain:
Reset password
Create computer objects
Delete computer objects
Read and write the msDs-supportedEncryptionTypes attribute.
Password: Is the password of the AD user who is used for the domain join operation.
Container to Create Computer Object: The container where the OES 2018 computer
object either has been or will be created.
If you have already created a computer object in Active Directory for the OES server,
select Use pre-created computer object.
Novell Identity Translator (NIT) Configuration: NIT generates UIDs as required for
anyone accessing data on a Linux server. For more information on NIT, see “Section 6.2,
“NIT (Novell Identity Translator),” on page 46”.
If you want NIT to generate UIDs for AD users, select Generate UID for AD users, then
specify the UID range. If you want NIT to retrieve UIDs from Active Directory, do not
select the Generate UID for AD users option.
For more information about this option, see “Table 6-2 on page 48.”
3. When you click Next, the server/node is joined to the AD domain.
For more information about joining cluster nodes to the AD domain, see “Joining the Cluster
Node to an Active Directory Domain” in the OES 2018: Novell Cluster Services for Linux
Administration Guide.
34 Installing and Configuring NSS AD SupportProcess Information and Links
Verify the AD domain and Kerberos is configured and working in all the cluster nodes.
3
1. Ensure that the OES computer object is created in the AD domain you specified.
2. Verify that the default keytab entries for the OES server are created by entering the following
command at the server’s terminal prompt:
klist -k
For example:
tstsrv:~/Desktop #klist -k
Keytab name: FILE:/etc/krb5.keytab
KVNO Principal
---- ----------------------------------
2 tstsrv$@ACME.COM
2 tstsrv$@ACME.COM
2 tstsrv$@ACME.COM
2 cifs/tstsrv.acme.com@ACME.COM
2 cifs/tstsrv.acme.com@ACME.COM
2 cifs/tstsrv.acme.com@ACME.COM
2 cifs/tstsrv@ACME.COM
2 cifs/tstsrv@ACME.COM
2 cifs/tstsrv@ACME.COM
2 host/tstsrv.acme.com@ACME.COM
2 host/tstsrv.acme.com@ACME.COM
2 host/tstsrv.acme.com@ACME.COM
tstsrv:~/Desktop #
The 12 keytab entries represents the Service Principals of the OES server.
3. You can also execute kinit -k $ to ensure that the OES
server is joined to the AD domain successfully.
For example, kinit -k tstsrv$
On successful execution of the above command, it does not display any output message and
returns to terminal.
1. Ensure that CIFS is chosen as the advertizing protocol for the cluster resource. NSS resource
4 access for AD users happens only through the CIFS protocol.
For more information, see “Adding Advertising Protocols for NSS Pool Cluster Resources” in
the OES 2018: Novell Cluster Services for Linux Administration Guide.
2. Join the cluster pool to the AD domain by following the instructions in “Joining Cluster Pools to
the AD Domain” in the OES 2018: NSS File System Administration Guide for Linux or “Joining
the Cluster Resource to an Active Directory Domain” in the OES 2018: Novell Cluster Services
for Linux Administration Guide.
You can also use the following tools:
The novell-ad-util CLI tool for joining the domain. See Section 6.3.1, “novell-ad-util
Command Line Utility,” on page 53.
NSSMU. See “NSS Management Utility (NSSMU) Quick Reference” in the OES 2018:
NSS File System Administration Guide for Linux.
3. Verify the Service Principal Names and computer objects by completing the steps in “Verifying
the Service Principals and Computer Objects” in the OES 2018: Novell Cluster Services for
Linux Administration Guide.
Installing and Configuring NSS AD Support 35Process Information and Links
1. Media-upgrade your NSS32 cluster pools that your AD users need access to.
5
The following is a simple, GUI-driven method.
a. At a terminal prompt, enter nssmu.
b. Select Pools
c. Select a pool.
d. Type g, then type Y(es) > O(kay).
e. Select another pool and continue until all of the NSS32 cluster pools that AD users need
access to are media-upgraded
For more information on the NSS Media upgrade options and processes, see “NSS Media Upgrade
Commands” and “Upgrading the NSS Media Format” in the OES 2018: NSS File System
Administration Guide for Linux.
1. AD-enable the NSS volumes that your AD users need access to.
6
The following is a simple, GUI-driven method.
a. At a terminal prompt, enter nssmu.
b. Select Volumes
c. Select a volume.
d. Type G, then type Y(es) > O(kay).
e. Select another volume and continue until all of the volumes that AD users need access to
are AD-enabled.
For more information on the NSS Media upgrade options and processes, see “NSS Media Upgrade
Commands” in the OES 2018: NSS File System Administration Guide for Linux.
See also, “AD-enable the Volume” and “Volume AD-enabling” in the OES 2018: NSS File System
Administration Guide for Linux.
1. Review the information in Chapter 4, “Assigning NSS Trustee Rights for AD Users and
7 Groups,” on page 39 to ensure that you understand the trustee-assignment processes and the
associated caveats, then continue with Step 2.
2. Assess whether the OES User Rights Map utility (NURM) applies to your organization by
considering the following questions:
a. Do any of your AD users and groups have matching eDirectory accounts?
If so, you can use the OES User Rights Map utility (NURM) to map the rights between
eDirectory and Active Directory users and groups and then apply NSS trustee
assignments based on the mapping.
If not, skip to process 8.
b. Do you use NetIQ Identify Manager 4.5 or later to coordinate identities and passwords
between Active Directory and eDirectory, and do you have a user map that was created
using IDM Designer?
If so, NURM can leverage that map.
If not, you can create a map using NURM.
c. Do you want to consolidate your overlapping eDirectory and Active Directory accounts to
only Active Directory?
If so, you can have NURM delete the eDirectory trustee assignments.
3. If applicable, run NURM to assign NSS trustee rights to your AD users.
For more information, see Section 6.4, “NURM (OES User Rights Management),” on page 57.
36 Installing and Configuring NSS AD SupportProcess Information and Links
1. For AD users and groups who need NSS access and do not have matching eDirectory
8 accounts, you can grant trustee assignments using either the NFARM Windows shell extension
or the rights utility.
2. Use other NSS tools to manage file and directory ownership, usage quotas and the other
things that you manage for eDirectory users and groups.
For more information, see “OES File Access Rights Management (NFARM)”, “rights”,
“nsschown”, and “nssquota” in the OES 2018: NSS File System Administration Guide for Linux.
To access the AD enabled NSS cluster volumes, do the following:
Ensure to create a forward lookup DNS entry for netbios name of the cluster resource.
Map the NSS cluster volumes with the complete DNS name created for the cluster resource or
with the short name of the netbios name of cluster resource (not with the IP address).
3.4 Leave a AD Domain
Use novell-ad-util to disjoin an OES server from the AD domain. Using YaST or NSSMU, you
cannot disjoin from the AD domain.
To disjoin the OES host from the Active Directory domain, execute the following:
1. kinit Administrator@EXAMPLE.COM
Authenticates the administrator with the AD server, where "Administrator" is the domain admin or
user with the sufficient rights and "EXAMPLE.COM" is the AD domain.
2. novell-ad-util --leave-domain --domain-name EXAMPLE.COM
To disjoin a cluster resource from the Active Directory domain, execute the following:
1. kinit Administrator@EXAMPLE.COM
Authenticates the administrator with the AD server, where "Administrator" is the domain admin or
user with the sufficient rights and "EXAMPLE.COM" is the AD domain.
2. Run the following command on the node where the cluster resource is running.
novell-ad-util --leave-domain --cluster-resource .cn=CLUSTER-OES2018-
POOLSERVER.o=novell.t=NSSAD_CLUSTER. --domain-name EXAMPLE.COM
3. Run the following command on all the cluster nodes except the node where step 2 is performed.
novell-ad-util --purge 0 --cluster-resource .cn=CLUSTER-OES2018-
POOLSERVER.o=novell.t=NSSAD_CLUSTER.
Removes all the keytab entries of the cluster resource specified in the default keytab file.
Verifying the Domain Leave
To ensure that the domain leave is successful, verify the following:
1. Computer objects in the AD domain representing the OES host and cluster resources are
removed.
2. Keytab entries are removed from /etc/krb5.keytab.
klist -k | grep
It should be empty after the OES host leaves the domain.
Installing and Configuring NSS AD Support 37 klist -k | grep
Execute this command from all the cluster nodes. It should be empty after the cluster
resource leaves the domain.
If AD domain leave still fails, see Section 7.2, “Domain Leave Fails Using the novell-ad-util,” on
page 81.
3.5 Reconfiguring NSS AD
If the OES host server or cluster resource is already joined to an AD domain and you need to join the
same OES host server or the cluster resource to a different AD domain, then you need to reconfigure
NSS AD using YaST.
Before reconfiguring NSS AD, ensure to leave the AD domain. For more information, see Section 3.4,
“Leave a AD Domain,” on page 37.
After leaving the AD domain, perform the following to reconfigure NSS AD:
1 Ensure that the AD requirements are met before reconfiguring the NSS AD. For more
information, see Section 2.2, “Meeting NSS AD Infrastructure Requirements,” on page 11.
2 Join to a AD domain. The AD domain can be the domain that was joined earlier or a different AD
domain. For more information, see step 2, step 3 and step 4 of process 1 and process 2 in the
Table 3-1 on page 21.
3.6 Renaming the Netbios Name of OES Host or
Cluster Resource
To rename the netbios name of a OES host or a cluster resource, perform the following:
1 Leave the domain. For more information, see Section 3.4, “Leave a AD Domain,” on page 37.
2 Using iManager, rename the netbios name also known as CIFS Virtual Server Name. For more
information, see Setting CIFS General Server Parameters in the OES 2018: Novell CIFS for
Linux Administration Guide.
3 Reconfigure NSS AD. For more information, see Section 3.5, “Reconfiguring NSS AD,” on
page 38.
38 Installing and Configuring NSS AD Support4 Assigning NSS Trustee Rights for AD
4
Users and Groups
Section 4.1, “Overview of the Provisioning Process,” on page 39
Section 4.2, “NURM Provisioning Caveats,” on page 40
4.1 Overview of the Provisioning Process
Novell provides a number of tools to help you provision your AD users and groups for NSS access.
Figure 4-1 provides a high-level overview of the provisioning process.
Figure 4-1 Provisioning AD User and Groups for NSS Access
Provisioning AD Users and Groups as NSS Trustees
NetIQ IDM 4.5 or later
1
Identity Map
eDirectory Active
Directory
Susanne Susanne
Thomas Thomas
Albert Albert
eDirectory Active
Directory
Susanne 2 NURM Susanne
Thomas Thomas
Albert 3 Albert
AD
NSS Volumes
4
Active
Directory rights 5
Jose
Mia
Stephanie NFARM
Assigning NSS Trustee Rights for AD Users and Groups 39Table 4-1 Upgrading to OES 2018 and Deploying NSS AD
Step Information and Links
If you have NetIQ IDM 4.5 or later, and you have created an Active Directory to eDirectory user
1
map using IDM Designer (not the IDM iManager plug-in), the User Resource Map utility
(NURM) can leverage the map for replicating NSS ACLS for eDirectory users and groups to
NSS ACLs for corresponding AD users and groups.
Select the IDM option to use a map file in eDirectory.
IMPORTANT: Ensure that the eDirectory user entered in NURM has access to the DirXML-
ADContext attribute in eDirectory from the administrative workstation where you will run
NURM.
If you don’t have an applicable Active Directory to eDirectory user map, NURM helps you
2
create one.
After you have verified the user map and the rights to be assigned to the users and groups, you
3
can apply the rights to the selected NSS volume.
To enable AD users and groups that don’t have corresponding eDirectory accounts, you can
4
use the rights CLI command at the server’s terminal prompt.
You can also use the NFARM Windows shell extension to assign NSS trustee rights to AD
5
users and groups.
4.2 NURM Provisioning Caveats
Section 4.2.1, “iManager Created NetIQ IDM Map Files Do Not Work with NURM,” on page 40
Section 4.2.2, “NURM eDirectory User Must Have a CIFS Universal Password Policy,” on
page 40
4.2.1 iManager Created NetIQ IDM Map Files Do Not Work with
NURM
To use an IDM-created user map, NURM requires that the map be located in the DirXML-ADContext
attribute in eDirectory.
IDM Designer stores the map in the DirXML-ADContext attribute; the IDM iManager plug-in does not.
For more information on creating the IDM drivers using IDM Designer, see Creating the Driver in
Designer in the NetIQ Driver for Active Directory Implementation Guide.
4.2.2 NURM eDirectory User Must Have a CIFS Universal
Password Policy
The eDirectory user that you specify in the NURM dialog must have the same universal password
policy assigned as your eDirectory CIFS users.
IMPORTANT: This applies to the eDirectory Admin and any container admins you might choose to
specify when running NURM.
40 Assigning NSS Trustee Rights for AD Users and GroupsYou can also read