Pexip One-Touch Join Deployment Guide - Software Version 26 Document Version 26.a July 2021 - Pexip ...
←
→
Page content transcription
If your browser does not render page correctly, please read the page content below

Pexip One-Touch Join

 Deployment Guide

     Software Version 26

    Document Version 26.a

          July 2021
Pexip One-Touch Join Deployment Guide

Contents

About One-Touch Join                                                                                 6
   Enabling One-Touch Join                                                                           6
   Supported Google Workspace editions                                                               6
   Supported Exchange environments                                                                   7
       Exchange servers                                                                              7
       Outlook clients                                                                               7
   Supported endpoints                                                                               7
       Cisco OBTP                                                                                    7
       Poly OTD                                                                                      8
   Supported meeting types                                                                           8
   Supported number of endpoints and Conferencing Nodes                                              8
   Pexip Infinity server requirements                                                                9

One-Touch Join process and deployment overview                                                  10
   Process overview                                                                             10
       Administrator configures OTJ                                                             10
       End user sends invitation                                                                10
       OTJ provides endpoint with meeting information                                           10
   Frequency and limitations on calendar requests                                               11
   Locations, Conferencing Nodes and redundancy                                                 11
       Conferencing Nodes                                                                       11
       Management Node                                                                          12
   Network architecture, firewalls and web proxy                                                12
       Conferencing Nodes                                                                       12
       Management Node                                                                          12
       Port usage                                                                               12
   Permitting the service account to access calendars                                           14
       Exchange integrations                                                                    14
       Google Workspace integrations                                                            14
   Using One-Touch Join with personal endpoints and calendars                                   15

Configuring Exchange on-premises for One-Touch Join                                             16
   Prerequisites                                                                                16
   Creating a service account                                                                   16
   Configuring Application Impersonation on the service account                                 17
       Creating a new Distribution Group                                                        17
       Configuring application impersonation                                                    18
   Enabling basic authentication                                                                18
   Configuring calendar processing on room resource mailboxes                                   19
       Recommended configuration                                                                19
       Optional configuration                                                                   19
       Checking calendar processing settings                                                    20

© 2021 Pexip AS                                             Version 26.a July 2021   Page 2 of 100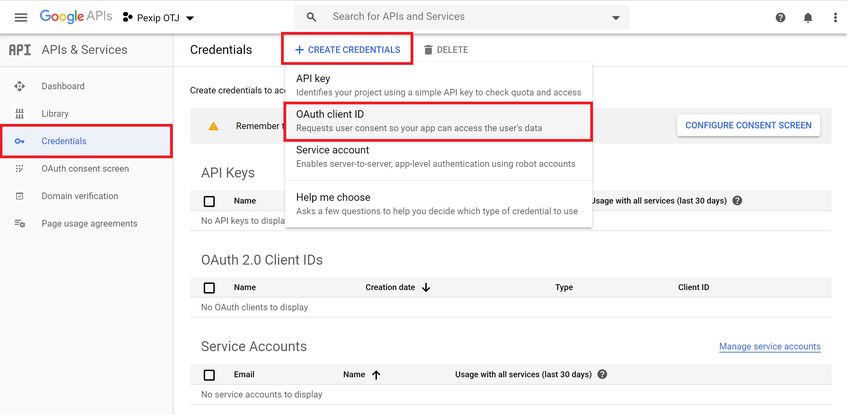
Pexip One-Touch Join Deployment Guide
Adding a One-Touch Join Exchange integration on Pexip Infinity 21
Next steps 22
Configuring Office 365 for One-Touch Join 23
Prerequisites 23
Creating a service account 23
Configuring Application Impersonation on the service account 24
Creating a new Distribution Group 25
Configuring application impersonation 25
Configuring calendar processing on room resource mailboxes 26
Recommended configuration 26
Optional configuration 26
Checking calendar processing settings 27
Enabling OAuth authentication 28
Adding a One-Touch Join Exchange integration on Pexip Infinity 31
Configuring the Exchange integration 31
Signing in to the service account 33
Next steps 34
Configuring Google Workspace for One-Touch Join 35
Prerequisites 35
Creating a service account 35
Creating a room resource 38
Configuring the room resource 39
Sharing calendars externally 40
Sharing individual calendars with the service account 40
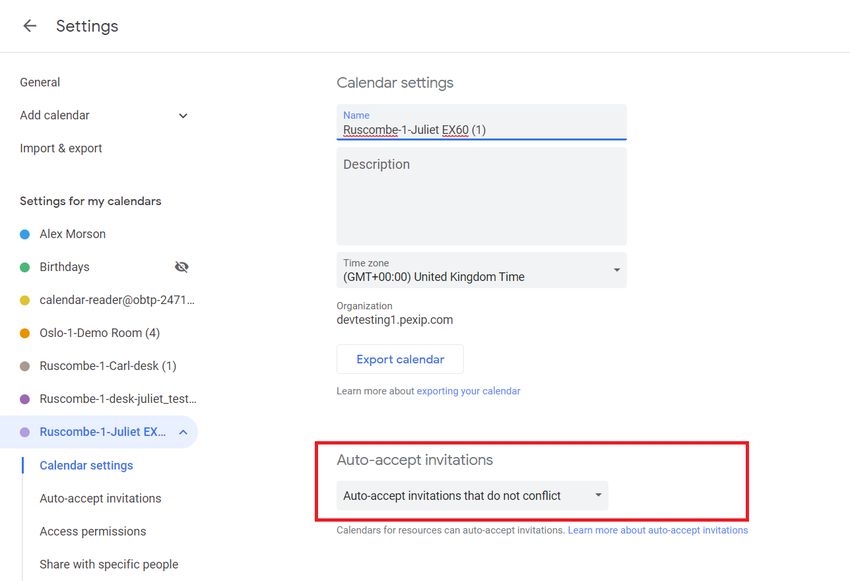
Auto-accepting invitations 41
Allowing users to book resources 42
Updating the per-user request quota 43
Requesting an increase to API limits 44
Adding a One-Touch Join Google Workspace integration on Pexip Infinity 45
Next steps 46
Configuring Pexip Infinity for One-Touch Join 47
Prerequisites 47
Adding a One-Touch Join profile 47
Hiding or changing the meeting subject 50
Adding One-Touch Join endpoint groups 50
Adding One-Touch Join endpoints 51
Adding endpoints individually 51
Adding OTJ endpoints in bulk 53
Adding One-Touch Join meeting processing rules 54
Testing the rule 56
Next steps 58
© 2021 Pexip AS Version 26.a July 2021 Page 3 of 100
Pexip One-Touch Join Deployment Guide

Configuring endpoints to support One-Touch Join                                                59
   Prerequisites                                                                               59
   Configuring Cisco OBTP endpoints for OTJ                                                    59
       Prerequisites                                                                           60
       Creating a Webex Integration                                                            60
       Enabling a One-Touch Join profile to use Webex Cloud                                    60
       Adding a Webex endpoint                                                                 61
       Disabling the calendar                                                                  61
       DNS records                                                                             62
       Poly authentication                                                                     62
       Configuring Poly RealPresence Group series                                              62
       Configuring Poly Trio series                                                            64
       Configuring Poly HDX series                                                             67
       Configuring Poly Studio X series and Poly G7500 series                                  69
       Configuring Poly Debut series                                                           70

One-Touch Join meeting types and transforms                                                    72
   Fallback alias matching                                                                     72
   Supported meeting types                                                                     72
   Regex meeting type                                                                          75
       Examples                                                                                75
   Custom meeting type                                                                         76
       Examples                                                                                77

Deploying a dedicated One-Touch Join platform                                                  79
   Minimum hardware requirements                                                               79
       On-premises deployments                                                                 79
       Cloud deployments                                                                       79
   Minimum Pexip Infinity platform configuration                                               80
       One-Touch Join configuration                                                            80

Scheduling and joining meetings using One-Touch Join                                           81
   Using One-Touch Join in meeting rooms                                                       81
   Using One-Touch Join with your personal endpoint                                            81

Viewing One-Touch Join status                                                                  82
   Viewing One-Touch Join meetings                                                             82
   Viewing One-Touch Join endpoints                                                            83

Configuring Google Workspace for domain user authorization                                     84
   Prerequisites                                                                               84
   Enabling authorization using OAuth                                                          84
   Creating a room resource                                                                    88
   Configuring the room resource                                                               89
       Sharing individual calendars with the authorization user                                89
       Auto-accepting invitations                                                              90

© 2021 Pexip AS                                            Version 26.a July 2021   Page 4 of 100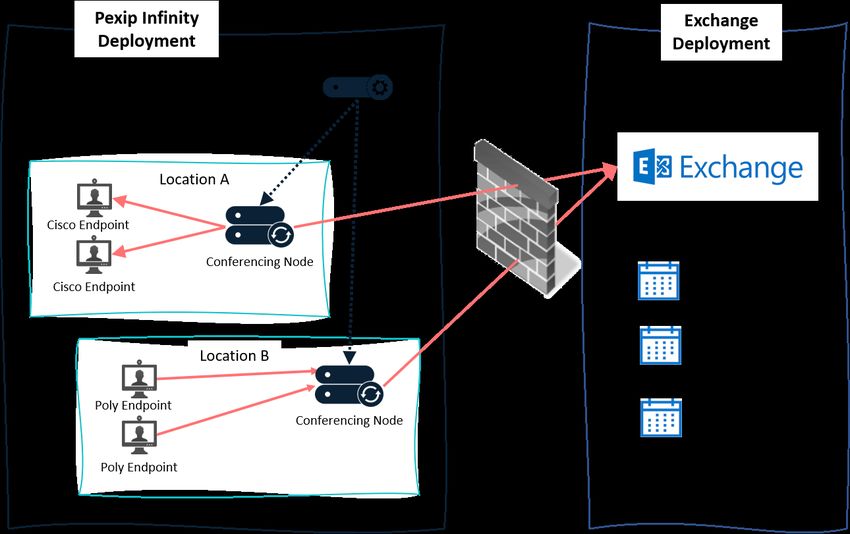
Pexip One-Touch Join Deployment Guide

       Allowing users to book resources                                                       91
   Updating the per-user request quota                                                        92
   Requesting an increase to API limits                                                       92
   Adding a One-Touch Join Google Workspace integration on Pexip Infinity                     93
       Configuring the Google Workspace integration                                           93
       Authorizing calendar access                                                            94
   Next steps                                                                                 96

Troubleshooting One-Touch Join                                                                97

© 2021 Pexip AS                                           Version 26.a July 2021   Page 5 of 100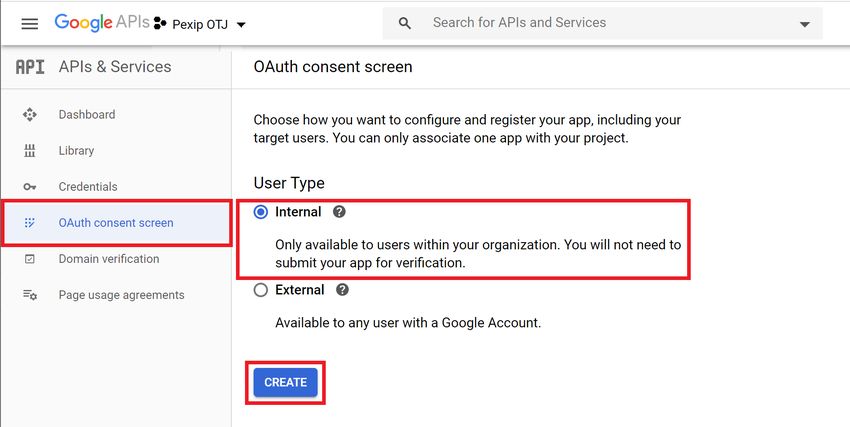
Pexip One-Touch Join Deployment Guide                                                            About One-Touch Join

About One-Touch Join
Pexip Infinity's One-Touch Join (OTJ) feature integrates support for existing "click to join" videoconferencing endpoint workflows into
your Pexip Infinity deployment. With One-Touch Join, when users schedule a meeting in Microsoft Outlook or Google Calendar and
include in the meeting invitation a room that contains a supported Cisco or Poly endpoint, the endpoint will display a Join button just
before the meeting is scheduled to begin. Participants can then simply walk into the room and select the button, and the endpoint will
automatically dial in to the meeting.
One-Touch Join is available as an optional licensed feature within the Pexip Infinity platform.
In most cases, One-Touch Join will be implemented as a feature within a wider Pexip Infinity deployment, and run on Conferencing
Nodes alongside other Pexip Infinity services. However, you can also set up separate OTJ locations within your deployment that contain
Conferencing Nodes used solely for One-Touch Join. A third option appropriate in some situations is to implement a separate Pexip
Infinity deployment purely for One-Touch Join, for example if you are a Pexip Service customer wishing to use One-Touch Join, or you
are a large enterprise wishing to separate the resources used for your One-Touch Join deployment. For more information, see
Deploying a dedicated One-Touch Join platform.

Enabling One-Touch Join
All Conferencing Nodes are capable of running One-Touch Join, although the service will only come into active operation on a node
when the location the node is in is associated with a One-Touch Join Endpoint Group.
Enabling the Pexip One-Touch Join service within your Pexip Infinity deployment involves the following steps, each described in
separate topics:

1. Depending on which calendar/email service is used in your environment, do one of the following:
      o   Configuring Google Workspace for One-Touch Join
      o   Configuring Exchange on-premises for One-Touch Join
      o   Configuring Office 365 for One-Touch Join
2. Configuring Pexip Infinity for One-Touch Join
3. Configuring endpoints to support One-Touch Join
4. Viewing One-Touch Join status

For an overview of the process and general deployment and network considerations for One-Touch Join, see One-Touch Join process
and deployment overview.
For a guide for end users, see Scheduling and joining meetings using One-Touch Join.
For help with troubleshooting your One-Touch Join deployment, see Troubleshooting One-Touch Join.

Supported Google Workspace editions
Pexip One-Touch Join is supported in the following Google Workspace environments:

 l   Google Workspace Basic
 l   Google Workspace Business
 l   Google Workspace Enterprise

© 2021 Pexip AS                                            Version 26.a July 2021                                          Page 6 of 100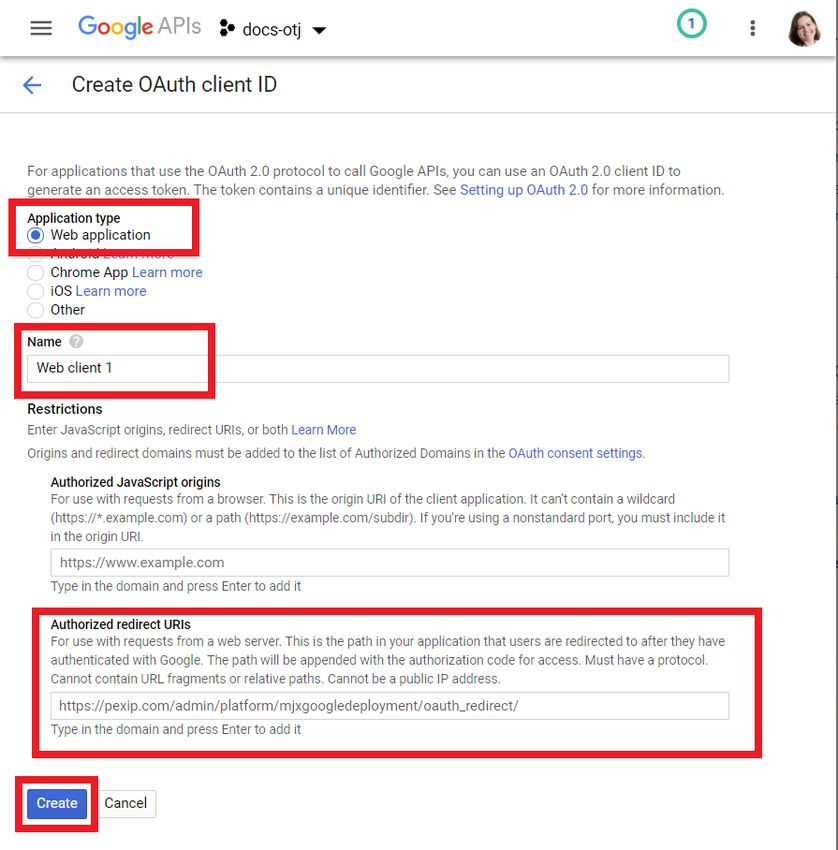
Pexip One-Touch Join Deployment Guide                                                            About One-Touch Join

Supported Exchange environments
Pexip One-Touch Join is supported in the following Microsoft Exchange environments:

Exchange servers
 l   Office 365
 l   Exchange 2013 (with the latest updates)
 l   Exchange 2016 (with the latest updates)
 l   Exchange 2019 (with the latest updates)

Outlook clients
Meetings scheduled in all Outlook clients are supported. Note that different third-party Outlook add-ins for different Outlook versions
may format the join details for some meeting types slightly differently.

Supported endpoints
Endpoints used for One-Touch Join must not also be registered to the calendaring service on other systems such as the cloud-based
Webex Hybrid Calendar Service, or Cisco TMS XE.

Cisco OBTP
Pexip Infinity One-Touch Join is supported on Cisco VTC endpoints that support Cisco One Button to Push (OBTP) and are running TC,
CE, or RoomOS software.
This includes:

 l   Cisco Webex Room series (Room, Room Kit)
 l   Cisco C series (C20, C40, C60, C90)
 l   Cisco DX series (DX70, DX80)
 l   Cisco EX series (EX60, EX90)
 l   Cisco MX series (MX200, MX300, MX700, MX800)
 l   Cisco SX series VTC systems (SX10, SX20, SX80)

There are two ways in which One-Touch Join can be implemented for these endpoints, depending on whether or not the endpoint is on
the same network as the OTJ Conferencing Nodes.

 l   If the endpoint is on the same network as the OTJ Conferencing Node, the Conferencing Node will connect directly to the endpoint
     to provide it with the necessary meeting information. When setting up these endpoints in Pexip Infinity, you assign them an
     Endpoint type of Cisco OBTP.
     For more information on how to configure these endpoints, see Configuring Cisco OBTP endpoints for OTJ.
 l   If the endpoint is not on the same network as the OTJ Conferencing Node (for example if it is located in a home office) but is
     registered to Webex or Webex Edge for Devices, the Conferencing Node will connect to Webex Cloud, which will in turn connect
     to the endpoint to provide it with the necessary meeting information. When setting up these endpoints in Pexip Infinity, you
     assign them an Endpoint type of Webex Cloud registered.
     For more information on how to configure these endpoints, see Configuring Cisco Webex Cloud registered endpoints.

© 2021 Pexip AS                                            Version 26.a July 2021                                          Page 7 of 100
Pexip One-Touch Join Deployment Guide                                                            About One-Touch Join

Poly OTD
Pexip Infinity One-Touch Join is supported on Poly VTC endpoints that support Poly One Touch Dial (OTD). This includes:

 l   Poly RealPresence Group series v5.0.0 or later
 l   Poly Trio series
 l   Poly HDX series (unless Pexip Infinity has been deployed in a secure mode of operation - for more information, see Poly
     authentication); must be running a software version that supports NTLMv2 for calendaring, e.g. 3.1.11 or later
 l   Poly Studio X series
 l   Poly G7500 series
 l   Poly Debut series

For information on how to configure these endpoints to support Pexip One-Touch Join, see Configuring Poly OTD endpoints for OTJ.

Supported meeting types
This release of Pexip One-Touch Join can be used to join the following types of meetings:

 l   Pexip Infinity meetings (i.e. those scheduled using the VMR Scheduling for Exchange feature)
 l   Pexip Service meetings (i.e. those scheduled using the plugin available to Pexip Service users)
 l   Google Meet (for Google Workspace integrations only)
 l   Microsoft Teams
 l   Skype for Business
 l   Webex
 l   Zoom
 l   BlueJeans
 l   GoToMeeting

You can also create your own meeting processing rules for meeting types not listed above. For more information, see One-Touch Join
meeting types and transforms.

Supported number of endpoints and Conferencing Nodes
The One-Touch Join feature will support up to 4,000 room resource calendars and associated endpoints. This applies to One-Touch Join
both when integrated with a Pexip Infinity deployment (i.e. when running on Conferencing Nodes alongside other Pexip Infinity
services), and as a deployment dedicated to One-Touch Join.
For integrated One-Touch Join deployments (i.e. where OTJ is being implemented as a feature within a wider Pexip Infinity
deployment), a Pexip Infinity deployment with a single Conferencing Node per location should also support up to 170 OTJ room
resource calendars and associated endpoints (although you may wish to include one or more additional Conferencing Nodes for
redundancy). For large or busy deployments, you may need to add additional Conferencing Nodes per location to provide the
additional capacity required when One-Touch Join is implemented — we recommend that you consult your Pexip authorized support
representative for advice on your particular deployment.
These recommendations apply to Pexip Infinity deployments with one or two One-Touch Join Integrations. For deployments with
multiple OTJ Integrations (for example, when implemented by service providers with multiple customers) we recommend a dedicated
One-Touch Join deployment.
For dedicated One-Touch Join deployments of all sizes (i.e. up to the supported 4,000 room resource calendars and associated
endpoints), we recommend one Conferencing Node for every 1,000 endpoints in a location (although you may wish to include one or
more additional Conferencing Nodes for redundancy).
     For information on the hardware requirements for OTJ, see Pexip Infinity server requirements.

© 2021 Pexip AS                                            Version 26.a July 2021                                          Page 8 of 100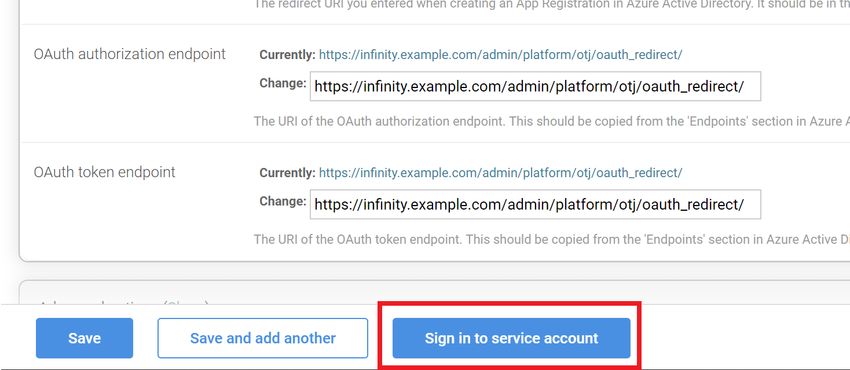
Pexip One-Touch Join Deployment Guide                                                           About One-Touch Join

Pexip Infinity server requirements
In most cases you will be enabling One-Touch Join within a new or existing Pexip Infinity deployment, and the One-Touch Join service
can be run alongside other Pexip Infinity services on each Conferencing Node. Enabling One-Touch Join within most Pexip Infinity
deployments (up to 170 endpoints — see Supported number of endpoints and Conferencing Nodes) will not significantly increase the
processing requirements of the Management Node or Conferencing Nodes, therefore our standard server design guidelines still apply.
However, if your deployment is expected to be particularly large or busy, we recommend that you consult your Pexip authorized
support representative for advice.
For dedicated One-Touch Join deployments, see Minimum hardware requirements.
In both cases, we recommend that each Conferencing Node runs on a different VM host and uses different storage.

© 2021 Pexip AS                                           Version 26.a July 2021                                         Page 9 of 100
Pexip One-Touch Join Deployment Guide                                     One-Touch Join process and deployment overview

One-Touch Join process and deployment overview
This topic gives an overview of the process used by One-Touch Join to extract calendar information and provide it to endpoints, along
with information on general deployment and network considerations.

Process overview
The general process from setting up One-Touch Join through to having the endpoint display a Join button at the start of a meeting is as
follows:

Administrator configures OTJ
1. The administrator configures their Google Workspace, Exchange on-premises or Office 365 deployment to support Pexip Infinity
   One-Touch Join, and ensures that each physical meeting room that contains an endpoint to be used for One-Touch Join has an
   associated email address.
2. The administrator then configures One-Touch Join on the Pexip Infinity Management Node. This configuration is automatically
   replicated to the One-Touch Join service that runs on each Conferencing Node in the Pexip Infinity deployment.
3. Finally, the administrator configures their endpoints to support One-Touch Join.

End user sends invitation
When an end user wants to use a One-Touch Join room for a meeting, they create a meeting invitation in their usual way, using their
usual client, ensuring that the room resource is added to the invitation.
    Generally, rooms are added to a meeting invitation as a room resource, but One-Touch Join will also work if the room resource's
    email address is included in the list of invitees, or as a location.

OTJ provides endpoint with meeting information
1. Each meeting room resource has one Conferencing Node which will be its primary node. Periodically, One-Touch Join on the
   Conferencing Node connects to Google Workspace or Microsoft Exchange and uses the configured service account details to
   impersonate each room resource for which it is the primary node. For each room resource, One-Touch Join finds all meetings to
   which the room has been invited. By default, it does this for all meetings with a scheduled start time from one day in the past up
   to seven days in the future, but this range is configurable.
2. One-Touch Join parses the meeting invitation (in accordance with the relevant meeting processing rule) to obtain information
   about the meeting, which it uses to generate the alias that the endpoint will dial in order to join the meeting.
3. One-Touch Join then provides the meeting information to the endpoint that is associated with the room resource:
     o   for Cisco endpoints, One-Touch Join pushes the meeting information to the endpoint - either directly (for endpoints on the
         same network) or via Webex Cloud (for endpoints on a different network)
     o   for Poly endpoints, the endpoint registers to the OTJ calendaring service on the Conferencing Node and periodically requests
         updated meeting information from the Conferencing Node.
         More than one endpoint can be associated with a single room resource; in this case, all the endpoints will receive the same
         meeting information.
4. When the meeting is about to start, the endpoint will display a Join button; participants in the room simply click the button and
   the endpoint will dial in to the meeting.

The flow of information between the calendar/email service, One-Touch Join and the endpoint is shown in the following diagram (using
Google Workspace and a Cisco endpoint as the example):

© 2021 Pexip AS                                           Version 26.a July 2021                                            Page 10 of 100
Pexip One-Touch Join Deployment Guide One-Touch Join process and deployment overview
Frequency and limitations on calendar requests
The length of time taken for a meeting booked via Exchange or Google calendar to appear on the corresponding room endpoint
depends on a number of factors, but is largely due to the number of endpoints in your deployment.
In general, for deployments of around 170 endpoints or fewer, the One-Touch Join service will poll room resource calendars with a
maximum frequency of every 30 seconds. (It does not poll any more frequently than this to avoid impacting the performance of
Conferencing Nodes.) Cisco endpoints will be updated after each poll; Poly endpoints will generally connect to the Conferencing Node
to get updates every minute, but this will depend on the Poly configuration.
As you add more endpoints, One-Touch Join will reduce the frequency of requests correspondingly. For a deployment of 4,000
endpoints (the maximum supported number), endpoints will be updated around every 12 minutes. This is because both Microsoft
Exchange and Google limit the number of API requests that can be made to their calendar services in a 24-hour period. It is possible to
change the 24-hour quota to increase the frequency of endpoint updates in larger deployments, but note that doing so may impact the
performance of the Conferencing Nodes, so you may need to consider deploying a dedicated One-Touch Join platform. We recommend
you discuss larger deployments with your Pexip authorized support representative first.
l For Google Workspace deployments, you can change the 24-hour quota by Requesting an increase to API limits and then
increasing the Maximum Google Workspace API requests, but this is a paid-for service.
l For Exchange deployments, you can change the 24-hour quota by increasing the Find Items Request Quota.
Locations, Conferencing Nodes and redundancy
Conferencing Nodes
All Conferencing Nodes in your deployment are capable of running One-Touch Join. However, the service will be in active operation on
only those nodes that belong to a location that has been associated with a OTJ Endpoint Group (and when that Endpoint Group has
been associated with an OTJ profile).
Within each such location, a maximum of five Conferencing Nodes will actively read room resource calendars and process meeting
information. Responsibility for each room resource is spread across these nodes in order to balance the workload and provide
redundancy. Should one node become unavailable (for example, if it is put into maintenance mode or loses connectivity), the other
nodes will take over responsibility for its room resources.
© 2021 Pexip AS Version 26.a July 2021 Page 11 of 100Pexip One-Touch Join Deployment Guide One-Touch Join process and deployment overview
However, if there are one or more Poly endpoints in the location, the One-Touch Join service on all nodes within the location will
handle requests from Poly endpoints. Therefore round-robin DNS records are required for all nodes in a location that has Poly
endpoints.
You can use existing system locations for One-Touch Join, in which case up to five Conferencing Nodes in that location will be actively
operating One-Touch Join in addition to their core functions. Alternatively, you can set up system locations that will be used specifically
for One-Touch Join. These can be in the same physical locations as your existing Conferencing Nodes, but their resources will be
dedicated to One-Touch Join.
The concept of media overflow locations does not apply to One-Touch Join (overflow locations relate specifically to the handling of call
media). Therefore if you want to provide redundancy, this can only be done by providing additional Conferencing Nodes within a given
location. For the same reason, if you put all Conferencing Nodes in a One-Touch Join location into maintenance mode, then none of
the endpoints in the associated Endpoint Groups will receive any updates.
Management Node
As with other Pexip Infinity services, the One-Touch Join service will continue to function if the Management Node goes offline,
although you will not be able to make any changes to the configuration of the service during this time.
For deployments using OAuth, the Management Node periodically refreshes OAuth tokens on behalf of Conferencing Nodes, so
eventually (after some weeks) these nodes may become unable to authenticate with Exchange / Google Workspace.
Network architecture, firewalls and web proxy
Conferencing Nodes
Each Conferencing Node used for One-Touch Join requires a persistent connection to either Google Workspace or the Microsoft
Exchange server (either directly or via a web proxy), and must be able to sign in to it as the service account.
If you are using OAuth for Exchange, or a Google Workspace integration, each Conferencing Node must be able to reach the OAuth
token endpoint, either directly or via a web proxy.
Each Conferencing Node must be able to access the Cisco One-Touch Join endpoints within its location (using the endpoints' APIs),
either directly or via a web proxy.
If you have Webex-registered endpoints, each Conferencing Node must be able to access the Webex OAuth token endpoint, and
Webex cloud.
Poly endpoints must be able to connect directly to the Conferencing Nodes in their location.
Management Node
As with all Pexip Infinity deployments, the Management Node must be able to contact each Conferencing Node.
In addition, if your One-Touch Join deployment is using OAuth (within an Exchange integration, a Google Workspace integration with
domain user authorization, or where your deployment includes Webex-registered endpoints on a different network to your
Conferencing Nodes), the Management Node will send requests to the OAuth token endpoint, both during the initial set up, and
periodically thereafter in order to refresh the OAuth tokens. These requests will be sent either directly or via the web proxy (if one has
been configured for the Management Node).
Port usage
The following table lists the ports/protocols required for communication between the components of Pexip One-Touch Join:
Source address Source port Destination address Dest. Protocol
port
Management 55000– Web proxy (if configured for the Management Node) 8080 † TCP
Node 65535
© 2021 Pexip AS Version 26.a July 2021 Page 12 of 100Pexip One-Touch Join Deployment Guide One-Touch Join process and deployment overview
Source address Source port Destination address Dest. Protocol
port
Management 55000– OAuth token endpoint (for Exchange/O365 using OAuth for the service ‡ TCP (HTTPS)
Node 65535 account; Google Workspace integrations; or Webex-registered endpoints) ◊
l for Exchange/O365 service account authorization:
login.microsoftonline.com
l for Google Workspace domain user authorization:
oauth2.googleapis.com/token
l for Webex-registered endpoints: webexapis.com
Conferencing 55000– Web proxy (if configured for the system location to which the Conferencing 8080 † TCP
Node 65535 Node belongs)
Conferencing 55000– Google Workspace (for Google Workspace Integrations) ◊ 443 † TCP (HTTPS)
Node 65535
Conferencing 55000– Exchange Server (for Exchange on-premises or O365 integrations) ◊ 443 † TCP (HTTPS)
Node 65535
Conferencing 55000– Exchange Server (only required if the O365 Autodiscover URL lookup has 80† TCP (HTTP)
Node 65535 otherwise failed) ◊
Conferencing 55000– OAuth token endpoint (for O365 or Google Workspace integrations, or ‡ TCP (HTTPS)
Node 65535 Webex-registered endpoints) ◊
l for O365: login.microsoftonline.com
l for Google Workspace service account authorization:
googleapis.com/oauth2/v4/token
l for Google Workspace domain user authorization:
oauth2.googleapis.com/token
l for Webex-registered endpoints: webexapis.com
Conferencing 55000– Cisco endpoint API ◊ 80/443 † TCP
Node 65535 (HTTP/HTTPS)
Conferencing 55000– Webex cloud: webexapis.com ◊ 443 ‡ TCP (HTTPS)
Node 65535
Poly endpoint Conferencing Node 443 TCP (HTTPS)
† Configurable by the administrator.
‡ Determined by Exchange / Google Workspace.
◊ Does not apply if a web proxy has been configured.
Note also that the ephemeral port range (55000–65535) is subject to change.
The diagram below summarizes the connectivity required between the components of Pexip One-Touch Join, using Microsoft Exchange
as an example.
© 2021 Pexip AS Version 26.a July 2021 Page 13 of 100Pexip One-Touch Join Deployment Guide One-Touch Join process and deployment overview
Note in most cases, and particularly for a dedicated One-Touch Join deployment, all Conferencing Nodes should remain within the
internal network, and not in the DMZ.
Permitting the service account to access calendars
Exchange integrations
For Exchange integrations, the One-Touch Join service account must be able to impersonate the calendar of each OTJ room resource
(or a user's personal calendar, if you wish to Use OTJ with personal endpoints and calendars). This is achieved by adding the email
address to a specific OTJ Distribution Group, and giving the service account application impersonation rights to that group. For
instructions on how to do this, see Configuring Application Impersonation on the service account (for Exchange on-premises) or
Configuring Application Impersonation on the service account (for Office 365).
The use of Exchange impersonation is common in business applications that work with mail, when a single account needs to access
many accounts.
The following information from Microsoft provides further background on the use of impersonation in Exchange:
l https://docs.microsoft.com/en-us/exchange/client-developer/exchange-web-services/impersonation-and-ews-in-exchange for
guidelines on when to use impersonation in your Exchange service applications.
l https://blogs.msdn.microsoft.com/exchangedev/2009/06/15/exchange-impersonation-vs-delegate-access/ for information on the
differences between impersonation and delegate access.
Google Workspace integrations
For Google Workspace integrations, the One-Touch Join service account (or the authentication user, if using 3-legged OAuth) must be
able to access the calendar of each room resource. This is achieved by sharing the room resource's calendar (or the user's personal
calendar, if you wish to Use OTJ with personal endpoints and calendars) with the service account. For instructions on how to do this,
see Sharing individual calendars with the service account.
© 2021 Pexip AS Version 26.a July 2021 Page 14 of 100Pexip One-Touch Join Deployment Guide One-Touch Join process and deployment overview Note that the Google calendar API limits the number of calendars that can be shared within a 24 hour period to 750 (for more information, see https://support.google.com/a/answer/2905486?hl=en). This means that if you have more than 750 room resources that you wish to use for One-Touch Join, they will need to be set up over a period of days. Using One-Touch Join with personal endpoints and calendars Some users in your enterprise may have their own personal endpoints on their desk or in their office, which they want to integrate with their personal calendars so that they can simply use the "Join" button to connect to any video meetings that appear in their calendar. To achieve this, you use the user's own email address as the room resource email address when configuring One-Touch Join. However, you must also ensure that the service account being used for One-Touch Join can access the user's calendar, as described in Permitting the service account to access calendars. © 2021 Pexip AS Version 26.a July 2021 Page 15 of 100
Pexip One-Touch Join Deployment Guide                                     Configuring Exchange on-premises for One-Touch Join

Configuring Exchange on-premises for One-Touch Join
This topic describes how to configure Microsoft Exchange in order to implement Pexip Infinity's One-Touch Join feature in a Microsoft
Exchange on-premises environment.
The process involves the following steps, described in detail in the sections that follow:

1. Creating a service account for One-Touch Join. This service account will be used by One-Touch Join to read each room resource's
   calendar.
         This should be a different service account to that used for VMR Scheduling for Exchange, because the configuration will be
         different.
2. Configuring Application Impersonation on the service account.
         For more information and guidelines on the use of application impersonation in Exchange, see Permitting the service account
         to access calendars.
3. Enabling basic authentication for the service account.
4. Configuring calendar processing within Exchange.
5. Creating an associated Exchange integration on Pexip Infinity.

Prerequisites
Before you begin, ensure that the following configuration is complete:

1. Ensure each physical room that will have a One-Touch Join endpoint in it has an associated room resource with an email address.
2. Enable auto calendar processing for each room resource, so that the room will automatically accept meeting requests if it is
   available, and automatically decline an invitation if it is already booked.
3. We recommend that if you are using Safe Links, you modify your Safe Links policy so that URLs are not rewritten in any meeting
   invitations sent to room resources used by One-Touch Join endpoints.
4. Ensure you have access to your Exchange Admin Center (EAC) web interface, and access to Exchange Management PowerShell.
5. If your Exchange server does not use a globally trusted certificate, you must upload a custom CA certificate.

Creating a service account
In this step, you create a service account that will be used to log in to Exchange to access the calendars of the room resources being
used for One-Touch Join.
This service account should not be used for any other purpose other than One-Touch Join. You can however use the same service
account for multiple One-Touch Join Exchange integrations.
You can create a new service account using either EAC or PowerShell, as follows:

© 2021 Pexip AS                                            Version 26.a July 2021                                                 Page 16 of 100
Pexip One-Touch Join Deployment Guide Configuring Exchange on-premises for One-Touch Join
EAC PowerShell
1. Log in to your Exchange Admin Center as an administrator and The first command lets the administrator type in a password for
go to recipients > mailboxes. the service account as a secure string. This password variable is
2. Add a new mailbox for the service account by selecting the + then used in the second command to create a mailbox for the
icon and then User mailbox. service account. The third command ensures the password of
the service account will not expire.
3. Complete the fields as appropriate.
$password = Read-Host "Enter password" -AsSecureString
4. Uncheck the Require password change on next logon box.
New-Mailbox -Name "" -UserPrincipalName "" -
Password $password -Alias "" -FirstName "" -LastName "" -DisplayName ""
Set-ADUser -Identity "" -PasswordNeverExpires $true
For example:
New-Mailbox -Name "Pexip OTJ Service Account" -UserPrincipalName
pexip-otj-svc@example.com -Password $password -Alias pexip-otj-svc
-FirstName "Pexip OTJ" -LastName "Service Account" -DisplayName
"Pexip OTJ Service Account"
Set-ADUser -Identity pexip-otj-svc@example.com -
PasswordNeverExpires $true
5. Select Save.
Configuring Application Impersonation on the service account
In this step, you create a new Distribution Group, and add the rooms to be used for One-Touch Join to the group. You then use
PowerShell commands to make it so that the service account will only be able to impersonate members of that Group.
Configuring Application Impersonation in this way means that if rooms are added or removed from the group, this automatically
updates whether or not the service account can impersonate them.
Creating a new Distribution Group
1. Log in to your Exchange Admin Center as an administrator and go to recipients > groups.
2. Select the + icon and select add a new Distribution Group.
3. Add the rooms you want to impersonate to the group.
© 2021 Pexip AS Version 26.a July 2021 Page 17 of 100Pexip One-Touch Join Deployment Guide Configuring Exchange on-premises for One-Touch Join
Note that the service account should not be added as a member of this distribution group. Instead, this step allows the service
account to impersonate any member of this distribution group (i.e. any of the room resources).
4. Make sure to uncheck the option to make the group owner a group member. Otherwise the service account will be able to
impersonate your account.
5. Also make sure to lock the group down so people cannot accidentally add themselves as group members. Do this by selecting
Closed: Members can be added / removed only by the group owners.
Configuring application impersonation
We recommend that you use combined PowerShell commands to configure application impersonation for the service account. This
allows you to use variables, thus reducing possible copy and paste errors.
1. Configure the following variables with the values you actually want to use:
o otj_group_id: the email of the distribution list whose members you want to be impersonated.
o otj_service_account: the email of the service account you want to grant impersonation to.
o management_scope_to_create: the name you want the newly created management scope to have.
o impersonation_role_name_to_create: the name you want the newly created impersonation role to have.
For example:
$otj_group_id = "otjrooms@example.com"
$otj_service_account = "pexip-otj-svc@example.com"
$management_scope_to_create = "OTJ Management Scope"
$impersonation_role_name_to_create = "OTJ Impersonation"
2. Create the management scope:
$otj_group = Get-DistributionGroup -Identity $otj_group_id
$otj_group_dn = $otj_group.DistinguishedName
$restriction_filter = "MemberOfGroup -eq ""$otj_group_dn"""
New-ManagementScope -Name $management_scope_to_create -RecipientRestrictionFilter $restriction_filter
Example output:
Name ScopeRestrictionType Exclusive RecipientRoot RecipientFilter
---- -------------------- --------- ------------- ---------------
OTJ Management Scope RecipientScope False MemberOfGroup -eq 'CN=OTJ Rooms20190430164340,OU...
3. Set up application impersonation using the previously created management scope:
New-ManagementRoleAssignment -Name $impersonation_role_name_to_create -Role ApplicationImpersonation -User $otj_service_
account -CustomRecipientWriteScope $management_scope_to_create
Example output:
Name Role RoleAssigneeName RoleAssigneeType AssignmentMethod EffectiveUserName
---- ---- ---------------- ---------------- ---------------- ----------------
OTJ Impersonation ApplicationImp... pexip-otj-svc User Direct
4. Verify that the above commands worked as expected. In the following command, replace with the email of the
room resource mailbox you want to test. If it is a room which is a member of the distribution list, it should show the OTJ
Impersonation in the returned roles. If it is anything else outside of the distribution list, it should not have the OTJ Impersonation
listed, which means the OTJ service account does not have permission to impersonate that user.
Get-ManagementRoleAssignment -Role ApplicationImpersonation -WritableRecipient "" | Format-List Name, Role,
RoleAssignee, CustomRecipientWriteScope
Expected output:
Name : OTJ Impersonation
Role : ApplicationImpersonation
RoleAssignee : pexip-otj-svc
Enabling basic authentication
In this step, you enable basic authentication for the service account that One-Touch Join uses to log in to Exchange.
If you are using on-prem Exchange you need to ensure basic authentication is enabled for Exchange Web Services (EWS). When basic
authentication is enabled, Pexip Infinity stores the credentials in encrypted form and all authentication is carried out over a secure TLS
channel.
You can enable basic authentication using either Windows Service Manager or PowerShell, as follows:
© 2021 Pexip AS Version 26.a July 2021 Page 18 of 100Pexip One-Touch Join Deployment Guide Configuring Exchange on-premises for One-Touch Join
Windows Service Manager PowerShell
1. Go to the Windows server on which Exchange is installed and This command enables basic authentication on a specific server:
open the Service Manager. Set-WebServicesVirtualDirectory -Identity "\EWS (Default
Web Site)" -BasicAuthentication $true
2. Select the server on which Exchange is installed, and right-click
to select Computer Management. For example, if your server name is PEXCHANGE then:
Set-WebServicesVirtualDirectory -Identity "PEXCHANGE\EWS (Default
3. From the panel on the left, select Services and Applications > Web Site)" -BasicAuthentication $true
Internet Information Services (IIS) Manager.
4. Expand the options and select Sites > Default Web Site > EWS.
5. Select the Authentication button in the main pane.
6. Find Basic Authentication in the list and ensure it is Enabled. (If
not, right-click and select Enable.)
7. Select Save.
Configuring calendar processing on room resource mailboxes
In this step, you change the calendar processing settings for room resources from the default to those required to support One-Touch
Join.
Recommended configuration
To take full advantage of the functionality offered by One-Touch Join, we recommend that, for One-Touch Join room resources, you
change the following calendar processing options from the default:
1. The meeting invite body is deleted by default. If you want One-Touch Join to parse meeting details from the body then you must
set the DeleteComments property to False. If you leave this set to True, only those rules that process information in the calendar
headers can be used (because the body will be deleted).
2. When a meeting invite is received by a resource mailbox, by default the meeting subject is deleted and is replaced with the name
of the organizer (for more information, see https://support.microsoft.com/en-gb/help/2842288/resource-mailbox-s-calendar-
shows-the-organizer-s-name-instead-of-the).
Because One-Touch Join accesses the meeting invites through the resource mailboxes, this default behavior means One-Touch Join
won't have access to the original subject. You can choose to leave the default behavior for privacy reasons, or you can modify the
calendar processing options for each mailbox so that the meeting subject is available to One-Touch Join and can be displayed on
the meeting room endpoints.
3. The private flag is cleared by default. If you want meetings that are marked as private by the organizer to remain marked as
private in the room mailbox, you must set the RemovePrivateProperty flag to False.
PowerShell command
To modify the calendar processing on a room from the default settings to those we recommend for One-Touch Join, use the following
PowerShell command (replacing with the address of the room resource whose processing you want to change):
Set-CalendarProcessing -Identity `
-DeleteComments $False `
-DeleteSubject $False `
-AddOrganizerToSubject $False `
-RemovePrivateProperty $False
Optional configuration
Hiding invitation details from other users
In order for One-Touch Join to function fully, the service account must be able to access the body of the invitation (which is why we
recommend that you set the DeleteComments property to False). However, this means that all other users in your deployment with
access to the room resource calendar may also be able to view the body of the invitation (depending on your deployment's other
© 2021 Pexip AS Version 26.a July 2021 Page 19 of 100Pexip One-Touch Join Deployment Guide Configuring Exchange on-premises for One-Touch Join
policies). If you want to prevent this, you can use the following PowerShell command to restrict what users can see by default, without
restricting what the service account can access.
In the following command, replace resource_name with the name of the room resource, and replace role with one of the following
roles:
l AvailabilityOnly: users can view the room's availability, but nothing else.
l LimitedDetails: users can view the room's availability and the meeting subject and location, but not the body of the invitation.
Set-MailboxFolderPermission "resource_name:\Calendar" -User Default -AccessRights role
Allowing forwarding of external invitations
If you want to enable users to forward invitations from other organizations to your OTJ room resources, you must set the
ProcessExternalMeetingMessages flag to True. This also allows users external to your organization to invite the resource directly; you
should therefore consult your Exchange administrator to determine whether this is appropriate in your environment.
If your Microsoft Exchange environment uses a security application (such as Office 365 ATP, or Mimecast) to re-write URLs, this may
prevent OTJ from being used to join external Microsoft Teams meetings (for example, when a user inside your organization forwards
an external Microsoft Teams meeting invitation to an OTJ room resource in order to join the meeting from that endpoint). To enable
users to join these meetings using OTJ, you must ensure that the security application's URL re-write rules include an exception for any
URL starting with the domain https:\\teams.microsoft.com\
Checking calendar processing settings
The following PowerShell command can be used to check calendar processing settings on all of the rooms in the Distribution Group
that was created for One-Touch Join.
We recommend copying and saving this as a file and running it from within PowerShell.
Before running, ensure that you edit $otj_group_id = "otjrooms@example.com" to use the email of the Distribution Group used in your
own deployment.
$deleted_subjects = @()
$organizer_added = @()
$deleted_bodies = @()
$private_flag_reset = @()
$not_auto_accept = @()
$process_external = @()
$otj_group_id = "otjrooms@example.com"
Get-DistributionGroupMember -Identity $otj_group_id -ResultSize Unlimited | ForEach-Object {
Write-Host "Checking room '$($_.name)'"
$processing = Get-CalendarProcessing -Identity $_.name
$pass = $true
if ($processing.DeleteSubject) {
Write-Host "WARNING: The room '$($_.name)' is deleting the meeting subject" -ForegroundColor Red
$deleted_subjects += $_.name
$pass = $false
}
if ($processing.AddOrganizerToSubject) {
Write-Host "WARNING: The room '$($_.name)' is adding the organizer to the meeting subject" -ForegroundColor Red
$organizer_added += $_.name
$pass = $false
}
if ($processing.DeleteComments) {
Write-Host "WARNING: The room '$($_.name)' is deleting the meeting body" -ForegroundColor Red
$deleted_bodies += $_.name
$pass = $false
}
if ($processing.RemovePrivateProperty) {
Write-Host "WARNING: The room '$($_.name)' is clearing the private flag on meetings" -ForegroundColor Red
$private_flag_reset += $_.name
$pass = $false
}
if ($processing.AutomateProcessing -ne "AutoAccept") {
© 2021 Pexip AS Version 26.a July 2021 Page 20 of 100Pexip One-Touch Join Deployment Guide Configuring Exchange on-premises for One-Touch Join
Write-Host "WARNING: The room '$($_.name)' is not configured to Auto Accept. Processing='$($processing.AutomateProcessing)'" -
ForegroundColor Red
$not_auto_accept += $_.name
$pass = $false
}
# Optional permission for allowing the external invites:
if ($processing.ProcessExternalMeetingMessages) {
Write-Host "The room '$($_.name)' is configured to process external (forwarded) meetings"
$process_external += $_.name
}
if ($pass) {
Write-Host "INFO: All checks passed for room '$($_.name)'" -ForegroundColor Green
}
}
Write-Host "Summary:"
Write-Host "There are $($deleted_subjects.count) rooms deleting the meeting subject"
if ($deleted_subjects) {
Write-Host $deleted_subjects -Separator ", "
Write-Host ""
}
Write-Host "There are $($organizer_added.count) rooms adding the organizer to the meeting subject"
if ($organizer_added) {
Write-Host $organizer_added -Separator ", "
Write-Host ""
}
Write-Host "There are $($deleted_bodies.count) rooms deleting the meeting body"
if ($deleted_bodies) {
Write-Host $deleted_bodies -Separator ", "
Write-Host ""
}
Write-Host "There are $($private_flag_reset.count) rooms clearing the private flag on meetings"
if ($private_flag_reset) {
Write-Host $private_flag_reset -Separator ", "
Write-Host ""
}
Write-Host "There are $($not_auto_accept.count) rooms not configured to Auto Accept"
if ($not_auto_accept) {
Write-Host $not_auto_accept -Separator ", "
Write-Host ""
}
Write-Host "There are $($process_external.count) rooms configured to process external (forwarded) meetings"
if ($process_external) {
Write-Host $process_external -Separator ", "
Write-Host ""
}
Adding a One-Touch Join Exchange integration on Pexip Infinity
In this step you log in to the Pexip Infinity Administrator interface and add details of the Exchange deployment you are integrating
with, including details of the service account username and password (based on the configuration you have just set up in Exchange).
From the Pexip Infinity Administrator interface, go to One-Touch Join > OTJ Exchange Integrations.
Option Description
Name The name of this One-Touch Join Exchange integration.
Description An optional description of this One-Touch Join Exchange integration.
Service account username The username of the service account to be used by the One-Touch Join Exchange integration.
This must be in the format name@example.com.
Enable OAuth Leave this option disabled to continue using Basic Auth. (OAuth 2.0 is supported for Exchange in Office 365
only.)
© 2021 Pexip AS Version 26.a July 2021 Page 21 of 100Pexip One-Touch Join Deployment Guide Configuring Exchange on-premises for One-Touch Join
Option Description
Service account password (Available if OAuth has not been enabled)
The password of the service account to be used by the One-Touch Join Exchange integration.
Advanced options
Find Items Request Quota The number of Find Item requests that can be made by OTJ to your Exchange Server in a 24-hour period.
The default of 1,000,000 should be sufficient for most deployments — for more information, see
Frequency and limitations on calendar requests.
We do not recommend increasing this quota unless you have deployed a dedicated One-Touch Join
platform, because it will impact the performance of the Conferencing Nodes.
OTJ Exchange Autodiscover URLs
This section is optional and will generally only be required if the Autodiscover URLs in your deployment do not use a standard location.
Name The name of this Exchange Autodiscover URL.
Description An optional description of this Exchange Autodiscover URL.
Autodiscover URL The URL used to connect to the Autodiscover service on the Exchange deployment.
If you are using Office 365, you may need to enter your autodiscover URL manually, particularly if you are
using a hybrid Exchange deployment. If your OTJ room resources and service account are hosted on O365,
then you should enter https://autodiscover-s.outlook.com/autodiscover/autodiscover.svc as the
Autodiscover URL.
The URL must end in .svc; URLs ending in .xml are not supported.
Next steps
You must now configure the remainder of the One-Touch Join components on Pexip Infinity, as described in Configuring Pexip Infinity
for One-Touch Join.
© 2021 Pexip AS Version 26.a July 2021 Page 22 of 100Pexip One-Touch Join Deployment Guide Configuring Office 365 for One-Touch Join
Configuring Office 365 for One-Touch Join
This topic describes how to configure Microsoft Exchange in order to implement Pexip Infinity's One-Touch Join feature in a Microsoft
Office 365 environment.
The process involves the following steps, described in detail in the sections that follow:
1. Creating a service account for One-Touch Join. This service account will be used by One-Touch Join to read each room resource's
calendar.
This should be a different service account to any used for VMR Scheduling for Exchange, because the configuration will be
different.
2. Configuring Application Impersonation on the service account.
For more information and guidelines on the use of application impersonation in Exchange, see Permitting the service account
to access calendars.
3. Configuring calendar processing within Exchange.
4. Enabling OAuth authentication for the service account.
5. Creating an associated Exchange integration on Pexip Infinity.
Prerequisites
Before you begin, ensure that the following configuration is complete:
1. Ensure each physical room that will have a One-Touch Join endpoint in it has an associated room resource with an email address.
2. Enable auto calendar processing for each room resource, so that the room will automatically accept meeting requests if it is
available, and automatically decline an invitation if it is already booked.
3. We recommend that if you are using Safe Links, you modify your Safe Links policy so that URLs are not rewritten in any meeting
invitations sent to room resources used by One-Touch Join endpoints.
4. Ensure that you have a Microsoft license available for the service account; this is required for the service account to access
Exchange.
5. Ensure you have access to your Office 365 web interface, and access to the Microsoft Exchange Online and Azure Active Directory
Modules for Windows PowerShell. (If you are connecting from your Windows PC for the first time, you may need to install these
modules. See these Microsoft articles about connecting to Exchange online and Microsoft 365 with PowerShell for more
information.)
Creating a service account
In this step, you create a dedicated service account to use to log in to Exchange to access the calendars of the room resources being
used for One-Touch Join. After creating the service account, you must assign it an appropriate Exchange license, such as Office 365
Enterprise E1, Office 365 Business Basic (formerly Essentials) or one of the Exchange Online plans.
This service account should not be used for any other purpose other than One-Touch Join. You can however use the same service
account for multiple One-Touch Join Exchange integrations.
If the service account is subject to a password rotation policy or uses multi-factor authentication (MFA), then each time the password
changes or the MFA is refreshed, you must sign in to the service account again via the Pexip Infinity Administrator interface.
You can create a new service account using either the Office 365 admin portal or PowerShell, as follows:
© 2021 Pexip AS Version 26.a July 2021 Page 23 of 100Pexip One-Touch Join Deployment Guide Configuring Office 365 for One-Touch Join
O365 PowerShell
1. Go to portal.office.com and log in as the administrator. You must run Powershell as administrator.
2. Go to the admin portal by selecting the Admin tile (this takes Establishing a remote connection
you to
https://portal.office.com/adminportal/home#/homepage). To use PowerShell for Office 365 you first need to connect remotely.
These commands install the required PowerShell modules (if they are
3. From the Users section, select Add a user and complete the
not already installed) and then connects to Exchange Online:
necessary fields:
#Set Execution Policy
a. In the Password section: Set-ExecutionPolicy RemoteSigned
n Select Let me create the password. #If not installed, install Exchange Online Module
Install-Module ExchangeOnlineManagement
n Uncheck Make this user change their password when
they first sign in. #If not installed, install Azure AD Module
Install-Module -Name AzureAD
b. In the Product licenses section, assign an appropriate
product license from the available list. #Connect to Exchange Online and AzureAD, works also with a MFA
enabled account
Connect-ExchangeOnline
Creating the service account
The first command lets the administrator type in a password for the
service account as a secure string. This password variable is then
used in the second command to create a mailbox for the service
account. The remaining commands log you into Azure AD and then
set the password of the service account to never expire.
#Capture password for service account
$password = Read-Host "Enter password" -AsSecureString
# Create service account and mailbox
New-Mailbox -Name "" -MicrosoftOnlineServicesID
"" -Password $password -Alias "" -FirstName
"" -LastName "" -DisplayName
""
#Connect to AzureAD
Connect-AzureAD
#Set password policy
Set-AzureADUser -ObjectId "" -PasswordPolicies
DisablePasswordExpiration
Example New-Mailbox command:
New-Mailbox -Name "Pexip OTJ Service Account" -
MicrosoftOnlineServicesID pexip-otj-svc@example.com -Password
$password -Alias pexip-otj-svc -FirstName "Pexip OTJ" -LastName
"Service Account" -DisplayName "Pexip OTJ Service Account"
4. Select Add to create the user.
Example Set-AzureADUser command:
Set-AzureADUser -ObjectId pexip-otj-svc@example.com -
PasswordPolicies DisablePasswordExpiration
Assigning a license to the service account
You must now assign an appropriate license to the service account.
See https://docs.microsoft.com/en-us/powershell/azure/active-
directory/enabling-licenses-sample for information on how to do
this.
Configuring Application Impersonation on the service account
In this step, you create a new Distribution Group, and add the rooms to be used for One-Touch Join to the group. You then use
PowerShell commands to make it so that the service account will only be able to impersonate members of that Group.
Configuring Application Impersonation in this way means that when a room is added to the group, the service account will
automatically be able to impersonate it. Likewise, when a room is removed, the service account will no longer be able to impersonate
© 2021 Pexip AS Version 26.a July 2021 Page 24 of 100Pexip One-Touch Join Deployment Guide Configuring Office 365 for One-Touch Join
it.
Creating a new Distribution Group
1. Go to admin.microsoft.com and log in as the administrator.
2. From the menu on the left hand side, select Groups > Add a group.
3. For the Group Type, select Distribution List. Enter a name, email address and description and select Add.
4. Add as members of the Group the rooms to be used for One-Touch Join. These will be the rooms that the service account will
impersonate.
Note that the service account should not be added as a member of this distribution group. Instead, this step allows the service
account to impersonate any member of this distribution group (i.e. any of the room resources).
5. Open up a remote PowerShell connection to Office 365 and import an Exchange session. For example see
https://docs.microsoft.com/en-us/office365/enterprise/powershell/connect-to-all-office-365-services-in-a-single-windows-
powershell-window
Configuring application impersonation
We recommend that you use combined PowerShell commands to configure application impersonation for the service account. This
allows you to use variables, thus reducing possible copy and paste errors.
1. You may need to enable customization, if this has not already been done within your organization:
Enable-OrganizationCustomization
2. Configure the following variables with the values you actually want to use:
o otj_group_id: the email of the distribution list whose members you want to be impersonated.
o otj_service_account: the email of the service account you want to grant impersonation to.
o management_scope_to_create: the name you want the newly created management scope to have.
o impersonation_role_name_to_create: the name you want the newly created impersonation role to have.
For example:
$otj_group_id = "otjrooms@example.com"
$otj_service_account = "pexip-otj-svc@example.com"
$management_scope_to_create = "OTJ Management Scope"
$impersonation_role_name_to_create = "OTJ Impersonation"
3. Create the management scope:
$otj_group = Get-DistributionGroup -Identity $otj_group_id
$otj_group_dn = $otj_group.DistinguishedName
$restriction_filter = "MemberOfGroup -eq ""$otj_group_dn"""
New-ManagementScope -Name $management_scope_to_create -RecipientRestrictionFilter $restriction_filter
Example output:
Name ScopeRestrictionType Exclusive RecipientRoot RecipientFilter
---- -------------------- --------- ------------- ---------------
OTJ Management Scope RecipientScope False MemberOfGroup -eq 'CN=OTJ Rooms20190430164340,OU...
4. Set up application impersonation using the previously created management scope:
New-ManagementRoleAssignment -Name $impersonation_role_name_to_create -Role ApplicationImpersonation -User $otj_service_
account -CustomRecipientWriteScope $management_scope_to_create
Example output:
Name Role RoleAssigneeName RoleAssigneeType AssignmentMethod EffectiveUserName
---- ---- ---------------- ---------------- ---------------- ----------------
OTJ Impersonation ApplicationImp... pexip-otj-svc User Direct
5. Verify that the above commands worked as expected. In the following command, replace with the email of the
room resource mailbox you want to test. If it is a room which is a member of the distribution list, it should show the OTJ
Impersonation in the returned roles. If it is anything else outside of the distribution list, it should not have the OTJ Impersonation
listed, which means the OTJ service account does not have permission to impersonate that user.
Get-ManagementRoleAssignment -Role ApplicationImpersonation -WritableRecipient "" | Format-List Name, Role,
RoleAssignee, CustomRecipientWriteScope
Expected output:
© 2021 Pexip AS Version 26.a July 2021 Page 25 of 100You can also read