Synergy JOIN Installation and Configuration Guide - Synergy JOIN 3.0 January 2019
←
→
Page content transcription
If your browser does not render page correctly, please read the page content below
Synergy JOIN Installation and
Configuration Guide
Synergy JOIN 3.0

January 2019

                   © Synergy SKY 2018
Synergy JOIN Installation and Configuration Guide

  Contents
        Introduction                                                         5
            About Synergy JOIN                                               5
        How Synergy JOIN works                                               6
            Feature overview                                                 6
            Limitations                                                      6
                Cisco CMS                                                    6
                StarLeaf Cloud                                               6
                Exchange Web Service Emulation                               6
            Overall process from install to end user                         6
            How the Skype URIs are generated                                 7
                Pexip / Videonor / Videxio                                   7
                Cisco CMS                                                    7
                StarLeaf Cloud                                               7
            How the call is routed                                           8
                Pexip / Videonor / Videoxio                                  8
                Cisco CMS                                                    8
                StarLeaf Cloud                                               8
            Requirements                                                     9
                Windows Server software                                      9
                Windows Server hardware                                      9
                Network requirements                                         9
                    Port forwarding to Cisco endpoints                       9
                Service accounts                                           10
            Device Support                                                 11
                    Devices that are supported with Synergy Join           11
            Exchange Resource Account Requirements                         12
                    Exchange Resource properties                           12
                Enabling forwarding of external meeting invitations        13
            Google Cloud Platform Configuration                            15
                Introduction                                               15
            Google Cloud Platform                                          15
                Creating a Project                                         15
                Choosing an Existing Project                               16
            Enabling API's and Services                                    17
            Service Account                                                20
                Create Service Account                                     20
                Create a Private Key for JOIN                              22
                Enabling Domain Wide Delegation                            22
            Enable Service accounts to access Calendar Resources           24
                Google Admin Console                                       25
                Service-act-on-behalf-of Email                             27

                                                                      Page 2 of 73
Synergy JOIN Installation and Configuration Guide

        Installing Synergy JOIN                                                                                              29
        Configuring Synergy JOIN                                                                                             30
            Task 1: Launching the configuration tool and installing the service                                              30
            Task 2: Configuring the General Settings                                                                         31
            Task 3: Testing that email is working                                                                            32
            Task 4: Creating Matching Rules                                                                                  33
                Configuring the General Rules                                                                                33
                Creating the rules                                                                                           34
                    Skype URI in Headers                                                                                     34
                    Skype URI in Body                                                                                        35
                    Teams URI in Headers                                                                                     35
                    Teams URI in Body                                                                                        35
                                                                                                                             35
                    Hangout Meet                                                                                             35
                    Regex                                                                                                    36
                Testing, editing and deleting rules                                                                          37
            Task 5: Adding Rooms                                                                                             38
            Task 6: Adding Video Systems                                                                                     39
            Task 7: Configuring Conference Settings                                                                          41
            Task 8: Configuring Services (optional)                                                                          44
                EWS Emulation and API fields                                                                                 44
                Recording                                                                                                    44
                One-Time-VMR                                                                                                 46
                                                                                                                             46
                Skype IVR                                                                                                    46
            Task 9: Adding a License                                                                                         48
            Task 10: Configuring Email templates                                                                             49
            Task 11: Configuring a proxy server (optional)                                                                   51
        Example meeting scenarios                                                                                            52
            Scenario 1: Booking a Skype meeting with one or more video-enabled meeting-rooms                                 52
            Scenario 2: Booking a Personal VMR (Virtual Meeting Room) meeting with one or more video-enabled meeting-
            rooms                                                                                                            52
            Scenario 3: Booking a One-time-VMR with one or more video-enabled meeting-rooms                                  52
            Scenario 4: Forwarding an existing invitation to a video-enabled meeting-room                                    53
        Manually upgrading JOIN                                                                                              54
        Synergy JOIN Troubleshooting                                                                                         55
            Common troubleshooting scenarios                                                                                 56
                Cisco OBTP or Polycom CTJ button does not appear on the endpoint touch panel                                 56
                One-Time-VMR is not provisioned on the MCU                                                                   56
                One-Time-VMR is not deprovisioned on the MCU                                                                 56
                Error in configurator when adding rooms                                                                      56
                Dial-out to meeting room does not happen at meeting start time                                               56
                Dial-out from the video system (Green Cisco OBTP or Polycom CTJ button) does not work                        57

                                                                                                                        Page 3 of 73
Synergy JOIN Installation and Configuration Guide

                Recipients do not receive dial-in information emails when meeting is booked        57
            Exchange permissions                                                                   58
            Using the logs                                                                         59
                Log levels:                                                                        59
                Log Size:                                                                          59
            Licenses                                                                               60
            Database                                                                               61
            Using Synergy JOIN for Skype IVR with Pexip                                            62
                Work flow of the JOIN Skype IVR service                                            62
                Exchange Requirements                                                              62
                Skype requirements                                                                 62
                Pexip Requirements                                                                 62
                Configuration steps                                                                63
                    JOIN IVR Resource Account                                                      63
                    JOIN IVR Resource Properties Adjustments                                       63
                    IVR URI in Skype Invitation Footer (Skype for Business configuration)          63
                        Example:                                                                   63
                    Hub Transport Rules                                                            63
                    Second transport rule to remove accept confirmations                           66
            Pexip Policy Script for use with Synergy JOIN Skype IVR                                67
                Local Policy Script                                                                67
            Using Synergy JOIN with AMX/Crestron for Cisco and Polycom endpoints                   69
                    Cisco One Button To Push                                                       69
                    Polycom Click To Join                                                          69
            How to create a StarLeaf Cloud authorization token                                     70
                Security                                                                           71
            Configuring Cisco Meeting Server profiles with Synergy JOIN                            72
                File Examples:                                                                     72
            Deleting unwanted future meetings                                                      73

                                                                                              Page 4 of 73
Synergy JOIN Installation and Configuration Guide

  Introduction

  About Synergy JOIN
  New technologies have made it possible for enterprise collaboration solutions to work seamlessly together. Today Skype for
  Business users and video conferencing users participate in joint meetings as standard, with high-quality video, audio and
  content sharing. There are still some challenges, however, when it comes to the user experience.
  Joining a meeting using Skype is easy, but the video conference user has to dial the meeting address from a video touch pad or a
  remote control. It may not even be possible to dial the address from an endpoint if the meeting is hosted in Office365 (Skype
  Online). Automating the connection process is therefore of great value to organizations.
  Synergy JOIN (JOIN) solves this by automatically connecting video-enabled meeting-rooms to Skype meetings using Cisco One
  Button To Push (Cisco OBTP) or Polycom Click To Join (Polycom CTJ). The end-user simply schedules a new Skype meeting in
  Microsoft Outlook and adds the required video-enabled meeting-rooms. JOIN manages the connection and brings the Cisco
  OBTP or Polycom CTJ information to the video endpoint. You can also forward a Skype meeting invitation to a video-enabled
  meeting-room and automatically enable Cisco OBTP or Polycom CTJ. JOIN removes the risk of typing errors, and ensures that
  all meetings start on time.
  In addition, JOIN can be used to schedule meetings in personal VMRs, and for Cisco and Pexip environments, in one-time-
  VMRs, sending the Cisco OBTP or Polycom CTJ information to the scheduled video endpoints and dialing out to endpoints that
  do not support Cisco OBTP or Polycom CTJ.
  JOIN is shipped as a Windows installer with a simple setup wizard that enables quick deployment.
  The solution supports Pexip, Cisco CMS and StarLeaf Cloud environments, and on-premises installations of Skype and
  Microsoft Exchange as well as Office 365.

                                                                                                                           Page 5 of 73
Synergy JOIN Installation and Configuration Guide

  How Synergy JOIN works
  This section gives an overview of JOIN features and how the product works; configuration is explained in more detail in the
  following chapters.

  Feature overview
  JOIN supports the following feature set:

     l   Booking Skype meetings using Outlook: JOIN creates a Skype URI for the meeting that is sent as Cisco One Button To
         Push (Cisco OBTP) or Polycom Click To Join (Polycom CTJ) to all video endpoints scheduled in the same meeting.
     l   Booking one-time-VMRs (Cisco and Pexip only): the endpoints receive the URI as Cisco OBTP or Polycom CTJ.
     l   JOIN can identify patterns in meeting room invitations so that the endpoint can be populated with Cisco OBTP or Polycom
         CTJ information for personal VMRs (e.g. meet.js@example.org).
     l   JOIN dials out to booked endpoints that don't support Cisco OBTP or Polycom CTJ.
     l   Emails containing the dial-in information for the meeting can automatically be sent to the meeting participants.

  Limitations
  Cisco CMS
  At this time JOIN can only dial out from one-time-vmrs on CMS, not from personal VMRs and Skype for Business (S4B)
  meetings. This means that for S4B calls and personal VMR calls when using CMS, the meeting can only be joined via Cisco
  OBTP/Polycom CTJ.

  StarLeaf Cloud
  At this time JOIN can be used to enable Cisco OBTP/Polycom CTJ for the following scheduled meetings:

     l   Office 365 / Skype for Business on-premises
     l   StarLeaf Cloud

  Exchange Web Service Emulation
  At this time the Exchange Web Service emulation service in JOIN supports Polycom HDX and Group Series systems. Other
  Polycom systems like for instance Trio are supported through existing calendar integration

  Overall process from install to end user
   1. After installation, video admins add the following information into the JOIN configurator tool:
      o Exchange or Google server connection settings.
      o MCU details (Pexip MCU that acts as Skype Gateway, Cisco CMS MCU for Dual Home meetings, Videonor as
          MCU and Skype Gateway or StarLeaf Cloud).
      o Exchange video-enabled meeting-room resources or Google Hangouts meeting resources.
   2. Users book a Skype, personal VMR or one-time-VMR video meeting from Outlook, inviting one or more video-enabled
      meeting-room resources.
        o Users book a Google meeting from their Google Calendar, inviting one or more video enabled meeting-room
            resources.
   3. JOIN monitors the meeting-rooms at the interval specified in Polling interval in minutes, to check if they receive a
      meeting invite. This is how it works with a Pexip MCU:
        o Skype invitations sent to meeting-room resources include a URI in this format:
            sip:js@example.org;gruu;opaque=app:conf:focus:id:TTC86056 which JOIN rewrites to a URI the meeting-room
            endpoint can call eg: S4B.TTC86056.js@example.org (this format is defined in Matching Rules in the
            configurator).
        o For one-time-VMR meetings, the URI is generated based on the format defined in Matching Rules in the
            configurator.
        o For personal VMR meetings, the URI in the invite body is identified as the URI.
   4. The URI is sent to the endpoint as Cisco OBTP or Polycom CTJ ready for attendees to start the meeting.
   5. The call is routed either through Pexip to the Skype server, using a gateway rule on the Pexip MCU, or through Cisco CMS
      to the Skype server, using the Dual Home technology, or through the StarLeaf Cloud to the Skype server.

                                                                                                                            Page 6 of 73
Synergy JOIN Installation and Configuration Guide

  How the Skype URIs are generated
  Skype URIs for JOIN should be based on your company dial plan.

  Pexip / Videonor / Videxio
  In this example, using a Pexip MCU, our URI Prefix is S4B (for Skype for Business). We recommend using a prefix that easily
  identifies these URIs on your network as Synergy JOIN Skype for Business URIs.
  NB. The prefix for Videxio is usually __sfb__ (two underscores + sfb + two underscores) but should be confirmed on installation.

  The second part of the URI is the Skype Meeting ID, and the last part is the Skype User ID.
  A URI created from our matching rule pattern looks like this:

   URI Prefix                Skype Meeting ID         Skype User ID              Full URI

   S4B                       TTC86056                 js@example.org             S4B.TTC86056.js@example.org

  Cisco CMS
  With CMS, the format of the replace value is (SkypeURL)@CompanyCMSDomain.local where “CompanySkype.com” is the
  routing domain that ensures the call is routed to the CMS.

  This domain must also be added as a “Targets Lync Simplejoin” domain on the CMS under Configuration > Incoming Calls.

  StarLeaf Cloud
  The Skype URI sent to the endpoint is the URI of the gateway call provisioned in the StarLeaf Cloud by JOIN.

                                                                                                                           Page 7 of 73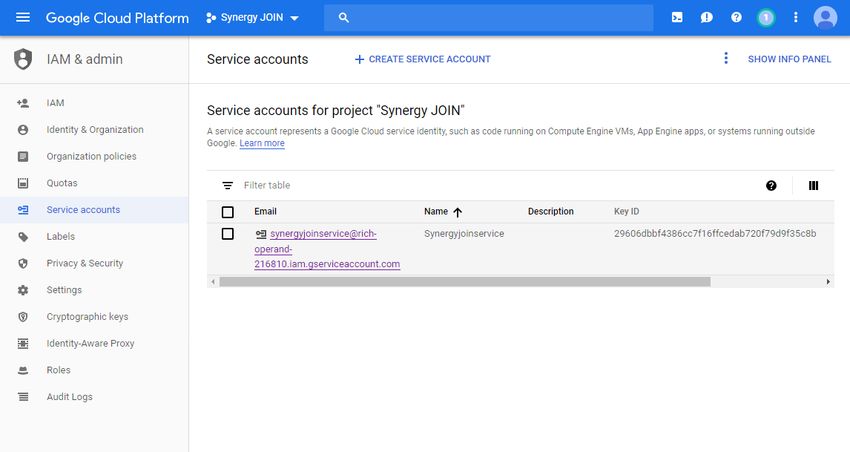
Synergy JOIN Installation and Configuration Guide

  This URI is in this format: numeric@customername.call.sl000000

  How the call is routed
  Pexip / Videonor / Videoxio
  There must be a Destination alias match in a gateway rule on the Pexip that corresponds to the matching rule URI pattern so
  that when the endpoint dials the skype URI, it is routed correctly.
  The protocol for this rule must be MS-SIP.

   Destination alias match                          Replace string                                        Protocol

   S4B\.([a-zA-Z0-9]+)\.(.+@.+)                     \2;gruu;opaque=app:conf:focus:id:\1                   Lync (MS-SIP)

  See Pexip documentation for more information on creating gateway rules.

   Note: If calls go through a VCS, you need a search rule on the VCS to send calls corresponding with the prefix of your URI
   pattern to Pexip (in our example, S4B).

  Cisco CMS
  The call is routed through the CMS to Skype using the Dual Home functionality:

   1. When a Skype meeting is forwarded to a video-enabled meeting-room that has been added to JOIN, JOIN tells the
      endpoint to call URL@simplejoindomain.
   2. The VCS routes the call to CMS.
   3. On CMS, the call hits the incoming calls simplejoin rule and CMS sets up the call.

   Note: The “Lync simplejoin domain” must be present on the VCS.

  StarLeaf Cloud
   1. The endpoint calls out to the StarLeaf Cloud using the URI it received from JOIN.
   2. The StarLeaf Cloud calls the Skype meeting.

                                                                                                                            Page 8 of 73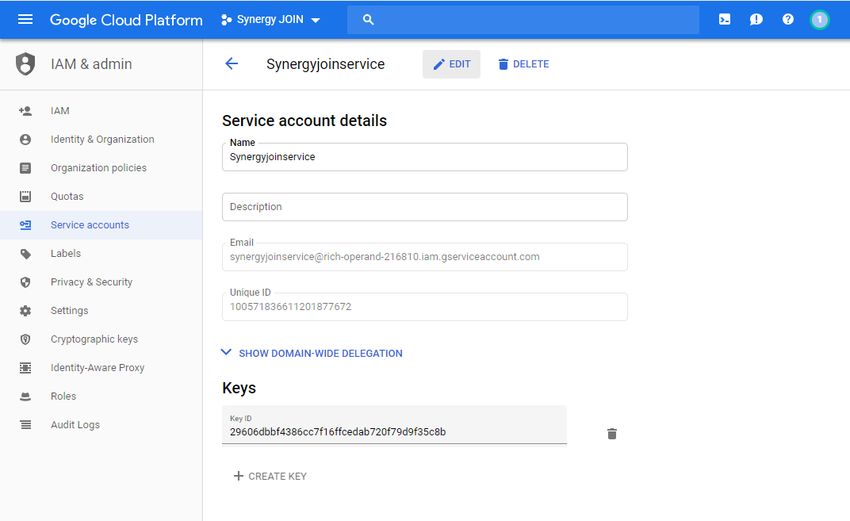
Synergy JOIN Installation and Configuration Guide

  Requirements
  Windows Server software
   Operating system                                                                 Additional features required

   Windows Server 2008 r2 64 bit (or newer)                                         Microsoft .NET 4.5.1 Framework

  Windows Server hardware
   Number of video-enabled meeting               CPU                           RAM                                            HDD
   rooms

   0 - 100                                       4 Cores                       8 GB                                           20 GB

   100 - 300                                     4 Cores                       16 GB                                          50 GB

   300 - 900                                     4 Cores                       32 GB                                          100 GB

   900 - 2000                                    6 Cores                       40 GB                                          150 GB

   2500 +                                        8 Cores                       64GB                                           250 GB

  Network requirements
   Source                             Destination                   Protocol   Port (TCP         Description
                                                                               unless
                                                                               otherwise
                                                                               stated)

   Synergy JOIN                       Microsoft Exchange            HTTPS      443               Scheduling.

   Synergy JOIN                       Cisco TMS                     HTTP       80                Tracking codecs on DHCP.
                                                                    HTTPS      443

   Synergy JOIN                       Pexip Management Node         HTTPS      443               Initiating dial-out calls.
                                                                                                 Provisioning one-time VMRs.

   Synergy JOIN                       Pexip Conference Node         HTTPS      443               Optional: JOIN requires access to one Pexip conference node for
                                                                                                 displaying “End of Conference Warnings”

   Synergy JOIN                       StarLeaf Cloud:               HTTPS      443               Provisioning gateway call in StarLeaf Cloud.
                                      https://api.starleaf.com

   Synergy JOIN                       Cisco CMS                     HTTP       80                Initiating dial-out calls.
                                                                    HTTPS      443               Provisioning one-time VMRs.

   Synergy JOIN                       Cisco codecs                  HTTP       80                Updating codecs with Cisco OBTP information.
                                                                    HTTPS      443

   Synergy JOIN                       Polycom codecs                N/A        N/A               N/A - JOIN does not talk to the codec - the Polycom endpoints get
                                                                                                 the meetings from Exchange.

   Synergy JOIN                       Synergy SKY Upgrade service   HTTP       80                Automatic upgrade of JOIN via this URL:
                                                                                                 http://synergysky.com/upgradeService/

   Synergy JOIN                       Internet                      HTTP       80                JOIN requires internet access to find the address to the Skype
                                                                                                 meeting for CMS Office 365 meetings, and for all external Skype
                                                                    HTTPS      443
                                                                                                 invitations that are forwarded.

  Port forwarding to Cisco endpoints
  Cisco video systems that are on external networks can be reached directly over the internet by setting up a port forwarding rule
  in the firewall to allow direct access to the video system.
  Note the following if using port forwarding to Cisco endpoints:
  • Ensure the Port Forwarding rule only accepts requests from the specific IP address that JOIN will connect from.
  • Ensure the Port Forwarding rule forwards requests to the HTTPS service of the Video System.
  • Ensure the Video System's HTTPS service is enabled.
  • Ensure the Video System has a strict password set.

                                                                                                                                                           Page 9 of 73
Synergy JOIN Installation and Configuration Guide

  • Include the port number after the IP address when configuring the Video System in JOIN (e.g. 213.112.33.179:8081).

  Service accounts
   Account type                                                  Permissions required

   Microsoft Exchange User (with a mailbox)                      None. (Editor access to meeting room resource mailboxes required if using in-body
                                                                 update)

   Pexip MCU                                                     Admin API account or LDAP API account.

   Cisco CMS                                                     Admin API account.

   StarLeaf Cloud                                                You need to have Allow scheduling external conferences enabled on your
                                                                 organization’s account.
                                                                 See "How to create a StarLeaf Cloud authorization token" on page 70

   Cisco codecs                                                  Admin user account.

   Polycom codecs                                                N/A - JOIN does not talk to the codec - the Polycom endpoints get the meetings from
                                                                 Exchange.

   Cisco TMS (optional - used to track codecs on DHCP)           Site administrator user account.

   Google API Access                                             API Scopes to allow for calendar access

   Google Service Account                                        Google Super Admin account in GSuite(admin.google.com). Additionally, Enable
                                                                 Domain Wide Delegation on the service account( console.cloud.google.com)

                                                                                                                                           Page 10 of 73
Synergy JOIN Installation and Configuration Guide
Device Support
Devices that are supported with Synergy Join
Device Version Comments
Microsoft Exchange On Prem and 0ffice 365 (Exchange
Online)
l 2010 SP2 and later
l 2013 all SPs
l 2016
Cisco TMS 12.0 - 15.5
Pexip MCU 13 - 19
Cisco CMS 1.8 - 2.4 Must be configured with Dual Home:
The “Lync simplejoin domain” must be present on the VCS if the
endpoints route calls through one. Also, the CMS must have a
working Lync outbound rule set up (Trunk type: Lync).
StarLeaf Cloud N/A You need to have Allow scheduling external conferences
enabled on your organization’s account.
See "How to create a StarLeaf Cloud authorization token" on page 70
Cisco codecs: l TC5.x and newer Note that only dial out is currently supported for endpoints registered
l CE8.x and newer on the Spark service.
l C-series
l MX-series
l SX-series
l EX-series
l DX-series
l Cisco Spark Room Kit
l Cisco Webex Room 55 Single & Dual
l Cisco Webex Room 70 G2
l Cisco Webex Room Kit Mini, Room Kit, Room
Kit Plus & Room Kit Pro
Polycom codecs: All versions supporting Polycom CTJ The endpoints must be configured to poll calendar data from
Exchange using the Polycom Calendaring service:
l HDX
l Group series l The Polycom endpoints must be configured to get the meetings
l Trio from their own room account in Exchange.
l JOIN will rewrite the body of these meetings in the Exchange
room accounts to embed the URI of the meeting in a Polycom-
friendly way.
NOTE:
Polycom HDX does not support Office 365, so it cannot currently get
the Polycom CTJ if the room is in Office 365 (this will be solved in
Synergy JOIN version 3.0).
The Polycom Trio is supported with Polycom Click To Join for one-
Time-VMRs and regex/static VMRs in Synergy JOIN version 2.6.
Microsoft Skype and Teams support will be available in JOIN
version 3.0. The reason is that the Trio will incorrectly try to call the
hidden Skype GRUU if it finds it in the meeting invitation header
when there is a different URI in the Polycom VMR token Synergy
JOIN generates, even if the Trio is not registered towards a Skype
server.
Page 11 of 73Synergy JOIN Installation and Configuration Guide
Exchange Resource Account Requirements
When deploying Synergy JOIN, we recommend running the following scripts on all of the rooms in Microsoft Exchange in order
to unlock the full potential of the product:
Add-MailboxPermission -Identity -User -AccessRights FullAccess
Set-CalendarProcessing -DeleteComments $false -DeleteSubject $false -RemovePrivateProperty $false -
AddOrganizerToSubject $false -ProcessExternalMeetingMessages $true
The embedded test tool in the JOIN Configurator can be used to verify most of these properties, and suggests PowerShell
commands to configure the rooms according to the JOIN recommendations.
The function of the various Exchange resource properties are explained in the table below.
Exchange Resource properties
Property name Function in Microsoft Exchange Function in Synergy JOIN Recommended Required
Setting
DeleteComments The DeleteComments parameter When set to $true, Exchange deletes the $false Yes, so that your
specifies whether to remove or keep any body of the meeting invitation when matching rules
text in the message body of incoming booking rooms. work correctly.
meeting requests.
As the matching rules rely on reading
Valid input for this parameter is $true or content in the body of the email, this stops
$false. Regex and the Skype URI in Body rule
from working in JOIN.
This parameter is used only on resource
mailboxes where the
AutomateProcessing parameter is set to
AutoAccept.
DeleteSubject Specifies whether to remove or keep the When set to $true, Exchange deletes the $false Yes, if you want the
subject of incoming meeting requests. subject of the meeting which means JOIN meeting title to be
does not display a meeting title on the displayed on the
Valid input for this parameter is $true or
touch panel of the video system. touch panel.
$false.
If you want the subject of the meeting to
The default value is $true.
be hidden, you can select the Private flag
This parameter is used only on resource when booking the meeting in Outlook,
mailboxes where the even if this property is set to $false.
AutomateProcessing parameter is set to
See also RemovePrivateProperty.
AutoAccept.
RemovePrivateProperty The RemovePrivateProperty parameter When set to $true, Exchange removes the $false No.
specifies whether to clear the private flag for Private flag when a Room is booked as a
incoming meeting requests. resource in a meeting flagged as Private
in Outlook. This means that the meeting
Valid input for this parameter is $true or
title is visible to everyone for all
$false.
meetings.
The default value is $true.
By setting this property to $false you can
By default, the private flag for incoming hide the title on meetings that are booked
meeting requests is cleared. To ensure the as Private in Outlook, while showing the
private flag that was sent by the organizer in title of all other meetings.
the original request remains as specified,
set this parameter to $false.
AddOrganizerToSubject The AddOrganizerToSubject parametors When set to $true, Exchange adds the $false Yes, if you want to
specifies whether to add the organizers organizers first name and last name to hide the meeting
name toe the subject line. the subject line of the meeting. title on the touch
panel.
Valid input for this parameter is $true or If you do not want to display the meeting
$false. name, at minimum we recommend to set
this field to $true
The default value is $true.
Page 12 of 73Synergy JOIN Installation and Configuration Guide
Property name Function in Microsoft Exchange Function in Synergy JOIN Recommended Required
Setting
ProcessExternalMeetingMessages The ProcessExternalMeetingMessages When set to $false, Exchange will not $true Yes, so that
parameter specifies whether to process allow external users to book Rooms forwarding invites
meeting requests that originate outside the resources. from external
Exchange organization. users works
However, a room is booked on behalf of
correctly.
Valid input for this parameter is $true or the organizer if a user forwards an invite
$false. into a room. This setting must therefore
be set to $true to allow internal users to
The default value is $false.
forward invitations to external Skype
By default, meeting requests that originate meetings into their meeting rooms, so
outside of the organization are rejected. that they can benefit from easy calling into
external Skype meetings.
Note: Administrators can still avoid
external users booking their rooms
directly by using an internal domain in the
room’s alias (e.g.
meetingroom@synergysky.local)
AutomateProcessing The AutomateProcessing parameter Meetings that are booked in Room AutoAccept Yes.
enables or disables calendar processing on resources are stored as Tentative unless
the mailbox. this setting is set to AutoAccept.
This parameter takes the following values: Tentative meetings are not processed by
JOIN, as you can book multiple tentative
l None Both the resource booking meetings within the same time interval in
attendant and the Calendar Attendant one resource.
are disabled on the mailbox.
l AutoUpdate Only the Calendar
Attendant processes meeting requests
and responses.
l AutoAccept Both the Calendar
Attendant and resource booking
attendant are enabled on the mailbox.
This means that the Calendar Attendant
updates the calendar, and then the
resource booking assistant accepts the
meeting based upon the policies.
The default value on a resource mailbox is
AutoAccept.
The default value on a user mailbox is
AutoUpdate, but you can't change the value
on a user mailbox.
AllRequestInPolicy These parameters specify whether to allow Meetings booked in Room resources that $false Recommended:
users to submit policy requests. are configured with either of these configure so that
AllRequestOutOfPolicy
properties that require meetings to be approval is not
Valid input for these parameters are $true or
RequestInPolicy approved by a delegate, will not be required.
$false.
RequestOutOfPolicy processed by JOIN until they are
The default value is $false. approved.
This will lead to a significant delay for the
meeting organizers, and is therefore not
recommended.
Enabling forwarding of external meeting invitations
Microsoft will only process meeting requests for meetings booked by external users if the settings
ProcessExternalMeetingMessages is set to “$true”. Enabling this setting potentially exposes your meeting rooms from being
booked directly by external users, but can be mitigated in one of two ways:
l Either stop direct emails from external users from ever reaching the room mailboxes; which can be done by a transport
rule in the Hub Transport server in Microsoft Exchange. The rule can be set to stop emails from external users from
reaching the mailboxes in a specific distribution list like the list of meeting rooms
l Alternatively you can change the alias of the rooms to a domain that is only available internally in the Exchange
environment; i.e. changing boardroom@acme.com to boardroom@acme.local. The acme.local domain should not be
reachable from the outside, but will be available for internal users.
Either of these changes will enable users to forward invitations they receive from the outside to their meetings rooms, while
hindering any external users from booking their meeting rooms directly.
Page 13 of 73Synergy JOIN Installation and Configuration Guide
NOTE. Enabling ProcessExternalMeetingMessages does not in any way expose the information of existing meetings to external
users.
Page 14 of 73Synergy JOIN Installation and Configuration Guide
Google Cloud Platform Configuration
Introduction
In order to install Synergy Sky JOIN with Google Calendar integration, the G Suite environment must be prepared. This is done
through the following 4 steps
1. Create a Google Cloud Platform Project or use an existing project
2. Enable three distinct APIs and Services
3. Create a service account or use an existing service account. This account must be given correct permissions. A private key
must be generated and copied to the JOIN server.
4. Appropriate Calendar Access must be given to the Service Account via the G Suite Domain
Google Cloud Platform
A Google Cloud Console Project is required in order for JOIN to be able to read calendar resource accounts, user accounts and
also have access to APIs that enable the JOIN integration.
Create a Google Cloud Platform Project or use an existing Project. The Project will be used for the API integration as well as for
the Service Account.
Logging into the Google Cloud Platform console:
l Browse to the following URL: https://console.cloud.google.com/iam-admin/serviceaccounts
l Log in with your admin user account to manage your Google cloud console.
Creating a Project
(Skip this section if you already have a project you want to add this account to)
N.B on some occasions, Google fails to create the project and as such, sometimes you may need to create the project twice
To create new Google Cloud Console project,
l Select IAM & Admin
l Click the 'Create' button.
Page 15 of 73Synergy JOIN Installation and Configuration Guide
l Fill in your project name, i.e. 'SynergyJOIN'.
l Select Create
Choosing an Existing Project
Follow these steps if you already have existing projects you would like to use for this project,
Page 16 of 73Synergy JOIN Installation and Configuration Guide
l Click on the Project Drop down arrow at the top left corner and you will be presented with the 'Select a Project Window'.
l Select your desired project and click 'Open'
Enabling API's and Services
You will have to enable API's to work with the project you have created. The API's you will have to enable are Google Calendar
API, GMail API & Admin SDK.
n Google Calendar API - To allow reading and updating resource calendars
n GMail API - To allow sending email
n Admin SDK - To allow listing out current available resources from the configuration tool
You need to enable one API at a time
Go to the Menu, Select APIs & Services > Dashboard
Select 'Enable APIs and Services'
Page 17 of 73Synergy JOIN Installation and Configuration Guide
You should now be presented with the API Library.
You will have to search for the APIs from this screen.
First, Search for 'Google Calendar API'
Select the 'Google Calendar API.
Page 18 of 73Synergy JOIN Installation and Configuration Guide
Click Enable
Once you have found this API, you will then have to perform a new search for GMail API
Select Enable for the GMail API
Once you have found this API, you will then have to perform a new search for Admin SDK API
Select Enable for the Admin SDK API
Page 19 of 73Synergy JOIN Installation and Configuration Guide
Service Account
Create Service Account
Select IAM & Admin and Choose 'Service Accounts
Page 20 of 73Synergy JOIN Installation and Configuration Guide
Enter a Service Account Name and select Create
Select the role for this service account. Resource Manager > Organization Administrator.
This will allow the service account to manage the meeting room resources.
Once you have selected the role, Click the 'Create Key' Button.
Page 21 of 73Synergy JOIN Installation and Configuration Guide
Create a Private Key for JOIN
On the next screen, choose the JSON radio button and click 'Create'
A file will be downloaded to your disk, this is your authentication information to be used by the JOIN application.
l Copy this file to the same directory as the JOIN application. (i.e. c:\SynergySKY\SynergySKYEnterpriseScheduling).
l Keep a secure copy of this file, since a new service account is required to be created if its lost.
Enabling Domain Wide Delegation
Once you are have moved the file to the same directory as the JOIN application and you click 'Done' you will be presented with a
screen similar to the below with your newly created service account visible in the list.
Page 22 of 73Synergy JOIN Installation and Configuration Guide
Click on the newly created service account.
Select 'Edit' and Expand the 'Show Domain-Wide Delegation' arrow
Page 23 of 73Synergy JOIN Installation and Configuration Guide
Tick the 'Enable G Suite Domain-wide Delegation' tick box
Select 'Save'
Enable Service accounts to access Calendar Resources
In order to enable Service accounts, first we need to find the Service account ID for the service account on
https://console.cloud.google.com
Page 24 of 73Synergy JOIN Installation and Configuration Guide
Select IAM & Admin and Choose 'Service Accounts
Copy the service account ID
An Administrator of the G Suite domain must complete the next steps
Google Admin Console
Browse to the Google Admin Console https://admin.google.com
Page 25 of 73Synergy JOIN Installation and Configuration Guide
Select Security from the list of controls.
If you don't see Security listed, select More controls from the gray bar at the bottom of the page, then select Security from the list
of controls.
N.B If you can't see the controls, make sure you're signed in as an administrator for the domain.
Select Advanced settings from the list of options
Page 26 of 73Synergy JOIN Installation and Configuration Guide
Select 'Manage API client access' in the Authentication section
1. In the Client Name field enter the service account's Client ID or Service account ID (which we copied in the previous step).
2. In the One or More API Scopes field enter this list of scopes:
n https://www.googleapis.com/auth/admin.directory.resource.calendar.readonly
n https://www.googleapis.com/auth/calendar.readonly
n https://www.googleapis.com/auth/gmail.send
n https://www.googleapis.com/auth/calendar
n https://www.googleapis.com/auth/calendar.events
You can copy and paste the below api scopes as they are into the 'One or More API Scops' field box
https://www.googleapis.com/auth/admin.directory.resource.calendar.readonly,
https://www.googleapis.com/auth/calendar,https://www.googleapis.com/auth/calendar.readonly,
https://www.googleapis.com/auth/gmail.send,https://www.googleapis.com/auth/calendar.events
Click Authorize.
The outcome should look like the below example:
Service-act-on-behalf-of Email
Page 27 of 73Synergy JOIN Installation and Configuration Guide
Browse to the dashboard and select 'Users'
In the users section, select the user that you would like to use as the 'service-act-on-behalf-of Email' in Synergy JOIN.
Scroll down to the 'Admin roles and privileges' section and verify that the user you would like to use has the role of 'Super Admin'
enabled.
Once you have verified this, copy the email address from this user and paste this into the 'service-act-on-behalf-of email' text
button in the 'General Settings' tab in the Synergy JOIN configuration tool.
More information on the general settings tab can be found here
Page 28 of 73Synergy JOIN Installation and Configuration Guide
Installing Synergy JOIN
You will be provided with an installer: SetupProject.msi.
1. Double click to run the installer.
2. Follow the simple install wizard, clicking Next to accept the license agreement, select the install location, and choose
whether to launch JOIN when installation completes.
3. Once the install has completed, you will see a shortcut to the configuration tool on the desktop.
Page 29 of 73Synergy JOIN Installation and Configuration Guide
Configuring Synergy JOIN
All configuration of the Synergy JOIN is done using the configuration tool.
Task 1: Launching the configuration tool and installing the service
1. Start the configuration tool by double-clicking on the JOIN icon on the desktop.
Note: On startup, the server checks for updates, so if you do not have internet access configured on the server, you will
see an error here.
2. Click Install Service to install the JOIN service on the server - once installed this button disappears from the configuration
tool.
The Start and Stop buttons are used once the service is installed to stop and start it, as necessary.
Note: Pressing Ctrl + F5 reveals the Uninstall Service button in the place of the Install Service button, which when clicked,
uninstalls the service from the server.
Page 30 of 73Synergy JOIN Installation and Configuration Guide
Task 2: Configuring the General Settings
Fill in the fields in the General Settings tab as follows:
Section/Field name Description
Notifications Contact details for the administrator who should receive notifications of any problems
in the platform, for example if JOIN fails to push Cisco OBTP or Polycom CTJ
information to endpoints.
Admin Contact Email Addresses The email addresses of administrators who will receive email notifications for the
specified events.
Use a comma to separate multiple email addresses.
Notifications Specify which events will trigger an email to be sent to the administrator email
addresses specified above.
Connection Types
Section/Field name Description
Exchange Connection info The Exchange Web Service (EWS) details for your Exchange environment.
EWS Url The Exchange Web Service (EWS) URL: if using Office 365, then you can normally
use the default value already populated here:
https://outlook.office365.com/EWS/Exchange.asmx
EWS Service Account Username The username of the EWS service account.
Microsoft Exchange sometimes requires the username to be in the format of
"domain\username" and sometimes "username@domain". In the latter cases the
domain field is optional
For details of the permissions required for the service account, see "Exchange
Resource Account Requirements" on page 12
EWS Service Account Domain The domain of the EWS service account.
EWS Service Account Password The password of the EWS service account.
Google connection info The details for your G-suite setup
Service-Act-On_Behalf-Of email A super administrator in the admin.google.com section of the configuration.
(Additional information can be found in the Google Cloud Platform Configuration)
Service Account FilePath Filepath to the service account json file you have downloaded in connection with the
creation of the service account (This is the json file that was copied in the Google
Configuration section under 'Create a Private Key for JOIN')
Polling interval in minutes The number of minutes between JOIN checking the mailbox. If you notice any issues
with your connection to your mailboxes taking longer than expected, we advise to set
your Polling interval in minutes to 0.
Continuing with General Settings:
Page 31 of 73Synergy JOIN Installation and Configuration Guide
Section/Field name Description
MCU Connection info A Pexip Infinity Management Node, Cisco CMS Master Node or StarLeaf Cloud
URL is required so that JOIN can:
l launch outbound calls to non-Cisco OBTP or Polycom CTJ systems
l provision one-time-VMRs when booking non-Skype meetings (Cisco and Pexip
only)
Note that for StarLeaf you need to request an authentication token that gives you
access to Skype for Business interworking.
MCU address / hostname The address of the MCU. Will normally start with https://
For StarLeaf Cloud enter https://api.starleaf.com
For Videonor Cloud enter https://core.videonor.net
MCU Username The username of an admin account on the MCU.
For StarLeaf Cloud, this field will show X-SL-AUTH-TOKEN
For Videonor Cloud, this field will show x-auth-token
MCU Password The password of an admin account on the MCU.
For StarLeaf Cloud, enter the access token from the StarLeaf Portal. See "How to
create a StarLeaf Cloud authorization token" on page 70
For Videonor Cloud, enter the access token you have been provided by Videonor
support
TMS Connection info (optional) Optionally you can add Cisco TMS to your JOIN; this is of value if the video systems
are configured with dynamic IP addresses (DHCP) in your environment. JOIN will
then query TMS for updated IP addresses if it is unable to connect to the video
systems. Adding TMS also makes it easier to add video systems, as they can then be
selected from a list instead of having to enter their IP addresses manually.
Cisco TMS address / hostname The hostname or IP address of the TMS server. This could be prefixed with either
http:// or https://. JOIN assumes TMS is installed on the default web application
named /TMS (e.g. http://tms.company.com/tms).
Cisco TMS Username The username of a Site Administrator in TMS. The username would normally be
prefix with the NETBIOS domain (e.g. company\admin).
Cisco TMS Password The password of a Site Administrator in TMS.
Preserve TMS Bookings* Check the checkbox if JOIN should preserve meetings that are pushed to the codec
by other booking systems such as Cisco TMS.
Enabling this feature will result in more network activity and higher cpu usage on the
codec and on JOIN because JOIN will increase the verification rate to ensure the
video conferencing system has the correct meetings added.
We recommend that you only enable this feature during a trial or migration phase.
*Note that TMS pushes out the meetings later than JOIN and therefore overwrites the meetings that are pushed out by JOIN.
Note the following regarding using the Preserve TMS Bookings setting above:
TMS JOIN without Preserve TMS Bookings JOIN with Preserve TMS Bookings
Pushes out a list of all Pushes out a list of meetings for the next 24 hours when a meeting is Pushes out a list of meetings for the next 24 hours when a meeting is
meetings to endpoint when booked, updated or deleted. booked, updated or deleted.
a meeting is booked,
updated or deleted.
Verifies and overwrites (if necessary) the meeting list on the Verifies and merges (with TMS meetings if necessary) the meeting list
endpoint every hour with meetings stored in JOIN for the next 24 on the endpoint every hour with meetings stored in JOIN for the next 24
hours. hours.
Verifies and overwrites (if necessary) the meeting list on the Verifies and merges (with TMS meetings if necessary) the meeting list
endpoint at Conference Start Buffer before every meeting starts on the endpoint at Conference Start Buffer before every meeting starts
(start-up buffer is by default 10 minutes) with meetings stored in (start-up buffer is by default 10 minutes) with meetings stored in JOIN for
JOIN for the next 24 hours. the next 24 hours.
Verifies and merges (with TMS meetings if necessary) the meeting list
on the endpoint continuously while a meeting is in progress with meetings
stored in JOIN for the next 24 hours.
Task 3: Testing that email is working
Click Test notification email to send a test email to the Admin Contact Email Addresses using the EWS Service Account or
the service-act-on-behalf-of email defined in the sections above.
Page 32 of 73Synergy JOIN Installation and Configuration Guide
Task 4: Creating Matching Rules
After configuring the General Settings, you need to create matching rules.
The matching rules in JOIN allow you to define how calendar bookings should be processed.
As an example, you can create rules that define that JOIN should do the following:
1. Look for personal VMRs in invites from internal users.
2. Look for Skype invites from all users.
3. Create a one-time-VMR if neither 1 or 2 apply.
Configuring the General Rules
Configure the General Rules as follows:
Field Description
Internal email domains Specify a comma separated list of the email domains your organization uses. This list is used to determine whether a meeting room
invitation is sent from an internal or external user. It is also used to determine which users are internal and external when sending out
connection information emails. (e.g. synergysky.com, synergysky.eu, synergysky.us)
Page 33 of 73Synergy JOIN Installation and Configuration Guide
Creating the rules
First, select the type of rule you want to add from the Add Rule dropdown menu:
Rule type Description
Skype URI in Headers This rule makes JOIN look for Skype invites in hidden text in the invite.
This will normally work for all Skype meetings when the invitation is sent internally in the organization. The
information may however be lost if the email jumps multiple Exchange servers, or when the invite comes
from someone outside the organization.
Skype URI in Body This rule analyzes the Hyperlink in the body of the invitation to find the URI of the Skype meeting. This will
work in most environments, both internally and externally, but is slower. It is therefore recommended to use
this as a fallback rule with lower priority than the Skype URI in Headers rule.
NOTE: This function requires Synergy JOIN to have access over HTTPS to the Skype server where the
meeting is hosted; either directly or via a proxy server.
Teams URI in Headers This rule makes JOIN look for Teams invites in hidden text in the invite.
This will normally work for all Teams meetings when the invitation is sent internally in the organization. The
information may however be lost if the email jumps multiple Exchange servers, or when the invite comes
from someone outside the organization.
NOTE: The Teams rule should be added with a high priority than the Skype rules, since Teams invitations
also contains an Skype invitation in the header
Teams URI in Body This rule makes JOIN look for Teams invites in the meeting body via Regex rule. The rule can be adjusted
according to the pattern in your Teams setup.
Regex Rule This rule enables you to use Regex to define how you want JOIN to work. You can define your own pattern
matches, and differentiate between invitations from internal and external organizers.
You can define both matching patterns and replace patterns to transform the URI when required.
This rule can be added multiple times.
Hangout Meet This rule enables JOIN to look for Google Hangout meetings in the Body of the Google Hangouts Meeting via
Regex rule. This rule is prepopulated when you select it
Skype URI in Headers
Configure the remaining fields as follows:
Field Description
Priority The priority defines the order in which the rules are applied. The lowest number gives the highest priority. (E.g. 1 is processed
before 5).
Applies to Internal invitations
Matching value Not applicable
Replace value Pexip:
S4B.(SkypeMeetingId).(SkypeUserId)@(UserDomain)
where:
l SkypeMeetingId = alphanumeric meeting Id found in every Skype meeting invite
l SkyperUserId = the userpart of the organizer’s Skype SIP URI
l UserDomain = the domain in the organizer’s Skype SIP URI
NOTE: For Organizations with a Pexip Gateway hosted by a Service Provider, the recommended pattern would be:
S4B.(SkypeMeetingId).(SkypeUserId)_(UserDomain)@serviceProvidersDomain.com
This allows the Service Provider to strip away their domain and replace the underscore with @ before sending the call through
the Pexip Gateway.
CMS:
(SkypeURL)@CompanyCMSDomain.local
where:
CompanyCMSDomain.local = the routing domain that ensures the call is routed to the CMS.
Note: This domain must also be added as a “Targets Lync Simplejoin” domain on the CMS under Configuration > Incoming
Calls.
StarLeaf Cloud:
This field is disabled as the required value is automatically configured.
Page 34 of 73Synergy JOIN Installation and Configuration Guide
Skype URI in Body
Configure the remaining fields as follows:
Field Description
Priority The priority defines the order in which the rules are applied. The lowest number gives the highest priority. (E.g. 1 is processed
before 5).
Applies to All invitations
Matching value Not applicable
Replace value Pexip:
Use the same format as for Skype URI in Headers.
CMS:
Use the same format as for Skype URI in Headers.
StarLeaf Cloud:
This field is disabled as the required value is automatically configured.
Teams URI in Headers
Configure the remaining fields as follows:
Field Description
Priority The priority defines the order in which the rules are applied. The lowest number gives the highest priority. (E.g. 1 is processed
before 5).
Applies to Internal invitations
Matching value Not applicable
Replace value Pexip:
Teams.(TeamsMeetingId)@company.com
where:
l TeamsMeetingId = alphanumeric meeting Id found in the Teams meeting invite
The URI needs to match the Teams gateway rule in the Pexip configuration. Please refer to the Pexip documentation for more
details
Teams URI in Body
Configure the remaining fields as follows:
Field Description
Priority The priority defines the order in which the rules are applied. The lowest number gives the highest priority. (E.g. 1 is processed
before 5).
Applies to All invitations
Matching value Not applicable
Replace value Pexip:
Use the same format as for Skype URI in Headers.
Hangout Meet
Configure the remaining fields as follows:
Field Description
Priority The priority defines the order in which the rules are applied. The lowest number gives the highest priority. (E.g. 1 is processed
before 5).
Applies to All invitations
Page 35 of 73Synergy JOIN Installation and Configuration Guide
Field Description
Matching value This field defines the Regex rule for matching data . For example:
\d@company.com will match all URIs starting with a number and ending with @company.com )
This field is prepopulated to catch all hangout meetings
Replace value This field defines how the matched data should be transformed before being sent to the endpoint.
This field is pre-populated to replace the matching value that has been identified.
Regex
Configure the remaining fields as follows:
Field Description
Priority The priority defines the order in which the rules are applied. The lowest number gives the highest priority. (E.g. 1 is processed
before 5).
Applies to All invitations
Matching value This field defines the Regex rule for matching data . For example:
\d@company.com will match all URIs starting with a number and ending with @company.com )
Replace value This field defines how the matched data should be transformed before being sent to the endpoint.
Pexip:
The value \0 uses the entire matched value, while \1 matches the first pair of parenthesis and so on.
Example:
Matching Value: Id: (\d)
Replace Value: \1@video.company.com
Email body: Conference Id: 123456789
URI = 12346789@video.company.com
CMS:
If you have CMS for internal dual-home, you can use a regex rule to look for "conference id: 123456" from internal meeting
organizers.
Page 36 of 73Synergy JOIN Installation and Configuration Guide
Testing, editing and deleting rules
Click the large Test button in the Add Rules area of the Matching Rules tab to launch the Regex Test Tool. The tool will help
you identify any errors in your regex by testing a Matching Value and Replace Value towards a text field:
Page 37 of 73Synergy JOIN Installation and Configuration Guide
Task 5: Adding Rooms
This tab is where you choose which meeting-room resources should be monitored by JOIN. The Microsoft Exchange User
service account requires Full Calendar Access to these rooms when you have configured your installation with Exchange. For
Google mode, a properly set up Google Service account is required along with correctly set Calendar scopes. For more details
see Requirements.
This table explains the fields and buttons on the Rooms tab:
Section/Field name Description
Available Rooms This list shows a list of Room Lists from your Exchange or Google Environment
Room lists are special address books in Exchange/ Google that only contain Rooms.
If no room lists are shown, ask your administrator to create one for you based on the
examples below.
Once a list of Room Lists is shown, double-click a list to open it. You can then double-click
rooms to add them to the Selected Rooms list.
Example for creating room lists in the Microsoft Exchange PowerShell tool:
$RoomAlias = Get-Mailbox -RecipientTypeDetails RoomMailbox -
Filter {Office -eq 'HQ'} | select -ExpandProperty Alias
New-DistributionGroup -RoomList -Name 'HQ Meetingrooms' -
Members $RoomAlias
$RoomAlias = Get-Mailbox -RecipientTypeDetails RoomMailbox |
select -ExpandProperty Alias
New-DistributionGroup -RoomList -Name 'All Meetingrooms' -
Members $RoomAlias
Selected Rooms This list shows which rooms are added to JOIN. They must be “connected” to video systems
in the Video Systems tab before they can be used. Double-clicking rooms in this list will
remove them.
Refresh Room list This button is used to refresh the room list.
Note: It can take up to 15 minutes before a room list is visible here after adding a room list in
Exchange.
Add Exchange room manually Click this button to add rooms from Exchange manually.
This is done by providing a display name and an alias for the room.
Page 38 of 73Synergy JOIN Installation and Configuration Guide
Task 6: Adding Video Systems
This is where you connect the Exchange meeting-room resources to the Video Systems. The video systems can be defined
manually or retrieved from Cisco TMS.
This table explains the fields and options on the Video Systems tab:
Section/Field name Description
Selected Rooms This list shows a list of all Exchange Rooms that are added to JOIN.
l Correctly configured systems are shown in bold.
l Rooms that are not connected to video systems are shown with normal text.
l Rooms with incorrect details are show with strike-through text.
Select a room to configure it.
Tracking mode l Manage manually: Use if you want to add the video system's details manually (video systems with static IP
address).
l Link to TMS: Use if you want the video system to be tracked by TMS (video systems with DHCP). Clicking Find in
TMS launches a TMS system browser. There may be a delay the first time the system browser launches.
o System Username: The admin account for the video system (e.g. admin).
o System Password: The password for the admin account. The system password is not available from TMS, so
you will always have to add this manually.
o System IP address: The IP address or hostname of the video system.
Page 39 of 73Synergy JOIN Installation and Configuration Guide
Section/Field name Description
Dial Options This setting defines whether the video system should get One-Button-to-Push (Cisco OBTP) or Click-to-Join (Polycom
CTJ) messages or be dialed out to.
l Cisco One Button to Push: The video system will receive Cisco OBTP information about upcoming meetings (limited
to the next 24 hours). For a list of supported video systems, see "Requirements" on page 9.
l Polycom Click To Join: The video system will receive Polycom CTJ information about upcoming meetings. Polycom
endpoints will get the meetings for 'today'. The endpoint must get the meetings from Exchange. Note that HDX does not
support Office 365. For a list of supported video systems, see "Requirements" on page 9.
l Dial Out to System: The video system will receive an incoming call from the Pexip MCU/GW at the meeting start
time. If the connection attempt fails, the MCU will retry connecting according to the settings in the Conference
Settings tab.
o SIP/H323 URI: The URI the video system can be reached on. This URI must be dialable by the Pexip MCU/GW.
o Dial out from MCU Location: The location the Pexip MCU/GW will use when making the call.
Connect and Add System Displayed if Dial Options: Cisco One Button To Push is selected.
Click this button to test the connection and add the settings.
The serial number of the video system will be saved and remembered by JOIN to ensure it’s sending the Cisco OBTP
information to the correct video system.
Save and Add System Displayed if Dial Options: Polycom Click to Join or Dial Out to System are selected.
Click this button to add the settings.
Video system passwords Specify a list of default passwords that JOIN will try when connecting to video systems.
Note: JOIN performs a nightly check of connectivity and time/date of all Cisco OBTP-enabled endpoints. If configured on the
General Settings tab of the configurator, admins are notified of any issues identified during this check. The check takes place
between 2am and 3am local server time; this is non-configurable.
Note: If the video system’s codec is replaced for any reason, and the video system is not linked to and imported from Cisco
TMS, you must re-add the video system here.
Page 40 of 73Synergy JOIN Installation and Configuration Guide
Task 7: Configuring Conference Settings
The conference settings define:
l conference configuration
l one-time-VMR pin and URI details
l who receives conference dial-in information emails
l End of Conference Warnings
Configure the fields in the Conference Settings tab as follows:
Section/Field name Description
Connection Details
Conference Start Buffer (Minutes) The start buffer defines when VMRs are provisioned and can be dialed into, and it defines when the green button in
the Cisco OBTP or Polycom CTJ message can be pressed on the video system. It also defines when Dial-in
information is resent to the invitees if Resend dial-in information at Conference Start Buffer is ticked.
Conference End Buffer (Minutes) The end buffer defines when the VMRs are de-provisioned and the remaining participants are disconnected.
Retry count on dial outs The retry count controls how many call attempts are made to dial-out video systems if the initial connection
attempt fails.
Retry delay between The retry delay controls how long JOIN will wait between the dial out attempts per participant.
Hide non-video meetings from video system If selected, meetings without dialable URIs will not be visible as Cisco One Button To Push meetings on booked
endpoints.
Disconnect auto-dialled participants at conference If selected, JOIN will disconnect dial-out calls it has initiated at conference end buffer, or if the meeting is deleted.
end
One-Time-VMR Settings If you have specified that JOIN should create one-time VMRs, this is where you define whether the one-time
VMRs should be configured with pin codes, and the numeric alias number range and domain so the VMRs can be
reached via an IVR from telephones.
The pin codes are included in the emails that are sent out to the Organizer and internal/external guests.
Note: If using pin codes, you must update the email templates to ensure that the host pin is not sent to guest
participants.
Host pin A 4-digit pin code will be randomly generated for each one-time VMR for hosts to use to start the meeting. See
"Configuring Cisco Meeting Server profiles with Synergy JOIN " on page 72 for controlling the behavior of hosts
and guests on Cisco Meeting Server
Guest pin A 4-digit pin code will be randomly generated for each one-time VMR for guests to use to join the meeting.
Conference Alias Range Start This defines the start value of the number range used to create the URIs (e.g. 900000).
Conference Alias Range End This defines the end value of the number range used to create the URI (e.g. 9999999).
Conference Alias Domain This defines the domain of the URI.
Page 41 of 73Synergy JOIN Installation and Configuration Guide
Section/Field name Description
Conference Alias Prefix This defines a prefix that will be added in front of the numeric alias for provisioning the URI. The numeric alias
will still be provisioned as an alternative alias for the vmr to enable IVR dial-in.
NOTE: Videonor Cloud requires all URIs to start with a alphanumeric prefix
End of Conference Warning
Enable End of Conference Warnings If ticked, End of Conference Warning notifications will be presented in the video stream X minutes before a
conference is about to end.
This applies for:
l Pexip personal VMRs
l Pexip onetime VMRs
l CMS onetime VMRs
End of Conference Warning Notifications do not work for Gateway calls.
End of conference text (use {0} as placeholder) Enter the text you want to appear if Enable End of Conference Warnings is ticked.
The placeholder {0} will display the number of minutes left in the meeting, based on the settings you have entered
below.
Conference ending text The text that will appear when the scheduled end time of a conference is reached.
Conference cancelled text The text that will appear when a conference the conference end buffer has been reached or if the meeting is deleted.
Message display duration (seconds) The length of time in seconds that End of Conference Warnings should stay on the screen.
Message display mode Define if the messages should be visible in the video stream, the chat (WebRTC chat, Skype chat and Pexip/CMS
client chat) or both.
When to show warnings (minutes before end) Specify when the End of Conference Warning Notifications should be displayed. Multiple entries must be separated
by a comma.
End of conference warnings are relative to end of booking: durations and other specifications are relative to the end time of the booked conference.
end buffer : durations and other specifications are relative to the conference end buffer.
Meeting Manager display name Define the name of the account that will be visible in the roster list while the end of conference message is being
displayed.
Note: Not available for CMS.
Pexip reverse proxy / conference node Enter the URL for the Pexip reverse proxy / conference node.
Note: Not required for CMS.
Send Conference Dial-in Information Emails This section specifies whether the organizer, internal guests and external guests should receive a dial-in
information email when meetings are booked.
To edit the email templates, go to C:\SynergySKY\SynergySKYEnterpriseScheduling\emailTemplates and
manually edit the templates using an HTML editor. See "Configuring Email templates" on page 49.
Note: The email domain list in the Matching Rules tab is used to determine which guest participants are
internal/external.
One-Time-VMRs Specify who will receive the dial-in information email when a one-time-vmr meeting is booked.
Skype Meetings Specify who will receive the dial-in information email when a Skype meeting is booked.
Regex rule meetings Specify who will receive the dial-in information email when a regex rule meeting is booked.
Resend dial-in information before Conference Specify whether a dial-in information email will be resent to the specified recipients shortly before the conference
Start start time.
Minutes before start to send information Specify the number of minutes before the conference start time that the dial-in information email will be resent to
the specified recipients.
Page 42 of 73You can also read