Elisa Videra Cloud Connect Meet User Guide v1.2 - Elisa Videra
←
→
Page content transcription
If your browser does not render page correctly, please read the page content below
Elisa Videra                            Elisa Videra Cloud Connect Meet User Guide   1/47

                                    Elisa Videra Cloud Connect Meet
                                                         User Guide v1.2

Copyright © 2020 Elisa Videra Ltd. All rights reserved
Elisa Videra                            Elisa Videra Cloud Connect Meet User Guide                                                                            2/47

            Table of contents
            1.         INTRODUCTION........................................................................................................................ 4

                 1.1       Video best practice ............................................................................................................. 4

            2.         WELCOME TO ELISA VIDERA CLOUD CONNECT MEET ............................................................ 5

                 2.1       Creating a meeting invitation ............................................................................................. 7

                       2.1.1      Creating an invitation to your personal meeting room .............................................. 7

                       2.1.2      Creating an invitation to a one-time virtual meeting room (additional service)........ 8

                 2.2       User role privileges and managing PIN codes .................................................................... 9

                       2.2.1      User role privileges ..................................................................................................... 10

                       2.2.2      Managing PIN codes ................................................................................................... 11

                 2.3       Managing room layout and speaker name visibility .......................................................... 12

                 2.4       Managing user account password ...................................................................................... 15

            3.         JOINING A MEETING VIA A BROWSER ..................................................................................... 16

                 3.1       Technical requirements ...................................................................................................... 16

                       3.1.1      Technical requirements for workstations ................................................................... 16

                       3.1.2      Technical requirements for mobile devices................................................................ 17

                 3.2       How to adjust call settings prior to joining a meeting ....................................................... 18

                 3.3       How to join a meeting via a browser.................................................................................. 22

                 3.4       In-call controls .................................................................................................................... 26

                       3.4.1      Enabling and using screen sharing .............................................................................. 39

            4.         JOINING A MEETING VIA SKYPE FOR BUSINESS ....................................................................... 43

                 4.1       How to join a meeting via Skype for Business .................................................................... 43

            5.         JOINING A MEETING VIA A VIDEOCONFERENCING DEVICE..................................................... 45

            6.         JOINING A MEETING VIA A MOBILE PHONE (AUDIO ONLY) .................................................... 46

            7.         TRANSFERRING CALLS BETWEEN DEVICES .............................................................................. 47

Copyright © 2020 Elisa Videra Ltd. All rights reserved
Elisa Videra                            Elisa Videra Cloud Connect Meet User Guide                                                                   3/47

                 7.1       Dialing in via a web browser............................................................................................... 47

                 7.2       Dialing in via Skype for Business......................................................................................... 47

                 7.3       Dialing in via a videoconferencing endpoint ...................................................................... 47

                 7.4       Dialing in via a mobile phone ............................................................................................. 47

Copyright © 2020 Elisa Videra Ltd. All rights reserved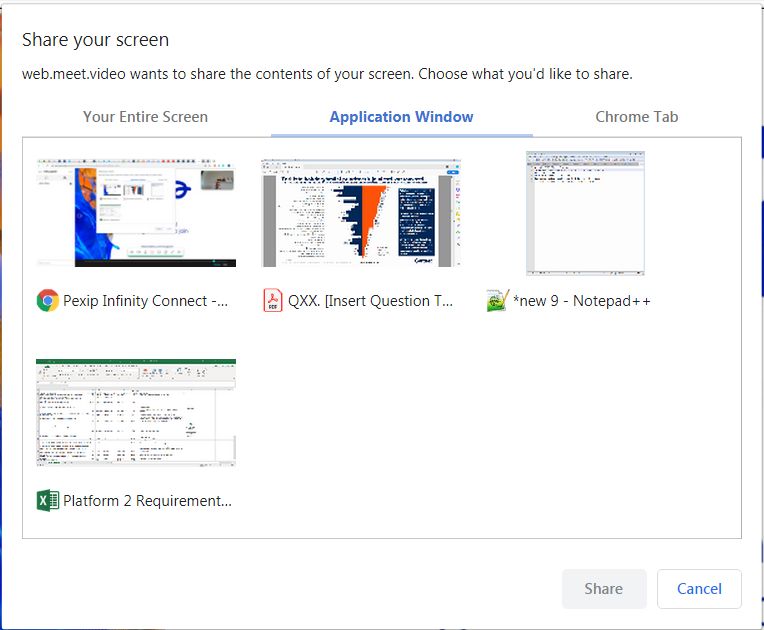
Elisa Videra                            Elisa Videra Cloud Connect Meet User Guide                               4/47

            1. INTRODUCTION

            The Elisa Videra Cloud Connect Meet service provides enterprise customers with a cloud-based global
            videoconferencing capability.

            This guide has been designed to provide the user with simple step-by-step instructions on how to use
            Cloud Connect Meet and its key features with a number of devices.

            1.1 Video best practice
            Cloud Connect Meet makes it easy to host and participate in video meetings, regardless of the device
            you are using. It provides a consistent user experience that removes complexity from the user.
            However, there are a few tips that can make your video meeting as effective as possible:

                  •     Remember that a video meeting is still a meeting and normal business codes of etiquette and
                        dress code apply.
                  •     Try to make yourself familiar with the system or application you intend to use for video prior
                        to your video meeting to avoid an awkward ten minute delay while you try and work things
                        out.
                  •     If you are using a room-based system, ensure the microphone is not too close to the system
                        speakers and near the attendees instead (please note participants do not need to be right on
                        top of the microphone to be heard).
                  •     Make sure there is nothing blocking the microphone for the participants that wish to speak.
                  •     Make sure the microphone is positioned away from other noise sources such as computer
                        fans or projectors

Copyright © 2020 Elisa Videra Ltd. All rights reserved
Elisa Videra                            Elisa Videra Cloud Connect Meet User Guide                            5/47

            2. WELCOME TO ELISA VIDERA CLOUD CONNECT MEET

            All Elisa Videra Cloud Connect Meet users will be provided with a personal virtual meeting room where
            they can hold their meetings. In addition, users who also make use of Cloud Connect Meet additional
            services will have the ability to create one-time virtual meeting rooms. The Cloud Connect Meet add-
            in for Outlook enables users to create meeting invitations, add their meetings to their Outlook
            calendar and to manage their virtual meeting room settings. In this section, you will find information
            on all of the above functions.

            Once an Elisa Videra Cloud Connect Meet user account has been created for you, you will receive
            either one or two emails from donotreply@elisa.com depending on how your account has been
            created.

            The first email contains your username and your personal virtual meeting room details including its
            call address:

                                                         Picture 1: Virtual Meeting Room details

            If you only receive one email (see Picture 1: Virtual Meeting Room details), your user account has been
            provisioned with Active Directory Integration and you can log into the service using your workstation
            password.

            If your user account has been created manually, you will receive two emails. The second one contains
            a separate password that you should use for logging in (see Picture 2).

Copyright © 2020 Elisa Videra Ltd. All rights reserved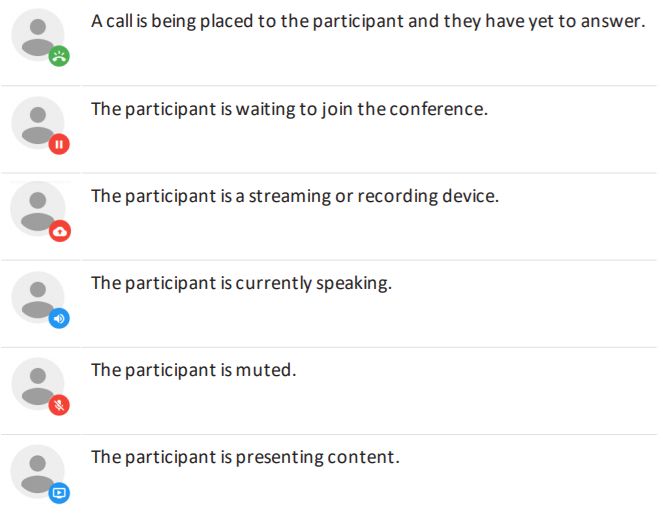
Elisa Videra Elisa Videra Cloud Connect Meet User Guide 6/47
Picture 2: Cloud Connect Meet password
The Outlook add-in can be downloaded from https://meet.video/outlook.vsto.
Please note! The Outlook add-in must be downloaded using Internet Explorer. If the add-in is
downloaded with another browser, it will not be installed properly.
Once you have downloaded and installed the Outlook add-in, take the following steps to sign in to
Cloud Connect Meet:
Go to the main view in Outlook and click on New Meeting in the Cloud Connect Meet add-in in the
upper right corner of the window. Choose Credentials and fill in your username and password.
The Cloud Connect Meet Outlook add-in supports the following functionalities:
• Meetings
o Meeting invitations to your personal meeting room
o Meeting invitations to a one-time virtual meeting room (additional service)
The meeting may be joined 30 minutes before its scheduled starting time
• Virtual meeting room settings
o Manage your personal meeting room and one-time virtual meeting room PIN codes
o Manage room layout and enable or disable speaker name visibility
o Manage your user account password
Copyright © 2020 Elisa Videra Ltd. All rights reserved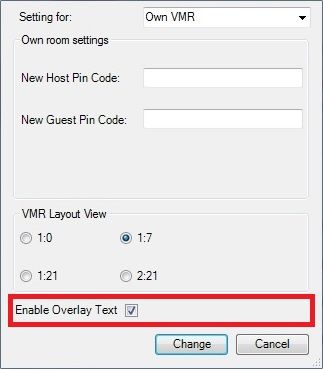
Elisa Videra                            Elisa Videra Cloud Connect Meet User Guide                            7/47

            2.1 Creating a meeting invitation
            With the Outlook add-in, you can create a meeting invitation and add the meeting to your Outlook
            calendar. You can create an invitation to your personal meeting room or, if you also make use of the
            Cloud Connect Meet additional services, to a one-time virtual meeting room.

            2.1.1 Creating an invitation to your personal meeting room

            You can create a meeting invitation to your personal meeting room by following these simple steps:

            Create a new event in your Outlook calendar. Go to the Cloud Connect Meet add-in in the upper right
            corner of the window, click on New Meeting and choose Settings.

                                                         Picture 3: Cloud Connect Meet add-in in Outlook

            Make sure that the option Own VMR is chosen in the Setting for field. Add or change the meeting PIN
            code (see section 2.2.2), adjust room layout and speaker name visibility settings (see section 2.3) and
            apply by clicking Change. If you do not wish to set a PIN code for the meeting and you do not make
            use of the Cloud Connect Meet additional services, you may skip this step.

            Click on the Elisa Videra logo in the upper part of the Cloud Connect Meet add-in. A meeting invitation
            containing joining instructions is created automatically. Add the users you would like to invite to the
            meeting and fill in the meeting subject, start time and end time.

Copyright © 2020 Elisa Videra Ltd. All rights reserved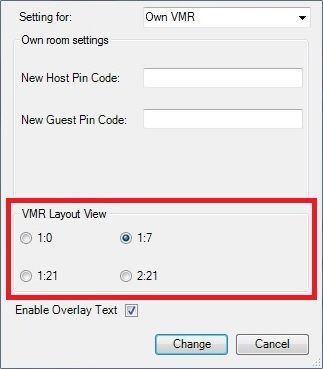
Elisa Videra                            Elisa Videra Cloud Connect Meet User Guide                                  8/47

                                              Picture 4: Meeting invitation to your personal virtual meeting room

            2.1.2 Creating an invitation to a one-time virtual meeting room (additional service)

            You can create a meeting invitation to a one-time virtual meeting room by following these simple
            steps:

            Create a new event in your Outlook calendar. Go to the Cloud Connect Meet add-in in the upper-right
            corner of the window, click on New Meeting and choose Settings.

                                                         Picture 5: Cloud Connect Meet add-in in Outlook

Copyright © 2020 Elisa Videra Ltd. All rights reserved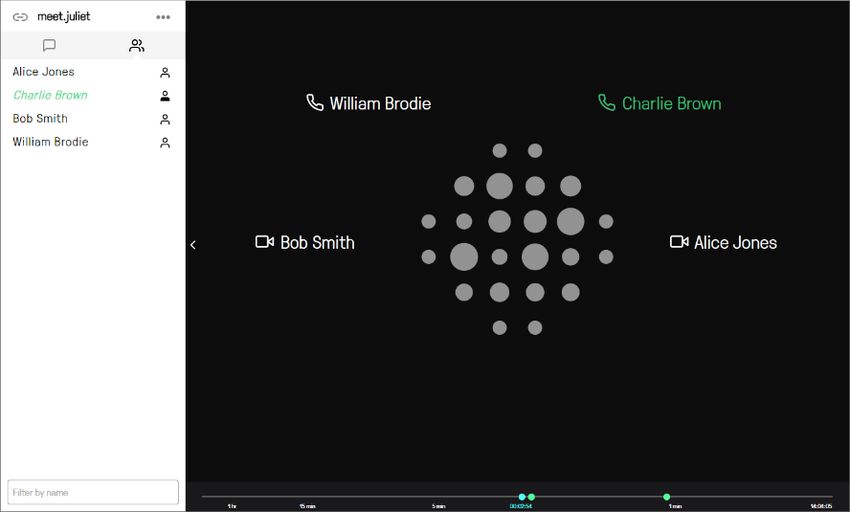
Elisa Videra                            Elisa Videra Cloud Connect Meet User Guide                                 9/47

            In the Setting for field, choose One time VMR from the drop-down list. Add or change the meeting PIN
            code (see section 2.2.2), adjust room layout and speaker name visibility settings (see section 2.3) and
            apply by clicking Change.

            Click on the Elisa Videra logo in the upper part of the Cloud Connect Meet add-in. A meeting invitation
            containing joining instructions is created automatically. Add the users you would like to invite to the
            meeting and fill in the meeting subject, start time and end time.

                                                Picture 6: Meeting invitation to a one-time virtual meeting room

            2.2 User role privileges and managing PIN codes
            Participants can join the meeting either as Guests or Hosts, and the meeting organizer can manage
            role assignation with PIN codes. If no PIN code has been set, all participants will join the meeting as
            Hosts by default. In this section, you will find information on Host and Guest privileges and managing
            PIN codes.

Copyright © 2020 Elisa Videra Ltd. All rights reserved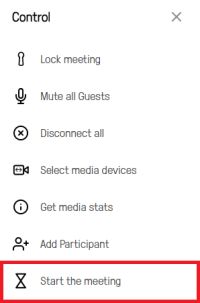
Elisa Videra                            Elisa Videra Cloud Connect Meet User Guide                                  10/47

            2.2.1 User role privileges

            Host and Guest participants are granted a different set of privileges:

              Hosts                                                      Guests
              • determine the start time of the meeting:                 • cannot join the meeting before the first Host
                 the meeting begins once the first Host has                 has joined but will be redirected to wait in
                 joined the meeting                                         the lobby. Guest will see a holding image
              • determine the end time of the meeting: the                  and hear a message stating that they are
                 meeting ends five minutes after the last                   waiting for the conference Host to join
                 Host has left the meeting                               • will be automatically disconnected from the
              • are able to join a locked conference that                   meeting five minutes after the last Host has
                 has a Host PIN by entering the PIN code                    left the conference
                 upon joining                                            • cannot join a locked conference without the
                                                                            acceptance of a Host participant
              •     can use a wider set of in-call controls than
                                                                         • have limited access to in-call controls
                    Guest participants. Only Hosts have access
                    to the following controls:
                          o      disconnecting participants from the
                                 meeting
                          o      adding participants to the meeting
                          o      transferring participants to another
                                 virtual meeting room
                          o      changing the role of other
                                 participants in the meeting
                          o      muting and unmuting an individual
                                 participant or all Guest participants
                                 simultaneously
                          o      stop sharing content to certain
                                 participants
                          o      locking and unlocking a conference
                                 and allowing users to join a locked
                                 meeting
                          o      sending DTMF tones
                          o      disconnecting all participants from
                                 the meeting

            You will find more detailed information on the above mentioned in-call controls in sections 3.4 (when
            joining the meeting via a browser), 4.1 (when joining the meeting via Skype for Business), 5 (when
            joining the meeting with a videoconferencing device) and 6 (when joining the meeting with a mobile
            phone).

Copyright © 2020 Elisa Videra Ltd. All rights reserved
Elisa Videra Elisa Videra Cloud Connect Meet User Guide 11/47
2.2.2 Managing PIN codes
You can set a PIN code for your personal meeting room or for a one-time virtual meeting room in the
Settings tab in the Cloud Connect Meet Outlook add-in. You can set a PIN code for Host participants
only or, alternatively, different PIN codes for Hosts and Guests. Please note that the PIN code needs
to be set before creating a meeting invitation.
If you set a PIN code for your personal meeting room (Own VMR selected in the Setting for field), the
change will take two minutes to be applied and will apply until the PIN code is modified again.
If you set a PIN code for a one-time virtual meeting room, the PIN code needs to be set when creating
the meeting invitation. The PIN code will apply to that meeting only.
In the table below, you can find a description on how setting a PIN code affects the meeting and
participant privileges.
Effect on the meeting Setting the Setting the
Host PIN code Guest PIN code
PIN code for Participants who would like to join the Go to the Leave the New
Host meeting as Hosts and have Host privileges Cloud Connect Guest Pin Code
participants must enter the PIN code upon joining. The Meet Outlook field blank.
only meeting will start when the first Host has add-in, click on
joined and end five minutes after the last Host New Meeting
has left the meeting. and choose
Settings. Enter
Other participants do not need to enter a PIN a PIN code of
code and they will have Guest privileges. your choice in
Guest participants will see the notification the New Host
Great, you’re in! Waiting for others to join Pin Code field.
until the first Host has joined the meeting.
Please note! Remember to forward the Host
PIN to the users you would like to grant Host
privileges. The PIN code will not be visible in
the meeting invitation.
Different Participants who would like to join the Enter a PIN Enter a PIN code
PIN codes meeting as Hosts and have Host privileges code of your of your choice in
for Host and must enter the PIN code upon joining. The choice in the the New Guest
Guest meeting will start when the first Host has New Host Pin Pin Code field.
participants joined and end five minutes after the last Host Code field. Host and Guest
has left the meeting. Host and Guest PINs must be
PINs must be different.
Other participants must enter the Guest PIN different.
code upon joining and they will have Guest
privileges. Guest participants will see the
notification Great, you’re in! Waiting for
others to join until the first Host has joined the
meeting.
Copyright © 2020 Elisa Videra Ltd. All rights reservedElisa Videra Elisa Videra Cloud Connect Meet User Guide 12/47
Effect on the meeting Setting the Setting the
Host PIN code Guest PIN code
Please note! Remember to forward the Host
PIN to the users you would like to grant Host
privileges. Only the Guest PIN will be visible in
the meeting invitation.
2.3 Managing room layout and speaker name visibility
The meeting room default layout is the following:
Picture 7: Virtual room default layout
The speaker’s video is shown in the main window and other participants are shown in a row of
thumbnails at the bottom of the screen. Up to seven participants’ video can be shown in the thumbnail
row, and the number of additional participants is indicated in the lower right corner. Phone
participants are shown on the left side.
You can edit the room layout by going to the Cloud Connect Meet Outlook add-in, clicking on New
Meeting and selecting Settings. Available layouts are shown under VMR Layout View.
Copyright © 2020 Elisa Videra Ltd. All rights reservedElisa Videra Elisa Videra Cloud Connect Meet User Guide 13/47
Picture 8: Edit virtual meeting room layout
If you edit your personal meeting room layout settings (Own VMR selected in the Setting for field –
see Picture 8), the change will take two minutes to be applied and will apply until the layout settings
are modified again.
If you edit a one-time virtual meeting room layout settings, the changes need to be made when
creating the meeting invitation. The changes will apply to that meeting only.
The layout option 1:7 means that the default layout is chosen (see Picture 7).
Choosing the option 1:0 will show the speaker’s video in full screen and the number of additional
participants in the lower right corner.
Picture 9: Option 1:0. The speaker’s video is shown in full screen and the number of additional participants in the lower
right corner
Copyright © 2020 Elisa Videra Ltd. All rights reservedElisa Videra Elisa Videra Cloud Connect Meet User Guide 14/47
Choosing the option 1:21 will show the speaker’s video in the main window and other participants in
three rows of thumbnails at the bottom of the screen. Up to 21 participants’ video can be shown in
the thumbnail rows, and the number of additional participants is indicated in the lower right corner.
Phone participants are shown on the left side.
Picture 10: Option 1:21. The speaker’s video is shown in the main window, other participants’ video in three thumbnail
rows, the number of additional participants in the lower right corner and phone participants on the left side
Choosing the option 2:21 will show two participants’ video in the main window and other participants
in three rows of thumbnails at the bottom of the screen. Up to 21 participants’ video pictures can be
shown in the thumbnail rows, and the number of additional participants is indicated in the lower right
corner. Phone participants are shown on the left side.
Picture 11: Option 2:21. Two participants’ video is shown in the main window, other participants’ video in three
thumbnail rows, the number of additional participants in the lower right corner and phone participants on the left side
Copyright © 2020 Elisa Videra Ltd. All rights reservedElisa Videra Elisa Videra Cloud Connect Meet User Guide 15/47
By default, the current speaker’s or presenter’s name is visible to all participants. You can hide the
speaker’s name by going to the Cloud Connect Meet Outlook add-in and unselecting the Enable
Overlay Text option in the Settings menu.
Picture 12: Speaker name visibility. Hide the speaker’s or the presenter’s name by unselecting Enable Overlay Text
If you edit speaker name visibility in your personal meeting room (Own VMR selected in the Setting
for field – see Picture 12), the change will take two minutes to be applied and will apply until the
setting is modified again.
If you the edit speaker name visibility in a one-time virtual meeting room, the changes need to be
made when creating the meeting invitation. The changes will apply to that meeting only.
2.4 Managing user account password
You can change your password in the Settings menu in the Cloud Connect Meet Outlook add-in.
If you have logged in to the service with your workstation password, your user account password will
change when your workstation password changes. Therefore if you change your workstation
password, you will need to update your new password to the Outlook add-in manually. You can do
this by clicking on New meeting and choosing Credentials. Type your new password into the Password
field and select Save.
Copyright © 2020 Elisa Videra Ltd. All rights reservedElisa Videra Elisa Videra Cloud Connect Meet User Guide 16/47
3. JOINING A MEETING VIA A BROWSER
The Elisa Videra Cloud Connect Meet service can be accessed from any browser that supports WebRTC
technology. This technology enables the browser to send and receive high-quality real-time video. In
this section, you will find information on the Cloud Connect Meet web interface and its functionalities.
NEW! You can now also place calls with Android and iOS mobile devices. You can find the technical
requirements in section 3.1.2 and instructions for joining in section 3.3.
3.1 Technical requirements
3.1.1 Technical requirements for workstations
The browser-specific technical requirements and special features for workstations are listed in the
table below.
Note We strongly recommend using the latest publicly-released version (i.e. "stable version" or
"supported release") of your chosen browser.
Browser Version Notes Screen sharing Operating system
Google Chrome 61 or Supports screen
WebRTC later sharing and PDF
(VP8/VP9/H.264) and image file
sharing via
plugin
Mozilla Firefox 60 ESR or Supports screen
later sharing and PDF
and image file
sharing
Microsoft 11 or Requires Flash Player 11 Supports PDF Not supported on
Internet Explorer later and later ActiveX® plugin, and image file Windows 10
and must not be in sharing only
Compatibility View. As IE
always uses the legacy web
application, it is preferable
to use another browser
Microsoft Edge 41 or Supports PDF
ORTC later and image file
sharing only
Apple Safari on 11.1 or Safari versions 6-10 require Supports PDF Mac OS X only
macOS later Adobe Flash Player 11 and and image file
the later plug-in, and uses sharing only
the legacy web application
Opera 53 or Supports PDF
later and image file
sharing only
Copyright © 2020 Elisa Videra Ltd. All rights reservedElisa Videra Elisa Videra Cloud Connect Meet User Guide 17/47
Additional notes:
• All browsers support RTMP media streaming
• All browsers support instant messaging between the web interface and the Skype for
Business client
3.1.2 Technical requirements for mobile devices
Technical requirements for mobile devices are listed in the table below.
Operating system Supported browsers Screen sharing
Android Google Chrome WebRTC only Supports image file
sharing only
iOS 11.2 or later Apple Safari only Supports image file
sharing only
Additional notes:
• Use of the latest browser version is recommended
• Mobile devices support instant messaging between the web interface and the Skype for
Business client
Copyright © 2020 Elisa Videra Ltd. All rights reservedElisa Videra Elisa Videra Cloud Connect Meet User Guide 18/47
3.2 How to adjust call settings prior to joining a meeting
When you go first time to https://meet.video, you will be asked to allow access to your camera and
microphone, and to provide your name. This is all that is needed before you make a call, but there are
also additional settings you can configure.
1. If prompted, allow access to your camera and microphone
2. If prompted, enter your name
Copyright © 2020 Elisa Videra Ltd. All rights reservedElisa Videra Elisa Videra Cloud Connect Meet User Guide 19/47
3. If required, turn on your camera and microphone by clicking on the icons in the middle and
bottom right of the video window:
4. If required, select the Settings icon underneath the video window to select which
camera, microphone and speakers to use:
Copyright © 2020 Elisa Videra Ltd. All rights reservedElisa Videra Elisa Videra Cloud Connect Meet User Guide 20/47
Configuring your client:
Setting Description
Home page
The name that will appear to other conference participants.
Name
You'll be asked to enter your name the first time you use the client, but you
can change your name from the home page by clicking on it.
Settings
Shows the currently selected camera. Select this option to change the
camera to use.
Camera When the selected camera is working properly, your self-view will be
shown in the main video window.
Shows the currently selected microphone. Select this option to change the
microphone to another.
When the selected microphone is working properly, a green bar will appear
under the main video window when audio is detected. The length of the
Microphone
bar represents the level of audio volume being picked up by the
microphone.
Shows the currently selected speakers or headset. Select this option to
change the speakers to use.
To check that the selected speakers are working properly, select the
Speakers
speaker icon from the bottom left of the main video window and then
select the speaker to use. A tone will be played from that speaker.
The maximum bandwidth for the call, and the bandwidth at which the
initial call attempt will be made. Note that calls may be temporarily down
speeded due to network conditions.
The default is Medium (up to 576kbps), but if you are on a cellular
connection or slow Wi-Fi connection you may wish to reduce this to Low
Bandwidth
(up to 256kbps).
You should also reconnect using a lower bandwidth if you experience slow
or low-quality video.
Allows you to select the language from a drop-down menu to use in your
Cloud Connect Meet client.
Language Note If your browser or device's default language is supported by the web
app, that language will be used automatically.
Advanced settings
Confirm when When this option is selected, you must confirm each time you wish to
disconnecting disconnect from a meeting. This prevents you from accidentally
disconnecting yourself. This is on by default.
Copyright © 2020 Elisa Videra Ltd. All rights reservedElisa Videra Elisa Videra Cloud Connect Meet User Guide 21/47
Setting Description
View incoming This setting determines how presentations from other participants are
presentation in full initially received by you.
motion
Presentations can be received in two formats:
• A lower-bandwidth series of still images (suitable for documents
and screens being shared). With this option, Cloud Connect Meet
periodically takes a snapshot of the presentation and converts it to
JPG format, and sends that to the Cloud Connect Meet client at
between 0.5 to 1 fps. For this reason, presentations that contain a
lot of movement may appear jerky to clients using this option.
• A higher-bandwidth full motion stream (suitable for presentations
with a lot of movement). With this option, Cloud Connect platform
sends the presentation to the Cloud Connect Meet client as a video
stream at up to 30 fps, so movement will appear smooth.
• The actual frame rate used will depend on the capabilities of the
endpoint that is sending the presentation. Cloud Connect Meet
clients can send presentations at up to 15 fps; other clients may
send at a higher frame rate.
This setting is off by default: presentations are initially received as still
images, and you can subsequently elect to view them in full motion by
selecting the HD button at any time during the call. However, when View
incoming presentation in full motion is selected, presentations received by
you will always be shown in full motion by default, and you can then elect
to view them as still images.
Send anonymous When this option is selected, anonymous information about how the client
statistics is being used is sent to Elisa Videra for product improvement purposes. This
is on by default.
High contrast When this option is enabled, there is a higher contrast between the
foreground and background elements of the user interface, making them
more legible. This is off by default.
Screen sharing This setting determines the frame rate used when you share your screen
quality with other participants. A lower frame rate will result in images with
greater definition or Sharpness and is best for static presentations; a higher
frame rate will be less sharp and is best used for content where there is
more Motion. The default framerate is 2 frames per second.
About this app
Reset app The Reset option clears the app storage and any registration settings.
Logs If you are having issues with your web app, Elisa Videra may ask you to
Download logs to obtain logging information about the last call.
Copyright © 2020 Elisa Videra Ltd. All rights reservedElisa Videra Elisa Videra Cloud Connect Meet User Guide 22/47
3.3 How to join a meeting via a browser
Use of a headset is recommended when using the web application.
To join a meeting, follow the steps below:
What How
1. Ensure that your camera and microphone are enabled and working
correctly:
o You should see your own image in the video window.
o The microphone icon should be green and you should see a green
bar under the video image indicating the volume of audio being
detected.
Joining a call
with audio and
video
2. Select .
3. In the box at the top right of the window, enter the address of the person
or meeting you wish to join:
4. Either click on the icon to the right of the box, or press enter.
1. Ensure that your microphone icon is green and you see a green bar
under the video image indicating the volume of audio being detected.
2. Select .
3. In the box at the top right of the window, enter the address of the person
or meeting you wish to join:
Joining a call
with audio only
4. Either click on the icon to the right of the box, or press enter.
When you have joined the call, you will be able to hear other participants and
they will be able to hear you, and you will be able to send and receive content,
but you will not send or receive any video. Instead, in the main video window
you will see an infographic of the participants in the call:
Copyright © 2020 Elisa Videra Ltd. All rights reservedElisa Videra Elisa Videra Cloud Connect Meet User Guide 23/47
What How
1. Select .
2. In the box at the top right of the window, enter the address of the meeting
you wish to join:
Joining a
meeting as
a presentation
and control-
only participant 3. Either click on the icon to the right of the box, or press enter.
You will join the meeting as a presentation and control-only participant - you
will not be sending any audio or video, and you will not receive any audio or
video from other participants. However, you will be able to view content that
others are sharing, and share content with others. You will also have access to
the participant list and events, and be able to control the conference (if you are
a Host).
For some meetings, you will be offered the ability to enter a PIN. If this is your
VMR, enter your Host PIN. If not, the meeting organizer should have informed
Entering the PIN you of the PIN to use. If you haven't been given a PIN or no PIN is required,
select Join to join as a Guest:
Copyright © 2020 Elisa Videra Ltd. All rights reservedElisa Videra Elisa Videra Cloud Connect Meet User Guide 24/47
What How
The PIN determines whether you join the meeting as a Host or Guest. Hosts can
control the meeting and the other participants; Guests can't control the
meeting but can still see and hear the other participants, and share content.
Other ways to select the person or meeting to call
You can add the addresses of people or meetings you call frequently to
your Favourites list.
To do this:
1. Select the add icon to the right of the Favourites section.
2. Enter the address of the person or meeting room, and the name you want
to remember it by:
Favourites
3. Select the icon or press enter.
You can also add a favourite from the Recents list (see below).
The addresses of any people or meetings you have previously called, or
received calls from, will appear in the Recents list.
• To call anyone in this list again, simply click on the address.
• To use an address in the list as a basis for a new address to call (for
Recents example if you have mis-typed an address), select the edit icon to the
right of the address. The existing address will appear in the box at the top
of the list; from here you can edit it before placing the call.
• To add an address in the list to your Favourites (see above), select the star
icon to the right of the address.
Copyright © 2020 Elisa Videra Ltd. All rights reservedElisa Videra Elisa Videra Cloud Connect Meet User Guide 25/47
What How
Advanced options
You can use the Cloud Connect Meet web app to pair with another video (or
audio) device. When paired, your web app will join the meeting as
a presentation and control-only participant, and the paired device will join with
video (or audio). Paired devices are added automatically to any Virtual Meeting
Room or Virtual Auditorium you join as a Host from the web app. The paired
device will be disconnected automatically from the meeting when you
disconnect your client.
Pairing is useful if, for example, you often make calls from a dedicated meeting
room with a videoconferencing endpoint that you use for the main video, but
you also want to use web app to control the meeting and view content.
To pair with an alternative device:
1. From the bottom of the call panel, select Pair with a device.
2. From the Device Pairing panel, select the + icon in the top right corner.
3. Enter the address of the device, and the name by which you want to
remember it.
By default, the paired device will be set to Showing presentation on this
device, meaning that any content being shared, as well as the main video,
will be shown. If you don't want content to be sent to the device (for
Pairing with an example, if you intend to view content on your Cloud Connect Meet client),
alternative click on the option; it will change to Presentation hidden on this device,
video/audio meaning that the device will only show the main video stream. Click the
device option again to toggle back to showing content.
4. Select the icon or press Enter.
5. The new device will appear in the list. To use it for your next call, click on it
- the selected device will appear in blue:
Copyright © 2020 Elisa Videra Ltd. All rights reservedElisa Videra Elisa Videra Cloud Connect Meet User Guide 26/47
What How
6. To return to the main call page, select the icon at the bottom left of
the panel.
Now, at the bottom left of the home screen you'll see Calling using …followed
by the name of the selected paired device:
When a paired device is selected, whenever you place a video (or audio-only)
call to a VMR, the selected device will be added to that VMR as a video (or
audio-only) participant, and the web app will join the VMR as a presentation
and control-only participant.
To stop using the additional device:
1. Click on the Calling using ... link at the bottom left of the home screen.
2. From the list of devices, select Default.
The button at the bottom of the call panel will change to Pair with a device —
this means that only web app will be used the next time you place a call.
3.4 In-call controls
When you connect to a meeting using a browser, you can make use of several in-call controls.
You can find the participant list in the upper left corner of the window. Participant icons show each
user’s status:
Copyright © 2020 Elisa Videra Ltd. All rights reservedElisa Videra Elisa Videra Cloud Connect Meet User Guide 27/47
Picture 13: Participant icons show each user’s status
In the top left corner of the window, you can find a chat window where participants who have joined
the meeting either via browser or Skype for Business can chat with each other. The chat window will
not be visible for phone or videoconferencing endpoint participants.
Other in-call controls are listed in the table below. Screen sharing is supported in both Google Chrome
and Mozilla Firefox. Other browsers only support PDF and image file sharing. For more information on
enabling and using screen sharing, go to section 3.4.1.
Please note! This guide has been designed for Google Chrome, Mozilla Firefox, Safari and Internet
Explorer. If you join a meeting using another browser, you may notice slight differences in the in-call
controls. In the What column, icons indicate which browsers support each in-call control if it is not
support by all of them (Google Chrome , Mozilla Firefox , Safari and Internet Explorer
).
What ? How ?
From the toolbar at the bottom of the window, select Enter Host PIN.
Enter Host PIN (if
joined as guest)
1. From the top right of the side panel, select Control .
2. Select Select media devices.
Change your
camera, 3. Select the camera, microphone or speakers/headset, and then choose a new
microphone or one from the list of available options.
speakers during a
call
Copyright © 2020 Elisa Videra Ltd. All rights reservedElisa Videra Elisa Videra Cloud Connect Meet User Guide 28/47
What ? How ?
From the toolbar at the bottom of the screen, select Float video window.
The main video window (including thumbnails) will shrink and be pinned on top of
Pin a minimized all your other application windows. You can drag it to a suitable location.
version of
the video To return to the Chrome tab with the video window resized within it, from the
window to your pinned window select Back to tab.
screen To close the pinned video window, from the toolbar select Reset video window.
1. From the toolbar at the bottom of the window, select Share my screen.
2. Select the window, screen or tab you want to share.
When you are sharing, the icon changes to blue. To stop sharing, select the Stop
Share your screen presenting button.
with all other The best way to share a PowerPoint presentation is to start the Slide Show from
participants within PowerPoint first, and then tab to Cloud Connect Meet client, share your
screen, and select the Slide Show window.
Note that the ability to present into a conference may have been restricted to
Hosts only.
1. From the toolbar at the bottom of the screen, select Present files.
The Presentation screen will appear:
2. Select +, or drag and drop the file(s) you want to share into
the Presentation window. You can add multiple files, and they can be a
Share images or combination of images (.JPEG, .BMP, .PNG, or .GIF) and PDFs (if supported by
PDFs with all your device). Each image will be converted into an individual slide, as will each
other participants page of each PDF.
3. By default, every slide will be selected for presenting, but you can click on
individual slides to select and deselect them:
Copyright © 2020 Elisa Videra Ltd. All rights reservedElisa Videra Elisa Videra Cloud Connect Meet User Guide 29/47
What ? How ?
4. When you have selected all the slides you want to share, select Present. Use
the left < and right > on-screen controls, or the arrow keys on your keyboard, to
scroll through the slides. You also have the option to View presentation in a
separate window.
5. To stop sharing the slides, from the toolbar select Stop presenting.
Note that the ability to present into a conference may have been restricted to
Hosts only.
When a participant starts a presentation, you will automatically see the content
View a they are sharing as your main image, and the image of the participants will reduce
presentation to a small thumbnail at the top left corner.
being shown by
You can toggle between viewing the presentation and viewing the participants by
another
clicking on the thumbnail.
participant
You can also click and drag this window to move it.
Whether you are the presenter or a participant, you can view the current
presentation in a separate pop-out window.
View a To do this, from the bottom right of the screen select View presentation in new
presentation in a window. To close the window, from the bottom right of the screen select Close
separate window separate presentation window.
When a participant is showing a presentation, by default you receive it as a series
of still images. This is suitable for documents and screens being shared, but if the
presentation contains a lot of movement it may appear jerky. If this is the case, you
View a can elect to receive the presentation in full motion as HD video.
presentation at a
higher (or lower) To do this, from the bottom right of the screen select View full motion presentation.
refresh rate To return to the default view, select View normal presentation.
(Requires Host privileges)
When a participant is sharing a presentation, other participants receive both the
presentation and the main video. However, you may want to receive just the main
video on a particular endpoint (for example, if you are using a meeting room
system for audio and video, but you are already viewing the presentation on
your Cloud Connect Meet client, you could stop sending presentation to the
meeting room system). To do this, from the Participant list, select the participant
and then select Hide presentation here.
Stop/start sending
presentation to a
participant
Copyright © 2020 Elisa Videra Ltd. All rights reservedElisa Videra Elisa Videra Cloud Connect Meet User Guide 30/47
What ? How ?
(For users who have initially joined without audio and video)
From the toolbar at the bottom of the window, select Start Video.
Start sending and
receiving video
(For users who have initially joined without audio and video)
From the toolbar at the bottom of the window, select Start audio.
Start sending and
receiving audio
From the toolbar at the bottom of the window, select Turn my camera off or Turn
my camera on.
Stop/start sending Other participants will no longer be able to see you, but you will be able to see
your video to them.
other participants
From the toolbar at the bottom of the window, select Turn my microphone off or
Turn my microphone on.
Stop/start sending Other participants will no longer be able to hear you, but you will be able to hear
your audio to them.
other participants
The video of yourself that is being sent to other participants is shown in a
thumbnail at the top right of the screen. To hide this, click on the image. It will be
replaced by a small Show self-view icon; select this to view your image again.
Stop/start viewing
the video of
yourself
To hide or show the side panel (containing the Participant list tab and the Events
tab, and the Control menu), select the Hide side panel < and Show side panel >
Show or hide the icons. These will be at the middle left or bottom of the screen, depending on your
side panel device and screen width.
For a complete list and details of each of the events represented in the timeline at
the bottom of the screen, from the top of the side panel select the Events tab:
View details of
events
Copyright © 2020 Elisa Videra Ltd. All rights reservedElisa Videra Elisa Videra Cloud Connect Meet User Guide 31/47
What ? How ?
The timeline shown at the bottom of the screen gives a visual overview of the
events during the course of the call:
You can click on any of the events for more information about it (note that this
feature is not available if the desktop or web app window has been narrowed to
the point where the control panel moves below the video window).
After you have been in the call for more than 10 minutes, you will see a clock icon
at the far left of the timeline. To zoom in on any 10-minute period within the
Timeline timeline, click on the clock icon. You'll see a shaded selector:
Drag the selector to the period you wish to zoom in on:
When you are zoomed in, you can again click on any of the events to view more
information about them.
To return to the full timeline, click on the clock icon again.
A list of all other conference participants will be shown in the Participant list tab
of the control panel (which is to the left of or at the bottom of the screen,
depending on the screen width). You can scroll through this list, or use the search
box at the top of the list, to view the names of other participants or select a
particular participant to control.
You can show and hide the side panel by clicking on the Hide side panel < and Show
View a list of side panel > icons.
other conference
participants
Each person in the Participant list has an icon next to their name, representing their
role:
Hosts, who can control the meeting and other participants
View an individual
participant's role Guests
External Guests, who connected directly to an externally-hosted conference,
such as a Microsoft Teams or Skype for Business meeting, or Google Hangouts
Meet.
Copyright © 2020 Elisa Videra Ltd. All rights reservedElisa Videra Elisa Videra Cloud Connect Meet User Guide 32/47
What ? How ?
(Requires Host privileges; you cannot change your own role to Guest.)
From the Participant list, select the participant and then select Make Host or Make
Guest.
You cannot change the role of an External Guest participants (those who are
connected directly to an externally-hosted conference, such as
a Microsoft Teams or Skype for Business meeting, or Google Hangouts Meet).
Change a
participant's role
From the Participant list, select the participant and then select Show Info. This
brings up an overlay dialog containing details of the participant, including their
avatar or image if available (otherwise a placeholder image is shown).
View individual
participant's
details
Copyright © 2020 Elisa Videra Ltd. All rights reservedElisa Videra Elisa Videra Cloud Connect Meet User Guide 33/47
What ? How ?
Click users name and select Spotlight. Spotlight will lock specific user to the main
view not the active speaker
Spotlight specific
user as active
speaker
All events, including chat messages, are shown in the Events tab of the side panel
(which is to the left of or at the bottom of the screen, depending on the screen
width).
Send and receive To send a message, type it in the text box at the bottom of the panel:
chat messages,
and share online
videos and images
Messages are visible to everyone else in the conference with a chat-capable client
(such as Skype for Business or Cloud Connect Meet client).
You can also share videos and images by pasting their URL into the text box.
From the top left of the screen, select Control and then select Lock
meeting or Unlock meeting:
The impact of locking depends on whether or not the meeting has a Host PIN.
Prevent/allow
others from
joining the
meeting
Copyright © 2020 Elisa Videra Ltd. All rights reservedElisa Videra Elisa Videra Cloud Connect Meet User Guide 34/47
What ? How ?
Participants who are waiting to join a locked conference are shown in the
Participant list with a tick and cross next to their names. To allow these participants
Allow a to join the conference, select the green tick. If you do not want them to join, select
participant to join the red cross.
a locked
conference
If a Guest joins a meeting without a Host, they will be kept waiting to join until the
first Host joins, at which point all waiting Guests will automatically be allowed into
the meeting. However, this only applies if the Host has joined with audio or
video; presentation and control-only Hosts will not automatically allow Guests to
join.
If you have joined a meeting as a presentation and control-only Host and want
Guests to join, from the top left of the screen, select the menu icon and then
select Start the meeting.
Allow waiting
Guests to join a
new meeting
without a Host
1. From the toolbar at the bottom of the screen, select Add participant.
2. At the prompt, enter the address of the person you want to dial.
3. Select whether you want the participant to have Host or Guest privileges.
4. Select Call in.
The call is placed from the VMR to the participant and they will appear in the
Add a participant participant list with a green line under their name while their endpoint is ringing. If
to the conference and when the participant answers the call they will join the conference; if they do
not answer, or do not accept the call, they will disappear from the participant list.
Note. Sometimes the address you have been given to dial will start with a prefix
such as sip: or mssip: or h323: or rtmp: — if so, you should enter the prefix as well
as the address. If you adding a streaming or recording service to the meeting, the
Copyright © 2020 Elisa Videra Ltd. All rights reservedElisa Videra Elisa Videra Cloud Connect Meet User Guide 35/47
What ? How ?
address that you are dialing must start with rtmp: followed by the address of the
service.
(Requires Host privileges)
Outbound calls are placed from a Virtual Meeting Room to a participant when a
Host uses the Add participant option, or if the Virtual Meeting Room has an
automatically dialled participant configured.
To cancel an outbound call, from the Participant list, select the participant and then
select Cancel Dialout.
Cancel a call to a
participant
With the screenshot capture plugin you may take snapshot of the main video
window or from the selfview.
Take screenshot
of the main video
or selfview
Copyright © 2020 Elisa Videra Ltd. All rights reservedElisa Videra Elisa Videra Cloud Connect Meet User Guide 36/47
What ? How ?
If you want to send a link to the meeting to someone so that they can join you,
select the Share icon at the top left of the screen and then select Copy meeting link.
You can then send this link to other participants who may paste it into their
Share a link to the browser to join the meeting.
meeting
(Requires Host privileges)
From the Participant list, select the participant and then select Mute or Unmute.
Mute/unmute
When muted, an icon is shown next to the participant's name.
another
participant
(Requires Host privileges)
From the top right of the side panel, select Control and then select Mute all
Guests.
Muting all Guests
Host user may change the conference layout between Equal(4+0), 1+0, 1+7, 1+21
or 2+21. See more from 2.3 Managing room layout and speaker name visibility.
Change
conference layout
from all the
participants (Host
user required)
Copyright © 2020 Elisa Videra Ltd. All rights reservedElisa Videra Elisa Videra Cloud Connect Meet User Guide 37/47
What ? How ?
(Requires Host privileges; you must be joined over audio, or video and audio)
From the Participant list, select the participant to whom you want to send DTMF
tones, and then select Send DTMF. This will open a keypad:
Send DTMF tones
to another
participant (when
in a VMR
This feature is generally used to communicate with external systems (such as audio
bridges, automated switchboards, and recording devices) after they have been
added to the conference.
From the toolbar at the bottom of the window, select Open dialpad. This will open
a keypad.
Send DTMF
tones to the
other participant
(when in a
person-to-
person call)
Disconnect (Requires Host privileges)
another
participant From the participant list, select the participant's name and then select Disconnect.
(Requires Host privileges)
From the top right of the side panel, select Control and then
select Disconnect all.
Disconnect all
participants
(including
yourself)
Copyright © 2020 Elisa Videra Ltd. All rights reservedElisa Videra Elisa Videra Cloud Connect Meet User Guide 38/47
What ? How ?
From the toolbar at the bottom of the screen, select Disconnect.
Disconnect
yourself from the
conference
From the toolbar at the bottom of the screen, select Mute/Unmute incoming audio.
Mute/unmute the
audio coming
from the
conference
From the toolbar at the bottom of the screen, use the slider to adjust the volume
Change the level (which is indicated by the green bar under the toolbar).
volume of the
audio coming
from the
conference
(Available when connected with audio or video)
From the top right of the side panel, select Control and then select Get
media stats.
This brings up an overlay dialog that displays statistics such as the codec usage,
incoming and outgoing audio and video bitrates, and how many data packets have
been lost and received.
It also shows the software version of the client and the Cloud Connect deployment
it is connected to.
View diagnostic
information about
your call and
client
Copyright © 2020 Elisa Videra Ltd. All rights reservedElisa Videra Elisa Videra Cloud Connect Meet User Guide 39/47
3.4.1 Enabling and using screen sharing
You can share your screen to other participants with Google Chrome and Mozilla Firefox. In addition,
Google Chrome allows sharing an individual application window.
You can choose the frame rate you would like to be used during screen sharing. Different frame rates
suit different types of content. The lower the frame rate, the sharper the image - a low frame rate is
suitable for sharing static content. A higher frame rate, in turn, is ideal for content that contains
movement. You can adjust the frame rate in the web application Settings menu prior to joining the
meeting (Settings > Advanced > Screen sharing quality).
If you are using a version of Google Chrome prior to v72, before you can use Cloud Connect Meet to
share your computer screen with other conference participants, you must install the Pexip
Screensharing Extension. To do this:
1. When connected to a meeting, select Share my screen at the bottom of the window.
If the extension has not yet been installed, you will see the following message:
Picture 14: Install Pexip Screensharing Extension
Copyright © 2020 Elisa Videra Ltd. All rights reservedElisa Videra Elisa Videra Cloud Connect Meet User Guide 40/47
Select Install. You will be redirected to the Pexip Screensharing Extension download page in
Chrome web store.
2. Install the extension by clicking on in the upper right corner of the
window.
The following window will appear. Select Add extension.
Picture 15: Finalize installation by selecting Add extension
You are now ready to start sharing your screen.
When sharing content on a particular domain for the first time, you will be asked to allow using Pexip
Screensharing Extension. Select OK to continue.
Picture 16: Allow using Pexip Screensharing Extension
Choose the screen you would like to share from the Your Entire Screen tab or an application window
from the Application Window tab. Please note that any minimized windows will not appear on the list.
Start sharing by clicking on Share.
Copyright © 2020 Elisa Videra Ltd. All rights reservedElisa Videra Elisa Videra Cloud Connect Meet User Guide 41/47
Picture 17: Choose the screen or application window you would like to share
Stop sharing by selecting Stop presenting at the bottom of the window.
If you would like to share a PowerPoint presentation, start the slide show first. Then, click on Share
screen , go to the Application Window tab and select the PowerPoint Slide Show window. Start
sharing by selecting Share.
Mozilla Firefox supports content sharing without add-in. To share your screen to other participants,
follow the steps below:
1. Click on Share screen at the bottom of the window.
2. Choose the screen you would like to share from the drop-down list. Confirm by clicking on
Share screen.
Copyright © 2020 Elisa Videra Ltd. All rights reservedElisa Videra Elisa Videra Cloud Connect Meet User Guide 42/47
Picture 18: Choose the screen to be shared
3. Stop sharing by selecting Stop presenting at the bottom of the window.
Copyright © 2020 Elisa Videra Ltd. All rights reservedElisa Videra Elisa Videra Cloud Connect Meet User Guide 43/47
4. JOINING A MEETING VIA SKYPE FOR BUSINESS
In this section, you will find information on how to join a Cloud Connect Meet meeting via Skype for
Business.
The following Skype for Business versions support Cloud Connect Meet calls:
Skype for Business version Operating system
Skype for Business 2016 Windows and OSX
Skype for Business 2015 Windows
Skype for Business Mobile iOS/Android/Windows
Lync 2013 desktop client Windows and OSX
Lync 2011 desktop client OSX
Lync 2010 desktop client Windows
Skype for Business client supports both screen sharing and chat functions.
4.1 How to join a meeting via Skype for Business
You can join a meeting via Skype for Business either by clicking on the link Join using any video device
or Skype for Business on the meeting invitation or by copying the call address on it (e.g.
firstname.lastname@meet.video) to your Skype for Business client. When you have typed the call
address in the address field, point your mouse at the contact’s picture on the left and click on the
video icon to place a call to the virtual meeting room (third icon from the right, see Picture 19).
Picture 19: Type in the call address and start a video call
Copyright © 2020 Elisa Videra Ltd. All rights reservedElisa Videra Elisa Videra Cloud Connect Meet User Guide 44/47
Picture 20: You are connected to the meeting
If the meeting has a PIN code, you can enter it by following the steps below:
1. Open the keypad by clicking on the icon in the bottom right corner of the window.
2. Enter the PIN code.
You will be connected to the meeting.
You can skip entering the PIN code by adding the PIN to the call address directly. To do this, type the
call address in format firstname.lastname**PIN@meet.video and start a video call as described above.
If the conference is locked and the meeting has a Host PIN, Host participants can join the locked
meeting by bypassing the PIN code as described above.
Host participants can control the meeting by sending DTMF tones with their keypad, which can be
opened by clicking on the icon in the bottom right corner of the window. Available DTMF
controls are listed in the table below.
DTMF digits Call control
*7 Lock or unlock conference. Prevents or allows participants to join the
meeting.
*5 Mute or unmute all Guest participants.
## End conference. All participants will be disconnected from the meeting
including yourself.
Copyright © 2020 Elisa Videra Ltd. All rights reservedYou can also read