Aventura NVR Software - User Guide & Manual (Verson 1.0) - 2009 Aventura Technologies
←
→
Page content transcription
If your browser does not render page correctly, please read the page content below

Aventura NVR Software

    User Guide & Manual
        (Verson 1.0)

   © 2009 Aventura Technologies
Aventura NVR Software

© 2009 Aventura Technologies

All rights reserved. No parts of this work may be reproduced in any form or by any means - graphic, electronic, or
mechanical, including photocopying, recording, taping, or information storage and retrieval systems - without the
written permission of the publisher.

Products that are referred to in this document may be either trademarks and/or registered trademarks of the
respective owners. The publisher and the author make no claim to these trademarks.

While every precaution has been taken in the preparation of this document, the publisher and the author assume no
responsibility for errors or omissions, or for damages resulting from the use of information contained in this document
or from the use of programs and source code that may accompany it. In no event shall the publisher and the author be
liable for any loss of profit or any other commercial damage caused or alleged to have been caused directly or
indirectly by this document.

Printed: April 2009
Contents                   I

Table of Contents
Part I         Introduction                                                                                                                                           2
                    .................................................................................................................................................
                Connection     Information                                                                                                                            2
                    ................................................................................................................................................. 3
                DVR Versions

Part II        Live View (Main Interface)                                                                                                                             5
                     .................................................................................................................................................
                Recording     Status                                                                                                                                   6
                     .................................................................................................................................................
                Options   (Right Click Menu)                                                                                                                           6
                    Disconnect ........................................................................................................................................7
                               ........................................................................................................................................7
                    Manual Record
                    Playback........................................................................................................................................8
                    Settings........................................................................................................................................8
                    Logs       ........................................................................................................................................9
                              Log
                     ................................................................................................................................................. 10
                Information
                     Version........................................................................................................................................10
                                  Information
                     System........................................................................................................................................11
                                 Information
                     ................................................................................................................................................. 11
                Buttons
                     Split Mode........................................................................................................................................12
                                     Buttons
                Tabs ................................................................................................................................................. 12
                     Device ........................................................................................................................................12
                                List Tab
                     Matrix &  ........................................................................................................................................12
                                   Display Tab
                               ........................................................................................................................................13
                     PTZ Control       Tab
                               ........................................................................................................................................14
                     Sensors/Alarms         Tab
                     Network   ........................................................................................................................................14
                                   Tab

Part III       Settings                                                                                                                                             16
                    ................................................................................................................................................. 16
                Devices
                    .................................................................................................................................................
                System    Settings                                                                                                                                    17
                    .................................................................................................................................................
                Recording      Schedule Settings                                                                                                                      17
                    .................................................................................................................................................
                Display   Settings                                                                                                                                    18
                    .................................................................................................................................................
                Matrix  Settings                                                                                                                                      19
                    .................................................................................................................................................
                Alarm  Settings                                                                                                                                       19
                User.................................................................................................................................................
                     Settings                                                                                                                                         20

Part IV Playback                                                                                                                                                    23
                    .................................................................................................................................................
                Playback     (Full Interface)                                                                                                                         23
                    Tabs ........................................................................................................................................24
                              Date
                              Cameras
                              Files
                              ........................................................................................................................................25
                       Video and   Audio Controls
                           Controls
                              ........................................................................................................................................27
                       Time Bar
                       Options........................................................................................................................................27
                                (Right Click Menu)

© 2009 Aventura Technologies
II     Aventura NVR Software

                        Search Images
                        Burn CD/DVD
                        Create File Clip
                        Backup By Time
                        Restore from Backup
             .................................................................................................................................................
          Remote    Playback (Full Interface)                                                                                                                  34
             Tabs ........................................................................................................................................35
                        Date
                        Cameras
                        Files
                        ........................................................................................................................................36
                 Video and   Audio Controls
                     Controls
                        ........................................................................................................................................38
                 Time Bar
                 Options........................................................................................................................................38
                          (Right Click Menu)
              .................................................................................................................................................
          Video  Download                                                                                                                                       39

Part V   Emap                                                                                                                                               41
             .................................................................................................................................................
          Emap  Interface                                                                                                                                      41
             .................................................................................................................................................
          Emap  Interface Options (Right Click Menu)                                                                                                           42
             General........................................................................................................................................42
                         Settings
                       ........................................................................................................................................43
             Layer Settings
             Add Sensor........................................................................................................................................44
             Add Camera........................................................................................................................................44

Part VI Glossary                                                                                                                                            46

                                                                                                                           © 2009 Aventura Technologies
Part

       I
2    Aventura NVR Software

Introduction

     Connection Information

                    PC Based Digital Video Recorder Quick Connection Guide

            Please refer to the Aventura CD for additional information and a complete user manual.

                                                                                   © 2009 Aventura Technologies
Introduction        3

           DVR Versions
                                          Standard            Advanced            Commercial          Professional/
                                                                                                      Enterprise
           Max Analog Channels            16                  32                  64                  32
           Max IP Cameras                 Not Supported       4                   16                  32
           Max Video Resolution           DCIF                4CIF                4CIF                4CIF
           Playback Channels              4                   9                   16                  16
           Remote Connections             Single Client       Single Client       Multiple Clients1   Multiple Clients2
           Monitor Outputs                1                   1                   2                   4
           Matrix Output                  Not Included        Not Included        2ch Included        4ch Included
           Emap Capability                No                  No                  Yes                 Yes
           Advanced User Management       Single User Level   Single User Level   Multiple User       Multiple User
                                                                                  Levels              Levels
           Film Strip Capability          No                  No                  Yes                 Yes

           1Commercial   NVR is locked to viewing a maximum of 2 DVRs at one time.
           2Professional/Enterprise NVR can view unlimited DVRs at one time.

© 2009 Aventura Technologies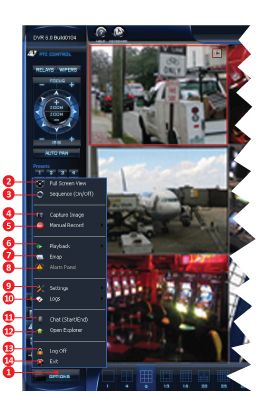
Part

       II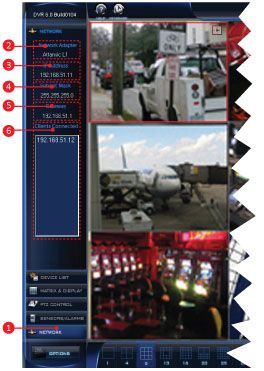
Live View (Main Interface) 5
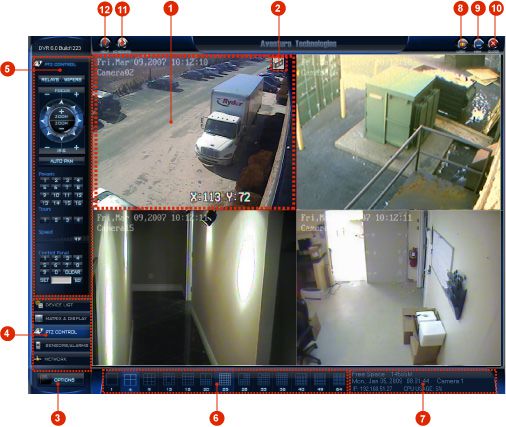
Live View (Main Interface)
Video Window System Information
Video Recording Status Lock Button
Options Minimize Button
Tab Buttons Close Button
Active Tab Panel On Screen Keyboard Button
Split Modes Help Button
© 2009 Aventura Technologies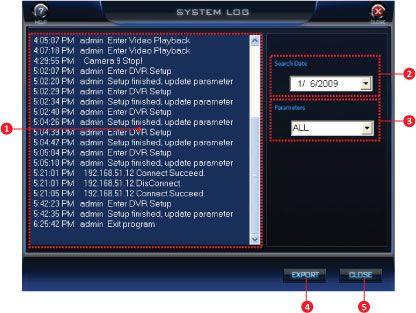
6      Aventura NVR Software

    Recording Status
    Recording Status – When a camera is currently recording, an icon will be displayed on the top right of its live
    video window. That icon indicates which type of recording is configured for that camera.

    Recording Status Icons

         Manual Recording – If a camera is set to manual record the icon will appear until the manual record is
    turned off.

         Continuous Recording – If the camera is set to continuous record, the icon will only appear during the set
    time frame.

    Options (Right Click Menu)

                             Options – The options button is located
       on the lower left of the main interface. Clicking this button
       will bring up a list of functions available in the software.
       Note: This menu can also be accessed by right clicking on
       any video window.

            Full Screen View – Removes the GUI and increases the
       size of the video windows. To exit full screen right click
       anywhere on the video and click the "Full Screen View"
       button again.

            Sequence – The software will rotate through all
       cameras at the rate set in Settings -> System.
       Note: The video split must be set to a smaller number than
       the amount of cameras in the system in order for
       sequence to function properly.

       Disconnect – Shows the disconnect menu.

            Capture Image – Saves a screenshot from the
       currently selected camera to the (Record Drive)\Grab
       folder.

            Manual Record – Shows the manual record menu.

            Playback – Shows the playback menu.

          Emap – Loads an electronic map screen that allows the user to layout camera and sensor locations. See
       Emap section for more information.

            Alarm Panel – Loads the video analytics alarm interface.

                                                                                          © 2009 Aventura Technologies
Live View (Main Interface) 7
Settings – Shows the settings menu.
Logs – Shows the logs menu.
Chat – Initiates a voice chat using the system’s microphone between the NVR Client and DVR Server.
Open Explorer – Opens a file explorer window to allow the user to browse computer files.
Log off – Logs the current user out of the NVR. The NVR will continue to record, but will require login
information entered to operate. Please refer to the "lock button" in the buttons section for more
information.
Exit – Will prompt the user to exit the software. Clicking “OK” will shut down the software and stop
recording, clicking “Cancel” or “Close” will return to the main interface.
Disconnect
Selected Camera – Removes selected camera from being displayed
on the live view.
All Cameras – Removes all cameras from being displayed on the
live view.
Manual Record
Selected Camera – Allows continuous recording of the
selected camera regardless of the recording schedule. Will
record until unselected or the software is closed.
All Cameras – Allows continuous recording of all cameras
regardless of the recording schedule. Will record until
unselected or the software is closed.
© 2009 Aventura Technologies8 Aventura NVR Software
Playback
Local Playback – Loads the playback screen to playback
local recorded video, view captured images, and burn
video/images to CDs/DVDs. See Playback section for more
information.
Remote Playback – Loads a playback screen to remotely
play recorded video, capture images, and download clips from
the selected DVR.
Download Video – Allows the user to download specified
video from selected DVRs.
Settings
Devices – List of devices the user can connect to.
System – NVR system settings.
Recording Schedule – Record type and record time
settings.
Display – Live view screen settings.
Matrix – Digital matrix output settings.
Alarms – Received alarm settings.
Users – User management settings.
Remote Settings – Allows the user to modify the settings
on a remote device.
© 2009 Aventura TechnologiesLive View (Main Interface) 9
Logs
Local Log – Displays the log information from the NVR
Client.
Remote Log – Displays the log information from the
selected DVR.
Log
Local/Remote Log – This window shows a list of user actions and system alerts along with the time of the
event. To view a log for a different day, select that day in the “Search Date” field. The log file can be filtered
between system information and user actions using the “Parameters” field.
© 2009 Aventura Technologies10 Aventura NVR Software
Display Window – Displays log information for the NVR.
Search Date – Allows the user to select one day's log to view from a calendar.
Parameters – Filters the log file so that only certain log entries will be display.
Export Button – Saves a copy of the currently selected log file to the hard drive.
Close Button – Closes the "System Log" window.
Information
Version Information
Version Information – Located at the top left of the main interface. This will display the version number and
version type.
© 2009 Aventura TechnologiesLive View (Main Interface) 11
System Information
System Information – Located at the bottom right of the main interface. This panel displays the free recording
space, current date, current time, selected camera number, IP address, and current CPU usage.
Hard Drive Space – Displays the remaining available record space on the NVR.
Date & Time – Shows the current date and time of the NVR.
Current Camera – Shows the camera that is currently selected in live view.
IP Address – Shows the current IP address of the NVR.
CPU Usage – Shows the current CPU usage of the NVR.
Buttons
Help Button – Located on the top left of the main interface. This will bring up the help manual for the
main interface window.
Keyboard Button – Located on the top left of the main interface. This will bring up the Windows
virtual keyboard to allow typing if no physical keyboard is connected to the NVR.
Lock Button – Located on the top right of the main interface. If the software is locked the button will
appear in red. While the software is locked the user will not be able to operate the NVR. To unlock the
software click anywhere on the NVR screen and the software will prompt for a user name and password. In
order to lock the software password protection must be enabled in Settings -> Users.
Minimize Button – Located on the top right of the main interface. This button will minimize the
software and allow access to the Windows desktop while the NVR is recording.
Close Button – Located on the top right of the main interface. This button will prompt the user to exit
the software. Clicking “OK” will shut down the software and stop recording, clicking “Cancel” or “Close” will
return to the main interface.
© 2009 Aventura Technologies12 Aventura NVR Software
Split Mode Buttons
Split Mode – Located at the bottom of the main interface. These buttons allow the user to quickly change the
live view video split. Options are 1 split, 4 split, 9 split, 13 split, 16 split, 20 split, 25 split, 28 split, 33 split, 36
split, 40 split, 49 split, and 64 split.
Tabs
Device List Tab
Located on the bottom left of the main interface. Clicking this tab will bring up the Device List panel. This
panel shows a list of devices the user can connect to. Double clicking the device name will connect to all
cameras. Pressing the plus sign next to the device will allow you to connect to specific cameras by double
clicking. The camera will be displayed in the currently selected window (outlined in red).
Stop All – Removes all cameras from being displayed on the live view.
Matrix & Display Tab
Matrix & Display – Located on the bottom left of the main
interface. Clicking this tab will bring up the Matrix &
Display panel. The panel will allow the user to quickly
switch between matrix groups and display groups. These
groups can be setup in Settings -> Matrix and Settings ->
Display.
Matrix Group – Select the matrix group to use.
Display Group – Select the display group to use.
Stop All – Removes all cameras from being displayed on
the live view.
© 2009 Aventura TechnologiesLive View (Main Interface) 13
PTZ Control Tab
PTZ Control – Located on the bottom left of the main
interface. Clicking this tab will bring up the PTZ panel.
Relays – Turns on/off an internal relay output on
supported PTZs.
Wipers – Turns on/off wipers on supported PTZs.
Focus –/+ – Overrides the auto-focus setting of the PTZ to
allow manual focus control.
Iris –/+ – Overrides the auto-iris setting of the PTZ to allow
manual iris control.
Zoom –/+ – Pressing and holding the zoom buttons causes
the PTZ camera to zoom in or zoom out.
Pan/Tilt Control – Pressing and holding the pan/tilt
buttons allows the user to adjust the view of the PTZ
camera by moving it up/down/right/left.
Note: If these controls are reversed go to Settings -> PTZ
Camera Config and change the “PTZ Position”.
Auto Pan – Triggers the PTZ to continuously pan 360° until unselected.
Presets – Triggers the PTZ to go to the position of the selected preset. To set these presets go to Settings ->
PTZ Camera Config -> Setup Tour.
Tours – Triggers the PTZ to start a tour through presets. To setup the tour go to Settings -> PTZ Camera
Config -> Setup Tour.
Speed – Adjusts the pan/tilt speed of the PTZ camera.
Control Panel – Allows advanced commands to be sent to the PTZ. Generally “95” “Go” will bring up the
PTZ OSD menu.
© 2009 Aventura Technologies14 Aventura NVR Software
Sensors/Alarms Tab
Sensors/Alarms – Located on the bottom left of the main
interface. Clicking this tab will bring up the Sensors/Alarms
panel. This panel allows the user to view the sensor status
and activate alarm outputs. Sensor and alarm settings can
be setup in Settings -> Sensors or Settings -> Alarms.
Sensors – Shows the status of the sensors connected to the
system. The number will appear red when a sensor is
triggered.
Alarms – Shows the status of the alarms connected to the
system. The number will appear red when an alarm is
triggered. The alarm can be manually triggered by clicking
the appropriate number.
Network Tab
Network – Located on the bottom left of the main
interface. Clicking this tab will bring up the Network panel.
Network Adapter – Shows the name of the network card
the software is using.
IP Address – Shows the IP address of the NVR.
Subnet Mask – Shows the subnet of the NVR, generally
255.255.255.0.
Gateway – Shows the gateway of the NVR.
Clients Connected – Shows a list of IP addresses that are
remotely connected to the NVR.
© 2009 Aventura TechnologiesPart
III16 Aventura NVR Software
Settings
Devices
Device Name – Allows the user to name the device for easy
identification.
IP Address – The IP Address of the device.
Device Manufacturer – The manufacturer of the device.
Device Type – The type of device (DVR, Embedded, IP Camera).
Connection Port – The port the device uses for video connections.
User Name – The user name needed to connect to the device. Leave
this field blank if the camera does not require a login.
Password – The password needed to connect to the device. Leave
this field blank if the camera does not require a login.
Number of Cameras – The number of cameras supported by the
device.
Device List – The list of devices added to this system.
Action Buttons:
Add – To add an device input all the above information and press the “Add” button.
Modify – To modify an device select it from the list, modify the desired information, and then press the
“Modify” button.
Delete – To delete an device select it from the list and press the “Delete” button.
Save Button – Saves the changes.
Close Button – Closes the "Devices" window.
© 2009 Aventura TechnologiesSettings 17
System Settings
Main Recording Drive – The starting record drive for the NVR. When
this drive becomes full the NVR will automatically record to the next
available drive.
Note: To avoid recording to a drive assign it to a letter before the
Main Recording Drive.
WARNING: C:\ drive is not recommended.
When Drive is Full:
Overwrite Data – When all recording drives are full the oldest video
will be deleted to allow the NVR to continue recording.
Stop Recording – When all recording drives are full the NVR will stop
recording and display a warning message on the monitor.
Web Browser Client Port – The port the software uses for Web
Client connections. The default is 8000.
Note: The Web Client will only work with Internet Explorer.
Use Matrix Decoder – Enable/Disable matrix card functionality.
Sequencing Interval – The speed at which the cameras will sequence (rotate) if selected to do so.
Save Button – Saves the changes.
Close Button – Closes the "System" window.
Recording Schedule Settings
Select Window – Select the window to record.
Copy Schedule to – Copies the current schedule to selected window.
Continuous – Records all the time during the selected days and times in the grid.
© 2009 Aventura Technologies18 Aventura NVR Software
Do Not Record – The NVR will not record the cameras during the selected days and times in the grid.
Recording Schedule – Allows the user to set the type of recording and time to record. Select the "Recording
Mode" button to choose a record type. Clicking the top left of the grid will set the whole grid to the
selected "Recording Mode" option. Clicking the day or hour will set that row or column to the selected
"Recording Mode" option. Select or drag across specific cells in the grid to set a more detailed schedule.
Save Button – Saves the changes.
Close Button – Closes the "Recording Schedule" window.
Display Settings
Group – Allows the user to set multiple display splits/layouts for the
cameras.
Monitor – Allows the user to select which monitor to display
cameras.
Group Split – Allows the user to select where each camera is
displayed.
Save Button – Saves the changes.
Close Button – Closes the "Display" window.
© 2009 Aventura TechnologiesSettings 19
Matrix Settings
Group – Allows the user to set multiple display splits/layouts for the
cameras.
Output – Allows the user to select which monitor to display
cameras.
Group Split – Allows the user to select where each camera is
displayed.
Save Button – Saves the changes.
Close Button – Closes the "Matrix" window.
Alarm Settings
Alarm Port – The port where the NVR Client will receive alarm
information.
Connect on Alarm – Automatically show live view of alarmed
cameras.
Play Alarm Sound – The sound the NVR will play when an alarm is
detected.
Save Button – Saves the changes.
Close Button – Closes the "Alarm" window.
© 2009 Aventura Technologies20 Aventura NVR Software
User Settings
Password Protection – Requires a password to log into the NVR
software and to connect remotely.
Auto Logout In – Will automatically log out of the NVR software
after the set amount of inactivity.
User List – Displays a list of users added to the software.
User Name – Login name when adding or modifying a user. User
Name must be 12 characters or less.
Full Name – Real name of the person associated with the user name.
Password – Password for the user. Password must be 12 characters
or less.
Confirm Password – Enter the same password to confirm there is no
typo.
Rights Level:
Manager – Full rights to the system including user management.
Operator – Rights to the system are selected from the “User Rights” list. Unable to access user
management.
User Rights – Limit user's right to access to certain area.
Action Buttons:
Add – To add a user input all the above information and press the “Add” button.
Modify – To modify a user select it from the list, modify the desired information, and then press the
“Modify” button.
Delete – To delete a user select it from the list and press the “Delete” button.
Save Button – Saves the changes.
Close Button – Closes the "Users" window.
© 2009 Aventura TechnologiesSettings 21 © 2009 Aventura Technologies
Part

       IV
Playback 23
Playback
Playback (Full Interface)
Playback Video Channel Video and Audio Controls
Active Tab Panel Playback Options
Tab Buttons Time Bar
© 2009 Aventura Technologies24 Aventura NVR Software
Tabs
Date
Date – Located on the middle left of the playback interface. Clicking
this tab will bring up the date panel. By default the current day is
selected.
Year – Allows the year the video was recorded to be selected.
Month – Allows the month the video was recorded to be selected.
Today – Displays the current system date.
Calendar – Shows the calendar for the selected month. The current
selected day is highlight in yellow, days with recorded video are
displayed in green, and days with no recorded video are displayed
in gray.
Cameras
Cameras – Located on the middle left of the playback interface.
Clicking this tab will bring up the camera panel.
Start At – Sets the time to play video from. If there is no video at
the selected time it will play the closest available recorded video.
Camera Numbers – Cameras with video for the selected day will
appear as selectable buttons. Cameras with no video will appear
with grayed out buttons. Clicking a camera button will load that
camera in the selected playback window.
View All – Selecting this button will load as many cameras as
supported by the current split screen starting at camera number 1.
© 2009 Aventura TechnologiesPlayback 25
Files
Files – Located on the middle left of the playback interface. Clicking
this tab will bring up the files panel.
File list – Displays the list of recorded files for the selected camera.
A file can be double clicked to jump to the selected time frame.
Video and Audio Controls
Volume – Adjusts the audio volume playing from the
selected file. To mute the volume click the icon next to the slide
bar.
Speed – Adjusts the playback speed of the selected camera.
Maximum speed is 16x. Moving the slider all the way to the left
will reverse the video at –1/4x speed. Clicking the icon next to the
speed bar will return the video to normal playback speed.
Playback Control – Play and navigation controls for playback.
Zoom – Allows the user to digitally zoom in on playback
video. Select “Zoom” button and then select where on the video
to zoom in. Unselect the zoom button to return to the normal
view.
© 2009 Aventura Technologies26 Aventura NVR Software
Controls
Play/Pause – Plays/pauses the video in the selected window.
Stop – Removes the video from the selected window.
Play All/Pause All – Plays/pauses all video windows.
Stop All – Removes the video from all windows.
Previous Frame – Jumps back one video frame on selected camera from current time position.
Next Frame – Jumps forward one video frame on selected camera from current time position.
Beginning – Jumps to the first recorded video of the day for the selected camera.
End – Jumps to the last recorded video of the day for the selected camera.
Previous Minute:
1 Min – Jumps back 1 minute on the selected camera.
5 Min – Jumps back 5 minutes on the selected camera.
Motion – Jumps back to the last motion detected on the selected camera from current time position.
Next Minute:
1 Min – Jumps ahead 1 minute on the selected camera.
5 Min – Jumps ahead 5 minutes on the selected camera.
Motion – Jumps ahead to the next motion detected on the selected camera from current time position.
© 2009 Aventura TechnologiesPlayback 27
Time Bar
Time bar – Displays the times of recorded video and the type of recording. If more than four cameras are
playing navigate to the other cameras using the up and down arrow. To view more detailed information for a
specific camera click its camera number to the left of its hour bar. To return to the multi-view press the close
button on the top right of the panel.
Record Type Key – Shows the color for each record type represented in the time bar.
Hour – Shows what hours the video was recorded.
Window Number – Shows the window number for the information to the right.
Camera Number – Shows the camera number that is being viewed.
Recorded Video Bar – Shows all the recorded video for the selected camera.
Minute – Shows a more detailed breakdown of recorded video by minute.
Up/Down Arrows – Allows the user to scroll between the time bars for windows 1-4, 5-8, 9-12, and 13-16.
Close – Closes out of the detailed camera view and returns to the multi-time bar.
Options (Right Click Menu)
Full Screen View – Removes the GUI and increases the size of video windows.
Split – Select an onscreen split mode. (1 Split, 4 Split, 9 Split, or 16 Split)
Capture Image – Saves a screenshot from the currently selected camera to the (Record
Drive)\_RecordFile_\Snapshot folder.
Synchronize Cameras – Synchronizes the play time on all cameras to the time of the selected camera. The
software will continue to sync until this is unselected. If a camera does not have video for the synchronized
time it will show a no video screen. Unselecting the option will turn off synchronize.
Smart Search – Allows the user to draw a box on the selected camera. Only video that has motion in the
selected area will be shown. Unselecting the option will turn off smart search.
© 2009 Aventura Technologies28 Aventura NVR Software
Film Strip – Used to look for a specific image within a video. Select Film Strip “By Second” or “By Frame” on a
video at a location shortly after the event. Film Strip by second will show an image for each of the previous 32
seconds. Film Strip by frame will show an image for each of the previous 32 frames. Only 16 images are
displayed at a time, to view the next 16 use the next button on the bottom right. Unselecting the option will
turn off film strip.
Search Images
Search Images – Allows the user to view screenshots taken using the “Capture Image” function of the
software.
Path – Select the path where the image is saved. By default when an image is captured from live view it is
saved to the (Record Drive)\Grab folder. By default when an image is captured from playback it is saved to
the (Record Drive)\_RecordFile_\Snapshot folder.
Directory – Allows the user to browse through the directory structure to search for an image.
File List – Shows a list of viewable images.
Preview Screen – Displays the image currently selected.
Image Editor Menu
Zoom In/Out – Digitally enlarges or shrinks the size of the image on screen.
Brightness +/– – Increases or decreases the brightness of the image.
Contrast +/– – Increases or decreases the brightness of the image.
Smooth – Softens rough edges on the picture.
© 2009 Aventura TechnologiesPlayback 29
Restore – Restores the image to its original condition before brightness, contrast, and smoothing
operations.
Print – Prints the image to the selected printer.
Magnify – Digitally enlarges a section of the picture that the mouse is scrolled over.
Delete – Deletes the selected image.
Delete All – Deletes all images in the selected folder.
Save Path – Location and file name where to save the modified image. The file name must be changed in
order to save the new image. Click “Save” to complete.
Save Button – Saves the edited image.
Close Button – Closes the "Search Image" window.
Burn CD/DVD
Burn CD/DVD – Allows the user to backup recorded video and easily burn it to a CD or DVD. When this CD or
DVD is inserted into a computer it will automatically load an interface to play the burned video.
Start Time – Set the start date and time of the video to burn.
End Time – Set the end date and time of the video to burn.
Include Snapshots – Select to burn any captured images from the set date/time.
© 2009 Aventura Technologies30 Aventura NVR Software
Select Cameras – Select the cameras to burn video from. Cameras that are grayed out have no video for
that selected time frame. “All” will select all cameras that have video and “None” will unselect all cameras.
Selected Size – Shows the total size of the video being burned.
CD’s Required – Shows the amount of CDs required to burn the video.
DVD’s Required – Shows the amount of DVDs required to burn the video.
Validate Log – Displays the validation information.
Validate – Checks the selected video files for corruption. Status will show up as “Pass” if no problems are
detected.
Backup – Backs up the selected video to the folder specified.
Save As – Saves the selected video to a compressed Aventura backup file.
Burn CD/DVD – Loads the Video Burn software to burn the selected video to a DVD or CD.
Available Devices – Select the CD/DVD burner drive.
Burn Control – Select whether to burn a CD or DVD. Press “Write Disk” when correct choice is selected.
Save Log – Saves a log file of the validate information.
Close Button – Closes the "Burn CD/DVD" window.
© 2009 Aventura TechnologiesPlayback 31
Create File Clip
Create File Clip – Allows the user to create a short file clip from a larger record file. This is useful for
transferring the file or for easy downloading.
File List – Shows the available file clips for the selected day and camera.
File Attributes – Shows the begin time, end time, file size, frame rate, resolution, record type, and file clip
size for the selected video file.
Camera ID – Allows the user to select the camera to view files from.
Save Path – The location where the file clip will be saved.
Preview window – Plays the file clip.
Time Bar – Shows the current position on the selected video clip.
Image Sharpening – Increases the detail on the selected video clip.
Video Clip Controls
Beginning – Jumps to the beginning of the file.
Previous Frame – Jumps back one frame from the current position.
Pause/Play – Plays/pauses the video.
Next Frame – Jumps forward one frame from the current position.
© 2009 Aventura Technologies32 Aventura NVR Software
End – Jumps to the end of the file.
Audio On/Off – Turns on/off the audio for the selected clip.
Clip Begin – The starting position for the file clip being created.
Clip End – The ending position for the file clip being created.
Save – Click the “Save” button after the Clip Begin, Clip End, and Save Path have been set.
Close Button – Closes the "Create File Clip" window.
Backup By Time
Backup By Time – Allows the user to backup a time frame from a selected camera. This type of backup is useful
for combining multiple small video files into larger video files.
Save Path – The location where the video file(s) will be saved.
Backup Camera – The camera the video file(s) will be backed up from.
Beginning Time – Set the start time of the video to save.
Ending Time – Set the end time of the video to save.
Combine Files – Select whether to combine multiple small files into larger files.
Maximum File Size – Select the maximum file size when combining video clips.
© 2009 Aventura TechnologiesPlayback 33
Backup Size – Displays the size of the video.
Test Button – Calculates the backup size.
Save – Will save the selected video to the Save Path. Must run a “Test” before saving.
Close Button – Closes the "Backup By Time" window.
Restore from Backup
Restore from Backup – Allows the user to restore video files that have been backed up using the DVR or NVR
software.
Restore from Folder – Use this option to restore from a backup folder. A CD or DVD Backup can also be
restored by selecting the _RecordFile_ directory on the CD or DVD.
Restore From File – Use this option to restore an Aventura Video Backup (*.avb) file.
Select Backup Location – Select the file(s) to restore.
Select Destination Drive – Select the drive where the file(s) will be saved.
Information Box – Lists any problems encountered during the restore process.
Restore – Click this button to start the restore process.
Close Button – Closes the "Restore" window.
© 2009 Aventura Technologies34 Aventura NVR Software
Remote Playback (Full Interface)
Playback Video Channel Video and Audio Controls
Active Tab Panel Playback Options
Tab Buttons Time Bar
© 2009 Aventura TechnologiesPlayback 35
Tabs
Date
Date – Located on the middle left of the playback interface. Clicking
this tab will bring up the date panel. By default the current day is
selected.
Year – Allows the year the video was recorded to be selected.
Month – Allows the month the video was recorded to be selected.
Today – Displays the current system date.
Calendar – Shows the calendar for the selected month. The current
selected day is highlight in yellow, days with recorded video are
displayed in green, and days with no recorded video are displayed
in gray.
Cameras
Cameras – Located on the middle left of the playback interface.
Clicking this tab will bring up the camera panel.
Start At – Sets the time to play video from. If there is no video at
the selected time it will play the closest available recorded video.
Camera Numbers – Cameras with video for the selected day will
appear as selectable buttons. Cameras with no video will appear
with grayed out buttons. Clicking a camera button will load that
camera in the selected playback window.
View All – Selecting this button will load as many cameras as
supported by the current split screen starting at camera number 1.
© 2009 Aventura Technologies36 Aventura NVR Software
Files
Files – Located on the middle left of the playback interface. Clicking
this tab will bring up the files panel.
File list – Displays the list of recorded files for the selected camera.
A file can be double clicked to jump to the selected time frame.
Video and Audio Controls
Volume – Adjusts the audio volume playing from the
selected file. To mute the volume click the icon next to the slide
bar.
Speed – Adjusts the playback speed of the selected camera.
Maximum speed is 16x. Moving the slider all the way to the left
will reverse the video at –1/4x speed. Clicking the icon next to the
speed bar will return the video to normal playback speed.
Playback Control – Play and navigation controls for playback.
Zoom – Allows the user to digitally zoom in on playback
video. Select “Zoom” button and then select where on the video
to zoom in. Unselect the zoom button to return to the normal
view.
© 2009 Aventura TechnologiesPlayback 37
Controls
Play/Pause – Plays/pauses the video in the selected window.
Stop – Removes the video from the selected window.
Play All/Pause All – Plays/pauses all video windows.
Stop All – Removes the video from all windows.
Previous Frame – Jumps back one video frame on selected camera from current time position.
Next Frame – Jumps forward one video frame on selected camera from current time position.
Beginning – Jumps to the first recorded video of the day for the selected camera.
End – Jumps to the last recorded video of the day for the selected camera.
Previous Minute:
1 Min – Jumps back 1 minute on the selected camera.
5 Min – Jumps back 5 minutes on the selected camera.
Motion – Jumps back to the last motion detected on the selected camera from current time position.
Next Minute:
1 Min – Jumps ahead 1 minute on the selected camera.
5 Min – Jumps ahead 5 minutes on the selected camera.
Motion – Jumps ahead to the next motion detected on the selected camera from current time position.
© 2009 Aventura Technologies38 Aventura NVR Software
Time Bar
Time bar – Displays the times of recorded video and the type of recording. If more than four cameras are
playing navigate to the other cameras using the up and down arrow. To view more detailed information for a
specific camera click its camera number to the left of its hour bar. To return to the multi-view press the close
button on the top right of the panel.
Record Type Key – Shows the color for each record type represented in the time bar.
Hour – Shows what hours the video was recorded.
Window Number – Shows the window number for the information to the right.
Camera Number – Shows the camera number that is being viewed.
Recorded Video Bar – Shows all the recorded video for the selected camera.
Minute – Shows a more detailed breakdown of recorded video by minute.
Up/Down Arrows – Allows the user to scroll between the time bars for windows 1-4, 5-8, 9-12, and 13-16.
Close – Closes out of the detailed camera view and returns to the multi-time bar.
Options (Right Click Menu)
Full Screen View – Removes the GUI and increases the size of video windows.
Split – Select an onscreen split mode. (1 Split, 4 Split, 9 Split, or 16 Split)
Capture Image – Saves a screenshot from the currently selected camera to the (Record
Drive)\_RecordFile_\Snapshot folder.
Synchronize Cameras – Synchronizes the play time on all cameras to the time of the selected camera. The
software will continue to sync until this is unselected. If a camera does not have video for the synchronized
time it will show a no video screen. Unselecting the option will turn off synchronize.
© 2009 Aventura TechnologiesPlayback 39
Video Download
Server – The server to download the files from.
Camera – The camera to download the files from.
Start Time – Set the start time of the video to save.
End Time – Set the end time of the video to save.
Add – Queues the video for download.
Selected Videos – Shows a list of videos that will be downloaded.
Remove – Removes selected file from the download queue.
Remove All – Removes all files from the download queue.
File Progress – Shows the download progress of the current file
Total Progress – Shows the download progress of all the files.
Delete Existing Video – Deletes all older video from the local machine.
Load Playback after download is complete – Automatically loads playback once all video has been
downloaded.
Setup – Allows the user to set the save location and Pre/Post incident times.
Download – Downloads the selected video.
Close Button – Closes the "Download Video" window.
© 2009 Aventura TechnologiesPart
VEmap 41
Emap
Emap Interface
The main interface shows the default Emap layer along with cameras and sensors that have been added.
Cameras that currently have motion or sensors triggered will blink in red on the Emap. To view the activity on
these devices double click the camera/sensor icon.
Emap Display Window – Displays the layer that is currently selected.
Options Button – Opens the Emap option menu.
Current Layer – Allows the users to select which Emap layer to view. This is generally used for different
floors or sections of a building. To add/remove/modify layers please check Options -> Layer Settings.
Close – Closes the "Emap" window.
© 2009 Aventura Technologies42 Aventura NVR Software
Emap Interface Options (Right Click Menu)
General Settings – Settings for Emap automatic actions.
Layer Settings – Allows the user to add Emap images and
setup a multi-layered Emap.
Add Sensor – Adds a sensor to the currently selected Emap
layer.
Add Camera – Adds a camera to the currently selected
Emap layer.
Delete All Items – Will delete all cameras and sensors
that have been added to the current Emap layer.
Lock(Unlock) Camera/Sensor Positions – When the
camera/sensor positions are locked the user will not be
able to move or delete those items. During setup keep this
unlocked. Once setup is finished it is recommended to lock
these items.
Exit – Closes the "Emap" interface .
General Settings
Auto Stop Alarm – Will stop an alarming camera or sensor from
flashing when that alarm turns off. If this is disabled, the camera or
sensor will flash until viewed by an operator.
Auto Popup on Alarm – Will popup the Emap screen when an alarm
is triggered on a camera or sensor.
Save Button – Saves the changes.
Close Button – Closes the "Emap Settings" window.
© 2009 Aventura TechnologiesEmap 43
Layer Settings
Layer List – Located on the left side of Layer settings. This shows a list of all layers that have been added in
the software. Using the up/down arrows allows the user to rearrange the order of the layers.
Layer Name – The name of the selected layer. This name will show up in the “Current Layer” drop down on
the main Emap interface.
Layer File – The picture that will be displayed for the Layer. Currently this supports jpeg images.
Default Layer – Select this checkbox to make a layer the default Emap image. This will be the layer that will
initially show up when loading Emap. Only one layer can be the default, any other layers previously set as
the default will be unselected.
Preview – Shows a preview of the Layer image selected.
Add – To add a layer overwrite any information in “Layer Name” and “Layer File” and press the “Add”
Button.
Update – To modify a layer select it from the list, modify the desired information, and press the “Modify”
button.
Delete – To delete a layer select the layer name in the Layer List and press the “Delete” button.
Save – In order for any changes made in the “Layer Settings” to be saved the user must press the “Save”
button when finished.
Close – Closes the "Layer Settings" window.
© 2009 Aventura Technologies44 Aventura NVR Software
Add Sensor
Add Sensor – Adds a sensor to the selected location on the Emap. To delete this sensor right click on it and
select “Delete This Item”.
Note: An item can only be deleted if the Emap is “Unlocked”
Device – Select "PCI Card" if the sensor is connected directly to the DVR.
Sensor – Select the sensor number for the selected location.
Sensor Name – Enter the name to show next to the sensor icon on the Emap.
Add – Adds the sensor to the Emap.
Cancel – Exits without adding the sensor to the Emap.
Add Camera
Add Camera – Adds a camera to the selected location on the Emap. To delete this camera right click on it
and select “Delete This Item”.
Note: An item can only be deleted if the Emap is “Unlocked”
Device – Select "PCI Card" if the sensor is connected directly to the DVR. For IP cameras select the name of
the camera from the list.
Camera – Select the camera name for the selected location.
Camera Name – Enter the name to show next to the camera icon on the Emap.
Add – Adds the camera to the Emap.
Cancel – Exits without adding the camera to the Emap.
© 2009 Aventura TechnologiesPart
VI46 Aventura NVR Software
Glossary
Bitmap – An uncompressed type of image file used to store digital pictures.
Bitrate – The amount of data used to make up an image or video. A higher bitrate will give better quality.
Baud rate – The speed at which information is sent over a line.
COM (Communication) Port – A serial port interface on a computer.
CPU (Central Processing Unit) – Computer chip that is used to run applications.
DVR (Digital Video Recorder) – System that runs the Aventura server software.
FPS (Frames Per Second) – The rate at which unique consecutive images are viewed/recorded.
GB (Gigabyte) – A computer storage unit (1,000,000,000 bytes). This is larger than a MB.
IP (Internet Protocol) Address – A numerical identification assigned to devices on a computer network.
JPEG – A compressed type of image file used to store digital pictures.
KB(Kilobyte) – A computer storage unit (1,000 bytes). This is smaller than a MB and GB.
LAN (Local Area Network) – A computer network covering a small area such as a home, office, or small group
of buildings.
MB (Megabyte) – A computer storage unit (1,000,000 bytes). This is larger than a KB, but smaller than a GB.
NTSC (National Television System Committee) – Video standard generally used in North America, north and
west parts of South America, Japan, South Korea, and Taiwan.
NVR (Network Video Recorder) – Software that allows viewing/recording of video from the DVR over the
LAN/WAN.
OSD (On Screen Display) – Text that appears over the camera video.
PAL (Phase Alternating Line) – Video standard generally used in Europe, Asia, and everywhere else not listed
under NTSC.
Port – A numerical identifier where communication takes place between network devices.
POS (Point of Sale) – Advanced system used for cash register monitoring.
Protocol – A standard of communication.
PTZ (Pan/Tilt/Zoom) – Advanced camera that has the ability to turn left/right, up/down, and zoom in/out.
Resolution – The level of detail on an image.
SMTP (Simple Mail Transfer Protocol) Server – A type of server for sending outgoing emails.
WAN (Wide Area Network) – A computer network covering a broad area, generally referred to as the Internet.
© 2009 Aventura Technologies180 Adams Avenue,
Hauppauge, NY 11788
Phone : (631) 300-4000
Fax: (631) 434-7000
www.aventuratechnologies.comYou can also read