Introduction to the Apple TV Guide - Overview
←
→
Page content transcription
If your browser does not render page correctly, please read the page content below
Introduction to the Apple TV Guide
Overview
Apple TVs are quickly becoming the ideal choice for presentation aids in a variety of settings. In the corporate
environment, Apple TVs enable visuals and projections from a presenter's devices at conferences and large-audience
meetings. In retail settings, Apple TVs broadcast product displays or store announcements to monitors throughout a
store or lobby area. Finally, in a classroom or teaching environment, teachers can whitelist AirPlay destinations to
prevent students from accidentally - or purposefully - projecting their iPhone or iPad to the Apple TVs in the classroom.
Additionally, teachers can prompt a student to mirror their device to a specific Apple TV to present a project or class
material.
In This Guide
Before You Begin – Details useful background information and things to keep in mind before diving into AirWatch
and Apple TV management, including prerequisites and suggested reading.
Enrolling Apple TVs – Walks through AirWatch's recommended enrollment process for Apple TVs.
Configuring Apple TVs – Details the available configuration options for outfitting your Apple TVs with AirWatch.
Managing Apple TVs – Explains how you can manage your Apple TVs from the AirWatch Admin Console and Self-
Service Portal.
1
Before You Begin

Overview
Before deploying Apple TV devices, you should consider the following prerequisites and supported devices. Familiarizing
yourself with the information available in this section will help prepare you for configuring and deploying Apple TV
devices.

Supported Devices
The Apple TV features and AirPlay management settings profiled in this guide are supported by 2nd and 3rd generation
Apple TVs and iPhones, iPod Touches and iPads running iOS 7 and higher.

                                                                                                                       2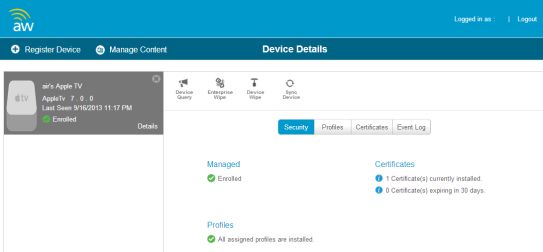
Apple TV Enrollment

Overview
The first step to integrating your Apple TVs with AirWatch is enrollment. You must enroll your device into your AirWatch
environment before it can be monitored and managed. Unlike other devices and platforms, Apple TV enrollment does
not involve the AirWatch MDM Agent or access to an Internet browser on the device itself.

Enrolling Apple TVs
Although you do not need to use an Internet browser, the Apple TV must be connected to a network to enroll in
AirWatch. Connect to Wi-Fi on the Apple TV by going to (Settings ►General ►Network) or by connecting an Ethernet
cable to the device. Or, set up a Wi-Fi profile using Apple Configurator to manage the Apple TV through the AirWatch
Admin console.

Setting up a Wi-Fi profile
1. Log in to the AirWatch Admin Console and select the Organization Group you wish to enroll the Apple TV .
2. Navigate to Devices ►Settings ►Apple ►Apple Configurator.
3. Select the Enable Automated Enrollment check box, select a Default Enrollment User and choose Apple TV from
   the Platform drop-down menu.
4. Click Save and Export Profile to save the MDM profile to an easily accessible location on your computer.

Note: For more information about setting up profiles, see the

Configuring Apple TV
1. Using a Mac computer, download and install the latest version of Apple Configurator from the app store. Once
   installed, ensure any instance of iTunes is closed.
2. Open the Apple Configurator.
3. Connect the Apple TV to a power source.
4. Look for the status light on the side of the Apple TV device. Once the status light stops blinking, connect the Apple
   TV to the Mac computer using a micro USB cable. An Apple TV Assistant wizard window pops up in the Apple
   Configurator after the device is detected.
5. Start the wizard by clicking Choose to select an enrollment profile for the device. Using the drop-down menu, select
   the MDM profile exported from the AirWatch Admin Console.

                                                                                                                           3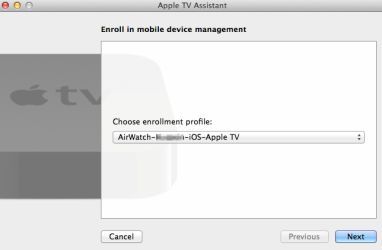
6. Choose to Erase and Install Latest version or choose Don't Install.
If you choose Erase and Install Latest version, then you will bypass the setup assistant on the device. Doing this will
wipe the OS and install the latest version of Apple TV.
If you choose Don't Install, then you will have to manually complete the setup assistant on each Apple TV if you
have not already done so.
Choosing Erase and Install Latest Version
o Configure your Apple TV settings to name the device(s), add a sequential number to device names by
selecting the check box if desired, choose the language, and choose to send Diagnostic Data to Apple.
o Use the drop-down menu to select an existing Wi-Fi profile to enable Internet connectivity and allow the
device to enroll into AirWatch. Or, create a new profile, by clicking New...
o Click Configure and wait for the wizard to prepare the device(s).
Choosing Don't Install
o Use the drop-down menu to select an existing Wi-Fi profile to enable Internet connectivity and allow the
device to enroll into AirWatch. Or, create a new profile, by clicking New...
o Click Configure and wait for the wizard to prepare the device(s).
7. Complete the Apple TV enrollment by disconnecting the Apple TV from the USB cable, unplugging the power cable.
reconnecting the power cable, waiting for the status light to stop blinking, and reconnecting the USB cable.
48. Wait for the Apple Configurator to finish and click Close.
5Apple TV Profiles
Overview
Once Apple TV devices are enrolled, you can configure them with enterprise settings to provide Wi-Fi, region and AirPlay
functionality. Configuration profiles enable you to tailor and prepare devices depending on how and where the device
will be used.
In This Section
Configuring General Profile Settings – Covers how to set up a profile's general settings.
Configuring Wi-Fi Access – Details how to configure a Wi-Fi profile for an Apple TV using AirWatch MDM profiles.
Configuring Credentials – Covers how to configure credentials for an Apple TV using AirWatch MDM profiles.
Whitelisting AirPlay Destinations – Walks through how to establish an AirPlay destination whitelist so that your
Apple TV knows which iOS devices to allow or block.
6Configuring General Profile Settings
The process for creating a profile consists of two parts. First, you must specify the General settings for the profile. The
General settings determine how the profile is deployed and who receives it as well as other overall settings. Next, you
must specify the payload for the profile. The payload is the type of restriction or setting applied to the device when the
profile is installed. The general settings listed below apply to any profile:
1. Navigate to Devices ►Profiles ►List View and select Add.
2. Select the appropriate platform for the profile you wish to deploy.
3. Configure General settings on the applicable tab. These include:
Name – Name of the profile to be displayed in the AirWatch Admin Console.
Description – A brief description of the profile that indicates its purpose.
Deployment – Determines if the profile will be automatically removed upon unenrollment:
o Managed – The profile is removed.
o Manual – The profile remains installed until removed by the end user.
Assignment Type – Determines how the profile is deployed to devices:
o Auto – The profile is deployed to all devices automatically.
o Optional – The end user can optionally install the profile from the Self-Service Portal (SSP) or can be
deployed to individual devices at the administrator's discretion.
o Interactive – This is a unique assignment type in which the profile integrates with third-party systems to
deploy a specific payload to a device.
o Compliance – The profile is deployed when the end user violates a compliance policy applicable to the
device.
Minimum Operating System – The minimum operating system required to receive the profile.
Model – The type of device to receive the profile.
Ownership – Determines which ownership category receives the profile:
Allow Removal – Determines if the profile can be removed by the device's end user:
o Always – The end user can manually remove the profile at any time.
o With Authorization – The end user can remove the profile with the authorization of the administrator.
o Never – The end user cannot remove the profile from the device.
Managed By – The Organization Group with administrative access to the profile.
Assigned Organization Groups – The Organization Groups that receive the profile.
Additional Assignment Criteria – These check boxes enable additional restrictions for the profile:
o Publish only to users in selected User Groups – Specify one or more User Groups to receive the profile.
7o Enable Scheduling and install only during selected time periods – Specify a configured time schedule in
which devices receive the profile only within that time-frame. See Time Schedules for more information.
4. Configure a payload for the device platform.
Note: For step-by-step instructions on configuring a specific payload for a particular platform, please refer to the
applicable Platform Guide.
5. Select Save & Publish.
Configuring Wi-Fi Access for Apple TVs
Configuring a Wi-Fi profile lets devices connect to corporate networks, even if they are hidden, encrypted, or password
protected. This can be useful for automatically configuring devices to connect to the appropriate wireless network while
in an office.
1. Navigate to Devices ►Profiles ►List View ►Add. Select Apple TV.
2. Configure General profile settings as appropriate.
3. Select the Wi-Fi payload from the list.
4. Configure Wi-Fi settings, including:
Service Set Identifier – This is the name of the network the device connects to.
Auto-Join – This determines whether the device automatically connects to the network.
Security Type – This is the type of access protocol used and whether certificates are required.
Password – This is the password required for the device to connect to the network.
Proxy – This enables an automatic or manual proxy that you can configure for your Wi-Fi profile.
5. Select Save & Publish.
Configuring Credentials for Apple TVs
Push certificates to streamline and secure Wi-Fi login. Use the following instructions to create a credentials payload:
1. Navigate to Devices ►Profiles ►List View.
2. Click Add and choose Apple TV from the platform list.
3. Fill out General information as necessary along with the Wi-Fi payload.
4. Select the Credentials payload and Upload a certificate, select Defined Certificate Authority, or select User
Certificate from the Credential Source dropdown, depending on the where the credential is pulled from.
5. Select the Certificate Authority and Certificate Template from their respective dropdowns. Navigate back to the
previous payload for Wi-Fi.
6. Select a compatible Security Type (WEP Enterprise, WPA/WPA2 Enterprise or Any (Enterprise)) and select the
Identity Certificate under Authentication.
7. Click Save and Publish when you are done configuring any remaining settings.
8Whitelisting AirPlay Destinations
Configuring the AirPlay payload lets you whitelist a specific set of devices to receive broadcast privileges according to
device ID. Additionally, if the display access to your Apple TV is password-protected, you can pre-enter the password to
create a successful connection without revealing the PIN to unauthorized parties. This payload will work even if you do
not enroll your Apple TVs with AirWatch. For more information about Apple TV capabilities, please see the AirWatch
Apple TV Guide.
Note: AirPlay whitelisting currently only pertains to supervised iOS 7 devices.
To configure an AirPlay destination whitelist:
1. Navigate to Devices ►Profiles ►List View
2. Click Add and choose Apple iOS from the platform list.
3. Configure General profile settings as appropriate.
4. Select the AirPlay Mirroring payload tab.
5. Click Add under Whitelisted AirPlay Destinations.
6. Enter the destination and device information, including:
Destination Name – This is the name of the destination display. The name must match the Apple TV device
name and is case-sensitive. The device name can be found on the Apple TV device settings.
Allowed Destination Device ID – This is the device ID for the destination display. Device IDs include the MAC
address or Ethernet address formatted as XX:XX:XX:XX:XX:XX)
Password – This is the password that shows on the user's device when attempting to mirror to the destination.
This password is only required if a password is required to mirror to the Apple TV.
7. Select Add to create additional destinations and corresponding device whitelists.
8. Click Save and Publish when you are done configuring AirPlay settings.
Now that the AirPlay destination whitelist is established, use the Device Control Panel for each Supervised iOS 7 device
to manually enable or disable AirPlay:
1. Navigate to Devices ►List View, locate the device intending to AirPlay, and select the device's Friendly Name.
2. Select Support and select Play AirPlay from the list of support options.
3. Choose the Destination created in the AirPlay profile, enter password if necessary and select the Scan Time.
Optionally, select Custom from the Destination list to create a custom destination for this particular device.
4. Select Save and accept the prompt to enable AirPlay.
To manually disable AirPlay on the device, return to the device's Control Panel, select Support and select Stop AirPlay.
9Time Schedules
In addition to simply assigning applicable profiles, you have the ability to enhance device management further by
controlling when each profile assigned to the device is active. Configure and apply time schedules to restrict when
profiles are active on the device. Applying time schedules to profiles secures your corporate resources by only allowing
employees access during the specific days and time frames. Conversely, applying time schedules can also limit personal
content and access during work hours.
In This Section
Defining Time Schedules – See how to create a time schedule, which allows or denies access to internal content and
features based on the day and time.
Applying a Time Schedule to a Profile – See how to apply a time schedule to a profile, which lets you control when
and how a particular profile is activated.
Defining Time Schedules
To create a time schedule:
1. Navigate to Devices ►Profiles ►Settings ►Time Schedules.
2. Select Add Schedule to launch the Add Schedule window.
3. Enter a name for the schedule in the Schedule Name field.
4. Select the applicable Time Zone using the drop-down menu.
5. Select the Add Schedule hyperlink.
6. Select the Day of the Week, Start Time and End Time using the applicable drop-down menus. You can also select
the All Day check box to disable start and end times for the schedule.
To remove a day from the schedule, select the applicable X under Actions.
107. Repeat steps 5 and 6 as many times as is necessary to add additional days to the schedule.
8. Select Save.
Applying a Time Schedule to a Profile
Once you have defined a time schedule, you can apply it to a profile and combine it with other payloads to create more
robust profiles. For example, you can define time schedules for the normal work hours of different organization groups
and add a Restrictions payload that denies access to the Game Center, multiplayer gaming or YouTube content based on
ratings and other settings.
Once activated, the employees of the Organization Group to whom the profile was applied will no longer have access to
these functions during the specified times.
1. Navigate to Devices ►Profiles ►List View ►Add and select your platform.
2. Select Enable Scheduling and install only during selected time periods on the General tab. An Assigned Schedules
box displays.
3. Enter one or multiple Time Schedules to this profile.
4. Configure a payload, such as Passcode, Restrictions or Wi-Fi that you want to apply only while devices are inside the
time frames.
5. Select Save & Publish.
11Managing Apple TVs
Overview
You can manage all of your deployment’s devices from the AirWatch Dashboard. The Dashboard is a searchable,
customizable view you can use to filter and find specific devices based on various criteria. This simplifies performing
actions and administrative functions on a particular set of devices. In addition, you can set up the Self-Service Portal
(SSP) to empower end users to manage their own devices and reduce the strain on Help Desk personnel.
In This Section
Using the Device Dashboard – Explains how administrators can locate and manage Apple TVs in the AirWatch Admin
Console.
Using the Device List View – Details how to use the Devices List View to search for, filter, and perform remote
actions on multiple Apple TV devices.
Using the Device Details Page – Walks through the ways you can manage Apple TVs from using the Device Details
Page in the AirWatch Admin Console.
Utilizing Reports – Presents reports and collected data within the AirWatch Admin Console featuring detailed
information on all aspects of your deployment.
Using the Hub – Presents the data flow within AirWatch Hub and how to use the data within.
Using the Self-Service Portal – Explains how users can manage their Apple TVs from the Self-Service Portal.
12Using the Device Dashboard
As devices are enrolled, view and manage them from the AirWatch Device Dashboard. The Device Dashboard provides a
high-level view of your entire fleet of mobile devices while allowing a quick and easy way to drill down to individual
devices and take MDM actions. View graphical representations of relevant statistics, including important device
information for your fleet, such as device ownership type, compliance statistics and platform breakdown.
Select any of the available data views from the Device Dashboard to quickly access each set of devices in the List View.
From this List View, take administrative action, including send a message, lock devices, delete devices and change
groups associated with the device.
Using the Device List View
Switch to List View (Devices ►List View) at any time to sort and manage devices by filtering the columns and fields
available in the Device Dashboard, including:
Last Seen Username
Friendly Name Display Name
Ownership Platform/OS/Model
13o Corporate - Dedicated Organization Group
o Corporate - Shared Compliance Status
o Employee-Owned
Select on a device Friendly Name at any time to open up the device details page for that device.
Sort columns and configure information filters to gain insight on device activity based on specific information you are
curious about. For example, sort the Compliance Status column to view only devices that are currently out-of-
compliance and take action or message only those specific devices. Search all devices for a friendly name or user's name
to isolate one device or user. Once you have sorted or filtered dashboard information, export, save and send the data
for review.
14Using the Search List, Filters, and Bulk Messaging
At times, you will need to search for a single device for quick access to its information and take remote action on the
device. For example, search for a specific device, platform or user. Navigate to Devices ►List View ►Search List and
search for all devices within the current Organization Group and all child groups.
You can also drill down to specific sets of devices by filtering device criteria,
including by Platform, Ownership Type, Passcode, Last Seen, Enrollment,
Encryption and Compromised status.
You can also search specific information across all fields associated with devices
and users, allowing you to search user name ("John Doe") or device type.
Once you have applied a filter to show a specific set of devices, perform bulk
actions to multiple, selected devices by clicking the check box for those devices
and selecting an action from the Management tabs.
Using the Management Tabs
With the categorized devices displayed, take bulk action on specific devices by selecting the check box next to each
device and using the top Control Panel to:
Note: The actions listed below will vary depending on factors such as device platform, AirWatch Admin Console settings,
and enrollment status.
15With the categorized devices displayed, take bulk action on specific devices by selecting
the check box next to each device and using the top Control Panel to:
Query – Query all selected devices for current device info, including last seen, OS, model
and compliance status.
Send – Access Send Message menu and compose message to send to selected devices.
Lock – Lock all selected devices and force users to re-enter device security PIN.
More – View commands that you can perform on all selected devices. For example:
Management – Query, lock or perform Enterprise Wipe on all selected devices.
Support – Send a message to a device with instructions or communication to end
user. Locate current GPS location of all selected devices.
Admin – Change AirWatch Admin Console settings, including changing Organization
Group, Ownership type or device group of selected devices or deleting devices from
AirWatch MDM.
Advanced – Perform a warm boot on devices to remotely reboot those devices.
Select Provision Now to perform a number of configuration for selected devices.
Select Install Product to install a particular apps to selected devices.
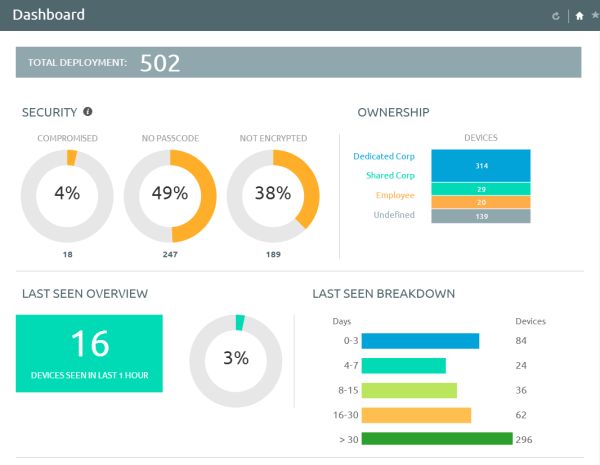
Using the Device Details Page
Use the Device Details page to track detailed device information and quickly access user and device management
actions. You can access the Device Details page by either selecting a device's Friendly Name from the Device Search
page, from one of the available Dashboards or by using any of the available search tools with the AirWatch Admin
Console.
Use the Device Details menu tabs to access specific device information, including:
Summary – View general statistics such as enrollment status, compliance, last seen, platform/model/OS,
Organization Group, contact information, serial number, power status, storage capacity, physical memory and
virtual memory.
Profiles – View all MDM profiles currently installed on a device.
Location – View current location or location history of a device.
User – Access details about the user of a device as well as the status of the other devices enrolled to this user.
The menu tabs below are accessed by clicking More from the main Device Details tab :
Security – View current security status of a device based on security settings.
Restrictions – View the types of restrictions that currently apply to the device.
16 Notes – View and add notes regarding the device. For example, note the shipping status or if the device is in repair
and out of commission.
Certificates – Identify device certificates by name and issuant. This tab also provides information about certificate
expiration.
Alerts – View all alerts associated with the device.
Event Log – View history of device in relation to MDM, including instances of debug, information and server check-
ins.
Status History – View history of device in relation to enrollment status.
Attachments – Add files associated to the device.
Performing Remote Actions
The More drop-down on the Device Details page enables you to perform remote actions over-the-air to the selected
device. See below for detailed information about each remote action.
Note: The actions listed below will vary depending on factors such as device platform, AirWatch Admin Console settings,
and enrollment status.
Device Query – Send comprehensive MDM information from the device to the AirWatch Admin Console.
Set Region – Set language and locale for the device.
Enterprise Wipe – Remove all AirWatch profiles, apps and content from the device.
Device Wipe – Perform a full wipe of the device, removing all data, email, profiles and MDM capabilities and the
phone returns to a factory default state. Prior to the wipe, a device ownership confirmation message serves as a
security precaution, and a key code is a requirement for performing the device wipe.
Sync Device – Compile and re-push down all pending profiles to the device.
Utilizing Reports
AirWatch has extensive reporting capabilities that provide administrators with actionable, result-driven statistics about
their device fleets. IT administrators can leverage these pre-defined reports or create custom reports based on specific
devices, User Groups, date ranges or file preferences.
In addition, the administrator can schedule any of these reports for automated distribution to a group of users and
recipients on either a defined schedule or a recurring basis. For example, you can run reports to see the number of
compromised devices, how many devices there are for a specific make or model, or the total amount of devices running
a particular version of an operating system.
Using the Hub
Utilize the AirWatch Hub as your central portal for fast access to critical information. Quickly identify important issues or
devices and take action from a single location in the AirWatch Admin Console. Select any metric to open the Device List
View for that specific set of devices, where you can perform actions such as sending a message to those devices.
17For more information about using the Hub to filter and view specific information, refer to the Managing Devices section
of the AirWatch Mobile Device Management Guide.
Using the Self-Service Portal (SSP)
The AirWatch Self-Service Portal (SSP) allows end users to remotely monitor and manage their smart devices. The Self-
Service Portal lets you view relevant device information for enrolled devices and perform remote actions such as clear
passcode, lock device, or device wipe.
Using the SSP
Logging into the SSP
You can access the SSP by logging in through a browser. To do this, navigate to the SSP website using the URL provided
to you. It should look similar to this format: https://mdm.acme.com/mydevice. Once you launch the SSP, you can log in
18using the same credentials (Group ID, username and password) you used to enroll in AirWatch. Optionally, if Email
Domain registration is configured, you can log in using your corporate email address.
Selecting a Device in the SSP
After logging in to the SSP, a list of all devices tied to your user account displays on the left. Select the device you want
to manage. The Device Details screen displays.
Viewing Device Information
The following tabs display device-related information:
Security – This tab displays the information specific to security controls currently in place for the device, including:
enrollment status, assigned profile status, installed certificate status, certificates nearing expiry and installed
applications.
Profiles – This tab shows all of the MDM profiles that have been sent to the devices enrolled under your user
account and the status of each profile. From the Profiles view, you can select the install icon ( )to install a profile
or the delete icon ( ) to remove it from the device.
Certificates – This tab displays a detailed listing of certificates currently assigned to and installed on the device.
From the Certificates view, you can deactivate, renew or remove a certificate, if allowed.
Event Log – This tab contains a comprehensive log of all interactions between the AirWatch Admin Console and the
device.
Perform Remote Actions
The Remote Actions enable you to perform remote actions over-the-air to the selected device. See below for detailed
information about each remote action.
Note: All remote action permissions are determined by your administrator and therefore you may not be able to
perform all listed actions.
Device Query – Manually requests the device to send a comprehensive set of MDM information to the AirWatch
Server.
Enterprise Wipe – Wipes all corporate data from the selected device and removes the device from AirWatch MDM.
All of the enterprise data contained on the device is removed, including MDM profiles, policies and internal
applications. The device will return to the state it was in prior to the installation of AirWatch MDM.
Device Wipe – Wipes all data from the selected device, including all data, email, profiles and MDM capabilities and
returns the device to factory default settings.
Sync Device – Sync the device with the AirWatch Admin Console.
19You can also read