SECURETRANSPORT AZURE INSTALLATION GUIDE - VERSION 5.5 17 AUGUST 2021
←
→
Page content transcription
If your browser does not render page correctly, please read the page content below
SecureTransport
Version 5.5
17 August 2021

Azure Installation Guide
Copyright © 2021 Axway

All rights reserved.

This documentation describes the following Axway software:

Axway SecureTransport 5.5

No part of this publication may be reproduced, transmitted, stored in a retrieval system, or translated into any human or
computer language, in any form or by any means, electronic, mechanical, magnetic, optical, chemical, manual, or otherwise,
without the prior written permission of the copyright owner, Axway.

This document, provided for informational purposes only, may be subject to significant modification. The descriptions and
information in this document may not necessarily accurately represent or reflect the current or planned functions of this
product. Axway may change this publication, the product described herein, or both. These changes will be incorporated in new
versions of this document. Axway does not warrant that this document is error free.

Axway recognizes the rights of the holders of all trademarks used in its publications.

The documentation may provide hyperlinks to third-party web sites or access to third-party content. Links and access to these
sites are provided for your convenience only. Axway does not control, endorse or guarantee content found in such sites. Axway
is not responsible for any content, associated links, resources or services associated with a third-party site.

Axway shall not be liable for any loss or damage of any sort associated with your use of third-party content.
Contents

    1 Introduction                                                             5
        About SecureTransport                                                  5
        Overview                                                               5

    2 SecureTransport in Azure Virtual Network                                 7

    3 Create a Virtual Network                                               10

    4 Network Security Groups                                                11
        Create Network Security groups                                        11
           SecureTransport Edge Security Group                                13
           SecureTransport Server Security Group                              16
           External Database Security Group                                   18
           GlusterFS Security Group                                           18
           Administration Host Security Group                                 19
        Subnets                                                               20
           Create subnets                                                     20

    5 Launch VM instances                                                    22

    6 Launch an instance for the Administration Host                         25

    7 Launch instances for SecureTransport components                        26
        Launch SecureTransport Edge instances                                 26
        Launch SecureTransport Server instances                               26
        Set up GlusterFS servers                                              27
           Attach additional volumes                                          27
           Install GlusterFS                                                  27

    8 Launch GlusterFS instances                                             28
           Attach additional volumes                                          28
           Install GlusterFS                                                  28

    9 Configure MS SQL Cluster                                               29

    10 Configure a Point-to-Site connection to your VNet                     30

    11 Set up Enterprise Cluster with streaming                              31
        Prerequisites                                                         31

Axway SecureTransport 5.5                                  Azure Installation Guide 3
Install SecureTransport 31
12 Set up Basic Load Balancer 32
Configure Health probes 32
Add a Backend pool 33
Add Load Balancing rules 33
13 Criteria for a successful setup 36
Axway SecureTransport 5.5 Azure Installation Guide 4Introduction
1
The current guide provides a basic outline regarding the installation of SecureTransport on a RedHat
Virtual Machine as deployed on the Microsoft Azure portal. You will pass through several simple stages
until you can finally proceed with your SecureTransport installation.
About SecureTransport
SecureTransport is part of the Axway family of managed file transfer (MFT) products.
SecureTransport allows organizations to adeptly control and manage the transfer of files inside and
outside of the corporate firewall in support of mission-critical business processes, while satisfying
policy and regulatory compliance requirements. SecureTransport serves as a hub and router for
moving files between humans, systems and more. SecureTransport also completes tasks related to
moving files (push or pull), hosting files in mailboxes or "FTP-like" folders, and provides portal access
with configurable workflow for file handling and routing. SecureTransport delivers user-friendly
governance and configuration capabilities, including delegated administration and pre-defined and
configurable workflows, while providing the highest possible level of security.
For a complete description of SecureTransport features and components, refer to the
SecureTransport Administrator's Guide.
Overview
This document provides a detailed overview and detailed instructions to set up SecureTransport in the
Microsoft Azure Virtual Network (VNet).
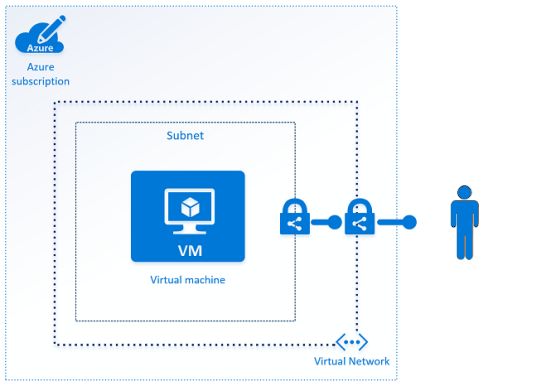
The Microsoft Azure Virtual Network service enables Azure resources to securely communicate with
each other in a virtual network. A virtual network is a logical isolation of the Azure cloud dedicated to
your subscription. You have complete control over your virtual networking environment, including
selection of your own IP address range, creation of subnets, and configuration of route tables. You
can connect virtual networks to other virtual networks, or to your on-premises network. The following
diagram shows some of the capabilities of the Azure Virtual Network service:
Axway SecureTransport 5.5 Azure Installation Guide 51 Introduction
Learn more about Azure Virtual Network.
Axway SecureTransport 5.5 Azure Installation Guide 6SecureTransport in Azure
Virtual Network 2
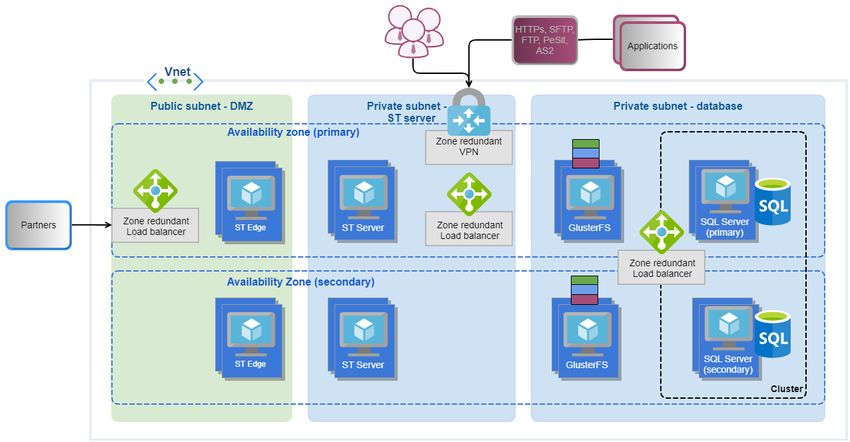
As of date of issue of the current guide, deployment of SecureTransport on Azure VNet is verified for
Red Hat Enterprise Linux in an Enterprise Cluster deployment with streaming setup to a cluster of
Edges.
The primary deployment architecture includes the SecureTransport Edges in cluster setup, logically
separated in the Public Subnet – DMZ. Streaming is established to all SecureTransport Edges from the
SecureTransport Servers. On the Backend part, the MS SQL cluster server and the GlusterFS Shared
storage servers reside in another dedicated Private Subnet.
Note The SQL servers are installed on Azure VMs and not as Azure SQL Database services.
Availability zones
To ensure high availability (HA), it is recommended to distribute Enterprise Cluster nodes evenly
across the two availability zones.
An Availability Zone is a unique physical location within a given Azure region which hosts the VMs of all
SecureTransport components. The SecureTransport deployment model described here suggests two
availability zones: each of which contains an equal number of SecureTransport Edges and Enterprise
Cluster nodes.
Availability zones provide a way to make applications highly available and protected from disaster
recovery with reliable replication of data with other zones.
Axway SecureTransport 5.5 Azure Installation Guide 72 SecureTransport in Azure Virtual Network
A zone in an Azure region provides a combination of a fault domain and an update domain. This
means that your VMs are effectively distributed across the update domains and fault domains and
maintain instant availability of replicated apps and data in another zone.
SQL Clustering
The primary and secondary MS SQL servers are deployed in an Always On availability group. This
availability group requires a cluster manager component. In Windows, failover clustering provides the
cluster manager (Windows Server Failover Cluster (WSFC)).
The availability replica of a given availability group must reside on the secondary node of the same
failover cluster. The shared storage GlusterFS servers are deployed in a similar fashion.
Depending on your requirements, you can deploy a load balancers for workload distribution across
your Edges.
This architecture concept allows high availability with controlled replication and logging across all
components in Azure.
As an optional component, there is a host placed in the public subnet called "Administration host"
(also known as "Bastion host" or “Jump host”). Bastion hosts are instances that typically reside within
your public subnet and are usually accessed using SSH or RDP. Once remote connectivity is
established with the bastion host, it then acts as a jump server, allowing you to use SSH or RDP to log
in to publicly inaccessible instances. The Administration host is used to perform maintenance and
administration tasks on the servers in the SecureTransport setup. If you consider resiliency and high
availability of your services in cloud deployments, the recommended practice is to have each of the
Administration hosts placed in a different Availability Zone in case one of the hosts goes down. For
minimal security risks, you should stop your Administration host instances for the duration of no
maintenance work and start them when you need access to your servers in Azure again.
You can connect directly to your VNet using a Point-to-Site connection in case you don't want to have
an Administration host in your setup (see Configure a Point-to-Site connection to your VNet section in
this guide).
The installation of SecureTransport on Red Hat instances in Microsoft Azure cloud follows a flow which
is the same as that of an installation on a regular Red Hat machine, including the required installation
prerequisites. This process is already described in the SecureTransport 5.5 Installation Guide.
You will pass through several Azure cloud specific setup and configuration stages until you are able to
proceed with your SecureTransport installation.
To set up SecureTransport in Azure Virtual Network, you must pass through the following steps:
1. Create a Virtual Network.
2. Create Network Security Groups.
3. Create one public and two private subnets.
4. Launch the following instances:
a. (optionally) Launch an instance for an Administration Host.
b. Launch instances in the public subnets for SecureTransport Edge installations.
c. Launch instances in the private subnets for SecureTransport Server installations.
Axway SecureTransport 5.5 Azure Installation Guide 82 SecureTransport in Azure Virtual Network
d. Launch instances in the private subnets for external GlusterFS file system.
Note Make sure to separate all components of each Enterprise Cluster node in a respective
Availability Zone.
5. Set up two Microsoft SQL Server Always On Availability groups, deployed in a Windows Server
Failover Cluster(WSFC).
6. Establish VPN connection to your Azure VNet.
7. Set up SecureTransport Enterprise Cluster.
8. Set up Load Balancer.
Axway SecureTransport 5.5 Azure Installation Guide 9Create a Virtual Network
3
To create a VNet, follow these steps:
1. Log in to the Azure Portal and
navigate to the Create a resource.
2. Under the "Azure Marketplace"
section, choose Networking.
3. Under the "Featured" section, choose
Virtual Network.
4. Fill in the settings and click Create.
Note The image provides an
example Address
space. You can
configure the Address
space according to your
needs.
Axway SecureTransport 5.5 Azure Installation Guide 10Network Security Groups
4
Azure provides two features that you can use to increase security in your VNet: network security
groups and endpoint ACLs. Security groups control inbound and outbound traffic for your instances or
subnets, and endpoint ACLs control inbound and outbound traffic for your VM endpoint. For more
information, see the Azure Security Documentation:
l Network Security groups - these act as a firewall for associated VMs or Subnets, controlling both
inbound and outbound traffic.
l Endpoint access control lists (ACLs) - provides the ability to selectively permit or deny traffic for a
virtual machine endpoint. This packet filtering capability provides an additional layer of security.
You can specify network ACLs for endpoints only. You cannot specify an ACL for a virtual network
or a specific subnet contained in a virtual network. It is recommended to use network security
groups (NSGs) instead of ACLs, whenever possible.
For more details on security options check the Azure Security Best Practices guide.
Note The firewall of the instance is with higher priority than the instance’s Network Security
Group. So, if you would like to use NSG, the instance’s firewall must be configured in the
same way as the NSG’s rules.
Note The suggested configurations with Network Security Groups as stated in the current guide
do not include outbound rules. For more information on best practices for the outbound rules
to apply for your setup, please refer to the SecureTransport Installation guide.
Create Network Security groups
When you launch a virtual machine in a VNet, you can associate it with one network security group
that you have created. If you do not specify a network security group when you launch an instance, all
traffic to this instance is allowed.
It is recommended that you create the network security groups you need for your SecureTransport
infrastructure in Azure as a first stage before proceeding with rest of the setup. You need to group
(assign) the instances and components into the following security groups:
l SecureTransport Edge network security group
l SecureTransport Server network security group
l External Database network security group
l External File System network security group
l Administration Host security group
Axway SecureTransport 5.5 Azure Installation Guide 114 Network Security Groups
It is recommended to have all components prepared prior the launch process of the instances. In this
way, during your SecureTransport setup, you will just select the network security group you need
from the list. You can always create the Network Security Groups on a later stage but we suggest you
adhere to the flow as described.
To create a network security group in Azure VNet:
1. Navigate to the Azure Portal and go to Create a resource.
2. Under the "Azure Marketplace" section, choose Networking.
3. Under the "Featured" section, choose Network Security Group.
4. On the newly opened dialog box, enter the required information and click Create.
5. Now that your NSG is created, you can select it on the "All resources" list.
6. Edit the "Inbound security rules" section of the network security group.
Axway SecureTransport 5.5 Azure Installation Guide 124 Network Security Groups
7. Use "Add" to enable/disable access to/from your instances on specific ports/source.
You must add the necessary inbound/outbound rules to the network security groups and the
instances assigned to each group will have the required for the group level of connectivity and
security. Please refer to the firewall specific information already provided in SecureTransport
Administrator guide.
You must give unique Name and Priority to each rule. Please, keep in mind that rules are applied
according to their priority. The lower the number, the higher the priority.
Note There are three default rules in each Network security group with the lowest priority that
cannot be modified and deleted. If you do not want them to take action, you can create a
rule with higher priority that denies all traffic.
Note The rules defined in the following Network Security Groups cover the most basic security
scenario. If you would like more restrictive rules, you can add more Inbound and Outbound
rules.
Note The rules below use default ports or ports specific for the test setup. Please change/add
rules according to your specific setup. Check the FTP does not work through the firewall
section in the SecureTransport Administrator Guide if you want to configure FTP.
SecureTransport Edge Security Group
Allow inbound traffic according to the Firewall rules section as described in the SecureTransport 5.5
Administrator's Guide.
Axway SecureTransport 5.5 Azure Installation Guide 134 Network Security Groups
Inbound traffic - this setup refers to traffic from the load balancer to the Edge serves.
l The Destination is a comma separated list of SecureTransport Edge Private IPs.
Note Specifying Any for Source and the fact that the SecureTransport Edge VMs do not have a
public IPs means that only the Load Balancer and VMs from the Virtual Network can access
the Edges on the specified ports.
Type Protocol Port / Port Source Description
Range
ST Edges TCP 80 Any HTTP
ST Edges TCP 443 Any HTTPS
ST Edges TCP 10022 Any SSH (SFTP and
SCP)
ST Edges TCP 21 Any FTP (secure and
non-secure)
control channel
(For secure
connections: the
firewall must allow
bidirectional
communication)
ST Edges TCP 20 Any FTP (secure and
non-secure)
active-mode data
channel
ST Edges TCP User-defined Any FTP (secure and
range non-secure)
passive-mode data
channel
ST Edges TCP 10080 Any AS2 (non-SSL)
ST Edges TCP 10443 Any AS2 (SSL)
ST Edges TCP 17617 Any PeSIT (non-SSL)
ST Edges TCP 17627 Any PeSIT over secure
socket (Transfer
CFT compatible)
Axway SecureTransport 5.5 Azure Installation Guide 144 Network Security Groups
Type Protocol Port / Port Source Description
Range
ST Edges TCP 17637 Any PeSIT over secure
socket (CFT
compatible)
ST Edges TCP 19617 Any PeSIT over pTCP
plain socket
ST Edges TCP 19627 Any PeSIT over pTCP
Secured Socket
Streaming – refers to traffic from the ST servers to the Edge serves.
l The Destination is a comma separated list of SecureTransport Edge Private IP addresses.
l The Source is comma separated list of SecureTransport Server Private IP addresses.
Type Protocol Port / Port Source Description
Range
ST Edges TCP 20080 SecureTransport Streaming HTTP
Servers Server
ST Edges TCP 20022 SecureTransport Streaming SSH
Servers Server
ST Edges TCP 20021 SecureTransport Streaming FTP
Servers Server
ST Edges TCP 21080 SecureTransport Streaming AS2
Servers Server
ST Edges TCP 20444 SecureTransport Streaming
Servers Administration
Tool Server
ST Edges TCP 27617 SecureTransport Streaming PeSIT
Servers Server
Internal communication – refers to traffic between the Edge serves and traffic from the
Administration host.
l The Destination is a comma separated list of SecureTransport Edge Private IP addresses.
Axway SecureTransport 5.5 Azure Installation Guide 154 Network Security Groups
Type Protocol Port / Port Source Description
Range
ST Edges TCP 33060 Administration Host Database
Private IP Administration
ST Edges TCP 33060 SecureTransport MariaDB or MySQL
Edges communication
ST Edges TCP 22 Administration Host SSH for
Private IP Administration
ST Edges TCP 444 Administration Host Administration
Private IP Tool (HTTPS)
ST Edges TCP 444 SecureTransport Cluster
Edges Synchronization
ST Edges TCP 8005 SecureTransport Tomcat shutdown
Edges
ST Edges TCP 8006 SecureTransport AS2 shutdown
Edges
ST Edges TCP 7800-7802 SecureTransport Hibernate second
Edges level cache
SecureTransport Server Security Group
Allow inbound traffic according to the Firewall rules section as described in the SecureTransport 5.5
Administrator's Guide.
Note Inbound traffic from 8088-8093 range should be allowed for both TCP and UDP protocols
from one SecureTransport Server to another (SecureTransport Server Security Group).
l The Destination is a comma separated list of SecureTransport Edge Private IPs.
l The Source is comma separated list of SecureTransport Edge Private IPs.
Type Protocol Port / Port Source Description
Range
SecureTransport TCP 80 SecureTransport SNMP
Servers Servers
Axway SecureTransport 5.5 Azure Installation Guide 164 Network Security Groups
Type Protocol Port / Port Source Description
Range
SecureTransport TCP 443 SecureTransport Cluster cache
Servers Servers management
SecureTransport UDP 10022 SecureTransport Cluster cache
Servers Servers management
SecureTransport TCP 444 Administration Host Administration
Servers Private IP Tool (HTTPS)
SecureTransport TCP 44431 SecureTransport Cluster Listener
Servers Servers
SecureTransport TCP 9999 SecureTransport TM JMX Port
Servers Servers
SecureTransport SSH 22 SecureTransport SSH for
Servers Servers Administration
SecureTransport TCP 8005 SecureTransport Tomcat shutdown
Servers Servers port
SecureTransport TCP 8009 SecureTransport Tomcat JK
Servers Servers connector
SecureTransport TCP 20444 SecureTransport Administration
Servers Servers Tool
SecureTransport TCP 7 SecureTransport Coherence
Servers Servers
SecureTransport TCP 7800-7802 SecureTransport Hibernate second-
Servers Servers level cache
SecureTransport TCP * Any Deny all TCP
Servers Traffic
SecureTransport UDP * Any Deny all UDP
Servers traffic
SecureTransport Any * SecureTransport Allow all ICMP
Servers Servers traffic for Cluster
communication
Axway SecureTransport 5.5 Azure Installation Guide 174 Network Security Groups
SecureTransport Server nodes communicate via ICMP protocol which is not available for selection as a
separate Protocol. If we want to enable it, we must enable the traffic for all protocols which we do not
prefer. So, we create two rules that deny all TCP and UDP traffic on all ports with lower priority than
the above rules. The rule with the lowest priority allows traffic on all protocols and ports. This means
that only the ICMP traffic will be allowed.
External Database Security Group
Allow the following inbound traffic:
Type Protocol Port / Port Source Description
Range
Database VM Any 1433 Administration Host Access to the
Private IP Private IP, database
SecureTransport
Servers
Database VM Any 3389 Administration Host RDP access to the
Private IP Private IP database VM
GlusterFS Security Group
Allow the following inbound traffic:
Type Protocol Port / Port Source Description
Range
GlusterFS Servers SSH 22 Administration Host Administration
Private IP Host Security
Group
GlusterFS Servers TCP 24007 GlusterFS Servers, Gluster Daemon
SecureTransport
Servers
GlusterFS Servers TCP 111 GlusterFS Servers, Portmapper
SecureTransport
Servers
GlusterFS Servers TCP 49152-49251 GlusterFS Servers, Each brick for
SecureTransport every volume on
Servers your host requires
its own port
Axway SecureTransport 5.5 Azure Installation Guide 184 Network Security Groups
Type Protocol Port / Port Source Description
Range
GlusterFS Servers TCP 2049 GlusterFS Servers, NFS
SecureTransport
Servers
Administration Host Security Group
Note Adding and Administration Host is an optional step. You can skip this subtopic if you are not
using an Administration Host in your deployment.
Allow the following inbound traffic:
Type Protocol Port / Port Source Description
Range
RDP TCP 3389 Your IP address Remote
connection to the
Administration
Host
The inbound rule is applicable for Windows instance in our case. Enter the source address from which
you plan to connect to the Administration Host.
Access your servers using Administration host
When designing the Administration host for your Azure infrastructure, you should use it only for
maintenance and administration. You need to keep it locked down as much as possible and avoid
opening unnecessary security holes. You could look into hardening your chosen operating system for
even tighter security. In order to minimize security risks, you should start your Administration host
instances only when you need access to your servers in Azure.
Network Security groups are essential for maintaining tight security and play a big part in making this
solution work. First, you need to create a network security group or update an existing one that will be
used to allow connectivity from the Administration host for your existing private instances (see the
SecureTransport Server Network Security Group in the Network Security groups section of the
guide). This NSG should only accept SSH or RDP inbound requests from your Administration hosts.
Apply this group to all your private instances that require connectivity.
Next, create a network security group to be applied to your Administration host. Inbound and
outbound traffic must be restricted at the protocol level as much as possible. The inbound rule base
should accept SSH or RDP connections only from the specific IP addresses (usually those of your
administrators' work computers). See the Administration Host Network Security Group in the Network
Security groups section of the guide. Your outbound connection should again be restricted to SSH or
RDP access to the private instances of your Azure infrastructure. An easy way to do this is to populate
the 'Destination' field with the IP of your private instances.
Axway SecureTransport 5.5 Azure Installation Guide 194 Network Security Groups
For more info, see Launch an instance for the Administration Host.
Subnets
After creating a VNet, you can add one or more subnets. Both Public and Private Subnets have
outbound access to the Internet by default. If you want inbound Internet traffic to you rVM, you give it
a Public IP, no matter of the Subnet. When you create a subnet, you specify the CIDR block for the
subnet, which is a subset of the VNet CIDR block.
Learn more about Subnets.
In the following example, the VNet has a single subnet.
Create subnets
Create three subnets (two private and one public) as follows:
1. Navigate to the Azure Portal, go to "All resources" and select your VNet.
2. Under the "Settings" section, choose Subnets.
3. Click +Subnet.
4. Fill the following settings.
l Name: specify unique name for each subnet
l IPv4 CIDR block: for each subnet specify a different block
l Network Security Group: None
l Route table: None
For example:
o 1.0.0/24 - Public
o 1.1.0/24 - Private1
o 1.2.0/24 - Private2
Note: This is an example CIDR block size. You can configure the CIDR block
according to your needs.
Axway SecureTransport 5.5 Azure Installation Guide 204 Network Security Groups
5. Click OK to add your subnet.
6. Repeat the steps for the additional subnets you wish to create.
Axway SecureTransport 5.5 Azure Installation Guide 21Launch VM instances
5
For the purpose of the described setup, we need seven RHEL instances in total:
l Two SecureTransport Servers – in the first Private Subnet
l Two SecureTransport Edges – in the Public Subnet
l Two GlusterFS Servers – in the first Private Subnet
l One instance to administer and access the above instances – Administration Host in one of the
public subnets
To launch a VM instance, follow these steps:
1. Navigate to the Azure Portal and click Create a resource.
2. Under the "Azure Marketplace" section, select Compute.
3. Under the "Featured" section, select Red Hat Enterprise Linux.
4. Fill in the Basics:
a. Give your VM a unique name
b. Select disk type: HDD or SSD
c. Select Authentication type: SSH public key or Password
d. Select your Subscription
e. Select existing or create a new Resource group
f. Select your Location
Axway SecureTransport 5.5 Azure Installation Guide 225 Launch VM instances
5. Click OK.
6. Choose a Size according to the Minimum UNIX hardware requirements in the SecureTransport
5.5 Installation Guide.
Note: SecureTransport in Azure has been verified with D4S_V3 Standard image for all
RHEL instances.
Axway SecureTransport 5.5 Azure Installation Guide 235 Launch VM instances
7. Configure Settings
l High availability: Select the respective Availability Zone for each VM.
l Disk type: Choose between HDD and SSD.
l Use managed disks: Choose between Yes and No.
l Virtual Network: Select your previously created Virtual Network or create a new one.
l Subnet: Select your previously created subnet.
l Public IP address: Select None.
l Network security group: Select previously created NSG or create a new one.
l Extensions: You can add new features, like configuration management or antivirus
protection.
l Enable Auto-shutdown: Choose between Off and On.
l Boot diagnostics: Choose between Enabled and Disabled.
l Guest OS diagnostics: Choose between Enabled and Disabled.
l Diagnostics storage account: Choose existing or create a new one.
8. Review the Summary and click Create.
Axway SecureTransport 5.5 Azure Installation Guide 24Launch an instance for the
Administration Host 6
Note Adding and Administration Host is an optional step. You can skip this chapter if you are not
using an Administration Host in your deployment.
The Administration Host is an instance of a virtual machine you launch in the public subnet in your
VNet. You can use this machine to perform the following activities:
l SecureTransport installations on launched instances
l Configurations on your launched instances
l Maintenance and administration tasks on your instances
Follow the steps for launching RHEL Instance with the following specifics:
1. Choose an Azure image and select the operating system that will be most suitable for your
administering needs.
2. Choose an Instance Size that will be most suitable for your administering needs.
3. Configure Instance Settings -> Virtual network.
4. Choose your Virtual Network.
5. Configure Instance Settings -> Subnet.
6. Choose the public subnet in your VNet.
7. Configure Instance Settings -> Public IP address (depending on the connectivity you would
like to have to this host).
8. Configure Instance Settings -> Network security group.
9. Assign the instance with the previously created Administration Host Network Security Group as
described in Network Security Groups.
Axway SecureTransport 5.5 Azure Installation Guide 25Launch instances for
SecureTransport components 7
This chapter outlines the procedures for launching your SecureTransport Server and Edge instances,
as well as your shared storage. Remember to distribute instances equally across your Enterprise
clusters.
Launch SecureTransport Edge instances
Follow the steps for launching RHEL Instance with the following specifics:
1. Configure Instance Settings-> High availability.
2. Select the respective Availability Zone for each SecureTransport Edge.
3. Configure Instance Settings->Subnet.
4. Choose the public subnet in your VNet.
5. Configure Instance Settings -> Public IP address:
6. Configure Instance Settings -> Network security group.
7. Assign both SecureTransport Edges to the previously created SecureTransport Edge Network
security group as described in Network Security Groups .
Launch SecureTransport Server instances
Follow the steps for launching RHEL Instance with the following specifics:
1. Configure Instance Settings-> High availability.
2. Select the respective Availability Zone for each SecureTransport Server.
3. Configure Instance Settings->Subnet.
4. Choose the first private subnet in your VNet.
5. Configure Instance Settings -> Public IP address:
6. Configure Instance Settings -> Network security group.
7. Assign both SecureTransport Servers to the previously created Security Group as described in
Network Security Groups.
Axway SecureTransport 5.5 Azure Installation Guide 267 Launch instances for SecureTransport components
Set up GlusterFS servers
Follow the steps for launching RHEL Instances with the following specifics:
1. Configure Instance Settings-> High availability.
2. Select the respective Availability Zone for each GlusterFS instance.
3. Configure Instance Settings-> Storage.
4. Select Yes for Use managed disks.
5. Configure Instance Settings->Subnet.
6. Choose the first private subnet in your VNet.
7. Configure Instance Settings -> Public IP address:
8. Configure Instance Settings -> Network security group.
9. Assign both GlusterFS servers to the previously created GlusterFS Network Security Group as
described in Network Security Groups .
Attach additional volumes
You will need to attach additional volumes to the GlusterFS instances, as they need two or more
virtual disks.
Create two Managed Disks:
1. Navigate to Azure Portal and click Create a resource.
2. in the search field, type "Managed Disks" and click the search icon.
3. Fill in the Settings.
For each GlusterFS Server do the following:
1. Navigate to Azure Portal ->All resources.
2. Select your GlusterFS Instance.
3. UnderSettings section selectDisks -> +Add data disk.
4. Select the previously created data disk.
5. Click Save.
Install GlusterFS
Follow the instructions for installing GlusterFS in the GlusterFS Documentation.
Axway SecureTransport 5.5 Azure Installation Guide 27Launch GlusterFS instances
8
Follow the steps for launching RHEL Instances with the following specifics:
1. Configure Instance Settings-> High availability.
2. Select the respective Availability Zone for each GlusterFS instance.
3. Configure Instance Settings-> Storage.
4. Select Yes for Use managed disks.
5. Configure Instance Settings->Subnet.
6. Choose the first private subnet in your VNet.
7. Configure Instance Settings -> Public IP address:
8. Configure Instance Settings -> Network security group.
9. Assign both GlusterFS servers to the previously created GlusterFS Network Security Group as
described in Network Security Groups .
Attach additional volumes
You will need to attach additional volumes to the GlusterFS instances, as they need two or more
virtual disks.
Create two Managed Disks:
1. Navigate to Azure Portal and click Create a resource.
2. in the search field, type "Managed Disks" and click the search icon.
3. Fill in the Settings.
For each GlusterFS Server do the following:
1. Navigate to Azure Portal ->All resources.
2. Select your GlusterFS Instance.
3. UnderSettings section selectDisks -> +Add data disk.
4. Select the previously created data disk.
5. Click Save.
Install GlusterFS
Follow the instructions for installing GlusterFS in the GlusterFS Documentation.
Axway SecureTransport 5.5 Azure Installation Guide 28Configure MS SQL Cluster
9
Your SQL Cluster configuration includes installation of each SQL instance on Windows VMs (each in its
respective Availability zone). You then must configure them in a WSFC cluster and then set them up in
an Always On availability group.
You will need the following components:
1. AD server containing domain accounts for SQL Server services account and SQL Server Agent
service account
2. File share witness server
3. Azure Load Balancer
4. Two Windows Datacenter VMs (each placed in a different Availability Zone).
Follow the steps for launching a VM instance with the following specifics:
a. Select a supported Windows Server for image.
b. Select an appropriate size - for example SecureTransport with D4_V3 Standard
size for VM instance.
c. Configure Instance Settings-> Subnet.
d. Choose the respective private subnet in your VNet.
e. Configure Instance Settings -> Public IP address:
f. Configure Instance Settings -> Network security group.
g. Assign the Windows VM to the previously created Database Network security
group as described in Network Security Groups
5. Install SQL Server on each of the two instances.
6. Set up Windows failover cluster
7. Set up Always On availability group.
Axway SecureTransport 5.5 Azure Installation Guide 29Configure a Point-to-Site
connection to your VNet 10
A Point-to-Site (P2S) configuration allows you to create a secure connection from a client computer to
your virtual network. So, you need a P2S SSTP tunnel for a client to connect to your VM.
On the Azure portal, open your newly created VM and follow the process as defined in the detailed
documentation as provided by Microsoft.
First-timers must go through all steps as defined in the Microsoft documentation:
1. Create a virtual network.
2. Specify address space and subnets.
3. Add a gateway subnet.
4. Specify a DNS server (optional).
5. Create a virtual network gateway.
6. Generate certificates:
l Obtain the .cer file for the root certificate: generate a network-side certificate and paste
the public part in the Gateway >P2S configuration.
l Generate a client certificate.
7. Add the client address pool.
8. Upload the root certificate .cer
9. Install the VPN client configuration package.
l Download the client configuration package: for example, VPN client (e.g. x64).
l Install the client configuration package.
10. Install the client certificate - generate a client certificate for secure connection to VPN.
11. Connect to Azure - verify that you can connect to your VM using its private IP address.
12. Verify your connection.
Axway SecureTransport 5.5 Azure Installation Guide 30Set up Enterprise Cluster
with streaming 11
Prerequisites
The following list outlines the prerequisites necessary for the described SecureTransport Enterprise
cluster setup.
1. Two RHEL Instances for SecureTransport Servers.
2. Two RHEL Instances for SecureTransport Edges.
3. Two RHEL Instances with GlusterFS Servers installed.
4. One Administration Host (optional).
5. One Microsoft SQL Server.
For correct setup of all your instances, please refer to the Prerequisites -> UNIX-based platforms topic
in the SecureTransport5.5 Installation Guide.
Note Make sure to have the following prerequisite installation package added:
ld-linux.so.2 library package
Install SecureTransport
1. Install SecureTransport Servers as described in the SecureTransport Installation Guide: Install
SecureTransport Server in an Enterprise Cluster or to use an external database.
2. Install SecureTransport Edges as described in the SecureTransport Installation Guide: Install
SecureTransport Server to use the embedded database and in the SecureTransport
Administrator's Guide: SecureTransport Edge synchronization
3. Install GlusterFS client on both SecureTransport Servers and mount the GlusterFS volume on the
client side.
For further reference, see GlusterFS Documentation.
Axway SecureTransport 5.5 Azure Installation Guide 31Set up Basic Load Balancer
12
Azure Load Balancer delivers high availability and network performance to your applications. It is a
Layer 4 (TCP, UDP) load balancer that distributes incoming traffic among healthy instances of services
defined in a load-balanced set. Azure Load Balancer supports two different types: Basic and Standard.
We have verified Basic Load Balancer.
When you create a load balancer in a VNet, you can make it an internal load balancer or an Internet-
facing load balancer. You create an Internet-facing load balancer.
When you create your load balancer, you configure Frontend IP, Load Balancing rules, health probes,
and register back-end instances. You configure a Load Balancing rule by specifying a protocol and a
port for front-end (client to load balancer) connections, and a protocol and a port for back-end (load
balancer to back-end instances) connections. You can configure multiple rules for your load balancer.
Follow these steps to create a Basic Load Balancer redirecting requests to SecureTransport Edge
instances in Azure VNet:
1. Log in to Azure portal -> Create a resource.
2. Under Azure Marketplace section select Networking.
3. Under Featured section select Load Balancer.
4. Fill in the Basic settings:
a. Enter Load Balancer name.
b. Select Type: Public.
c. Choose a Public IP address - Select existing or create a new one.
d. Select your Subscription, Resource group and Location.
e. Click Create.
After creating the Load Balancer, you must configure Health probes, Backend pools and Load
Balancing rules.
Configure Health probes
1. Navigate to your Load balancer settings -> Health probes.
2. Click +Add.
3. Give your probe a Name, Protocol, Port, Interval and Unhealthy threshold.
Note: Create a Health probe for each Load Balancing rule specifying the port and protocol.
Axway SecureTransport 5.5 Azure Installation Guide 3212 Set up Basic Load Balancer
Add a Backend pool
1. Navigate to your Load balancer settings -> Backend pools.
2. Click +Add.
3. Fill in the Backend pool settings:
a. Give it a unique name.
b. Select both SecureTransport Edge Instances as a Target virtual machine.
c. Select each SecureTransport Edge Network IP Configuration.
4. Click OK.
Add Load Balancing rules
Axway SecureTransport 5.5 Azure Installation Guide 3312 Set up Basic Load Balancer
1. Navigate to your Load balancer settings -> Load Balancing rules.
2. Click +Add.
3. Fill in the Load Balancing rule settings:
a. Provide a unique name.
b. Select an IP version.
c. Select Frontend IP address from the drop-down menu.
d. Select a Protocol.
e. Select a Port on which the Load Balancer will be accessed.
f. Select a Backend Port to route traffic.
g. Select a Backend pool - target of the load balancer traffic.
h. Select a Health probe for the Load balancing rule.
i. Select Session persistence: Client IP and protocol.
j. Configure Idle timeout (minutes).
k. Select Floating IP.
Note: For each Load balancing rule select the Health probe that corresponds to the rules protocol and
port.
Axway SecureTransport 5.5 Azure Installation Guide 3412 Set up Basic Load Balancer
Note The Load balancing rules in the screenshot are configured with default ports or ports specific
for the test setup. Please change/add rules according to your specific setup.
Note Check the FTP does not work through the firewall section in the SecureTransport 5.5
Administrator's guide if you want to configure FTP listeners.
Now, your load balancer is ready to fetch requests and distribute them across your SecureTransport
Edge instances.
If you would like to use a friendly DNS name to access your load balancer, instead of the default DNS
name automatically assigned to your load balancer, you can create a custom domain name.
Axway SecureTransport 5.5 Azure Installation Guide 35Criteria for a successful
setup 13
Make sure that all the listed criteria meet the requirements for a successful SecureTransport:
1. Both SecureTransport Server and Edge Clusters are synchronized and work as expected.
2. Successful end-user login over the desired protocols via the Load Balancer or SecureTransport
Edge.
3. Successful file operations and transfers over the desired protocols.
Axway SecureTransport 5.5 Azure Installation Guide 36You can also read