Qualys App for IBM QRadar - User Guide Version 1.2.0 February 23, 2020 (Updated April 28, 2021)
←
→
Page content transcription
If your browser does not render page correctly, please read the page content below
Qualys App for IBM QRadar
User Guide
Version 1.2.0
February 23, 2020 (Updated April 28, 2021)
Copyright 2020-21 by Qualys, Inc. All Rights Reserved.
Qualys and the Qualys logo are registered trademarks of Qualys, Inc. All other trademarks are
the property of their respective owners.

Qualys, Inc.
919 E Hillsdale Blvd
4th Floor
Foster City, CA 94404
1 (650) 801 6100

Qualys App for IBM QRadar                                                               2
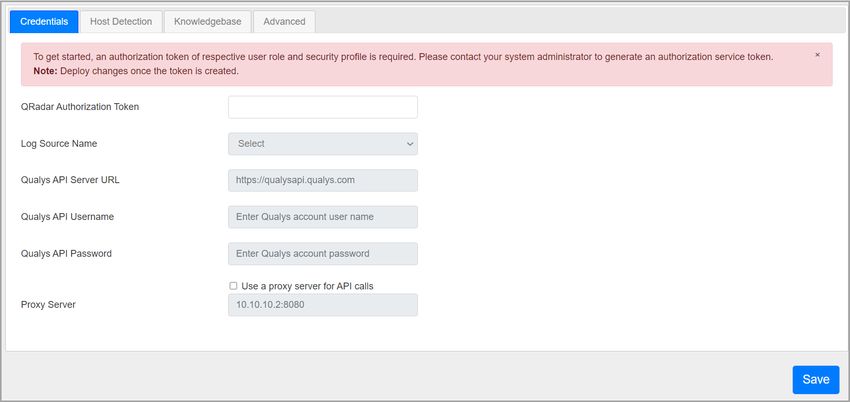
Table of Contents
Introduction to Qualys App for QRadar............................................................................. 5
What’s New in This Release .............................................................................................. 5
Prerequisites ....................................................................................................................... 5
Install the App .................................................................................................................... 5
Application Dependencies ................................................................................................. 6
Validating Dependencies ................................................................................................... 6
  Log Source Event Mapping ..................................................................................................... 6
  Enable Last Scan Datetime Parsing....................................................................................... 7
  Log Source ................................................................................................................................ 7
  Custom Event Properties ........................................................................................................ 8
Configure the App ............................................................................................................. 10
   Qualys API Configurations ................................................................................................... 10
      Credentials......................................................................................................................................... 10
      Proxy Configuration.......................................................................................................................... 11
      Host Detection................................................................................................................................... 12
      Knowledgebase ................................................................................................................................. 12
      Advanced ........................................................................................................................................... 13
   Advanced Configurations..................................................................................................... 14
      Index Management ........................................................................................................................... 14
Multi-tenant Environment ............................................................................................... 15
   Achieving Multi-tenancy and Segregating Data into Different Log Sources .................. 15
   Configuring Log Source ........................................................................................................ 16
   Managing Multi-tenant Apps ............................................................................................... 17
      Creating an Instance ........................................................................................................................ 17
      Managing Instances.......................................................................................................................... 19
      Configuring Instance ........................................................................................................................ 19
How Qualys App works? .................................................................................................. 20
 What happens after configuration? .................................................................................... 20
 How does data get into QRadar? ......................................................................................... 20
Using the Qualys app ....................................................................................................... 20
   Summary ............................................................................................................................... 20
   Knowledgebase ...................................................................................................................... 21
   Reports ................................................................................................................................... 22
   Search ..................................................................................................................................... 24
   Raw Data ................................................................................................................................ 25
   Input Logs .............................................................................................................................. 25
      Host Detection................................................................................................................................... 26
      Knowledgebase ................................................................................................................................. 26
Uninstalling the app ......................................................................................................... 27
Troubleshooting................................................................................................................ 28
   If you see no data .................................................................................................................. 28
   If your host detection job is not running............................................................................ 28
   If you get “[Errno 111] Connection refused” error ............................................................. 28

Qualys App for IBM QRadar                                                                                                                       3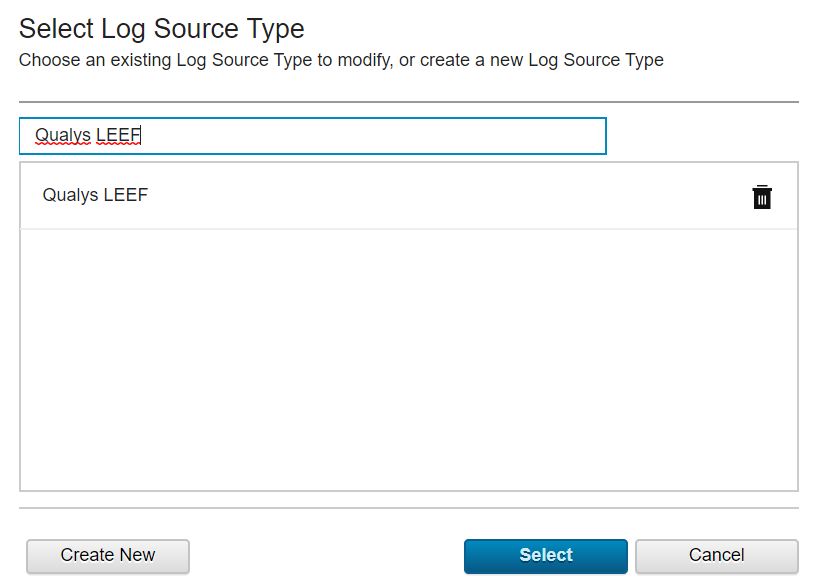
If you see “HTTP Error 401: Unauthorized” error .............................................................. 29
   If you see the ‘Number of host detections logged = 0’ in host detection ........................ 29
   If you see “corresponding record not found in KB” message ........................................... 29
   If you see “Internal Server Error” while saving settings ................................................... 29
   If dashboard widgets are not showing data for multi-tenant environment .................. 30
   DSM editor doesn’t show Tags or DNS properties and you can’t add them .................. 30
   If you need to delete and recreate Log Source Type “Qualys LEEF” ................................ 30
   Helpful AQLs to check VM Detection Logs and Events ..................................................... 32
      To check the logs .............................................................................................................................. 32
      To check the event data payload .................................................................................................... 32
Known Issues .................................................................................................................... 33
Previous Releases ............................................................................................................. 33
 1.1.4 ........................................................................................................................................ 33
 1.1.2 ........................................................................................................................................ 33
 1.1.1 ........................................................................................................................................ 34
Qualys Support ................................................................................................................. 34

Qualys App for IBM QRadar                                                                                                                    4
Introduction to Qualys App for QRadar
Use the Qualys App for QRadar to ingest your Qualys VM detections into QRadar and visualize
them on a single page. All you need to do is install the app, configure the app and schedule the
sync. The Qualys App will continuously pull your detection delta, so you always see updated
reports. Want to visualize historical data? Just use date-time pickers given in the Qualys App and
see useful reports.
What’s New in This Release
Features / Improvements:
- Support for multi-tenant environment
- Updates for Summary Tab Widget and Reports / Search Tab
- QRadar authentication token workflow is improved to upgrade existing version of Qualys
App for QRadar and for fresh installations
- Improved the Qualys App Settings interface. Added Advanced tab which shows the
success and failure messages for the etls running with process ids. User can download etl
logs from Advanced tab
Prerequisites
Make sure you have:
- A valid Qualys subscription
- API access to Qualys VM module
- Knowledgebase API access, if you want to enable Knowledgebase input
- Internet access and your Qualys API server must be reachable from QRadar
Install the App
Note
- Changes made for AQL are not compatible with QRadar 7.2.8 if your Qualys App
version is 1.1.0 or later.
- If you’re using Qualys App for QRadar with version 1.1.2 or before, you need to
uninstall existing app.
1) Log in to QRadar and go to the Admin tab.
2) Click Extensions Management.
3) Click the Add button and upload the extensions .zip file. Don’t have it? Click here to
download Qualys App for QRadar.
4) Confirm whether you want to replace/skip any existing contents with those coming from
the extension and click the Install button.
Note: If you’re upgrading Qualys App for QRadar by unchecking “Start default instance
for each App” option, it will still create shared instance. In this case, you need to delete
the shared instance from QRadar Assistant app and manually create separate instances
for desired security profile. For more information, refer Creating an instance.
5) Once installation is completed, refresh your QRadar user interface.
6) You should see the tab Qualys App for QRadar in the top menu.
7) Deploy changes once app installation is completed.
Qualys App for IBM QRadar 5Application Dependencies
This application has the following dependencies. These are installed by QRadar’s application
management while spinning up the application container.
- vixie-cron
- python-crontab-2.1.1.tar.gz
- pycrypto-2.6.1.tar.gz
The vixie-cron is installed by installing the rpm of cronie-anacron-1.4.4-16.el6_8.2.x86_64 &
cronie-1.4.4-16.el6_8.2.x86_64, whereas python-crontab-2.1.1 is installed locally using pip
command.
Starting from version 1.1.0, all application dependencies are bundled with the application itself.
Validating Dependencies
Please go through each of the sections listed below. You need to carry out the following steps
manually, right after you install the app and before you start using it. Some sections may not be
applicable in your case, and you may need to skip them.
Log Source Event Mapping
1) Go to Admin > DSM Editor.
2) In Select Log Source Type, search for “Qualys LEEF” and click Select button.
3) From the Qualys LEEF screen, go to Event Mappings tab. The requirement is that there
should be mapping for QualysMultiline and if you don’t see mapping for QualysMultiline,
create new (refer below steps).
4) Click + icon to add a new mapping. The “Create a new Event Mapping" pop-up opens. Set
Event ID as “QualysMultiline” (without quotes) and Category as “QualysMultiline”
(without quotes).
5) Click the Choose Event link. In the “Event Categorizations” pop-up that opens, click the
Create New button. Set the values as follows:
- Name: QualysMultiline Information
- Description: QualysMultiline Information
- Log Source Type: Qualys LEEF
- High Level Category: System
- Low Level Category: Information
- Severity: 2
6) Click Save. This will take you back to “Event Categorizations”.
Qualys App for IBM QRadar 67) Click and select the newly created entry, which is shown in the “Search Results” table.
8) Click Ok. This takes you back to “Create a new Event Mapping”.
9) Click Create. This takes you back to “Qualys LEEF” pop-up - Event Mappings tab.
10) Confirm that you now have 3 entries, including Event ID “QualysMultiline” - Category
“QualysMultiline”.
11) Finally, click Save and close the window.
Enable Last Scan Datetime Parsing
1) Go to Admin > DSM Editor.
2) In Select Log Source Type, search and select “Qualys LEEF”.
3) In the pop-up that opens, go to Properties. In the list of properties, search and open “Last
Scan Datetime”.
4) In the Property Configuration > Expression section, click Edit.
5) Notice the Enabled field. This field may be in disabled state (grayed out). If disabled,
select the Enabled field. It changes color.
6) Click OK in the Expression section.
7) Click Save and close the window.
Log Source
When you install app, it will create a new Log Source named “QualysMultiline”. Please check if it
is created. You can also create the custom log source for the Qualys app with following steps.
Keep the configuration of custom log source same as that mentioned below.
1) Qualys VM will send the data to QRadar console only. The user will not be able to use the
app for distributed setup.
2) On your console UI, go to Admin > Data Sources > Log Sources and click the Add button.
3) Add the details shown below to the form to Create QualysMultiline Log Source. All fields
marked with an asterisk (*) are mandatory. Make sure your Log Source Name and Log
Source Identifier have same value.
Property Value
Log Source Name QualysMultiline (Customizable) *
Log Source Description QualysMultiline
Log Source Type Qualys LEEF *
Protocol Configuration TCP Multiline Syslog *
Log Source Identifier QualysMultiline (Customizable, but *
same as Log Source Name)
Listen Port 12468 (Customizable)
Aggregation Method Start/End Matching *
Event Start Pattern [A-Z][a-z][a- *
z]\s\d\d\s\d\d:\d\d:\d\d\s
Event End Pattern qualys_event_ends *
Event Formatter No Formatting *
Show Advance Option Yes *
Use Custom Source Name Unchecked *
Use As A Gateway Log Source Checked *
Flatten Multiline Events Into Single Line Checked *
Retain Entire Lines During Event Checked *
Aggregation
Enabled Checked *
Qualys App for IBM QRadar 7Credibility 5
Target Event Collector
Coalescing Events Unchecked *
Store Event Payload Checked *
Log Source Extension QualysLEEFCustom_ext *
4) Click Save.
If you need to create this new Log Source manually, you must do a full deployment. For that,
please go to Admin > Advance and click Deploy Full Configuration.
Custom Event Properties
1) Go to Admin > Log Sources and confirm that QualysMultiline Log Source is Enabled. If it
is disabled, please enable it.
2) Go to Admin > Custom Event Properties and confirm that all 25 Qualys related
properties are Enabled and are linked to “Qualys LEEF” log source type.
Qualys related properties are:
- App Version
- PCI Flag
- Qualys QID
- Severity Level
- QID Category
- CVE
- Last Fixed Datetime
- Operating System
- Qualys Host ID
- Tracking Method
- First Found Datetime
- Qualys Severity
- Last Scan Datetime
- App ID
- Last Test Datetime
- Detection Type
- Patchable
- Last Update Datetime
- Network ID
- Last Found Datetime
- QID Title
- Host IP
- Status
- DNS
- Tags
For the Qualys related properties, complete these checks:
1) If any property is disabled, enable it.
2) If any property does not belong to the Qualys LEEF log source type, please open it to edit
and select Qualys LEEF as the log source type.
3) If any property does not belong to QualysMultiline log source, open it to edit and select
QualysMultiline as log source.
Qualys App for IBM QRadar 84) Please check if all Custom Event Properties have Event Name as QualysMultiline
Information. If not, select Event Name as QualysMultiline Information.
5) Finally, save the properties.
If you do not see the properties, please refer to the Troubleshooting section in this document to
learn how to delete and recreate Log Source Type “Qualys LEEF”.
For any change in Custom Event Properties, it is recommended to do Deploy Full Configuration.
Qualys App for IBM QRadar 9Configure the App For Single User Instance - If you want to use Qualys App for QRadar as single user instance, you just need to configure the steps mentioned in Qualys API Configurations. Multi-tenant Environment - If you want to use Qualys App for QRadar in multi-tenant environment, you need to configure the steps mentioned in Multi-tenant Environment section and then the steps mentioned in Qualys API Configurations. Qualys API Configurations Complete the following steps once you configure the app. 1) Log in to QRadar and go to the Admin tab. 2) Scroll to “Apps” section and click Qualys App Settings. A pop-up window opens. Credentials QRadar Authorization token is used while interacting securely with QRadar. You can obtain this token from Admin > User Management > Authorized Service. For multi-tenant environment, make sure that you create an authentication token with user role permission specific to the security profile's user and select security profile same as that of the instance is created and configured. For more information, refer Adding an authorized service. For example, here we’ve created instance for Security Profile A and users that will be using this instance has user role as User Role A. Hence, while creating authentication token for the created instance, follow the steps: a) Go to Authorized Services in Admin tab b) Click Add Authorized Service. c) Enter the desired Service Name. d) Select User Role as User Role A. e) Select Security Profile as Security Profile A. f) Set the expiry date as required. g) Click Create Service and then click Deploy changes. Qualys App for IBM QRadar 10
Use the Credentials tab to configure your Qualys credentials. Enter your Qualys API server,
username and password in the appropriate fields.

Proxy Configuration
If you want Qualys app to use proxy while calling the API, configure proxy details.
Select the check box to enable proxy.
Add your proxy server and proxy port in : format.
If your proxy needs authentication, add proxy user and proxy password along with server and
port, in :@: format.

Qualys App for IBM QRadar                                                                11
Host Detection
Use the Host Detection tab to configure and enable Host Detection input.

You must enable this input in order to use this extension. To enable this input, select the
checkbox in front of Enable Host Detection fetch.
In the Host Detection Cron Schedule field, write a valid cron entry (time part only). Your input
will run according to this schedule. This is a mandatory field. It’s advised that you keep the cron
schedule in sync with your scanning schedule. For example, if you run scans once a day,
schedule this input to run once a day. Learn about cron expressions…
(Optional) In the “Start Date-Time” field, enter the date from which you wish to fetch the VM
detection data. The date/time is specified in YYYY-MM-DD[THH:MM:SSZ] format (UTC/GMT),
like “2007-01-25T23:12:00Z”. This field is optional and may be left blank. When left blank, it
defaults to 1999-01-01T00:00:00Z.
(Optional) If you want to provide any extra parameters for the Host Detection API, set them in
the Extra API Parameters field, in valid JSON format. Please refer to the Qualys API (VM, PC) User
Guide for a list of API input parameters. This field is optional and may be left blank.
(Optional) If you want to get Tags in VM detection data, select the “Add Tags to Events” option.

Knowledgebase
Use Knowledgebase tab to configure and enable Knowledgebase input.
A copy of Qualys knowledgebase is bundled with this extension. To keep it up to date, please
enable this input. It is advised that you update your knowledgebase copy at least once a week.
To enable this input, select the checkbox in front of Enable Knowledgebase fetch.
In the Knowledgebase Cron Schedule field, write a valid cron entry (time part only). Your input
will run according to this schedule. This is a mandatory field. You might not want to run this
every day. Once a week is also OK. Learn about cron expressions…
(Optional) If you want to provide any extra parameters for the Knowledgebase API, set them in
the Extra API Parameters field, in valid JSON format. Please refer to the Qualys API (VM, PC) User
Guide for a list of API input parameters. This field is optional and may be left blank.

Qualys App for IBM QRadar                                                                     12
You can specify KB table batch size to define the number of records to be pulled for faster
loading.

Advanced
Use Advanced tab to see the last success and last failure for host detection and knowledgebase.

Qualys App for IBM QRadar                                                                 13
Advanced Configurations
These are the advanced and optional configurations which provides you additional benefits
while using Qualys App for QRadar!
Index Management
From the QRadar Console, you can use the Index Management tool to control database indexing
on event and flow properties. By adding an indexed field in your search query, it helps to
improve the speed of searches in QRadar by narrowing the overall data. Learn how to modify
database indexing in the Index Management tool by making use of statistics before and after you
enable or disable indexing on multiple properties.
Steps to enable indexing for the specific custom event properties:
1) On the navigation menu, click Admin and then click Index Management in the System
Configuration section.
2) Search, select and click Enable Index for the below mentioned properties:
   •   Qualys Host Id (custom)
   •   Qualys Severity (custom)
   •   Qualys QID (custom)
   •   Status (custom)
   •   Last Scan Date (custom)
   •   Detection Type (custom)
Once you click Enable Index, Indexed column shows     (green bubble) for the indexed property.

3) Click Save.

For more information, refer Index management.

Qualys App for IBM QRadar                                                                14
Multi-tenant Environment
Multitenant environments allow Managed Security Service Providers (MSSPs) and multi-
divisional organizations to provide security services to multiple client organizations from a
single and shared IBM QRadar deployment. You don't have to deploy a unique QRadar instance
for each customer.
In a multitenant deployment, you ensure that customers see only their data by creating domains
that are based on their QRadar input sources. Then, use security profiles and user roles to
manage privileges for large groups of users within the domain. Security profiles and user roles
ensure that users have access to only the authorized information.

Achieving Multi-tenancy and Segregating Data into Different Log Sources
Prerequisites for Setup:
    • QRadar Version should be 7.4.0 (Fix pack 1) or later
    • QRadar Assistant App must be installed with Version 3.0.0 or later
    • Qualys App for QRadar Version 1.2.0 ( or later ) should be installed
    • QRadar Log Source Management app should be installed

Prerequisites for Configurations:
    • Creating Log Sources - Event ID, Event Category and Event Mappings
    • Creating Tenant
    • Creating and assigning a domain to the tenant
    • Creating a Security profile and associating Domains and Log sources to it
    • Creating a user role for Tenant users
    • Create the tenant users with desired User role and Security profile

Qualys App for IBM QRadar                                                              15
Configuring Log Source
User can create custom log sources of "Qualys LEEF" log source type to segregate the data. For
more information, see Creating Log Sources.
1. After creating Log Sources, go to DSM Editor and search for "Qualys LEEF" log source
type.
2. Add Event ID and Event Category in Properties tab specific to the log source for which
data is to be pulled. In DSM Editor in Qualys LEEF log source ‘Properties’ tab user will
need to create a new Event Id and Event Category like 'QualysMultiline' as per the Log
source created, add format string for both Event Id and Event Category then save it.
Qualys App for IBM QRadar 163. Create the event mapper in the "Event Mappings" tab specific for the created log source-
• User will need to create event mapper in "Event Mappings" tab and choose the
already existing QID i.e. 'QualysMultiline'.
• Enter the same values in "Event ID" and "Event Category" field as per the log source
name and then click Choose QID and search for "QualysMultiline Information".
Note: This way the user created event mapper will inherit the configurations of the
"QualysMultiline" event mapper that comes bundled with app installation.
Now, user will be able to pull the data into the desired Log Source by following the above steps
and saving the same log source in the Qualys app settings.
Managing Multi-tenant Apps
Qualys App for QRadar can now be used in multi-tenant environment for QRadar V.7.4.0 (Fix
pack 1) or later.
When a user installs the app, they are presented with the option to create a default instance.
Users can select this option if they only want a single instance of the app, or the app does not
need to support multi-tenancy. If a user does not select the Default Instance option, they must
create a separate instance and associate each instance with a security profile to keep all your
data separate.
Creating an Instance
1. Click the QRadar Assistant app icon ( ), and then click Applications.
2. Ensure you're in the List View (Manage > List View option) in Application Manager.
3. In the Installed Extensions section, click the ellipsis icon ( ) in the Options column of
the extension and then click Create New Instance.
Qualys App for IBM QRadar 174. Select the security profile for which the app instance is to be created and click Next.
5. Select user role shown for the selected security profile and click Next.
6. Review the summary and click Confirm & Create to create an instance.
7. Once you confirm the changes, the app will be installed for that security profile and app
instance will be created.
Run the following command to check the app ID for the instance:
/opt/qradar/support/recon ps
8. Go to Admin tab and click Deploy Changes.
Qualys App for IBM QRadar 18Managing Instances
After creating multiple instances, it will be listed as shown below with the total memory
consumed and the memory for each instance.
To configure the Qualys App Settings from IBM QRadar Assistant for the created instances,
follow the steps mentioned below:
1. Click on the ellipsis icon ( ) in the Options column for the instance and then click
Configure Instance > Qualys App Settings option.
2. Do various configurations on the Configuration Page. For more information, see Qualys
App Settings.
For more information related to other options, refer Managing instances.
Configuring Instance
For multi-tenant instance, once you complete above configurations, you need to proceed with
Qualys API Configurations.
Qualys App for IBM QRadar 19How Qualys App works?
What happens after configuration?
Once you configure and enable Host Detection input, the application bundled with this extension
will start fetching your VM detection data. By default, it will pull detection data for 10 hosts at a
time. This value is set to such a small number to make sure the app can process your data
without hitting the memory limit governed by QRadar. For first run, it might take some time
depending on your scan volume. After that, subsequent pulls are incremental ones - fetching
only new/changed data.
How does data get into QRadar?
Whenever cron runs any job (based on the cron schedule you defined), it makes outbound API
call to Qualys, transforms the XML response it receives into LEEF format and sends it to the
QRadar over socket using TCP port configured in “QualysMultiline” Log Source. Using DSM editor
and “QualysLEEF” Log Source Type provided with this extension, QRadar then puts this data into
the “events” table in Ariel database.
Using the Qualys app
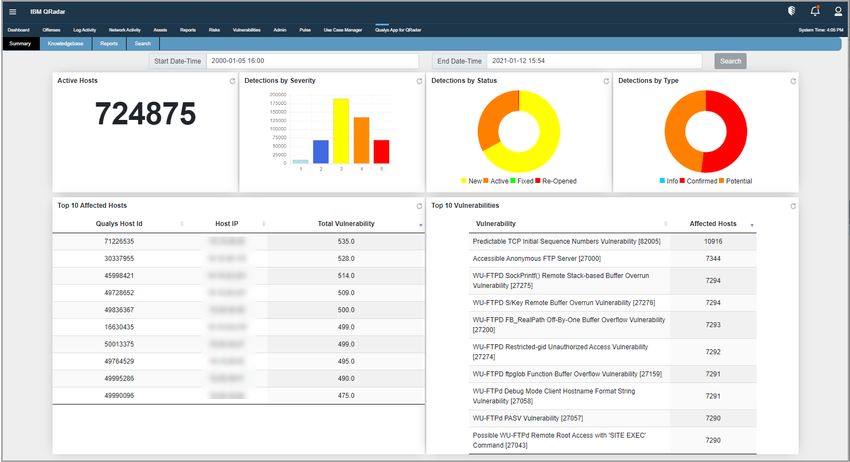
Summary
When you click the Qualys App for QRadar tab in the top menu, you’ll see a summary
dashboard provided by the app. It renders the following reports:
- Count of Active Hosts
- Detections by Severity
- Detections by Status
- Detections by Type
- Hosts Not Scanned in Last 30 Days
- Top 10 Vulnerabilities
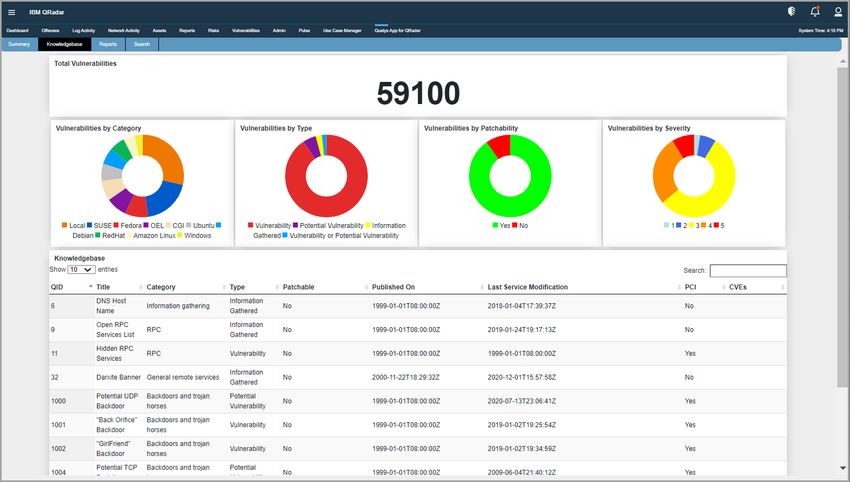
Qualys App for IBM QRadar 20By default, these reports are based on detection data in the last 20 days. To change this date- time range, use “Start Date-Time” and “End Date-Time” and click the Search button. When you click Search, all the reports are updated according to the new date-time range that you’ve defined. Knowledgebase The application has a default copy of knowledgebase bundled with it. This menu shows you some visualizations about current knowledgebase copy. If you enabled knowledgebase input, this copy will be kept up to date. It also shows knowledgebase in tabular format. Qualys App for IBM QRadar 21
Reports
You can view reports for vulnerabilities by hosts and hosts by vulnerabilities within specific date
range.

Vulns by Hosts

Click on count of Total Vulnerabilities to view vulnerabilities on the host.

Qualys App for IBM QRadar                                                                  22
Hosts by Vulns

Click on count of Total Hosts to view affected hosts on QID.

Qualys App for IBM QRadar                                      23
Search
You can search for vulnerabilities in Search tab by QID or CVE or by IP address.
Search by IP Address:

Click on the count of Confirm Vulnerabilities to view vulnerabilities on the host.

Qualys App for IBM QRadar                                                            24
Search by QID or CVE:

Click on the count of Total Hosts to view affected hosts for the QID or CVE.

Raw Data
There may be times when you want to see the raw data. Follow these steps:
1) Go to Log Activity tab and go to Advance Search field.
2) In the Advance Search field, post the sample AQL below. (Tip - For more AQLs please check
the Troubleshooting section in this guide.)
SELECT "Qualys Host Id", "Operating System", "Last Scan Datetime", "Tracking
Method", "Qualys QID", "Qualys Severity", "Detection Type", "Status" from
events where LOGSOURCENAME(logsourceid) = 'Qualys' OR
LOGSOURCENAME(logsourceid) = 'QualysMultiline'
3) Select the date range for which you want to see the data.
4) Click Search.
Depending on the results, you may want to change the date-time range to widen/shorten your
search span. You can also execute your own AQL queries to find more appropriate data. Please
refer to fields in “Qualys LEEF” log source to know the Qualys fields.

Input Logs
While running, host detection input sends its log to QRadar over syslog. To see them, you can
use the following AQL in Log Activity > Advance Search. Follow the same steps mentioned
above with below AQL.

Qualys App for IBM QRadar                                                                25
Host Detection
SELECT UTF8(payload) as utf8_payload from events where utf8_payload ILIKE
'%Qualys:HostDetection%' ORDER BY utf8_payload ASC

Knowledgebase
SELECT UTF8(payload) as utf8_payload from events where utf8_payload ILIKE
'%Qualys:Knowledgebase%' ORDER BY utf8_payload ASC

Qualys App for IBM QRadar                                                   26
Uninstalling the app
1) Uninstall the app from Admin > Extensions Management.
2) Delete saved searches for this app (in case of Qualys App version 1.0.1 or lower):
    a. Go to Log Activity > Search > New Search.
    b. In Available Saved Searches, find saved searches starting with “Qualys” and delete it.
3) Delete custom events for this app:
    a. Go to Admin > Custom Event Properties.
    b. Search and delete all entries associated with Qualys LEEF log source type. (How to do?
        Just search “qualys” and delete all the entries that displayed in search results).
4) Delete Log Source extension:
    a. Go to Admin > Log Source Extensions.
    b. Delete entries with extension “QualysLEEFCustom_ext”.
5) Delete Log Source:
    a. Go to Admin > Log Sources.
    b. Delete log source named “Qualys” or “QualysMultiline”.
6) Delete custom event mapping from Qualys LEEF:
    a. Go to Admin > DSM Editor.
    b. Search and open Qualys LEEF and go to Event Mappings tab.
    c. Delete the entry with Event ID / Category “Qualys” or “QualysMultiline”.
    d. Click Save button and close the tab.

While uninstalling the app in unfortunate cases, it should be done cleanly. Any leftover artifacts
can potentially interfere with next installation attempt creating unstable state.
When app gets installed following components will get installed in QRadar, so to uninstall
completely following components also need to be removed.

Qualys App for IBM QRadar                                                                  27
Troubleshooting
If you see no data
If the application isn’t bringing in your VM detection data, please go through the list below:
1) Check the data whether data indexing is happening properly with the help of AQL.
2) Check the app configuration.
- Check host detection ETL is enabled in Qualys App Settings.
- Check cron jobs scheduled properly. For more information about cron jobs
scheduling, refer https://crontab.guru/.
- Make sure you have the correct API and access permissions.
- Make sure your credentials are correct.
- If you set start date-time, make sure it complies with Qualys required format.
- If you added extra API parameters, make sure the JSON is valid and that all the
extra parameters listed are valid.
3) Make sure application dependencies were installed correctly.
4) Make sure you have done Deploy Full Configurations and your TCP port in listening.
5) Make sure QRadar has Internet access and is able to reach your Qualys API server.
6) Check your host detection ETL is running:
Login to Qualys App container and run below commands :
ps aux | grep python
If your host detection job is not running
To run the host detection ETL, run the following command:
python /app/etl_host_detection.py -d
Once you run above command, make sure you can see screen like –
If you get “[Errno 111] Connection refused” error
Following error messages will be displayed for different cases:
Case 1
ERROR: Socket connection on port 12468 configured for 'QualysMultiline' log
source is refused, 'Deploy Full Configuration'. Error while connecting to
socket: [Errno 111] Connection refused
This error occurs when the Listen port is not LISTENING. You need to do the Deploy Full
Configuration on QRadar box to resolve this issue.
Case 2
Making Request - https://qualysapi.qualys.com/msp/about.php with PARAM: {}
2020-01-16T10:19:58Z PID=421 Qualys:HostDetection client ERROR: Error during
Qualys App for IBM QRadar 28request to https://qualysapi.qualys.com/msp/about.php:
This error occurs if the proxy settings are not configured on Qualys App Settings page. You need
to configure proxy setup in Qualys App Settings.
If you see “HTTP Error 401: Unauthorized” error
This error occurs if you provide invalid credentials. To resolve this issue, check the API server
URL and credentials.
If you see the ‘Number of host detections logged = 0’ in host detection
This can be due to following reasons:
• No scan was performed on the POD in the given period of time.
• No vulnerabilities are detected for the scan.
• If the API parameters are incorrect.
For Example, the 'vm_processed_after': '1999-01-01 00:00' is wrong in following API
Request.
https://qualysapi.qualys.com/api/2.0/fo/asset/host/vm/detection/ with
PARAM: {'truncation_limit': 10, 'show_results': 0, 'show_igs': 1,
'output_format': 'XML', 'show_tags': 0, 'action': 'list',
'vm_processed_after': '1999-01-01 00:00'}
If you see “corresponding record not found in KB” message
The following message may appear in Host Detection logs:
A record for QID QID-Number found on Host %s, but its corresponding record
not found in KB. May be KB is not updated.
This means you have some detections of given QID, but since your knowledgebase is not up to
date, the app could not enrich the event data with QID details (like title, category, CVEs,
patchable etc.). Maybe you have not enabled the Knowledgebase input in Qualys App Settings.
Enable it and schedule it to run at least once a week.
If you see “Internal Server Error” while saving settings
1) This error occurs if Log Source ‘QualysMultiline’ is not configured. You need to complete Log
Source configurations.
2) This error occurs if ‘Deploy Full Configuration’ is not done before configuring Qualys App for
QRadar.
3) Log source TCP port is not listening. To check, run the following command on QRadar box.
netstat -tulpn | grep LISTEN
To enable TCP listen port, you need to Deploy Full Configurations. Even after the Deploy Full
Configuration, please contact IBM Support.
4) There might be some issue with cron service. Please follow the steps given below to identify
the issue.
Qualys App for IBM QRadar 29- Go to QRadar terminal and connect to Qualys app’s container. Check if cron service is up and
running, if it is not running, start it.
- If you do not find cron service, that means QRadar did not install cron while installing Qualys
app. You will have to manually install the cron service and start it. You can confirm the issue
from /store/log/startup.log file as well. It should indicate that cron installation failed.
If dashboard widgets are not showing data for multi-tenant environment
When the dashboard widgets are not loading or showing no data even if the data fetch is
completed –
• Check whether the "Event ID", "Event Category", and "Event Mapping" is created for the
desired log source as suggested.
• If more multiple log sources are created and the "Event ID", "Event Category" and "Event
Mapping" are created, make sure all of them are created in same specific order. Suppose,
if the user has 3 log sources - "QualysMultiline"(default), "QualysTokyo" and
"QualysBerlin", then while creating the event id and event category, order should be
similar in both.
If the order of creating "Event ID" and "Event Category" with respect to the desired log
sources mismatches, then the order in "QualysLEEFCustom_ext" may get affected and
hence events parsing may get failed. Also, the events may get addressed as "Unknown"
and not sent to the selected log source.
DSM editor doesn’t show Tags or DNS properties and you can’t add them
After installation of Qualys App, if DSM editor does not show TAGS and DNS properties, you can
try adding them manually. If you are unable to add them manually, please follow these steps:
1) Check if “QualysMultiline” Log Source has correct Log Source Type. If it is not correct,
delete the log source.
2) From DSM editor, delete the “Qualys LEEF” entry and create a new one. Add appropriate
event mappings as mentioned in the Check Log Source Event Mapping section of this
document.
3) Create a new Log Source using newly created “Qualys LEEF” as Log Source Type.
4) Complete Deploy Full Configurations step.
5) Go through the Check Custom Event Properties section of this document to make sure
event mappings are all correct.
If you need to delete and recreate Log Source Type “Qualys LEEF”
Add the following custom event properties to newly created Log Source Type. For each property
in the table below, Type should be “Regex”.
Property Name Log Source Log Event Name Expression
Type Source
App Version Qualys LEEF All QualysMultiline Information app_version=([^\t]+)
CVE Qualys LEEF All QualysMultiline Information cves=([^\t]+)
DNS Qualys LEEF All QualysMultiline Information dns=([^\t]+)
Detection Type Qualys LEEF All QualysMultiline Information detection_type=([^\t]+)
First Found Datetime Qualys LEEF All QualysMultiline Information first_found_datetime=([^\t]+)
Host IP Qualys LEEF All QualysMultiline Information ip=([^\t]+)
Qualys App for IBM QRadar 30Property Name Log Source Log Event Name Expression
Type Source
Last Fixed Datetime Qualys LEEF All QualysMultiline Information last_fixed_datetime=([^\t]+)
Last Found Datetime Qualys LEEF All QualysMultiline Information last_found_datetime=([^\t]+)
Last Scan Datetime Qualys LEEF All QualysMultiline Information last_scan_datetime=([^\t]+)
App ID Qualys LEEF All QualysMultiline Information app_id=([^\t]+)
Last Test Datetime Qualys LEEF All QualysMultiline Information last_test_datetime=([^\t]+)
Last Update Datetime Qualys LEEF All QualysMultiline Information last_update_datetime=([^\t]+)
Network ID Qualys LEEF All QualysMultiline Information network_id=([^\t]+)
Operating System Qualys LEEF All QualysMultiline Information os=([^\t]+)
PCI Flag Qualys LEEF All QualysMultiline Information pci_flag=([^\t]+)
Patchable Qualys LEEF All QualysMultiline Information patchable=([^\t]+)
QID Category Qualys LEEF All QualysMultiline Information category=([^\t]+)
QID Title Qualys LEEF All QualysMultiline Information title=([^\t]+)
Qualys Host Id Qualys LEEF All QualysMultiline Information host_id=([^\t]+)
Qualys QID Qualys LEEF All QualysMultiline Information qid=([^\t]+)
Qualys Severity Qualys LEEF All QualysMultiline Information severity=([^\t]+)
Severity Level Qualys LEEF All QualysMultiline Information severity_level=([^\t]+)
Status Qualys LEEF All QualysMultiline Information status=([^\t]+)
Tags Qualys LEEF All QualysMultiline Information tags=([^\t]+)
Tracking Method Qualys LEEF All QualysMultiline Information tracking_method=([^\t]+)
Qualys App for IBM QRadar 31Helpful AQLs to check VM Detection Logs and Events Use the following AQLs to check VM detection data and perform troubleshooting. To check the logs You can download app logs from Qualys App container. Go to Advanced tab and click Download button next to Download Application Logs. You can also see ETL logs in ETL folder from the downloaded zip file. Get the PID (process id) of either etl_host_detection or etl_knowledgebase using the below command inside the container: cat app/host_detection.pid cat app/etl_knowledgebase.pid On the Log Activity search following queries under Advance Search. It will show you the log for the particular PID (replace the with the appropriate process id): SELECT UTF8(payload) as utf8_payload from events where utf8_payload ILIKE '%PID=%' ORDER BY utf8_payload ASC SELECT UTF8(payload) as utf8_payload from events where utf8_payload ILIKE '%Qualys:HostDetection%' ORDER BY utf8_payload ASC SELECT UTF8(payload) as utf8_payload from events where utf8_payload ILIKE '%Qualys:Knowledgebase%' ORDER BY utf8_payload ASC SELECT UTF8(payload) as utf8_payload from events where utf8_payload ILIKE '%detections =%' ORDER BY utf8_payload ASC SELECT UTF8(payload) as utf8_payload from events where LOGSOURCENAME(logsourceid) = 'Qualys' OR LOGSOURCENAME(logsourceid) = 'QualysMultiline' To check the event data payload SELECT LOGSOURCENAME(logsourceid) as logsourceids, UTF8(payload) as utf8_payload from events where LOGSOURCENAME(logsourceid) = 'Qualys' OR LOGSOURCENAME(logsourceid) = 'QualysMultiline' SELECT "Qualys Host Id", "Operating System", "Last Scan Datetime", "Tracking Method", "Qualys QID", "Qualys Severity", "Detection Type", "Status" from events where LOGSOURCENAME(logsourceid) = 'Qualys' OR LOGSOURCENAME(logsourceid) = 'QualysMultiline' Qualys App for IBM QRadar 32
Known Issues
   1. Reports and search table rendering happens after all the records for search results are
      fetched. Sometime is observed that reports rendering breaks for huge data while
      processing and loading data table.
   2. For Active Host widgets on Summary dashboard, the aggregate AQL returns maximum
      1000001 hosts.

Previous Releases
Following were the updates from previous releases:

1.1.4
   -    Improved fetching search results to have it incremental for Reports and Search
   -    We have improved loading of the knowledgebase data table
   -    You’ll be able to provide QRadar authentication token for better security while
        interacting with QRadar
   -    You’ll see query progress percentage on dashboard widget, reports, and search
   -    Only potential and confirmed vulnerabilities will be fetched by default. If user need
        Information Gathered vulnerabilities, that can be configured from Settings page
   -    We have fixed widget reloading issue and now loading speed of Summary dashboard
        AQLs for rendering widgets is improved
   -    You’ll be able to download logs from Qualys App Settings page

1.1.2
   -    If the KB file is not updated, then NA will be provided for the QIDs in the host
        information.
   -    Updated the configuration missing warning on Qualys App dashboard. If any data pull is
        not enabled, then it will show data pull specific warning.
   -    Updated the reports and search data tables to show the row details. The outer row will
        show important information and the inner rows will show associated rows.
   -    jQuery updated to 3.5.1 version.
   -    Using ([^\t]+) in all the custom event properties regex.
   -    If the data feed is running for HD or KB it will update the setting page tabs accordingly
        with the process ID.
   -    Non-Admin users can access the Qualys app for QRadar.
   -    How to manage user roles?

Qualys App for IBM QRadar                                                                   33
1.1.1
- We have fixed an issue where 'Internal Server Error - 500' message was displayed on
Settings page. This was occurring due to the App was not able to fetch DSM Port which is
need for TCP Multiline Socket Connection.
- We have fixed and issue where '[Errno 111] Connection refused' message occurs if the
DSM port is not listening and when the user tries to fetch Host Detection or
Knowledgebase Data. For more details, refer Troubleshooting section.
- From Qualys App for QRadar version 1.1.1, API Password and Proxy Server Password is
encrypted.
- From Qualys App for QRadar version 1.1.1, the proxy server password is masked while
configuring proxy.
- While using the HTTPS in proxy URL, app uses ca-bundle.crt file. By default, IBM QRadar
provides this file. If the user wants to use their CA certificate file, they should follow the
steps given in the link:
https://www.ibm.com/support/knowledgecenter/en/SS42VS_7.3.2/com.ibm.qradar.doc/t_
qradar_adm_updates_proxy.html
Qualys Support
If you tried the troubleshooting steps but still need help, please contact Qualys Support at
https://www.qualys.com/support/
Provide the following information to Qualys Support:
- Qualys App version number
- QRadar version number, including the patch number
- Steps to reproduce the issue
- Note any manual changes done to Qualys app’s code
- Note any manual changes done to Qualys app’s container
- Please download the logs from Admin > Qualys App Settings page and attach
them to your support case.
Qualys App for IBM QRadar 34You can also read