CIC Web Applications - Genesys Docs
←
→
Page content transcription
If your browser does not render page correctly, please read the page content below

PureConnect®
        2018 R4

         Generated:
      22-October-2018

    Content last updated:
                                           CIC Web Applications
       22-October 2018
See Change Log for summary of
                                    Installation and Configuration Guide
          changes.

                                                                        Abstract
                                    This installation and configuration content describes configuration
                                    settings needed to install CIC Web Applications on IIS, Apache, or Nginx
                                    servers. It also includes information about load balancing and
                                    troubleshooting, and enabling HTTPS.
                                    For the latest version of this document, see the PureConnect
                                    Documentation Library at: http://help.genesys.com/cic.

                                For copyright and trademark information, see
                                https://help.genesys.com/cic/desktop/copyright_and_trademark_information.htm.

                                                      1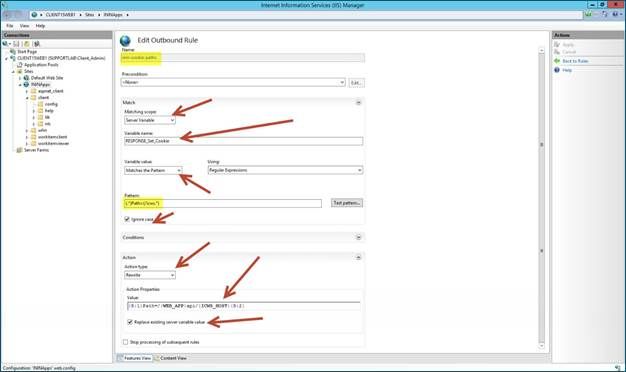
Table of Contents
Table of Contents                                                                                     2
About this content                                                                                    3
Requirements                                                                                          4
  Web servers                                                                                         4
Transport Layer Security                                                                              5
Parent directories                                                                                    6
Prerequisites                                                                                         7
Installation Overview for IIS, Apache, and Nginx                                                      8
Install CIC Web Applications on Microsoft IIS                                                         9
  Step 1: Add Required IIS Services                                                                   9
  Step 2: Download and Copy CIC Web Applications Files                                               10
  Step 3: Configure IIS                                                                              10
  Configure HTTPS for IIS                                                                            16
    Enable HTTPS between the web browser and IIS                                                     16
      Step 1: Add a Certificate to the Web Server                                                    16
        Create a Self-Signed Certificate                                                             17
        Use a Third Party Certificate                                                                17
      Step 2: Bind the Certificate to the HTTPS port                                                 18
      Step 3: Enable SSL on the Site                                                                 18
    Enable HTTPS between IIS and CIC                                                                 18
      Step 1: Change Inbound rule to use HTTPS                                                       19
      Step 2: Trust the CIC Server HTTPS Certificate                                                 19
Install CIC Web Applications on Apache                                                               20
  Configure HTTPS for Apache                                                                         21
    Enable HTTPS between the web browser and Apache                                                  21
      Step 1: Generate Certificate Signing Request                                                   21
      Step 2: Add the Signed Certificate to the Server                                               22
    Enable HTTPS between Apache and CIC                                                              22
Install CIC Web Applications on Nginx                                                                23
  Configure HTTPS for Nginx                                                                          24
    Enable HTTPS between the web browser and Nginx                                                   24
      Step 1: Generate Certificate Signing Request                                                   24
      Step 2: Add the Signed Certificate to the Server                                               25
      Enable HTTPS between Nginx and CIC                                                             25
Application Configuration                                                                            26
  servers.json                                                                                       26
    altHostHints                                                                                     27
Application updates (subsequent installs)                                                            28
  Backing up existing applications                                                                   28
  Upgrading Interaction Connect                                                                      28
  Safely copying files over to the web server                                                        28
  Rollbacks                                                                                          28
Load balancing multiple web servers                                                                  29
Troubleshooting                                                                                      30
  On IIS, the CIC Web Application's main.js takes a long time to load when compression is enabled.   30
  On IIS, a slow request becomes faster after reloading the resource multiple times.                 30
Appendix A: IIS XML Configuration                                                                    31
Change Log                                                                                           34

                                                                2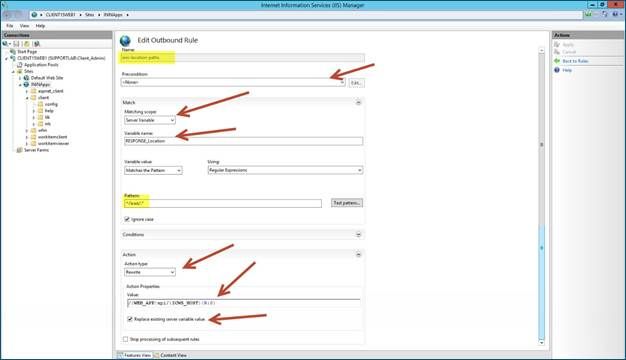
About this content
This content describes the configuration settings needed to install CIC Web Applications on IIS, Apache, or Nginx web servers. It
assumes you are installing all of the CIC Web Applications at once. However, individual applications can be installed by placing the
appropriate application folders in the CIC Web Applications folder created following the process described in this document.
These installation instructions are for a first-time installation of the CIC Web Applications. Information about applying upgrades is
at the end of this document.
Download the CIC Web Applications from the PureConnect Product Information site at
https://my.inin.com/products/Pages/Downloads.aspx.
  Note:
  CIC Web Applications 2015 R2 and later contain the IPA Stand-alone Web Client, Optimizer Web Features, and Interaction
  Connect.

                                                                  3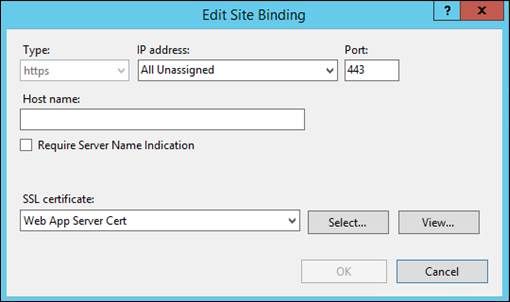
Requirements
Web servers
CIC Web Applications can be installed on any of the following web servers:
    Apache 2.4.7+
    If installing on Windows, you can find 2.4.x versions at http://www.apachehaus.com/cgi-bin/download.plx or
    http://www.apachelounge.com/download/
    IIS 7+
         Application Request Routing extension (http://www.iis.net/downloads/microsoft/application-request-routing)
         URL Rewrite extension (http://www.iis.net/downloads/microsoft/url-rewrite)
    Nginx
    No additional modules are necessary.

                                                               4
Transport Layer Security
The recommended setup for CIC Web Applications uses a separate web server and Customer Interaction Center server. In this
setup, the web server is used as a reverse proxy to communicate with Interaction Center Web Services (ICWS) on a Customer
Interaction Center server.
There are two legs of communication you can encrypt in a CIC web applications deployment.
Configuration of encryption for each leg is independent of configuration for the other leg: you can encrypt either, both, or neither leg
of traffic.
The front-end connection between the web browser and the web server
To avoid credential theft, the recommended deployment is to encrypt this connection.
The back-end connection between the web server and the CIC server
If your web server and CIC server(s) are in the same secured environment, the recommended deployment is to use HTTP
between the web server and CIC to reduce load on the CIC server.
However, you can also secure the connection between the web server and the CIC server. In order to do so, use the correct
HTTPS port noted in the instructions for your server.
For instructions about enabling encryption, see the instructions for your server type:
IIS: Configure HTTPS for IIS
Apache and Nginx: Configure HTTPS for Apache and Nginx
5Parent directories
This document describes hosting CIC Web Applications at the root of web servers. However, the rewrite rules will also work if there
are additional parent directories.
This document describes the default setup in which application is located at http://webServer/application, but the rewrite rules will
continue to work if your URLs need to follow a pattern such as http://webServer/ININWebApps/application. Note that in this
scenario, you may need to modify some of the configuration file entries to avoid affecting non-CIC web applications.
If a parent directory is named api, modify the URL rewrite rules as needed.
6Prerequisites
No reverse proxies should exist in front of the one created for CIC Web Applications. If there are multiple reverse proxies in
your environment, it is crucial that the same rewrite rules for HTTP headers X-Forwarded-For and ININ-ICWS-Original-URL are
also set up in each reverse proxy. At minimum, they must be set up in the reverse proxy that client requests hit first.
If you use the same reverse proxy for CIC Web Applications and Genesys Intelligent Automation, then the Intelligent Automation
rewrite rule must come before the CIC Web Application rule. For more information, see the PureConnect Integration with
Genesys Intelligent Automation Technical Reference.
Forward proxies must not change the "Host" header of clients' requests, or CIC Web Applications may not be fully functional.
Before beginning the installation process, verify that
Your web server is accessible from client computers. Make firewall modifications as needed.
Your CIC server (and any OSSMs) are accessible from your web server. Make firewall modifications as needed: the web server
will communicate with ICWS over port 8018 (or port 8019 if you are securing each ICWS endpoint with certificates).
The appropriate level of security is set up on your web server. Genesys requires that your front-end web server is at least
secured via TLS.
Your web server(s) (and any proxies) are configured to forward any HTTP header without modifying it. A primary example is X-
Forwarded-For, which is unchanged by default in IIS, Apache, and Nginx.
7Installation Overview for IIS, Apache, and Nginx
For all server types, download and unzip the CIC Web Applications files and move the files to your web server’s document root.
The remaining instructions for installing CIC Web Applications vary depending on your web server software. Although the details
vary, the general steps are as follows:
Install and Configure your Web Server Software (IIS, Apache or Nginx).
Create the application pool that will be used by the new CIC Web Application Site. (IIS only).
Create the CIC Web Application site.
Create the rewrite rules that will be used for this site. This section will include adding the rules, the required server variables,
and the rewrite map.
Configure the required MIME types for the site. This will ensure that all the necessary files for the applications will be loaded.
Restart the web server and test the new site.
8Install CIC Web Applications on Microsoft IIS
For a basic working installation, such as for a test environment, follow the first three sections:
Step 1: Add Required IIS Services
Step 2: Download and Copy CIC Web Applications Files
Step 3: Configure IIS
For a production environment, you can also follow the instructions in "Configure HTTPS for IIS" and "Application Configuration."
Step 1: Add Required IIS Services
1. In Server Manager, verify that the Web Server Role (IIS 7) is added with the following (minimum required) role services installed:
Common HTTP Features
Static Content
Default Document
Performance
Static Content Compression
Security
Request Filtering
Management Tools
IIS Management Console
2. If you have not installed the Application Request Routing and URL Rewrite extensions, install them.
Application Request Routing extension (http://www.iis.net/downloads/microsoft/application-request-routing)
URL Rewrite extension (http://www.iis.net/downloads/microsoft/url-rewrite)
3. Enable server as proxy and enable response buffering:
a. In IIS Manager, click your server.
b. Double-click the Application Request Routing Cache module.
c. In the Actions pane, click Server Proxy Settings.
d. Check Enable proxy.
e. Change the Response buffer threshold (KB) setting under "Buffer Setting" to 0.
f. Click Apply.
4. Verify that index.html and index.htm are present as Default Documents.
9Step 2: Download and Copy CIC Web Applications Files
1. In Windows Explorer, create a directory in the Home Directory in IIS for the CIC Web Applications. In a default IIS installation,
the Home Directory is C:\\inetpub\wwwroot. Verify that IIS has the appropriate permissions for that newly created
directory.
Note:
In this document, the directory is named ININApps.
2. Download the CIC Web Applications zip file from https://my.inin.com/products/Pages/Downloads.aspx. All of the web
applications are contained in this single zip.
3. Unzip the CIC Web Applications folder.
4. Navigate to the web_files folder inside the unzipped CIC Web Applications folder.
5. Copy all of the folders inside of web_files.
Each folder contains one CIC web application.
6. Paste the folders copied in the previous step into the directory you created in step 1. Doing so places the appropriate directory
structure and files for all CIC Web Applications on your web server.
Figure 1: Example directory structure for CIC Web Applications in IIS.
Step 3: Configure IIS
1. Create a new Site named ININApps in IIS:
a. Right-click on Sites and choose Add web site.
b. In the dialog box, set the Content Directory Physical path to the CIC Web Applications folder you previously created in your
server's Home Directory.
102. Remove the .NET Framework version of the application pool:
a. In the IIS Manager side pane, click Application Pools.
b. Right-click the newly created ININApps application pool.
c. Click Basic Settings.
d. Change the .NET Framework version to "No Managed Code."
e. Click OK.
3. Enable static content compression on the new Site:
a. Click the site in IIS Manager.
b. Double-click the Compression module.
c. Check Enable static content compression.
d. Click Apply.
4. Update the maximum URL and query string size in Request Filtering, if enabled:
a. Click the site in the IIS Manager.
b. Double-click on the Request Filtering module, if enabled. If the module doesn't appear, Request Filtering is not enabled.
c. Select the URL tab in the Request Filtering view.
d. Click on Edit Feature Settings in the Actions pane.
i. Update Maximum URL Length (bytes) to "8192".
ii. Update Maximum Query String (bytes) to "8192".
iii. Update Maximum allowed content length (bytes) to something greater than or equal to "20971520".
e. Click OK.
5. Add allowed server variables:
Note:
Steps 6 through 10 can alternatively be completed using XML configuration file. See Appendix A for XML configuration.
a. Click the site in the IIS Manager.
b. Double-click on the URL Rewrite module.
c. In the Actions pane, click View Server Variables.
d. Create the following three server variables by clicking Add in the Actions pane.
WEB_APP
ICWS_HOST
HTTP_ININ-ICWS-Original-URL
6. Create the rewrite map.
a. Click the site in the IIS Manager.
11b. Double-click the URL Rewrite module.
c. In the Actions pane on the right, click View Rewrite Maps.
d. Click Add Rewrite Map.
e. Enter MapScheme for the rewrite map name.
f. In the Actions pane, click Add Mapping Entry.
g. Enter the following:
Original value: New value:
on https
h. Repeat steps f and g with the following information:
Original value: New value:
off http
7. Create URL rewrite rules. You will create one inbound rule and two outbound rules.
a. Click the site in the IIS Manager.
b. Double-click the URL Rewrite module.
c. Navigate to the Actions pane and select Add Rule(s).
d. For each rule, select Blank rule under the appropriate type (Inbound rule or Outbound rule).
e. Enter the following information for each rule. Tables are provided for ease of copying values, followed by screenshots for
each rule.
Note:
Do not add conditions for any of the rules.
Inbound rule
This rule allows the client to reach the Session Manager host that ICWS is served from.
Name inin-api-rewrite
Requested URL Matches the Pattern
Using Regular Expressions
Pattern (?:^(.*/)api|^api)/([^/]+)(/.*)
Ignore case checked
Server Variables See "Server Variables" table below
Action type Rewrite
Rewrite URL http://{ICWS_HOST}:8018{R:3}
(see "Configure HTTPS for IIS" for HTTPS)
Append query string checked
Log rewritten URL checked
Stop processing of subsequent rules checked
Server Variables
Name Value Replace
WEB_APP {R:1} True
ICWS_HOST {R:2} True
HTTP_ININ-ICWS-Original-URL {MapScheme:{HTTPS}}://{HTTP_HOST}{UNENCODED_URL} False
12Outbound rule 1
This rule allows the cookies required by ICWS and the client to be located where the client needs them.
Name inin-cookie-paths
Precondition
Matching scope Server Variable
Variable name RESPONSE_Set_Cookie
Variable value Matches the Pattern
Using Regular Expressions
Pattern (.*)Path=(/icws.*)
Ignore case checked
Action type Rewrite
Value {R:1}Path=/{WEB_APP}api/{ICWS_HOST}{R:2}
Replace existing server variable value checked
Stop processing of subsequent rules unchecked
13Outbound rule 1
Outbound rule 2
This rule adjusts the location header
Name inin-location-paths
Precondition
Matching scope Server Variable
Variable name RESPONSE_location
Variable value Matches the Pattern
Using Regular Expressions
Pattern ^/icws/.*
Ignore case checked
Action type Rewrite
Value /{WEB_APP}api/{ICWS_HOST}{R:0}
Replace existing server value checked
Stop processing of subsequent rules unchecked
14Outbound rule 2
When you are finished, you will have one inbound rule and two outbound rules:
8. (Optional) Increase the cache sensitivity thresholds if you have application load performance issues.
a. In Configuration Editor, select the system.webServer/serverRuntime section.
b. Update frequentHitThreshold to 1.
c. Update frequentHitTimePeriod to 00:10:00.
9. Enable static content caching for Interaction Connect:
The following table summarizes the cache settings. Steps to configure cache settings follow.
Note:
Client/addins and client/config do not exist in a new installation. If you plan to user servers.json or create
custom add-ins, use the cache settings below for those folders.
Recommended cache settings
Directory or file Expire web content:
client/lib After 365 days
client/addins Immediately
client/config Immediately
client/index.html After 15 minutes
client/appsettings.json Immediately
a. Expand the site in the tree view and select the client/lib folder.
b. Double click the HTTP Response Headers module.
c. Click Set Common Headers.
15d. In the dialog box:
i. Check Expire Web content.
ii. Select After and enter 365 days in the fields.
e. Click OK.
f. Repeat steps 1-5 for the client/addins and client/config directories with the following difference:
Select Immediately under Expire web content.
g. Right-click on the client folder and select Switch to Content View.
h. Select index.html.
i. In the Actions pane click Switch to Features View.
j. Repeat steps b-e for index.html (which should now show up under client). This time set the After expires field to 15
minutes.
k. Repeat steps g-j for appSettings.json, but this time select the Immediately expires field.
10. Verify that the following MIME types are defined in the IIS Manager for the ININApps Site by double clicking the MIME Types
module:
.css -> text/css
.gif -> image/gif
.html -> text/html
.jpg -> image/jpeg
.js -> application/x-javascript
.json -> application/json
.otf -> application/octet-stream
.png -> image/png
.svg -> image/svg+xml
.ttf -> application/octet-stream
.woff -> font/x-woff
.woff2 -> application/font-woff2
11. (Optional) If you want to set the CIC server that the CIC Web Applications connect to, follow the instructions in "servers.json".
12. Restart the IIS server by using the iisreset command line application.
13. Verify that all applications work as expected.
The basic installation tasks are complete, and the CIC Web Applications should be functional. Complete the following configuration
tasks as needed for your requirements.
Configure HTTPS for IIS
Enable HTTPS between the web browser and IIS
Follow these instructions to encrypt the connection between the web browser and the web server.
Step 1: Add a Certificate to the Web Server
You can use either a self-signed certificate or a third-party certificate.
If you choose a self-signed certificate, client workstations need to trust that certificate after it is installed on the web server. For
this reason, self-signed certificates are usually used only for testing.
To use a third-party certificate, you need to first create a certificate signing request.
16Create a Self-Signed Certificate
1. On the web server, open IIS Manager.
2. In the Connections pane, select the CIC web applications server.
3. Double-click the Server Certificates module.
4. In the Actions pane, click Create Self-Signed Certificate.
5. In the Create Self-Signed Certificate window:
Type a name for the certificate.
Select Web Hosting for the certificate store.
6. Click OK.
Use a Third Party Certificate
Generate Certificate Signing Request
1. On the web server, open IIS Manager.
2. In the Connections pane, select the CIC web applications server.
3. Double-click the Server Certificates module.
4. Click Create Certificate Request to create a certificate signing request (CSR).
5. In the Request Certificate window, enter the information for your organization.
6. For Common name, enter the fully-qualified domain name of the server, e.g. www.example.com.
7. Click Next.
8. Choose the appropriate Cryptographic Service Provider Properties. Ask your third-party certificate authority (CA) which options
to choose.
9. Click Next.
10. Enter a file name and location for the CSR.
11. Click Finish.
12. Send the generated CSR to your CA for signing.
Complete Certificate Request
1. Copy the signed certificate you received from the certificate authority to your web server.
2. In IIS Manager, open the Server Certificates Module.
3. Click Complete Certificate Request.
4. In the Specify Certificate Authority Response window:
Select the signed certificate you copied to your web server.
Enter a friendly name for the certificate.
Select Web Hosting for the certificate store.
Click OK.
17Step 2: Bind the Certificate to the HTTPS port
1. In the Connections pane, click the Site for the CIC Web Applications, named ININApps in this document.
2. In the Actions pane, click Bindings.
3. Click Add.
4. Change the Type to https.
5. In the SSL certificate list, select the certificate you previously created or imported.
6. Click OK.
7. Click Close.
Step 3: Enable SSL on the Site
1. In the Connections pane, click the Site for the CIC Web Applications, named ININApps in this document.
2. Double-click the SSL Settings module.
3. Check Require SSL.
4. In the Actions pane, click Apply.
If you used a self-signed certificate, client workstations need to trust the certificate.
Enable HTTPS between IIS and CIC
Tip:
Best practice is to use HTTPS from CIC to IIS and from IIS to the web browser, or from IIS to the web browser only. Securing
traffic from IIS to CIC only can cause issues with Secure cookies.
These directions encrypt the connection between the web server and the CIC server.
18Step 1: Change Inbound rule to use HTTPS
1. On your web server, open IIS Manager.
2. Expand Sites.
3. Select your web site, i.e. ININApps.
4. Double-click the URL Rewrite module.
5. Open the Inbound Rule inin-api-rewrite.
6. In the Rewrite URL field, change the Rewrite URLto use HTTPS:
a. Change the protocol to https.
b. Change the port to 8019.
7. In the Actions pane, click Apply.
Step 2: Trust the CIC Server HTTPS Certificate
Note:
If the Servername_Certificate.cer file has a Certificate Chain, then you must trust all the certificates in the Chain. Check
to see if Issued To and Issued By are different names. If you do not trust all the certificates in the chain, the certificate can't be
validated and the SSL handshake will fail. Repeat this task for each Session Manager device in your environment (including both
CIC Servers and any Off-Server Session Managers.)
1. Locate the HTTPS certificate on your CIC server. The default location is \I3\IC\Certificates\HTTPS.
2. Copy Servername_Certificate.cer to your web server.
3. On your web server, locate the copied HTTPS certificate.
4. Double-click the certificate.
5. Click Install Certificate.
6. Select Local machine.
7. Select Next.
8. Select Place all certificates in the following store.
9. To choose the certificate store, click Browse and select Trusted Root Certification Authorities.
10. Click OK.
11. Click Next.
12. Click Finish.
19Install CIC Web Applications on Apache
1. Create a folder in the document root of your web server for the CIC Web Applications. Verify that your web server software has
the appropriate permissions for that newly created folder.
Note:
In this document, the folder is named ININApps.
2. Download the CIC Web Applications zip file from https://my.inin.com/products/Pages/Downloads.aspx. All of the web
applications are contained in this single zip.
3. Unzip the CIC Web Applications folder.
4. Navigate to the web_files folder inside the unzipped CIC Web Applications folder.
5. Copy all of the folders inside of web_files. Each folder contains one CIC web application.
6. Paste the folders copied in the previous step into the directory you created in step 1. Doing so places the appropriate directory
structure and files for all CIC Web Applications on your web server.
The following actions take place in the Apache server's /conf/httpd.conf file.
1. Set the following minimally required modules to be loaded:
One or more auth* modules that are appropriate for your web server
dir_module modules/mod_dir.so
env_module modules/mod_env.so
expires_module modules/mod_expires.so
headers_module modules/mod_headers.so
mime_module modules/mod_mime.so
proxy_module modules/mod_proxy.so
proxy_http_module modules/mod_proxy_http.so
rewrite_module modules/mod_rewrite.so
setenvif_module modules/mod_setenvif.so
2. Change the DocumentRoot as well as the single section to point to the CIC Web Applications folder
3. Change the DirectoryIndex property to contain index.html and index.htm
4. If LimitRequestBody is set to something other than 0, ensure that you increase it to something greater than or equal to
20971520 (bytes).
5. Set up the proxy rewrite rules:
a. If Apache is set up for HTTP (possibly in addition to HTTPS), add the following URL rewrite rules at the bottom of
httpd.conf:
RewriteEngine On
RewriteRule "^(/.*|)/api/([^/]+)(/.*)" "http://$2:8018$3"
[P,E=WEB_APP:$1,E=ICWS_HOST:$2,E=ICWS_PATH:$3,E=HTTP_HOST:%{HTTP_HOST},E=REQUEST_URI:%
{REQUEST_URI},E=SCHEME:%{REQUEST_SCHEME}]
# If you are securing the ICWS host(s), use the following configuration
in place of the RewriteRule above:
# SSLProxyEngine on
# RewriteRule "^(/.*)/api/([^/]+)(/.*)" "https://$2:8019$3"
[P,E=WEB_APP:$1,E=ICWS_HOST:$2,E=ICWS_PATH:$3,E=HTTP_HOST:%{HTTP_HOST},E=REQUEST_URI:%
{REQUEST_URI},E=SCHEME:%{REQUEST_SCHEME}]
Header edit Set-Cookie "(.*)Path=(/icws.*)" "$1Path=%{WEB_APP}e/api/%{ICWS_HOST}e$2"
Header edit Location "^(/icws.*)" "%{WEB_APP}e/api/%{ICWS_HOST}e$1"
SetEnvIf "ININ-ICWS-Original-URL" ".+" HAVE_ININICWSOriginalURL
RequestHeader set "ININ-ICWS-Original-URL" "%{SCHEME}e://%{HTTP_HOST}e%{REQUEST_URI}e"
env=!HAVE_ININICWSOriginalURL
b. If Apache is set up for HTTPS (possibly in addition to HTTP), add the following URL rewrite rules to the appropriate
VirtualHost section(s) of httpd-ssl.conf or httpd-sni.conf:
RewriteEngine On
RewriteRule "^(/.*|)/api/([^/]+)(/.*)" "http://$2:8018$3"
[P,E=WEB_APP:$1,E=ICWS_HOST:$2,E=ICWS_PATH:$3,E=HTTP_HOST:%{HTTP_HOST},E=REQUEST_URI:%
{REQUEST_URI},E=SCHEME:%{REQUEST_SCHEME}]
# If you are securing the ICWS host(s), use the following configuration
in place of the RewriteRule above:
# SSLProxyEngine on
# RewriteRule "^(/.*)/api/([^/]+)(/.*)" "https://$2:8019$3"
20[P,E=WEB_APP:$1,E=ICWS_HOST:$2,E=ICWS_PATH:$3,E=HTTP_HOST:%{HTTP_HOST},E=REQUEST_URI:%
{REQUEST_URI},E=SCHEME:%{REQUEST_SCHEME}]
Header edit Set-Cookie "(.*)Path=(/icws.*)" "$1Path=%{WEB_APP}e/api/%{ICWS_HOST}e$2"
Header edit Location "^(/icws.*)" "%{WEB_APP}e/api/%{ICWS_HOST}e$1"
SetEnvIf "ININ-ICWS-Original-URL" ".+" HAVE_ININICWSOriginalURL
RequestHeader set "ININ-ICWS-Original-URL" "%{SCHEME}e://%{HTTP_HOST}e%{REQUEST_URI}e"
env=!HAVE_ININICWSOriginalURL
6. Configure caching for Interaction Connect:
Add the following to conf/httpd.conf:
ExpiresActive On
ExpiresDefault "access plus 15 minutes"
Header Set Cache-Control "no-cache"
ExpiresDefault "access plus 1 year"
Header Set Cache-Control "no-cache"
ExpiresActive Off
7. (Re)start the Apache process
8. Verify that all applications work as expected
Configure HTTPS for Apache
Enable HTTPS between the web browser and Apache
Step 1: Generate Certificate Signing Request
Note:
OpenSSL is an open source tool and is not supported by Genesys. For more information about installing and using Open SSL,
see https://www.openssl.org/
To use OpenSSL to generate a CSR:
1. Create a destination folder to make finding the CSR and private key easier. Open the command prompt.
2. Open terminal.
3. Use cd to navigate to the folder where you want to generate the CSR.
4. Type the following command:
openssl req -out CSR.csr -new -newkey rsa:2048 -nodes -keyout PrivateKey.key
5. Follow the prompts to enter the information about the end point for the CSR.
6. Close the window.
This process generates two files: CSR.csr and PrivateKey.key
7. Send the CSR file to the third-party CA to be signed. Do not send the private key. The third-party CA will provide a signed
certificate and a CA certificate.
21Step 2: Add the Signed Certificate to the Server
1. Copy the signed certificate(s) you received from the CA to your web server.
2. Locate the Apache server’s configuration file, for example, /conf/httpd.conf.
3. Add the certificate information to the Virtual Hosts section for port 443.
#IP Address of your server and port for HTTPS.
DocumentRoot /var/www/website
ServerName www.domain.com
SSLEngine on
#The main certificate for your server.
SSLCertificateFile /etc/ssl/crt/primary.crt
#The private key you generated when creating a certificate signing request.
SSLCertificateKeyFile /etc/ssl/crt/private.key
#The intermediate certificate your CA sent, if any.
SSLCertificateChainFile /etc/ssl/crt/intermediate.crt
4. Edit the three locations to match the filename and location of your certificates.
5. Save your changes.
6. Restart Apache.
Enable HTTPS between Apache and CIC
Tip:
Best practice is to use HTTPS from CIC to Apache and from Apache to the web browser, or from Apache to the web browser
only. Securing traffic from Apache to CIC only can cause issues with Secure cookies.
To enable HTTPS between the CIC server and the web server when using Apache:
1. Import the CIC HTTPS certificate to the web server as a trusted root certificate authority.
Note:
Consult the documentation for your server operating system because instructions for adding a trusted root certificate
authority vary by operating system.
2. Verify that your web server’s configuration file includes a rewrite rule for HTTPS traffic over port 8019:
Apache
SSLProxyEngine on
# RewriteRule "^(/.*)/api/([^/]+)(/.*)" "https://$2:8019$3"
[P,E=WEB_APP:$1,E=ICWS_HOST:$2,E=ICWS_PATH:$3,E=HTTP_HOST:%{HTTP_HOST},E=REQUEST_URI:%
{REQUEST_URI},E=SCHEME:%{REQUEST_SCHEME}]
Nginx
proxy_passhttps://$server:8019$icws_path$is_args$args;
See the installation instructions for Apache or Nginx for more information.
22Install CIC Web Applications on Nginx
1. Create a folder in the document root of your web server for the CIC Web Applications. Verify that your web server software (IIS,
Apache, or Nginx) has the appropriate permissions for that newly created folder.
Note:
In this document, the folder is named ININApps.
2. Download the CIC Web Applications zip file fromhttps://my.inin.com/products/Pages/Downloads.aspx. All of the web
applications are contained in this single zip.
3. Unzip the CIC Web Applications folder.
4. Navigate to the web_files folder inside the unzipped CIC Web Applications folder.
5. Copy all of the folders inside of web_files. Each folder contains one CIC web application.
6. Paste the folders copied in the previous step into the directory you created in step 1. Doing so places the appropriate directory
structure and files for all CIC Web Applications on your web server.
7. In Nginx /conf/nginx.conf, verify the following (minimally required) configuration entries are set or added (whether at the
http or server level):
include mime.types;
default_type application/octet-stream;
sendfile on;
keepalive_timeout 65;
gzip on;
gzip_types text/plain text/css application/javascript application/json image/svg+xml;
index index.html index.htm;
client_max_body_size 0;
autoindex on;
autoindex on;
8. Set the root entry for the server to the CIC Web Applications folder
9. Add the following rewrite rules within the server object:
set $ininIcwsOriginalUrl $http_inin_icws_original_url;
if ($ininIcwsOriginalUrl !~ .+) {
set $ininIcwsOriginalUrl $scheme://$http_host$request_uri;
}
location ~* (?:^(.+)/api|^/api)/([^/]+)(/.+)$ {
set $web_app $1;
set $server $2;
set $icws_path $3;
proxy_cookie_path /icws/ $web_app/api/$server/icws/;
proxy_redirect /icws/ $web_app/api/$server/icws/;
proxy_set_header X-Forwarded-For $proxy_add_x_forwarded_for;
proxy_set_header ININ-ICWS-Original-URL $ininIcwsOriginalUrl;
proxy_pass http://$server:8018$icws_path$is_args$args;
add_header P3P ‘CP=“CAO PSA OUR”';
# If you are securing the ICWS host(s), use this rewrite rule instead:
# proxy_passhttps://$server:8019$icws_path$is_args$args;
proxy_buffering off;
proxy_http_version 1.1;
}
Note:
If the X-Forwarded-For header is already being set to $proxy_add_x_forwarded_for at a higher level, it is not needed here.
That header is, however, required for these API calls.
Note:
All proxy_set_header directives must be placed at the same level within the configuration file, i.e. in the code above, the
proxy_set_header directives both must either be inside of the location block or outside of the location block.
10. Add the following cache rules within the server object:
location ~ /client/ {
location ~ /client/help/ {
23expires off;
}
location ~ /client/(?:addins|config)/ {
add_header Cache-Control "no-cache";
}
location ~ index.html?$ {
expires 15m;
}
location ~ appSettings.json$ {
add_header Cache-Control "no-cache";
}
location ~ .(?:js|css|jpe?g|ico|png|gif|svg|ttf|woff|otf|eot|mp3|wav|ogg)$ {
expires 1y;
}
}
11. (Re)start the Nginx process
12. Verify that all applications work as expected.
Configure HTTPS for Nginx
Enable HTTPS between the web browser and Nginx
Step 1: Generate Certificate Signing Request
Note:
OpenSSL is an open source tool and is not supported by Genesys. For more information about installing and using Open SSL,
see https://www.openssl.org/
To use OpenSSL to generate a CSR:
1. Create a destination folder to make finding the CSR and private key easier. Open the command prompt.
2. Open terminal.
3. Use cd to navigate to the folder where you want to generate the CSR.
4. Type the following command:
openssl req -out CSR.csr -new -newkey rsa:2048 -nodes -keyout PrivateKey.key
5. Follow the prompts to enter the information about the end point for the CSR.
6. Close the window.
This process generates two files: CSR.csr and PrivateKey.key
7. Send the CSR file to the third-party CA to be signed. Do not send the private key. The third-party CA will provide a signed
certificate and a CA certificate.
24Step 2: Add the Signed Certificate to the Server
1. Copy the signed certificate(s) you received from the CA to your web server.
2. If you need to use multiple certificates, Nginx requires that all certificates be located in one file. To combine the certificates:
cat your_domain_name.crt ExampleCA.crt >> bundle.crt
3. Open the virtual hosts file and add the following information:
server {
listen443;
sslon;
ssl_certificate/etc/ssl/your_domain_name.pem;
(or bundle.crt)
ssl_certificate_key/etc/ssl/your_domain_name.key;
server_name your.domain.com;
access_log /var/log/nginx/nginx.vhost.access.log;
error_log /var/log/nginx/nginx.vhost.error.log;
location / {
root/home/www/public_html/your.domain.com/public/;
indexindex.html;
}
}
4. Edit the certificate locations to match the filename and location of your certificates.
5. Save the file.
6. Restart Nginx.
Enable HTTPS between Nginx and CIC
Tip:
Best practice is to use HTTPS from CIC to Nginx and from Nginx to the web browser, or from NGIX to the web browser only.
Securing traffic from Nginx to CIC only can cause issues with Secure cookies.
To enable HTTPS between the CIC server and the web server when using Nginx:
1. Import the CIC HTTPS certificate to the web server as a trusted root certificate authority.
Note:
Consult the documentation for your server operating system because instructions for adding a trusted root certificate
authority vary by operating system.
2. Verify that your web server’s configuration file includes a rewrite rule for HTTPS traffic over port 8019:
Nginx
proxy_passhttps://$server:8019$icws_path$is_args$args;
See the Nginx installation instructions for more information.
25Application Configuration
servers.json
To restrict the CIC servers users can choose, add a file called servers.json under the config directory in the client folder under
the CIC Web Applications folder. If users are logging into one server, the configuration is as follows:
{
"version": 1,
"servers": [
{ "host": "salesic",
"displayName": "Sales" }
]
}
If users can choose from a predefined list of CIC servers:
{
"version": 1,
"servers": [
{ "host": "salesic",
"displayName": "Sales", "order": 0
},
{ "host": "supportic",
"displayName": "Support", "order":
1 }
]
}
Note:
The host is the CIC server, not the OSSM. The old key hostName is deprecated but still supported.
This file requires strict JSON. Hanging commas or single quotes will cause errors.
If no servers are specified, (e.g., servers: []), then the server selection page during log on will have a text field to enter the CIC server
to connect to. If a single server is specified, the server selection page will be skipped. If two or more servers are specified, then the
server selection page will have a dropdown to select a server.
26altHostHints
In 2015 R4 and following, servers.json supports listing alternate hosts for a given server entry, which is helpful in switchover
scenarios when the primary server is not reachable or the switchover pair is in a DNS round-robin. The new altHostHints property
lists alternate servers the application can use.
{
"version": 1,
"servers": [
{ "host": "notReachableSalesIc",
"displayName": "Sales",
"altHostHints": [ "salesic1", "salesic2"
] }
]
}
In a CIC environment with OSSMs, it is advantageous to put the all of the OSSMs in the altHostHints array.
With a round-robin switchover pair, do not place the short host name in host (e.g. server1). Instead use fully qualified domain
names in both host and altHostsHints. List the primary server in hosts and the backup servers in altHostHints.
For example, here is a configuration for server1 (without OSSMs):
{
"version": 1,
"servers": [
{ "host": "server1.example.com",
"displayName": "Indianapolis", "altHostHints":
[ "server2.example.com" ] }
]
}
The host property should not be changed because settings will depend on it in 2015 R4.
Once we successfully connect with the client, the alternate hosts are cached from what the server gives us.
27Application updates (subsequent installs)
New versions of the CIC Web Applications are located at https://my.inin.com/products/Pages/Downloads.aspx. Download and
unzip the new version of the applications before completing the instructions that follow.
Backing up existing applications
Back up Genesys web application files before performing updates. This will enable you to roll back the installation if necessary.
All CIC Web Applications should exist in a single directory, which should be zipped and backed up. Genesys recommends adding the
date and release number to the zip file's name.
Upgrading Interaction Connect
As of 2016 R1, Interaction Connect supports add-ins. When upgrading Interaction Connect, back up the add-ins and config
directories before upgrading Interaction Connect.
In the following instructions, [client] is the Interaction Connect root directory on your web server. For example, if Interaction
Connect is in a directory named client, back up client/addins and client/config.
To upgrade Interaction Connect:
1. Back up the [client]/addins and the [client]/config directories.
2. Download and unzip the new version of Interaction Connect. See steps 2-4 in "All server types: download, unzip, and copy
application files" for detailed instructions.
3. In the unzipped folder, navigate to web_files/client and copy the contents inside of the client directory.
Note:
If you copy the entire client directory, instead of the contents of the client directory, you will need to add the backed up
[client]/addins and [client]/config directories back to the [client] directory after upgrading.
4. Move the copied files for the new version of Interaction Connect into the [client] directory for the CIC Web Applications on
your web server, replacing files when they collide.
5. Verify that [client]/addins and [client]/config have the appropriate files.
Safely copying files over to the web server
Copy only the application directories, leaving in place other files such as configuration files. In the following examples, source is a
directory that solely contains the unzipped application directories.
Windows
ROBOCOPY \path\to\source \path\to\webserver\root /e
*nix
rsync -a /path/to/source/ /path/to/webserver/root/
Rollbacks
To rollback an update, use the zip file you created as a backup to replace the files currently in place.
28Load balancing multiple web servers
CIC Web Applications are comprised of static files, with no server-side session state. Therefore, affinity is not needed for web
server requests. All requests for a single session do need affinity with an CIC server (or OSSM), but the URL rewrite rules take care
of that for you.
For information about load balancing multiple web servers, consult the following resources:
IIS: http://technet.microsoft.com/en-us/library/jj129390.aspx
Apache: http://httpd.apache.org/docs/2.2/mod/mod_proxy_balancer.html
Nginx: http://nginx.org/en/docs/http/load_balancing.html
29Troubleshooting
On IIS, the CIC Web Application's main.js takes a long time to load when
compression is enabled.
Solution
The Chrome network tab can be useful to determine which request is taking the longest. Turn on the Disable caching option in
the Chrome Network tab.
Ensure that output caching is enabled on IIS and is working properly. Perfmon contains several counters in the Web Service
Cache category that monitor the state of the cache, including the size, number of files/URIs cached, and the hit rate.
Check for I/O performance issues
On IIS, a slow request becomes faster after reloading the resource multiple
times.
Solution
You may need to tweak the frequentHitThreshold and frequentHitTimePeriod parameters to ensure that IIS is retaining the cached
responses.
30Appendix A: IIS XML Configuration 1. Add the following location entry in ApplicationHost.config at %WINDIR%\system32\inetsrv\config\applicationHost.config Put this location entry above or below the other location entry already present in order to avoid breaking applicationHost.config The location path needs to match the IIS Site name. 2. If there is not a web.config file, create a web.config file with the following content in the CIC Web Applications folder on your web server:
name="inin-location-paths">

                                                  32
33
Change Log
The following changes have been made to CIC Web Applications Installation and Configuration Guide , since initial release.

        Date                                                              Change
 01-October-2014      Initial Release
 01-August-2015           Added alternate hosts information for 2015 R4, updated cover page and copyright info
                          Added recommended cache settings for Interaction Connect
                          Added IIS Manager configuration steps and placed IIS XML configuration in Appendix A
                          Fixed reference to incorrect server variable name

 01-September-2015 Added information about updating Interaction Connect.
 01-November-2015         Added "Configure HTTPS for IIS"
                          Added "Configure HTTPS for Apache"
                          Added "Configure HTTPS for Nginx"

 01-December-2015 Added instructions for disabling response buffering in IIS install instructions.
 01-May-2016          Reorganized installation instructions to clarify required and optional tasks.
 01-August-2016       Added "Desktop alerts do not appear in Interaction Connect" section in Troubleshooting chapter.
 01-November-2016 In "Step 1: Change Inbound rule to use HTTPS", fixed typographical error in step 6.
 01-February-2017         Added Tip about best practice to Enable HTTPS between IIS and CIC, Enable HTTPS between Apache
                          and CIC, and Enable HTTP between Nginx and CIC.
                          In the Step 3: Configure IIS section, added to step 4 of procedure, iii. Update Maximum allowed content
                          length (bytes) to something greater than or equal to "20971520".
                          In "Install CIC Web Applications on Apache" section, inserted a new step:
                                  4. If LimitRequestBody is set to something other than 0, ensure that you increase it to
                                  something greater than or equal to 20971520 (bytes).
                          Then renumbered rest of procedure.

 01-June-2017             Added .woff2 -> application/font-woff2 to MIME types in step 10 of "Configure IIS" procedure.

 01-July-2017             Rebranded this document to apply Genesys corporate lexicon.

 01-August-2017           Updated cover, copyrights and trademarks pages.
                      Added to Prerequisites: If you use the same reverse proxy for CIC Web Applications and Genesys Intelligent
 25-September-2018 Automation, then the Intelligent Automation rewrite rule must come before the CIC Web Application rule. For
                      more information, see the PureConnect Integration with Genesys Intelligent Automation Technical Reference.
                      Updated servers.json. Corrected location of servers.json file to read: To restrict the CIC servers users can
 22-October 2018      choose, add a file called servers.json under the config directory in the client folder under the CIC Web
                      Applications folder.

                                                                 34
You can also read