VAULT CLIENT EUCLIDEON - QUICK-START GUIDE VERSION 1.15 25/6/19
←
→
Page content transcription
If your browser does not render page correctly, please read the page content below

EUCLIDEON

VAULT CLIENT
QUICK-START GUIDE
VERSION 1.15
25/6/19

Euclideon Vault Client

                                Quick Start Guide
Contents
 •   Purpose of this guide
 •   Downloading the Euclideon Vault Client software
 •   Unpacking and Installing
 •   Logging into Vault Client
 •   Vault Client Interface
       – 1. Menu and Status Bar
            * System Menu
            * Windows Menu
            * Projects Menu
       – 2. Scene Viewport
            * Default Mouse Controls
            * Default Keyboard Controls
       – 3. Scene Explorer
            * Loading existing UDS Models
            * Loading a sample project
       – 4. Settings
       – 5. Convert
 •   Hosting a model
 •   Euclideon Vault Development Kit
 •   Contact Us
 •   Special Acknowledgements

                                                       1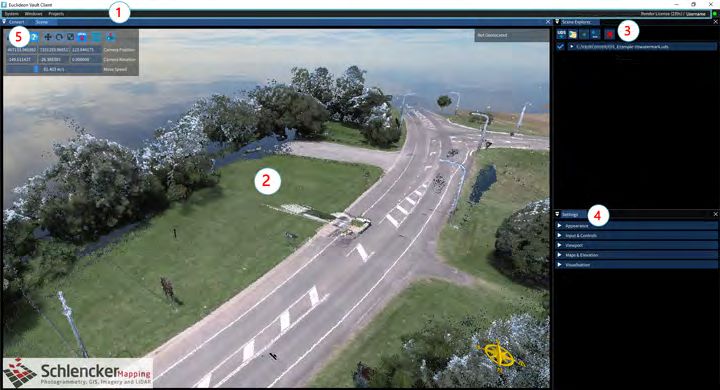
Purpose of this Guide
This Quick Start guide provides the information needed to start using Euclideon’s Vault Client application. Before
starting, please ensure you received an email from Euclideon with a software download link and login credentials. If
you have any questions or suggestions, please contact Euclideon at info@euclideon.com or go to https://
www.euclideon.com/ to access our online support.

Refer to the Euclideon Vault Client User Guide for detailed coverage of the Euclideon Vault Client interface.

Downloading the Euclideon Vault Client software
To use Euclideon Vault, you will need to download the Euclideon Vault Client software for your respective operating
system.

 Step              Action

 1.                Click on the link provided in the email that Euclideon sent: https://earth.vault.euclideon.com/
 2.                If this is your first time downloading the Euclideon Vault Client software, then Login using the
                   credentials provided in the email from the previous step. Otherwise, login using your existing
                   credentials.
 3.                Change your password from the temporary one Euclideon gave you by clicking on your
                   Username in the top right-hand corner of the window and choosing Change Password.
 4.                The packages screen lists the latest Euclidon Vault Client software version. Click on Download
                   for your operating system.

 5.                If you do not see the version that has been approved for use from your Euclideon Vault Server
                   provider, then Click on Packages on the top menu.

                                                         2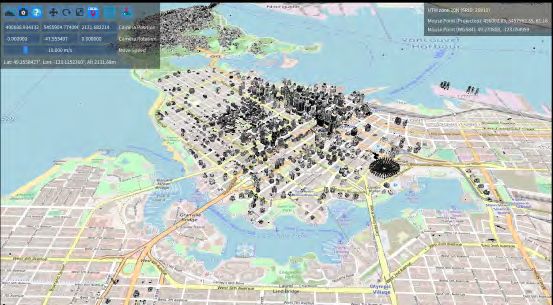
Step             Action

 6.               Select Download for your version and operating system.

 7.               Select the location to download the EuclideonVaultClient_OS_version.zip file.
 8.               Click Save to download to your default download location defined by your browser, or Click the
                  up arrow next to Save to select Save As to select another download location.
 9.               Change to the directory where you downloaded the file.
 10.              Go to Unpacking and Installing for specific installation instructions on your operating system.

Unpacking and Installing

Windows

  1. If you haven’t already, change to the directory where you downloaded the Euclideon Vault Client software.
  2. Right-click on the EuclideonVaultClient\_OS\_version.zip file and select Extract Here to unpack the files
     to the current directory.
  3. If you have a computer capable of running OpenGL, then run (double-click) vaultClient_OpenGL.exe.
     Otherwise, run (double-click) vaultClient.exe.

macOS

  1. Locate the Euclideon Vault Client DMG package that you downloaded previously.
  2. Open the DMG and drag the “Euclideon Vault Client” icon onto the provided “Applications” icon.
  3. Open System Preferences, then click "Security & Privacy".
  4. Under the General, tab locate "Allow apps downloaded from" and choose Anywhere.
  5. Run the “Euclideon Vault Client” application from “Applications”.

Ubuntu Linux Distributions

Using this package requires a desktop environment.

                                                       3
1. Use your package manager to install the following:
        • SDL2 (Minimum version 2.0.5)
        • libCURL (Version 3)
  2. Locate the Euclideon Vault Client tar.gz package that you downloaded previously.
  3. Unpack the entire contents of the tar.gz
  4. Type ./vaultClient or double-click on vaultClient to initiate the Euclideon Vault Client interface.

iOS and Android

The iOS and Android builds are not currently publicly available.

Logging into Vault Client
Before attempting to log into the Euclideon Vault Client, ensure you have downloaded and extracted the Euclideon
Vault Client software.

The remaining instructions in this guide target Windows operating systems. Refer to the Euclideon Vault User Guide
for detailed information relating to the other supported operating system types.

  Parameter         Description

  ServerURL         Will be provided by your Euclidon Vault Server provider.

                                                          4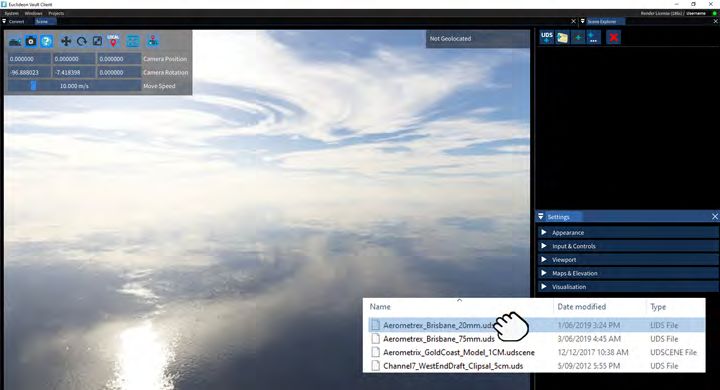
Parameter        Description

  Username         The username you were given (or entered while registering). If you weren’t provided with a
                   username you may be able to register for one by visiting the server URL in your browser. TIP:
                   If Remember is ticked, the client will store the value entered so you don’t have to enter it every
                   time.
  Password         Your account password.

There are also additional settings in the Advanced Connection Settings dropdown:

  Parameter        Description

  Proxy Address    The address for your internet proxy (this is provided by your system administrator). It can
                   additionally include the port number and protocol.Examples include: 192.168.0.1,
                   169.123.123.1:80 or https://10.4.0.1:8081.Leaving this blank will attempt
                   auto-detection.
  User Agent       A field included in HTTP request headers. Very few users will need to specify this setting.
  Ignore           Will disable verification of the PEER and HOST certificate authorities.This setting should only
  Certificate       be used when instructed by your system administrator and only when errors are occurring
  Verification      during the login process, as it will weaken the security between your computer and the
                   Euclideon Vault Server.NOTE: Ignore Certificate Verification will not be saved due to
                   the security risk associated. You will need to enable this setting each time you open the
                   application.

After you have entered your credentials, click Login and you will see an empty scene in the viewport similar to the
image below.

                                                          5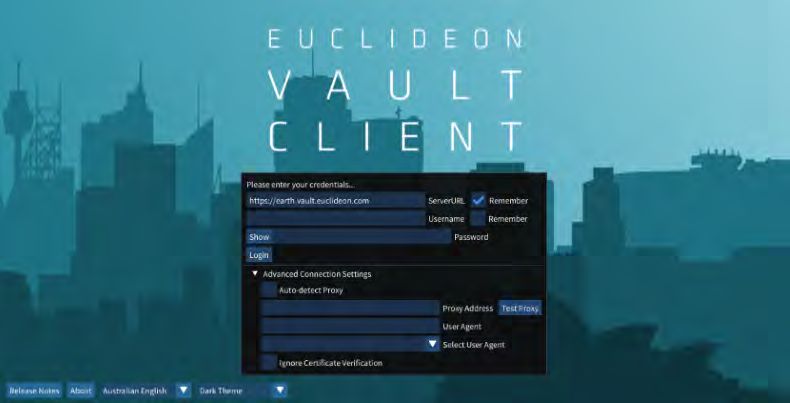
TIP: If the system reports a username or password error, ensure you have entered the credentials
     correctly. The system is case-sensitive and does not accept spaces before or after the Server URL and
     login credentials.

Vault Client Interface
Use the Euclideon Vault Client Interface to view, import, and convert 3D models. Refer to the sections that correlate
to the numbers on the image for more detailed information on how to use that feature.

We are only touching on the elements you need to start using Euclideon Vault Client. Refer to the Euclideon Vault
Client User Guide for detailed coverage of the Euclideon Vault Client interface.

                                                         6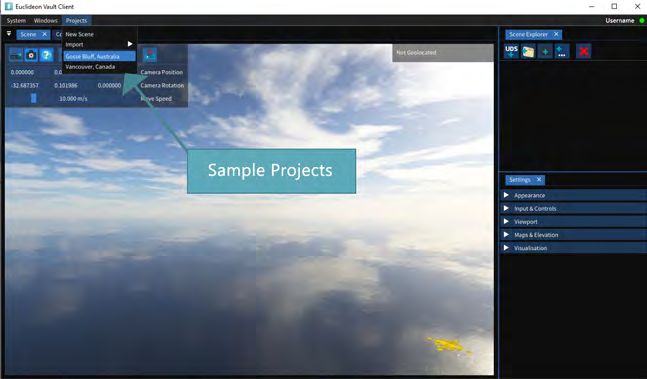
1. Menu and Status Bar
2. Scene Viewport
3. Scene Explorer
4. Settings
5. Convert Tab

MENU AND STATUS BAR

The menu bar consists of 2 sections, the left section with menu drop downs and the right section with status
information. The status information will change depending on what models are loaded.

System Menu

The System menu has a number of system related functions:

                                                     7
• Logout terminates your current session with the server and takes you back to the login screen. Logging out
     prevents attackers from potentially hijacking your session and enables you to change users or servers.

       TIP: Logout does not unlock your current licenses for use by other users, they must still time out.

   •   Restore Defaults resets all settings back to how they were when you ran Euclideon Vault Client the first time.
   •   About displays a popup with the version and license information for the current version of Client.
   •   Release Notes displays a popup with information on the current and previous release changes.
   •   Quit logs you out and then closes the program.

Windows menu

The Windows menu allows you to show (tick) or hide (untick) the Scene, Scene Explorer, Settings, and Convert
windows in the Euclideon Vault Client application.

       TIP: If you notice missing functionality, be sure to enable the required screen panels.

Projects menu

Use the projects menu to manage project viewing.

                                                            8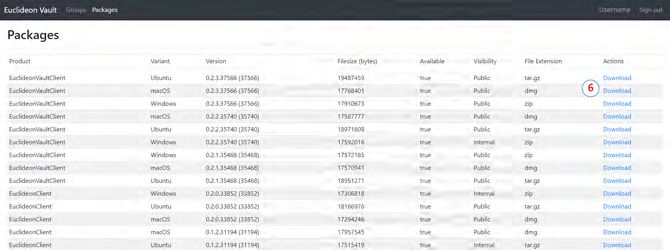
• New Scene will remove all items from your Scene and create a new empty Scene.
   • Export will export the project information, including links to models and other features, to a GeoJSON
     (JavaScript Object Notation) file in a user-specified directory. The directory must exist.
   • Import will enable you to import a project in UDP or GeoJSON (JavaScript Object Notation) format to the Scene.
   • Projects list of available projects on your Euclideon Vault Server.

     TIP: You can also drag and drop a UDP or GeoJSON file onto the Euclideon Vault Client interface to load
     a project.

SCENE VIEWPORT

When you load a model or project, it will display in the scene viewport. You can manoeuvre within the scene display
using the mouse or the keyboard.

Default Mouse Controls
  Action           Description

  Tumble           Hold down the left-mouse button and move the mouse left-right-up-down to rotate within
                   the display and change the angle of your view. You will not travel with the tumble action.
  Pan              Holding the right mouse button on a point in the scene (not the skybox) will begin “panning”
                   (moving the camera, but not turning the camera. It will keep the originally hovered point under
                   the mouse cursor.
  Orbit            Hold down the mouse scroll wheel as you move the mouse. The mouse movement will
                   give you the sensation that you are orbiting around the point you selected. This feature is
                   based on where you first click on the screen and will keep the camera the same distance from
                   the clicked point by turning and moving the camera.
  Dolly            The mouse scroll wheel will “dolly” (zoom the camera in and out) from the point where the
                   mouse is hovering (will not work with the skybox).

                                                        9
Default Keyboard Controls
You can use specific keys, with the “Scene” window focused, to control the camera movement.
Action Description
W and S manoeuvre the camera forward and backward at the current Camera Move Speed.
A and D pan the camera left and right at the current Camera Move Speed.
R and F ascend and descend the camera at the current Camera Move Speed.
Spacebar locks altitude, allowing you to pilot the camera without changing the camera’s height (Z-axis
lock).
TIP: Hold the Ctrl key while pressing W, S, A, D, R, or F keys to dramatically slow the camera movement.
Hold the Shift key while pressing the W, S, A, D, R, or F keys to speed up the camera movement.
SCENE EXPLORER
The Scene Explorer window lists the assets currently in your scene. When you first open the Euclideon Vault Client
interface, there should be no items listed. In order to familiarise yourself with the Euclideon Vault Client interface, you
can load an existing UDS model or select a sample project if you are an Euclideon Earth subscriber. We cover both
10methods in this chapter.
Loading existing UDS Models
The easiest way to load a model into the Euclideon Vault Client is to DRAG a UDS file from your file explorer and DROP
it in the Euclideon Vault Client Scene window to add the model to the scene.
Another way is to use the Quick Action Menu buttons across the top of the Scene Explorer to add or remove from
the scene.
11Button Description
Add UDS This button opens the dialog box to add a UDS model to the scene. The Path/URL can
include files on the local drives, network drives, UNC Paths, HTTP, HTTPS, FTP & FTPS.
(hotkey Ctrl + U)
Delete This deletes all selected items from the scene (hotkey Delete)
Loading a sample project
If you are a subscriber to Euclideon Earth, Euclideon provides sample projects for application evaluation.
Step Action
1. To load a sample project, select Projects from the top menu.
2. Click a Sample Project from the dropdown list.
12Step Action
3. The sample project should load.
SETTINGS
You can customise settings such as speed of movement, panel brightness, camera lens, and more. This section will
cover the most common customised settings. Refer to the more detailed Euclideon Vault User Guide for information
on the other options in the Settings panel.
Use the parameters in the Settings window to customise how the Euclideon Vault Client looks and operates: - Change
the viewport camera values - Manipulate the maps & elevation settings
We recommend familarising yourself with each setting by altering the parameters individually to see how they affect
the display and operation.
13TIP: To restore all default values for any of these settings, simply right-click on the subheading and then
select Restore Defaults.
Viewport
The Viewport allows you to adjust the camera’s viewing distance and field of view (fov) of the camera lens. These
settings affect your viewing range within the Scene Window.
Please note that Viewport parameters do not work in Map Mode (Ctrl+M).
TIP: If the model disappears from the scene, yet you can still see the sky, watermark, or a (list of) uds
file(s) in the Scene Explorer, your View Distance might be set too low. Adjust the View Distance settings
until your models are visible again.
Parameter Default Value Description
View 10000.000m The distance that the camera’s view extends.
Distance
Camera 30mm The Camera Lens (fov) operates like standard cameras. Use the field of
Lens (fov) view (fov) to alter the visual angle of the camera lens. Select from the
values in the drop down box. The shorter focal length (i.e. 15mm) gives a
wider field of view than a larger length (i.e. 70mm).
14Maps and Elevation
The map feature is useful when you need a geospatial view and are unfamiliar with the area or are looking for a
specific reference point. Select Map & Elevation within the Settings tab.
TIP: Hold down the Ctrl-key and click in any parameter that has a slide bar to manually set a more precise
value or set a value outside the parameter boundaries.
Default
Parameter Value Description
Map Tiles checked As long as the 3D models are geospatially correct, suitable map tiles will
generate automatically. If you uncheck the box, the map tiles (street map)
below the model (and all other customisable options in Maps & Elevation) will
disappear.
Mouse can checked Check this box to enable the mouse to lock to map tiles when moving the
lock to camera. It also allows you to add interest points, measurements, and lines to
maps the map tile, and execute other right-click functionality, such as setting the
map height to the current mouse position.
15Default
Parameter Value Description
Tile Server Tile Server allows overlay with existing maps, clicking Tile Server prompts
you to enter a server address for retrieving background map tiles.
Map Height 0.000m If you adjust Map Height, the map tile will move higher or lower according to
your selection. The higher the value, the more the map will cover the model.
Couple with the overlay option to see where map markers cross the terrain
image.
Blending Hybrid Choose from three options: Hybrid Hybrid-map will move above and below
the model as you adjust the map height. Overlay Overlay-map will stay above
the terrain image as you adjust the map height. Underlay Underlay-the map
will stay below the terrain image as you adjust the map height.
16Default
Parameter Value Description
Opacity 1 The transparency (opacity) slider adjusts the transparency (opacity) of the
map tiles so they don’t obscure the visibility of objects in the scene. Move the
blue bar to adjust the transparency of the map enabling you to view street
markers over the terrain map.
Set to N/A The Set to Camera Height button can be used to set the height of the map
Camera tiles to the camera’s current height. This can be used to place map tiles
Height outside the default range of the slider of +/-1000m.
CONVERT
The Euclideon Vault Client enables users to import 3D models and convert them to Euclideon’s Unlimited Detail
format (UDS). Euclideon’s UDS format enables you to stream and load massive point cloud data sets. Euclideon
Vault currently supports the following file types:
• LAS
• PTS
• PTXS
• TXT/CSV
• E57
• XYZ
• OBJ
• ASC (Esri)
17TIP: If you attempt to drag and drop the file to want to convert on to the Convert Window before typing
in the Output Name path and filename, then Euclideon Vault Client will report that the file type is not
supported.
Step Action Comments
1. Select the Convert tab in the If the convert table is not visible, select Convert from the
Euclideon Vault Client interface Windows drop down menu in the top left-hand corner of the
Euclideon Vault Client interface.
2. Type in the Output Ideally, this parameter should be the final target location of the
Name—path and name—of the file so that you don’t need to copy the file at the end. The system
exported UDS file. will add the file extension for you. Make sure there is enough
space in the target directory to store the entire converted file.
18Step Action Comments
3. Type in the Temp Directory Defaults to the same location as the output file in the previous
step. Type C:\Vault\convert in the Output Name field and the
Temp Directory will default to C:\Vault\convert_temp. Euclideon
recommends setting the Temp Directory location to one that
resides on a high-speed local drive with plenty of space (rule of
thumb: set aside as much space as the uncompressed raw
input, as the points in the temporary files have not as yet been
compressed), as the convert process will write many small,
temporary files. The conversion will remove the temp directory
after completion.
4. Optional Selection: Continue If corrupt or incomplete data is detected during a conversion,
processing after this setting will decide whether the conversion is cancelled
corrupt/incomplete data (unticked) or continues (ticked) resulting in a skip of the
(where possible). corrupted points. NOTE: If you tick this setting, the system will
not report that it found corrupt or incomplete data.
5. Optional Selection: Point Set to the source size, or it will default to 0.01 if no source size
resolution:0.00000—Override configured. This setting determines the size of the points (in
metres) in the point cloud after conversion. It will attempt to find
a good size based on the source data but can be set manually by
first ticking the "Override" checkbox and then typing a value in
the text field.
6. Optional Selection: Override If the source data has been correctly geolocated, when you
Geolocation import that file prior to converting it, the file should already have
the “Spatial Reference Identifier” (SRID) information filled in this
box: search for “EPSG code” or “SRID code” in the metadata. The
SRID is the Geotagged ID of the GIS zone for the exported
model. If the pre-parse can detect the SRID it will be set
automatically. If not, and you wish to correctly geolocate your
data, then you can manually select the "Override" checkbox and
enter the correct SRID in the text field. It assumes that the input
is already in the correct zone. Global Point Offset can be used to
add an offset to the x, y and z coordinates of the converted
model from that which was specified in the file’s metadata, or if
not, from the global origin (0, 0, 0).
7. Quick Partial Convert Enabling this option will greatly speed-up the conversion process
by only processing 1 in every 1000 points of the input data. This
is useful for testing and calibrating the conversion settings
before attempting to convert a large and time-consuming job.
When imported into the scene the converted model will appear
disintegrated and will have 1/1000th of the intended resolution.
19Step Action Comments
8. Metadata This section allows you to import watermark by drag and
dropping, add metadata related information such as Author,
Comments, Copyright and License holders.
9. Choose a file to convert Drag and drop the file from Windows Explorer onto the Convert
window.
10. Look at the Input Files panel. Once you have selected your file for conversion, a new panel
appears listing your selected files. The estimated number of
points in each file will be shown. During conversion, the progress
for each file will also be shown. Click Remove or Remove All
Files if the wrong file(s) was selected.
11. Click Begin Convert Euclideon Vault will read the file then process and write the
points.
12. X to Cancel The “X” button beside the convert job in the “Convert Jobs”
section allows you to cancel a running convert (it will cancel at
the next ‘safe’ point and clean up temporary files). Once
cancelled, the ‘Begin Convert’ button and the configuration
options will reappear enabling you to restart the conversion.
After a job has completed the “X” button also allows you to
remove it from the list.
20Step Action Comments
13. Click Add to Scene When the conversion has completed successfully, click the Add
to Scene button located at the top of the window. Euclideon
Vault Client interface will automatically switch to the Scene
Window to display your 3D model. NOTE: Requires a Render
License.
14. Review your 3D Model If Euclideon Vault Client interface does not switch automatically
to the Scene Window, then select Scene from the Windows
menu at the top of the Euclideon Vault Client interface. NOTE:
Requires a Render License.
TIP: Euclideon does not recommend running multiple converts at the same time. Converting is a memory
and processor intensive process so it’s almost always faster to have 1 convert running at a time. Euclideon
Vault Client helps with this by allowing you to queue multiple jobs to run one after another.
Hosting a model
You can store 3D models on:
• A local computer hard-drive
• A network drive
• In a Cloud.
Detailed configuration and implementation instructions on how to host models in a cloud is outside the
scope of this document. Please, refer to the Euclideon Server and VDK Guides for more information.
Euclideon Vault Development Kit
The Vault Development Kit ("VDK") will allow businesses to utilise the features of the Vault ecosystem to enhance
existing products, or create new ones. Information created via VDK can be accessed through other VDK enhanced
products allowing seamless integration across multiple products.
21The VDK provides access to the patented Unlimited Detail renderer, approved through the Vault Server licenses for
3rd party applications.
The VDK is a complex topic aimed at experienced Developers. You can request software developer-level technical
information from Euclideon via email at sales@euclideon.com.
You must sign a Software Development Agreement, which sets out guidelines for developers.
Contact Us
To learn more about Euclideon Vault and other Euclideon solutions, please email sales@euclideon.com or visit us at
https://www.euclideon.com.
Special Acknowledgements
Thank you to AEROmetrex for supplying the Gosse Bluff sample model.
AEROmetrex provides aerial mapping services and products to our clients by exploiting both existing and emerging
air and ground imaging technologies.
The award winning company specialises in aerial photogrammetry and offers a growing range of aerial
orthophotography products, precision digital surface and terrain modelling, 3D models and value-added geospatial
services.
Schlenker Mapping was established in 1984 with the objective of providing service oriented, specialised digital
photogrammetric and terrestrial surveys, as well as conventional aerial surveys. Today, Schlencker Mapping
operates softcopy photogrammetric workstations providing one of the largest photogrammetric production
capacities of any mapping organisation in Australia.
22You can also read