Avast! Free Antivirus 8.0 Quick Start Guide - avast! Free Antivirus 8.0 - Quick Start Guide
←
→
Page content transcription
If your browser does not render page correctly, please read the page content below

avast! Free Antivirus 8.0 – Quick Start Guide

avast! Free Antivirus 8.0

Quick Start Guide

                                                                    1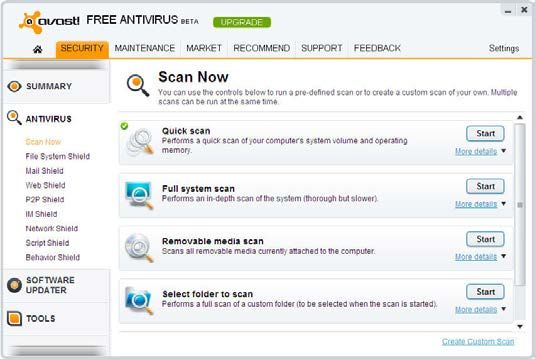
avast! Free Antivirus 8.0 – Quick Start Guide

Contents
Welcome to avast! Antivirus 8.0 ..................................................................................... 3
How to install avast! Free Antivirus 8.0 ......................................................................... 4
Protection Status ............................................................................................................. 9
More about the real-time shields ................................................................................... 10
Cloud Intelligence ........................................................................................................... 12
Remote Assistance ........................................................................................................ 14
AccessAnywhere ............................................................................................................. 15
Manually scanning your computer ................................................................................. 16
Creating a custom scan .................................................................................................. 17
What to do if a virus is found ........................................................................................ 18
Software Updater ........................................................................................................... 19
The avast! Auto-Sandbox ............................................................................................... 20
Browser Protection ........................................................................................................ 21
Browser Cleanup ............................................................................................................ 23
Avast “System Tray” Icon .............................................................................................. 25
Further help .................................................................................................................... 26
Upgrading to avast! Pro, Internet Security, or Premier ................................................ 28

                                                                                                                                       2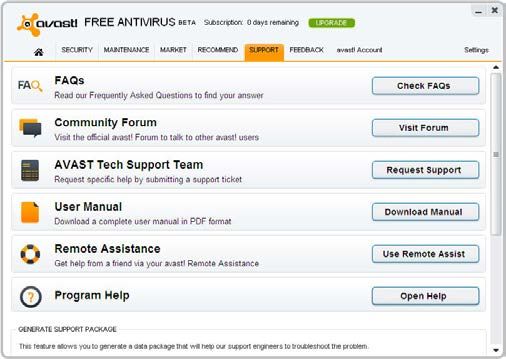
avast! Free Antivirus 8.0 – Quick Start Guide

Welcome to avast! Antivirus 8.0
avast! Antivirus 7.0 introduced a number of new features and improvements which
made it even faster and even less resource-hungry than previous versions. New
hybrid cloud technologies such as streaming (real-time) virus database updates and
the new avast! FileRep gave you greater protection than ever. The Remote
Assistance feature enabled you to get help from anybody else with an internet
connection, enabling them to connect directly to your computer.

In avast 8.0, we’ve made improvements to the Behavior Shield and Remote
Assistance features, we’ve improved the hybrid cloud technologies and we’ve
redesigned and simplified the user interface. With the new AccessAnywhere feature,
you can access any other computer on which avast! Premier has been installed, and
control it remotely, provided it has been configured to allow you remote access.

We’ve also added the new Software Updater to help you keep all your software up
to date to prevent malware attacks which specifically target known vulnerabilities.
There’s also an optional Browser Cleanup tool for removing unwanted toolbars and
plug-ins.

Based on the award-winning avast! antivirus engine, avast! Free Antivirus
incorporates anti-spyware technology, certified by West Coast Lab’s Checkmark
process, as well as anti-rootkit and strong self-protection capabilities, but remains
one of the fastest and least resource-intensive antivirus solutions available with top-
notch detection ability.

Like all avast! antivirus 8.0 products, avast! Free Antivirus 8.0 is based on several
real-time shields which continuously monitor your email and internet connections and
check the files on your computer whenever they are opened or closed. Once installed,
avast! runs silently in the background to protect your computer against all forms of
known malware. If everything is ok, you won’t even notice that avast! is running –
just install and forget!

                                                                                          3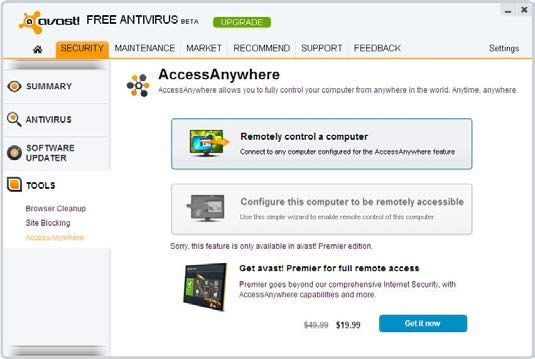
avast! Free Antivirus 8.0 – Quick Start Guide

How to install avast! Free Antivirus 8.0
The following pages describe how to download and install avast! Free Antivirus 8.0
on your computer and how to start using the program once the download and
installation process has been completed. The screens shown in the following pages
are as they appear in Windows XP and may differ slightly in other versions of
Windows.

The following are the minimum recommended system requirements to install and run
avast! Free Antivirus 8.0:

   •   Microsoft Windows 2000 Professional Service Pack 4, or Microsoft Windows XP
       Service Pack 2 or higher (any Edition, 32-bit or 64-bit), Microsoft Windows Vista (any
       Edition, 32-bit or 64-bit) or Microsoft Windows 7/8 (any Edition, 32-bit or 64-bit).

   •   Windows fully compatible PC with Intel Pentium III processor or above (depends on
       the requirements of the used operating system version and any other 3rd party
       software installed).

   •   128 MB RAM or above (depends on the requirements of the used operating system
       version and any other 3rd party software installed).

   •   400 MB of free space on the hard disk (to download and install).

   •   Internet connection (to download and register the product, for automatic updates of
       the program and antivirus database).

   •   Optimally standard screen resolution not less than 1024 x 768 pixels.

Please note that this product cannot be installed on a server operating system
(Windows NT/2000/2003 Servers).

                                                                                                4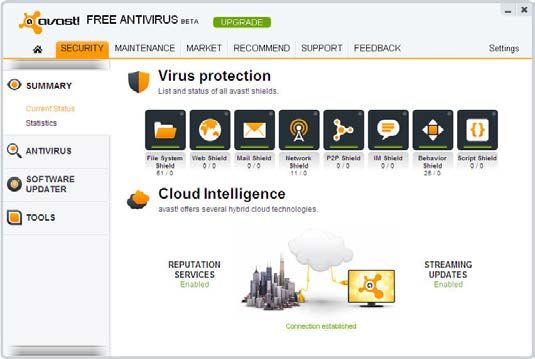
avast! Free Antivirus 8.0 – Quick Start Guide

Step 1. Download avast! Free Antivirus 8.0 from www.avast.com

It is strongly recommended that all other Windows programs are closed before
beginning the download.

If you are using Internet Explorer as your web browser, when the download starts
the box shown below will then be presented:

Clicking either “Run” or “Save” will start the download of the installation file to your
computer.

If you want avast! Free Antivirus 8.0 to be installed on your computer immediately
after the installation file has been downloaded, click “Run”.

In other web browsers, you may only have the option to “Save” the file. Clicking
“Save” will download the software to your computer but avast! will not be installed
at this time. To complete the installation process it will be necessary to run the
installation file so remember where it has been saved!

                                                                                           5
avast! Free Antivirus 8.0 – Quick Start Guide

Step 2. Install avast! Free Antivirus 8.0 on your computer

To install avast! Free Antivirus 8.0 on your computer, you need to run the installation
file. When you run the installation file (by clicking “Run” as described above, or by
double clicking the file saved on your computer) the following screen will then be
displayed:

       Clicking “Run” again will take you to the avast! Installation screen:

       Click Install Free Antivirus to proceed with the installation.

                                                                                          6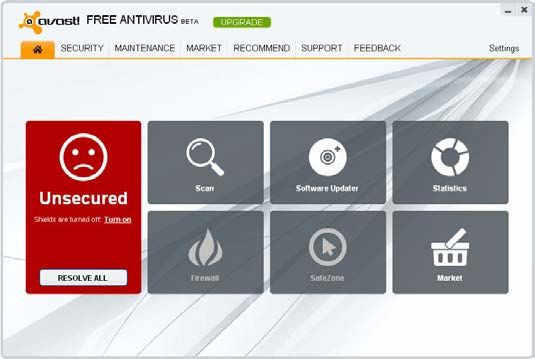
avast! Free Antivirus 8.0 – Quick Start Guide

On the next screen, by changing the language in the top-right corner, you can select
your preferred language for the installation.

You can then choose the type of installation. For most users, it is recommended to
select “Express Install”.

There is also a “Custom Install” option for more advanced users, which allows you to
tailor the installation according to your specific requirements, for example you can
select exactly which components to install and the language in which the program
will be installed.

Finally, while avast! Free antivirus is completely free to use, you just need to register
your use of the product. You can register using your Facebook login details or you
can provide an alternate email address.

                                                                                            7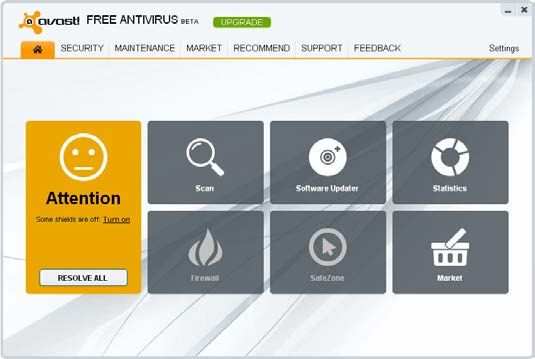
avast! Free Antivirus 8.0 – Quick Start Guide

If you already have an avast! Account, you should enter your avast! Account email
and password. Your avast Free Antivirus will then be connected with your avast!
Account. If you choose to register with Facebook, you will be able to access your
avast! Account directly from Facebook without logging in again.

If you do not already have an avast! Account, a new Account will be created for you
automatically, which you can access using the same email and password. You can
access your avast! Account at any time to check the status of your avast! Free
Antivirus and any other avast! products which you have installed.

You can use avast! Free Antivirus completely free of charge for as long as you want,
however, in order to continue to receive the latest virus definition updates so that
you continue to be protected against the latest threats, we do ask you to re-register
each 12 months. You will be informed in advance that your registration is due to
expire - all you need to do is re-register and your protection will be renewed for
another 12 months.

The final screen should confirm that your installation of avast! has been successfully
completed. Click “Finish”.

            On your desktop, you should now see the orange avast! icon and the
            orange avast! ball in your system tray (close to the clock)

If you are using Windows Vista or later, with the sidebar option, you
will also see the avast sidebar icon. This tells you the current status of
your avast program and you can drag & drop files onto the avast icon
if you want them to be scanned.

                                                                                         8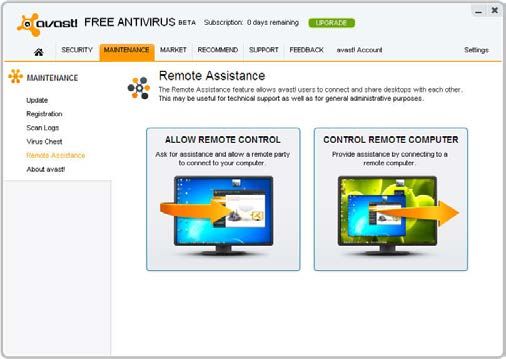
avast! Free Antivirus 8.0 – Quick Start Guide

Protection Status
When you open the program’s main window, it will tell you the current security status
of your computer. Normally, the window should appear as shown below.

If the main window appears as shown below, it means that your virus definitions may
not be up to date or one or more of your real-time shields may be turned off. You can
solve this by clicking on “Resolve”.

                                                                                        9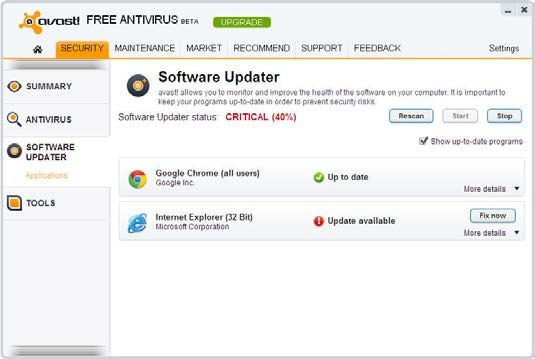
avast! Free Antivirus 8.0 – Quick Start Guide

“Unsecured” means all of your real-time shields are turned off. Use the “Resolve”
button to turn them all on so that your computer is fully protected.

More about the real-time shields
The real-time shields are the most important part of the program, as they are working
continuously to prevent your computer from becoming infected. They monitor all of your
computer's activity, checking all programs and files in real-time - i.e. at the moment a
program is started or whenever a file is opened or closed. Click on the “Security” tab to see
the current status of all the Shields.

Normally, the real-time shields start working automatically whenever your computer is
started. The presence of the orange avast! icon in the bottom-right corner of your computer
screen tells you that the real-time shields are working. Any of the shields can be turned off
at any time, but this is not normally recommended as it may reduce the level of your
protection.

Click on any shield icon to access the shield controls and to see information about what has
been scanned and any threats that have been stopped.

                                                                                                10
avast! Free Antivirus 8.0 – Quick Start Guide
avast! antivirus 8.0 contains the following real-time shields:
File system shield - checks any programs at the moment they are started and other files at
the moment they are opened or closed. If anything suspicious is detected, the file system
shield will prevent the program from being started or the file from being opened to prevent
any damage being caused to your computer and data.
Web shield - protects your computer from viruses while using the internet (browsing,
downloading files etc) and can also block access to infected web pages. If a virus is detected
while downloading a file from the internet, the download will be stopped to prevent the
infection from reaching your computer.
Mail shield - checks incoming and outgoing email messages and will stop any messages
containing a possible virus infection from being accepted or sent.
Network shield - monitors all network activity and blocks any threats that are detected on
the network. It also blocks access to known malicious websites.
P2P shield - checks files downloaded using common peer-to-peer (file sharing) programs.
IM shield - checks files downloaded by instant messaging or "chat" programs.
Behavior shield - monitors all activity on your computer and detects and blocks any
unusual activity that might indicate the presence of malware. It does this by continuously
monitoring your computer's entry points using special sensors to identify anything
suspicious.
Script shield - monitors all scripts that try to run on your computer, whether the
script is executed remotely e.g. while browsing the internet, or locally by opening a
file on your computer.
11avast! Free Antivirus 8.0 – Quick Start Guide
Cloud Intelligence
With avast! Cloud Intelligence, you can benefit from the global avast! CommunityIQ
network, which provides information about possible suspicious files and also allows
new threats to be detected and neutralized almost as soon as they appear.
Reputation Services
If this option is enabled, avast will check if a file is safe even before it is opened, by
checking its database of known files. Whether the file is considered safe or not will
be determined by how many other users have the file, and for how long it has
existed.
Streaming (real-time) Updates
Any antivirus program is only as good as its database of known virus
definitions. This is what the program uses to identify threats to your
computer, which is why it is important to ensure the virus definitions are
regularly updated.
By enabling Streaming Updates, you can make sure that new virus definitions
are sent to you in real-time, rather than waiting for the next regular update.
As your virus database will be continuously updated, this will give you even
more protection against the very latest threats.
By default, avast! is set to update both the engine and virus definitions
automatically whenever a new version is available. To disable Streaming
Updates, click on “Maintenance” then “Updates”.
12avast! Free Antivirus 8.0 – Quick Start Guide
Here, you can also check the current version of the program and when the virus
definitions were last updated.
The “engine” is the part of the program that scans your computer for potential
threats based on the virus definitions. The “program” means what you can see – the
user interface which is used to control what the program does.
You can manually update either by clicking on the green arrow. Note that clicking on
“Update Program” automatically updates both the program and the program engine
and virus definitions.
Reputation Services and Streaming Updates can be enabled or disabled by opening the
Settings in the top-right corner and selecting “Cloud Services”.
13avast! Free Antivirus 8.0 – Quick Start Guide
Remote Assistance
The remote assistance tool enables you to give another person remote access to
your computer. This can be useful if you are having any difficulties and you want
another person to take control of your computer to help resolve the problem.
If you need to request assistance from another person, click “Allow Remote Control”.
Avast! will generate a code that you then need to provide to the assisting person. To
transfer the code to the other party please use e.g. telephone, e-mail or chat. By
sending the code you are granting remote access to your computer to another
person. After the person takes control, this dialog disappears automatically.
If you will be providing the remote assistance, click on "Control Remote Computer".
Enter the code which you receive from the person needing assistance, then click the
"Connect" button. When the connection is established, this dialog disappears and the
remote desktop window appears.
To close the connection, click the following link or press the Alt+Shift+End shortcut.
14avast! Free Antivirus 8.0 – Quick Start Guide
AccessAnywhere
Very similar to the Remote Connect feature, this allows you to access and control a
computer
remotely from another location. If you are a frequent traveler and need to access
your computer back at home while you are away, you can do so via any other
computer on which avast 8.0 is installed.
Unlike Remote Connect, the connection is established by the remote user, not from
the computer which is being accessed. However, the computer which is to be
accessed, must be running avast! Premier and must have first been configured to be
remotely accessible. This can only be done in avast! Premier.
To remotely connect to another computer which has been correctly configured, just
click on the button to remotely control a computer and then enter the email and
password for the avast! Account to which it is connected.
Another use of AccessAnywhere is where a friend or family member regularly needs
your help but does not want to use the Remote Connect feature. In such a case,
provided they have installed avast! Premier, you can configure their computer in
advance to allow you remote access.
In order to connect to their computer remotely, you would only need to know the
logon credentials for the avast! Account with which the computer is connected. By
first connecting the other person’s computer to your own avast! Account, you would
be able to control it remotely by entering your own avast! Account credentials.
15avast! Free Antivirus 8.0 – Quick Start Guide
Manually scanning your computer
To carry out a manual scan of your computer, select the “Scan computer” tab. This
will open the “Scan Now” screen as shown below.
avast! Free Antivirus 8.0 comes with a number of pre-defined scans installed by default.
Quick scan - this will perform a scan of just your system partition (normally the C:\ drive on
your computer) and will normally be sufficient to detect the majority of malware. By default,
only files with "dangerous" extensions are scanned, e.g. files with extensions such as "exe",
"com", "bat" etc. Only those areas at the beginning and at the end of a file, where infections
are normally found, are tested.
Full System Scan - This performs a more detailed scan of all your computer's hard disks.
By default, all files are scanned according to their content, in other words, avast! looks
inside every file to determine what type of file it is and whether it should be scanned. The
whole file is tested, not just those parts of the file at the beginning or at the end where
infections are normally found. This is useful if you suspect you have an infection which was
not detected by the quick scan.
Removable Media Scan - this will scan any removable media that is connected to your
computer, such as USB flash drives, external hard drives etc. It will scan the media to detect
potential "auto-run" programs that may try to launch when the device is connected.
Select folder to scan - this option enables you to scan just a specific folder or multiple
folders.
To run one of the pre-defined scans now, just click "Start". Alternatively, by clicking on
“Settings”, you can schedule the scan to be run on a regular basis, or just once at a later
date and time. The other settings screens can be used to further customize the scan, or by
clicking on “Create custom scan” you can create a new scan with all the required settings.
16avast! Free Antivirus 8.0 – Quick Start Guide
Creating a custom scan
By clicking on the "Create Custom Scan" button, you can define a completely new
scan with its own scan parameters. A new window will open, where you can create a
name for the new scan, specify which parts of your computer and which types of file
should be scanned.
By default, the area to be scanned is set as "All hard disks". To select a new area to
be scanned, just open the drop-down menu and select the additional area to be
scanned. To remove an area, click on it once and then click "delete". You can also
specify how avast! should recognize potentially suspicious files that should be
scanned, either by checking the file extension or by checking the actual content:
Content – if this is checked, avast! will look inside every file to determine what type of file it
is and whether it should be scanned.
Name extension – if this is checked, only files with extensions such as "exe", "com", "bat"
etc. will be scanned.
On this page, you can also access the other scan settings, for example, if you want
to schedule a regular scan or a scan to run just once at a specific time. You can also
exclude specific folders or files from being scanned, and define what action should be
taken in the event that a virus is detected e.g. delete the file, or move it
automatically to the virus chest.
You can also create reports of the files that were scanned and any errors that
occurred during the scan. The other settings can be used to adjust the speed and
depth of the scan.
New in avast! 8.0, you can now also specify that a scan should not start if your
computer is running on batteries.
17avast! Free Antivirus 8.0 – Quick Start Guide
What to do if a virus is found
At the end of the scan, if the program has detected a suspicious file, the message
“Threat detected” will be displayed – see below.
To see more information about the suspicious file and the available options, click on
“Show Results”.
You will then see a list of the files which avast! considers suspicious and you will be
able to specify what action to take in respect of each one, e.g. Delete, Move to virus
chest etc. Once you have specified the action to be taken, click “Apply”.
The RECOMMENDED OPTION is to move the file to the Virus Chest. This is a special
quarantine area which can be used to safely store infected or suspicious files until
you decide it is safe to delete it. Files stored here cannot cause damage to your
other files or your computer. Here it can possibly be repaired before moving it back to
its original location.
By default, suspicious files which are detected by the real-time shields are moved to
the virus chest automatically.
You can view the scan results again at any time by going to the “Scan Logs” section
then selecting the scan that you wish to review.
18avast! Free Antivirus 8.0 – Quick Start Guide
Software Updater
Malware often spreads by exploiting known security issues in commonly used
software.
This means if your software is kept up to date, most malware would be unable to
spread!
avast! Software Updater shows you an overview of all your outdated software
applications, so you can keep them up to date and eliminate any security
vulnerabilities.
Your security status will be shown as one of the following:
DISABLED Avast! Software Updater is disabled completely.
GOOD (%) The programs on your computer are in a good condition.
BAD (%) Some of the installed programs are not up-to date. For security
reasons it’s recommended to update these programs.
CRITICAL You have either a single program with HIGH criticality, or several
(%) programs with LOW or MEDIUM criticality. It’s strongly
recommended to update them immediately.
You can resolve any issues by just clicking the “Fix Now” button. The available
updates will then be downloaded and your software will be updated automatically.
Once all updates are installed, your Software Updater status will be shown as “Good”
and you will no longer be at risk of malware that targets out-dated software.
19avast! Free Antivirus 8.0 – Quick Start Guide
The avast! Auto-Sandbox
The avast! Sandbox is a special security feature which allows potentially suspicious
applications to be run automatically in a completely isolated environment with no risk
to your computer or any of your other files.
By default, if an application is started and avast! detects anything suspicious, it will
automatically run the application in the Sandbox. In the AutoSandbox settings, which
can be found in the File System Shield settings, you can change this so that avast!
will ask you first:
In the settings, the AutoSandbox can also be disabled completely, or you can specify
any files or applications that should be excluded and never run automatically in the
Sandbox.
The advantage of running an application in the Sandbox is that it allows you to check
any suspicious applications while remaining completely protected against any
malicious actions that an infected application might try to perform.
The browser or other application will then open in a special window with a red border,
indicating that it is being run inside the sandbox.
In the “Browser Integration” tab, you can further specify that your browsers should
always be run in the Sandbox to ensure you are always protected while surfing the
web.
When the Sandbox is closed, it will be restored to its original state and any
downloaded files or changed browser settings will be automatically deleted.
20avast! Free Antivirus 8.0 – Quick Start Guide
Browser Protection
If you have installed Google Chrome, the avast! Web Rep and phishing filter are
automatically installed during the installation of avast! antivirus. Either of these can
be uninstalled or installed for any supported browser by opening "Settings", selecting
“Browser integration” and then just clicking "Uninstall" or “Install”. Here you can also
see whether your Internet browser is supported, before you try to install it.
Alternatively, you can enable or disable just the avast! WebRep, or just the phishing
filter in the program settings:
The WebRep is based on information received from the global avast! user community
related to the content and security of visited websites, to help improve the browsing
experience of all users. You can contribute your own feedback by “voting” on the
content and security of websites that you visit.
21avast! Free Antivirus 8.0 – Quick Start Guide
When you visit a website, you will see a sequence of three bars (red, yellow, or green)
which tell you how the website has been rated, or when you do a search using one of
the popular search engines, you will see the same color-coded indicator next to each
of the listed results.
The color of the indicator tells you whether the site is rated as "good" (green),
"average" (yellow), or "bad" (red). The number of bars that are highlighted indicate the
strength of the rating. One, two, or three highlighted bars represent a small, limited,
or large number of votes.
Clicking on the colored indicator will open a box where you can see more information
about how the site has been rated and where you can also submit your own vote.
On the left side, you can see the overall rating. Below the rating, you can see smaller
icons which represent the categories that the site belongs to.
On the right side, you can submit your own vote. Here you can see a single bar
divided into five colored segments which you can use to assign a more detailed rating
to the domain. Below this bar you can again find the category icons. Click on one or
more icons to assign the domain to the relevant categories, then finally click on
"vote" to submit your rating.
22avast! Free Antivirus 8.0 – Quick Start Guide
Browser Cleanup
Often, when you install free software it comes with other, possibly unwanted add-
ons. In most cases, a new Browser Toolbar is installed. Some of these may be useful,
however, in general they are used to analyze your browsing behavior and present you
with specific ads.
avast! Browser Cleanup will show you a list of your browser toolbars, together with
their user rating, and will give you the option to disable them, or to fully remove
them. It will also give you the option to restore your browsers settings, such as your
homepage and default search provider. So avast! Browser Cleanup is a very useful
tool which will help to keep your Internet browsing experience fast and reliable.
Just click the button to start the avast! Browser Cleanup and it will check all your
installed browsers for added toolbars.
If no additional toolbars or other add-ons are detected, your browser status will be
reported as “Clean”.
Alternatively, if any add-ons are detected which have a low user rating, your browser
status will be either yellow or red with the word “Attention”.
• Yellow means that add-ons may have been manually removed, but there may
still be some relics left behind which have not been fully removed.
• Red means that one or more Internet browsers appear to contain add-ons and
products that have a poor user rating and which are removable.
You can remove the add-ons individually and they will be removed from all browsers,
or you can click one button to remove all of them and reset all your browser settings
to their default values.
23avast! Free Antivirus 8.0 – Quick Start Guide
If you choose to Remove an add-on, this permanently deletes the add on, which
cannot be reversed. However, only add-ons with a bad, or very bad rating can be
removed.
Alternatively, you can use the tabs on the left to disable any unwanted add-ons for
each specific browser. Disabling an add-on only has the effect of turning it off and
can be reversed later by enabling the add-on again.
After selecting a specific browser, you will then see a list of all the installed add-ons
for that particular browser, together with their user rating. You can disable any which
are not wanted, or you can completely reset the browser settings to their default
settings.
By checking the box at the top of the page, you can choose to exclude any add-ons
that have a good user rating, so you will see only those whose rating is not good.
You can then decide what action to take for the others individually.
24avast! Free Antivirus 8.0 – Quick Start Guide
Avast “System Tray” Icon
The orange avast! icon located in your computer’s system tray can be used to access
various features without opening the main user interface. If you right-click on the
avast! icon, a short menu will appear, as shown below.
You can choose to open the main interface and use the program as normal, or select
any of the other options directly from the menu.
• By selecting “avast! shields control”, you can turn off all of the shields
permanently, or for just the selected period of time.
• If “Silent/gaming mode” is activated, avast! will run automatically in silent
mode if a full-screen application is running. This means your games or other
full-screen applications will not be interrupted with annoying popups or other
messages.
• If you select “Update”, you can choose to update your program, or you can
update just the scanning engine and virus definitions.
• You can also choose to see the last popup message that was displayed or by
clicking on “Subscription Information”, you can see the status of your current
subscription, insert your license, or purchase a new license.
• Finally, by clicking on “About avast”, you can see general information about
your avast security application.
25avast! Free Antivirus 8.0 – Quick Start Guide
Further help
This Quick Start Guide is intended to give just a brief overview of the program and its
main features. It is not an exhaustive user guide. For more detailed information about
the program and the detailed program settings, just press the F1 key to see the help
for the currently displayed screen.
If you need additional help, or if you experience any difficulties with your avast!
antivirus program, which you are unable to resolve after reading this manual, you may
find additional help in the “Support” tab.
• In the FAQs section you can quickly find answers to some of the most Frequently
Asked Questions.
• Alternatively, you can take advantage of the avast! Community Forum. Here you
can interact with other users of avast! who may have experienced the same
problem and may already have discovered the solution. You will need to register
to use the forum but this is a very quick and simple process.
• If you are still unable to resolve your query, you can Request Support by
submitting a ticket to our support team. Again, you will need to register to do this
and when writing to us, please make sure to include as much information as
possible.
• If you need to find this user guide again later, click on Download Manual
• Here you can also request Remote Assistance from another avast user, which is
described in detail in the previous section.
• Finally, from here you can also open the Program Help in full.
There is an additional feature in avast which allows you to generate a support
package to help our support engineers to troubleshoot the problem.
26avast! Free Antivirus 8.0 – Quick Start Guide
You can select what information to include in the package, but as a minimum, it is
recommended to include the basic information and log files, then click on “Generate
Now!”. The data package generated will be saved to a special folder on your
computer and can then be sent by email to the avast support team.
You can also generate “Minidumps” of “Full dumps” which will include much more
comprehensive information about your system and will therefore be much larger.
These files are too large to be sent by email and would need to be provided using
other File Transfer tools. Minidumps or Full dumps should therefore be generated
only if specifically requested by the avast! support team or other person providing
technical assistance.
27avast! Free Antivirus 8.0 – Quick Start Guide
Upgrading to avast! Pro, Internet Security, or Premier
By upgrading your avast! antivirus, you will be able to take advantage of a range of
additional features:
avast! avast! avast! avast!
Free Pro Internet Premier
antivirus antivirus Security 8.0 8.0
8.0 8.0
High performance
antivirus engine
Anti-rootkit
protection
Anti-spyware
protection
Avast! SafeZone
Command-line
scanner
Anti-spam filter
Built-in firewall
Auto Software
Updates
Enable Remote
Access
Data Shredder
To upgrade to avast! Pro antivirus or avast! Internet Security could not be easier.
Simply decide whether you want to purchase a license for 1, 2, or 3 years, then go to
our website (www.avast.com) where you can purchase your license.
You will then receive an email with an attachment containing your license file. Just
double-click on the attachment to activate your new license and the program will be
upgraded automatically. There’s no need to uninstall the current version of your
program - once you have upgraded, you can start using the new version immediately
and you will continue to receive automatic updates so that you remain protected
against the very latest threats.
28avast! Free Antivirus 8.0 – Quick Start Guide
Alternatively, you can save the license file on your computer (or on a shared device if
you have purchased a multi-license to protect more than one computer) and insert it
manually into the program. Just open the “Maintenance” tab, select “Registration”
and then click on the upgrade button to locate the license on your computer and
insert it into the program.
Thank you for choosing avast!
29You can also read