Programming BBRAM and eFUSEs - Author: Mir Sayed Ali - Xilinx
←
→
Page content transcription
If your browser does not render page correctly, please read the page content below
Application Note: Zynq UltraScale+ Devices

                                    Programming BBRAM and eFUSEs
                                    Author: Mir Sayed Ali
XAPP1319 (v2.1) November 23, 2020

Summary
           The Zynq® UltraScale+™ MPSoC family is based on the Xilinx® UltraScale™ MPSoC
           architecture. The Zynq UltraScale+ RFSoCs are similar to the basic MPSoCs with the addition of
           key RF subsystems for multi-band, multi-mode cellular radios, and cable infrastructure. These
           MPSoC and RFSoC products integrate a feature rich 64-bit quad-core or dual-core Arm®
           Cortex™-A53 and dual core Arm Cortex R5 based processing system (PS) and Xilinx
           programmable logic (PL) UltraScale™ architecture in a single device. Nonvolatile memory
           (NVM) in the form of eFUSEs and battery-backed RAM (BBRAM) is used for advanced
           encryption standard (AES) keys, Rivest-Shamir-Adleman (RSA) key hashes, security control, and
           user-defined applications. This application note describes the programming of BBRAM and
           eFUSEs in Zynq UltraScale+ devices. The capability to program BBRAM and eFUSEs increases
           the field programmability of Xilinx FPGAs and SoCs. The programming of BBRAM and eFUSEs in
           Zynq UltraScale+ devices provides ease-of-use and security advantages over the programming
           capabilities of the Zynq-7000 SoC and UltraScale devices.

           Download the reference design files for this application note from the Xilinx website. For
           detailed information about the design files, see Reference Design.

Introduction
           The BBRAM and eFUSEs in Zynq UltraScale+ devices are principally used to store AES keys and
           the hashes of RSA keys. Self-programming of BBRAM and eFUSEs in Zynq UltraScale+ devices
           does not require an IP core. Software running on the Arm® Cortex-A53 or Cortex-R5 processor
           uses the Xilinx Secure Key (XilSKey) library to program the BBRAM or the eFUSEs. Example C
           code is provided with the XilSKey library to program the BBRAM or eFUSEs.

           This application note provides two methods to program the BBRAM and eFUSEs:

           •   Create and run software built in the Vitis™ software platform to program the BBRAM and
               eFUSEs
           •   Use Xilinx Lightweight Provisioning (XLWP) command line tool to program the BBRAM and
               eFUSEs

           Along with instructions to program BBRAM and eFUSEs, steps are provided to create and run an
           application software project in Vitis to test the cryptographic functionality, enabled by
           programmed memory. For example, run the zcu102_program_bbram software project to
           program the BBRAM, and then test the functionality using the standard hello_world software
           project.

XAPP1319 (v2.1) November 23, 2020                                                                       1
                                             www.xilinx.com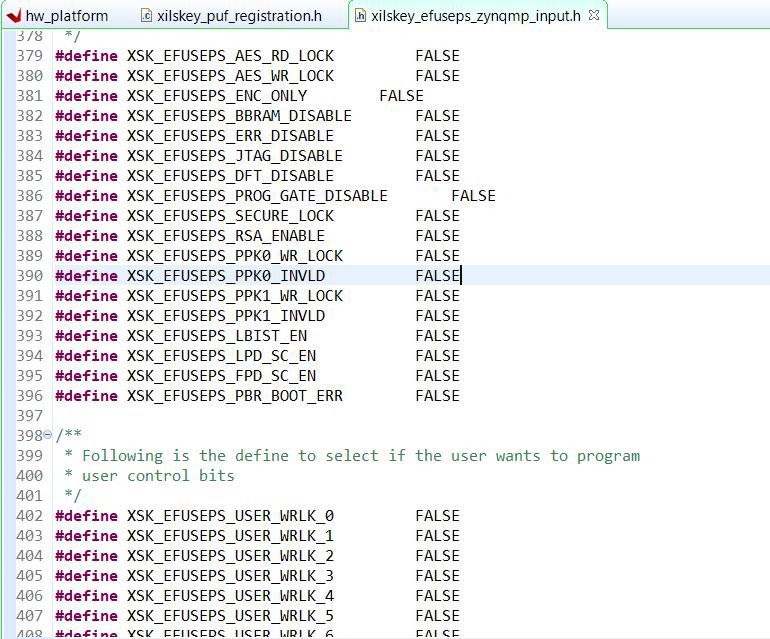
Hardware and Software Requirements

          The uses of programming the BBRAM and eFUSEs are listed as follows:

          •   AES Key
          •   RSA Support
          •   Security Control Support
          •   Physically Uncloneable Function (PUF) Support
          •   User Defined eFUSEs

          For a complete list of programmable eFUSEs, see the Zynq UltraScale+ MPSoC: Technical
          Reference Manual (UG1085) [Ref 2].

          Programming BBRAM and eFUSEs is a prerequisite for the secure boot functionality discussed in
          the Zynq UltraScale+ MPSoC: Embedded Design Tutorial (UG1209) [Ref 1].

          Note: This application note applies to eFUSEs located in the processor system (PS) of Zynq UltraScale+
          MPSoC/RFSoC devices, not the eFUSEs located in the programmable logic (PL). For details on
          programming the eFUSEs located in the programmable logic (PL) of Zynq UltraScale+ devices, see
          Internal Programming of BBRAM and eFUSEs (XAPP1283) [Ref 3].

Hardware and Software Requirements
          The hardware and software requirements for the reference systems are as follows:

          •   ZCU102 evaluation board or Avnet UltraZed-EG board
          •   AC power adapter (12 VDC)
          •   USB type-A to USB mini-B cables (for UART, JTAG communication)
          •   SD-Card (FAT32)
          •   Xilinx Vitis software platform 2020.1 or newer

          IMPORTANT: Programming any of the noted eFUSE settings preclude Xilinx test access. Consequently, Xilinx
          may not accept return material authorization (RMA) requests. The eFUSEs are ENC_ONLY, JTAG_DIS,
          DFT_DIS, RSA_EN, and AES key. For further details, refer to Table 12-13 in the Zynq UltraScale+ MPSoC:
          Technical Reference Manual (UG1085) [Ref 2].

Programming BBRAM and eFUSEs Using XilSKey Library
          The software projects in Vitis uses the XilSKey library to program the BBRAM and eFUSEs. The
          XilSKey library is located at /data/embeddedsw/lib/sw_services.

          The XilSKey library provides examples for programming Zynq UltraScale+ device eFUSEs and
          BBRAM. The high-level steps using the XilSKey library are explained in the following sections:

XAPP1319 (v2.1) November 23, 2020                                                     Send Feedback
                                                                                                                 2
                                                www.xilinx.com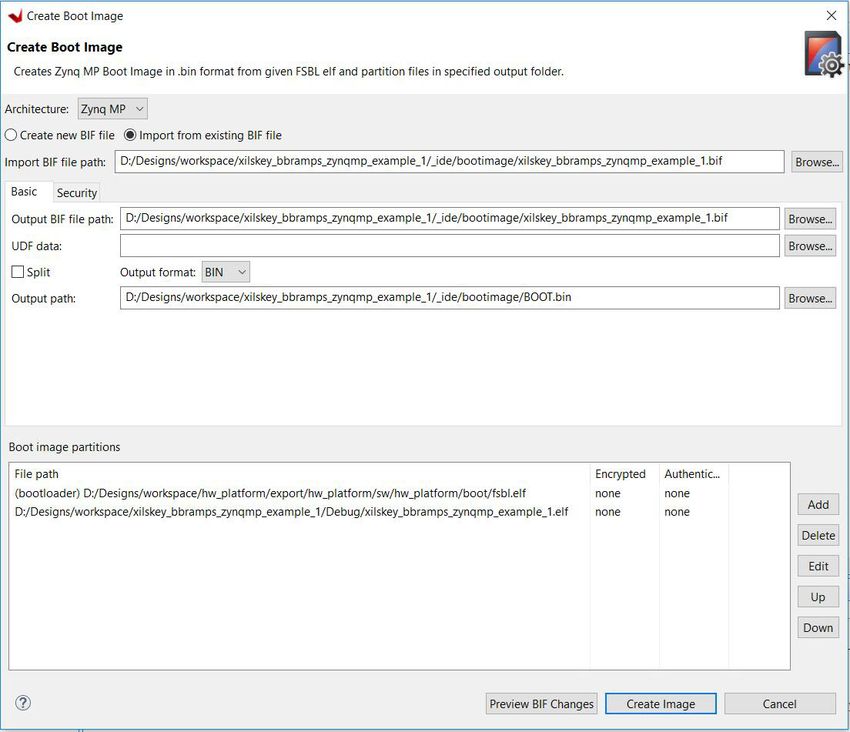
BBRAM and eFUSE Uses

          •   Programming the AES Key in BBRAM.
          •   Programming eFUSEs for AES and RSA Cryptographic Functions.
          •   Programming PUF-related eFUSEs.

BBRAM and eFUSE Uses
          This section describes the uses cases of programming the BBRAM and eFUSEs in Zynq
          UltraScale+ devices:

          AES Key
          Zynq UltraScale+ devices use a hardened AES cryptographic block for AES encryption and
          decryption. The AES cryptographic block accepts keys from several sources to include storing a
          256-bit AES key in BBRAM or eFUSEs. The AES key can also be stored in an obfuscated or black
          format either externally in flash or internally in eFUSEs. The AES key cannot be read out of
          BBRAM or eFUSEs once it has been programmed. The integrity of the key loading operation is
          verified using a 32-bit CRC. The Zynq UltraScale+ device also supports AES encryption and
          decryption using a PUF generated key, as discussed in Physically Uncloneable Function (PUF)
          Support. In the PUF eFUSEs mode, the CHASH, AUX data, and SYNDROME or PUF helper data
          are programmed into the eFUSEs.

          eFUSE Uses
          Additional eFUSE fields use cases are described in the following section.

          RSA Support
          Zynq UltraScale+ devices use silicon-based RSA and SHA3 cryptographic blocks for RSA
          authentication. RSA uses a 4096-bit private/public key pair. Only the 384 bit hash of the primary
          public key (PKK) is stored in the eFUSEs to save area on the device. The configuration security
          unit (CSU) reads the public key from external memory, calculates its cryptographic checksum
          using the SHA-3/384 engine, and compares it to the value stored in eFUSEs. For further details,
          you can refer to Zynq UltraScale+ MPSoC: Technical Reference Manual (UG1085) [Ref 2].

          You can also program eFUSEs for revoking public keys of applications and partitions. For further
          details, you can refer to Key Revocation Lab (XAPP1344) [Ref 8].

          Security Control Support
          Zynq UltraScale+ devices provide eFUSEs that increase the security of the device. For example,
          some eFUSE bits can permanently disable the JTAG and design for testing (DFT) functionality of
          the device which is useful during the development phase. When a device moves to the
          production phase, disabling the JTAG and DFT ensures these ports are no longer accessible,
          preventing an adversary from gaining access to the hardware.

XAPP1319 (v2.1) November 23, 2020                                                Send Feedback
                                                                                                          3
                                             www.xilinx.com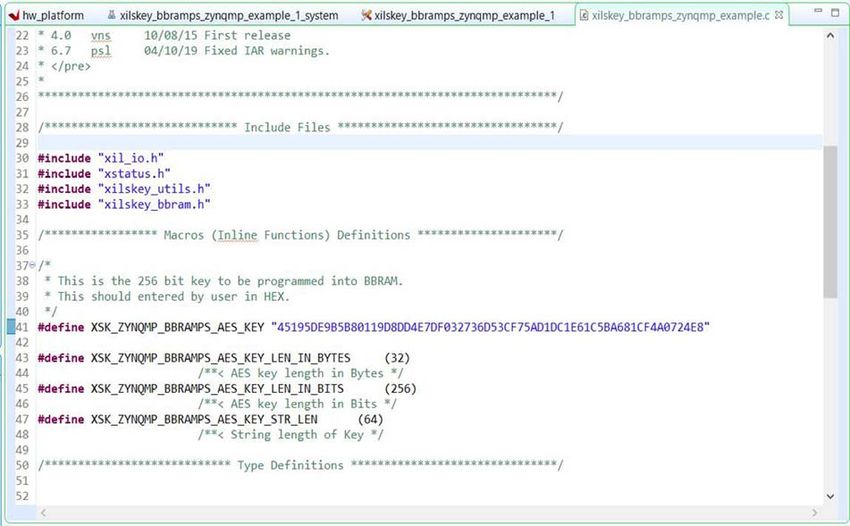
XilSKey

          Physically Uncloneable Function (PUF) Support
          The principle use of the PUF in Zynq UltraScale+ devices is black key storage. Black key storage
          stores the user’s AES key in the eFUSEs or in the Bootheader in an encrypted format. At the time
          of use, the encrypted key in the eFUSEs or Bootheader is decrypted, and the resulting plaintext
          key is used for the encryption and decryption operation. As a secondary usage of the PUF, the
          PUF along with the AES engine, can be used to encrypt and decrypt user data. Refer to External
          Secure Storage Using the PUF (XAPP1333) [Ref 9].

          The PUF registration software commands the PUF to generate values and program the eFUSEs
          used by the PUF. This software is included in the XilSKey library. The registration software
          commands the PUF to generate the following values:

          •     Helper data
          •     Black key (encrypted user key)

          The values generated by the PUF registration software are programmed into the eFUSEs. In the
          PUF Bootheader mode, the values are included in the Bootheader by Bootgen.

          The steps used to generate and program PUF values into the eFUSEs are explained in
          Programming PUF-related eFUSEs. The use of the PUF Bootheader mode is discussed in Secure
          Boot of Zynq UltraScale+ MPSoC: Embedded Design Tutorial (UG1209) [Ref 1].

          User Defined eFUSEs
          Zynq UltraScale+ devices provides eight 32-bit registers for user-defined eFUSEs. These eFUSEs
          can be written to and read from, for various user-defined functions. They can be used for
          enhanced secondary key revocation.

XilSKey
          The XilSKey library provides a convenient structure to program the BBRAM and eFUSEs.

          Table 1 provides a summary of the user-defined macros used in BBRAM and eFUSE
          programming. These are used in the xilskey_bbramps_zynqmp.c,
          xilskey_efuseps_zynqmp_input.h, and xilskey_puf_registration.h files used in the example
          designs.

          Table 1:     Zynq UltraScale+ User-configurable PS eFUSE Parameters
                              Macro                                          Description
              AES
              XSK_EFUSEPS_WRITE_AES_KEY             Commands to write the value defined in the
                                                    XSK_EFUSEPS_AES_KEY macro to the AES eFUSE
              XSK_EFUSEPS_AES_KEY                   256-bit AES key for use in eFUSE
              XSK_ZYNQMP_BBRAMPS_AES_KEY            256-bit AES key for use in BBRAM

XAPP1319 (v2.1) November 23, 2020                                                      Send Feedback
                                                                                                         4
                                                 www.xilinx.com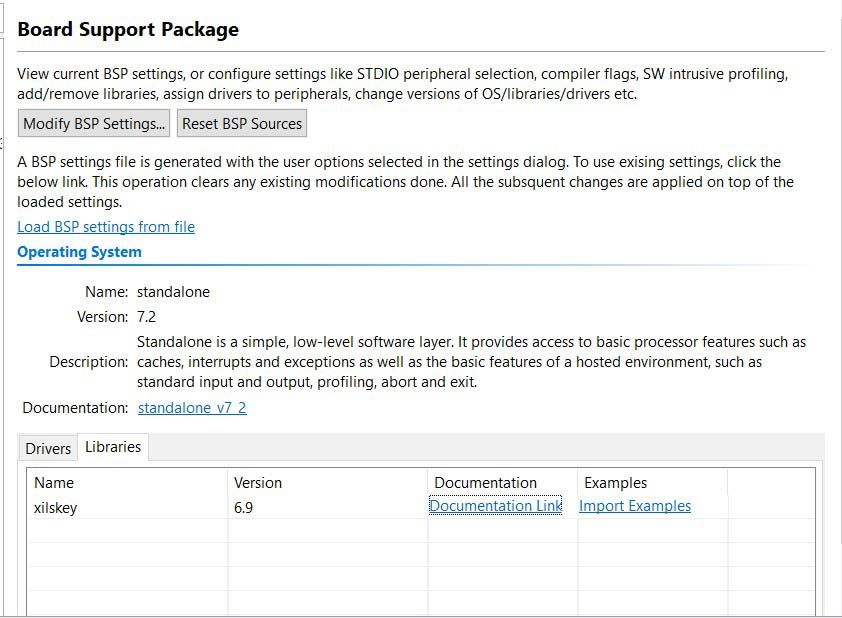
XilSKey

          Table 1:   Zynq UltraScale+ User-configurable PS eFUSE Parameters (Cont’d)
                              Macro                                        Description
           XSK_EFUSEPS_AES_RD_LOCK               Disables the AES key cyclic redundancy check (CRC) for eFUSE
                                                 key storage
           XSK_EFUSEPS_AES_WR_LOCK               Disables write to AES eFUSEs
           XSK_EFUSEPS_ENC_ONLY                  Requires that the boot image be encrypted with eFUSE AES key,
                                                 when programmed. It only applies to the encryption status and
                                                 is independent of the RSA_EN.
           XSK_EFUSEPS_BBRAM_DISABLE             Disables use of AES key from BBRAM permanently
           RSA
           XSK_EFUSEPS_PPK0_IS_SHA3              Specifies secure hash algorithm-2 (SHA-2) or SHA-3 of PPK0
           XSK_EFUSEPS_WRITE_PPK0_HASH           Causes hash of public-private key 0 (PPK0) to be programmed
                                                 into eFUSEs
           XSK_EFUSEPS_PPK0_HASH                 PPK0 hash
           XSK_EFUSEPS_PPK1_IS_SHA3              Specifies SHA-2 or SHA-3 of PPK1
           XSK_EFUSEPS_WRITE_PPK1_HASH           Causes hash of PPK1 to be programmed into eFUSEs
           XSK_EFUSEPS_PPK1_HASH                 PPK1 hash
           XSK_EFUSEPS_PPK0_WR_LOCK              Disables writing to PPK0 eFUSEs permanently
           XSK_EFUSEPS_PPK0_INVLD                Revokes PPK0 permanently
           XSK_EFUSEPS_PPK1_INVLD                Revokes PPK1 permanently
           XSK_EFUSEPS_PPK1_WR_LOCK              Disables writing to PPK1 eFUSEs permanently
           XSK_EFUSEPS_RSA_ENABLE                Forces RSA authentication during boot permanently
           XSK_EFUSEPS_SPK_ID                    Selects SPK to use
           XSK_EFUSEPS_WRITE_SPK                 Writes control for SPK selection
           Security Control
           XSK_EFUSEPS_ERR_DISABLE               Prohibits error messages from being read via JTAG
                                                 (ERROR_STATUS register)
           XSK_EFUSEPS_JTAG_DISABLE              Disables JTAG. IDCODE and BYPASS are the only allowed
                                                 commands.
           XSK_EFUSEPS_DFT_DISABLE               Disables DFT boot mode permanently
           XSK_EFUSEPS_PROG_GATE_DISABLE         When programmed, these fuses prohibit the PROG_GATE feature
                                                 from being engaged. If any of these are programmed, the PL is
                                                 always reset when the PS is reset.
           XSK_EFUSEPS_SECURE_LOCK               When programmed, the device does not enable boundary scan
                                                 (BSCAN) capability while in secure lockdown.
           XSK_EFUSEPS_LBIST_EN                  Enables logic built-in self-test (BIST) to be run during boot
                                                 permanently
           XSK_EFUSEPS_LPD_SC_EN                 Enables zeroization of registers in low-power domain (LPD)
                                                 during boot permanently
           XSK_EFUSEPS_FPD_SC_EN                 Enables zeroization of registers in full-power domain (FPD)
                                                 during boot permanently
           XSK_EFUSEPS_PBR_BOOT_ERR              Enables boot halt after a platform management unit (PMU) error
                                                 permanently

XAPP1319 (v2.1) November 23, 2020                                                     Send Feedback
                                                                                                                  5
                                             www.xilinx.com
Programming the AES Key in BBRAM

          Table 1:     Zynq UltraScale+ User-configurable PS eFUSE Parameters (Cont’d)
                            Macro                                             Description
              PUF
              XSK_PUF_PROGRAM_EFUSE                 Programs syndrome data, CHASH, AUX, and black key into
                                                    eFUSEs
              XSK_PUF_IF_CONTRACT_MANUFACTURER      Checks whether or not RSA is enabled prior to issuing PUF
                                                    commands
              XSK_PUF_READ_SECUREBITS               Reads status of secure bits (SYN_INVALID, REGISTER_DISABLE,
                                                    SYN_WRLK) for display on communication terminal
              XSK_PUF_PROGRAM_SECUREBITS            Programs PUF secure bits (SYN_INVALID, REGISTER_DISABLE,
                                                    SYN_WRLK)
              XSK_PUF_SYN_INVALID                   Invalidates the programmed helper data permanently
              XSK_PUF_REGISTER_DISABLE              Disables PUF regeneration permanently
              XSK_PUF_AES_KEY                       Red key value used in black key generation
              XSK_PUF_IV                            User-provided initialization vector
              XSK_PUF_SYN_WRLK                      Locks PUF helper data from future programming
              User eFUSEs
              XSK_EFUSEPS_USER[0-7]_FUSES           User eFUSE value
              XSK_EFUSEPS_WRITE_USER[0-7]_FUSE      Burns value in XSK_EFUSEPS_USER[0-7] to user eFUSEs
              XSK_EFUSEPS_USER_WRLK_[0-7]           Locks the corresponding user eFUSE register so it cannot be
                                                    written to again

Programming the AES Key in BBRAM
          This section provides step-by-step procedures to program a user AES key in BBRAM for the
          ZCU102 evaluation board. The main steps are as follows:

          •     Launch Vitis and create a platform project.
          •     Import the example BBRAM project in Vitis and generate the elf file.
          •     Generate the boot image and program the BBRAM.
          •     Test the functionality of the programmed BBRAM using a hello_world software project.
          Note: These steps demonstrated here are for a Windows machine but could be performed in a Linux
          machine (either physical or virtual).

          Launch Vitis and create a platform project:
          1. Launch the Vitis IDE in Windows by using the desktop shortcut or by double-clicking the
             C:\Xilinx\Vitis\2020.1\bin\vitis.bat file. The Eclipse Launcher dialog box
             opens.

XAPP1319 (v2.1) November 23, 2020                                                         Send Feedback
                                                                                                                  6
                                                 www.xilinx.com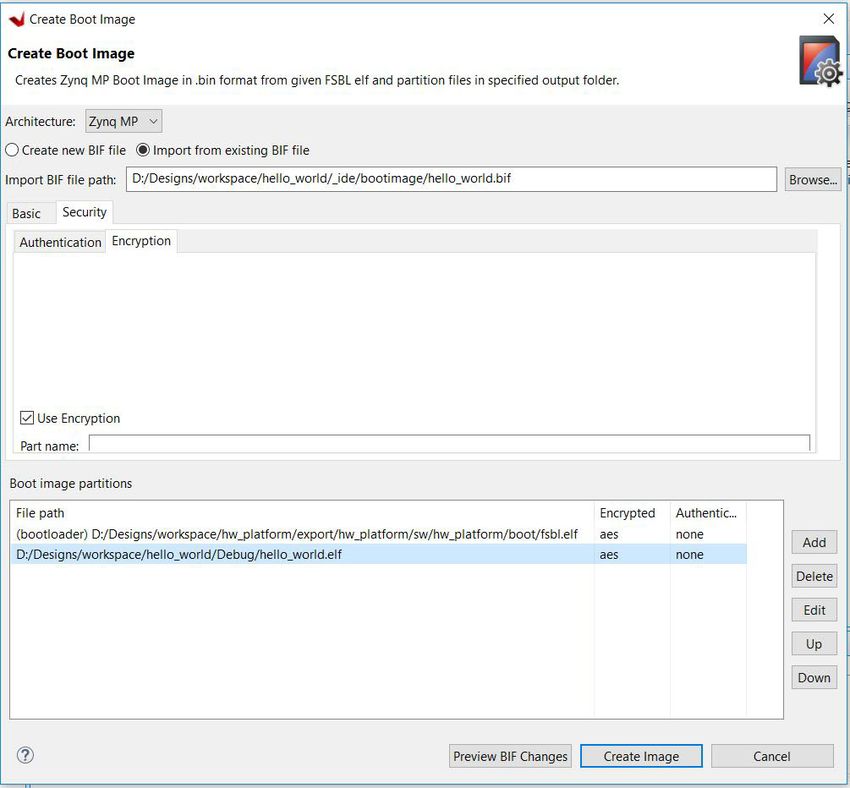
Programming the AES Key in BBRAM

          2. Select the workspace location (for example: D:\designs\workspace). Create the
             workspace folder if it is not already created.

          X-Ref Target - Figure 1

                                    Figure 1:   Vitis IDE Eclipse Launcher Dialog Box

          3. Click Launch. The Vitis integrated design environment (IDE) opens.
          4. Click File > New > Platform Project to create platform project using ZCU102 Vivado Xilinx
             Shell Archive (XSA).

XAPP1319 (v2.1) November 23, 2020                                                       Send Feedback
                                                                                                        7
                                                www.xilinx.com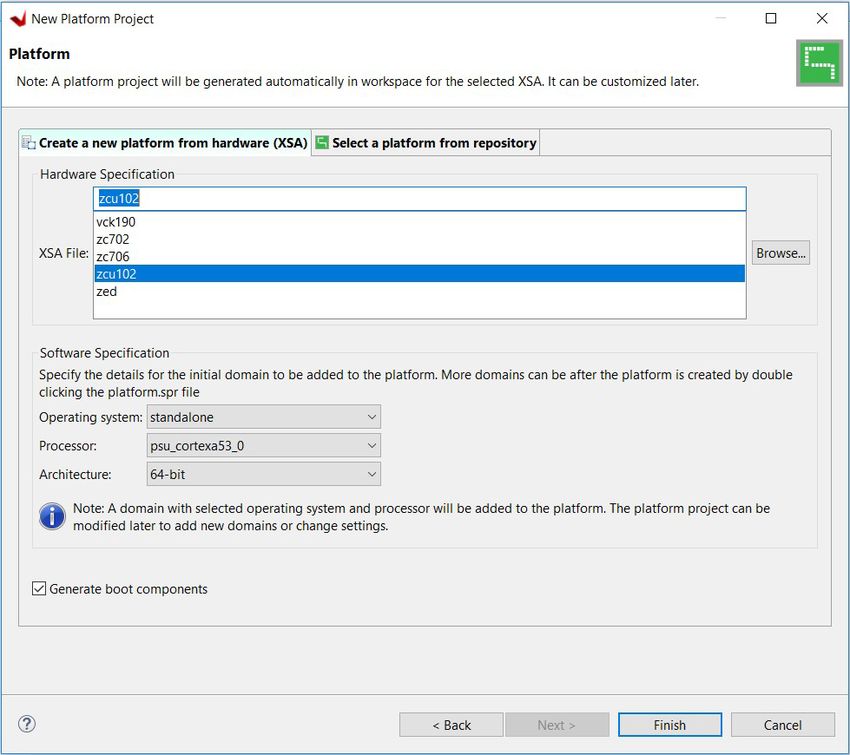
Programming the AES Key in BBRAM

          5. Enter the project name as hw_platform, when the New Platform Project dialog box opens as
             shown in Figure 2. Click Next.
          X-Ref Target - Figure 2

                                    Figure 2:   New Platform Window in Vitis

XAPP1319 (v2.1) November 23, 2020                                              Send Feedback
                                                                                                    8
                                           www.xilinx.com
Programming the AES Key in BBRAM

          6. Choose Create from hardware specification (XSA) in the Platform Project dialog box, and
             click Next.
          X-Ref Target - Figure 3

                                      Figure 3:   Setting Custom Hardware

XAPP1319 (v2.1) November 23, 2020                                            Send Feedback
                                                                                                       9
                                           www.xilinx.com
Programming the AES Key in BBRAM

          7. Browse and select zcu102.xsa from the Vitis installation folder. To create the platform
             based on your selection, the tool automatically selects the appropriate operating system
             and processor.
          X-Ref Target - Figure 4

                                    Figure 4:   Hardware and Software Specification in Vitis

XAPP1319 (v2.1) November 23, 2020                                                      Send Feedback
                                                                                                        10
                                                  www.xilinx.com
Programming the AES Key in BBRAM
8. Click Finish to create your platform project. The platform project editor opens as shown in
Figure 5.
X-Ref Target - Figure 5
Figure 5: Platform View in Vitis
9. Right-click hw_platform and select Platform Build >Project to build the hardware platform.
When the platform is generated, the dialog box shows the status of platform generation and
the Board Support Package settings dialog box opens.
10. Select Board Support Package under psu_cortexa53_0. The Board Support Package
opens as shown in Figure 6.
X-Ref Target - Figure 6
Figure 6: Board Support Package View in Vitis
XAPP1319 (v2.1) November 23, 2020 Send Feedback
11
www.xilinx.comProgramming the AES Key in BBRAM
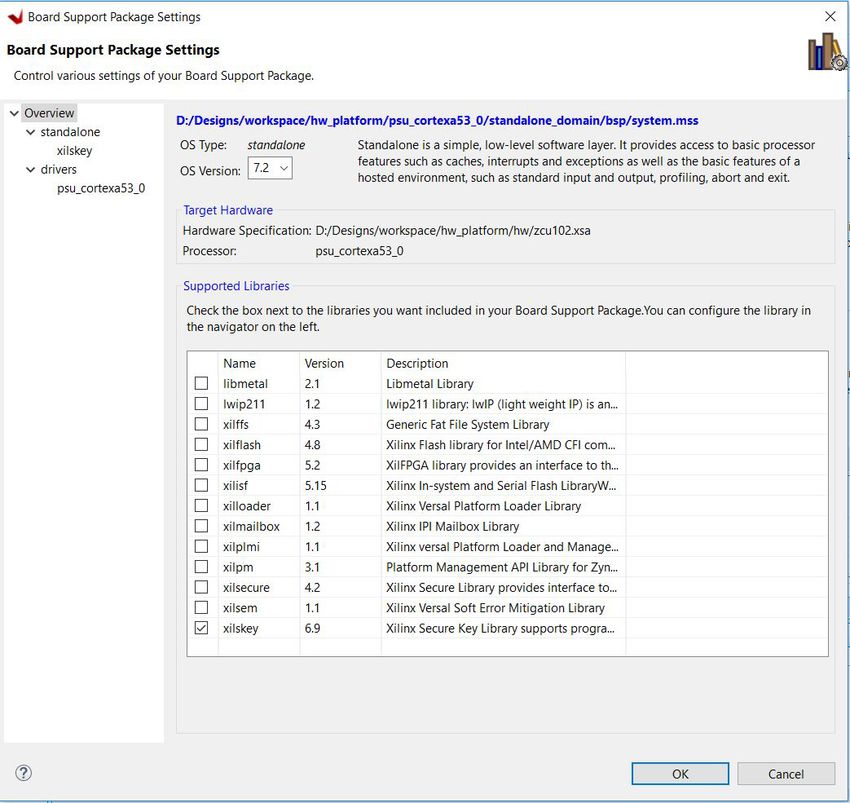
11. In the Board Support Package page, click Modify BSP Settings.
12. Select xilskey under Supported Libraries in Board Support Package Settings window, and
click OK.
X-Ref Target - Figure 7
Figure 7: Board Support Package Settings - Xilinx Secure Key Library
XAPP1319 (v2.1) November 23, 2020 Send Feedback
12
www.xilinx.comProgramming the AES Key in BBRAM
Import the example BBRAM project in Vitis and generate the elf project:
1. Select the Libraries tab under Board Support Package and click Import Examples to the
right of the xilskey libraries to view the xilskey example projects.
X-Ref Target - Figure 8
Figure 8: Import Example Project for Xilinx Secure Key Library
2. Select the check box for xilskey_bbramps_zynqmp_example. Click OK.
X-Ref Target - Figure 9
Figure 9: Import Xilskey BBRAM Example Project
XAPP1319 (v2.1) November 23, 2020 Send Feedback
13
www.xilinx.comProgramming the AES Key in BBRAM
The xilskey_bbramps_zynqmp_example_1 project gets added to the workspace. This project
contains the example C code to program a key into BBRAM and verify the key.
3. Double-click xilskey_bbramps_zynqmp_example.c so that it is displayed in the text
window.
4. From the aes.nky file in the reference design files (see Reference Design), copy the AES key
to line 41 in the xilskey_bbramps_zynqmp_example.c file as shown in Figure 10.
X-Ref Target - Figure 10
Figure 10: xilskey_bbramps_zynqmp_example.c file
5. Save the file.
6. Right-click xilskey_bbramps_zynqmp_example_1 in the Project Explorer, and select
Build Project to build the application.
XAPP1319 (v2.1) November 23, 2020 Send Feedback
14
www.xilinx.comProgramming the AES Key in BBRAM
Generate the boot image and program the BBRAM fuse:
1. Right-click xilskey_bbramps_zynqmp_example_1 and select Create Boot Image. The
Create Boot Image dialog box opens with pre-populated setting as shown in Figure 11.
X-Ref Target - Figure 11
Figure 11: Create Boot Image in Vitis
2. Click Create Image to create boot image (.Bin) file.
XAPP1319 (v2.1) November 23, 2020 Send Feedback
15
www.xilinx.comProgramming the AES Key in BBRAM
The console window (Figure 12) shows the boot generation command line setting and result.
X-Ref Target - Figure 12
Figure 12: Create a Zynq MP Boot Image for the BBRAM AES Key
3. Verify that the BOOT.BIN and program_aes_bbram_key.bif files are written to the specified
directory D:/Designs/workspace/ xilskey_bbramps_zynqmp_example_1/_ide/bootimage.
4. Use a text editor to review the program_bbram_aes_key.bif file.
5. Insert an SD card into the SD card slot of the PC. Copy BOOT.BIN to the SD card.
6. Set up the ZCU102 or UltraZed-EG evaluation board.
7. Set up a communication terminal such as Tera Term using Interface 0, 115200 baud rate, and
default settings.
8. Move the SD card from the PC to the SD card slot on the ZCU102 or UltraZed-EG evaluation
board. The ZCU102 evaluation board uses a standard SD card. The UltraZed-EG board uses
a mini SD card.
9. Configure the board to boot in SD-Boot mode by setting switch SW6 as shown in Figure 13
below.
X-Ref Target - Figure 13
Figure 13: SD-Boot Mode for Switch SW6
XAPP1319 (v2.1) November 23, 2020 Send Feedback
16
www.xilinx.comProgramming the AES Key in BBRAM
10. Apply power to the evaluation board.
11. Verify that the output on the communication terminal indicates successful programming of
the BBRAM AES key (Figure 14).
X-Ref Target - Figure 14
Figure 14: Programmed and Verified BBRAM AES Key
Test the functionality of the programmed BBRAM by using a hello software project:
XAPP1319 (v2.1) November 23, 2020 Send Feedback
17
www.xilinx.comProgramming the AES Key in BBRAM
1. In the Vitis IDE, select File > New >Application Project. The New Application Project
wizard welcome screen opens.
X-Ref Target - Figure 15
Figure 15: Create hello_world Application Project
2. Click Next, and use the information in Table 2 to make your selections in the “New
Application Project” wizard screen.
Table 2: New Application Project Settings for Standalone APU Application
Wizard Screen System Properties Settings
Platform Select platform from repository hw_platform
Application project Application project name hello_world
details
System project name hello_world_system
Target processor psu_cortexa53_0
Domain Domain standalone on psu_cortexa53_0
Templates Available templates Hello World
The hello_world project gets created.
XAPP1319 (v2.1) November 23, 2020 Send Feedback
18
www.xilinx.comProgramming the AES Key in BBRAM
3. Right-click hello_world under hello_world_system and select Build Project to build the
project.
4. Right-click hello_world once more and select Create Boot Image.
5. Rename the output BIF file as test_encrypted_hello.bif (Figure 16), in the Output
BIF file path field.
X-Ref Target - Figure 16
Figure 16: Create Boot Image for hello_world
XAPP1319 (v2.1) November 23, 2020 Send Feedback
19
www.xilinx.comProgramming the AES Key in BBRAM
6. Click Security tab, then click Encryption tab, and check Use Encryption. Under Key store
select BBRAM RED (Figure 17).
X-Ref Target - Figure 17
Figure 17: Create Boot Image Encryption
7. Double-click fsbl to open edit partition window and change the encrypted option to AES,
and browse to aes_fsbl.nky for key file (Figure 18). Click OK.
XAPP1319 (v2.1) November 23, 2020 Send Feedback
20
www.xilinx.comProgramming the AES Key in BBRAM
Note: The file aes_fsbl.nky is available in the Reference Design file.
X-Ref Target - Figure 18
Figure 18: Encryption for fsbl Boot Image
XAPP1319 (v2.1) November 23, 2020 Send Feedback
21
www.xilinx.comProgramming the AES Key in BBRAM
8. Next, double-click the hello_world.elf, change the encrypted option to AES, and browse to
aes.nky file as Key file as shown in Figure 19. Click OK.
X-Ref Target - Figure 19
Figure 19: Encryption for hello_world Boot Image
XAPP1319 (v2.1) November 23, 2020 Send Feedback
22
www.xilinx.comProgramming the AES Key in BBRAM
Figure 20 shows the encrypted boot image creation GUI for hello_world project.
X-Ref Target - Figure 20
Figure 20: Create Boot Image Using Encryption
9. Click Create Image to create a boot image (.Bin) file for hello_world.
10. Insert an SD card into the SD card slot of the PC. Copy the BOOT.BIN to the SD card.
11. Move the SD card from the PC to the SD card slot on the evaluation board.
12. Apply power to the evaluation board.
XAPP1319 (v2.1) November 23, 2020 Send Feedback
23
www.xilinx.comProgramming eFUSEs for AES and RSA Cryptographic Functions
13. Verify that Hello World is displayed on the communication terminal (Figure 21).
X-Ref Target - Figure 21
Figure 21: Verified Hello World
Programming eFUSEs for AES and RSA Cryptographic
Functions
The following section provides step-by-step procedures to program the AES eFUSEs and hash
of the primary public key. These steps can be used to program any of the other eFUSEs as well.
Additionally, it includes steps to test the functionality of the programmed eFUSEs, using a
hello_world software project.
1. Follow steps from Launch Vitis and create a platform project: to create a platform project.
2. Expand Libraries under Board Support Package and click Import Examples to the right of
the xilskey.
3. Select the check box for xilskey_efuseps_zynqmp_example (Figure 22) in the import
examples pane, and click OK.
X-Ref Target - Figure 22
Figure 22: Import Xilskey eFUSEs Examples Project
XAPP1319 (v2.1) November 23, 2020 Send Feedback
24
www.xilinx.comProgramming eFUSEs for AES and RSA Cryptographic Functions
4. Expand xilskey_efuseps_zynqmp_example_1 in the project explorer pane, and
double-click puf_registration > src > xilskey_efuseps_zynqmp_input.h to invoke
the file in the Vitis source editor (Figure 23).
This file contains the #define statements that specifies the eFUSE functionality.
X-Ref Target - Figure 23
Figure 23: xilskey_efuseps_zynqmp_input.h File in Source Editor
5. Change the xilskey_efuseps_zynqmp_input.h as defined in Table 3.
Table 3: Cryptographic Macros in xilskey_efuseps_zynqmp.h
Line No Macro Value
416 XSK_EFUSEPS_WRITE_AES_KEY TRUE TRUE
417 XSK_EFUSEPS_WRITE_PPK0_HASH TRUE TRUE
441 XSK_EFUSEPS_WRITE_PPK1_HASH TRUE TRUE
6. Open the supplied xilskey_efuseps_zynqmp_input.h file in the Reference Design files,
update the following keys and hash value, and save the
xilskey_efuseps_zynqmp_input.h file:
° XSK_EFUSEPS_AES_KEY (Line 455)
° XSK_EFUSEPS_PPK0_HASH (Line 458)
XAPP1319 (v2.1) November 23, 2020 Send Feedback
25
www.xilinx.comProgramming eFUSEs for AES and RSA Cryptographic Functions
° XSK_EFUSEPS_PPK1_HASH (Line 461) (Figure 24)
X-Ref Target - Figure 24
Figure 24: Updated Keys in Hash Values
7. In the project explorer pane, right-click xilskey_efuseps_zynqmp_example_1, and select
Build Project.
8. Right-click xilskey_efuseps_zynqmp_example_1, and select Xilinx > Create Boot Image.
9. Use default settings and Click Create Image.
10. Insert an SD card into the SD card slot of the PC. Copy
/xilskey_efuseps_zynqmp_example_1/_ide/bootimage
/BOOT.BIN to the SD card.
11. Move the SD card from the PC to the SD card slot on the ZCU102 or UltraZed-EG evaluation
board.
12. Set the Boot Mode switch to SD mode.
13. Apply power to the board.
14. Verify that the log in the communication terminal indicates that programming of eFUSEs
works as expected.
To test the functionality of the programmed eFUSEs, create a hello_world software project:
15. In the Vitis IDE, select File > New Application Project. The Create New Application
project wizard welcome screen opens.
16. Click Next and use the information in Table 2 to make your selections in the New
Application Project wizard screens.
17. Right-click hello_world and select Build Project.
18. Right-click hello_world and select Create Boot Image.
XAPP1319 (v2.1) November 23, 2020 Send Feedback
26
www.xilinx.comProgramming PUF-related eFUSEs
19. Rename the BIF file as test_encrypted_hello.bif in the Output BIF file path field.
20. Click Security > Encryption tab and check Use Encryption. Select EFUSE RED under key
store.
21. Double-click the zynqmp_fsbl.elf and change the Encrypted option to AES, and browse
to aes_fsbl.nky (Figure 18). Click OK.
22. Next, double-click the hello_world.elf and change the encrypted option to AES, and
browse to aes.nky file (Figure 19). Click OK.
23. In the Create Boot Image GUI, click Create Image.
24. Insert an SD card into the SD card slot of the PC. Copy the BOOT.BIN to the SD card.
25. Move the SD card from the PC to the SD card slot on the evaluation board.
26. Apply power to the evaluation board.
27. Verify that Hello World is displayed on the communication terminal. If the RSA_EN eFUSE is
programmed, every boot is required to be authenticated.
Programming PUF-related eFUSEs
This section provides step-by-step procedure to program eFUSEs used by the PUF. In
Programming eFUSEs for AES and RSA Cryptographic Functions, a red AES key is programmed
in the eFUSEs. This section show the user how to program a black key in the eFUSEs.
Note: The users cannot run this section after Programming eFUSEs for AES and RSA Cryptographic
Functions , as the eFUSEs have already been programmed with the red AES key. Also, the users who want
a Black Key cannot program the AES key in the earlier section.
1. Follow steps from Launch Vitis and create a platform project:
2. Select Board Support Package under psu_cortexa53_0 and the Board Support Package
page opens.
3. In the Board Support Package window, click Modify BSP Settings.
4. Select xilskey and xilsecure under Supported Libraries and click OK.
5. Expand Libraries under Board Support Package and click Import Examples to the right of
the xilskey.
6. Select the check box for xilskey_puf_registration in the examples for xilskey pane, and click
OK.
7. Expand xilskey_puf_registration_1 in the project explorer pane.
8. Double-click xilskey_puf_registration_1 > src >xilskey_puf_registration.h in the project
explorer pane, to invoke the file in the source editor.
XAPP1319 (v2.1) November 23, 2020 Send Feedback
27
www.xilinx.comProgramming PUF-related eFUSEs
9. Edit the xilskey_puf_registration.h as shown in Table 4.
Table 4: Cryptographic Macros in xilskey_puf_registration.h
Line No Macro Value
131 XSK_PUF_PROGRAM_EFUSE TRUE
145 XSK_PUF_AES_KEY 45195DE9B5B80119D8DD4E7DF032736D53CF7
5AD1DCE61C5BA681CFA0724E8
146 XSK_PUF_BLACK_KEY_IV 62A4B57D0F121CCB02CB8336
10. Save the file and exit.
11. In the project explorer, right-click the xilskey_puf_registration_1 project, and select Build
Project.
12. Right-click the xilskey_puf_registration_1 project, and select Create Boot Image.
13. In the Create Boot Image GUI, ensure that Zynq MP is selected in the architecture field.
14. Use default settings and Click Create Image. Click Create Image to create boot image (.Bin)
file.
15. Insert an SD card into the SD card slot of the PC. Copy
D:/Designs/workspace/xilskey_puf_registration_1/ide/boot
image/BOOT.bin to the SD card.
16. Move the SD card from the PC to the SD card slot on the ZCU102 or UltraZed-EG evaluation
board.
17. Set the Boot Mode switch to SD mode.
18. Set up a communication terminal.
19. Power cycle the board.
20. Verify that the log displayed in the communication terminal indicates that the security
control eFUSEs are programmed as expected.
XAPP1319 (v2.1) November 23, 2020 Send Feedback
28
www.xilinx.comUse XLWP Command Line Tool to Program the BBRAM and eFUSEs
Use XLWP Command Line Tool to Program the BBRAM and
eFUSEs
Xilinx Lightweight Provisioning (XLWP) Tool is a simple way to program BBRAM and eFUSEs. It
performs all of its functionality via JTAG. It allows an interactive user mode via JTAG UART to
terminal app or via Tcl script mode. Contact your local sales team to download the XLWP tool.
For windows, it is recommended to install the TeraTerm terminal program to use the XLWP tool.
TeraTerm is an open-source and free terminal emulator for Windows available from Tera Term
Home Page.
There are three Tcl files and one .ELF file that comprise the XLWP tool:
• xlwp_tool.tcl: Main XLWP Tcl that gets called by XSCT -- sets up JTAG connection
downloads .elf, launches terminal -or- user_script, etc.
• xlwp_zup_cmds.tcl: Contains all the commands to allow reading/programming of Zynq
UltraScale+ eFUSEs and load the AES key into BBRAM when running in script mode
• xlwp_zup_script.tcl: Template modified by user to define which ZU+ eFUSEs to
read/program and the AES key to load into BBRAM when running in script mode
• xlwp_zup_mhz.elf: Binary files based on xilskey and xilsecure libraries that is
downloaded to Zynq UltraScale+ A53_0 via JTAG - where must match the external
PS_REF_CLK frequency on the customer's board
There are two batch (.bat) files and one initialization file for Windows and sample script for
Linux included here. Here are the windows batch files:
• xlwp_tool.bat: Starts the hw_server application and then calls xlwp_tool.tcl via XSDB
with command-line arguments (ensure the path setting matches your system)
• xlwp_term.bat: Starts the TeraTerm terminal program in user mode and passes in the
hw_server hostname and TCP port number (ensure the path setting matches your system)
• tt_jtag_uart.ini: TeraTerm initialization file to setup proper operation with the XLWP
tool via the JTAG UART over TCP
XAPP1319 (v2.1) November 23, 2020 Send Feedback
29
www.xilinx.comUse XLWP Command Line Tool to Program the BBRAM and eFUSEs
Launching XLWP Tool in Command Line Mode to Program the
BBRAM
1. Double-click xlwp_tool.bat file to run the batch file.
X-Ref Target - Figure 25
Figure 25: XLWP Tool Launch
2. Press any key and XLWP tool will open in TeraTerm terminal. Figure 25 shows XLWP tool
running in Teraterm GUI.
3. Press 4 to load BBRAM AES key, and enter your 256-bit AES key (you can use the same one
that is used in Vitis flow).
4. Press y for “Is the key correct” instruction, and press y once more for Load key into BRAM
instruction.
XAPP1319 (v2.1) November 23, 2020 Send Feedback
30
www.xilinx.comUse XLWP Command Line Tool to Program the BBRAM and eFUSEs
The AES key will be programmed in BBRAM and a CRC value will be calculated. Refer to
Figure 26.
X-Ref Target - Figure 26
Figure 26: BBRAM AES Programming Using XLWP Tool
5. Press any key to continue.
XAPP1319 (v2.1) November 23, 2020 Send Feedback
31
www.xilinx.comConclusion
6. Press x to quit XLWP tool and then y for “Quit XLWP tool” instruction (Figure 27).
X-Ref Target - Figure 27
Figure 27: Exiting XLWP Tool
7. Close any terminal that remains open.
Note: You can follow similar steps and use a script to program BBRAM or eFUSE using the supplied
script.
Conclusion
BBRAM in Zynq UltraScale+ devices can be used to store the 256-bit AES image decryption key.
This AES key can also be stored in the eFUSEs with the important difference that it can neither
be modified nor erased. Additionally, various custom use cases are also available for eFUSEs.
This application note provides a straightforward and secure method to self-program BBRAM
and eFUSEs in the Zynq UltraScale+ devices. It also shows a hello_world design with an
encrypted image to verify the BBRAM key.
XAPP1319 (v2.1) November 23, 2020 Send Feedback
32
www.xilinx.comReference Design
Reference Design
Download the reference design files for this application note from the Xilinx website.
Table 5 shows the reference design matrix.
Table 5: Reference Design Matrix
Parameter Description
General
Target devices Zynq UltraScale+ devices
Source code provided Yes
Source code format C
Design uses code and IP from existing Xilinx No
application note and reference designs or
third party
Static code analysis/MISRA C Yes
Simulation
Functional simulation performed No
Timing simulation performed No
Test bench used for functional and timing No
simulations
Test bench format N/A
Simulator software/version used N/A
SPICE/IBIS simulations N/A
Implementation
Synthesis software tools/versions used N/A
Implementation software tools/versions used N/A
Static timing analysis performed No
Hardware Verification
Hardware verified Yes
Hardware platform used for verification Avnet UltraZed-EG and ZCU102 evaluation
boards
Documentation Navigator and Design Hubs
Xilinx Documentation Navigator provides access to Xilinx documents, videos, and support
resources, which you can filter and search to find information. To open the Xilinx
Documentation Navigator (DocNav):
• From the Vivado® IDE, select Help > Documentation and Tutorials.
• On Windows, select Start > All Programs > Xilinx Design Tools > DocNav.
XAPP1319 (v2.1) November 23, 2020 Send Feedback
33
www.xilinx.comReferences
• At the Linux command prompt, enter docnav.
Xilinx Design Hubs provide links to documentation organized by design tasks and other topics,
which you can use to learn key concepts and address frequently asked questions. To access the
Design Hubs:
• In the Xilinx Documentation Navigator, click the Design Hubs View tab.
• On the Xilinx website, see the Design Hubs page.
Note: For more information on Documentation Navigator, see the Documentation Navigator page on
the Xilinx website.
References
1. Zynq UltraScale+ MPSoC: Embedded Design Tutorial (UG1209)
2. Zynq UltraScale+ MPSoC: Technical Reference Manual (UG1085)
3. Internal Programming of BBRAM and eFUSEs (XAPP1283)
4. Secure Boot of Zynq-7000 SoC (XAPP1175)
5. Zynq UltraScale+ MPSoC Technical Reference Manual (UG1085)
6. Changing the Cryptographic Key in Zynq-7000 SoC (XAPP1223)
7. Zynq UltraScale+ MPSoC Software Developer Guide (UG1137)
8. Key Revocation Lab (XAPP1344)
9. External Secure Storage using the PUF (XAPP1333)
10. Zynq UltraScale+ MPSoC: Embedded Design Tutorial (UG1209)
XAPP1319 (v2.1) November 23, 2020 Send Feedback
34
www.xilinx.comRevision History
Revision History
The following table shows the revision history for this document.
Date Version Revision
11/23/2020 2.1 Updated the flow and design example using Vitis IDE 2020.1.
Updated the Introduction section to clarify the BBRAM and eFUSEs
programming options.
Added Figure 10.
Modified Figure 2, Figure 3, Figure 4, Figure 5, Figure 6, Figure 7, Figure 8,
Figure 9, Figure 11, Figure 12, Figure 13, Figure 14, Figure 16, Figure 17,
Figure 18, Figure 19, Figure 20, Figure 21.
Modified Table 2, Table 3, Table 4.
Updated application projection creation flow for Vitis IDE 2020.1 in Test the
functionality of the programmed BBRAM by using a hello software project:
section.
08/31/2020 2.0 Updated for Vitis™ unified software platform. Validated for Vitis IDE 2019.2.
Updates describe how to program eFUSEs in the field. Added new section
Programming BBRAM and eFUSEs Using XilSKey Library. Added procedural
steps in section Programming the AES Key in BBRAM. Added Figure 1, Figure 2,
Figure 3, Figure 4, Figure 5, Figure 6, Figure 7, Figure 8, Figure 9, Figure 11,
Figure 12, Figure 14, Figure 15, Figure 16, Figure 17, Figure 18, Figure 19,
Figure 20, and Figure 21 in section Programming the AES Key in BBRAM.
Added procedural steps in section Programming eFUSEs for AES and RSA
Cryptographic Functions. Added Figure 22, Figure 23, and Figure 25. Added
Table 3. Added procedural steps inProgramming PUF-related eFUSEs. Added
Table 4. Added new section Use XLWP Command Line Tool to Program the
BBRAM and eFUSEs. Added Launching XLWP Tool in Command Line Mode to
Program the BBRAM. Added procedural steps in section Launching XLWP Tool
in Command Line Mode to Program the BBRAM. Added Figure 25, Figure 26,
and Figure 27.
07/26/2017 1.0 Initial Xilinx release.
Please Read: Important Legal Notices
The information disclosed to you hereunder (the “Materials”) is provided solely for the selection and use of Xilinx products. To the
maximum extent permitted by applicable law: (1) Materials are made available "AS IS" and with all faults, Xilinx hereby DISCLAIMS ALL
WARRANTIES AND CONDITIONS, EXPRESS, IMPLIED, OR STATUTORY, INCLUDING BUT NOT LIMITED TO WARRANTIES OF
MERCHANTABILITY, NON-INFRINGEMENT, OR FITNESS FOR ANY PARTICULAR PURPOSE; and (2) Xilinx shall not be liable (whether in
contract or tort, including negligence, or under any other theory of liability) for any loss or damage of any kind or nature related to,
arising under, or in connection with, the Materials (including your use of the Materials), including for any direct, indirect, special,
incidental, or consequential loss or damage (including loss of data, profits, goodwill, or any type of loss or damage suffered as a result
of any action brought by a third party) even if such damage or loss was reasonably foreseeable or Xilinx had been advised of the
possibility of the same. Xilinx assumes no obligation to correct any errors contained in the Materials or to notify you of updates to the
Materials or to product specifications. You may not reproduce, modify, distribute, or publicly display the Materials without prior written
consent. Certain products are subject to the terms and conditions of Xilinx’s limited warranty, please refer to Xilinx’s Terms of Sale which
can be viewed at https://www.xilinx.com/legal.htm#tos; IP cores may be subject to warranty and support terms contained in a license
issued to you by Xilinx. Xilinx products are not designed or intended to be fail-safe or for use in any application requiring fail-safe
performance; you assume sole risk and liability for use of Xilinx products in such critical applications, please refer to Xilinx’s Terms of
Sale which can be viewed at https://www.xilinx.com/legal.htm#tos.
AUTOMOTIVE APPLICATIONS DISCLAIMER
XAPP1319 (v2.1) November 23, 2020 Send Feedback
35
www.xilinx.comPlease Read: Important Legal Notices
AUTOMOTIVE PRODUCTS (IDENTIFIED AS "XA" IN THE PART NUMBER) ARE NOT WARRANTED FOR USE IN THE DEPLOYMENT OF
AIRBAGS OR FOR USE IN APPLICATIONS THAT AFFECT CONTROL OF A VEHICLE ("SAFETY APPLICATION") UNLESS THERE IS A SAFETY
CONCEPT OR REDUNDANCY FEATURE CONSISTENT WITH THE ISO 26262 AUTOMOTIVE SAFETY STANDARD ("SAFETY DESIGN").
CUSTOMER SHALL, PRIOR TO USING OR DISTRIBUTING ANY SYSTEMS THAT INCORPORATE PRODUCTS, THOROUGHLY TEST SUCH
SYSTEMS FOR SAFETY PURPOSES. USE OF PRODUCTS IN A SAFETY APPLICATION WITHOUT A SAFETY DESIGN IS FULLY AT THE RISK OF
CUSTOMER, SUBJECT ONLY TO APPLICABLE LAWS AND REGULATIONS GOVERNING LIMITATIONS ON PRODUCT LIABILITY.
© Copyright 2017-2020 Xilinx, Inc. Xilinx, the Xilinx logo, Alveo, Artix, ISE, Kintex, Spartan, Versal, Virtex, Vivado, Zynq, and other
designated brands included herein are trademarks of Xilinx in the United States and other countries. PCI, PCIe, and PCI Express are
trademarks of PCI-SIG and used under license. AMBA, AMBA Designer, Arm, ARM1176JZ-S, CoreSight, Cortex, PrimeCell, Mali, and
MPCore are trademarks of Arm Limited in the EU and other countries. All other trademarks are the property of their respective owners.
XAPP1319 (v2.1) November 23, 2020 Send Feedback
36
www.xilinx.comYou can also read