Implementation Guide Public Health Information Network Messaging System - (PHINMS) Version 1.0 - CDC
←
→
Page content transcription
If your browser does not render page correctly, please read the page content below
Implementation Guide
Public Health Information
Network Messaging System
(PHINMS)
Version 1.0

Prepared by:
Centers for Disease Control and Prevention

March 31, 2021
PHINMS 3.2 Implementation Guide

                                   EXECUTIVE SUMMARY
Many organizations work together to protect and advance public health. These organizations
need to use the internet to securely exchange sensitive data among various public health
information systems. The exchange of data, also known as "messaging," is enabled through
electronic messages created by using special file formats and a standard vocabulary. The
exchange uses a common approach to security and encryption, methods for dealing with various
firewalls, and internet protection schemes. The system provides a standard way of ensuring that
messages are routed securely while providing a consistent confirmation of message exchange.
The Public Health Information Network Messaging System (PHINMS) sends sensitive data to
and receives sensitive data from public health information systems through the internet by using
secure Electronic Business Extensible Markup Language (ebXML) securely.
The PHINMS Implementation Guide provides instructions for installation and basic
configuration of the PHINMS software; advance configuration procedures are located in the
PHINMS Technical Guide.

PHINMS Implementation Guide v3.2.pdf                                                       Page ii
PHINMS 3.2 Implementation Guide

                                       REVISION HISTORY
  VERSION #          IMPLEMENTER            DATE                 EXPLANATION
 1.0                The PHINMS            12-30-2020   Update 3.2 Implementation Guide from
                    Team                               previous versions.

PHINMS Implementation Guide v3.2.pdf                                                 Page iii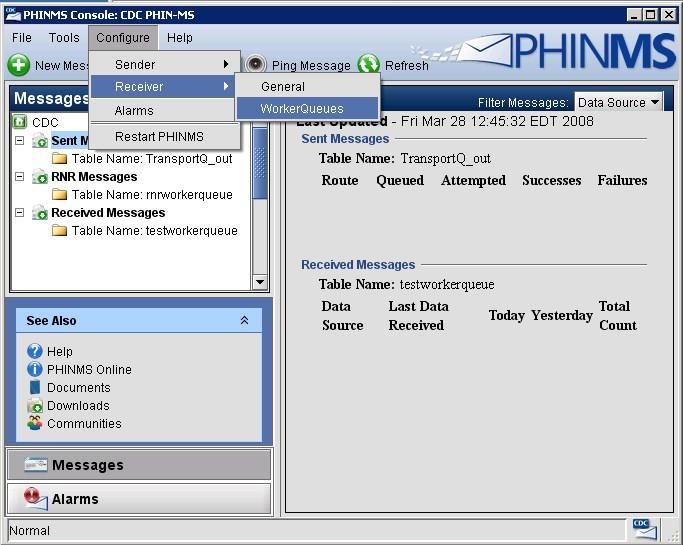
PHINMS 3.2 Implementation Guide

                                             TABLE OF CONTENTS
1.0 Introduction..............................................................................................................................9
      1.1 References ......................................................................................................................9
      1.2 Communiqués ................................................................................................................9
2.0 INSTALLATION REQUIREMENTS................................................................................ 10
      2.1 PHINMS 3.2 Tests ........................................................................................................ 10
      2.2 System Requirements .................................................................................................... 10
      2.3 Apply for a Digital Certificate ....................................................................................... 11
      2.4 Request PartyID ............................................................................................................ 11
3.0 DOWNLOAD AND INSTALL THE PHINMS SOFTWARE ......................................... 11
4.0 UPGRADE PHINMS SOFTWARE ................................................................................... 23
5.0 CONFIGURE SQL DATABASES................................................................................... 30
6.0 SENDER INFORMATION .............................................................................................. 31
      6.1 Ping Loopback ............................................................................................................ 32
      6.2 Configure CDC Staging Receiver Route Map .............................................................. 33
      6.3 Ping a Valid PHINMS Route ........................................................................................ 37
      6.4 Email CPA File ............................................................................................................. 38
      6.5 Export the CPA file ....................................................................................................... 39
      6.6 Send Test Payload Message .......................................................................................... 40
7.0 RECEIVER INFORMATION ............................................................................................ 43
      7.1 Configure WorkerQ ....................................................................................................... 43
      7.2 Create Service and Action Pair...................................................................................... 46
8.0 UNINSTALL PHINMS 3.2 .................................................................................................. 49
9.0 ADDITIONAL FEATURES ................................................................................................ 51
      9.1 Import CPA ................................................................................................................... 51
      9.2 View Receiver Logs ...................................................................................................... 51
      9.3 View Sender Logs ......................................................................................................... 51
      9.4 Import Trusted Certificate ............................................................................................. 52
      9.5 Import JDBC JAR Files ................................................................................................ 52
      9.6 Change Login Password ................................................................................................ 52
      9.7 Sender and Receiver Alarms ......................................................................................... 53
      9.8 Alarm Resolution .......................................................................................................... 53
      9.9 Folder-Based Polling ..................................................................................................... 55
      9.10 Transport Queue Auto Delete ...................................................................................... 56
      9.11 Worker Queue Auto Delete ......................................................................................... 56
      9.12 Secondary Receiver Decryption Certificate ................................................................ 57
      9.13 Secondary Sender Certificate ...................................................................................... 57
      9.14 Message Signing/Verifying Functionality................................................................... 58

PHINMS Implementation Guide v3.2.pdf                                                                                                 Page iv
PHINMS 3.2 Implementation Guide

                                                      LIST OF FIGURES
Figure 3.1. Log On Dialog Box.................................................................................................... 11
Figure 3.2. PHINMS 3.2 FTP Downloads.................................................................................... 11
Figure 3.3. FTP Logon Dialog Box............................................................................................ 12
Figure 3.4. PHINMS 3.2 FTP Windows Build ........................................................................... 12
Figure 3.5. Installation Wizard Preparation Screens.................................................................... 13
Figure 3.6. End User Licensing Agreements Screen................................................................... 13
Figure 3.7. User Data Screen To Select Installation Type........................................................... 14
Figure 3.8. Target Path Screen ………………............................................................................ 14
Figure 3.9. PartyID and Domain Name Screen........................................................................... 15
Figure 3.10. Port Numbers Screen................................................................................................ 15
Figure 3.11. Register this PHINMS instance with PHIN/CDC ................................................... 16
Figure 3.12. Installation Package Screen...................................................................................... 16
Figure 3.13. Installation ............................................................................................................... 17
Figure 3.14. Setup Shortcuts........................................................................................................ 17
Figure 3.15. PHINMS Installation Options ................................................................................. 18
Figure 3.16. PHINMS Processing................................................................................................ 18
Figure 3.17. PHINMS Installation Finished................................................................................. 19
Figure 3.18. PHINMS Console Login Screen.............................................................................. 19
Figure 3.19. PHINMS Console .................................................................................................... 20
Figure 4.1. Install Shield Wizard Preparation Screens ............................................................... 21
Figure 4.2. End User Agreement Screen ..................................................................................... 21
Figure 4.3. New Installation or Upgrade Screen.......................................................................... 22
Figure 4.4. Target Path Selection ………………........................................................................ 22
Figure 4.5.The Upgrade Location ................................................................................................ 23
Figure 4.6. Port Numbers Screen ................................................................................................ 23
Figure 4.7. Installation Package Screen....................................................................................... 24
Figure 4.8. Installation................................................................................................................. 24
Figure 4.9. Setup Shortcuts ......................................................................................................... 25
Figure 4.10. PHINMS Installation Options ..................................................................................25
Figure 4.11. PHINMS Processing................................................................................................ 26
Figure 4.12. PHINMS Installation Finished................................................................................. 26
Figure 4.13. PHINMS Console Login Screen.............................................................................. 27
Figure 4.14. PHINMS Console .................................................................................................... 27
Figure 6.1. CDC PHINMS Topology.......................................................................................... 29
Figure 6.2. PHINMS 3.2 Console ................................................................................................ 30
Figure 6.3. PHINMS Ping............................................................................................................ 30
Figure 6.4. Ping Message............................................................................................................. 31
Figure 6.5. PHINMS 3.2 Console ................................................................................................ 32
Figure 6.6. Sender Configuration................................................................................................. 32

PHINMS Implementation Guide v3.2.pdf                                                                                                 Page v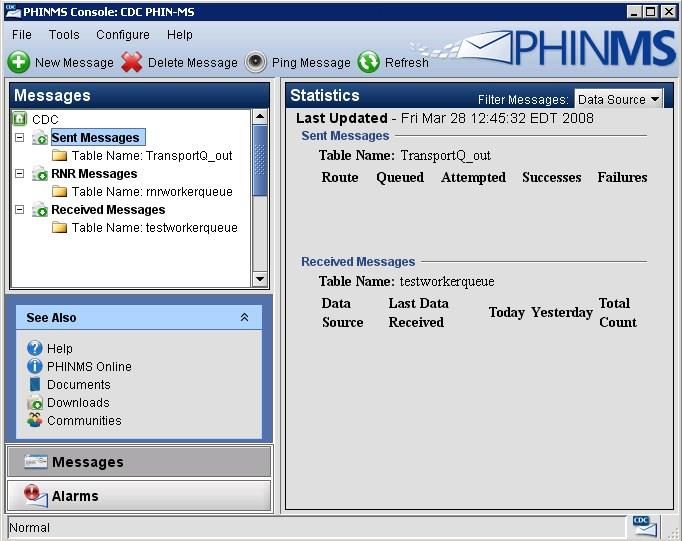
PHINMS 3.2 Implementation Guide

Figure 6.7. Route Map Item ......................................................................................................... 33
Figure 6.8. CDC Route Map Configuration................................................................................. 33
Figure 6.9. Sender Configuration................................................................................................. 34
Figure 6.10. CDC Route Configuration Successful ..................................................................... 34
Figure 6.11. Restart PHINMS Console ....................................................................................... 35
Figure 6.12. PHINMS 3.2 Console.............................................................................................. 35
Figure 6.13. PHINMS Ping ......................................................................................................... 36
Figure 6.14. Ping Message........................................................................................................... 36
Figure 6.15 PHINMS Tools Option ............................................................................................. 37
Figure 6.16. Export Route CPA ................................................................................................... 38
Figure 6.17. PHINMS 3.2 Console .............................................................................................. 39
Figure 6.18. PHINMS Send Message .......................................................................................... 39
Figure 6.19. Security Options ...................................................................................................... 40
Figure 6.20. Send Message........................................................................................................... 41
Figure 6.21. Message Sent Confirmation..................................................................................... 41
Figure 7.1. PHINMS 3.2 Console................................................................................................ 42
Figure 7.2. Receiver Configuration - Database ........................................................................... 42
Figure 7.3. Database Item ............................................................................................................ 43
Figure 7.4. Queue Maps............................................................................................................... 44
Figure 7.5. Queue Map Item......................................................................................................... 44
Figure 7.6. WorkerQ Database Configuration Successful............................................................ 45
Figure 7.7. PHINMS 3.2 Console ................................................................................................ 45
Figure 7.8. Service Map............................................................................................................... 46
Figure 7.9. Service Map Item ...................................................................................................... 46
Figure 7.10. Service and Action Added........................................................................................ 47
Figure 7.11. Service and Action Successful Configuration ......................................................... 47
Figure 7.12. Service Map Item .................................................................................................... 48
Figure 8.1. PHINMS Uninstaller screen...................................................................................... 48
Figure 8.2. Application Uninstaller ............................................................................................. 49
Figure 8.3. Successful Uninstall................................................................................................... 49
Figure 8.4. PHINMS install directory .......................................................................................... 49
Figure 9.1. Alarms....................................................................................................................... 53
Figure 9.2. Alarm Resolution....................................................................................................... 53
Figure 9.3. Alarm Successfully Processed................................................................................... 54

PHINMS Implementation Guide v3.2.pdf                                                                                                Page vi
PHINMS 3.2 Implementation Guide
                                                                                   Implementation Guide

                                                       LIST OF TABLES
Table 1. References ...................................................................................................................... 9
Table 2. JDBC Drivers ................................................................................................................ 10
Table 3. SDN PHINMS Digital Certificate Activities ................................................................ 11
Table 4. WorkerQ Database Tag Values.................................................................... ................ 46

PHINMS Implementation Guide v3.2.pdf                                                                                                     vii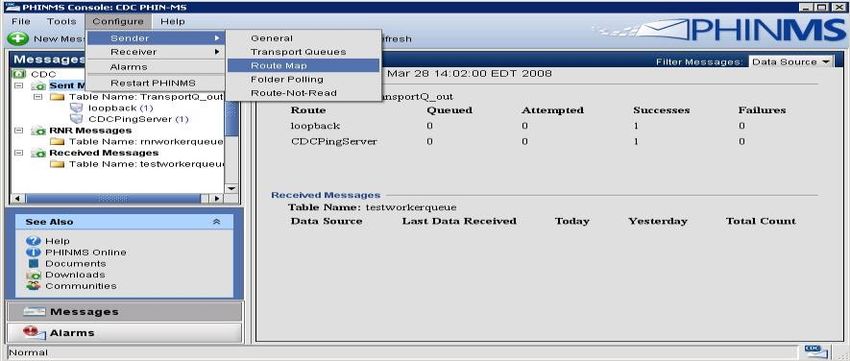
PHINMS 3.2 Implementation Guide

                                        ACRONYM LIST
CDC            Centers for Disease Control and Prevention
CPA            Collaboration Protocol Agreement
CPS            Certification Practice Statement
ebXML          Electronic Business Extensible Markup Language
FAQs           Frequently Asked Questions
FTP            File Transfer Protocol
HF3            Hot Fix 3 (installs with 32 and 64 bit versions of java)
JDBC           Java Database Connectivity
LDAP           Lightweight Directory Access Protocol
PC             Personal Computer
PartyID        Party Identifier
PHINMS         Public Health Information Network Messaging System
PHINMSG        Public Health Information Network Messaging
RDBMS          Relational Database Management System
SDN            Secure Data Network
SP1            Service Pack 1
SQL            Structured Query Language
SSL            Secure Socket Layer
TLS            Transport Layer Security
TransportQ     Transport Queue
URL            Uniform Resource Locator
WorkerQ        Worker Queue

PHINMS Implementation Guide v3.2.pdf                                                         viii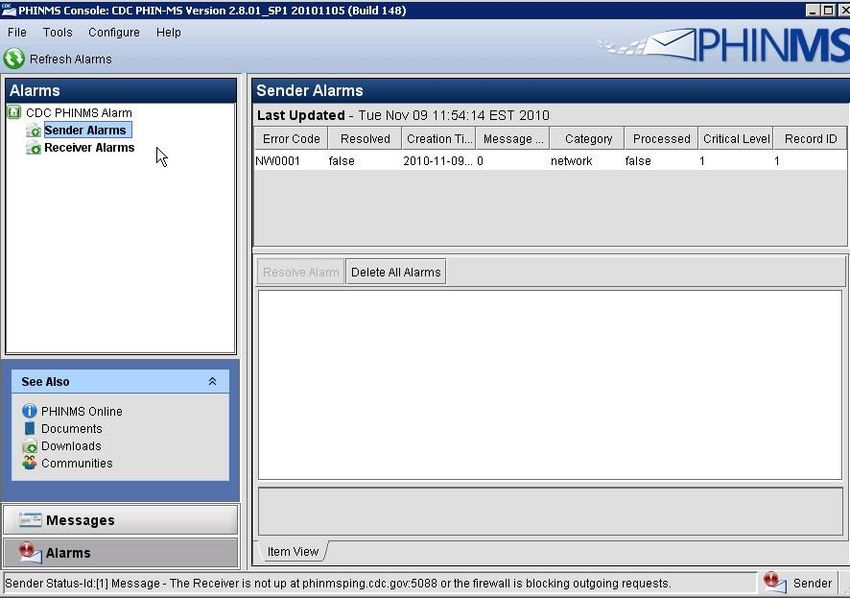
PHINMS 3.2 Implementation Guide
1.0 INTRODUCTION
The Public Health Information Network Messaging System (PHINMS) Implementation Guide
assists users with the installation, configuration, and upgrade of the PHINMS product. It also
provides instructions to install and configure PHINMS to send and receive messages from the
Centers for Disease Control and Prevention (CDC) and CDC partners.
PHINMS is updated periodically; refer to the PHINMS website at
www.cdc.gov/phin/tools/phinms for the most current release of PHINMS software. Information
available on the website includes:
Overview: The overview summarizes the purpose of PHINMS and announces new
PHINMS features and processes.
Installation: This section of the website provides documentation pertinent to the
installation and configuration of the PHINMS software. Other PHINMS documents are
also available, such as an acronym and glossary list, web service adapters, and more.
Quick Tips for Getting Started: PHINMS Quick Tips provide an overview of the
information needed most often. Quick steps are documented for Release 3.2. Suggestions
for additional questions can be sent to the PHINMS website point of contact by using the
support tab.
FAQs: The list of frequently asked questions (FAQs) is stored in this section. The list
contains answers to many questions users have previously submitted. The PHINMS team
welcomes questions, suggestions, and/or comments.
Support: The support section provides contact information for contacting the PHINMS
Help Desk, accessing online help, and contacting the website administrator.
1.1 References
NAME LOCATION
Quick Tips for
Located at www.cdc.gov/phin/tools/phinms.
Getting Started
PHINMS Release
Notes 3.2 Description of supported environments, software requirements,
explanation of upgrade path, and a list of new features and bug fixes
made since PHINMS Release 3.1. Located at:
http://www.cdc.gov/phin/tools/PHINMS/installation.html
Table 1 References
1.2 Communication with Users
Send questions, suggestions, and/or comments concerning PHINMS support or documentation to
the PHINMS website by using the email link located in the Contact Us block on the left side of
the home page. The PHINMS team will respond to users’ communications.
PHINMS Implementation Guide v3.2.pdf ix of 58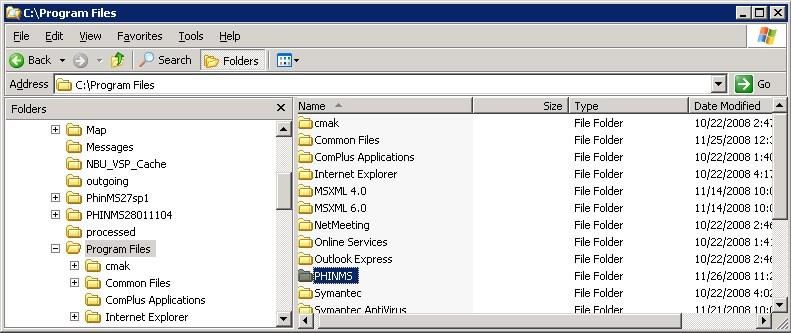
PHINMS 3.2 Implementation Guide

2.0 INSTALLATION REQUIREMENTS
2.1 PHINMS 3.2 Tests
PHINMS 3.2 has been tested on the following platforms:
   o Operating systems (64-bit only):
     ▪     Windows Server 2016.
     ▪     Windows 10.
   o Databases:
        ▪      Default Databases - used for testing purposes: HSQL DB 1.8.0.4
        ▪      Production Qualified Databases: Microsoft SQL Server 2016.
   o Application Servers:
        ▪      Tomcat 9
   o Receiver Side Proxy Servers:
      ▪    IIS 10
   o JDBC drivers.

 DB
                 VERSION          JDBC DRIVER NAME             VERSION        DATE
 SERVER
 MS SQL         2016            Sqljdbc41.jar, sqljdbc42.jar   6.0         02/27/2018

                               Table 2. JDBC Drivers

Note: Java Database Connectivity (JDBC) drivers listed in this table were successfully tested for
connectivity. However, CDC does not guarantee or support any potential defect of JDBC drivers
themselves. It is entirely up to PHINMS users to decide a JDBC driver to use. This table is provided for
referential purpose only.
2.2 System Requirements
The installation of PHINMS 3.2 system requirements is as follows:
       ▪    Local administrator for Windows
       ▪    Minimum disk space: 6 GB
       ▪    Minimum memory: 4 GB
       ▪    TLS 1.2
       ▪    Java Open JDK or Oracle JDK from version 8 to 11.

PHINMS 3.2 Implementation Guide.pdf                                                  Page 10 of 58
PHINMS 3.2 Implementation Guide
Ensure that all the correct ports—which may be 5088 (default local host port), 443 (Hyper Text
Transfer Protocol over Secure Sockets Layer [HTTPS]), and 389 (Lightweight Directory Access
Protocol [LDAP])—are open on the firewall.
Once the requirements above have been met, proceed to Section 2.3, which can be performed
simultaneously with Section 2.4.
2.3 Apply for a Digital Certificate
PHINMS users who send data to CDC are required to have a digital certificate. To obtain a certificate,
contact the PHIN Help Desk at PHINtech@cdc.gov. Information about digital certificates is available in
the Digital Certificate Policy section on the PHINMS website.
2.4 Request PartyID
To obtain the PHINMS software, email the PHIN Help Desk at PHINTech@cdc.gov. Information
will need to be provided about the organization(s) that will use the software to send and/or receive
messages. This information will be reviewed and confirmed by a PHINMS support team member
and the software download link will be emailed to the requestor, along with a PHINMS PartyID.
A unique PartyID is required for every organization sending and receiving messages to CDC. A
PartyID uniquely identifies a PHINMS installation, also called an instance or node. The PartyID is
included with every message, which informs the recipient of the originator. Contact the PHIN Help
Desk at PHINTech@cdc.gov for any issues with the PartyID or if a PartyID is not received
following submission of organization information.
The PartyID is required during installation and becomes a permanent, identifying part of the
application. The PHINMS application will need to be reinstalled if the PartyID needs to be
changed.
Note: If there is a need to install PHINMS at more than one site or to install more than one PHINMS
installation at the same site, a unique PartyID is required for each installation.
The recommended way to install PHINMS 3.2 is to download the application from the File Transport
Site (FTP) site (Section 3.0). Note: Contact PHINTech@cdc.gov for FTP site login credentials.
3.0 DOWNLOAD AND INSTALL THE PHINMS SOFTWARE
Install PHINMS 3.2 by using the following steps. These steps pertain to new installations; instructions for
upgrading an existing installation are in Section 4.0.
Note: Refer to Section 2.4 if an email was not received with the PartyID information.
1. Open any web browser and type the ftp URL into the address bar: ftp://sftp.cdc.gov. This will
open a dialog box (Figure 3.1).
PHINMS 3.2 Implementation Guide.pdf Page 11 of 58PHINMS 3.2 Implementation Guide
Figure 3.1. FTP log on Dialog Box
2. Enter user name and password, then click Log on. This will open the FTP root directory (Figure
3.2).
PHINMS 3.2 Implementation Guide.pdf Page 12 of 58PHINMS 3.2 Implementation Guide
Figure 3.2. PHINMS 3.2 FTP Downloads
3. To view this FTP site in Windows Explorer, enter the link in the Explorer bar and select enter. This
will open a dialog box as illustrated in Figure 3.3.
Figure 3.3. FTP log on Dialog Box
4. Enter user name and password, then click Log on. This will open the installation utility illustrated
in Figure 3.4.
Figure 3.4. PHINMS 3.2 FTP Windows Build
PHINMS 3.2 Implementation Guide.pdf Page 13 of 58PHINMS 3.2 Implementation Guide
5. Double-click on the PHINMS-3.2-install.exe executable file and select Save to save the application
to your local computer. The installation wizard will open, as illustrated in Figure 3.5.
Figure 3.5. Installation Wizard Preparation Screens
6. Click Next. The licensing agreements will open as illustrated in Figure 3.6. The responsibilities of
the PHINMS user are listed on this screen.
Figure 3.6. End User Licensing Agreements Screen
PHINMS 3.2 Implementation Guide.pdf Page 14 of 58PHINMS 3.2 Implementation Guide
7. Once you have read the terms of the agreement, select “I accept the terms of the license agreement”
and click Next. The user data screen will open as illustrated in Figure 3.7. This screen allows the
user to select whether they are completing a new installation or an upgrade of an existing
installation.
Figure 3.7. User Data Screen To Select Installation Type
8. Select New Install and click Next.
Figure 3.8. Target Path Screen
PHINMS 3.2 Implementation Guide.pdf Page 15 of 58PHINMS 3.2 Implementation Guide
9. Click OK to select the default target directory, or click browse to install to a different directory on
your local computer. Click OK to proceed, a window to select Java version will open.
Figure 3.9. Java Selecting Screen
10. Click browse to go to the JDK folder and select the folder.
Figure 3.10. JDK Path Selecting Screen
PHINMS 3.2 Implementation Guide.pdf Page 16 of 58PHINMS 3.2 Implementation Guide
11. Click Open then click Next.
Figure 3.11. Path Confirmation Screen
12. Click Yes to confirm the path. This will open a user data window to enter the domain name and
party ID.
Figure 3.12. PartyID and Domain Name Screen
PHINMS 3.2 Implementation Guide.pdf Page 17 of 58PHINMS 3.2 Implementation Guide
13. Enter the domain name (defined by user, e.g., cdc.gov) and the assigned party ID then click Next.
A user data screen will open requesting the port identification information (Figure 3.13).
Figure 3.13. Port Numbers Screen
14. The default PHINMS port numbers are prefilled by default. Click Next, the registration screen will
open as illustrated in Figure 3.14. It is optional to enter the organization name, administrator name,
and email address to register the product with CDC. Note: Do not check the box that reads, “I want
to register this PHINMS instance with PHINS/CDC.” At the time of this publication, there is no
active registration server.
Figure 3.14. Registration Screen
PHINMS 3.2 Implementation Guide.pdf Page 18 of 58PHINMS 3.2 Implementation Guide
15. Click Next. The select installation packages screen will display, as illustrated in Figure 3.15.
Figure 3.15. Installation Package Screen
16. PHINMS Core is checked by default. Click Next, the system will begin installation, as illustrated
in Figure 4.6. Progress bars will indicate the status of installation.
Figure 3.16. Installation Screen
PHINMS 3.2 Implementation Guide.pdf Page 19 of 58PHINMS 3.2 Implementation Guide
17. When the installation completes, click Next. The shortcut screen will display, as illustrated in
Figure 3.17. This screen displays options to create shortcuts in the PHINMS start menu.
Figure 3.17. Setup Shortcuts Screen
Note: Choose default to reset this screen if you make changes and want to undo them.
18. Click Next. A screen with options for final actions will display, as illustrated in Figure 3.18.
Figure 3.18. PHINMS Installation Options Screen
PHINMS 3.2 Implementation Guide.pdf Page 20 of 58PHINMS 3.2 Implementation Guide
19. Select how PHINMS is to be installed on your system (i.e., as a service and start console,
service only, or not as a service [just install]) and click Next. The processing screen will
display, as illustrated in Figure 3.19.
Figure 3.19. PHINMS Processing Screen
Note: Some Java versions may cause the screen to display exception or warning message, this is
normal and can be ignored.
20. Click Next to initiate PHINMS for the first time. The Installation Finished window will
display as illustrated in 3.20. Click Done.
Figure 3.20. PHINMS Installation Finished Screen
PHINMS 3.2 Implementation Guide.pdf Page 21 of 58PHINMS 3.2 Implementation Guide
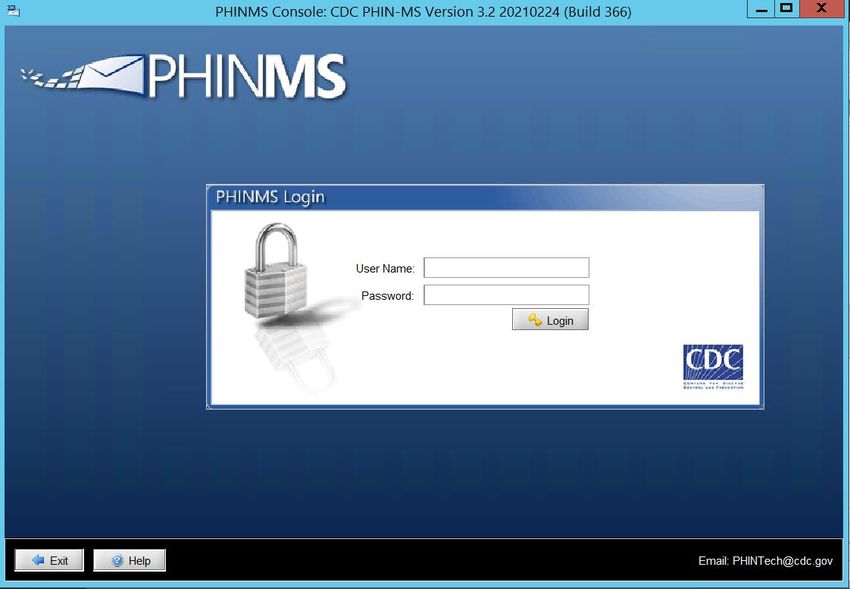
21. The PHINMS console login screen will load, as displayed in Figure 3.21.
Figure 3.21. PHINMS Console Login Screen
22. Enter user name as “system” and password as “Phinms123” and then click Login to access
the PHINMS console as displayed in Figure 3.22.
Figure 3.22. PHINMS Console
PHINMS 3.2 Implementation Guide.pdf Page 22 of 58PHINMS 3.2 Implementation Guide
4.0 UPGRADE PHINMS SOFTWARE
PHINMS 3.2 allows the user to upgrade from version 2.8 and newer. Systems using versions of
the PHINMS software earlier than 2.8 must perform a fresh install of PHINMS 3.2.
Note: The PHINMS upgrade will not overwrite the previous versions. It will install PHINMS 3.2
in a new location and pull the configuration files, mainly the TransportQ table configuration
information, and use this information to configure the new PHINMS 3.2 application. This process
allows the user to maintain the previous installation in case there are any problems with the new
installation.
Complete the following steps to upgrade to version 3.2 from versions 2.8 through 3.1. PLEASE FOLLOW
THESE STEPS CAREFULLY. You will need to know the file directory location of your existing version
of PHINMS to complete this process:
1. If open, close the console for the previous version of PHINMS.
2. Stop the PHINMS services for the previous version of PHINMS (Windows Services).
3. Rename the existing instance of PHINMS to PHINMSold.
4. Open the executable file PHINMS-3.2-install.exe. The Installation Wizard will open (Figure 4.1)
and will begin installing PHINMS 3.2.
Figure 4.1. Install Shield Wizard Preparation Screens
5. Click Next to proceed to the next step (Figure 4.2).
PHINMS 3.2 Implementation Guide.pdf Page 23 of 58PHINMS 3.2 Implementation Guide
Figure 4.2. End User Agreement Screen
6. Review the licensing agreement and then select, “I accept the terms of this license agreement.” and
click Next to proceed to step 3 (Figure 4.3).
Figure 4.3. New Installation or Upgrade Screen
PHINMS 3.2 Implementation Guide.pdf Page 24 of 58PHINMS 3.2 Implementation Guide
7. Select Upgrade 2.8.00 or later and click Next to proceed to step 4 (Figure 4.4).
Figure 4.4. Target Path Selection Screen
8. Confirm that the default installation path is the same path as the previous version PHINMSold. If
necessary, click Browse to locate that identical directory. Once the correct directory is in the
installation path, click Next to proceed (Figure 4.5).
Figure 4.5 Selection Screen for Existing PHINSMS Instance
PHINMS 3.2 Implementation Guide.pdf Page 25 of 58PHINMS 3.2 Implementation Guide
9. Click Browse and find the file location of the old PHINMS instance (PHINMSold). Once the
correct directory shows in the selection bar, click Next to proceed (Figure 4.6).
Figure 4.6. Port Numbers Screen
10. Enter PHINMS default port numbers: 5088 for HTTP, 5089 for HTTPS, and 6087 for the database.
Click Next to proceed to the Installation Package screen (Figure 4.7).
Figure 4.7. Installation Package Screen
PHINMS 3.2 Implementation Guide.pdf Page 26 of 58PHINMS 3.2 Implementation Guide
11. Select PHINMS Core and click Next to proceed to the installation process (Figure 4.8). The
progress bars will illustrate the status of installation.
Figure 4.8. Installation Screen
12. Once installation is complete, click Next to proceed to the Setup Shortcuts screen (Figure 4.9). This
screen displays options to create shortcuts in the PHINMS start menu.
Figure 4.9. Setup Shortcuts Screen
PHINMS 3.2 Implementation Guide.pdf Page 27 of 58PHINMS 3.2 Implementation Guide
13. Click default if you make changes and want to undo them. Once you have created shortcuts, click
Next to proceed to the installation options screen (Figure 4.10).
Figure 4.10. PHINMS Installation Options Screen
14. Select how PHINMS is to be installed on your system (i.e., as a service and start the console, as a
service only, or not as a service [just install]) and click Next. The Processing screen will display as
illustrated in Figure 4.11.
Figure 4.11. PHINMS Processing Screen
PHINMS 3.2 Implementation Guide.pdf Page 28 of 58PHINMS 3.2 Implementation Guide
Note: Some Java versions may cause the screen to display exception or warning message, this is
normal and can be ignored.
15. Click Next to complete installation (Figure 4.12).
Figure 4.12. PHINMS Installation Finished Screen
Note: The installation has completed successfully. An uninstaller has been created. There is now an
option to generate an automatic installation script to deploy PHINMS with the same configuration on
another system.
16. Click Done in the installation screen to proceed to the PHINMS login screen (Figure 4.13).
Figure 4.13. PHINMS Console Login Screen
PHINMS 3.2 Implementation Guide.pdf Page 29 of 58PHINMS 3.2 Implementation Guide
17. Enter user name and password, then click login to open the PHINMS console (Figure 4.14).
Figure 4.14. PHINMS Console
5.0 CONFIGURE SQL DATABASES
A Structured Query Language database (HSQLDB) containing a transport queue (TransportQ) is
automatically installed with the PHINMS 3.2 application. An external database can be created for
the purpose of hosting the messaging queue tables. PHINMS 3.2 will support the following
databases for hosting messaging queues (only Microsoft SQL Server were tested with PHINMS
3.2):
HSQLDB 1.8.0
Microsoft SQL Server.
MySQL.
Oracle.
An HSQL database is provided with the PHINMS installation on the Windows platform as a
default database and facilitates installation testing. It is recommended that PHINMS users
conduct an evaluation of the tradeoffs between SQL and a high transaction-volume relational
database management system (RDBMS) such as others listed above.
All table scripts needed for PHINMS external database configurations for the databases listed above
will be posted on the FTP site (ftp://sftp.cdc.gov/PHINMS). The provided table scripts are for the
transport queue, worker queue only.
Note: To use an external database (DB) connection, the appropriate JDBC driver must be
imported into PHINMS via the PHINMS Console Tools option (section 9.6). DB drivers can
PHINMS 3.2 Implementation Guide.pdf Page 30 of 58PHINMS 3.2 Implementation Guide
also be found on the FTP site (ftp://sftp.cdc.gov/PHINMS/PHINMS_Database_Drivers/). For
external DB connection string properties, please refer to the PHINMS Technical Guide.
6.0 SENDER INFORMATION
PHINMS Version 3.2 has two components: the sender and the receiver. Sending a test message
allows the PHINMS Sender to send messages from the TransportQ to a receiver such as the CDC.
Testing the PHINMS installation is a three-part procedure:
1. Ping the PHINMS Sender loopback route.
2. Ping a configured PHINMS route (Collaboration Protocol Agreement [CPA] files must be imported
on the receiving side).
3. Ping the PHINMS CDC Staging Receiver (CPA files must be emailed to Phintech@cdc.gov. See
Section 6.4 for more information.).
Figure 6.1 is a topology diagram to help users understand the PHINMS authentication process.
Figure 6.1. CDC PHINMS Topology
PHINMS 3.2 Implementation Guide.pdf Page 31 of 58PHINMS 3.2 Implementation Guide
6.1 Ping Loopback
The Ping Loopback validates that the PHINMS installation was downloaded and installed
successfully on the sender’s system. This process is not a test to verify that messages can be sent
outside of a firewall if one is present.
Verify that the generated Ping Loopback is sent to the loopback message processor successfully by
completing the following steps:
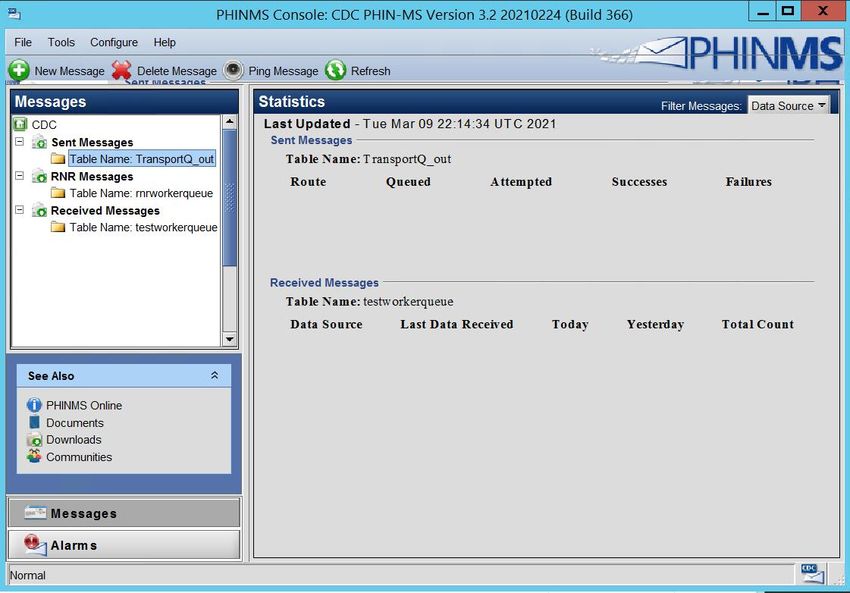
1. Open the PHINMS 3.2 Console (Figure 6.2).
Figure 6.2. PHINMS 3.2 Console
2. Click Ping Message in the top menu bar to display the ping dialog box (Figure 6.3).
Figure 6.3. PHINMS Ping Screen
PHINMS 3.2 Implementation Guide.pdf Page 32 of 58PHINMS 3.2 Implementation Guide
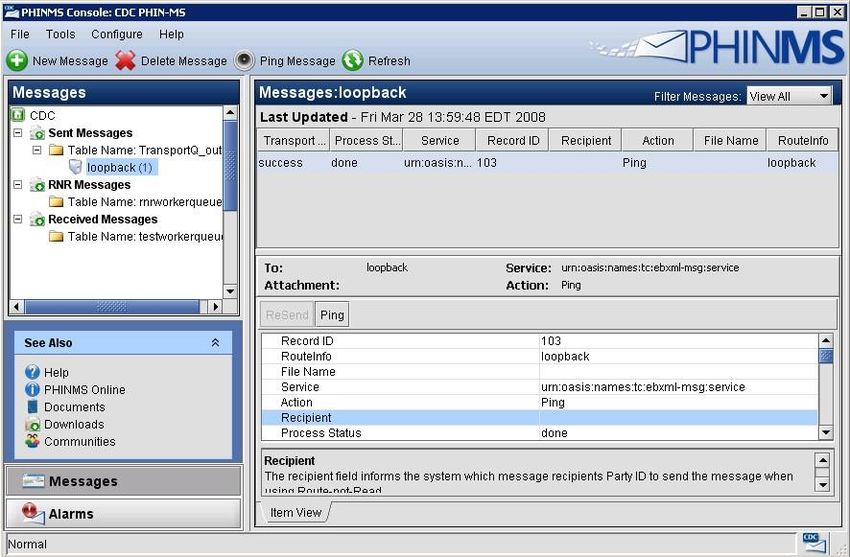
3. Select loopback, then click Ping Selected Routes to return to the console with the loopback screen
open (Figure 6.4).
Figure 6.4. Ping Message Screen in PHINMS Console
4. In the right-hand dropdown menu, select the loopback folder showing the status of the ping.
Note: When the Transport status (first column in the status block) lists a status of “queued” or
“attempted,” click Refresh in the top menu bar until the status changes.
6.2 Configure CDC Staging Receiver Route Map
The CDC Staging Receiver must be configured before sending a ping. Configure the CDC Staging
Receiver by using the steps detailed in this section.
Note: Perform these steps only if sending to CDC. A digital certificate must be obtained before a
successful ping test can be sent.
1. Open the PHINMS 3.2 Console (Figure 6.5).
Figure 6.5. PHINMS 3.2 Console
PHINMS 3.2 Implementation Guide.pdf Page 33 of 58PHINMS 3.2 Implementation Guide
2. Go to the Configure option in the menu bar and select Sender>Route Map as illustrated in Figure
6.5. This action will open the Sender Configuration screen (Figure 6.6).
Figure 6.6. Sender Configuration Screen
3. Select CDCStagingReceiver and then click Update to open the Route Map dialog box (Figure 6.7).
Figure 6.7. Route Map Item Dialog Box
PHINMS 3.2 Implementation Guide.pdf Page 34 of 58PHINMS 3.2 Implementation Guide
4. Select “clientcert” from the Authentication Type dropdown list. Click OK to return to the Route
Map dialog box (Figure 6.8).
Figure 6.8. Route Map Item Dialog Box
5. Enter the (.pfx) path to the stored certificate Key Store. This is the digital certificate issued to the
person who will use it to send data to CDC.
6. Enter the associated password in the Password field and click OK to return to the Sender
Configuration screen (Figure 6.9).
Figure 6.9. Sender Configuration Screen
PHINMS 3.2 Implementation Guide.pdf Page 35 of 58PHINMS 3.2 Implementation Guide
7. Click Save to set configuration. If all information has been entered correctly, the system will return
a success message (Figure 6.10).
Figure 6.10. Confirmation that Route Configuration Successful
8. Click OK and restart PHINMS by going to the Configure menu in the PHINMS Console menu and
selecting Restart PHINMS (Figure 6.11).
Figure 6.11. Restart PHINMS Console
PHINMS 3.2 Implementation Guide.pdf Page 36 of 58PHINMS 3.2 Implementation Guide
6.3 Ping a Valid PHINMS Route
The Ping Message validates that the Sender can connect to the Internet and to the selected route.
Verify the Ping Message to the selected route is successful by completing the following steps:
1. Open the PHINMS 3.2 Console (Figure 6.12).
Figure 6.12. PHINMS 3.2 Console
2. Select Ping Message in the top menu bar to open the PHINMS Ping screen (Figure 6.13).
Figure 6.13. PHINMS Ping Screen
PHINMS 3.2 Implementation Guide.pdf Page 37 of 58PHINMS 3.2 Implementation Guide
3. Select route of choice. This example uses CDCProductionReceiver.
Note: You must have a valid digital certificate configured to ping any route requiring client
certificate authentication (see section 6.2).
4. Click Ping Selected Routes to return to the console (Figure 6.14).
Figure 6.14. Ping Message Screen in PHINMS Console
5. In the left-hand dropdown menu, select the CDC folder showing the status of the ping.
Note: When the Transport Status (first column in the status block) lists a status of “queued” or
“attempted,” click Refresh in the top menu bar until the status changes.
6.4 Email CPA File
PHINMS creates a CPA file for each route listed in the PHINMS Route Map tab of the Sender
Configuration panel. The PHINMS administrator must export the CPA for any configured route
and send the related CPA to the receiving site to import into the receiving PHINMS console. To
send to CDC, export the CPA file and send them for the CDC Production Receiver or the CDC
Staging Receiver to the PHINMS Help Desk (Phintech@cdc.gov). Only after the PHIN Help
Desk has received the CPA file and applied it to the PHINMS Receiver can messages be
successfully transmitted from the sender to the receiver.
The required CPA files are in directory C:\(PHINMS install directory)\ config\sender \CPA.
Note: Information on CPA can be found in the PHINMS Technical Reference Guide.
PHINMS 3.2 Implementation Guide.pdf Page 38 of 58PHINMS 3.2 Implementation Guide
6.5 Export the CPA file
1. Open the PHINMS Console. Using the Tools option in the main menu, select Export CPA Files
(Figure 6.15).
Figure 6.15 PHINMS Tools>Export CPA Files
2. Select the route to export the CPA. For this example, the export is to the CDCStagingReceiver
route (Figure 6.16).
Figure 6.16. Export Route CPA Screen
3. Click Export Selected Routes.
4. Browse to the location where the CPA file will be exported.
5. Email the CPA xml file to the appropriate receiving site.
PHINMS 3.2 Implementation Guide.pdf Page 39 of 58PHINMS 3.2 Implementation Guide
6. Once the receiving site has confirmed that the CPA file is imported, use the steps in Section 6.6 to
test the route.
6.6 Send Test Payload Message
The Send Payload Message option verifies the capability to send an outbound message with an
attached file to a receiver. Users must have received a confirmation that the required CPA files
have been sent to the PHIN Help Desk before attempting to send a payload message to CDC.
Refer to Section 9.1 for CPA information.
To send the payload message test to the PHINMS Staging Receiver:
1. Open the PHINMS 3.2 Console (Figure 6.17).
Figure 6.17. PHINMS 3.2 Console
2. Select New Message from the top menu bar to open the Send Message screen (Figure 6.18).
Figure 6.18. PHINMS Send Message Screen
PHINMS 3.2 Implementation Guide.pdf Page 40 of 58PHINMS 3.2 Implementation Guide
3. Enter the Send Message parameters provided by the receiving site or, if sending to CDCStaging,
use the parameters below:
- Route: CDC Staging Receiver
- Service: test
- Action: send
- Message Recipient: optional - can be left blank
- Filename: browse to the file to be sent to the receiver
- Destination Name: optional - can be left blank
- Arguments: optional - can be left blank.
4. Security options are available for encrypting or signing messages if desired. If using security
options, proceed to Step 5. Otherwise, skip to Step 8.
5. Click Security Options to open the Security Options menu (Figure 6.19).
Figure 6.19. Security Options
PHINMS 3.2 Implementation Guide.pdf Page 41 of 58PHINMS 3.2 Implementation Guide
6. Ensure the following defaults if sending to CDC:
- Encrypt Message is checked
- Sign Message is checked
- Use LDAP lookup to find encryption certificate is selected
- Address: directory.pki.digicert.com:389
- Base DN: o=Centers for Disease Control and Prevention
- Common Name: cn=cdc phinms
7. Click OK to return to the Send Message screen (Figure 6.20).
Figure 6.20 Send Message Screen
8. Click Send. If the message is successfully queued, PHINMS will display a confirmation message
(Figure 6.21).
Figure 6.21. Message Sent Confirmation
9. Click OK
PHINMS 3.2 Implementation Guide.pdf Page 42 of 58PHINMS 3.2 Implementation Guide
7.0 RECEIVER INFORMATION
7.1 Configure WorkerQ
The worker queue (WorkerQ) is the database table used for storing inbound messages. When
configured from the receiver configuration screen in the console, the WorkerQ is used to store
incoming messages sent to the receiver. The database configuration needs to be completed before
creating the WorkerQ table. Instructions on how to configure a database connection to the
external database are in Section 5.0.
If configured from the sender configuration screen in the console, the WorkerQ is used to write
the responses to polling requests (route-not-read configuration). More information on sender
configuration is located in the PHINMS Technical Guide.
Create an external database WorkerQ table by using the following steps:
1. Open the PHINMS 3.2 Console (Figure 7.1).
Figure 7.1. PHINMS 3.2 Console
2. Using the Configure dropdown in the main menu, select Receiver>WorkerQueues. The Receiver
Configuration screen will open (Figure 7.2).
Figure 7.2. Receiver Configuration - Database
PHINMS 3.2 Implementation Guide.pdf Page 43 of 58PHINMS 3.2 Implementation Guide
3. Click Add to open the Database Item screen (Figure 7.3). (A user can also update or delete a
database once it is added by using the appropriate buttons in Figure 7.2).
Figure 7.3. Database Item
4. Enter the database items. Refer to Table 4 for an explanation of the values.
TAG VALUE DESCRIPTION
Database ID The unique name for the database connection pool, referenced in the queue map. The
service map uses the databaseId to map the queue to a specific database.
(The unique databaseId is determined by the user.)
TAG VALUE DESCRIPTION
Database Type Designates the type of database.
Database URL The URL to the database. The URL depends on the type of database and driver used,
(e.g., jdbc:sqlserver://host:portnumber;DatabaseName=database for Microsoft
SQL Server and jdbc:oracle://host:port:sid for Oracle).
Database The type of JDBC driver. The JDBC driver should be appropriate for the type of
Driver database, (e.g., com.microsoft.sqlserver.jdbc.SQLServerDriver for Microsoft SQL
Server and oracle.jdbc.OracleDriver for Oracle).
Database User The database user account is provided by the database administrator for login
purposes and to automate the login process via PHINMS. A pointer to the database
user entry is in the message receiver’s encrypted password store. The value is not the
database user but the name of the tag within the password file. The value of the tag
contains the actual database user name.
PHINMS 3.2 Implementation Guide.pdf Page 44 of 58PHINMS 3.2 Implementation Guide
Database This password is provided as part of the user account created by the database
Password administrator for login purposes and to automate the login process via PHINMS. A
pointer to the database password entry is in the message receiver’s encrypted
password store. The value is not the database password but the tag within the
password file. The value of the tag contains the actual database password.
Pool Size Pool size is the number of database connections to open. When setting the pool size,
users should ensure that the system can handle the maximum client load while
keeping enough memory available.
Table 4. WorkerQ Database Tag Values
5. After entering the database items, click Queue Maps to open the Queue Maps menu (Figure 7.4).
Figure 7.4. Queue Maps Menu
6. Click Add to open the Queue Map entry screen (Figure 7.5).
Figure 7.5. Queue Map Item Entry Screen
PHINMS 3.2 Implementation Guide.pdf Page 45 of 58PHINMS 3.2 Implementation Guide
7. Enter the Queue Map ID (determined by the user).
8. Enter Table Name
» Click OK
» Click OK
» Click OK.
9. Click Save. If configuration was successful, PHINMS will display a confirmation screen (Figure
7.6).
Figure 7.6. WorkerQ Database Configuration Successful
10. Click OK.
11. Using the Configure option in the PHINMS console main menu, select Restart PHINMS.
7.2 Create Service and Action Pair
PHINMS 3.2 uses message envelopes for each sent message. The envelope has address information
tags called Service and Action. These tags are known as character strings and are logically mapped
to an application queue on the receiving side. The Service and Action tags determine the message
type.
Create a Service and Action pair by completing the following steps:
1. Open the PHINMS 3.2 Console (Figure 7.7).
Figure 7.7. PHINMS 3.2 Console
PHINMS 3.2 Implementation Guide.pdf Page 46 of 58PHINMS 3.2 Implementation Guide
2. Using the Configure dropdown in the PHINMS console main menu, select
Receiver>WorkerQueues to open the Receiver Configuration menu (Figure 7.8). Click the Service
Map tab (Figure 7.8).
Figure 7.8. Service Map Menu
3. Click Add to open the Service Map Item menu (Figure 7.9).
Figure 7.9. Service Map Item Menu
4. Enter Service.
5. Enter Action.
PHINMS 3.2 Implementation Guide.pdf Page 47 of 58PHINMS 3.2 Implementation Guide
6. Select WorkerQueue from the dropdown list.
7. Highlight WorkerQueue in the Q ID column on the left-hand side.
8. Click the Add button located between the two columns.
9. Click OK to return to the Receiver Configuration screen (Figure 7.10). The selected options will
appear in the Service Map list.
Figure 7.10. Confirmation of Service and Action Added
10. Click Save. If the configuration was successful, PHINMS will display a confirmation message
(Figure 7.11).
Figure 7.11. Service and Action Successful Configuration
11. Click OK.
12. Using the Configure option in the PHINMS console main menu, select Restart PHINMS.
PHINMS 3.2 Implementation Guide.pdf Page 48 of 58PHINMS 3.2 Implementation Guide
Figure 7.12. Service Map Item
Note: When Payload to Disk is checked in the Service Map Item menu (Figure 7.12), the
incoming payload is written to disk instead of to the database field. The default location for
payload to disk is (C:\Program Files\PHINMS\shared\receiverincoming).
8.0 UNINSTALL PHINMS 3.2
Complete the following steps to uninstall PHINMS 3.2:
1. Click the Start button on your computer. Go to All Programs>PHINMS>Uninstall PHINMS. This
action will open the DOS menu displayed in Figure 8.1.
Figure 8.1. PHINMS Uninstaller Screen
PHINMS 3.2 Implementation Guide.pdf Page 49 of 58PHINMS 3.2 Implementation Guide
2. The DOS window confirms that the application is removed and deleted. This initiates the
application uninstaller screen (Figure 8.2).
Figure 8.2. Application Uninstaller
3. Select “Force the deletion of C:\Program Files\PHINMS (i.e., the PHINMS install directory folder)
structure,” then click Uninstall. The middle progress bar will display the status of the uninstall
process. When the program is uninstalled, the status bar will read, “Finished” (Figure 8.3).
Figure 8.3. Successful Uninstall Confirmation
4. Click Quit.
Note: PHINMS can also be uninstalled by running the Uninstaller file in the
…\PHINMS\Uninstaller\ folder.
5. Open the computer’s C: drive and navigate to the PHINMS install directory (Figure 8.4).
Figure 8.4. PHINMS Install Directory
PHINMS 3.2 Implementation Guide.pdf Page 50 of 58PHINMS 3.2 Implementation Guide
6. Delete the PHINMS install directory by clicking on the folder and hitting the delete key on your
keyboard. These steps will successfully uninstall PHINMS 3.2.
9.0 ADDITIONAL FEATURES
9.1 Import CPA
PHINMS 3.2 allows the user to import the CPA directly from the PHINMS 3.2 Console. Complete the
following steps to import the CPA:
1. Open the PHINMS 3.2 Console.
2. Open the Tools dropdown from the main menu.
3. Click Import CPA.
4. Select the CPA to import.
5. Click Open.
6. Click OK.
9.2 View Receiver Logs
The Receiver Logs store information on the status of received messages and can be viewed directly
from the PHINMS 3.2 Console. Viewing the logs allows users to check the status of received
messages. Complete the following steps to view the Receiver Logs:
1. Open the PHINMS 3.2 Console.
2. Open the Tools dropdown from the main menu.
3. Select Receiver Logs.
4. Select Route from the dropdown list.
5. Select Date.
6. Click View to display the log text.
9.3 View Sender Logs
The Sender Logs store information on the status of sent messages and can be viewed directly from
the PHINMS 3.2 Console. Viewing the logs allows users to check the status of sent messages.
Complete the following steps to view the Sender Logs:
1. Open the PHINMS 3.2 Console.
2. Open the Tools dropdown from the main menu.
3. Select View Sender Logs.
4. Select Route from the dropdown list.
5. Select Date.
6. Click View to display the log text.
PHINMS 3.2 Implementation Guide.pdf Page 51 of 58PHINMS 3.2 Implementation Guide
9.4 Import Trusted Certificate
A trusted certificate consists of a root and intermediate certificate authority (CA) certificate.
When the browser is trying to make a SSL (secure socket layer) connection, it needs to validate
the certificate chain of the SSL certificate installed on the proxy server on the receiver’s end.
PHINMS Sender verifies the chain by using CACERTS Key Store file. If the chain does not
match, the sender must import the trusted certificate into the CACERTS Key Store file by using
an import option. The user can then import the trusted certificate directly from the PHINMS 3.2
Console. Complete the following steps to import the trusted certificate:
1. Open the PHINMS 3.2 Console.
2. Open the Tools dropdown from the main menu.
3. Select Import Trusted Cert.
4. Navigate to the location where the Trusted Certificate is stored.
5. Select the Trusted Certificate (.cer or .pem file) to import.
6. Click Open, then restart PHINMS by going to the Configure menu in the PHINMS Console main
menu and selecting Restart PHINMS.
9.5 Import JDBC JAR Files
JDBC Jar Files can be imported directly from the PHINMS 3.2 Console. Complete the following steps to
import the three (3) JDBC Jar files:
1. Open the PHINMS 3.2 Console.
2. Open the Tools dropdown from the main menu.
3. Select Import JDBC Jar files.
4. Locate and select the JDBC driver for your database (see Table 1. JDBC Drivers, Section
2.1, page 11 for recommended JDBC drivers).
5. Click Open.
6. A message will indicate a successful import. Click OK.
7. Restart PHINMS Tomcat Instance located in the Windows services console.
9.6 Change Login Password
PHINMS 3.2 allows the user to change the Console login password. Complete the following steps
to change the login password:
1. Open the PHINMS 3.2 Console.
2. Open the File dropdown from the main menu.
3. Select Change Login Password.
4. Enter the Old Console Password in the appropriate block.
5. Enter the New Console Password and Re-Enter New Console Password in the appropriate blocks.
PHINMS 3.2 Implementation Guide.pdf Page 52 of 58PHINMS 3.2 Implementation Guide
6. Click Change Password.
7. Click OK.
8. Exit PHINMS Console.
9. Restart PHINMS Apache Tomcat service.
9.7 Sender and Receiver Alarms
PHINMS 3.2 contains system alarms for the sender and receiver. This feature allows the user to
acknowledge and enter a resolution for each alarm. Configure the alarm features by completing
the following steps:
1. Open the PHINMS 3.2 Console.
2. Open the Configure dropdown from the main menu.
3. Select Alarms.
4. Check Report Alarms.
Note: When Report Alarms is selected, the alarms can be viewed in the console and
configuration of the Email Alarms feature can be configured.
5. Complete the following fields:
» SMTP Server - required
» User Name
» User Password
» Re-Enter User Password
» From Address – required.
6. Click OK.
9.8 Alarm Resolution
The Alarm Resolution feature allows the user to view error and help messages. It also allows the user
to store the resolution information. The Alarm Resolution feature can be implemented by using the
following steps:
1. Open the PHINMS 3.2 Console.
2. Select Alarms, located at the lower left-hand corner of the console. The Sender Alarms information
will display in the main console window (Figure 9.1).
PHINMS 3.2 Implementation Guide.pdf Page 53 of 58You can also read