GENIUS INSTALLATION & - EUROTRONIC Technology GmbH
←
→
Page content transcription
If your browser does not render page correctly, please read the page content below

GENIUS                                       THE INGENIOUS ENERGY-SAVING
                                             CONTROLLER

                       INSTALLATION &
                       		OPERATION GUIDE

                                 GENIUS LCD100

Eurotronic Technology GmbH
Südweg 1 | 36396 Steinau-Ulmbach | Germany
www.eurotronic.org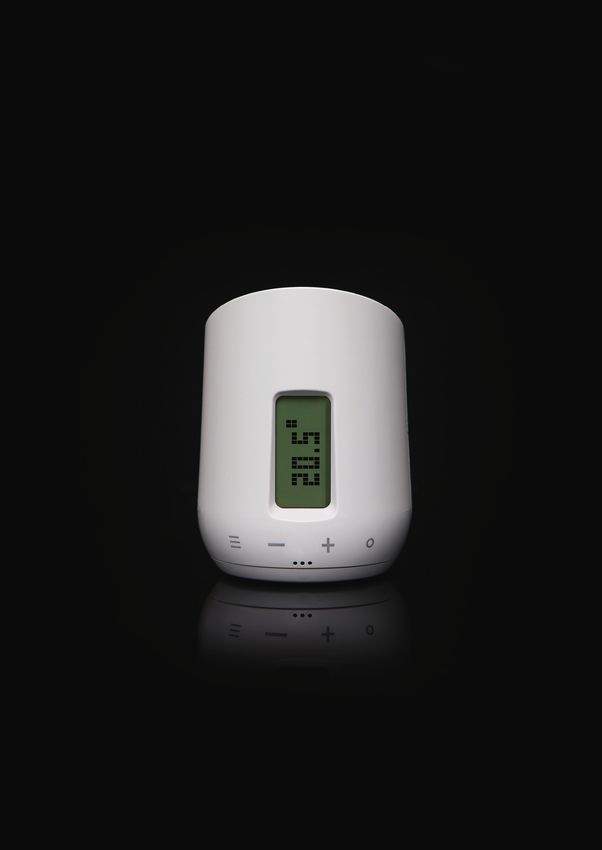
TABLE OF CONTENTS
  GENIUS LCD 100

The following operating instructions will guide you during commissioning and use of your GENIUS LCD 100 and answer
all essential questions. Please read these operating instructions carefully before using your GENIUS LCD 100.

               1.   Scope of Delivery                                                           3
               2.   Warning / Safety                                                            4
               3.   Introduction Genius LCD100                                                  5
               4.   Setup Menu                                                                  6
               5.   Controls and Display Elements                                               7
               6.   Installation and Start-Up                                                   8
               		 6.1 Inserting / Changing batteries                                            8
               		 6.2 Set the Date and Time                                                     8
               		 6.3 Installation at the Radiator                                              9
               		 6.4 Adapters                                                                 10
               		 6.5 Adaptation                                                               11
               		 6.6 Disassembly                                                              11
               7.   Fast-Link-Technology                                                       12
               8.   GENIUS App                                                                 13
               		 8.1 Settings (App)                                                           13
               		 8.2 Temperature (App)                                                        14
               		 8.3 Heating Profile (App)                                                    14
               		 8.4 Holiday Function (App)                                                   15
               		 8.5 Support (App)                                                            15
               9.   Main Functions                                                         16-17
               10. Further functions                                                           18
               11. Cleaning and Storage                                                        18
               12. Error Messages and Help                                                     19
               13. Technical Specifications                                                    20
               14. Support and Contact                                                         20
               15. Environmental Information                                                   21
               16. Warranty                                                                    21

Page 2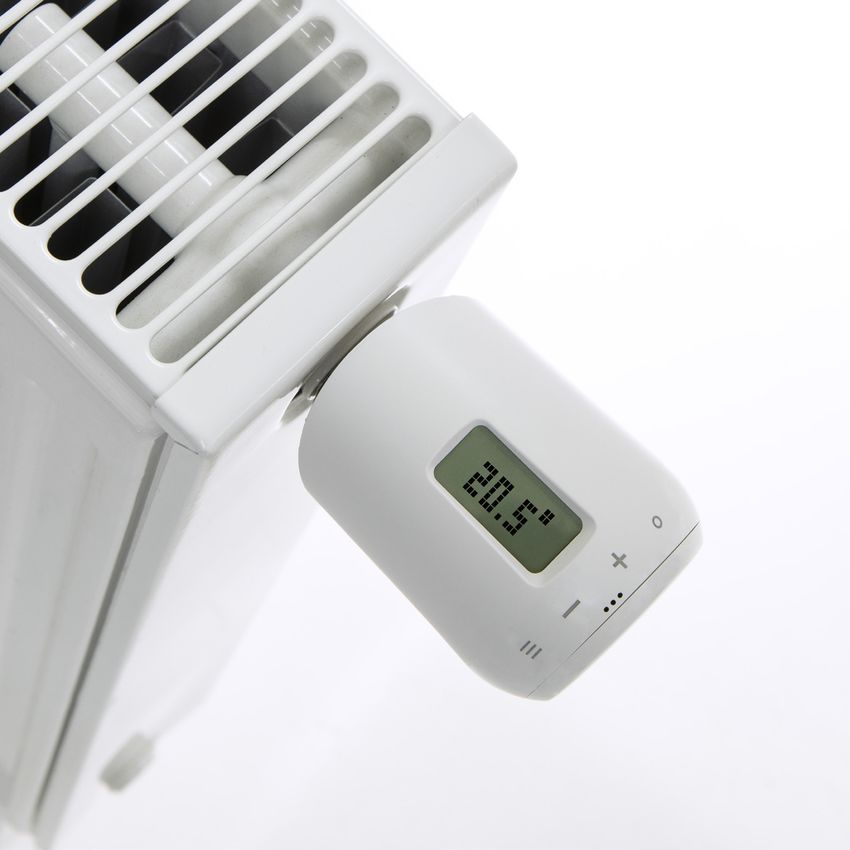
1. SCOPE OF DELIVERY
  GENIUS LCD 100

1x GENIUS LCD100
1x Quick Start Guide
3x Adapters (Danfoss RA / RAV / RAVL)
1x Srew for Adapter
2x Batteries AA LR6

NOTE: The following figures are for illustrative purpose only and can differ from the real product.

                                                                             RAV Pin*

                                                                             RAVL

                                                                             RAV

                                                                             RA

    GENIUS LCD100                                 Screw for Adapter           * When using the RAV adapter, you need the
    energy-saving controller                                                    RAV Pin for the extension of the valve stem.

    2x batteries AA LR6

NOTE: Please check the delivery scope for completeness.

Page 3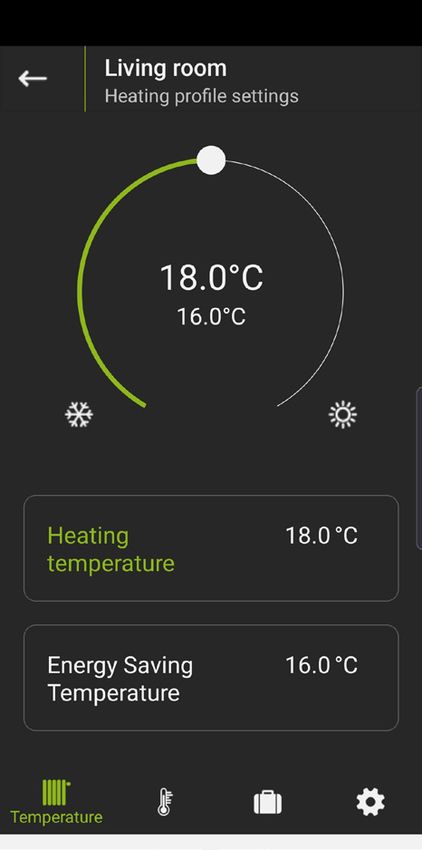
2. WARNING / SAFETY
  GENIUS LCD 100

WARNING! This signal word indicates a hazard with a medium degree of risk which, if not avoided, may result in death
or serious injury.
NOTE! This signal word warns of possible material damage.

SAFETY INSTRUCTIONS
- GENIUS LED100 is designed for use in buildings.
- Operate GENIUS LED100 only as described in the user manual
- GENIUS LED100 should only be put to use in a dry and dust-free place, away from direct sunlight.
- Do not keep using the device when ther is obvious damage.
- GENIUS LED100 may not be rerebuilt, modified or opened

WARNING! RISK OF EXPLOSION!
Improper handling of batteries can lead to explosion.
- Do not heat batteries and do not throw batteries into an open fires.
- Do not place batteries in direct sunlight.
- Protect batteries from excessive heat.
- Do not short-circuit the batteries.
- Never attempt to charge non-rechargeable batteries.
- Never disassemble batteries.
- Do not use new and used batteries together.
- Observe the correct polarity (+/-) when inserting the batteries.
- Before inserting the batteries, clean the batteries and the contacts in the thermostat.

WARNING! RISK OF ACID BURNS!
Leaking battery acid can lead to burns.
- Avoid contact of battery acid with skin, eyes and mucous membranes.
- In case of contact with battery acid, rinse the affected areas immediately with plenty of clear water and consult a
doctor.

WARNING! RISK OF INJURY!
When children play with the thermostat or packaging, they might swallow small parts and suffocate.
- Do not let children play with the thermostat or packaging.
- Keep batteries away from children. Seek medical attention immediately if batteries are swallowed.

WARNING! SENSITIVITY TO LIGHT!
Some people may have epileptic seizures if they are exposed to certain light effects, even if no previous incidents are
known.

Page 4
3. INTRODUCTION GENIUS LCD100
  GENIUS LCD 100

Thank you for purchasing a product from Eurotronic Technology GmbH. This device is designed to adjust the tempera-
ture in your rooms comfortably and completely according to your needs while helping you to reduce your heating costs
effectively.
All development and production are 100% „Made in Germany“, guaranteeing the highest quality and technology stan-
dards. These operating instructions will help you to put your device into operation quickly and easily.

GENIUS LCD 100

GENIUS LCD100 automatically regulates your room temperature according to your specifications and can be configured
directly on the controller or conveniently via your smartphone using Fast-Link.

                                                                  Bis zu
                                                                             Save heating costs through
                                                                  30%        energy-efficient control.

                                                                               Touch control
                                                                               enables perfect control as well as simple
                                                                               and clear operation.

                                                                           Fast-Link technology
                                                                           transmits your heating plan, individu-
                                                                           ally created in the app, contactlessly.

                                                          Simple installation
                                                          without intervention in the heating system.

Page 5
4. SETUP MENU
  GENIUS LCD 100

Press MENU to enter the selection menu. Use the PLUS/MINUS buttons to navigate through the menu.
Press OK/SET to select a menu item and PLUS/MINUS to change the values. Press OK/SET to confirm your entry and
MENU to return to the previous menu level.
In normal mode, you can set the temperature with PLUS/MINUS.

         Press the MENU button to access the menu

         Confirm with OK/SET button

                          HEATING PROFILE ON/OFF: : AUTOMATIC MODE / MANUAL MODE (P. 16)

                          FASTLINK: Start Fast-Link transmission (p. 12)

                          LCD ECONOMY MODE: Switching the display on/off (standby) (p. 16)

                          I NSTALLATION MODE: Mounting/dismounting mode
                          		                   (please only screw or unscrew the energy-saving controller
            +             		                   onto the valve in this mode.) (p. 9)

                          ADAPTATION: Start of a new adaptation for valve adjustment (p. 11)
     Navigate with
     PLUS/MINUS           RESET: Resetting the controller to factory settings (p. 18)

            –             HOLIDAY MODE: A freely selectable temperature can be determined for the period of
                                        absence (p. 16)

                          COMFORT/ ECONOMY TEMPERATURE: Setting the comfort temperature and economy
                          					                         temperature (p. 16)

                          HEATING PROFILE: Creation of heating profiles (p. 17)

                          DATE/TIME: Setting the date and time (p. 8)

                          ROTATE LCD: Turn the display by 180° (p. 18)

                          WINDOW-OPEN-DETECTION: When a window is open, the heating valve is closed to
                                                 save energy (p. 17)

                          SUMMER TIME: On/Off (Summer/winter time Activate/deactivate clock change)

                          TEMPERATURE ADJUSTMENT: Adapt temperature to local conditions (p. 17)

                          SOFTWARE VERSION: Software Version of the device

Page 6
5. CONTROLS AND DISPLAY ELEMENTS
GENIUS LCD 100
Heizprofil aktiv
Spartemperatur
OK/SET = Confirm
PLUS = Increase temperature /
scroll further in menu
MINUS = D
ecrease temperature
scroll back in menu
MENU = Get to the menu
Key lock active
Battery level display
Fast-Link transmission running (animation is displayed)
Fast-Link was successful
Fast-Link was not successful
Window-open-detection active
Anti-freeze protection function active
Adaptation (the animation is displayed until the adaptation is complete)
Holiday function
Page 76. INSTALLATION AND START-UP
GENIUS LCD 100
6.1 INSERTING/CHANGING BATTERIES
1. Remove the battery cover by pulling it upwards at the notch (Fig. 1).
2. Now insert the batteries. Pay attention to the correct polarity! Do not use rechargeable batteries.
3. Place the battery cover back on the GENIUS LCD100 (Fig. 2) by pressing until it clicks.
Fig. 1
Fig
.2
6.2 SET THE DATE AND TIME
During initial commissioning, the year number starts flashing after the batteries have been inserted. The year, date and
time can now be set one after the other.
Set the year with PLUS/MINUS. Confirm with OK/SET.
Set the month with PLUS/MINUS Confirm with OK/SET.
Set the day with PLUS/MINUS Confirm with OK/SET.
Set the hour with PLUS/MINUS Confirm with OK/SET.
Set the minute with PLUS/MINUS Confirm with OK/SET.
An animation appears in the display immediately afterwards. The motor now opens completely to facilitate assembly.
As soon as GENIUS LCD 100 is ready for installation, ADAPTATION appears on the display. Now please do not press any
more buttons! Now mount the energy-saving controller onto the valve.
Page 86.3 INSTALLATION AT THE RADIATOR
GENIUS LCD 100
GENIUS LCD100 can easily be mounted on all known valve bodies (see adapter list at: https://eurotronic.org/service/
faq).
1. Unscrew the old thermostatic head completely, loosen the fastening and pull it off the valve (Fig. 3)
2. If necessary, select a suitable adapter and mount it on the valve (Fig. 4)
3. Screw the thermostat onto the valve or adapter by turning the union nut clockwise (Fig.5).
CAUTION:
Make sure that the device is in the installation mode even if it is installed/removed later. Only assemble/disassemble in
this position.
Fig. 3
Fig. 4
Fig. 5
Page 96.4 ADAPTERS
GENIUS LCD 100
Fig. 6
NOTE:
Remove the connectors of the plastic adapters completely (Fig. 6) before using one of the included adapters! For Dan-
foss RA/RAV, use the enclosed screw and nut.
For the following valves no adapter is required:
Heimeier; Junkers Landys+Gyr; MNG; Honeywell; Braukmann, as these have a thread of M30 x 1,5 mm. The adapters
for Danfoss RAV (pin must be plugged on the valve tappet) Danfoss RA and Danfoss RAVL are included.
For the following valves you need an adapter:
Herz M28 x 1,5 mm; Comap M28 x 1,5 mm; Vaillant 30,5 mm; Oventrop M30 x 1,0 mm; Meges M38 x 1,5 mm; Ondal
M38 x 1,5 mm; Giacomini 22,6 mm; Rossweiner M33 x 2,0 mm; Markaryd M28 x 1,0 mm; Ista M32 x 1,0 mm; Vama
M28 x 1,0 mm; Pettinaroli M28 x 1,5 mm; T+A M28 x 1,5 mm; Gampper 1/2/6; Danfoss RA/RAV/RAVL.
For additional adapters, please visit: http://shop.eurotronic.org
If you are not sure which valve you have, please visit: www.eurotronic.org/produkte/faq/ and check the adapter list.
RAV Pin RAV RA RAVL
Page 106.5 ADAPTATION
GENIUS LCD 100
After the installation has been completed, GENIUS LCD 100 is able to start adapting by holding down OK/SET for ap-
prox. 3 seconds. The device now adapts to the stroke of your valve body. To do this, the valve is now opened and closed
several times to learn the respective end points. The display shows . This process may take some time.
After successful adaptation, the GENIUS LCD 100 switches to normal operation, the display shows the setpoint tempera-
ture.
| If a new adaptation is necessary, e.g. if your radiator does not become cold in the OFF position, please select ADAP-
TATION in the menu. Confirm with OK/SET and start the adaptation again.
| If the error E1 appears in the display, place GENIUS LCD 100 on the radiator valve and then remove the batteries
briefly to perform a reset.
6.6 DISASSEMBLY
To remove GENIUS LCD 100, select MENU INSTALLATION MODE and confirm with OK/SET. Wait briefly
until the motor movement shown by an animation is completed and ADAPTATION appears in the display.
Now turn the union nut counterclockwise and remove the
GENIUS LCD 100 from the valve (Fig. 7).
Fig. 7
Page 117. FAST-LINK-TECHNOLOGY
GENIUS LCD 100
With Fast-Link technology and our app, you can quickly and easily make settings on your controller and create heating
profiles using your smartphone. Using Fast-Link technology, the settings are then transmitted to the controller simply
by holding the smartphone on to it.
To use Fast-Link you need the Eurotronic GENIUS App. Download the free „Eurotronic GENIUS“ application from the
Apple App Store (iOS) or Google Play Store (Android) to your smartphone or tablet.
NOTE: To ensure trouble-free transmission, set the brightness of your display to the highest level. No energy-saving
mode or similar must be activated.
1. Remove the battery cover (Fig.9).
2. Select FASTLINK from the menu and confirm with OK/SET. (The animation shows that the controller is ready for
transmission via Fast-Link.)
3. Start Fast-Link from your smartphone and hold it up to the device as shown in Figure 10.
4. Now you can transmit your settings and heating profiles via Fast-Link. After successful transmission the display shows
If the transmission was not successful, the display shows
NOTE: Both devices, the smartphone and the device, need to be set to
FAST-LINK Mode. GENIUS
Heizprofil
Fig. 8
9
Fig.
0
Fig. 1
Page 128. GENIUS APP
GENIUS LCD 100
Back to the
home page.
Please select
your device:
GENIUS LCD100.
By „wiping further“ you can display the as-
sembly instructions in four steps.
NOTE:
Please remember to transmit the data via Fast-Link as soon as you have made a change in the app.
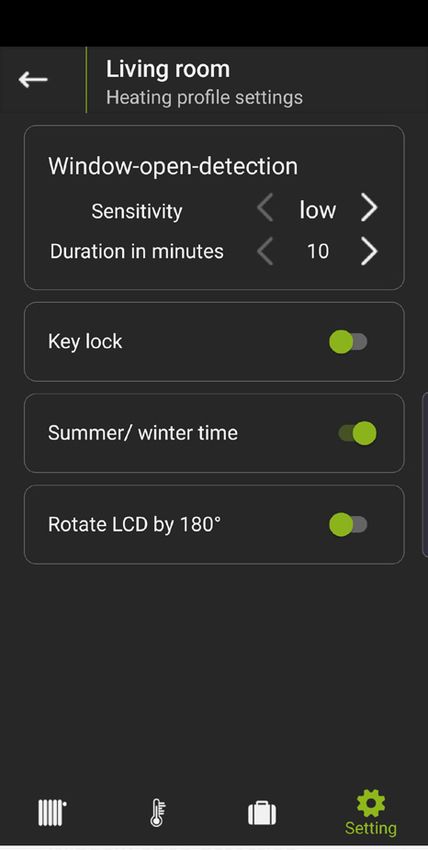
8.1 SETTINGS (APP)
Select the sensitivity of the temperature setting (high,
medium, low).
Set the desired period of time for which the valve is to
remain closed.
By activating the child lock, manual operation on the
controller is blocked. In the display of GENIUS LCD100
the following symbol is shown .
If you activate the „Summer/winter time“ toggle switch, the
time changeover is carried out automatically.
Activate this button to rotate the display by 180°.
In the menu bar you can switch between the menu items:
settings, temperature, heating profile and holiday.
Page 138.2 TEMPERATURE (APP)
GENIUS LCD 100
The temperature
shown above is With the setting wheel you can set your comfort tem-
the one currently perature and economy temperature, which will then
being set. be used for your heating profiles.
Determine the temperature with which the heating is to be carried
out during the heating times. To do this, select the „Comfort tempe-
rature“ button and set the temperature using the setting wheel.
Determine how far the temperature should be lowered during the
saving times. To do this, select the „Economy temperature“ button
and set the temperature using the setting wheel.
In the menu item „Temperature“ you may set your com-
fort and economy temperatures.
NOTE:
Please remember to transmit the data via Fast-Link as soon as you have made a change in the app.
8.3 HEATING PROFILE (APP)
Back to the
overview. After defining the hea-
ting times, confirm with
the check mark.
Here you can create a heating
profile for the whole week.
Here you can create different hea-
ting profiles for the weekdays and
weekends.
Here you can create an individual
heating profile for each day.
You can transmit
After you have made your settings,
simply.
you can transmit your heating profi-
le via Fast-Link. You can transmit your
settings at triple speed.
In the menu item „Heating profile“ you can
create individual heating profiles.
Page 148.4 HOLIDAY FUNCTION (APP)
GENIUS LCD 100
Select the time of your
departure.
Select the time of your
return.
Determine the room tem-
perature for the duration
of your absence.
Select your month
After you have created and day and con-
your holiday profile, Select your month and day and firm with OK.
transmit it via Fast-Link. confirm with OK.
The menu item „Holiday“ allows you to create a
holiday profile for the time of your absence.
NOTE:
Please keep in mind, to transmit the data you have changed in the App via Fast-Link.
8.5 SUPPORT (APP)
Back to the
overview.
If you have any questions, please do
not hesitate to contact us by telephone.
If you have any questions, you can
send us an e-mail.
Leave the checkmark
ticked so that we can
identify your problem
more quickly.
Page 159. MAIN FUNCTIONS GENIUS LCD 100 HEATING PROFILE OFF: In manual mode, GENIUS LCD 100 regulates the temperature to the manually set value. In this mode, the timer func- tion is disabled. HEATING PROFILE ON: In automatic mode, GENIUS LCD 100 switches between two temperatures according to the set time programme: Comfort temperature (factory setting 21°C) and economy temperature (factory setting 16°C). The following symbol appears on the display , indicating that the heating profile is currently active. As soon as the setpoint temperature is changed manually, the symbol flashes . LCD ECONOMY MODE: To extend battery life, the LCD saver mode can be activated. This causes the LCD display to automatically go into standby mode after a short time. To activate this function, press MENU. Press PLUS/MINUS to select the menu item LCD ECONOMY MODE. Confirm with OK/SET. Use PLUS/MINUS to set to on or off. By pressing any button, the display is reactivated. HOLIDAY MODE: For the time of your absence, you can determine a freely selectable temperature. After the set time has elapsed, the programme you have set will automatically run again. To set the holiday mode, press MENU. Press PLUS/MINUS to select the menu item HOLIDAY MODE. Confirm with OK/SET. Select the end of the absence with PLUS/MINUS (date of start of regular heating operation). Enter the time and confirm with OK/SET. When the holiday mode is active, the following symbol appears on the display . To exit the HOLIDAY MODE prematurely, press MENU. COMFORT/ ECONOMY TEMPERATURE: Press MENU to set the comfort and economy temperatures. Press PLUS/MINUS to select the menu item COMFORT/ ECONOMY TEMPERATURE. Confirm with OK/SET. Set the comfort temperature with PLUS/MINUS. Confirm with OK/SET. Set the economy temperature with PLUS/MINUS. Confirm with OK/SET. Range OFF: 8°C, anti-freeze protection function active Range ON: Valve fully open, control function switched off. | Advice: You achieve maximum energy savings at an economy temperature that is approx. 5°C below the comfort tem- perature. Page 16
9. MAIN FUNCTIONS
  GENIUS LCD 100

HEATING PROFILE:
The heating and saving times can be defined by the freely adjustable time programme. GENIUS LCD 100 has the follo-
wing factory default setting:
Heating time: Heating to comfort temperature (factory setting): 1st heating time at 07:00 am)
Saving time: Reduction to economy temperature (factory setting: 1st saving time at 10:00 pm)

Create heating plans - define heating and saving times
With GENIUS LCD 100 you can set 4 heating and 4 saving times per day - for each day individually or for several days
in a block.

Individual days:
DAY1 for Monday, DAY2 for Tuesday, etc. appears in the display.
Select the day/block with PLUS/MINUS. 		Confirm with OK/SET.
Set the start of the 1st heating time with PLUS/MINUS. Confirm with OK/SET.
Set the start of the 1st saving time with PLUS/MINUS.     Confirm with OK/SET.

Now you may enter a 2nd, 3rd and 4th heating/saving time.
|	If you do not want to set another heating/saving time, confirm the „----“ display with OK/SET. The next day to
       be programmed appears in the display.
|	If you do not want to set another day, exit the menu with MENU.
|	It is also possible to overwrite individual days with deviating times within blocks.

Block formation:
T1 – 5 = same programme Monday to Friday
T1 – 6 = same programme Monday to Saturday
T1 – 7 = same programme Monday to Sunday
|	If days are not programmed, the factory settings remain active.
        To set and save an individual programme, press MENU. Use PLUS/MINUS to select the HEATING PROFILE
        menu item.

WINDOW-OPEN-DETECTION:
The GENIUS LCD 100 automatically closes the heating valve to save energy if you open a window and the temperature
thereby drops significantly. If the window-open-detection is active,    appears in the display. After the time you have
specified (e.g. 10 minutes), GENIUS LCD 100 resumes normal operation.
To configure the settings for the window-open-detection, select the menu item WINDOW-OPEN-DETECTION in the
MENU. Confirm with OK/SET. First, select the sensitivity with PLUS/MINUS (HIGH = high sensitivity (default), MID = me-
dium sensitivity, LOW = low sensitivity). Confirm with OK/SET. Then select the duration (e.g. 10 min (factory setting) -
60 min) for which the valve is to remain closed. Confirm with OK/SET. After the time has elapsed, the controller returns
to normal mode.

TEMPERATURE ADJUSTMENT:
If the perceived temperature deviates from the set temperature, you can carry out a temperature adjustment. To do this,
press MENU and select the menu item TEMPERATURE ADJUSTMENT with PLUS/MINUS. Confirm with OK/SET. The
degree setting 0.0° flashes in the display. Now set the desired adjustment (from -5 to 5°C) of the temperature using
PLUS/MINUS. Confirm your entry with OK/SET. The temperature indication in the display does not change!

Page 17
10. FURTHER FUNCTIONS GENIUS LCD 100 Align the display: Depending on the position of your radiator valve, it may be necessary to rotate the display of your controller by 180°. To do this, press MENU and select ROTATE LCD to rotate the display accordingly. OK? appears in the display, which can now be rotated and adjusted with PLUS/MINUS. When the desired orientation is reached, confirm with OK/SET. Key lock: To prevent unauthorised operation of your controller, you can lock the GENIUS LCD 100. Press and hold the OK/SET and MENU buttons simultaneously for approx. 3 seconds until the symbol appears on the display. If you press this combination again, the symbol disappears and you unlock it again. Anti-freeze and anti-scale function: The anti-freeze and anti-scale functions are automatically active. Anti-freeze function: If the temperature drops below 8°C, GENIUS LED 100 opens the valve until the temperature rises above 8°C again. This prevents the radiators from freezing. Anti-scale function: To prevent the radiator valves from scaling, GENIUS LED 100 regularly carries out a scaling protec- tion run. Manual operation: Use PLUS/MINUS to manually change the room temperature at any time. In AUTO mode, this manually set temperature remains until the next setting point. Then the GENIUS LCD 100 switches back to the heating programme set. Resetting: To reset the radiator controller to the factory settings, press MENU. Press PLUS/MINUS to select the menu item RESET. Confirm with OK/SET. A flashing „OK?“ appears in the display. Confirm with OK/SET. The GENIUS LCD 100 is now back in the factory setting. Now proceed as for the initial commissioning. 11. CLEANING AND STORAGE RISK OF DAMAGE! Improper handling of the thermostat can lead to damage. • Do not immerse the thermostat in water or other liquids. • Do not use aggressive cleaning agents, brushes with metal or nylon bristles or sharp or metallic cleaning objects such as knives, hard spatulas and the like. These can damage the surface. • Clean the thermostat with a soft, dry cloth. Do not exert pressure on the display. Switch off the device and remove the batteries if you will not be using the device for a long time. Store the device in a dry, dust-free place. Page 18
12. ERROR MESSAGES AND HELP
 GENIUS LCD 100

 Problem                             Ursache                                  Lösung
                                     Batteries almost exhausted.              Replace the batteries.

 Radiator does not warm up.          Boiler water temperature OK? Valve       Correct boiler water temperature, re-
                                     does not open after the summer           move GENIUS LCD100. Move the valve
                                     heating break - is it scaled?            tappet back and forth several times by
                                                                              hand/tool.

 Radiator does not get cold.         Valve does not close completely.         Perform new adaptation (see „Adapta-
                                     The closing point of your valve seal     tion“) Move the valve tappet several times
                                     may have shifted.                        by hand - adaptation may not be possible
                                                                              because the valve may have scaled or the
                                                                              seal no longer fulfils its function.

 Thrust piece falls out. (This can   An endless thread can cause the          Insert thrust piece. Press the OK-button
 also cause a E1 error)              thrust piece located on the under-       or perform adaptation of the device by
                                     side to fall out if the controller has   removing and reinserting the batte-
                                     not been applied to the valve.           ries. The endless thread now turns and
                                                                              tightens the thrust piece again. Attach to
                                                                              radiator and perform adaptation again.

 E1-E3                               By pressing any button, the error message in the display is deleted and the
                                     adaptation restarts.
 E1                                  No adaptation possible. GENIUS           Device correctly mounted on radiator?
                                     LCD 100 is not mounted on the            Mount the GENIUS LCD 100 .
                                     radiator.
 E2                                  Valve stroke too short or battery        Open and close the valve tappet several
                                     power too low.                           times by hand or insert new batteries.

 E3                                  No valve movement possible.              Make sure that the valve tappet can
                                                                              move freely.
                                     Fast-Link transmission not success-      Increase the brightness of your smart-
                                     ful.                                     phone display to the highest level. Hold
                                                                              your smartphone to the controller as
                                                                              soon as you have selected Fast-Link
                                                                              transmission on your smartphone and
                                                                              your controller is ready for transmission.

Page 19
13. TECHNICAL SPECIFICATIONS
GENIUS LCD 100
Name of device GENIUS LCD 100
EAN 4260012711349
Article Number 700069
Supply Voltage 2 x 1,5V LR6/Mignon/AA
Connection M30 x 1,5mm
Method of operation Type 1
Dimensions (W x H x D) 56 x 68 x 89 mm
Weight 149,7 g (incl. batteries)
Degree of protection IP20
Degree of pollution 2
Technical modifications are subject to change. All descriptions for compatibility are without engagement.
14. SUPPORT AND CONTACT
For technical support for the Eurotronic products, please contact Eurotronic via e-mail or telephone:
Customer Service: Eurotronic Technology GmbH
Südweg 1
36396 Steinau-Ulmbach
Germany
Telefon: +49 (0) 6667 91847- 0
Email: info@eurotronic.org
Page 2015. ENVIRONMENTAL INFORMATION
GENIUS LCD 100
From the date of transposition of the European Directives 2012/19/EU into national law, the following shall apply:
Electrical and electronic devices as well as batteries must not be disposed of with household waste.
The consumer is legally obliged to return electrical and electronic equipment and batteries at the end of their
service life to the public collection points set up for this purpose or to the point of sale. Details are regulated by
the respective national law.
Batteries and rechargeable batteries must not be disposed of with household waste!
As a consumer, you are legally obliged to dispose of all batteries and rechargeable batteries, no matter whether they
contain harmful substances* or not, at a collection point in your municipality/city district or in the respective stores, so
that they can be disposed of in an environmentally friendly manner.
*labelled with: Cd = cadmium, Hg = mercury, Pb = lead
Dispose of Packaging:
®
Dispose of the packaging sorted by type. Add paperboard and cardboard to the waste paper, foils to the
recyclables collection. Dispose of the packaging sorted by type. Add paperboard and cardboard to the waste
paper, foils to the recyclables collection. The symbols on the product, the instruction manual or the packaging
refer to these regulations. By recycling, material utilisation or other forms of utilisation of old devices/batteries, you
make an important contribution to the protection of our environment.
Declaration of Conformity:
Eurotronic Technology GmbH hereby declares that the GENIUS LED 100 radiator thermostat complies with all
applicable European Economic Area regulations of Directive 2014/53/EU. The full text of the EU Declaration of
Conformity is available at the following Internet address: https://eurotronic.org/service/downloads.
The Apple Logo, iPad und iPhone are brands of Apple Inc., which are registered in the USA and other countries. App
Store is a service brand of of Apple Inc. Google Play, Android and other brands are brands of Google Inc.
16. WARRANTY
The two-year warranty begins on the day of purchase. Please keep the receipt as evidence of purchase in the future.
During the guarantee period, defective radiator thermostats may be sent to the service address below. Please ensure
sufficient postage is paid.
A new or repaired device will then be sent to you free of charge. There is no new warranty period stargting when repai-
ring or replacing the device. Please note that we only grant warranty on the function of the device. We will not grant
warranty for the interaction between the thermostat and the bottom part of the valve. The technical data is only valid
for the use of the following valves: Heimeier, Junkers Landys+Gyr, MNG, Honeywell Braukmann (measure of thread
M30x1,5), Oventrop (M30x1,5) Danfoss RA, RAV und RAVL.
Please see the combinations of the devices on our website (www.eurotronic.org/service/faq/)
Following expiry of the warranty, you may still send the defective device to the address below for repairs. Please ensure
sufficient postage is paid. Repairs carried out after the guarantee are subject to a charce. Your legel rights are not affec-
ted by this guarantee.
Page 21Eurotronic Technology GmbH
Südweg 1 | 36396 Steinau-Ulmbach | Germany
www.eurotronic.org
02/2021You can also read