Can I Create Animations Using the Movie Timeline Tool?
←
→
Page content transcription
If your browser does not render page correctly, please read the page content below
Can I Create Animations Using the Movie Timeline
Tool?

In this exercise you will record a movie of the 3D Graphics window in the scenario to use in a
PowerPoint presentation. Upon completion you will be able to:

•   Set application level properties to prepare the STK software for movie making.
•   Edit and optimize a previously created scenario for movie making.
•   Use a previously created and installed UI Plugin to record a movie in STK.

Can I Create Animations Using the Movie Timeline Tool?

                            Problem Statement
                            After the Hayman forest fire of 2002, you were asked to analyze methods of
                            combating forest fires in the Colorado area. Your analysis has led you to the
                            conclusion that adding a slurry bomber, an aircraft that can make aerial water drops
                            on the burn area, would assist crews in the field and greatly enhance the timeliness
                            and effectiveness of your firefighting efforts.

                            You have an STK scenario that models the firefighting system that you envision.
                            Using this scenario, you’d like to create a visually dynamic presentation which
                            includes a technical animation that demonstrates the timing and effectiveness of the
                            modified system. In this animation, you would like to highlight the action of the
                            slurry bomber.

                            Break it Down
                            Take a look at what you know:

                            • You want to create a technical animation that depicts the action of the water drop.
                            • You need the animations to be fairly short, so that size won’t cause delays when
                              launching.
                            • You have a customized Movie Timeline Tool available for your use.
                            • You would like to show the rear door of the aircraft opening in preparation for a
                              water drop and closing afterward.
                            • You’d like a visual representation of the actual water release from the rear hatch of
                              the aircraft.
                            • You want to show the aircraft’s propeller movement as well.

                            Solution
                            Use the existing REMSAT scenario and analysis to plan a technical animation that
                            allows you to visualize the proposed modification to the REMSAT fire fighting
                            system.

                            Open a Previously Created Scenario
                            A previously developed scenario that details the action of the aerial water drops and
                            is optimized for movie making is available to you. Use this model as your base.

                            1. Ensure that the Welcome dialog is visible in the STK Workspace.
                            2. Click Open a Scenario.
                            3. Open the REMSAT_TimelineModels scenario that you created earlier.

2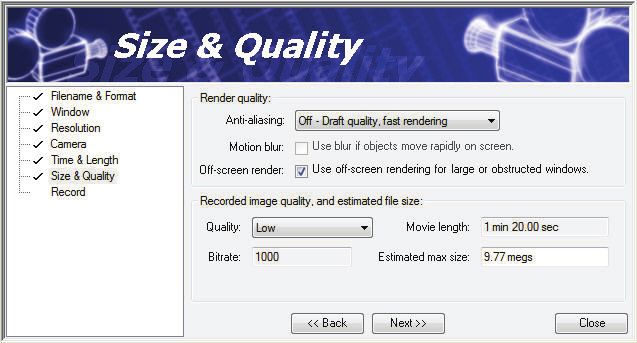
Can I Create Animations Using the Movie Timeline Tool?

     If you do not have the REMSAT_TimelineModels scenario, you can open a VDF
     version of the completed scenario via the STK Data Federate (SDF). If you do not
     have internet access or you cannot access the SDF, browse to the location of the
     starter scenario provided for this exercise (typically,
     C:\Training\STK\REMSAT\Scenarios\).

Before you make any changes to the scenario, save it with a different name to
preserve the integrity of the previously developed analysis.

4. Save the new scenario in your student area (C:\Documents and Settings\\My
   Documents\STK 10\). In doing so, create a unique folder and rename the new folder
   and the scenario file (*.sc) REMSAT_TimelineAction.

Camera Control Tool
Use the Camera Control tool to define the path that the virtual camera takes during a
technical animation. The Camera Control tool provides:

• Keyframes properties - Use to add, modify, copy, and delete camera paths. Many of the
  functions on this page are duplicated on the Camera Control toolbar.
• 3D Window properties - Use to define properties for a particular camera path in a
  specific 3D Graphics window.
• Render Properties - Use to control how the camera paths are drawn in the 3D Graphics
  window.
• Camera Control toolbar - Use this toolbar to interact with camera paths.

We’ll discuss the different properties in more detail as you use them.

     The Camera Control tool requires that the Selection option on the 3D Graphics
     Annotation property page be Enabled.

1.   Enable the 3D Camera Control toolbar if it is not visible in the STK Workspace.
2.   Open the Camera Control tool ( ).
3.   Ensure that the Camera Control tool ( ) window is in Floating mode.
4.   Arrange the STK Workspace so that the Camera Control tool ( ) and the 3D
     Graphics window are both clearly visible in the STK Workspace.

Camera Paths
The REMSAT scenario that you opened has already been prepared for filming. The
next step in the process is to create the path that the virtual camera will take
throughout the movie. To create a camera path, a series of keyframes are stored at

                                                                                                              3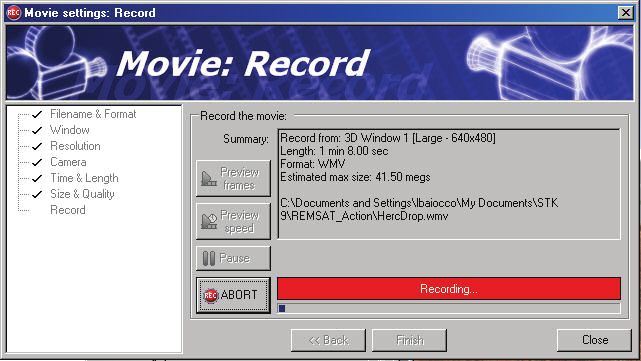
Can I Create Animations Using the Movie Timeline Tool?

                            intervals along the desired path. The Camera Control tool will use these keyframes to
                            build a smooth line using a splining algorithm. When you create a viewpath, you
                            would place these keyframes so that the desired regions of interest are in the camera’s
                            view at the appropriate times.

                            A sequence of key frames joined by this splined path is called a view path. During
                            animation, you have the option of watching the camera follow the path. STK allows
                            you to alter the splining algorithm, but for your purposes, the default is a great
                            choice. The default choice guarantees that the camera will pass through each and
                            every keyframe.

                            View paths, therefore, tend to transition smoothly from key frame to key frame.
                            Using the Soft VTR capability, each frame generated while animating along a view
                            path can be written to a file. These files can then be used to create movies or videos.
                            Here are a few rules of thumb for creating a simple Camera Control path.

                            Tips
                            Here are some tips that will help you create better camera paths:

                            • In general, fewer key frames result in a smoother camera path and you probably
                              want these keyframes spaced evenly in time.
                            • To create a smooth camera path that travels completely around an object, use at
                              least five keyframes.
                            • To determine the number of frames needed to achieve the desired length of the
                              movie, you need to calculate the amount of elapsed time between keyframes. To
                              do this, multiply the running time of the movie by 30. Since the standard frame
                              rate is 30 frames per second, this calculation provides the number of frames you
                              need to produce to achieve the desired running time.
                            • Once you have the number of frames needed, divide the overall animation time
                              (in scenario epoch seconds) by the number of frames needed. This gives you the
                              time interval (in seconds per frame) needed to make your scenario produce the
                              requisite number of frames. This number is used in the STK basic properties
                              panel before you start recording frames.
                            • Try to make the keyframes at points where you really want the camera to show the
                              very best visuals that you can arrange. In each scene that you record, there should
                              be a single “money shot” that depicts the essence of what you wish to convey.
                            • Once you have mapped a camera path or series of camera paths to use for
                              animation purposes, make sure the window is the correct size before recording.
                            • You can change the view in the 3D window at any time to any keyframe by
                              double-clicking the keyframe in the 3D window and then clicking the Add Keyframe
                              button ( )button. The viewer position, direction, and time are changed to that of
                              the selected keyframe.

4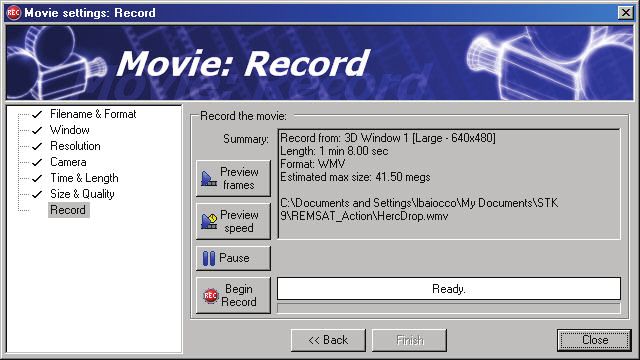
Can I Create Animations Using the Movie Timeline Tool?
• Don’t try to do anything too quickly. You want to create a smooth, gliding path
through the scene. Don’t attempt to turn suddenly or change speed rapidly.
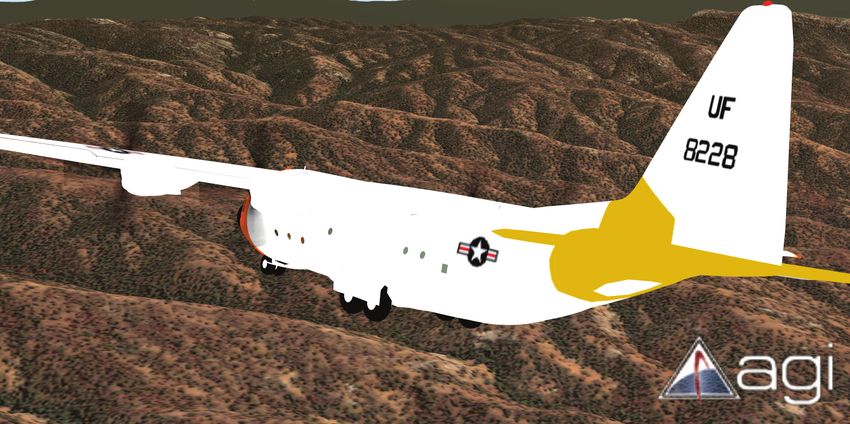
Follow Hercules
Let’s make a camera path that follows Hercules as it moves towards the burn area and
makes a slurry drop on the fire.
Hercules Camera Path
The video that you will show in your presentation will be used to demonstrate
Hercules’ role in the firefighting effort. The best way to show this is to have the virtual
camera follow Hercules as it enters the drop zone and after it turns out to return to
Peterson.
Perform a Walkthrough
The next step in the process is to perform a walkthough to ensure that nothing
unexpected that you don’t want in the film shows up during animation.
1. Bring the 3D Graphics window to the front.
2. Reposition the view so that Hercules is the focal point in the 3D Graphics window if
it is not already.
3. Play ( ) the animation.
FIGURE 1. 3D View: Hercules at water drop
• Does your scenario start, run properly, and stop at the appropriate points?
• Are there any unnecessary annotations or obstructions in your 3D Graphics
window?
5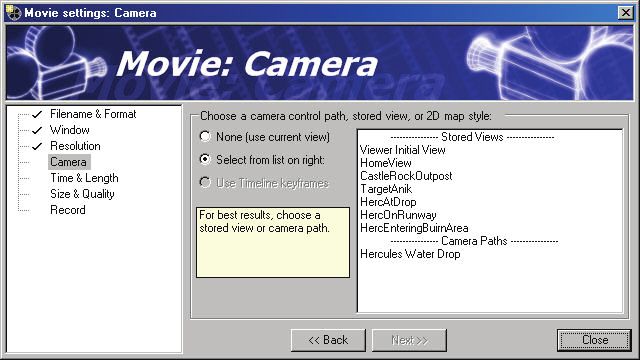
Can I Create Animations Using the Movie Timeline Tool?

                            4. When you finish, Reset ( ) the animation.

                            Create a Camera Path
                            Now that you have prepared your 3D animation, you need to make a custom camera
                            path, or a custom view. Camera paths are comprised of key frames or the placement
                            of the “camera” at a particular time. Let’s make our camera path now.

                            Try to make the key frames at points where you really want the camera to show the
                            very best visuals that you can arrange. It is good to try to capture some dramatic
                            lighting, or to show a feature of the Earth in the background. In your case, you’d like
                            to see the aircraft make a water drop and land. If you record a key frame that includes
                            such elements, they will also show up in the camera path that is created from that key
                            frame.

                            1.   Select the Keyframes page.
                            2.   Click New. A new camera path segment will be added to the table.
                            3.   Rename the camera path Water Drop.
                            4.   Scroll down to the Keyframes area.
                            5.   Click Add.

                            Each time you snap a frame, STK advances the animation at the rate of the designated
                            time step.

                            6. Use the mouse to manipulate the view in the 3D Graphics window until you get a
                               good view of Hercules heading to the burn area.
                            7. Click Add in the Keyframes area. A second keyframe will be added to your camera
                               path.

                            Keyframes show up in the table in the keyframes area with an automatically assigned
                            sequential identifier, the time, and the field of view for that “shot”. You may also see
                            the camera path in the 3D window. The red line is the camera path. The white circles
                            are the keyframes you have recorded. The yellow circles are connected to these balls
                            are tensioners. They modify the curves that the camera path takes.

                            Add More Keyframes

                            1. Adjust the 3D Graphics window as necessary to find a favorable view.
                            2. Click the Add Keyframe button ( ) on the 3D Camera Control toolbar.

                                 If the Camera Control tool is open when you use the Add Keyframes button, the
                                 added keyframes don’t appear in the Keyframes table until you click Apply or OK in
                                 the Camera Control tool.

6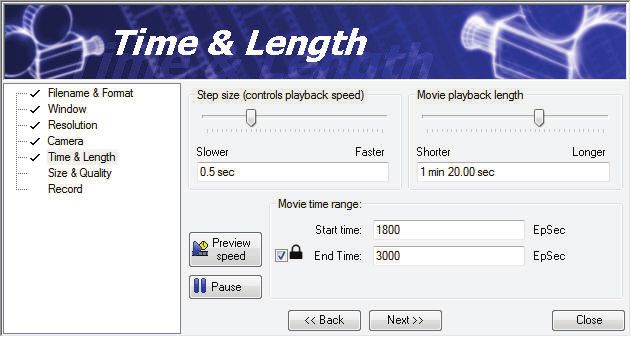
Can I Create Animations Using the Movie Timeline Tool?

Add as many keyframes as you like. Don’t be afraid to get creative. You may want to
increase the time step as well to add more time in between each keyframe. We
recommend 120 seconds or higher. Each time you pause to set the 3D Graphics
window take a good look at the action you are viewing. If you think you want to see
more or less in a particular shot, go back and change the field of view.

Review the Recording
When you finish, go back to your 3D window to see what you’ve set up.

1. Bring the 3D Graphics window to the front.
2. Reset ( ) the animation.
3. Click the Follow Path While Animating ( ) button.

This will force the camera to ride along the view path you created. To stop riding the
camera path, click the Follow Path While Animating ( ) button or move the camera in the
3D Graphics window.

    You may need to slow down the time step.

4. Play ( ) the animation.
5. Watch as move through your scenario along the new camera path.
• Do you have a smooth path?
• Did you include all of the events that you want to highlight in your
   presentation?

Make Some Adjustments if Necessary

1. If you notice areas where there are problems, pause ( ) the animation.
2. Click the Free Edit Mode ( ) button.
3. Mouse around in your 3D Graphics window until you see your new camera path.

When in free edit mode, the camera path includes control points that can be used to
adjust the curves and tension of the path.

4. Use your mouse to click and drag the edit points along the path until you’re
   happy with the camera path.

You can also alter a keyframe by double-clicking on the entry to bring up the
keyframe table. In the keyframe table, you can move your camera location and add
the new location to the keyframe table. Adding a new camera location will overwrite
the recorded keyframe, which will warp the view path curve.

                                                                                                            7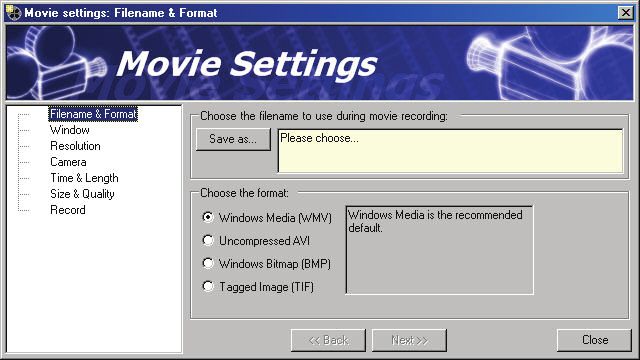
Can I Create Animations Using the Movie Timeline Tool?

                            Take a look at Table 1. “Colors Explained” for an explanation on what each color
                            represents.
                                                            TABLE 1. Colors Explained
                             Option                                                             Value
                             Camera Path                                                        Red
                             Keyframes                                                          White
                             Keyframe Tension Adjusters                                         Yellow
                             Current Camera Position                                            Blue

                            Check It Out!

                            1.   Bring the 3D Graphics window to the front.
                            2.   Reset ( ) the animation.
                            3.   Click the Follow Path While Animating ( ) button.
                            4.   Play ( ) the animation.
                            5.   Watch as move through your scenario along the new camera path.
                            • Do you have a smooth path.
                            • Has editing the keyframes made a visible impact?

                            Clean Up
                            When you’re happy with your camera path, you can remove the path lines and
                            control points from the 3D Graphics window.

                            1.   Open the Camera Control tool ( ), if it is not already open.
                            2.   Select the Keyframe page.
                            3.   Disable the Show option for Hercules Water Drop.
                            4.   Select the Render Properties page.
                            5.   Set the following:
                                                           TABLE 2. Render properties
                             Option                            State
                             Show Keyframes                    Off
                             Show Control Points               Off
                             Show Camera Object                Off

                            6. Click OK.

                            Now that you’ve created an camera path that follows Hercules as it enters the burn area
                            and makes his drop, you can use that camera path to create an animation using the
                            Movie Timeline tool (MTL).

8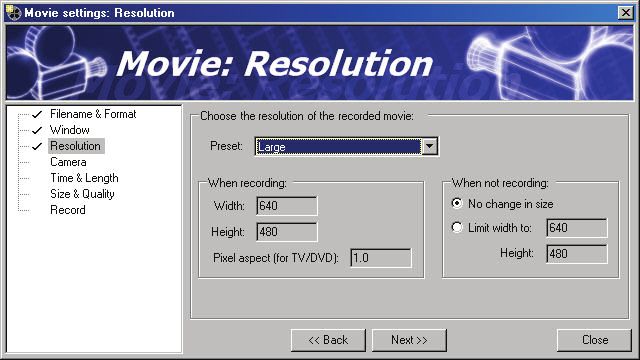
Can I Create Animations Using the Movie Timeline Tool?

Movie Timeline Controls
Previously, you used the MTL tool to articulate model. This time you will use it to
record a movie. Let’s take a closer look at the Movie Timeline controls and the function
of each.

                              FIGURE 2. Movie Timeline toolbar

                               TABLE 3. Movie TImeline Buttons
 Button           Description
                  Open the Movie Timeline

                  Record from the Movie Timeline

                  Play the Movie Timeline showing each frame

                  Play the Movie Timeline emulating playback speed

                  Import a Move Timeline

                  Export the Movie Timeline

                  Set DateFormat to Gregorian UTC
                  Set DateFormat to Epoch Seconds

Recording Control
When you record a movie, it will always record in Normal mode, capturing each frame
regardless of computer performance, and regardless of the last preview mode used.
You can expect it to play back at a fixed rate on any system capable of properly
playing the movie.

When you click the Record button ( ), either from the Timeline window or from the
toolbar, the Movie Recording wizard will launch. From the seven pages that comprise this
wizard, you can set and check any and all of the options that affect the recording of
your movie. We’ll discuss those properties in more detail later. First, let’s take a
moment to understand some of the other controls available.

Preview Controls
There are two ways to preview the movie before recording--Play the Movie Timeline
showing each frame ( ) and Play the Movie Timeline emulating playback speed ( ). For simple
scenarios, you may not notice a difference between the two. If the two types of
previews differ, the final movie should combine the content from one preview with
the playback speed of the other preview.

                                                                                                                  9
Can I Create Animations Using the Movie Timeline Tool?
Play All Frames
The Play the Movie Timeline showing each frame button ( ) plays the movie using Normal
animation mode. Normal animation mode shows each frame of animation as fast as
your computer can render it. The rate you see here may be faster or slower than the
playback rate of a recorded movie, depending on the performance of your
computer's graphics card. This mode is good for previewing frame-dependent effects
like pulsing sensors.
Emulate Playback
The Play the Movie Timeline emulating playback speed button ( ) uses a special animation
mode called XRealTime to emulate the proper playback rate of a recorded movie. If
your graphics card performance is low, frames of animation may be dropped from
this preview, to keep up the playback rate. If your graphics card performance is high,
it is possible that additional frames will be added, to maintain the desired rate. This
preview mode is the preferred mode when you're trying to get an idea of how fast the
action will unfold for viewers watching your movie.
Import and Export
Most users will never need to click the Import ( ) or Export ( ) buttons. These
buttons are for people who need to migrate a Movie Timeline from one scenario to
another, or are trying to manage multiple versions of a timeline for one scenario.
They allow you to save and load the state of the timeline independently from the STK
scenario. Timelines are saved in a MTLINE (*.mtline) file format.
Unit Controls
The times displayed on the timeline are shown using DateFormat units, as set on the
Units page of the scenario Basic properties (Basic - Units). If you change the DateFormat
unit setting in STK, you can use the Reset button to apply the change to the timeline.
The two buttons on the toolbar can be used as shortcuts, to switch the DateFormat
units to one of the two types commonly used in STK movie making: Gregorian UTC
and Epoch Seconds. When you click either of these buttons, you immediately set the
displayed units both on the timeline and in the STK user interface.
Open the Movie Timeline Tool
The Movie Timeline controls should already be opened, and the Movie Timeline should be
visible in the STK Workspace.
1. Locate the Movie Timeline tool in the STK Workspace.
2. Click the Record from the Movie Timeline button ( ).
10Can I Create Animations Using the Movie Timeline Tool?
Movie Settings
When you click the Record button ( ), the Movie Recording wizard will launch. From the
seven pages that comprise this wizard, you can set and check any and all of the
options that affect the recording of your movie. The the Movie Recording wizard allows
you to set and confirm both recording and output files as well as set options for how
the tool will interact with STK. Let’s work our way through the movie properties
using the Movie Recording wizard.
Filename & Format
1. The first page in the Movie Recording wizard is the Filename & Format page where you
can specify just that. You will be incorporating the resultant movie into a
PowerPoint presentation that will be viewed via a feed from your laptop to a
projector. Ensure that the Filename & Format page is selected.
FIGURE 3. Movie Filename and format
2. Click the Save As... button.
3. Browse to the scenario directory
(C:\My Documents\STK 10\REMSAT_TimelineAction\).
4. Name the movie WaterDrop.wmv.
5. Ensure the Format is set to Windows Media (WMV).
6. Click Next to advance you to the Window page.
11Can I Create Animations Using the Movie Timeline Tool?
Window
This is the same Window page that you used to select a window when you launched
the Movie Timeline tool.
1. Ensure the window is still 1 - 3D Graphics 1 - Earth.
2. Click Next to advance to the Resolution page.
3. Ensure that the 3D Graphics window is not maximized.
Resolution
The Resolution page provides configured presets for screen resolution and related
settings. You can select one of the preconfigured resolution options or select Custom
and define your own.
Several presets area available for selection when using the Movie Timelne tool. Each
Preset option available on the Resolution page plugs in a set of predefined properties that
get plugged into the Window Properties for the selected 3D Graphics window as described
in the table following. Many movie formats require these numbers to be an integer
multiple of 16. It's best to pick one of the presets from the pull-down menu if you're
not sure. These are the most commonly used formats. These formats will play on just
about anything that has a fast enough graphics card to handle it.
TABLE 4. Resolution Preset options
Preset Window Properties
Use the When recording and When not recording options on the
Custom
page to define the window size.
Small Sets the window size to 320 X 240 when recording
Medium Sets the window size to 480 X 360 when recording
Large Sets the window size to 640 X 480 when recording
HDTV - 720p Sets the window size to 1280 X 740 when recording
HDTV - 1080i/1080p Sets the window size to 1920 X 1080 when recording
By default, the No change in size option is selected no matter which Preset option is
selected. You can change that option if you want the window to become larger or
smaller when you are not recording. Pixel setting will be defined appropriately based
on your selections.
The size of your window is important if you plan to use compression to store your
video. To ensure the best quality playback by most compression schemes make sure
your window dimensions are divisible by sixteen (16).
You will be creating a PowerPoint presentation that will be projected onto a screen via
your laptop. Since compression will not be an issue in this case, lets just check the
12Can I Create Animations Using the Movie Timeline Tool?
dimensions of the 3D Graphics window and talk about how you might adjust them if
you were making a video tape or DVD for distribution.
1. Work through these questions with your instructor to determine the appropriate
window size.
• What medium did you select?
• How will your movie be viewed?
• How will your movie be distributed?
• Will you need to compress your output?
• If so, are your window dimensions divisible by sixteen (16)?
2. Set the Preset to Large. This will automatically pick a good size for your 3D Graphics
window.
FIGURE 4. Movie Resolution
If you see error messages during this stage, check to make sure that your graphics
window is not minimized, maximized, or docked. On most systems, the graphics
window is prevented from growing larger than the desktop. If the window does not
have room to resize itself appropriately, it will return an error and resize itself as best
it can. For example, if you ask for HDTV 1080p while using a 1280x1024 monitor,
you may get an error message, because the window would be too big to fit on the
screen (This is an intentional limitation within Microsoft Windows, to protect general
13Can I Create Animations Using the Movie Timeline Tool?
usability of the system). If this happens, pick a smaller size, or use a higher resolution
screen.
3. Click Next to advance to the Camera page.
STK can render a movie that is larger than your screen size by enabling the Support
Off Screen Rendering option. This will do the rendering so that it is not limited to
the size of your desktop. But remember, your desktop will not be able to play it back.
Camera
The Movie Timeline can make animations that switch between multiple 3D camera
views. There are two main types of 3D camera views supported--Stored Views and
Camera Paths.
FIGURE 5. Movie Camera
After setting up one or more camera views, you may assign them to become active at
specific times during your movie.
TABLE 5. Camera viewing options
Camera View Description
Stored Views (3D) Stored views are simple to create, and allow the camera to sit in place and watch the action unfold.
14Can I Create Animations Using the Movie Timeline Tool?
TABLE 5. Camera viewing options
Camera View Description
A camera path adds substantial user interest and visual appeal to an animated movie by displaying different
Camera Paths (3D)
viewpoints which change over the course of a scenario as it is animated.
These are similar to Stored Views in 3D, in that they define a viewing region-of-interest, but they also
Map Styles (2D) include information about which 2D graphics options are turned on. Currently it is not possible to change
Map Styles in the middle of a movie.
We have a nice 3D representation of the Hercules aircraft. Let’s stick to 3D views for
this movie. A stored view, named HercAtDrop, was saved for you with the scenario.
You also created a camera path in the first part of this exercise. Feel free to select
either here.
1. Select None for the camera path option.
2. Click Next to advance to the Time & Length page.
Time & Length
This is the same Time & Length page that appeared in the abbreviated version of the
Movie Recording wizard that launched when you opened the Movie Timeline tool.
FIGURE 6. Movie Time & Length
The two sliders at the top of the page represent the rate of playback and length of
playback, respectively. Together, they dictate that a certain amount of scenario time
15Can I Create Animations Using the Movie Timeline Tool?
will play out during the allotted movie playback time. There is a small padlock icon as
part of the End Time option in the Movie time range area. When the lock is enabled,
changes made to either of the top two sliders will affect the other slider, and the End
Time will remain unchanged. When you disable the padlock option, changes made to
either slider will affect the End Time directly.
Typically, if you have already used the timeline start and end markers (the green and
red handles on either end of the timeline) to frame the action of interest in your
movie, then you will want to leave the padlock on, leaving your desired start and end
time locked in place, and use the sliders to strike a balance between play speed and
movie length.
Try to resist the temptation to make your movie longer than about 30 seconds.
Shorter is generally better with technical animations. If you need to run longer, it is
better to break the movie into several scenes. These scenes can be stitched together
using a tool like MovieMaker tool, which is a free download by Microsoft.
1. Change the End Time to just past the end of Hercules flight (about 3000 EpSec).
2. Click Next to move to the Size & Quality page.
Size & Quality
There are two major factors that affect the image quality in your movie: (1) the
amount of time that you're willing to spend rendering (creating) the movie, and (2)
how much disk space you're willing to devote to the finished product.
16Can I Create Animations Using the Movie Timeline Tool?
FIGURE 7. Movie Size & Quality
The options on the top half of this page govern the Render Quality. The anti-aliasing
setting will determine how much time your system spends creating a movie. Higher
anti-aliasing creates a movie with smoother edges and cleaner images and textures.
No anti-aliasing creates draft quality rendering, quickly.
Using higher anti-aliasing for your final product is recommended. Higher rendering
quality may even save you some disk space. Without anti-aliasing, your video may
contain “aliasing artifacts” such as rough edges and flickering texture maps, which
the video encoder may attempt to preserve on disk. A smoother, anti-aliased image
will be stored more efficiently.
1. Set the Anti-aliasing to Off - Draft quality, fast rendering for any test runs. You can reset it
when you’re ready to make your final recording. When you’re ready, use 4x4 - Best
quality, slow rendering.
The options on the bottom half of the page help you define the size of the movie file
on disk. If you're using Windows Media (the default, from the first page), then you have
a lot of flexibility here. You can pick one of the quality presets (High, Medium, Low,
etc) from the pull-down menu, and see an estimate of the movie size. Conversely, you
could enter the desired maximum size, and the wizard will compute a corresponding
bitrate (the amount of disk space used per second of movie playback) that can be
given to the Windows Media Encoder to target a specific file size. Note that if you have a
17Can I Create Animations Using the Movie Timeline Tool?
lot of black space or solid color in your movie, the actual file size may be substantially
less than the estimated size.
2. Change the Quality to Low for the test run. Again, you can reset it when you’re
ready to make your final recording.
3. Ensure that the Use off-screen rendering for large or obstructed windows option is enabled.
4. Click Next to advance to the Record page.
Record
The final page provides a summary of the selections that you made through the
wizard, a chance to preview the movie, and the option to begin recording.
FIGURE 8. Movie Record
1. Click Begin Record.
Once recording is underway, the main record button changes to an abort button
18Can I Create Animations Using the Movie Timeline Tool?
FIGURE 9. Movie Record
The Movie Maker tool starts to animate and you can watch your movie animating in the
3D Graphics window. You can also watch the Movie Timeline at the bottom of the STK
window. The Timeline will advance with the movie.
2. Wait for the recording to finish. The progress indicator along the bottom of the
page will show your progress.
3. Click Yes when the message asking if you want to watch your recording appears.
When you answer Yes, the Movie Timeline will have your system play the recorded movie
using the movie playing software that is registered as the default for that type of file.
Typically, this would be Windows Media Player on most systems.
Watch your movie and determine if changes need to be made.
• Should it move faster, slower?
• Is it too long or too short?
• Perhaps the quality needs to be increased or the files size decreased?
If you want to re-record, feel free to go back and change the settings and try again.
19Can I Create Animations Using the Movie Timeline Tool?
Save and Load
Save and load happens automatically when you save or load a scenario in STK. The
save file has the same base filename as the scenario file, but has a MTLINE file
extension of (*.mtline) instead of an SC file extension (*.sc). The data is saved in
XML format, and is not meant to be edited by hand.
1. Close the movie.
2. Close the movie player.
3. Save ( ) your scenario.
Save Your Work
1. Close the Camera Control tool ( ) in STK.
2. Save ( ) your work.
3. Leave the scenario ( ) open.
4. Leave STK ( ) open.
20You can also read