EVITA training Practical familiarisation course - Eurocontrol
←
→
Page content transcription
If your browser does not render page correctly, please read the page content below
EVITA training
Practical familiarisation course

Edition: 1.1
Edition date: 19-01-2021
Classification: Green
Reference nr:
EUROCONTROL                                                              Network Management Directorate

                                  DOCUMENT CONTROL

   Document Title                      EVITA training

   Document Subtitle                   Practical familiarisation course

   Document Reference                  This field is automatically updated

   Edition Number                      1.1

   Edition Validity Date               19-01-2021

   Classification                      Green

   Status                              Draft

   Author(s)                           Armin SCHAWE (NMD/NOM/IBC)

   Contact Person(s)                   armin.schawe@eurocontrol.int

                                      APPROVAL TABLE

                      Authority                                 Date                       Signature

   Prepared by:
   Armin Schawe

   Reviewed and endorsed by:
   Carlo Verelst

   Approved by:

Edition Number: 1.1               Edition Validity Date: 19-01-2021       Classification: Green        Page: i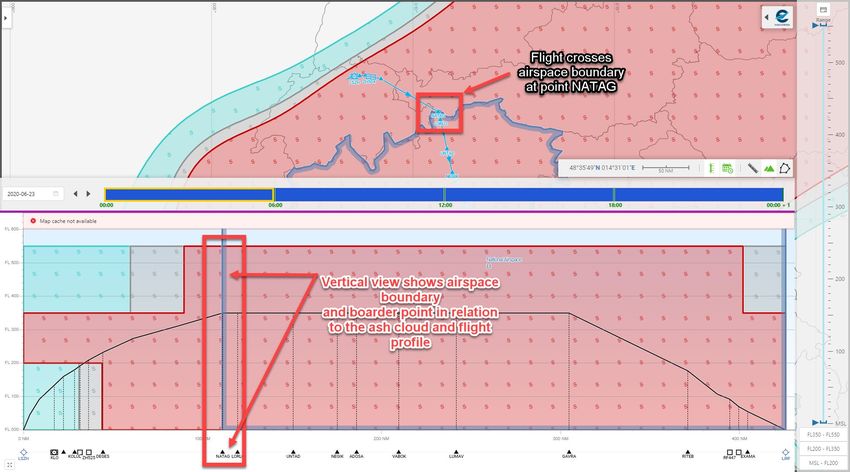
EUROCONTROL                                                      Network Management Directorate

                                  EDITION HISTORY

Edition No.           Validity Date                  Author(s)                      Reason
                                                                   Provide hands-on familiarisation
      1                                             A. Schawe
                                                                              guidance
     1.1                                            A. Schawe      Updates to reflect date changes

Edition Number: 1.1           Edition Validity Date: 19-01-2021   Classification: Green      Page: ii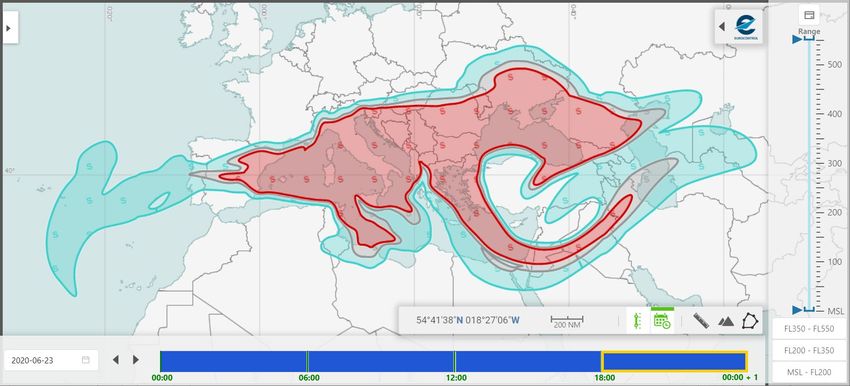
EUROCONTROL                                                                            Network Management Directorate

                                       TABLE OF CONTENT
   DOCUMENT CONTROL ...................................................................................................I
   APPROVAL TABLE .........................................................................................................I
   EDITION HISTORY .........................................................................................................II
   1            INTRODUCTION ..............................................................................................1
   1.1          Objective ........................................................................................................1
   1.2          Scope .............................................................................................................1
   1.3          Not in scope....................................................................................................1
   1.4          Pre-requisites .................................................................................................1
   1.5          Accompanying EVITA guidance material to be used.........................................1
   1.6          Approach ........................................................................................................2
   1.7          Limitations......................................................................................................2
   1.8          Technical support ...........................................................................................2
   2            PROGRAM STEP-BY STEP ..............................................................................3
   2.1          Access the protected NOP portal [UG 2.1]........................................................4
   2.2          Access and display the simulated crisis ..........................................................5
   2.3          Manage time settings [UG 9.5] ........................................................................7
   2.4          Ash cloud display options ...............................................................................8
   2.5          Select and display flights [UG 4] ......................................................................9
   2.6          Fine-tune the display of the flights (map options) [UG 9] ................................ 10
   2.7          Select and display airspace/environment data [UG 5] ..................................... 12
   2.8          Map options for the display of airspaces [UG 9] ............................................. 13
   2.9          Select and display aerodromes [UG 6]............................................................ 14
   2.10         Create a user defined area (AO area) for local display [UG 7] ........................ 15
   2.11         Additional map functionality [UG 9] ............................................................... 19
   APPENDIX ................................................................................................................... 20
   A.           TECHNICAL SUPPORT .................................................................................. 20
   A.1          List of known issues ..................................................................................... 20
   A.2          Proposed solutions ....................................................................................... 20

Edition Number: 1.1                  Edition Validity Date: 19-01-2021                 Classification: Green                   Page: iii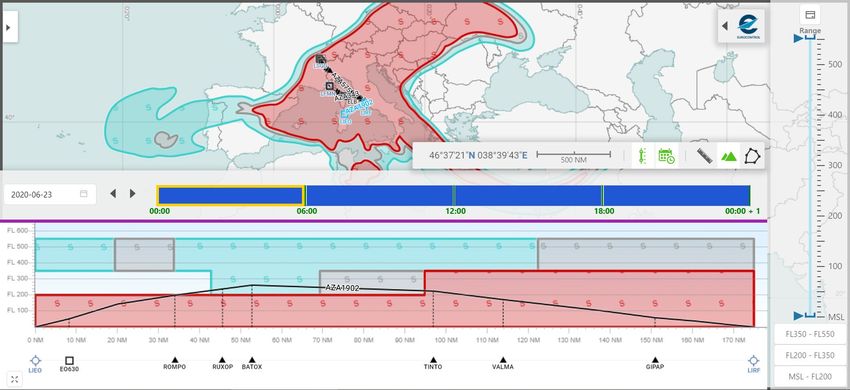
EUROCONTROL                                                       Network Management Directorate

               1       Introduction
      The map of the EVITA application received a major software update with the NM24
      release in June 2020.
      Compatibility issues caused by the phase-out of the previously used Adobe Flash
      player technology led to a complete replacement of the map layout by a more modern
      and user-friendly interface.
      The previous EVITA functionality has not changed as such, yet the complete new look
      and feel suggests refreshing our memories on how to use this tool.
      The following document provides a step-by-step guide to familiarise with the new map
      hands-on. This training can be done anytime, online and at any pace.

               1.1     Objective
      Familiarise EVITA users with the new map functionality provided by the application.
      This training is hands-on to exercise the practical usage.
      This training shall be available anytime.

               1.2     Scope
      This training is tailor made for the main external users of EVITA, the Aircraft Operator
      staff. For the NM internal users, NMOC staff or others the training can be used to
      understand the functionality we provide to the AO’s.

               1.3     Not in scope
      The tasks of NMOC staff are not part of this training; they are subject to a different
      training package.
      Air reports (AIREPs) on volcanic ash, and the procedures to manage them, are not part
      of this training. They are described in detail in the EVITA Users Guide.

               1.4     Pre-requisites
      Only users authorised to access the protected NOP Portal via a valid token have
      access (as in reality only token users have access to EVITA).
      A computer with internet connection and Google Chrome or Mozilla Firefox browsers.

               1.5     Accompanying EVITA guidance material to be used
      This training is to be used together with the EVITA Users Guide (External) version 3.2
      (or higher), hereafter named [UG]. Please check regularly for updates.
      The User Guide can be downloaded here:
      https://www.eurocontrol.int/publication/evita-users-guide
      For most training steps in this training, the corresponding section in the EVITA Users
      Guide is given in the following way: [UG ]. For example: [UG 2.1] means
      additional information can be found in section 2.1 of the Users Guide.
      Additional user help and guides:
           •    NOP Portal Online help [UG 1.7.2]

Edition Number: 1.1           Edition Validity Date: 19-01-2021    Classification: Green     Page: 1
EUROCONTROL                                                     Network Management Directorate

           •    EVITA web-based training (EUROCONTROL Training Zone) [UG 1.7.1]

               1.6    Approach
      A simulated volcanic ash crisis is available on the NM protected NOP portal that can
      be accessed anytime with a valid token.
      This simulated crisis can be used to try out the tools EVITA provides during a real
      crisis. Typically, we would like to be able to display flights and airspace elements
      together with the ash cloud.
      This training guide gives suggestions and examples on how to best use EVITA and
      refers to additional information available in other guidance material.
      The actions to be performed by the user of this training guide are numbered and in
      square brackets, like [1] [2] [3]. They need to be executed one after the other.

               1.7    Limitations
      The crisis is simulated and only updated every 2-3 months. The validity period will
      therefore always be in the past (a full-simulated crisis cannot be entered every day).
      This causes two smaller limitations:
      1. The screenshots in the documents might show different date/time values than in
      reality. The crisis start time needs to be updated periodically to match a recent AIRAC
      cycle to prevent environment data mismatch.
      2. The function ‘calculate impacted flights/airspaces’ will not show anything marked
      as impacted by the ash cloud since the flights of today will not be impacted by a cloud
      in the past. However, it is not important for the training purpose because the flights
      and airspaces or aerodromes can still be plotted onto the map and be used for the
      training. The only difference to reality will be the colour of the elements that are
      displayed.
      This limitation is lifted during VOLCEX exercises when a simulation is entered for the
      validity period of the exercise.
      During VOLCEX exercises and real crisis events, the training crisis will be
      removed/disabled (to avoid confusion).

               1.8    Technical support
      Like with any web-based application, problems can occur due to local settings,
      limitations, company policy etc… At the same time, there are numerous browser types
      with different versions on different operating systems.
      The most common issues users encountered with their local installation, together with
      known solutions, are listed in Annex A.

Edition Number: 1.1          Edition Validity Date: 19-01-2021   Classification: Green      Page: 2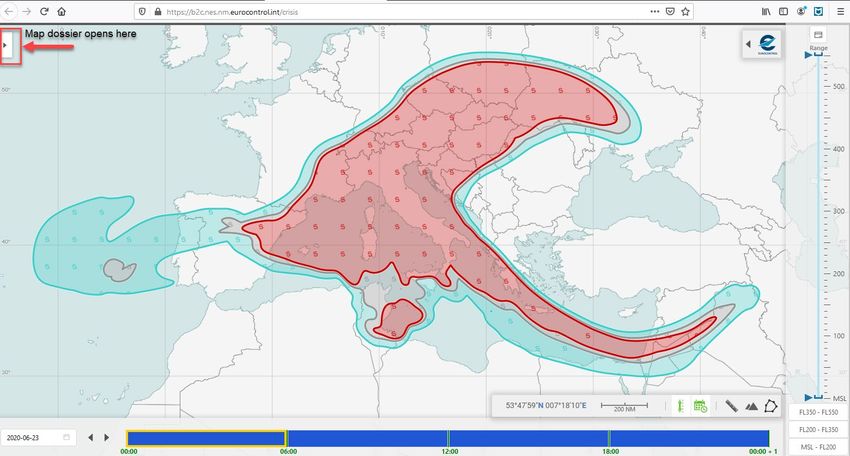
EUROCONTROL                                                    Network Management Directorate

              2       Program step-by step
      1) Access the protected NOP portal

      2) Access and display the simulated volcanic ash crisis

      3) Manage time settings

      4) Manage forecasts

      5) Display flights

      6) Flight display options

      7) Select and display airspace/environment data

      8) Airspace display options

      9) Select and display aerodromes

      10) Draw user defined areas on the map (AO area)

      11) Additional map functionality

      Annex A – Known technical problems and proposed solutions

Edition Number: 1.1         Edition Validity Date: 19-01-2021   Classification: Green     Page: 3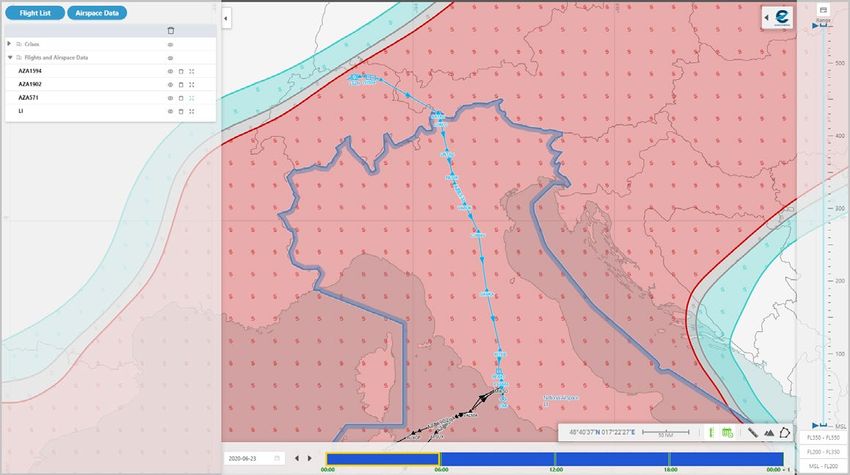
EUROCONTROL                                                          Network Management Directorate

              2.1      Access the protected NOP portal [UG 2.1]
      [1] Open a complete new browser session with Google Chrome or Mozilla Firefox.
      [2] In Google Chrome, open a new incognito window with Ctrl+Shift+N.
          In Mozilla Firefox, open a new Private Window with Ctrl+Shift+P.
      [3] If incognito or private windows cannot be used, clean out all cookies (please see
          Annex A).
      [4] Enable pop-ups (please see Annex A) if not yet done.
      [5] Enter the following link:
          https://www.nm.eurocontrol.int/PORTAL/gateway/spec/index.html
          Please make sure you have not visited any other webpage before, else restart from
          point [1].
      [6] Enter your UserName and Passcode from your token.

      [7] Enter Role and Domain (if applicable) and press GO

            Cookie handling:
            Today’s modern browsers come with complex cookie handling. Since browsers
            keep details of a login, it often happens that subsequent login attempts fail
            (when the cookies of the previous session interfere with the cookies of the next
            session), especially when the computer is in use by many different people using
            many different programs and no complete logout is done.
            In order to avoid this, please always do the following:
            •    Use incognito window for Google Chrome or private window for Mozilla
                 Firefox. Annex A and point [2] above shows how to open them.

                 ELSE (in a normal browser window)

            •    Start a complete new browser session
            •    Clean all cookies
            •    Use the link above without visiting another web page beforehand (direct
                 link)
            •    When work is completed, do a proper logout. EVITA and the NOP Portal
                 need to be closed with the LOGOUT button from the NOP Portal (and not
                 via the x of the browser).This will automatically clean out all session
                 cookies. Only detached windows must be closed with the x on top right of
                 the window).

Edition Number: 1.1            Edition Validity Date: 19-01-2021   Classification: Green        Page: 4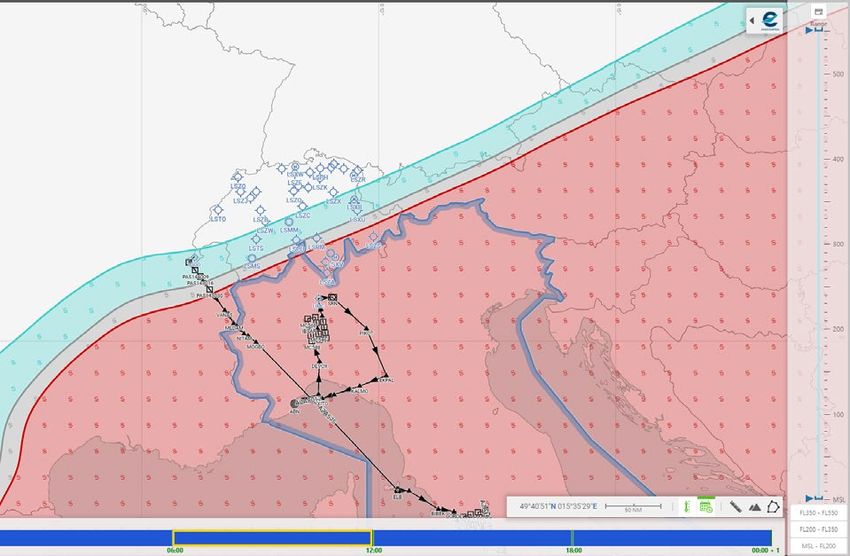
EUROCONTROL Network Management Directorate
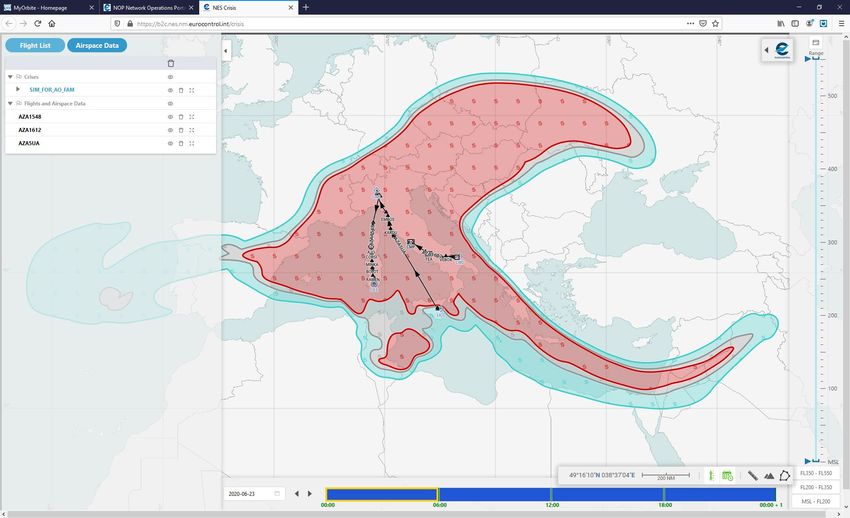
2.2 Access and display the simulated crisis
[1] Scroll down to the EVITA portlet (on the right hand side).
[2] There is one ongoing simulated crisis listed, called SIM_FOR_AO_FAM.
[3] There are several ways to display either a complete crisis or just parts of it (e.g. a
specific forecast). This is explained in detail in [UG 3] and online course. For this
training and for someone who accesses EVITA for the first time we want to display
the full crisis to get an overview of the situation. This is done by clicking on
[4] A new tab opens with the EVITA map. A Disclaimer is displayed. After reading, click
on OK. The Disclaimer is only shown once per login.
[5] Now the full crisis is displayed showing the ash cloud in three different colours
representing the different ash concentration levels (high (red), medium (grey), low
(blue)).
Map control options
[6] Panning: left mouse-click in the map and hold to move the map when moving the
mouse pointer [UG 9.8].
[7] Zooming: Scroll the mouse wheel up and down to zoom in/out [UG 9.8].
[8] Try the other mouse control options from [UG 9.8].
[9] Now use the above control options to move the ash cloud to the centre of the map.
[10] Re-centre can also be done from the map dossier. Open the dossier (arrow on the
top left hand side (see picture above) [UG 9.4], expand the Crises list as shown
below (click the arrow in front). Click on the Fit map symbol [UG 9.4.1.3] to re-
centre the cloud display.
Edition Number: 1.1 Edition Validity Date: 19-01-2021 Classification: Green Page: 5
EUROCONTROL                                                           Network Management Directorate

      [11] Close the map dossier (with the arrow shown above – top right).

      Display rules:
      When there is an ash crisis ongoing over several days with many forecasts partly in
      the past, for today or for the future, and a new map is opened from the NOP portal,
      EVITA needs to decide which situation is displayed.

      There is a clear rule for cases where several crises or forecasts are existing at various
      times and EVITA will check them in this order:

      1) If a crisis is ongoing at present date/time: display this crisis at current time;

      2) If not existing but there is a crisis in the future: display it at start of its crisis period;

      3) If both of the above do not exist but there is a crisis in the past, display it at start
         date of its crisis period.
      Our simulated crisis for this training is in the past, no other crisis exists so the
      displayed cloud is at the start of the first forecast for this crisis, on 23-12-2020 at
      00:00.

      In the following section we see how a different date/time can be set.

Edition Number: 1.1            Edition Validity Date: 19-01-2021       Classification: Green          Page: 6
EUROCONTROL Network Management Directorate
2.3 Manage time settings [UG 9.5]
Whenever the map opens, it displays the situation based on the rules explained in the
previous section. The user can now set the date and time according to the working
requirements, for example, when flights need to be checked in another time block than
the one presently displayed.
[1] Change the Date [UG 9.5.1]. The map we opened displays the situation on 23-12-
20 at 00:00. Open the date picker [UG 9.5.2]. Select different days in the calendar.
As we only have one crisis that covers exactly one day, the map shall be empty on
all other selected days. Return to the date marked in blue. The blue marking
highlights that there is a crisis existing for that day.
[2] Change Time [UG 9.5.3]. The map we opened displays the situation on 23-12-20 at
00:00. The next snapshot received from the Volcanic Ash Advisory Centre is at
06:00. We mark this 6 hours period by a yellow frame. Within this period, there is
no update of the ash cloud so the same snapshot is displayed for a flight at 02:00
or 05:30. Look at the timeline and click on the other 6 hours blocks to see the
different snapshots of the moving cloud.
[3] Select the correct cloud situation for a flight with EOBT 20201223 1900.
The correct time block is 1800-2400
Edition Number: 1.1 Edition Validity Date: 19-01-2021 Classification: Green Page: 7EUROCONTROL Network Management Directorate
2.4 Ash cloud display options
Display forecasts for different times [UG 9.5]
The Volcanic Ash Advisory Centre (VAAC) provides forecasts consisting of four
snapshots in always the same 6 hours interval, covering 24 hours ahead (at 00:00,
06:00, 12:00 and 18:00). In EVITA, the intervals are clearly marked in corresponding
blocks. A new time block can easily be selected with one mouse click on the time line.
[1] Click on the first block in the timeline (00:00 - 06:00).
[2] Click on the next block in the timeline (0600 – 12:00). See how the cloud changes.
[3] Do the same with blocks 3 and 4.
[4] Move in the timeline using the arrows [UG 9.5.3.1].
Horizontal definition of the ash cloud [UG 9.3]
The Volcanic Ash Advisory Centre (VAAC) calculates ash concentration in always the
same three different horizontal flight level (FL) blocks (MSL-FL200, FL200-FL350 and
FL350-FL550). EVITA provides quick select of the corresponding ranges with three
predefined Range buttons [UG 9.3.1].
[1] Select the 00:00 snapshot forecast (time block 00:00-06:00).
[2] Select the three predefined range buttons [UG 9.3.1] one after each other and note
the different ash concentration in the airspaces.
MSL-FL200 FL200-FL350 FL350-FL550 MSL-F550 (all levels)
[3] To manually set a flight level range, use the mouse pointer to set the Upper and/or
Lower slider to the desired value - see how it affects the display [UG 9.3.1].
[4] Re-establish view of the complete range by moving the sliders to MSL/FL0 and
FL550. We now see the three cloud layers on top of each other.
[5] Change to slice mode [UG 9.3.2] and select single FL values up and down the scale.
[6] Return to Range mode and set the full range.
Edition Number: 1.1 Edition Validity Date: 19-01-2021 Classification: Green Page: 8EUROCONTROL Network Management Directorate
2.5 Select and display flights [UG 4]
The way flights are selected has not changed compared to previous EVITA versions.
They are available from the Flights portlet in the NOP portal main view. The important
improvement is that the Flights portlet can now be called directly from within the map.
[1] Open the map dossier [UG 9.4] (see 2.2 [9] and [10]).
[2] Click on - a new detached window opens with the Flight List app.
[3] Select the tab Aircraft Operator.
[4] In Operator type AZA, in WEF type 0900 and in UNT type 1300 press GO.
Please note: the maximum number of Flights that can be queried is 100. If this
number is exceeded the query period needs to be reduced.
[5] The flight list of AZA is displayed for the current day between 0900 and 1300 UTC.
AZA is proposed because the ash cloud covers Italy.
[6] Click on Compute Impacted Flights. At this point EVITA calculates if any of the
flights is impacted by the ash cloud. Since the ash cloud is in the past, no flight is
impacted. None of them shall be marked with a tick in the field Impacted.
[7] EVITA allows any flight from the Flight List to be plotted, impacted or not. Select at
least three flights (any) from the flight list by placing a tick in the box next to the
call sign.
[8] Click on Plot EVITA. The selected flights are loaded. This can take a few moments.
Return to the map, the flights shall show on the map and in the dossier [UG 9.4].
Please note: since the crisis period is in the past, the flights are marked as not
impacted (the do not match the cloud validity date). Flights not impacted are displayed
in black. Flights impacted are displayed in red, also in the vertical view. Please see [UG
4.1] for examples. For the training purposes, it is not relevant.
Edition Number: 1.1 Edition Validity Date: 19-01-2021 Classification: Green Page: 9EUROCONTROL Network Management Directorate
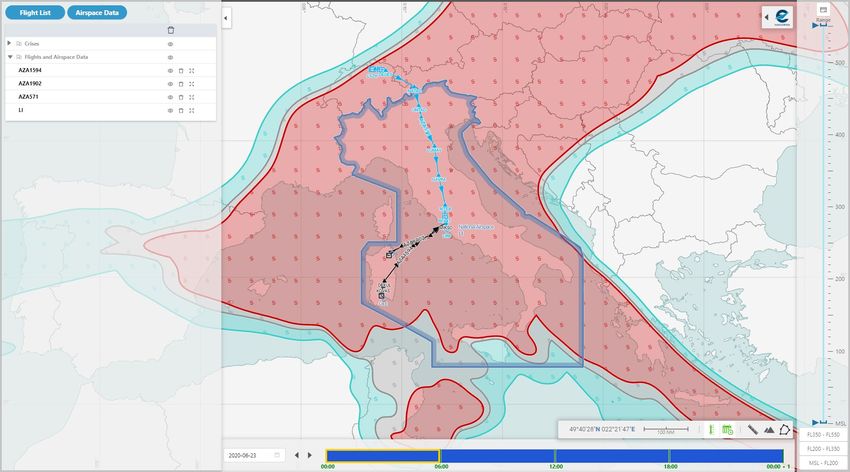
2.6 Fine-tune the display of the flights (map options) [UG 9]
With one or more flights on the map, there are many options to fine-tune their
appearance and relation to the cloud.
Please note the following EVITA concept:
• Once a flight is plotted on the map, it will stay there until it is manually removed
by the user.
• A flight will thus not disappear from the map when the flight time is outside the
cloud period.
• A flight will also not disappear from the map when the selected flight level range
does not correspond to the filed flight level.
That way a flight can be analysed against all available cloud snapshot scenarios. It
shows at what time or flight level a flight would be outside or inside the ash cloud
with an EOBT delay or a different RFL.
[1] If not done, execute all steps of 2.5 and open the map dossier [UG 9.4].
[2] Expand “Flights and Airspace Data” - all plotted flights are listed.
[3] Move the mouse pointer over the list and see how the different flights are
highlighted on the map.
[4] Click on the symbol of one flight reference. The flight is hidden. Click on of the
same flight – it is shown again.
[5] Chose one of the flights and click on Fit ( ). The map rearranges to show the flight
in the centre. Click on Fit for the other flights. Each time the map puts the flight
reference in the centre.
[6] Chose a flight with a route inside the cloud (if none, select one from the flight list
in 2.5) and click on Fit.
[7] Close the map dossier and click on the flight trajectory in the map. The colour
changes from black to blue.
[8] Open the flight in the vertical view [UG 4.1] by clicking on Check how your
selected Flight intersects with the vertical definition of the displayed Crisis.
[9] Expand the vertical view window upwards with right-click+hold on the upper
boarder of the vertical view window (the purple line) and move upwards.
Result
Edition Number: 1.1 Edition Validity Date: 19-01-2021 Classification: Green Page: 10EUROCONTROL Network Management Directorate
[10] Scale [UG 4.1]: in the vertical view, mouse over the FL axis and roll the mouse
wheel up or down to change the vertical scale of the graph. Mouse over the NM
axis and roll the mouse wheel up or down to change the horizontal scale of the
graph.
[11] Zoom: mouse over the vertical view graph and roll the mouse wheel up/down to
zoom in/out [UG 4.1].
[12] Move/Pan: click and drag the vertical view graph to display the desired area [UG
4.1].
[13] Reset vertical view: to revert to the original display click on the symbol at the
bottom left corner. Drag the borderline of [9] back down to the desired size.
[14] Close the vertical view with the symbol from step [8].
Edition Number: 1.1 Edition Validity Date: 19-01-2021 Classification: Green Page: 11EUROCONTROL Network Management Directorate
2.7 Select and display airspace/environment data [UG 5]
The way airspace data is selected has not changed compared to previous EVITA
versions. The data is available from the Airspace portlet in the NOP portal main view.
The important improvement is that the Airspace portlet can now be called directly from
within the map.
[1] Open the map dossier [UG 9.4] (or see 2.2 [9] and [10]).
[2] Click on - a new detached window opens with the Airspace Data Portlet.
[3] In the Airspace Data Portlet, click on Airspaces. In Airspace Id (*) type LI*, meaning
all airspace Id’s in Italy (* = wildcard). In Type(s) select ALL. Click Go.
[4] A list of airspaces is displayed. Click on Compute Impacted Airspaces. At this point
EVITA calculates if any of the airspaces is impacted by the ash cloud. Since the
ash cloud is in the past, no airspace is impacted; hence, none of them shall be
marked with a tick in the field Impacted [UG 5.1]
[5] EVITA allows any airspace from the list to be plotted, impacted or not. Select LI
(Type NAS) from the list by ticking the box next to the CFMU Id (see above).
[6] Click on Plot Evita. The selected airspace is now loaded. Return to the map, the
complete Italian national airspace shall show on the map and in the dossier.
Edition Number: 1.1 Edition Validity Date: 19-01-2021 Classification: Green Page: 12EUROCONTROL Network Management Directorate
2.8 Map options for the display of airspaces [UG 9]
Please note the following EVITA concept:
Once an airspace is plotted on the map, it will stay there until it is manually removed
by the user.
[1] We still have the flights from AZA on the map, if not repeat all steps from 2.5.
[2] In the dossier move the mouse over LI. The airspace is highlighted on the map.
[3] In the reference line for LI click on the symbol. The airspace is hidden. Click on
of the same reference – the airspace is shown again.
[4] In the same reference line click on Fit ( ). The map rearranges to show the
airspace in the centre.
[5] Chose a flight with a route crossing the airspace boundary (if none, select one
from the flight list in 2.5) and click on Fit.
Please note: since the crisis is in the past, the airspace is marked as not impacted
(the airspace of ‘today’ is not in the crisis period). Airspaces not impacted are
displayed in blue. Impacted airspaces are displayed in red. The same goes for the
vertical view. Please see [UG 5.1] for examples. For this training, it is not important.
[6] Close the map dossier and click on the flight trajectory in the map. The colour
changes from black to blue.
[7] Open the flight in the vertical view [UG 4.1] by clicking on Check how the
airspace is displayed, at what point the flight profile enters/leaves the airspace and
the ash concentration in the airspace.
[8] The options to modify the vertical view display are the same as in 2.6 [9]-[14].
Edition Number: 1.1 Edition Validity Date: 19-01-2021 Classification: Green Page: 13EUROCONTROL Network Management Directorate
2.9 Select and display aerodromes [UG 6]
The way aerodromes are selected for display has not changed compared to previous
EVITA versions and follows in broad lines the same steps as for 2.7 airspaces. The
data is available from the same Airspace portlet in the NOP portal main view. The
Airspace portlet can be called directly from within the map.
[1] Open the map dossier [UG 9.4] (or see 2.2 [9] and [10]).
[2] Click on - a new detached window opens with the Airspace Data Portlet
[3] In the Airspace Data Portlet, click on Aerodrome. In Aerodrome (*) one or more
aerodromes can be queried through wildcards (* = wildcard).
[4] Single aerodrome: type LIRF in the Aerodrome (*) and click Go.
[5] Like for flights and airspaces the option to Compute Impacted Aerodromes can be
used. It will not result in the aerodrome being marked as impacted since the crisis
period is in the past.
[6] We can still display the aerodrome by selecting LIRF (tick box) and click Plot Evita.
The aerodrome is listed in the dossier and pointing the mouse over the reference
line will highlight the aerodrome on the map.
[7] Go back to the Airspace Data portlet and Aerodrome. Type LS* in Aerodrome (*)
and click GO.
[8] The complete list of aerodromes in Switzerland is displayed. In a real crisis, clicking
on Compute Impacted Aerodromes would clearly mark all aerodromes that are
under the ash cloud or very close to it [UG 6].
Please note: the maximum number of Aerodromes that can be queried is 100.
[9] Select 20 aerodromes from the list and select Plot Evita.
[10] Zoom into the Swiss airspace. In the first time period (00:00-06:00) all aerodromes
are under the cloud.
[11] Click on the other time period blocks on the time bar. In time, the ash cloud is
moving on and out of the Swiss airspace.
Edition Number: 1.1 Edition Validity Date: 19-01-2021 Classification: Green Page: 14EUROCONTROL Network Management Directorate
2.10 Create a user defined area (AO area) for local display
[UG 7]
EVITA provides the possibility to draw a user defined area on the map that is only
visible locally (so no other EVITA user sees areas popping up on their map).
The same tool as for inserting forecasts by the NMOC staff is used but the functionality
to publish the forecast to all users has been removed for external users. In principle,
drawing an AO area is like creating a local forecast.
A new tool has been developed for easy definition of the area on the map. Although
there are other ways of doing this, only that tool is covered here since it is by far the
easiest and quickest way.
This input is therefore done in the Forecasts portlet that cannot be accessed straight
from the map but from the Evita portlet in the NOP portal main view.
[1] Normally, when no other windows have been opened, the NOP portal main view
and the NES map sit next to each other as tabs in the browser.
[2] Click on the NOP Network Operations Portal tab. Navigate to the EVITA portlet,
click on F (for Forecast). This is a shortcut leading to the EVITA Forecasts [UG 7].
[3] The EVITA Forecast window opens with the Forecast List. Click on Create Forecast.
Edition Number: 1.1 Edition Validity Date: 19-01-2021 Classification: Green Page: 15EUROCONTROL Network Management Directorate
[4] The Forecast Details input mask appears at the bottom of the EVITA Forecast
window, one might has to scroll down a little. We now specify what we want to see
on the map by entering the forecast details.
[5] Enter the time period during which the area shall be displayed on the map:
Valid from 23/12/2020 00:00 (the calendar can be used)
to 23/12/2020 17:00 (the calendar can be used)
[6] Owner: the two VAAC’s are pre-defined. For any other owner a free text name needs
to be entered. Select the lower circle and type ‘AO no fly zone’ into the text box.
[7] Tick the box Pub ANU only. This means the forecast is to be displayed only locally.
[8] A Comment can be entered in the Comment box but it is not needed, so we leave
it empty. Version can be left untouched.
[9] Click on Save. The forecast has been created.
[10] Scroll up to the Crisis Details view. A reference has been added. We see it is in
status draft because we still miss data.
[11] In the next step, we will add the geographical outline of the affected area. Scroll
back down to the Forecast Details and click on Create Affected Area.
[12] The Affected Area Details input window shows. Here we specify in which colour
we want to have our area displayed. In the Concentration Level drop down menu
a fixed selection appears, each of them corresponds to a pre-defined colour.
Corresponds to
[13] Select AO AREA and click Save. The colour of the area will be .
Edition Number: 1.1 Edition Validity Date: 19-01-2021 Classification: Green Page: 16EUROCONTROL Network Management Directorate
[14] The Affected Area Details input field closes. Move up the window to the Crisis
Details and select our forecast as shown in [10] above.
[15] The Forecast Details re-appear (scroll down) with the affected area just defined.
Click anywhere in that reference line (1), the Affected Area Details input field
shows up (2). Click on Create Prism (3).
[16] The Prism Detail input field shows.
[17] Define the vertical limits of the area expressed in Flight Level but only use the three
digits. In Lower Limit, enter 000. In Upper Limit, enter 350.
[18] Now the shape of the area must be described as polygon defined by coordinates
in a closed circle. [UG 7] describes several ways of doing this, we will use the
easiest way.
[19] Go back to the EVITA map (the NES Crisis tab, see 2.10 [1]).
[20] In the EVITA map, select the area drawing tool.
[21] Draw an area around Switzerland. Click in the map to add a sequence of points
forming a closed shape. Correct/change the shape as required (select individual
points and move them). When completed, double click to finish adding points.
[22] When done, right click and click on the Copy to clipboard … text box.
[23] Go back to the Prism Details window, click in the big table on the right and do
paste (right mouse click or Ctrl+V). The copied coordinates from the clipboard of
the drawing tool are listed.
Edition Number: 1.1 Edition Validity Date: 19-01-2021 Classification: Green Page: 17EUROCONTROL Network Management Directorate
[24] Click To Table to transfer the coordinates into the Lat/Long columns on the left.
[25] Finally press Validate Polygon to see that all rules for a polygon are correct (as
specified in [UG 10]). A confirmation will come up to show the result. Press Ok.
[26] Click on Save. We have now completed the creation of a local area. At this stage,
it is a separate entity. We will now combine it with the rest of the crisis elements.
[27] Scroll up to the Forecast Details display. Press Publish.
[28] Press Ok for the confirmation message.
[29] Scroll up to Crisis Details and Press Plot Crisis. The area is now displayed together
with the ash cloud.
Quick check that time and prism definitions are correct:
[30] On the timeline, the end of the validity period is clearly marked in red (17:00). Click
anywhere to the right of the red marker – the area is removed (outside the defined
time).
[31] Select the time block 0600-1200. The area is displayed. From the flight level
selection box select FL350-FL550. The area is removed since the upper limit is
exceeded. Try the other flight level boxes. The area must be displayed. Reset the
flight level range from FL000 to FL550.
Edition Number: 1.1 Edition Validity Date: 19-01-2021 Classification: Green Page: 18EUROCONTROL Network Management Directorate
2.11 Additional map functionality [UG 9]
For this part, the EVITA User Guide section 9 is needed.
Info tray, online help file [UG 9]
[1] Take the EVITA User Guide section 9, based on the information, open the online
help file from the map info tray, access the EVITA content and scroll through the
information.
[2] Close the NOP Portal – Help – EVITA window and close the info tray.
Map controls [UG 9.1]
[1] Coordinates: Move the mouse pointer around on the map. For any position of the
mouse pointer, the coordinates are displayed.
[2] Scale: Click in the map and zoom/in/out with the mouse wheel. The scale of the
map as set by the zoom factor (ranges from 2 NM to 2000 NM) is displayed.
[3] Press and hold the Ctrl key of your keyboard and repeat step 2. Zooming is now
done in smaller steps.
[4] LevelBand: Click on the symbol and the Flight Level control elements to
the right are closed. Press again to re-open. Check functionality in
2.4 and [UG 9.3]
[5] Timeline: Click on the symbol and the time control elements on the
bottom of the map are closed. Click again to re-open. Check
functionality in [UG 9.5]
[6] Measuring tool: Check functionality in [UG 9.6]. Click on the symbol.
Now click anywhere on the outside of the cloud. Click again on the opposite side
of the cloud. See the distance displayed on the map.
[7] Vertical view: covered in 2.6 [8] – [14] and [UG 4.1]. Select any flight still on the
map and click on the symbol. The vertical view shows. Click again to close.
[8] The area drawing tool: is described and exercised in 2.10 [20] and [UG 9.7].
Edition Number: 1.1 Edition Validity Date: 19-01-2021 Classification: Green Page: 19EUROCONTROL Network Management Directorate
Appendix
A. Technical support
Most users work in a secured IT environment and based on the company’s policy the
local settings can have an influence on the usage of EVITA. Many times issues can be
easily solved.
A.1 List of known issues
[1] Login: after entering UserName and Passcode, a blank page is presented and
nothing else but a text message “Your login was successful”.
[2] When calling the EVITA map, the info pop-up states “map loading, please wait” but
the map never comes up. This is solved with the usage of incognito windows in
Google Chrome and private window in Mozilla Firefox, as explained below.
[3] It is advised to clean out all cookies before using a normal browser session (when
point [2] above is not usable).
[4] When trying to open the flight list or airspace data list or any other detached
window and nothing happens: enable pop-ups as shown below.
[5] No proper logout was done from a previous NOP portal session.
A.2 Proposed solutions
Point [1]
Problem: At login, after entering UserName and Passcode, a blank page is presented
and nothing else but a text message “Your login was successful”.
Solution:
Copy and paste the URL to the protected NOP portal one more time into the
(incognito/private see point 2 below) browser command and press enter.
https://www.nm.eurocontrol.int/PORTAL/gateway/spec/index.html
Edition Number: 1.1 Edition Validity Date: 19-01-2021 Classification: Green Page: 20EUROCONTROL Network Management Directorate
Point [2]
Problem: When calling the EVITA map, the info pop-up states “map loading, please
wait” but map never comes up.
There are two main reasons for this behavior:
1. The cookie handling of the browser causes a mix-up of user profiles because the
previous session or other programs where not properly closed.
2. The cookie handling of the browser causes a mix-up because the user is accessing
the protected NOP portal from another website that also already set cookies.
The solution for the two points is quick and easy: use a private/incognito browser
session, go directly to the NOP portal and close the session with a proper logout.
Solution:
Use of an ‘incognito window’ in Google Chrome or a ‘private window’ in Mozilla Firefox.
In this mode, cookie setting is restricted and cleaned after closing the window. Firefox
and Chrome use different names for this mode.
‘Incognito window’ in Google Chrome:
Open the Chrome browser
Open a new incognito window with Ctrl+Shift+N
Proceed as described in 2.1 [5] – copy/paste the NOP portal URL and press enter.
‘Private window’ in Mozilla Firefox
Open the Firefox browser
Open a new private window with Ctrl+Shift+P
Proceed as described in 2.1 [5] – copy/paste the NOP portal URL and press enter.
After opening the incognito/private window, go straight to the protected NOP portal
for login. Do not visit any other websites in between (this will avoid the second reason
explained above).
Edition Number: 1.1 Edition Validity Date: 19-01-2021 Classification: Green Page: 21EUROCONTROL Network Management Directorate
Point [3]
When the usage of incognito/private windows is not possible, a regular browser
session can be used but it is strongly advised to clean out existing cookies beforehand.
Clean cookies in Google Chrome
1. Open Chrome.
2. In the top right corner of the browser, there are three dots, which indicates a
settings menu.
3. Scroll down to the bottom of the page and click on “Advanced.”
4. Click on the section “Clear browsing data.”
5. Under the “All cookies and site data” section, customize which cookies to delete
based on a specific time range and other options. Finally, complete the deletion by
clicking “Clear data.” It is also advised to clear the cache of previously viewed
websites.
Clean cookies in Mozilla Firefox
1. Open Firefox.
2. In the upper right-hand corner of the browser, click the “menu bars,” which look like
three parallel lines, and click the “Privacy” tab.
3. Select “Clear your recent history.”
4. Be sure that only “Cookies” is checked. To delete all cookies, select “Everything.”
5. Double check the selections and then hit “Clear now.”
Edition Number: 1.1 Edition Validity Date: 19-01-2021 Classification: Green Page: 22EUROCONTROL Network Management Directorate
Point [4]
Problem: EVITA does not seem to open a detached window.
The flight list or the airspace data list is displayed in a new window opening as an
independent window not attached to any of the existing ones, very much as a ‘pop-up’.
The standard setting in browsers is usually that pop up’s are disabled in which case
the browser prevents opening of the requested window.
Solution: Whenever a browser is blocking a window, this is indicated. The blockage
can be lifted as follows:
Google Chrome
1. Enable pop-ups in the settings (if not allowed see point 2)
1. On your computer, open Chrome.
2. At the top right, click More Settings.
3. Under "Privacy and security," click Site settings.
4. Click Pop-ups and redirects.
5. At the top, turn the setting to Allowed or Blocked.
2. Enable pop-up when the problem occurs
When Chrome blocks a pop-up from a website, it displays an icon with a red X in the
corner of the Omnibox.
To see the pop-ups from this website, click on the icon to see site-specific options,
select “Always Allow Pop-ups and Redirects” and then click “Done.”
Edition Number: 1.1 Edition Validity Date: 19-01-2021 Classification: Green Page: 23EUROCONTROL Network Management Directorate
Mozilla Firefox
1. Enable pop-up’s in the settings (if not allowed see point 2)
1. Open the Tools menu (the icon of three horizontal lines in the top right of the
browser window).
2. Select Options.
3. Select the Privacy & Security panel.
4. Under the Permissions section, uncheck the box next to Block pop-up windows to
disable the pop-up blocker altogether.
5. Close the window.
2. Enable pop-ups when the problem occurs
When blocking a pop-up, Firefox displays an information bar, as well as an
icon in the address bar.
Click either the Options button in the info bar or the icon in the address bar. A menu is
displayed, from the choices select: Allow/Block pop-ups for this site and allow.
Edition Number: 1.1 Edition Validity Date: 19-01-2021 Classification: Green Page: 24EUROCONTROL Network Management Directorate
Point [5]
The NOP portal is a web based application. Many users close the NOP portal session
by closing the browser (the x at the top right of a window), which is not the correct way
to log out from the NOP portal. Existing session elements (cookies) are not fully
removed. They can interfere with future sessions.
Please always close the NOP portal via a logout using the LOGOUT button in the main
view as shown below.
Edition Number: 1.1 Edition Validity Date: 19-01-2021 Classification: Green Page: 252021
You can also read