EXTERNAL GUIDE

HOW TO REGISTER FOR EFILING AND
  MANAGE YOUR USER PROFILE
←
→
Page content transcription
If your browser does not render page correctly, please read the page content below
EXTERNAL GUIDE HOW TO REGISTER FOR EFILING AND MANAGE YOUR USER PROFILE

REVISION HISTORY TABLE

     Date      Version                              Description
  06-12-2019      6      Added new functionality: User invitation to a portfolio; Chatbot,
                         SARS correspondence
  26-03-2020     7       Automatic income tax registration for new eFilers (individuals
                         with valid SA ID number)
  20-04-2020     8       Enhanced functionality: Tax Type Transfer.
  08-05-2020     9       Added: Passwordless login; Two-factor authentication
  04-12-2020     10      Capture Registration screen: ‘Next’ button replaced with
                         ‘Submit’; Profile and Preference Setup screen: last date and
                         time that the profile was accessed
  23-04-2021     11      New function to Manage Tax Types, Practitioner configuration
  11-08-2021     12      Chatbot; Approve Tax Type Transfer request

EXTERNAL GUIDE - HOW TO REGISTER                 Revision: 12                        Page 2 of 48
FOR EFILING AND MANAGE YOUR USER
PROFILE
GEN-ELEC-18-G01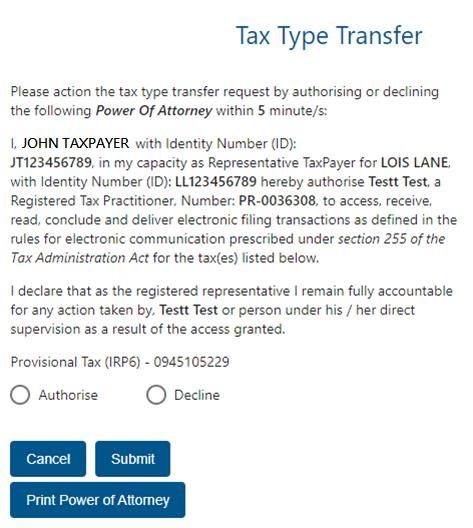
TABLE OF CONTENTS

1      PURPOSE                                                                     4
2      INTRODUCTION                                                                4
3      SERVICES OFFERED ON EFILING                                                 4
4      NEW LOOK                                                                    5
4.1    MIGRATION OF USERS                                                          5
4.2    PORTFOLIOS                                                                  5
5      PASSWORD RULES                                                              6
6      ONE-TIME PIN (OTP)                                                          6
7      CHAT BOT                                                                    6
8      REGISTRATION ON EFILING                                                     6
8.1    HOW TO REGISTER AS A NEW USER ON EFILING                                    6
8.2    REQUEST FOR ADDITIONAL INFORMATION TO FINALISE REGISTRATION                 8
8.3    AUTOMATIC REGISTRATION FOR INCOME TAX                                      10
9      FIRST TIME LOGIN                                                           11
9.1    FIRST TIME LOGIN FOR EFILING USERS REGISTERED ON/AFTER 1 JULY 2019         11
9.2    FIRST TIME LOGIN FOR EFILING USER REGISTERED BEFORE 1 JULY 2019            14
9.3    ACCESS TO MY PROFILE                                                       17
10     PROFILE AND PREFERENCE SETUP                                               17
10.1   CHANGE SECURITY CONTACT DETAILS:                                           18
10.2   CHANGE USER NAME AND PASSWORD:                                             18
10.3   TWO-FACTOR AUTHENTICATION USING ONE TIME PIN                               18
10.4   TWO-FACTOR AUTHENTICATION USING THE EFILING MOBILE APP                     19
10.5   PASSWORDLESS LOGIN                                                         21
11     PORTFOLIO MANAGEMENT                                                       22
12     MANAGE USERS ON AN ORGANISATION OR TAX PRACTITIONER PORTFOLIO              25
12.1 INVITE, EDIT AND DELETE A USER ON A PORTFOLIO                                25
12.2 ACCEPT INVITE TO BE A USER ON A PORTFOLIO                                    28
13     MANAGE GROUPS                                                              29
14     MANAGE TAXPAYERS ON AN ORGANISATION OR TAX PRACTITIONER PORTFOLIO          31
15     MANAGE TAX TYPES                                                           32
15.1 INDIVIDUALS                                                                  32
15.2 ORGANISATIONS AND TAX PRACTITIONERS                                          33
16     ACTIVATE REGISTERED REPRESENTATIVE                                         41
17     TAX PRACTITIONER CONFIGURATION                                             41
17.1 PRACTITIONER ACTIVATION                                                      42
17.2 DELEGATE PRACTITIONER AUTHORITY                                              42
17.3 CONFIRM PRACTITIONER REGISTRATION STATUS                                     44
18     SARS CORRESPONDENCE                                                        45
19     FORGOT PASSWORD                                                            45
20     FORGOT USERNAME                                                            46
21     CONCLUSION                                                                 48

 EXTERNAL GUIDE - HOW TO REGISTER            Revision: 12               Page 3 of 48
 FOR EFILING AND MANAGE YOUR USER
 PROFILE
 GEN-ELEC-18-G01
PURPOSE
The purpose of this document is to assist clients to register for eFiling and manage their eFiling
profiles.

This guide in its design, development, implementation and review phases is guided and underpinned
by the SARS values, code of conduct and the applicable legislation. Should any aspect of this guide
be in conflict with the applicable legislation the legislation will take precedence.

        INTRODUCTION
The vision of SARS is to be an innovative revenue and customs agency that enhances economic
growth and social development. This is in line with the legislative mandate of SARS which is to collect
revenue and ensure compliance with tax laws. eFiling enables SARS to achieve its mandate by being
a service channel for the collection and administration of all national taxes, duties and levies.

One of the issues that emerged from the SARS customer satisfaction research is that the public often
dreads standing in long queues, filling in paperwork and visiting SARS branches. The electronic filing
system (eFiling) aims to address these issues and ensure that the services SARS provides are
efficient and convenient for the taxpayer.

eFiling is a free electronic tool designed by SARS to offer electronic services such as filing tax
returns, making payments and accessing accounts to name a few.

eFiling allows you the benefit of direct, secure and real-time electronic access to your tax profile as
well as the opportunity to manage this at any time and from anywhere.

You must be linked to a tax type (e.g. income tax) in order to have full access to the services on
eFiling and to transact.

SARS values you, the taxpayer. In order to protect your tax account(s), please note that not all
services are offered online. Services such as change of name and surname must be done at a SARS
branch.

        SERVICES OFFERED ON EFILING
The following services are available on eFiling:

•       Pay-As-You-Earn (EMP201 return)
•       Skills Development Levy (included on the EMP201 and EMP501 return)
•       Value Added Tax (VAT201)
•       Provisional Tax (IRP6)
•       Secondary Tax on Companies (IT56)
•       Individual Income Tax (ITR12)
•       Trusts (IT12R)
•       Advanced Tax Ruling (ATR)
•       Change of Personal Details
•       Payments
•       Request for Tax Clearance Certificate
•       Request for Tax Directive
•       Transfer Duty
•       Stamp Duty
•       Security Transfer Tax(STT)
•       VAT Vendor Search
•       Notification Tool
•       Tax Calculators
•       Complete history of eFiling usage

    EXTERNAL GUIDE - HOW TO REGISTER                     Revision: 12                        Page 4 of 48
    FOR EFILING AND MANAGE YOUR USER
    PROFILE
    GEN-ELEC-18-G01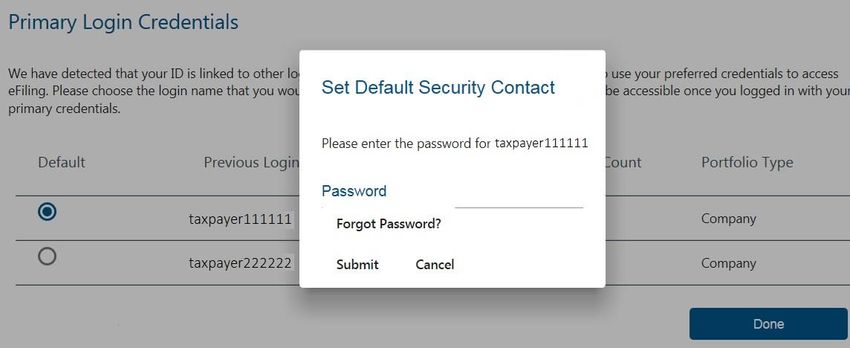
• Customs payments
• Air Passenger Tax payments
• Mineral and Petroleum Resource Royalty (MPRR)
NEW LOOK
SARS has redesigned eFiling in an effort to embrace the benefits of emerging technologies and
provide an optimized and secure digital environment. The new look is also intended to help promote
voluntary compliance, reduce the administrative burden and provide you, our valued client, with a
more intuitive and user-friendly experience. The redesigned functionality on eFiling will be
implemented using a phased in approach.
Changes for this phase include:
• New look to align to SARS’ corporate identity
• Improved security to safeguard against fraud
• Implementation of a primary user-id (single login) to access all profiles
• Profile management (e.g. Organisations and Tax Practitioners)
• A dashboard providing the eFiler with a visual summary of his/her tax affairs at a glance.
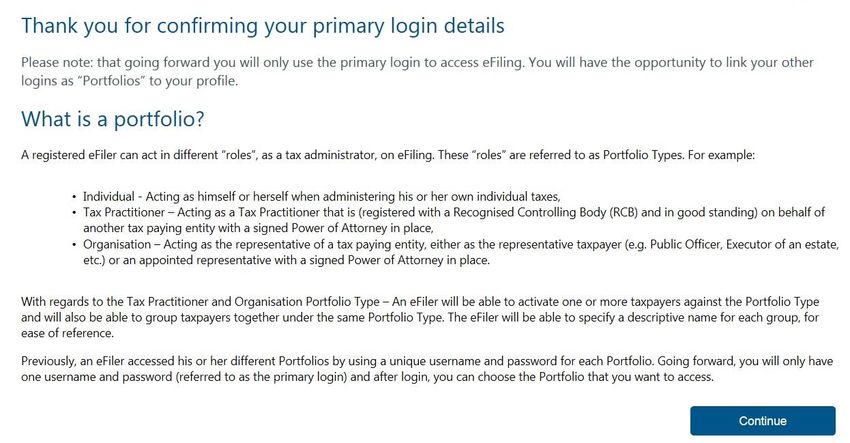
4.1 MIGRATION OF USERS
All eFiling users registered prior to 1 July 2019 will be authenticated and migrated to one single user
sign on. If you have multiple login profiles linked to your identity/passport number, a list of your
profiles will display (after you have been authenticated). You will be required to choose a primary
login from the list. All your profiles will still be accessible once you logged in with your primary
credentials. You can link your other logins as “Portfolios” to your profile.
4.2 PORTFOLIOS
A registered eFiler can act in different “roles” on eFiling (e.g. tax administrator). These “roles” are
referred to as Portfolio Types. For example:
• Individual – a person acting as himself/herself to administer his/her own individual taxes
• Tax Practitioner – a person registered with SARS and a Recognised Controlling Body (RCB)
and has a signed power of attorney to act on behalf of another taxpayer.
• Organisation – a representative of a tax paying entity acting either as the representative
taxpayer (e.g. Public Officer, Executor of an estate, etc.) or an appointed representative with a
signed Power of Attorney in place.
eFilers with a Tax Practitioner and Organisation portfolio type can:
• Activate multiple taxpayers against that portfolio type
• Group taxpayers under the same portfolio type
• Specify a descriptive name for each group (for ease of reference).
If you registered different portfolio types prior to 1 July 2019, you would have accessed the
abovementioned portfolios by using a unique username and password for each. As from 1 July 2019,
you will only use one username and password (referred to as the primary login) to login to eFiling.
You can then choose the portfolio that you want to access.
EXTERNAL GUIDE - HOW TO REGISTER Revision: 12 Page 5 of 48
FOR EFILING AND MANAGE YOUR USER
PROFILE
GEN-ELEC-18-G01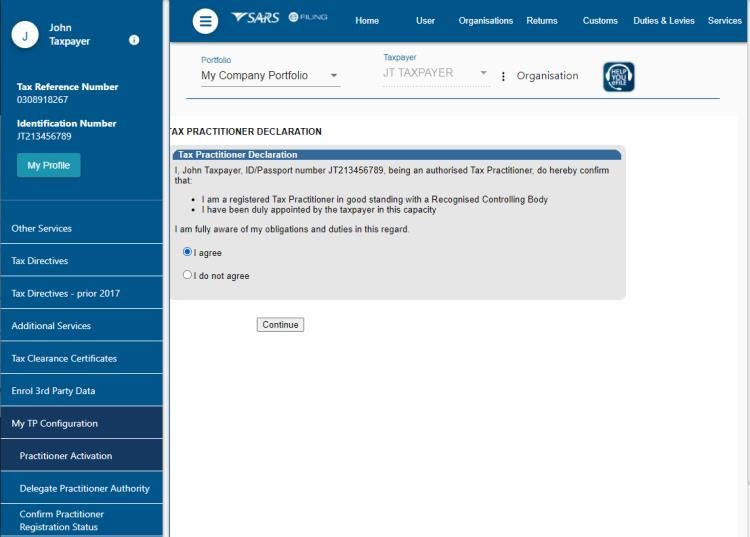
PASSWORD RULES
When creating or changing a password on eFiling please ensure that the password contains a
minimum of 8 characters and has at least one of the following:
• uppercase letter
• lowercase letter
• special character
• numeric digit.
ONE-TIME PIN (OTP)
The OTP is a unique 6-digit security PIN and you will be required to enter this pin as confirmation
when performing certain functions on eFiling.
• You can choose to receive an OTP via SMS or via an email address. Your preferred method of
communication for the OTP can be maintained via your eFiling profile.
• For security reasons, the OTP is time-sensitive and you will be required to enter it within the time
period indicated. If you are unable to enter the OTP within the specified time, you may request
for it to be resent to you.
• For your security, you can only opt to resend an OTP twice.
CHATBOT - LWAZI
The chat bot icon appears on the bottom right side of your screen.
• Click on this icon and do the following to ask a question:
Type a question in the input text-box
Click on the button on your screen or press on your keyboard to submit the
question
Lwazi, the virtual assistant, will process your request and display the answers on your
screen.
• The following personal income tax services can also be requested via the virtual assistant. Note,
you will be prompted to provide certain information (e.g. ID number, email, cell number) to enable
us to authenticate you for the required service:
Request Tax Reference Number
Request Statement of Account
Request Refunds Status
Request Audit Status
Request Notice of Assessment
Request Call Back
REGISTRATION ON EFILING
8.1 HOW TO REGISTER AS A NEW USER ON EFILING
a) Log on to the SARS website. On the top right side of the home page is a list of SARS eFiling
options.
b) Select
• The eFiling Register screen will display.
EXTERNAL GUIDE - HOW TO REGISTER Revision: 12 Page 6 of 48
FOR EFILING AND MANAGE YOUR USER
PROFILE
GEN-ELEC-18-G01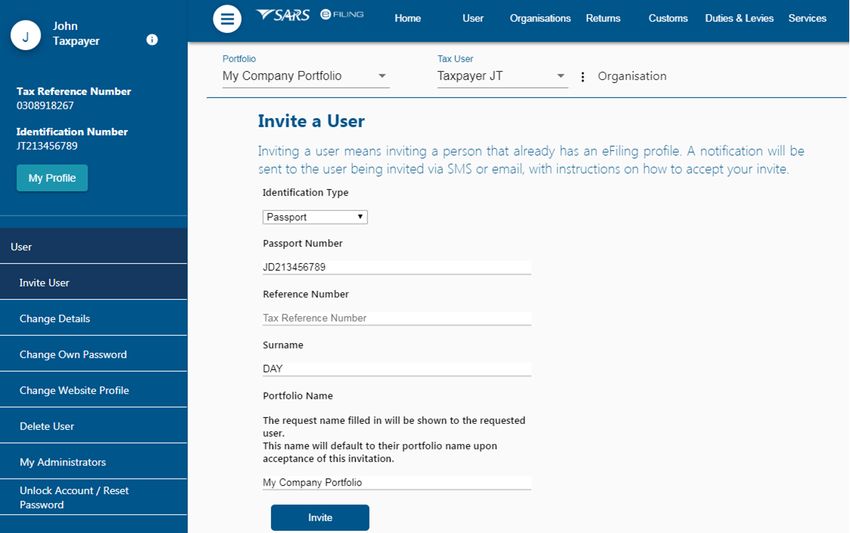
•     Complete your personal details and click on
      •     Complete your contact and login details and click on
      •     If the details entered are successfully matched with the SARS records, you will be
            presented with the One-Time-Pin (OTP) screen
      •     Please enter the OTP that is sent to either your cellphone number or your email address
      •     If the time period to enter the OTP expires you can click on . Note: for your
            security you can only select this option twice
      •     If you do not complete the OTP process successfully, you will have to start the registration
            process again
      •     Once you have successfully entered the OTP, the eFiling Login Screen will display (refer
            to the section on ‘First Time Login’ below).

  Please Note:

  •       If we cannot match the personal details that you entered, we may ask you a few random
          questions to authenticate you.

  •       If you have multiple income tax numbers or your income tax number is inactive/coded as
          a deceased estate or you are only registered for VAT/PAYE and not for income tax, you
          will be required to first visit your nearest SARS branch office to register for income tax or
          activate your income tax number.

  •       If our system identifies you as a registered eFiler, you will either have the option to login
          with your existing eFiling profile or recover your password (if you cannot remember it).

EXTERNAL GUIDE - HOW TO REGISTER                        Revision: 12                         Page 7 of 48
FOR EFILING AND MANAGE YOUR USER
PROFILE
GEN-ELEC-18-G01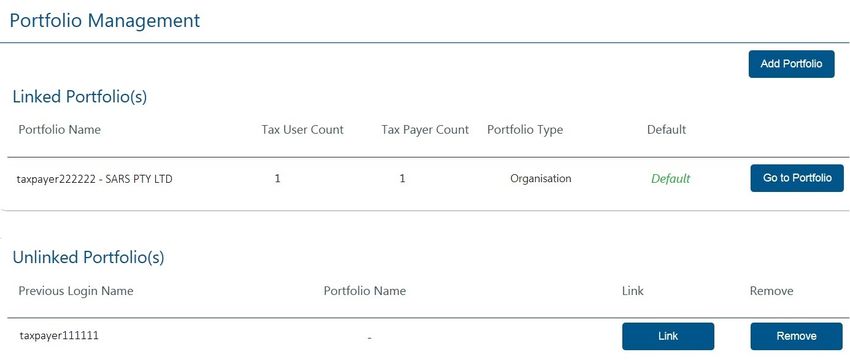
• If your tax number is already registered against another party’s eFiling profile (e.g. a tax
practitioner), you have the option to obtain shared access or revoke the other party’s
access.
8.2 REQUEST FOR ADDITIONAL INFORMATION TO FINALISE REGISTRATION
If we are unable to finalise your eFiling registration immediately we may request additional information
before we issue an OTP to you. Please follow the steps below in order for us to finalise your eFiling
registration as soon as possible.
a) A message will display confirming your registration request and prompting you to upload
supporting documents in order to finalise your eFiling registration.
• A case number will be allocated to you. Please quote this number when contacting SARS
to follow up on the progress of your eFiling registration.
• If you are logged out, please use the username and password that you provided during
the registration process.
• Please note: You will have 21 business days to upload the required documents.
• Click on .
b) The Registration Workpage will display. Click on to upload the required supporting
documents.
• The file size may not exceed 5mb.
• The following file types will be accepted:
.doc .docx .jiff
.jpeg .jpg .pdf
.png .xls .xlsx
• Follow the screen prompts to upload the documents
• Please ensure that you upload all the documents requested by SARS before you click on
the
Once the documents are submitted you will not be able to add more documents
unless you receive a new request from SARS
After you have uploaded the documents, click on .
SARS will receive the case for review.
• You can log in with your username and password at any time to view the status of your
registration (e.g. awaiting supporting document, documents submitted).
EXTERNAL GUIDE - HOW TO REGISTER Revision: 12 Page 8 of 48
FOR EFILING AND MANAGE YOUR USER
PROFILE
GEN-ELEC-18-G01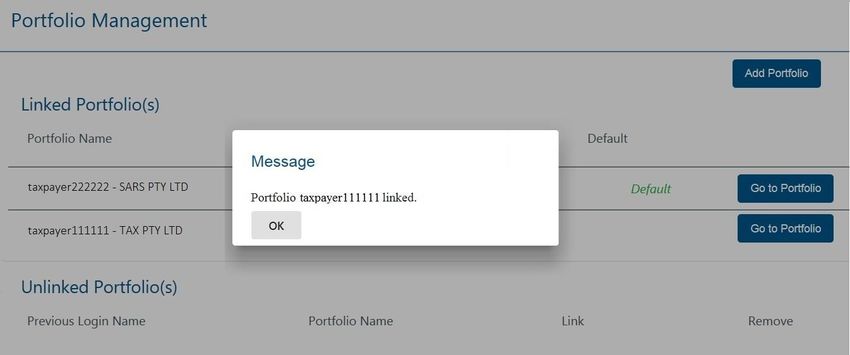
c)   Once SARS has verified your details, the status will change to ‘Request Successful’ and you will
     be notified via email and SMS.

     •     Click on the  button.
     •     Select your preferred method of communication and click on . The method
           you select will serve as your eFiling security contact details and will be used to send a
           One-Time-Pin (OTP) to authenticate you. Please enter the OTP sent to either your
           cellphone number or your email address.

d)   Once you have successfully entered the OTP, the eFiling Login Screen will display (refer to the
     section on ‘First Time Login’ below).

 EXTERNAL GUIDE - HOW TO REGISTER                    Revision: 12                       Page 9 of 48
 FOR EFILING AND MANAGE YOUR USER
 PROFILE
 GEN-ELEC-18-G01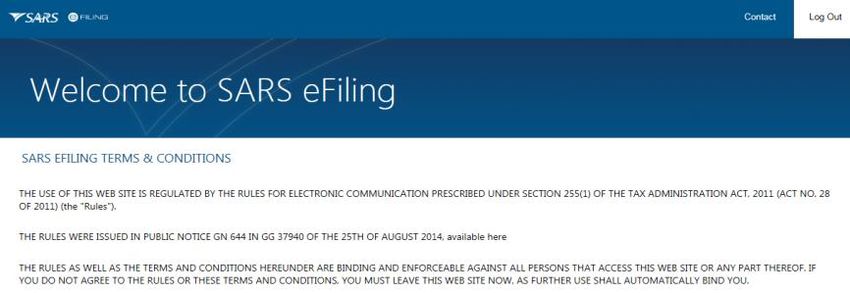
Please Note:

      You may be requested to complete your address details in the following instances:

      •       To assist us to automatically register you for income tax
      •       If you are already registered for income tax and we cannot match the details that you
              have entered with the SARS records.

8.3       AUTOMATIC REGISTRATION FOR INCOME TAX

When you register as a new eFiler, SARS will do the work for you and automatically issue a personal
income tax number to you if:

•         You are not yet registered for income tax
•         You have a valid South African ID number.

A Notice of Registration will be available to you, should you need to provide a third party (e.g. your
employer) with proof of your income tax number.

After you have successfully registered for eFiling, login with your user name and password, link the tax
number to your profile and follow the steps below to access your notice of registration:

•         Select  from the menu on the top
•         Select  from the menu on the left
•         Select
•         Click on .

    EXTERNAL GUIDE - HOW TO REGISTER                    Revision: 12                      Page 10 of 48
    FOR EFILING AND MANAGE YOUR USER
    PROFILE
    GEN-ELEC-18-G01
FIRST TIME LOGIN
9.1 FIRST TIME LOGIN FOR EFILING USERS REGISTERED ON/AFTER 1 JULY 2019
a) Log on to the SARS website. On the top right side of the home page select from the list
of eFiling options.
• Enter your eFiling Username and click on
• Enter your Password and click on
EXTERNAL GUIDE - HOW TO REGISTER Revision: 12 Page 11 of 48
FOR EFILING AND MANAGE YOUR USER
PROFILE
GEN-ELEC-18-G01b) The eFiling welcome screen will display.
• Please read the terms and conditions. At the bottom of the screen click on to
continue with the log in process.
c) You will be presented with a list of returns types as per SARS records.
• Please click on the button for each return type that you want to activate on your
profile
• Click on to remove a return type from your profile
• After you have selected the return type(s), click on .
EXTERNAL GUIDE - HOW TO REGISTER Revision: 12 Page 12 of 48
FOR EFILING AND MANAGE YOUR USER
PROFILE
GEN-ELEC-18-G01d) The eFiling home page will display. This screen is also referred to as the eFiling Dashboard
and provides a visual summary of your current tax affairs with SARS with regard to compliance,
outstanding returns and account balance(s). You can also view your statement of account and
any notifications sent by SARS.
Please Note:
• If you have multiple income tax numbers or your income tax number is inactive/coded
as a deceased estate or you are only registered for VAT/PAYE and not for income tax,
you will be required to first contact a SARS branch office to register for income tax or
activate your income tax number.
• If your tax number is already registered against another party’s eFiling profile (e.g. a tax
practitioner), you have the option to obtain shared access or revoke the other party’s
access.
EXTERNAL GUIDE - HOW TO REGISTER Revision: 12 Page 13 of 48
FOR EFILING AND MANAGE YOUR USER
PROFILE
GEN-ELEC-18-G019.2 FIRST TIME LOGIN FOR EFILING USER REGISTERED BEFORE 1 JULY 2019
9.2.1 USER WITH SINGLE LOGIN PROFILE
a) Log on to the SARS website. On the top right side of the home page select from the list
of eFiling options.
• Enter your eFiling Username and click on
• Enter your Password and click on .
• The eFiling welcome screen will display.
• Please read the terms and conditions. At the bottom of the screen click on to
continue with the log in process.
b) Select your preferred method of communication and click on .
• This will serve as your eFiling security contact details. We will send a One-Time-Pin (OTP)
to your preferred method of communication in order to authenticate you
• You can edit your contact details on this screen.
c) Please enter the OTP sent to either your cellphone number or your email address.
• Once the correct OTP is entered, the eFiling home page will display.
• This screen is also referred to as the eFiling Dashboard and provides a visual summary of
your current tax affairs with SARS with regard to compliance, outstanding returns and
account balance(s). You can also view your statement of account and any notifications
sent by SARS.
EXTERNAL GUIDE - HOW TO REGISTER Revision: 12 Page 14 of 48
FOR EFILING AND MANAGE YOUR USER
PROFILE
GEN-ELEC-18-G019.2.2 USER WITH MULTIPLE LOGIN PROFILES
a) Log on to the SARS website. On the top right side of the home page select from the list
of eFiling options.
• Enter your eFiling Username and click on
• Enter your Password and click on
• Please read and accept the terms and conditions (refer to the section above).
b) After you have accepted the terms and conditions, a screen will display with a list of all the login
profiles linked to your identity/passport number prior to 1 July 2019.
• Please select the primary login name that you would prefer to use going forward. All your
profiles will still be accessible once you logged in with your primary credentials.
c) If you select a primary login (e.g taxpayer111111 as illustrated in the screen below) that is
different to the profile that you are currently logged in with (e.g. taxpayer222222), you will be
prompted to enter the password for the primary login you select (i.e taxpayer111111). If you do
not remember the password, click on to reset it.
d) Once you have selected the primary login, click on . On the next screen select your
preferred method of communication and click on .
• This will serve as your eFiling security contact details. We will send a One-Time-Pin (OTP)
to your preferred method of communication in order to authenticate you
• You can edit your contact details on this screen.
EXTERNAL GUIDE - HOW TO REGISTER Revision: 12 Page 15 of 48
FOR EFILING AND MANAGE YOUR USER
PROFILE
GEN-ELEC-18-G01e) Please enter the OTP sent to either your cellphone number or your email address. A message
will display confirming that your primary login has been sucessfully set-up. Click on .
f) The Portfolio Management screen will display for you to link, unlink or add portfolios. For more
information please refer to the Portfolio Management section below.
Please Note:
• After you have selected and confirmed your primary login, you must only use that login
to access eFiling. If you attempt to login with any other portfolio that is linked to your
identity/passport number, the following error message will display:
EXTERNAL GUIDE - HOW TO REGISTER Revision: 12 Page 16 of 48
FOR EFILING AND MANAGE YOUR USER
PROFILE
GEN-ELEC-18-G01“According to our records you have already chosen your Primary Login. Please Login
with your Primary Login details and then activate your other profiles in the Portfolio
Management section on eFiling.”
• If you are an individual with multiple logins and you try to login with the username that is
not linked to your personal income tax number, the following message will display:
“Our records indicate that your own personal income tax is associated to one of your
other existing Login details. Due to improved security measures implemented, please
authenticate this profile by providing the applicable password below. Note – should you
not be able to authenticate this profile now, you may be required to do so at a later
stage to gain access to certain online transactions.”
9.3 ACCESS TO MY PROFILE
When you log in for the first time and your tax number(s) is already registered against another party’s
eFiling profile (e.g. a tax practitioner), the system will display the name of the party who has access to
the tax type. You have the option to obtain shared access or revoke the other party’s access.
a) Select the type of access you require (see below) and click on :
• - this option will only allow you to view transactions
done on your behalf on eFiling
• - this option will allow you to have full shared access and
the other party will still retain access rights to the tax type
•
• - This option will display if you currently have shared access with
your tax practitioner
•
PROFILE AND PREFERENCE SETUP
This function is used to manage your primary login details, security contact details, two-factor
authentication and passwordless login (each item is discussed in the sub-sections below).
EXTERNAL GUIDE - HOW TO REGISTER Revision: 12 Page 17 of 48
FOR EFILING AND MANAGE YOUR USER
PROFILE
GEN-ELEC-18-G01You cannot change your tax reference number and identity/passport number on this screen.
10.1 CHANGE SECURITY CONTACT DETAILS:
a) Select from the menu on the left and click on
• Scroll to the section
• Insert your new email address and/or your new cell number
• Select your preferred method of communication
• Click on
• On the pop-up screen that displays, select your preferred method of communication to
receive the One-Time-Pin number
• After you have entered the correct OTP, a message will display confirming that your
security contact details have been updated successfully.
10.2 CHANGE USER NAME AND PASSWORD:
a) Select from the menu on the left and click on
• Scroll to the section
• Insert your new username (you may user your email address as your username)
• Insert your new password
• Insert your new password again to confirm it
• Click on
• An OTP will be sent to your preferred method of communication
• After you have entered the correct OTP, a message will display confirming that your
username and password have been updated successfully.
10.3 TWO-FACTOR AUTHENTICATION USING ONE TIME PIN
Two-factor authentication is an additional security measure and requires you to provide your
password as well as a second factor of authentication to login to eFiling. If you prefer to use the OTP
method for additional authentication follow the steps below:
EXTERNAL GUIDE - HOW TO REGISTER Revision: 12 Page 18 of 48
FOR EFILING AND MANAGE YOUR USER
PROFILE
GEN-ELEC-18-G01a) Select from the menu on the left and click on
• Select the button to switch ‘two-factor authentication’ on
• Select
• Click on
• An OTP will be sent to your preferred method of communication
• After you have entered the correct OTP, a pop-up message will display confirming that
your two-factor authentication has been successfully activated.
• Going forward, you will be required to do the following each time you log on to your profile
via the eFiling website:
Enter username
Enter password
Enter OTP.
10.4 TWO-FACTOR AUTHENTICATION USING THE EFILING MOBILE APP
a) If you prefer to use the mobile app for additional authentication, please download the SARS
Mobile App from your app store. Once you have downloaded the app onto your device, follow
the steps described below.
b) Log on to the eFiling website:
• Select from the menu on the left and click on
• Select the button to switch ‘two-factor authentication’ on
• Select
• Click on the button
• You will be issued with an OTP to confirm the device you want to enrol
• A pop-up screen will display with a QR Code and instructions. Please ensure that you only
click the button on this screen after the device enrolment is completed (refer to step
c below) else the device will not be added to your eFiling profile.
EXTERNAL GUIDE - HOW TO REGISTER Revision: 12 Page 19 of 48
FOR EFILING AND MANAGE YOUR USER
PROFILE
GEN-ELEC-18-G01c) Launch the mobile app on your device:
• Click on the ellipses ( ⋮ ) on the top right corner of the screen to display the menu
• Select
• Use your device to scan the QR code displayed on the eFiling website
• Once the QR Code is scanned successfully, a message will display to confirm that your
device has been enrolled
• Click on the button to complete the enrolment
• The device will automatically be added as part of your linked devices on eFiling
• For more information on how to use the app please refer to the ‘Guide to the SARS
MobiApp’ which is available on the SARS website.
EXTERNAL GUIDE - HOW TO REGISTER Revision: 12 Page 20 of 48
FOR EFILING AND MANAGE YOUR USER
PROFILE
GEN-ELEC-18-G01d) After the device has been enrolled, you will be required to do the following each time you log on
to the eFiling website:
• Enter username
• Enter password (the “Two Factor Authentication” timer will display)
• Click on on your mobile device to authorise the request before the timer
expires. You will be logged in to the eFiling website.
Please Note:
• A device can only be enrolled on one eFiling profile at a time. If you try to enrol a device
that is already linked to another eFiling profile, an error message with display. If you
would like to enrol the device on a another eFiling profile:
Logon to the existing eFiling profile > Navigate to the Two Factor Authentication
function > click on the ellipses ( ⋮ ) menu and select the option to remove the
device.
Logon to the new eFiling profile > Navigate to the Two Factor Authentication
function > Follow the steps above to enrol the device.
• If two factor authentication is activated on your eFiling profile and you uninstall the mobile
app or clear the app data, you will no longer receive the authorisation notification on your
mobile device (even though the eFiling website will display the two factor authentication
“timer”). In this instance:
Select on the two factor authentication timer screen to log on
Remove the device from your profile
Reinstall the mobile app and enrol the device again.
10.5 PASSWORDLESS LOGIN
Passwordless Login enables you to use your mobile device to approve the eFiling login request
instead of typing in your password.
a) Please download the SARS Mobile App from your app store. Once you have downloaded the
app onto your device, follow the steps described below.
e) Log on to the eFiling website:
EXTERNAL GUIDE - HOW TO REGISTER Revision: 12 Page 21 of 48
FOR EFILING AND MANAGE YOUR USER
PROFILE
GEN-ELEC-18-G01• Click on on the menu on the left and select
• Select the button to switch on
• Select
• Click on the button. A pop-up screen will display with a QR Code and
instructions.
f) Launch the mobile app on your device. Follow the steps described in the section “Two-Factor
Authentication Using the Efiling Mobile App” to enrol your device.
Please Note:
• You can either switch on Passwordless Login or Two-factor Authentication on your
profile, however both can never be switched on at the same time.
PORTFOLIO MANAGEMENT
The Portfolio Management function is used to link, and add various portfolios (roles) on your eFiling
profile, such as:
• Your individual portfolio to manage your own personal taxes
• Multiple company portfolios where you are the registered representative (e.g. public officer) or
employee and you manage the taxes of those companies
• Multiple tax practitioner portfolios where you manage the taxes of multiple individuals/entities as
a tax practitioner.
You can also opt to have all your roles merged into one company or tax practitioner profile if you so
wish.
a) Once you have logged on to eFiling:
• Select from the menu on the left
• Select .
• The Portfolio Management screen will display for you to link, unlink, or add portfolios.
EXTERNAL GUIDE - HOW TO REGISTER Revision: 12 Page 22 of 48
FOR EFILING AND MANAGE YOUR USER
PROFILE
GEN-ELEC-18-G01b) You will be prompted to enter the password for each portfolio that you want to link.
• If you do not remember the password, click on to reset it
• After you enter the correct password, a message will display to confirm that the portfolio
has been linked.
c) You can set a default portfolio so that the sytem automatically displays this portfolio when you
login instead of you having to select it each time. To change the default portfolio, click on the
ellipses ( ) menu icon and then either select or .
• You cannot have more than one default portfolio
• Portfolios that are not linked cannot be set as a default profile.
d) To change the portfolio type, click on the ellipses ( ) menu icon and select .
EXTERNAL GUIDE - HOW TO REGISTER Revision: 12 Page 23 of 48
FOR EFILING AND MANAGE YOUR USER
PROFILE
GEN-ELEC-18-G01• Select the portfolio type (i.e. Individual / Tax Practitioner / Organisation) from the drop
down menu and click on
• You can have multiple Tax Practitioner and Organisation portfolios on your profile
• You can only have one Individual portfolio linked to your profile.
e) You can rename your portfolios for your ease of reference. Click on the ellipses ( ) menu icon
and select . Insert the new description for the portfolio and click on .
f) To link a new portfolio to your profile, click on the button. On the pop-up screen,
insert the portfolio name, select the and click on
• You can choose to set the new portfolio as your default
• You can add taxpayers and users to this portfolio.
EXTERNAL GUIDE - HOW TO REGISTER Revision: 12 Page 24 of 48
FOR EFILING AND MANAGE YOUR USER
PROFILE
GEN-ELEC-18-G01MANAGE USERS ON AN ORGANISATION OR TAX PRACTITIONER
PORTFOLIO
12.1 INVITE, EDIT AND DELETE A USER ON A PORTFOLIO
This function is used to add new users to a portfolio, grant access to tax types, set the required levels
of authorisation for each user and delete users.
To successfully add users to portfolios, actions are required from both the following parties:
• The Requestor – this refers to an existing user that has the ‘Manage User’ role assigned to him/her
and wants to invite another person to be a user and have access to the organisation or tax
practitioner portfolio.
• The User – this is the person (e.g. a tax practitioner’s employee) who has been invited to have
access to one or more taxpayers that are managed by the requestor.
a) To access the required Organisation or Tax Practitioner portfolio:
• Select and from the menu on the left
• Click on .
b) Once you have selected the required Portfolio:
• Select from the menu on the top
• Select again from menu on the left
• Select
• Complete the following information for the user you are inviting
Identification Type
Passport or ID Number
Tax Reference Number (only applicable if identification type is passport)
Surname
The default Organisation or Tax Practitioner Portfolio name that you want the user
to view on his/her portfolio upon accepting your invite
• Click on .
c) Select the roles (i.e. permissions) that you want to assign to the user.
EXTERNAL GUIDE - HOW TO REGISTER Revision: 12 Page 25 of 48
FOR EFILING AND MANAGE YOUR USER
PROFILE
GEN-ELEC-18-G01• Examples of roles:
‘Manage Transfer Duty Financial Account’ (allows users to maintain all financial
detail against the Transfer Duty account)
‘SARS Registration’ (allows users to register taxpayers with SARS to obtain tax
reference numbers)
‘RLA – View Customs Product information’ (allows users to only view information
such as address, contact and bank account details and information relating to their
specific client type(s) e.g. importer/exporter)
‘RLA - View Client Type (allows users to only view information relating to their
specific client type(s) e.g. importer/exporter)
‘RLA – Manage Customs Product information’ (allows users to view and change
information such as address, contact and bank account details and also change
information relating to their specific client type(s) e.g. importer/exporter)
‘RLA - Manage Client Type’ (allows users to only view and change information
relating to their specific client type(s))
‘Manage Users’ (allows users to add & change users and assign them to groups)
‘Manage Taxpayers’ (allows users to add & change taxpayers and assign them to
groups)
‘Manage Groups’ (allows users to create & change groups and assign users and
payers to groups)
‘Manage Excise Financial Account’ (allows users to maintain all financial detail
against an Excise Account)
‘Manage Deferment Account’
‘ISV Activation’ (allows users access to the ISV activation screen)
‘Directives’ (allows users to access the tax directives functionality)
‘Perform Bulk and Additional Payments’ (allows users without full admin rights
access to perform bulk and additional payments).
• Click on
• A summary of the roles selected will display. Click on .
• The invite will be sent to the user. You will be notified via email or SMS once the user
accepts the invite.
EXTERNAL GUIDE - HOW TO REGISTER Revision: 12 Page 26 of 48
FOR EFILING AND MANAGE YOUR USER
PROFILE
GEN-ELEC-18-G01d) Select from the menu on the left to do any of the following:
• Send Reminder – this option will resend the notification to the user to remind him/her to
accept the invite.
• Cancel Invitation – this option will delete the invite, remove the user on the requestor’s
portfolio and also remove the requestor’s profile from the user’s portfolio management
screen.
• Update User Rights – use this option to edit roles (permissions) assigned to the user.
e) Select from the menu on the left to remove a user from an existing portfolio.
EXTERNAL GUIDE - HOW TO REGISTER Revision: 12 Page 27 of 48
FOR EFILING AND MANAGE YOUR USER
PROFILE
GEN-ELEC-18-G01• Insert a reason for deleting the user
• Click on
• On the pop-up message click on to confirm your request.
Please Note:
• Only a person with an existing eFiling profile can be added as a user on a portfolio. Once
an invite is sent by the requestor, the user will receive an SMS and email notification with
instructions on how to accept the invite.
• A requestor will not be allowed to invite a user should any of the following conditions
apply:
SARS cannot find a match for the user details entered
The user registered for eFiling prior to 1 July 2019 and has not yet logged in to set
up his/her profile on the new eFiling website
The user has not yet completed his/her eFiling registration
The user already exists on the portfolio he/she is being invited to.
12.2 ACCEPT INVITE TO BE A USER ON A PORTFOLIO
SMS and email notifications will be sent to the person who has been invited to be a user on an
organisation or tax practitioner’s portfolio.
a) Log on to your eFiling profile.
• Select
• Select
• The User Invitation will display. Click on .
EXTERNAL GUIDE - HOW TO REGISTER Revision: 12 Page 28 of 48
FOR EFILING AND MANAGE YOUR USER
PROFILE
GEN-ELEC-18-G01b) As part of the authentication process, you will be prompted to enter the One-Time-Pin (OTP) sent
to your preferred method of contact. Once the OTP is successfully entered, a pop message will
display to confirm that the organisation/tax practitioner profile will be linked to your profile.
Please Note:
• The invite from the requestor will automatically expire if not accepted by the user within
5 working days.
• If the invite expires, the record will be deleted on both the requestor’s and user’s portfolio.
• A notification will be sent to the requestor to notify him/her that the invite has expired.
The requestor can opt to send a new invite.
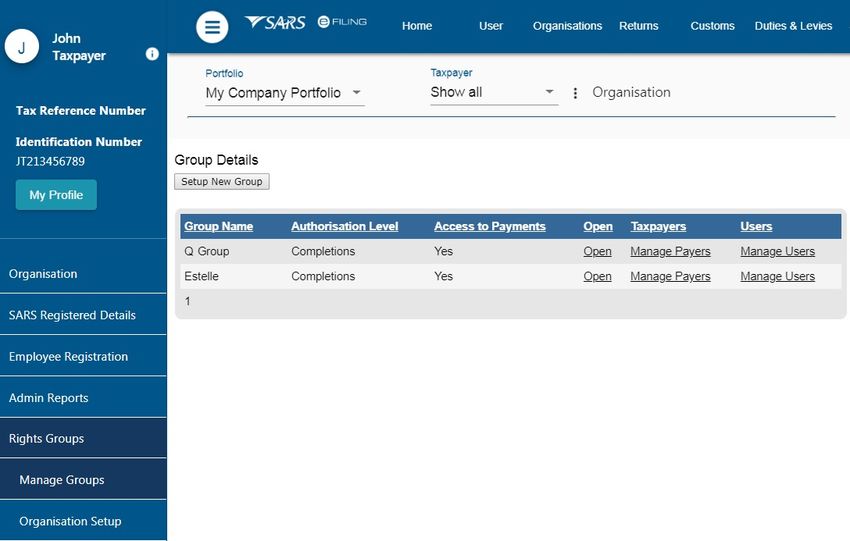
MANAGE GROUPS
In order to activate the tax type functions and services on eFiling (e.g. Tax Directives, Tax Compliance
Status, etc) you must ensure that the correct rights and authorisation levels have been allocated to
users on your organisation’s portfolio.
a) To activate the tax type functions and services:
• Select from the menu on the top
• Select again from menu on the left
EXTERNAL GUIDE - HOW TO REGISTER Revision: 12 Page 29 of 48
FOR EFILING AND MANAGE YOUR USER
PROFILE
GEN-ELEC-18-G01• Click on
• Click on
• The screen will display.
Click on the button to create a new group (e.g. Return
Submissions)
Click on the hyperlink to add Taxpayers (activated on your
organisation’s portfolio) to a specific group
Click on the hyperlink to add users on your organisation’s portfolio
to a specific group (for more information refer to the section on manage users).
b) To amend the details of an existing group click on the hyperlink:
• Edit the where applicable
• Select the applicable :
View Only: This will allow you to only have view access
Completions: You will only be able to view and complete forms or applications
Submissions: You will be allowed to view, complete and submit forms (e.g tax
directive applications)
• Select the applicable tax types to be activated (e.g. Directives, Tax Reference Number,
Tax Compliance Status, etc.)
• Click to activate the specific tax type functionality required. You also have the
option to .
EXTERNAL GUIDE - HOW TO REGISTER Revision: 12 Page 30 of 48
FOR EFILING AND MANAGE YOUR USER
PROFILE
GEN-ELEC-18-G01MANAGE TAXPAYERS ON AN ORGANISATION OR TAX PRACTITIONER
PORTFOLIO
a) To manage taxpayer types linked to a portfolio:
• Select from the menu on the top
• Select from menu on the left.
b) To amend details of an existing taxpayer on your portfolio select from the
menu on the left.
c) To add a new taxpayer/entity type to your portfolio:
• Select from the menu on the left
• Select the from the drop down list (e.g. individual, company, trust, fund)
The registration fields displayed will differ according to the type of entity selected
• Complete the applicable fields and click on
• On the pop-up screen select the group(s) to which the taxpayer should be added (for more
information refer to the section on Manage Groups)
• A summary of the new taxpayer’s details will display. Click on
• Refer to the section on Manage Tax Types for more information on how to activate
return/tax types for a taxpayer.
EXTERNAL GUIDE - HOW TO REGISTER Revision: 12 Page 31 of 48
FOR EFILING AND MANAGE YOUR USER
PROFILE
GEN-ELEC-18-G01Please Note:
• You will only have access to the ‘Register New’ function if the Manage Taxpayer rights
have been assigned to you
• The system will display a message if the taxpayer you want to add already exists on
another portfolio where you also have manage taxpayer rights. You will have the option
to add the taxpayer to the current portfolio
MANAGE TAX TYPES
The purpose of this function is to enable the following:
• Activation/Deactivation of specific tax types – In order to transact on eFiling (e.g. submit
returns, make payments, request statement of account) the applicable tax type must be activated
on your profile
• Transfer of tax types (personal income tax and provisional tax) between taxpayers, tax
practitioners and registered representatives on eFiling.
The owner/registered representative of that tax number must approve the transfer in order to
complete the process.
15.1 INDIVIDUALS
a) To activate/deactivate tax types on your individual portfolio:
• Click on
• Select from the menu on the left
• Select and then click on
• A list of taxes you are registered for will display.
• Select the items that you want to activate/deactivate. Click on .
• A summary of the actions will display. Click on to confirm the action.
EXTERNAL GUIDE - HOW TO REGISTER Revision: 12 Page 32 of 48
FOR EFILING AND MANAGE YOUR USER
PROFILE
GEN-ELEC-18-G01b) If your tax type is activated with another party (e.g. tax practitioner), you can navigate to the
function and select one of the following options at any time:
•
•
•
15.2 ORGANISATIONS AND TAX PRACTITIONERS
a) To activate/deactivate tax types for taxpayers on your portfolio, click on the ellipses ( ) menu icon
• Search for the specific taxpayer using the name, registration number, ID number or tax
reference number
• Click on the button. This option will load the existing taxpayer details.
EXTERNAL GUIDE - HOW TO REGISTER Revision: 12 Page 33 of 48
FOR EFILING AND MANAGE YOUR USER
PROFILE
GEN-ELEC-18-G01c) The ‘Tax Types Details’ screen will display with the following buttons:
• – used to update eFiling correspondence details only. To update
your security contact details please use the function
• – used to activate/deactivate specific taxes that you represent the
client for
• – used to add the taxpayer to a group if you have the manage taxpayer
rights.
d) Click on
• A table will display with the following information:
List of tax types linked to the selected taxpayer
Reference numbers
Activation Status
Action that can be selected for that number (e.g. request activation, request tax type
transfer, deactivate)
EXTERNAL GUIDE - HOW TO REGISTER Revision: 12 Page 34 of 48
FOR EFILING AND MANAGE YOUR USER
PROFILE
GEN-ELEC-18-G0115.2.1 Request Activation or Transfer of Tax Type
a) Select the tick-boxes for the applicable actions required (example: “Request Activation” or
“Request Tax Type Transfer
• Click on the button.
• A screen will display with the summary of the actions you selected. Click on
b) The status of the request will change to awaiting authorisation and will require the current
owner/representative of the tax number to approve the request in order to complete the process.
c) If the owner/representative approves the request, the status will change to “Successfully
Activated”.
EXTERNAL GUIDE - HOW TO REGISTER Revision: 12 Page 35 of 48
FOR EFILING AND MANAGE YOUR USER
PROFILE
GEN-ELEC-18-G0115.2.2 Approve Request for Tax Type Activation or Transfer
a) A notification will be sent to the current owner/representative to inform him/her:
• Of the transfer request, and
• The steps to follow to action the request
b) The owner/registered representative must follow the steps below to action the request and
complete the process.
• Log on to the SARS website and select on
• On the Tax Type Transfer screen select yes or no to indicate if you are a South Africa
Citizen
• Insert your own identification number and the tax number for which the transfer is
requested. Click on
• As part of the authentication process, you will be required to enter a One-Time-Pin (OTP).
• Insert the OTP sent to your email or cell number and click on .
EXTERNAL GUIDE - HOW TO REGISTER Revision: 12 Page 36 of 48
FOR EFILING AND MANAGE YOUR USER
PROFILE
GEN-ELEC-18-G01b) Read the declaration and the details of the party requesting the tax type transfer and print the
Power of Attorney
• Select or
• Click on
• After you have authorised or declined the request, click on .
c) If you are a registered eFiler, you can log on to eFiling to view a list of tax type requests that
require your authorisation:
• Navigate to the function
EXTERNAL GUIDE - HOW TO REGISTER Revision: 12 Page 37 of 48
FOR EFILING AND MANAGE YOUR USER
PROFILE
GEN-ELEC-18-G01• Click on
Please Note:
• When a taxpayer or registered representative authorises the transfer request, the tax
type will move from the holding party (e.g. old tax practitioner) to the requesting party
(e.g. new tax practitioner). If the taxpayer or registered representative has shared access
with the holding party, shared access will be established with the requesting party.
• When a taxpayer or registered representative rejects the initial transfer request the
requesting tax practitioner will be allowed up to two more retry options to request the tax
type transfer.
If the two retries are exhausted, the tax practitioner will not be allowed to submit any
further tax type transfer requests for that particular taxpayer for a period of 21 business
days
• If you have multiple portfolios, you can transfer tax types between portfolios:
We will check if the portfolio/profile has ‘Manage Payer Rights’ on both the
requesting and holding portfolio. Once verified the tax type will be transferred
immediately.
• Where the owner or registered representative does not approve the request for tax type
transfer after 5 working days, 3 reminders will be sent. If there is no action from the owner
or registered representative after the last reminder is sent, the request to transfer the tax
type will expire.
• A tax type transfer will be disallowed if:
You are not a registered tax practitioner
You are not the registered representative for that taxpayer
You are a user with the ‘Manage Payer Rights’ but you are not the registered
representative/valid tax practitioner of the individual whose provisional tax or
personal income tax type is being requested.
15.2.3 Tax Types Legacy
a) The legacy menu items will be available for a temporary period and is intended to allow users to
view/monitor requests made via the previous Tax Type Transfer functionality (prior to the
implementation of the Manage Tax Type function).
EXTERNAL GUIDE - HOW TO REGISTER Revision: 12 Page 38 of 48
FOR EFILING AND MANAGE YOUR USER
PROFILE
GEN-ELEC-18-G01b) To access the legacy requests
• Select from the menu on the top.
• Select from the menu on the left
• Select from the menu on the left
c) - this function is read-only and allows you to view tax types
previously activated for a particular taxpayer
d) - this function allows you to access the list of previous tax type
transfer requests.
• You can open individual requests
• Where applicable you can capture an override code that was sent for a legacy request
(prior to the implementation of the Manage Tax Types function)
• You will not be able to create any new tax type transfer requests.
EXTERNAL GUIDE - HOW TO REGISTER Revision: 12 Page 39 of 48
FOR EFILING AND MANAGE YOUR USER
PROFILE
GEN-ELEC-18-G01e) - There may be cases where SARS needs to review a request
before activating the particular tax type for eFiling. In this instance the status of the tax type
activation will be “Awaiting Registration Verification” and a case number will be allocated to you.
You can use this function to view the pending registration requests.
• Select the option for all taxpayers
• Click on the hyperlink
• You can view the taxpayer’s details and click on to view the progress of
the eFiling registration.
EXTERNAL GUIDE - HOW TO REGISTER Revision: 12 Page 40 of 48
FOR EFILING AND MANAGE YOUR USER
PROFILE
GEN-ELEC-18-G01ACTIVATE REGISTERED REPRESENTATIVE
a) If you are the appointed registered representative for an entity, you must activate the status on
eFiling in order to transact on behalf of your client.
• Select from the menu on the top.
• Select from the menu on the left
• Select
• Select the applicable option (i.e. Tax Practitioner or Registered Representative)
• Agree to the declaration confirming that you are the authorised representative for the
taxpayer and click on
• Complete the applicable fields and select the representative capacity (e.g. accounting
officer, curator, public officer, parent guardian, etc.)
• Click the on the activate button at the bottom of the screen
TAX PRACTITIONER CONFIGURATION
This functionality enables tax practitioners to confirm their tax practitioner status at SARS and allow tax
practitioners to link practitioner users to other activated practitioner user profiles.
If a user is not a confirmed practitioner or has not been linked to a practitioner user, access to ITR12
returns will be limited to only a “SAVE” functionality. This means that the tax practitioner or
practitioner user will not be able to submit the ITR12 returns to SARS and the taxpayer will have to
either submit the return via eFiling (if he/she has got shared access to the ITR12 with the tax
practitioner) or the taxpayer will have to contact a SARS branch office for assistance to submit the
return.
a) To access this functionality, click on on the menu on the top and select from the menu on the left.
EXTERNAL GUIDE - HOW TO REGISTER Revision: 12 Page 41 of 48
FOR EFILING AND MANAGE YOUR USER
PROFILE
GEN-ELEC-18-G0117.1 PRACTITIONER ACTIVATION
a) Select from the menu on the left
• The Tax Practitioner Declaration will display. Read the declaration, select click
on the button
• On the screen enter a valid practitioner number in the tax
practitioner number field and click on the button.
Please Note:
• If the tax practitioner number is inactive and does not match with SARS, the status field
will be indicated as “Unconfirmed”. Tax practitioners are encouraged to register with
RCB’s and ensure that they are registered as a tax practitioner with SARS.
• If the tax practitioner number is valid and matches with SARS, the status field will be
indicated as “Registered”.
• If you wish to validate the status of an existing PR number on the profile, select the
“Reconfirm Status” button. A message will display that indicating that you have been
successfully confirmed as a registered tax practitioner.
17.2 DELEGATE PRACTITIONER AUTHORITY
Tax practitioners are allowed to link practitioner users to other activated practitioner users and thereby
delegate authority. This is typically in cases whereby staff members of an organisation are performing
functions on eFiling on behalf of the tax practitioner.
a) Select < Delegate Practitioner Authority > from the menu on the left
b) If the tax practitioner has not been activated against the eFiling profile, the following message
will be displayed. To activate, refer to “Practitioner Activation” step above.
EXTERNAL GUIDE - HOW TO REGISTER Revision: 12 Page 42 of 48
FOR EFILING AND MANAGE YOUR USER
PROFILE
GEN-ELEC-18-G01c) If the tax practitioner has been activated and the status is indicated as “Registered”, the
page will be displayed.
d) Choose the “PR number” that you want to delegate authority to:
• Administrators or the registered tax practitioner may perform actions on this page
The admin user on eFiling will be able to view all linked practitioners in the
dropdown.
If it is the user on eFiling, only his/her practitioner (PR) number will display on the
dropdown list for selection.
• Once the PR number has been chosen click on
• A list of users will display. Select the users and click on the button to continue
• Click on to confirm the selection. A message will display to indicate that the users
have been successfully updated.
EXTERNAL GUIDE - HOW TO REGISTER Revision: 12 Page 43 of 48
FOR EFILING AND MANAGE YOUR USER
PROFILE
GEN-ELEC-18-G0117.3 CONFIRM PRACTITIONER REGISTRATION STATUS
a) Select from the menu on the left
• The tax practitioner registration status page will display.
• Enter the tax practitioner number. Complete and verify the security pin displayed on the
screen
• Click the “Search” button to continue.
b) If the tax practitioner number is incorrect, the following error message will be displayed.
c) If no registered tax practitioner can be found, a message will be displayed on the screen.
d) If the tax practitioner is registered, the practitioner’s name, surname, practitioner number and
registration status indicated as “Registered” will be displayed.
EXTERNAL GUIDE - HOW TO REGISTER Revision: 12 Page 44 of 48
FOR EFILING AND MANAGE YOUR USER
PROFILE
GEN-ELEC-18-G01SARS CORRESPONDENCE
For your convenience all letters, notices and messages issued by SARS is available in one place
under ‘SARS Correspondence’.
d) To search for correspondence:
• Log on to eFiling and select from the menu on the left
• Click on
• The correspondence grid will display
• You can use one or more of the following filters to search for correspondence:
Tax type
Tax year
Received from date (i.e. start date)
Received to date (i.e. end date)
Correspondence Type (such as Letters, Notices and Text Messages issued by
SARS)
• Click on .
Please Note:
If you navigate to other eFiling pages after logging on, you will no longer see on the menu on the left. To navigate back to
select from the menu on the top.
FORGOT PASSWORD
a) On the eFiling login in screen click on and then enter your user name.
EXTERNAL GUIDE - HOW TO REGISTER Revision: 12 Page 45 of 48
FOR EFILING AND MANAGE YOUR USER
PROFILE
GEN-ELEC-18-G01b) Indicate if you want your OTP to be sent to your email or your cell number. Click on .
c) Insert your new password and retype it to confirm.
• Click on
• A pop-up message will display confirming that your password has been changed
sucessfully.
d) If you registered for eFiling prior to 1 July 2019 and did not provide your contact details, you will
be required to enter your cell number and email address.
• If we can match your details with our records, an OTP will be sent to you
• If we cannot match your details, we will ask you a few questions to authenticate you
• If we are still unable to match your details, please call the SARS Contact Centre for further
assistance.
FORGOT USERNAME
a) On the eFiling login in screen click on . Insert the following particulars:
EXTERNAL GUIDE - HOW TO REGISTER Revision: 12 Page 46 of 48
FOR EFILING AND MANAGE YOUR USER
PROFILE
GEN-ELEC-18-G01• Cell number
• Email
• Indicate if you are a South African citizen
• ID number (or Passport number if you are not a South African citizen)
• Tax number (if you have one).
b) If we can match your personal particulars, an OTP will be sent to your email address or your cell
number. Insert the OTP and click on .
c) Once you have entered the correct OTP, your username will display. You will be prompted to
insert a password and retype it to confirm.
• Click on
• A pop-up message will display confirming that your password has been changed
sucessfully.
d) If you registered for eFiling prior to 1 July 2019 and did not provide your contact details, you will
be prompted to select a preferred channel to receive your OTP.
• If we can match your details with our records, an OTP will be sent to you
• If we cannot match your details, we will ask you a few questions to authenticate you
• If we are still unable to match your details, please call the SARS Contact Centre for further
assistance.
EXTERNAL GUIDE - HOW TO REGISTER Revision: 12 Page 47 of 48
FOR EFILING AND MANAGE YOUR USER
PROFILE
GEN-ELEC-18-G01CONCLUSION
Please contact SARS should you require any further information which might not be addressed in this
guide.
DISCLAIMER
The information contained in this guide is intended as guidance only and is not considered to be a legal reference,
nor is it a binding ruling. The information does not take the place of legislation and readers who are in doubt
regarding any aspect of the information displayed in the guide should refer to the relevant legislation, or seek a
formal opinion from a suitably qualified individual.
For more information about the contents of this publication you may:
• Visit the SARS website at www.sars.gov.za
• Visit your nearest SARS branch
• Contact your own tax advisor/tax practitioner
• If calling from within South Africa, contact the SARS Contact Centre on 0800 00 SARS (7277)
• If calling from outside South Africa, contact the SARS Contact Centre on +27 11 602 2093 (only between
8am and 4pm South African time).
EXTERNAL GUIDE - HOW TO REGISTER Revision: 12 Page 48 of 48
FOR EFILING AND MANAGE YOUR USER
PROFILE
GEN-ELEC-18-G01You can also read