New World ERP 2018.1 INSTALLATION GUIDE - Tyler Technologies
←
→
Page content transcription
If your browser does not render page correctly, please read the page content below
New World ERP 2018.1
INSTALLATION GUIDE
June 22, 2018
Review important information for installing this release:
Install Tyler Identity before installing New World ERP. Click here for guide.
SSL is required for the New World ERP software. IIS needs to be configured to have
the Default Web Site setup to have https binding enabled using port 443.
Take a daily/hourly backup of the LogosRuntimeServices and HRReporting data-
bases.
“Additional Requirements” on page 2 (Microsoft .NET Framework 4.6 installed on
application server).
All user machines need .NET Framework 4 installed on them. (See “Additional
Requirements” on page 2.)
“IE ESC Settings on the Application Server” on page 2.
“Installation Matrix” on page 3 shows where each piece of the software is to be
installed.
“Installing Community Development myCommunity” on page 34.
“Managed Internet Update (MIU)” on page 39.
“Appendix B: Product Registration” on page 42.
Review hardware specs on Check.TylerTech.com.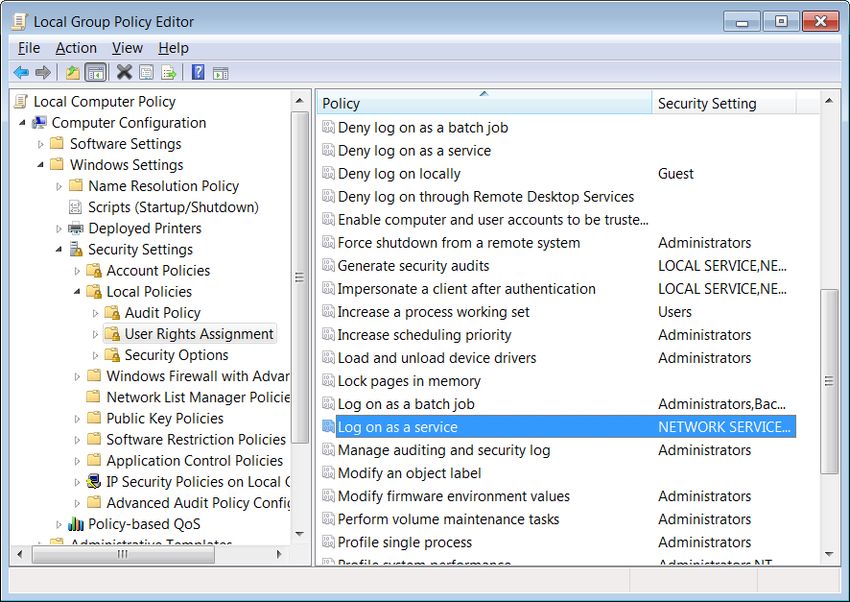
Important requirements before and after applying this update to your production environment

Before applying this update to your production environment

•   Apply the update to a test environment first. In terms of server configuration, the test environment
    should mirror the production environment as closely as possible.

•   Refer to the application specific testing checklists to test key pieces of functionality and interfaces. Each
    time a new release or service pack is readied for deployment, New World thoroughly tests all parts of the
    software; however, due to the configurability of the applications and each customer's unique deployment
    environment, we strongly recommend that you use the testing checklists each time you apply a hardware
    or software update. Testing checklists may be found on Help Central (https://nwerphelp.tylertech.com/
    nwerp_help_2018.1/Content/Home.htm). From the home page, type “Testing Checklist” in the search
    field.

•   Report to New World all problems that occur in the test environment so corrections can be made and con-
    firmed in the test environment.

After applying this update to your production environment

•   Revisit and re-execute the processes listed on the testing checklists, especially if there are significant dif-
    ferences between your production and test environments.

•   Register the product on your application server.

© 2018 Tyler Technologies. All Rights Reserved.

All rights reserved. Information within this document is the sole property of Tyler Technologies and is
protected by copyright and or trade secret regulations. Unauthorized copying or dissemination of this
information without the written permission of New World Systems is strictly prohibited. Information
within this document is subject to change without notice.

Printed in the United States of America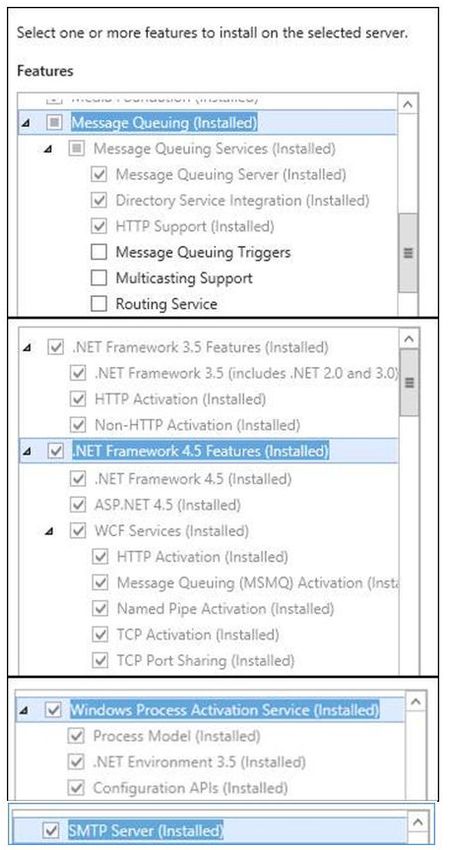
N EW WORLD ERP 2018.1 I NSTALLATION G UIDE
               This document provides details for installing the New World ERP 2018.1 Release. Please review
               the complete chapter before beginning the installation.

                           NOTE:
                       If this is your first installation at this release level, we recommend that you go to Help Central
                       (https://nwerphelp.tylertech.com/nwerp_help_2018.1/Content/Home.htm) to review the Release
                       Notes and What’s New pages, which will include more details about available features.

               Esri Support
               New World ERP now supports Esri releases 10.2 through 10.5.1.

               Release Requirements
               Operating Systems
                       •      Windows Server 2008 R2 (last supported release)
                       •      Windows Server 2008 x64 with Service Pack 2 or later (last supported release)
                       •      Windows Server 2012
                       •      Windows Server 2012 R2
                       •      Windows Server 2016

               Databases
                       •      SQL Server 2012 (last supported release)
                       •      SQL Server 2014 (Database in 2012 Compatibility Level)
                       •      SQL Server 2016 (Database in 2012 Compatibility Level)
                       •      SQL Server 2017 (Database in 2012 Compatibility Level)

               Client Machines (Please see the Technical Currency Matrix for more details on sup-
               ported client operating systems)
                       •      Windows 7
                       •      Windows 8 and Windows 8.1
                       •      Windows 10
                       •      4.14 macOS 10.12 Sierra
                       •      4.15 macOS 10.13 High Sierra

Last Revised: June 22, 2018                                        1                                           New World ERP Release 2018.1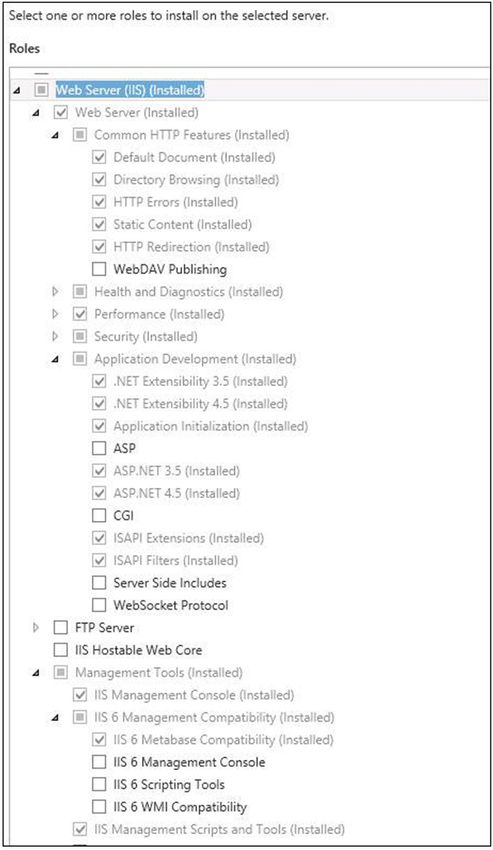
New World ERP 2018.1 Installation Guide

                   Browsers (Please see the Technical Currency Matrix for more details on supported cli-
                   ent browsers)
                          •     IE 11
                          •     Edge
                          •     Chrome
                          •     Firefox
                          •     Safari on Mac

                   New World ERP Releases
                          •     2017.1

                              NOTE:
                          Make sure year-end processing patch 2017.1.3 is applied to release 2017.1 before you
                          upgrade to 2018.1.

                   Additional Requirements
                          •     Microsoft .NET 3.5 and 4.6 on database and website hosting machine (Download site:
                                http://www.microsoft.com/en-us/download/details.aspx?id=48137)
                          •     Microsoft .NET 4.0 is required on client machines that make use of auto-printing to
                                local laser printers in the following areas of the software:
                                --Inventory Transaction-Issues
                                --Revenue Collection Receipts
                                --Collection Station Setup
                                Please note that this is only supported on Windows PCs and not Mac.
                          •     Windows 2016 users may use Microsoft .NET 4.6, 4.6.1 and 4.6.2.
                          •     JAVA JRE 8.X (64-bit) that is included with the Elasticsearch installer

                   IE ESC Settings on the Application Server
                                On the Application Server, IE ESC needs to be turned off for Administrator users
                                according to the instructions provided on the following website:
                                http://blogs.technet.com/b/chenley/archive/2011/03/10/how-to-turn-off-ie-esc.aspx
                                This configuration may be done at any time, and the machine should be rebooted
                                afterwards, if the configuration has not been done previously.

 New World ERP Release 2018.1                                    2                                            Last Revised: June 22, 2018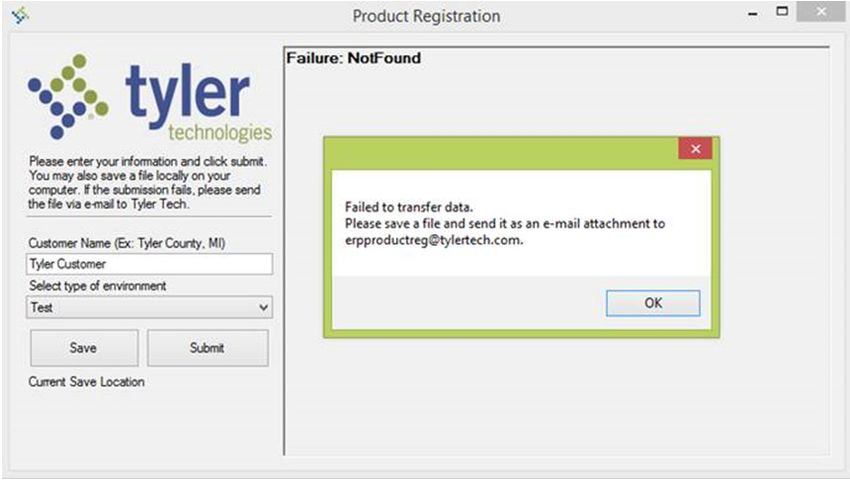
New World ERP 2018.1 Installation Guide

               Installation Matrix
               The chart below shows you where each piece of the software is to be installed, in the preferred
               install order:

               Time Required to Install the Update
               While the installation should go more quickly at most locations, please allow up to four hours of
               downtime for the update to be applied.

               Before You Install
               Before beginning the actual installation of the New World ERP update, it is important to perform
               the following steps:

                        NOTE:
                       You must install Tyler Identity before installing New World ERP. To view the Tyler
                       Identity Installation Guide, click here.

Last Revised: June 22, 2018                                   3                                        New World ERP Release 2018.1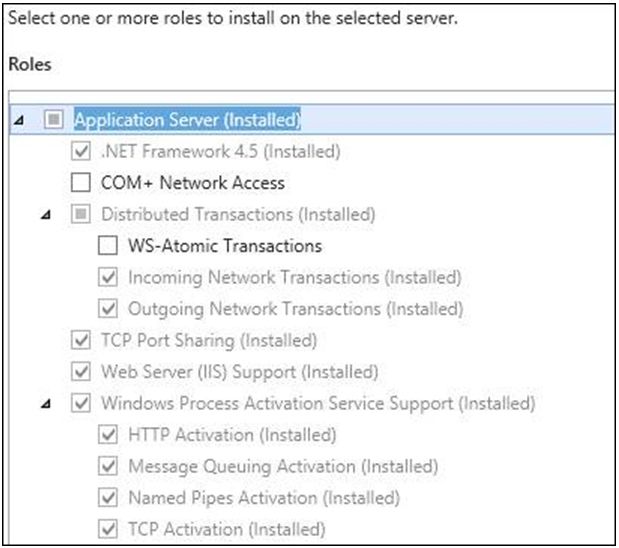
New World ERP 2018.1 Installation Guide

                           NOTE:
                          Please back up any custom DLL files (imports/exports) you may have before applying the
                          release. These files are typically found in {InstallDirectory}\Logos.Net\Custom. They may
                          need to be reapplied after the update.

                           NOTE:
                          For the steps in this section, if C:\ is not the drive on the application server where New World
                          ERP is installed, use the letter that corresponds to the correct drive.

                          1     Request a new license key from New World ERP Product Support. Upon receipt, unzip
                                the file and drag and drop it onto the licensing screen on the Management Console.
                                You should see a message like the following:

                          2     Create a backup of your most recent database.
                          3     Create a copy of the File Storage folder in C:\Program Files\New World Systems\
                                Logos.NET (or wherever New World ERP is installed). Place this copy outside of the New
                                World Systems directory.
                          4     Have all users sign off of the system.
                          5     Stop the New World ERP Management Console on the application server.
                          6     Exit the console.
                          7     Stop the Caching Console.
                          8     Exit the console.
                          9     If your organization licenses eSuite, stop the eSuite website on the eSuite server, as it
                                also points to the New World ERP database:
                                Open Internet Information Services (IIS) Manager.
                                In the Connections pane, open the Sites folder.
                                Right-click Default Web Site to open drop-down menu.
                                Point to Manage Web Site.
                                Click Stop.

 New World ERP Release 2018.1                                    4                                               Last Revised: June 22, 2018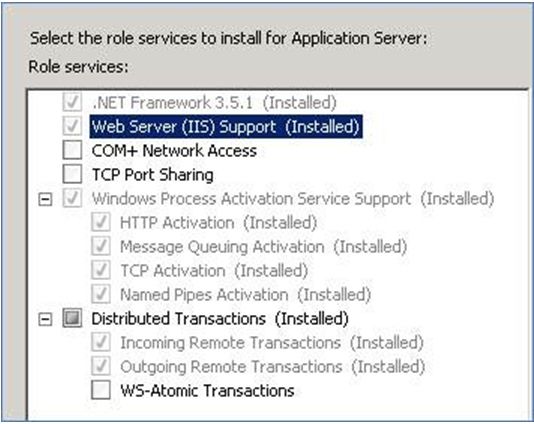
New World ERP 2018.1 Installation Guide
Hardware Recommendations
To review hardware recommendations for this release, please navigate to https://
check.tylertech.com. Use your personal email address and a password of Tyler to log in. Clicking
on New World ERP will get you to the hardware recommendations.
Windows Server 2008/2008 R2 Server Setup
Application Server Role
1 Run Server Manager.
2 In Server Manager, verify the Application Server Role has the following services
installed (note that Windows Server 2008 does not have the .NET Framework 3.5.1
option):
Web Server (IIS) Role
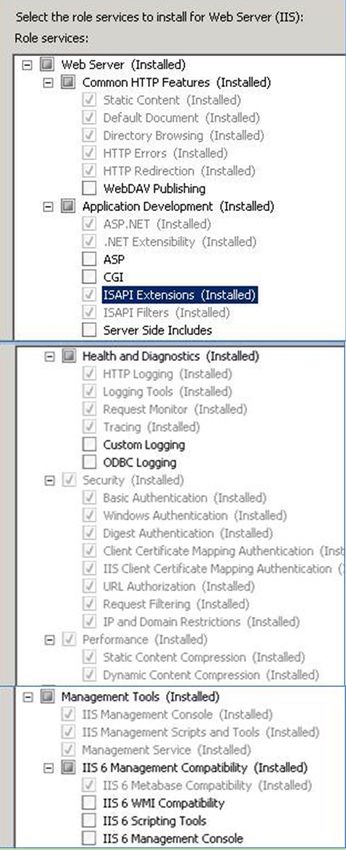
1 Run Server Manager.
2 In Server Manager, verify the Web Server Role has the following services installed:
Last Revised: June 22, 2018 5 New World ERP Release 2018.1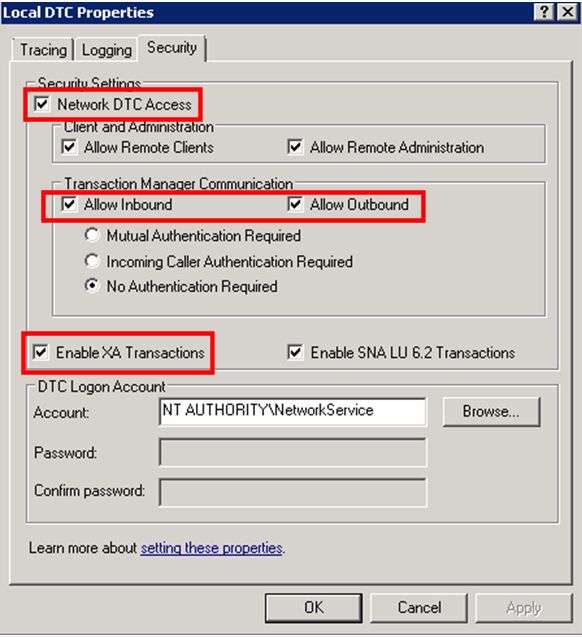
New World ERP 2018.1 Installation Guide

                   Installing Message Queuing (MSMQ) and Other Features
                           NOTE:
                          Install message queuing if you are installing 8.X for the first time.

                          1     Run Server Manager:

                          2     In Server Manager, click Features.
                          3     In the right-hand pane under Features Summary, click Add Features.
                          4     In the resulting window, expand Message Queuing.
                          5     Expand Message Queuing Services.
                          6     Click Directory Services Integration (for computers joined to a Domain), then click
                                HTTP Support.

 New World ERP Release 2018.1                                    6                                         Last Revised: June 22, 2018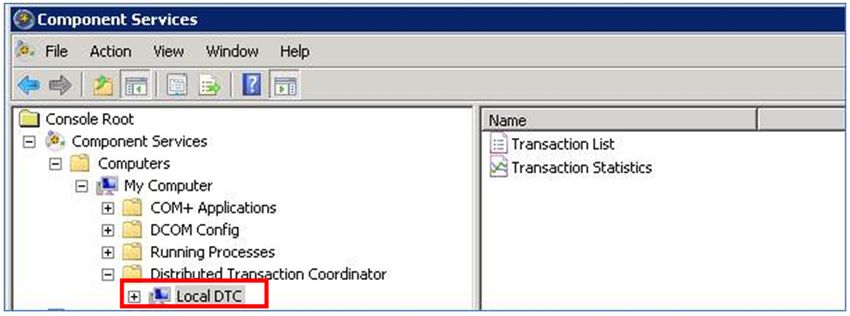
New World ERP 2018.1 Installation Guide

               Windows Server 2012 Server Setup
               Application Server Role
                       1      Run Server Manager.
                       2      In Server Manager, verify the Application Server Role has the following roles installed:

Last Revised: June 22, 2018                                        7                                        New World ERP Release 2018.1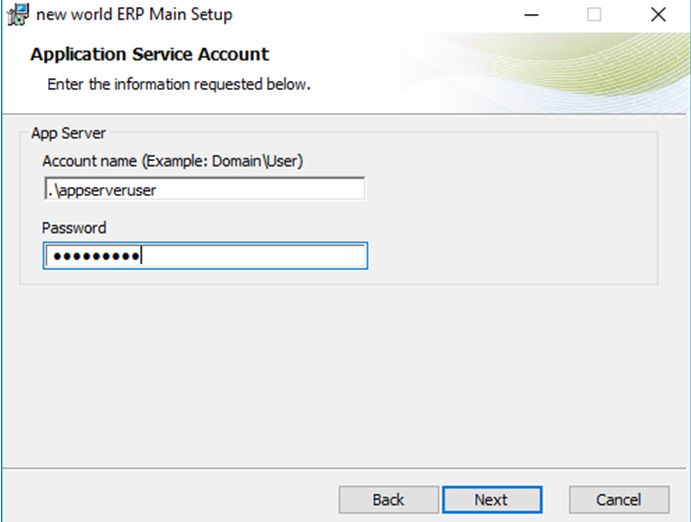
New World ERP 2018.1 Installation Guide

                   Web Server (IIS) Role
                          1     Run Server Manager.
                          2     In Server Manager, verify the Web Server Role has the following roles installed:

 New World ERP Release 2018.1                                   8                                             Last Revised: June 22, 2018
New World ERP 2018.1 Installation Guide
Installing Message Queuing (MSMQ) and Other Features
1 Run Server Manager.
2 In Server Manager, verify the following features are installed:
Windows Server 2016 Server Setup
1 Run Server Manager.
2 Select Manage > Add Roles and Features.
Last Revised: June 22, 2018 9 New World ERP Release 2018.1New World ERP 2018.1 Installation Guide
3 Under Server Roles, verify the Web Server (IIS) role has the following installed:
4 Under Features, verify the following features are installed:
New World ERP Release 2018.1 10 Last Revised: June 22, 2018New World ERP 2018.1 Installation Guide
Setting up Account to Run Application Service
Create User (on a new application server; a domain user can be used if it is
explicitly part of the administrator’s group on the server)
a Open Computer Management.
b Expand the tree to: Computer Management\System Tools\Local Users and Groups\
Users
c On the Action menu, click New User.
d Type the appropriate information in the dialog box.
e Clear the check box for User must change password at next logon.
f Check Password never expires.
NOTE:
The user who will run the application service should be set up as someone other than
“Administrator,” or whatever name typically is used to log into the system.
Add to Administrator’s Group (on a new application server)
a Open Computer Management.
b Expand the tree to: Computer Management\System Tools\Local Users and Groups\
Groups
c Right-click on the Administrators group and select Add to Group.
d Click Add.
e Type the name of the user you just created or one that already existed.
f Click Check Names.
g Once valid, click OK.
h Click OK again.
Set up Account to Run Windows Service (on a new application server)
1 Click Start, then run.
2 Type gpedit.msc.
3 Press .
Last Revised: June 22, 2018 11 New World ERP Release 2018.1New World ERP 2018.1 Installation Guide
4 Select Computer Configuration > Windows Settings > Security Settings > Local Poli-
cies > User Rights Assignment:
5 Double-click Log on as a service policy.
6 Click Add User or Group.
7 Enter the account that will be running the service.
8 Click OK.
NOTE:
The user needs to log into this account at least once.
Setting up Microsoft Distributed Transaction Coordinator
To have network access enabled, Microsoft Distributed Transaction Coordinator (MS DTC) must be
set up. Follow the below steps to enable network access:
1 Click Start, then Run.
2 Type dcomcnfg.
New World ERP Release 2018.1 12 Last Revised: June 22, 2018New World ERP 2018.1 Installation Guide
3 Expand the console tree to locate Local DTC (e.g. Component Services > Computers >
My Computer > Distributed Transaction Coordinator > Local DTC).
4 On the Action menu, click Properties.
5 Click the Security tab and verify that the following options are enabled:
Network DTC Access
Allow Inbound
Allow Outbound
Enable XA Transactions
6 Ensure the database server has had steps 1-5 applied as well.
Windows Firewall Settings
1 On the App/Web and DB Server, browse to Control Panel > Administrative Tools > Win-
dows Firewall with Advanced Security, or navigate through Server Manager > Tools.
Last Revised: June 22, 2018 13 New World ERP Release 2018.1New World ERP 2018.1 Installation Guide
2 Inbound Rules: All three components beginning with "Distributed Transaction Coordi-
nator Inbound Rules" must be enabled. Right-click on each component and select
Enable Rule.
3 Outbound Rules: Enable Distributed Transaction Coordinator Outbound Rule.
Installation Scenarios
Your organization’s setup will determine how you will need to install the update. There are three
possibilities:
• Application Server, Web Server and Database Server on the same machine. In
this scenario, the entire installation will be performed on only one box. Please note:
This scenario is not recommended.
• Application Server and Web Server on the same machine. Database Server on
a different machine. In this scenario, the installation will be performed on one box.
Auditing SSRS would be the only piece installed on the database server.
• Application Server and Web Server on separate machines. In this scenario, the
update will need to be run on each box. The prompts you receive will be different on
each box. NOTE: This scenario is possible but typically not used.
NOTE:
For instructions on downloading the update, refer to Appendix A.
Auditing and SSRS
Before the update is installed, a script needs to be run that will install auditing for Financial
Management and Human Resources and a .dll file that is used for styling and formatting when
SSRS reports are deployed. The installer is located in an AuditingSSRS folder that is included
with the installation.
NOTE:
The new Auditing and SSRS installer handles updating multiple databases with auditing
triggers.
The installer needs to be run on the machine that houses the SQL database and on the machine
that houses the report server. If these are on the same machine, the installer needs to be run
only once.
Two versions of the installer are available. If the server is running with a 32-bit version of SQL
Server Reporting Services, select the LOGOSAuditingSSRS_x86.msi file. If the server is running
with the 64-bit version of SQL Server Reporting Services, select the LOGOSAuditingSSRS_x64.msi
file.
New World ERP Release 2018.1 14 Last Revised: June 22, 2018New World ERP 2018.1 Installation Guide
1 Double click the LOGOSAuditing SSRS executable to select it. You will see the following
introductory screen:
2 Click Next. You will see the following screen:
3 If your SQL database and report server are on the same machine, select the Auditing
and SSRS Styling features. If interested in configuring SSRS to send email reports,
select the SSRS Email Delivery feature to be installed (please note that this feature is
not necessary if email settings have already been configured in the Reporting Services
Configuration Manager). Refer to the SSRS documentation for steps needed to create
subscriptions that send reports through email.
4 If your SQL database and your report server are on separate machines, select the cor-
rect process for the machine you are on: Auditing for the machine with the SQL data-
Last Revised: June 22, 2018 15 New World ERP Release 2018.1New World ERP 2018.1 Installation Guide
base or SSRS Styling for the machine with the report server. Expand the option by
clicking the arrow to the left of the label:
If interested in configuring the SSRS server to send email reports, select the SSRS
Email Delivery feature to be installed (please note that this feature is not necessary if
email settings have already been configured in the Reporting Services Configuration
Manager). Refer to the SSRS documentation for steps needed to create subscriptions
that send reports through email.
5 The Will be installed on the local hard drive option is the default. Use the default
if you plan to install the selected item. For the item you are not installing, expand the
list and select the Entire feature will be unavailable option. Click Next to go to the
following screen:
New World ERP Release 2018.1 16 Last Revised: June 22, 2018New World ERP 2018.1 Installation Guide
6 Click Next to go to the following screen if the SSRS Email Delivery feature was
selected:
7 Select the appropriate SSRS INSTANCE ID and enter the SMTP Server and Sender Address.
Click Next to go to the following screen:
Last Revised: June 22, 2018 17 New World ERP Release 2018.1New World ERP 2018.1 Installation Guide
8 Click the Install button. You will see the following screen while the install progresses:
9 When the installation is complete, you will see the following screen:
10 Click Finish to complete the installation.
New World ERP Release 2018.1 18 Last Revised: June 22, 2018New World ERP 2018.1 Installation Guide
If the auditing feature was installed, the SQL Configuration Tool will be launched. This
tool will be used for tasks such as enabling auditing. The tool also may be found under
All Programs > Tyler Technologies > SQL > SQL Configuration Tool:
11 Click the Add Button. A dialog will display, requesting the New World ERP Server:
12 Enter the ERP server and click the Next button. The ERP Database Connection dialog
will display:
Last Revised: June 22, 2018 19 New World ERP Release 2018.1New World ERP 2018.1 Installation Guide
13 Fill in the information requested for the ERP database and click the OK button. A new
instance will be created that will modify the ERP database (e.g. enable auditing):
14 Additional instances can be added to target other ERP databases (e.g. training and
live) by following the above steps. If a newer version of the software has been
installed, the current instance(s) may be upgraded. As shown below, all instances that
are not at the latest version will be highlighted in red:
15 Select the instance that will upgraded and click the Upgrade button. A confirmation
dialog will display.
16 Click the Yes button and the instance will be upgraded.
To delete an instance, select it and click the Delete button. Click the Yes button and
the instance will be deleted.
NOTE:
The SQL Agent will now be started and have the start mode set to automatic.
New World ERP Release 2018.1 20 Last Revised: June 22, 2018New World ERP 2018.1 Installation Guide
Reporting
Human Resources/Payroll customers without a previous install of the New World ERP Reporting
Installer will need to install the New World ERP Reporting Installer before running the update.
Please see the New World ERP Reporting Installer Guide for additional information. The New
World ERP Reporting Installer first appeared in release 9.0 SP2.
Elasticsearch
Installing Java:
1 Under the Elasticsearch-REL_XX folder, open the Prereqs > Java folder.
2 Double-click the jre--windows-x64.exe file.
3 Click the Install button.
4 Click the Close button after the Java software has been installed.
5 Open the Java Control Panel.
6 Click the Update tab.
7 Deselect the Check for Updates Automatically check box. A Java Update - Warning dia-
log will appear:
8 Click the Do Not Check button to prevent Java from updating without consent.
9 Click Apply.
Last Revised: June 22, 2018 21 New World ERP Release 2018.1New World ERP 2018.1 Installation Guide
10 Click OK to close the control panel:
11 Any time the Java software is upgraded, please run the ERP Java Updater Tool, ERP-
JavaUpdater.exe, to reconfigure the New World ERP software to work with the latest
version of Java. The tool can be found in the ERPJavaUpdater folder that is included
with the Java installer. Click the Start button to start reconfiguring the ERP software.
Installing Elasticsearch
NOTE:
The Elasticsearch installer should not be installed under a path that includes the closing
parenthesis character )--for example, C:\Program Files(x86)\Elasticsearch.
1 Return to the Elasticsearch-REL_XX folder and double click the setup.exe file. You
will see the following screen:
New World ERP Release 2018.1 22 Last Revised: June 22, 2018New World ERP 2018.1 Installation Guide
2 Click Next. The Destination Folder dialog will open:
3 If you do not want to accept the default location, click the Change button to select
another location.
4 Click Next. The dialog to begin the installation will open:
5 Click Install to begin the installation.
6 Once the installation is complete, click the Finish button.
NOTE:
The Elasticsearch installer will uninstall the CD installer.
Last Revised: June 22, 2018 23 New World ERP Release 2018.1New World ERP 2018.1 Installation Guide
Installing the Update
Once the software has been downloaded, it must then be installed on the application server.
Installing Tyler Identity
NOTE:
You must install Tyler Identity before installing New World ERP. To view the Tyler
Identity Installation Guide, click here.
Installing Prerequisite Software
NOTE:
Install the prerequisite software only if it is not already installed. The software, if installed,
will be listed under Programs and Features as Erlang OTP 17 (6.0), RabbitMQ Server and
Microsoft SQL Server 2012 Native Client.
1 Open the Main > Prereqs > Erlang folder.
2 Double-click the otp_win64_17.0.exe file if running on a 64-bit operating system;
otherwise, run otp_win32_17.0.exe.
3 Keep the default selected components and install.
4 Open the Main > Prereqs > RabbitMQ folder.
5 Double-click the rabbitmq-server-3.3.0.exe file.
6 Select all components to be installed and install.
7 Open the MAIN > Prereqs > SQL Server 2012 Native Client folder.
8 Double-click the sqlncli_x64.msi file.
9 Keep the default selected components and install.
NOTE:
If you are using AppAssure version 5.4, the AppAssure Agent Service should be stopped prior
to the upgrade.
New World ERP Release 2018.1 24 Last Revised: June 22, 2018New World ERP 2018.1 Installation Guide
Installing ERP
1 Open the Main folder.
2 Double-click the setup.exe file to start the installer. (Please note the user running
the installer must have admin rights.) You will see the following screen:
3 Click Next. The Destination Folder dialog will open:
4 If you prefer, you may use this dialog to change the install location of the software.
Last Revised: June 22, 2018 25 New World ERP Release 2018.1New World ERP 2018.1 Installation Guide
5 Click Next. You will see the following screen:
6 Select the desired software features. A typical installation on an application server
would have all features except Faxing Service and Esri ArcGIS API selected.
NOTE:
The Human Resources feature should only be selected if you are a Human Resources/Payroll
customer.
WARNING:
If you are not sure which components should be selected for this installation, contact
Customer Support at 877-734-3315 before continuing.
7 Click Next. You will see the following screen:
New World ERP Release 2018.1 26 Last Revised: June 22, 2018New World ERP 2018.1 Installation Guide
NOTE:
If you switch from the default SQL Server Authentication to Windows Authentication, clear
any values in the SQL Server field; otherwise, database errors will result. Most sites will use
SQL Server Authentication.
NOTE:
If you are unsure about the verification of your database backup, contact Customer Support
at 877-734-3315 before continuing. As the message above indicates, the changes made to
the database as a result of the installation cannot be rolled back without a database backup.
NOTE:
Releases in 2018.1 will require SQL 2012, 2014, 2016 or 2017.
a In the SQL Server field, enter or select the name of the database server.
b Select SQL server authentication and enter the User Name and Password of the
user that has administrator rights over the ERP database.
c In the ERP Database Name field, enter or select the name of the database that you
are updating.
8 Click Next. You will see the following screen:
a In the SQL Server field, enter or select the name of the database server.
NOTE:
The SQL user must have rights to create a database.
b Select SQL server authentication using credentials below and enter the User Name
and Password of the user who has administrator rights over the ERP Runtime Ser-
vices database.
Last Revised: June 22, 2018 27 New World ERP Release 2018.1New World ERP 2018.1 Installation Guide
c The ERP Runtime Services database will be created during the install if it does not
already exist. The default name of the database is LogosRuntimeServices.
9 Click Next. You will see the following screen if you selected the Application Server fea-
ture in Step 6:
The user the application server is running as needs to be an administrator;
consequently, a local Administrator account can be created and logged into at least
once. Domain users can also be used; however, it is not recommended to use the
domain/administrator account:
a In the Account name field, enter the account that will run the Application service
(e.g., Domain\User). The account must have rights to run a Windows service.
Please refer to “Set up Account to Run Windows Service (on a new application
server)” on page 1-19 for steps on how to add rights to an account to run a Win-
dows service.
NOTE:
For the domain, use a logical name rather than an IP address. Do not use localhost.
b In the Password field, enter the password of the account.
NOTE:
The double quotation mark character (“) cannot be used in the account password. The dash
character (-) is also not supported in passwords due to issues in SQL’s DTUtil utility.
New World ERP Release 2018.1 28 Last Revised: June 22, 2018New World ERP 2018.1 Installation Guide
10 Click Next to continue. You will see the following screen if the SQL Reporting Services
Reports feature was selected:
a The SQL Services Server URL is the URL to the SSRS server's ReportService2005 web
service. The full URL will be filled in for you by typing in just the name of a server
(e.g., DBServer) and clicking Next (URL should be http:///ReportServer/ReportService2005.asmx). The “2005” in the name is
correct and should not be changed.
NOTE:
If the SSRS server is configured to use SSL, update the SSRS URL to be in the following format:
https:///ReportServer/
ReportService2005.asmx.
b The Deployment Folder field holds the name of a folder on the SSRS server to pub-
lish the reports to. The folder does not have to currently exist. By publishing
reports to a specific folder, the same SSRS server can be used by multiple ERP
installations. Give this folder the name of the application server you are installing
it on (e.g., City of New World ERP - Test). This will keep your live and test environ-
ments separate.
c The Deployment User Authentication Type field is used to select the authentication
method to use against the SSRS server when deploying the reports. Choose Win-
dows Authentication only if the currently logged on user has Publisher rights on
the SSRS server. Otherwise, choose Specify User.
d If you have selected Specify User as the authentication type, enter values in the
Domain And User and Password fields under the section, User to Deploy Reports.
Enter the Domain and User value as domain\user.
e Enter values in the Domain And User and Password fields under the section User to
Run Reports. Enter the Domain and User value as domain\user. This should be the
same as the previous Domain and User and Password values entered.
Last Revised: June 22, 2018 29 New World ERP Release 2018.1New World ERP 2018.1 Installation Guide
11 Click Next. If you are installing the website feature, the following dialog will be dis-
played during the UI sequence:
Select the default FQDN or enter a custom hostname.
NOTE:
IIS needs to be configured to have the Default Web Site setup to have https binding enabled
using the certificate on port 443.
12 Click Next. If you are installing the website feature, the following dialog will be dis-
played:
Type the name of a user who has rights to the SSRS and ERP Website servers. The
purpose of this user is to be able to deploy any scheduled report to an ERP user's
myReports, which will happen when a user schedules a report and provides a
distribution group. The SSRS server will drop the report files into a shared location on
the web site server using the account credentials entered.
New World ERP Release 2018.1 30 Last Revised: June 22, 2018New World ERP 2018.1 Installation Guide
13 Click Next. If Esri ArcGIS API was selected for installation, you will see the following
screen:
NOTE:
New World ERP now supports Esri releases 10.2 through 10.5.1. As a result of the upgraded
support, the original ArcGIS Service location no longer is valid. Please use the new RESTful
service location.
14 Click Next. If the Human Resources feature was selected for installation, you will see
the following screen:
a In the SQL Server field, enter or select the name of the database server.
b Select the authentication type. If selecting SQL Server authentication, enter the
User Name and Password.
c In the ERP HR Reporting Database Name field, enter or select the name of the HR
Reporting database.
Last Revised: June 22, 2018 31 New World ERP Release 2018.1New World ERP 2018.1 Installation Guide
15 Click Next. If the Import Service feature was selected for installation, you will see the
following screen:
NOTE:
The import service must be installed to take advantage of the scheduled service import feature
for Journals, Revenue Collections Receipt Batches, and Accounts Payable Invoice Batches. You do
not need to install the service unless you plan to use the scheduled service import feature.
If the default value, Local System Account, is chosen, the service can access only the
local drives for the machine it is installed on; therefore, the import folder that must be
defined when the scheduled service is set up must also be local. If your organization
plans to set up the import folders on another machine, select the Account Name
option and specify a domain User and Password.
16 Click Next. You will see the following screen:
17 Click Install. The following processes will be indicated as they are performed: remov-
ing old application server files, installing new application server files, removing previ-
New World ERP Release 2018.1 32 Last Revised: June 22, 2018New World ERP 2018.1 Installation Guide
ous website files, installing new website files, removing old script files,
decompressing and copying new script files, and deploying SSRS reports:
Once all the processes are complete, you will see the following screen:
NOTE:
If SQL or SSRS report deployment errors/warnings have occurred, the screen will display a
Show Errors button. Clicking the button will display the errors/warnings in Notepad. If SSRS
subscriptions are used and the parameters change for a report, a warning will be returned in
the SSRS error log file along with the subscription settings; the subscriptions will need to be
recreated for the identified reports. Errors are not expected and should be reported to
Customer Support at 877-734-3315.
18 Click Finish.
NOTE:
See Appendix B for information on the product registration process following installation.
Last Revised: June 22, 2018 33 New World ERP Release 2018.1New World ERP 2018.1 Installation Guide
Installing Community Development myCommunity
The myCommunity software needs to be installed only if you are using the myCommunity Mobile
application.
Installer Prerequisites
NOTE:
If you are using the myCommunity Mobile app, an SSL certificate is required, and the IIS
Default Web Site must be configured to have https binding enabled.
• Microsoft .NET 3.5 and 4.6
Administrator Guide
Before running the CD Installer, please read the Community Development System Administrator’s
Guide.pdf.
Install Sequence
After you have reviewed the Community Development System Administrator’s Guide, follow the
steps below to install the New World ERP Community Development software. The software will
need to be installed on the myCommunity server. The myCommunity server should reside outside
the corporate firewall. The software that runs on the myCommunity server only needs to be
installed if you are using the myCommunity Mobile app. Please note that all the software can be
installed on a single machine only if it is a test server.
NOTE:
An SSL certificate is required, and the IIS Default Web Site must be configured to have https
binding enabled.
NOTE:
The server/firewall needs to be configured to work with Apple Push Notification.
1 Copy the CD_myCommunity_ folder included with the New World ERP
release to the server.
New World ERP Release 2018.1 34 Last Revised: June 22, 2018New World ERP 2018.1 Installation Guide
2 Double-click the setup.exe file. You will see the following screen:
3 Click Next. The Destination Folder dialog will open:
4 If you do not want to accept the default location, click the Change button to select
another location.
Last Revised: June 22, 2018 35 New World ERP Release 2018.1New World ERP 2018.1 Installation Guide
5 Select only the myCommunity Server feature and click Next. The New World ERP
Server Information dialog will open:
6 Enter the ERP Server and click Next. The dialog to begin the installation will open:
7 Click Install to begin the installation.
New World ERP Release 2018.1 36 Last Revised: June 22, 2018New World ERP 2018.1 Installation Guide
8 Once the installation is complete, click the Finish button:
NOTE:
See Appendix B for information on the product registration process following installation.
For Customers with eSuite or Decision Support
If you use eSuite or Decision Support, please be sure to upgrade to the current software of those
releases after you have applied the post-installation steps in the next section that are applicable
to your location.
Post-Installation Setup
New World ERP Module Installer
NOTE:
Only customers who license Dynamic Reporting need to install this.
You will see the following sequence of dialogs if you are installing New World ERP Module
Installer after you have installed the New World ERP release. Please review all steps before
beginning the installation.
1 Locate the New World ERP Module installer under the LOGOSModule- folder
with the rest of the installers. New World ERP must be installed on the machine before
you run this installer.
Last Revised: June 22, 2018 37 New World ERP Release 2018.1New World ERP 2018.1 Installation Guide
2 Double-click the setup.exe file to start the installer. The first dialog introduces you to
the Setup Wizard:
3 Click Next. The SQL Server Information dialog displays:
4 Fill in the SQL database deployment information:
a In the SQL Server field, type the name of the server where your SQL database
resides, or use the Browse button to find and select the name.
b Select the following radio button: SQL Server authentication using credentials
below.
c Type the User Name and Password of the user who has administrator rights to the
ERP database.
d In the ERP Database Name field, type or browse for the name of the database that
you are updating.
New World ERP Release 2018.1 38 Last Revised: June 22, 2018New World ERP 2018.1 Installation Guide
5 Click Next. The dialog to start the installation of the New World ERP Module Installer
displays:
6 Click Install. After all of the files have been installed, the following dialog displays:
7 Click Finish to exit the Setup Wizard.
Report Writer
If you license the Report Writer, it is included with the rest of the software in a folder named,
Report Writer_. Run the setup.exe and click the Next button on the dia-
logs to install.
Managed Internet Update (MIU)
New in the 2017.1 release was the Managed Internet Update (MIU) program, an internet-driven
fix delivery program. It is the sole method of fix application. At this point in the update process,
we strongly recommend that you run the available patches in the MIU.
Last Revised: June 22, 2018 39 New World ERP Release 2018.1New World ERP 2018.1 Installation Guide
For more information on the program and how to apply fixes, please see the MIU Administrator’s
Guide in the Managed Internet Update folder of the software download zip package.
NOTE:
If this is a test environment, please note which patches you are installing, so you can
replicate the patches in your live environment.
Changing the Color of the ERP Header
A file named Custom.css, is located in the LOGOS website directory, whose default install location
is C:\Program Files (x86)\New World Systems\Logos.Net\Logos\Styles.
This file contains commented code that can be uncommented to change the color of the header
in New World ERP so that you can easily differentiate servers when testing New World ERP. To
uncomment the code and have it take effect, you need only remove the /* */ that surrounds the
tag .phbackground and save the file. The change will take effect immediately. See the illustration
below:
You can also change the color of the header by changing the RGB value of the background-color
tag.
To choose whatever color you want, go to the following website:
http://www.colorpicker.com/
NOTE:
The installer now persists this config file.
New World ERP Release 2018.1 40 Last Revised: June 22, 2018New World ERP 2018.1 Installation Guide
Appendix A: Downloading the Update
Appendix A: Downloading the Update
After creating a case for software access, you will receive an email like the following:
Tyler Technologies uses an electronic delivery system to make software available for download
toyour servers. The 2018.1 New World ERP Release is available via one of the links below. Please
click on the link to access the files and download the software to your server:
• Download your software (Primary - East Coast) at: https://edelivery.tylertech.com/
[customer number]
• Download your software (Secondary - Midwest) at: https://edelivery2.tylertech.com/
[customer number]
You will be prompted for your credentials; please use the following information:
Username: [customer number]
Password: [customer number]
Last Revised: June 22, 2018 41 New World ERP Release 2018.1New World ERP 2018.1 Installation Guide
Appendix B: Product Registration
Appendix B: Product Registration
When the installation completes, you will be prompted to register the product:
1 Type your Customer Name, typically the city and state or county and state.
2 Select the type of environment--Test, Live or Other--where the software has been
installed.
3 If you have an internet connection, click Submit, and your registration information
will be sent to Tyler Technologies. A successful submission will display as follows:
New World ERP Release 2018.1 42 Last Revised: June 22, 2018New World ERP 2018.1 Installation Guide
Appendix B: Product Registration
4 If you do not have an internet connection and click Submit, an error will display,
instructing you to save the file and send it as an attachment to erpproduc-
treg@tylertech.com:
5 Click OK.
6 If you do not have an internet connection, click Save. The Select Save File Location
dialog will display:
7 Select the location where you want to save the registration information to be submit-
ted.
8 Click Save.
9 Send the saved file as an email attachment to erpproductreg@tylertech.com.
Last Revised: June 22, 2018 43 New World ERP Release 2018.1New World ERP 2018.1 Installation Guide Appendix B: Product Registration New World ERP Release 2018.1 44 Last Revised: June 22, 2018
You can also read