INSTALLATION ecoDMS Version 18.09 (apu)
←
→
Page content transcription
If your browser does not render page correctly, please read the page content below
ecoDMS Version 18.09 (apu)

INSTALLATION
Imprint

 ecoDMS Version:                        18.09 (apu)
 Manual Date:                           27th October 2020
 Type:                                  Installation
 Language:                              EN

 Author / Originator:                   ecoDMS GmbH
 ©2020                                  Dresdener Straße 1
                                        52068 Aachen
                                        Germany
 Website:                               www.ecodms.de
 Email:                                 info@ecodms.de
 Phone:                                 0049 241 47572 01
 Company’s registered office:           Aachen
 Registry court:                        Amtsgericht Aachen 19201
 Management:                            Dipl.-Betrw. Michael Schmitz
                                        Helge Lühmann

Important Information
This manual supplied by ecoDMS GmbH is protected by copyright law. Any use of text and illustrations, particularly reproduction,
which requires the translation or import into electronic systems, in whole or in part, requires the previous written approval by ecoDMS
GmbH, Dresdener Straße 1, 52068 Aachen. Please note that the violation of copyright law is an offence.

NO GUARANTEE. All technical information and screen shots in this manual have been prepared with great care. Nevertheless,
errors cannot be entirely excluded. ecoDMS GmbH neither provides any guarantee nor accepts any legal responsibility or liability for
consequences resulting from incorrect information. The author welcomes any suggestions for improvement or information regarding
errors.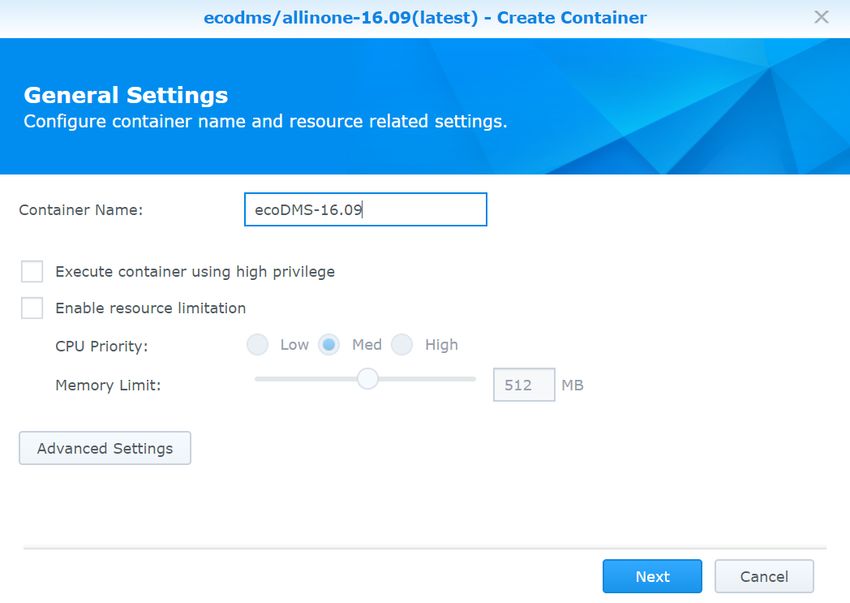
Contents 3
Contents
1 System Requirements 5
2 Windows 6
2.1 Upgrade Notes . . . . . . . . . . . . . . . . . . . . . . . . . . . . . . . . . . . . . . . . . . . . . . . . . . 6
2.2 Installation . . . . . . . . . . . . . . . . . . . . . . . . . . . . . . . . . . . . . . . . . . . . . . . . . . . . 6
2.2.1 AllinOne Installation . . . . . . . . . . . . . . . . . . . . . . . . . . . . . . . . . . . . . . . . . . . 6
2.2.2 ecoDMS Server . . . . . . . . . . . . . . . . . . . . . . . . . . . . . . . . . . . . . . . . . . . . . 12
2.2.3 ecoDMS Client . . . . . . . . . . . . . . . . . . . . . . . . . . . . . . . . . . . . . . . . . . . . . 19
2.2.4 ecoDMS Printer . . . . . . . . . . . . . . . . . . . . . . . . . . . . . . . . . . . . . . . . . . . . . 24
2.3 Uninstall . . . . . . . . . . . . . . . . . . . . . . . . . . . . . . . . . . . . . . . . . . . . . . . . . . . . . 27
2.3.1 Basics . . . . . . . . . . . . . . . . . . . . . . . . . . . . . . . . . . . . . . . . . . . . . . . . . . 27
2.3.2 ecoDMS Server . . . . . . . . . . . . . . . . . . . . . . . . . . . . . . . . . . . . . . . . . . . . . 29
2.3.3 ecoDMS Client . . . . . . . . . . . . . . . . . . . . . . . . . . . . . . . . . . . . . . . . . . . . . 31
2.3.4 ecoDMS Printer . . . . . . . . . . . . . . . . . . . . . . . . . . . . . . . . . . . . . . . . . . . . . 34
Important Information for Chapter 2 . . . . . . . . . . . . . . . . . . . . . . . . . . . . . . . . . . . . . . . . . 35
3 Linux-Distributions 37
3.1 Upgrade . . . . . . . . . . . . . . . . . . . . . . . . . . . . . . . . . . . . . . . . . . . . . . . . . . . . . 37
3.1.1 Basics . . . . . . . . . . . . . . . . . . . . . . . . . . . . . . . . . . . . . . . . . . . . . . . . . . 37
3.1.2 Process . . . . . . . . . . . . . . . . . . . . . . . . . . . . . . . . . . . . . . . . . . . . . . . . . 37
3.1.3 License Information . . . . . . . . . . . . . . . . . . . . . . . . . . . . . . . . . . . . . . . . . . . 38
3.2 Installation . . . . . . . . . . . . . . . . . . . . . . . . . . . . . . . . . . . . . . . . . . . . . . . . . . . . 38
3.2.1 Basics . . . . . . . . . . . . . . . . . . . . . . . . . . . . . . . . . . . . . . . . . . . . . . . . . . 38
3.2.2 Install Editor . . . . . . . . . . . . . . . . . . . . . . . . . . . . . . . . . . . . . . . . . . . . . . . 38
3.2.3 apt Sources . . . . . . . . . . . . . . . . . . . . . . . . . . . . . . . . . . . . . . . . . . . . . . . 39
3.2.4 ecoDMS Server . . . . . . . . . . . . . . . . . . . . . . . . . . . . . . . . . . . . . . . . . . . . . 39
3.2.5 ecoDMS Client . . . . . . . . . . . . . . . . . . . . . . . . . . . . . . . . . . . . . . . . . . . . . 40
3.2.6 ecoDMS Printer . . . . . . . . . . . . . . . . . . . . . . . . . . . . . . . . . . . . . . . . . . . . . 41
3.3 Uninstall . . . . . . . . . . . . . . . . . . . . . . . . . . . . . . . . . . . . . . . . . . . . . . . . . . . . . 42
3.3.1 ecoDMS Server . . . . . . . . . . . . . . . . . . . . . . . . . . . . . . . . . . . . . . . . . . . . . 42
3.3.2 ecoDMS Client . . . . . . . . . . . . . . . . . . . . . . . . . . . . . . . . . . . . . . . . . . . . . 42
3.3.3 ecoDMS Printer . . . . . . . . . . . . . . . . . . . . . . . . . . . . . . . . . . . . . . . . . . . . . 42
Important Information for Chapter 3 . . . . . . . . . . . . . . . . . . . . . . . . . . . . . . . . . . . . . . . . . 43
4 NAS 44
4.1 Upgrades . . . . . . . . . . . . . . . . . . . . . . . . . . . . . . . . . . . . . . . . . . . . . . . . . . . . . 44
4.1.1 Basics . . . . . . . . . . . . . . . . . . . . . . . . . . . . . . . . . . . . . . . . . . . . . . . . . . 44
4.1.2 Process . . . . . . . . . . . . . . . . . . . . . . . . . . . . . . . . . . . . . . . . . . . . . . . . . 44
4.1.3 License Information . . . . . . . . . . . . . . . . . . . . . . . . . . . . . . . . . . . . . . . . . . . 45
4.2 Update . . . . . . . . . . . . . . . . . . . . . . . . . . . . . . . . . . . . . . . . . . . . . . . . . . . . . . 45
4.2.1 Basics . . . . . . . . . . . . . . . . . . . . . . . . . . . . . . . . . . . . . . . . . . . . . . . . . . 45
4.2.2 Container-Update . . . . . . . . . . . . . . . . . . . . . . . . . . . . . . . . . . . . . . . . . . . . 46
4.2.3 License Information . . . . . . . . . . . . . . . . . . . . . . . . . . . . . . . . . . . . . . . . . . . 46
4.3 ecoWORKZ . . . . . . . . . . . . . . . . . . . . . . . . . . . . . . . . . . . . . . . . . . . . . . . . . . . 46
4.4 Synology Installation (ecoDMS Server) . . . . . . . . . . . . . . . . . . . . . . . . . . . . . . . . . . . . . 46
4.4.1 Create Folder Structure for ecoDMS (Example) . . . . . . . . . . . . . . . . . . . . . . . . . . . . 46
4.4.2 Install & Open Docker . . . . . . . . . . . . . . . . . . . . . . . . . . . . . . . . . . . . . . . . . 48
4.4.3 Search & Install ecoDMS Images . . . . . . . . . . . . . . . . . . . . . . . . . . . . . . . . . . . . 48
4.4.4 Create Container . . . . . . . . . . . . . . . . . . . . . . . . . . . . . . . . . . . . . . . . . . . . 48
4.4.5 Container Settings . . . . . . . . . . . . . . . . . . . . . . . . . . . . . . . . . . . . . . . . . . . . 49
4.4.6 Configure Mount Paths . . . . . . . . . . . . . . . . . . . . . . . . . . . . . . . . . . . . . . . . . 50
ecoDMS Version 18.09 (apu) Installation | EN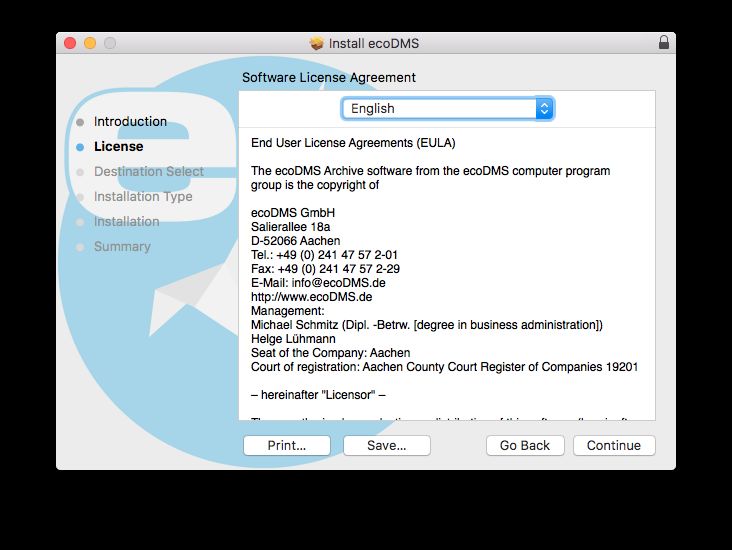
Contents 4
4.4.7 Change Language (English) . . . . . . . . . . . . . . . . . . . . . . . . . . . . . . . . . . . . . . . 52
4.4.8 Start Container . . . . . . . . . . . . . . . . . . . . . . . . . . . . . . . . . . . . . . . . . . . . . 53
4.5 QNAP Installation (ecoDMS Server) . . . . . . . . . . . . . . . . . . . . . . . . . . . . . . . . . . . . . . 54
4.5.1 Create Folder Structure for ecoDMS (Example) . . . . . . . . . . . . . . . . . . . . . . . . . . . . 54
4.5.2 Install & Open ContainerStation . . . . . . . . . . . . . . . . . . . . . . . . . . . . . . . . . . . . 55
4.5.3 Search & Install ecoDMS Images . . . . . . . . . . . . . . . . . . . . . . . . . . . . . . . . . . . . 55
4.5.4 Container Settings . . . . . . . . . . . . . . . . . . . . . . . . . . . . . . . . . . . . . . . . . . . . 56
4.5.5 Configure Mount Paths . . . . . . . . . . . . . . . . . . . . . . . . . . . . . . . . . . . . . . . . . 57
4.5.6 Change Language (English) . . . . . . . . . . . . . . . . . . . . . . . . . . . . . . . . . . . . . . . 58
4.5.7 Start Container . . . . . . . . . . . . . . . . . . . . . . . . . . . . . . . . . . . . . . . . . . . . . 59
Important Information for Chapter 4 . . . . . . . . . . . . . . . . . . . . . . . . . . . . . . . . . . . . . . . . . 59
5 MacOS 60
5.1 Information . . . . . . . . . . . . . . . . . . . . . . . . . . . . . . . . . . . . . . . . . . . . . . . . . . . 60
5.2 Upgrade . . . . . . . . . . . . . . . . . . . . . . . . . . . . . . . . . . . . . . . . . . . . . . . . . . . . . 60
5.3 Installation . . . . . . . . . . . . . . . . . . . . . . . . . . . . . . . . . . . . . . . . . . . . . . . . . . . . 60
5.3.1 ecoDMS Clients . . . . . . . . . . . . . . . . . . . . . . . . . . . . . . . . . . . . . . . . . . . . . 60
5.4 Uninstall . . . . . . . . . . . . . . . . . . . . . . . . . . . . . . . . . . . . . . . . . . . . . . . . . . . . . 64
5.4.1 ecoDMS Client . . . . . . . . . . . . . . . . . . . . . . . . . . . . . . . . . . . . . . . . . . . . . 64
Important Information for Chapter 5 . . . . . . . . . . . . . . . . . . . . . . . . . . . . . . . . . . . . . . . . . 64
6 Login 65
7 Plugins & Addons 66
7.1 Installation . . . . . . . . . . . . . . . . . . . . . . . . . . . . . . . . . . . . . . . . . . . . . . . . . . . . 66
7.1.1 Microsoft Office Plugin . . . . . . . . . . . . . . . . . . . . . . . . . . . . . . . . . . . . . . . . . 66
7.1.2 Libre- & OpenOffice Addon . . . . . . . . . . . . . . . . . . . . . . . . . . . . . . . . . . . . . . . 70
7.1.2.1 Java Activation . . . . . . . . . . . . . . . . . . . . . . . . . . . . . . . . . . . . . . . . 70
7.1.2.2 Install Addon . . . . . . . . . . . . . . . . . . . . . . . . . . . . . . . . . . . . . . . . . 72
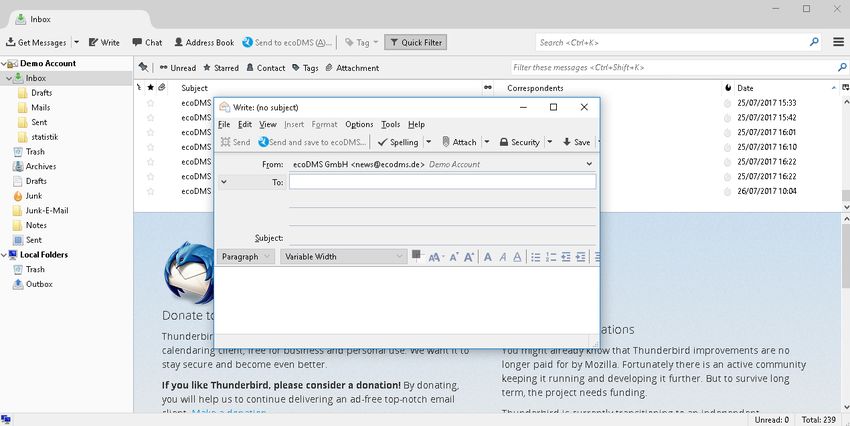
7.1.3 Thunderbird Addon . . . . . . . . . . . . . . . . . . . . . . . . . . . . . . . . . . . . . . . . . . . 74
7.2 Uninstall . . . . . . . . . . . . . . . . . . . . . . . . . . . . . . . . . . . . . . . . . . . . . . . . . . . . . 77
7.2.1 Microsoft Office Plugin . . . . . . . . . . . . . . . . . . . . . . . . . . . . . . . . . . . . . . . . . 77
7.2.2 Libre- & OpenOffice Addon . . . . . . . . . . . . . . . . . . . . . . . . . . . . . . . . . . . . . . . 78
7.2.3 Thunderbird Addon . . . . . . . . . . . . . . . . . . . . . . . . . . . . . . . . . . . . . . . . . . . 80
Important Information for Chapter 7 . . . . . . . . . . . . . . . . . . . . . . . . . . . . . . . . . . . . . . . . . 81
8 Backup & Restore 83
ecoDMS Version 18.09 (apu) Installation | EN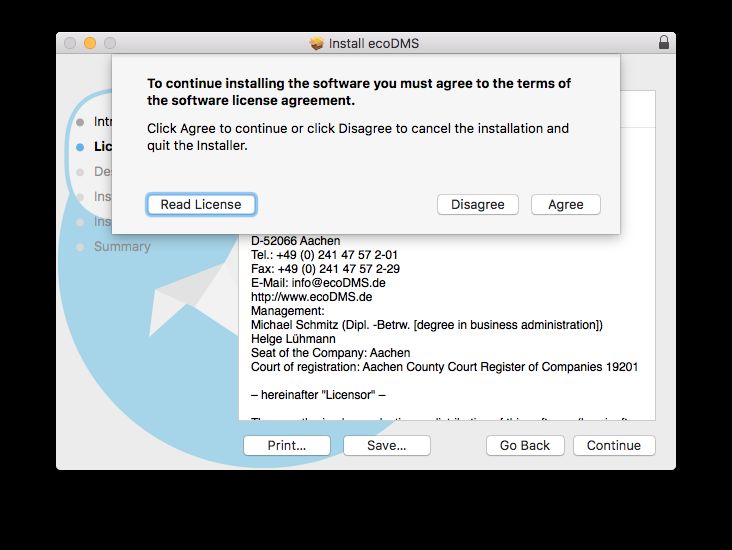
1. System Requirements                                                                                             5

1 System Requirements
Please refer to the official system requirements for the respective ecoDMS component before each installation. If your
system does not meet these requirements, we cannot guarantee the smooth and stable operation of our software. For the
system requirements of ecoDMS Version 18.09 (apu), please refer to the official ecoDMS website at the following link:
 https://www.ecodms.de/index.php/en/ecodms-archive/system-requirements/ecodms-version-18-09-apu

ecoDMS Version 18.09 (apu)                                                                            Installation | EN
2. Windows                                                                                                                  6

2 Windows
This chapter describes the necessary steps for installing and uninstalling ecoDMS components under Windows. In addition,
it features a description of how to perform ecoDMS upgrades and important information about the individual processes.

2.1 Upgrade Notes
If your installation is an upgrade, please note the following information:

   – Before upgrading, you must create a full and clean backup.
   – You must always upgrade all ecoDMS components to the latest version.
   – Disable your antivirus software during the ecoDMS Server installation.
         – Then add the data folder you select during the installation to the exclusions list in your antivirus software.

   – Notes on the database:
         – When updating from ecoDMS version 14.08 or 16.09 to 18.09, postgreSQL is upgraded to version 10.
         – If you installed the ecoDMS database manually, a direct upgrade is not possible. Proceed as follows in this case:
             1. Create a complete and clean data backup.
             2. Uninstall all ecoDMS components completely.
             3. Restart your computer.
             4. Install the new version with all necessary components.
             5. Install the data backup.
   – Archives: If ecoDMS is installed from scratch (not as upgrade) or if there is only one archive in the version that is
     upgraded, the settings do not include the "Archive" option. If the upgrade installation has at least 2 archives, the
     settings include the "Archive" option.
   – When using synchronisation services / cloud services, always ensure that the ecoDMS folders are excluded.
     Otherwise this may lead to errors in the data folders / containers.

2.2 Installation
The following section describes how to install the available ecoDMS components under Windows.

2.2.1 AllinOne Installation
Use this installation file to execute all necessary base components in sequence within one installation. The package includes
the ecoDMS Server with postgreSQL database & container storage system, the ecoDMS Client including Inbox & Connection
Manager and the PDF/A Printer from ecoDMS. If all ecoDMS components of the installation have been installed on a
workstation, an ecoDMS profile will already exist in the Connection Manager for this workstation. Please refer to the chapter
"Access Data" in the ecoDMS manual for the login credentials for the default profile [3, 5, 1, 2, 6, 7].
   1. If this installation is an update, close all Connection Managers first and make sure that no user is connected with the
      server.

ecoDMS Version 18.09 (apu)                                                                                   Installation | EN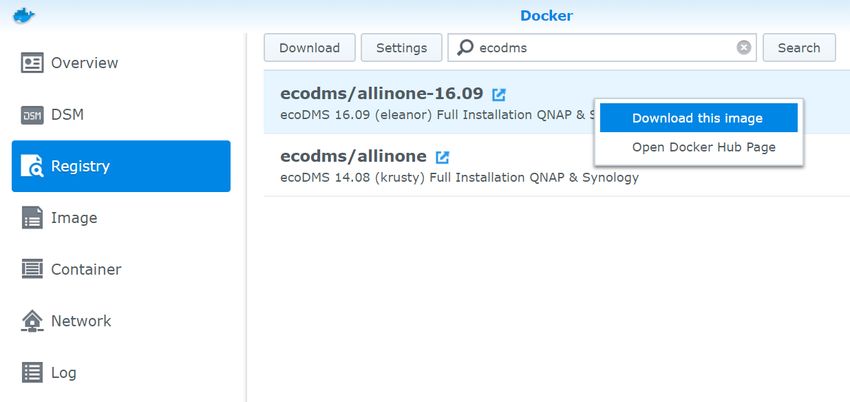
2. Windows                                                                                                      7

                                              Fig. (similar) 2.1: Exit Connection Manager

  2. Download the file for the "AllinOne-Installer" at ecodms.de.
  3. If this is a ZIP-file, unzip it first.
  4. Execute the installation file "....exe".

  5. Depending on the system environment, Windows displays a confirmation prompt for the "User Account Control"
     during installation. Confirm with "Yes" when asked whether you want to allow the following programme to make
     changes to this computer.

                              Fig. (similar) 2.2: AllinOneInstaller: Windows Confirmation Prompt

  6. The ecoDMS Server setup wizard opens. Click "Next" in the "Welcome Screen".

ecoDMS Version 18.09 (apu)                                                                         Installation | EN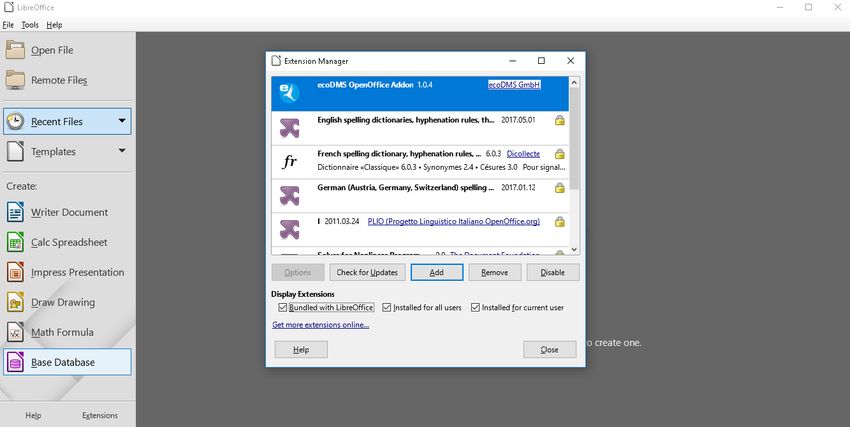
2. Windows                                                                                                             8

                           Fig. (similar) 2.3: AllinOneInstaller: Welcome Screen (Windows)

  7. Select the required components you want to install and click the associated language. Click "Next" to continue.
       a) If you are installing an update, the existing components are selected and cannot be modified.

ecoDMS Version 18.09 (apu)                                                                                Installation | EN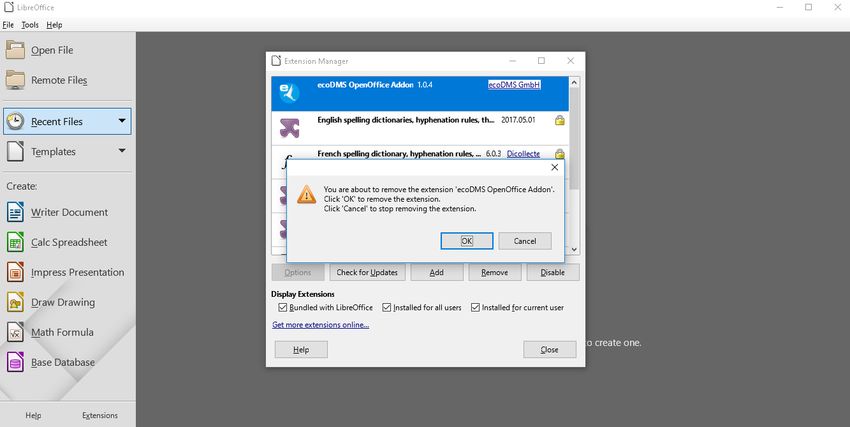
2. Windows                                                                                                         9

                 Fig. (similar) 2.4: AllInOneInstaller: Components and Language Selection (Windows)

  8. Read the license agreement carefully and tick the check box "I accept the terms of the license agreement". Click
     "Next" to continue.

                         Fig. (similar) 2.5: AllinOneInstaller: License Agreement (Windows)

ecoDMS Version 18.09 (apu)                                                                            Installation | EN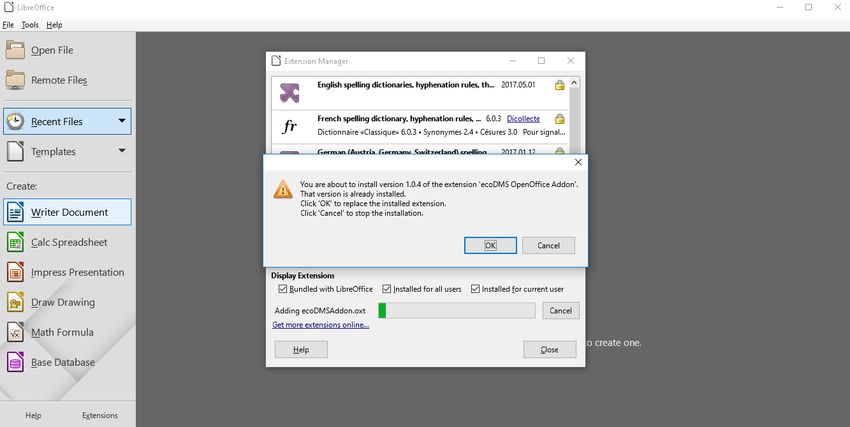
2. Windows                                                                                                            10

  9. The setup program is now ready to install the individual components on your computer. The required disk space for
     the installation will be displayed. Click “Install” to start the installation process.

                      Fig. (similar) 2.6: AllInOneInstaller: Start the installation process (Windows)

 10. The installation starts. The AllInOne-Installer consecutively executes the installation of the components. This process
     may take a while.
       a) Depending on your selection, the following components are installed:
              i. ecoDMS Server incl. postgreSQL & Microsoft Visual C++
             ii. ecoDMS Client
             iii. ecoDMS PDF/A-Printer

ecoDMS Version 18.09 (apu)                                                                                 Installation | EN
2. Windows 11
Fig. (similar) 2.7: AllInOneInstaller: Installing the individual components (Windows)
11. As soon as all components have been installed, click “Finish” to close the AllInOneInstaller.
Fig. (similar) 2.8: AllInOneInstaller: Installation complete (Windows)
ecoDMS Version 18.09 (apu) Installation | EN2. Windows 12
2.2.2 ecoDMS Server
Use this installation file to install ecoDMS Server. As a client-server system, ecoDMS Server forms the base of ecoDMS.
It is the main software component of ecoDMS Archive. In order to work with each of the components (ecoDMS Client,
ecoDMS Webclient, plugins, API REST service...), the server must be accessible and stable. The following explains how to
install ecoDMS Server under Windows[3, 5, 1, 2, 6, 7].
1. If this installation is an update, close all Connection Managers first and make sure that no user is connected with the
server.
Fig. (similar) 2.9: Exit Connection Manager
2. Download the file for ecoDMS Server at ecodms.de.
3. If this is a ZIP-file, unzip it first.
4. Execute the installation file "....exe".
5. The setup wizard opens. Click "Next" in the "Welcome Screen".
Fig. (similar) 2.10: Install ecoDMS Server: Start Screen
6. Select the installation folder. You can change the suggested folder by clicking "Browse".
ecoDMS Version 18.09 (apu) Installation | EN2. Windows 13
Fig. (similar) 2.11: Install ecoDMS Server: Installation Folder
7. Select the server components you want to install.
a) We recommend you install "ecoDMS Server" and "postgreSQL".
b) If the installation is an update, only "ecoDMS Server" is displayed here for selection.
Fig. (similar) 2.12: Install ecoDMS Server: Select Components
8. Read the license agreement carefully and tick the check box "I accept the license". Click "Next" to continue.
ecoDMS Version 18.09 (apu) Installation | EN2. Windows 14
Fig. (similar) 2.13: Install ecoDMS Server: License Agreement
9. In the start menu, select the folder in which you want to create the application shortcuts. You can specify a name to
create a new folder. Click "Next" to continue.
Fig. (similar) 2.14: Install ecoDMS Server: Start Menu Shortcut
10. The following describes how to setup the database, ports and language. In a standard setup, the default ports should
not be changed. The ports are used, for example, for the client connections and for the database. If the selected port
is already occupied, an error message displays[6].
Select the data folder: The data folder is the target folder for the container storage system. This is where ecoDMS
saves the data. In a default installation, the default folder should not be changed. You can change the
suggested folder by clicking "Browse" or "...". We recommend using the largest possible memory for the
data folder.
ecoDMS Version 18.09 (apu) Installation | EN2. Windows 15
ecoDMS Port for client connections: Assign the port for the connection between ecoDMS Desktop Client and
ecoDMS Server. The default port is:
17001
Database port: Assign the port for the database. The default port is:
17002
Web access port: Assign the port for accessing ecoDMS Webclient. The default port is:
8080
Apply firewall rules for remote access: The firewall controls the incoming and outgoing traffic between computer
and internet. As a rule, you do not need to modify the general firewall settings. To access ecoDMS
from outside and enable the web service, the default settings for the port are not sufficient. They must
be shared. Check the checkbox to enable the firewall for ecoDMS and web access. ecoDMS makes the
necessary settings automatically. Under Windows you can manage the firewall settings at System Settings
-> System and Security -> Windows Firewall (-> Advanced settings).
ecoDMS languag setting: Select the language in which you want to save the attributes and ecoDMS functions for
all users (e.g. classification attributes, status...) You can install the server in the languages German or
English.
a) Port Information:
– The port specified during the ecoDMS installation is automatically specified in the firewall.
– If a compatible version of postgreSQL is already installed, the installation of the ecoDMS Server does not create
a new instance. A new database (ecodms) is created in the existing instance.
– If postgreSQL was installed manually, ensure that it was the postgreSQL version supported by ecoDMS.
– During the installation, ecoDMS requests the login credentials for the existing postgreSQL database.
– If postgreSQL was installed manually, make sure that the postgreSQL service is started before ecoDMS Server.
Otherwise ecoDMS Server cannot run.
Fig. (similar) 2.15: Install ecoDMS Server: Database and Port Settings
11. Default settings only for German installation: If you have not created a postgreSQL Database, you can select a
default setting for the database. The default setting includes a pre-defined archive structure for different application
fields. A rough folder structure, document types and, depending on the line of business, some specific classification
attributes already exist.
ecoDMS Version 18.09 (apu) Installation | EN2. Windows 16
a) You can only install default settings on a German Windows operating system.
b) On non-German operating systems, this installation step is not displayed.
Fig. (similar) 2.16: Install ecoDMS Server: Default Settings (Only for German System Environment)
12. ecoDMS Server is now ready for installation. Start the installation by clicking the "Continue" button. The installation
process may take a while.
Fig. (similar) 2.17: Install ecoDMS Server: Ready for Installation
13. Depending on the system environment, Windows displays a confirmation prompt for the "User Account Control"
during installation. Confirm with "Yes" when asked whether you want to allow the following programme to make
changes to this computer.
ecoDMS Version 18.09 (apu) Installation | EN2. Windows 17
Fig. (similar) 2.18: Install ecoDMS Server: User Account Control
14. If your installation is an update / upgrade, a message from postgreSQL will appear. Confirm this message with "OK"
to continue with the installation.
Abbildung 2.19: ecoDMS Server installieren: Meldung von postgreSQL
15. The installation is executed. This process may take a while.
a) The following components are installed (depending on selection and software version).
i. ecoDMS Server
ii. Microsoft Visual C++
iii. postgreSQL
ecoDMS Version 18.09 (apu) Installation | EN2. Windows 18
Figure 2.20: Install ecoDMS Server: Installation Process
Figure 2.21: Install ecoDMS Server: MS Visual C++ 2013
ecoDMS Version 18.09 (apu) Installation | EN2. Windows 19
Figure 2.22: Install ecoDMS Server: postgreSQL
16. Now the installation is complete. Click "Finish" to close the wizard.
Figure 2.23: Install ecoDMS Server: Installation Completed
2.2.3 ecoDMS Client
Use this installation file to install the ecoDMS Archive user interface. Moreover, the Connection Manager and the Inbox
are fixed components of this software package. The following explains the installation process of the ecoDMS Client under
Windows [1, 2, 7].
1. If this installation is an update, close all Connection Managers first and make sure that no user is connected with the
server.
ecoDMS Version 18.09 (apu) Installation | EN2. Windows 20
Fig. (similar) 2.24: Exit Connection Manager
2. Download the file for the ecoDMS Client at ecodms.de.
3. If this is a ZIP-file, unzip it first.
4. Execute the installation file "....exe".
5. The setup wizard opens. Click "Next" in the "Welcome Screen".
Fig. (similar) 2.25: Install ecoDMS Client: Start Screen
6. Select the installation folder. You can change the suggested folder by clicking "Browse".
ecoDMS Version 18.09 (apu) Installation | EN2. Windows 21
Fig. (similar) 2.26: Install ecoDMS Client: Installation Destination
7. Read the license agreement carefully and tick the check box "I accept the license". Click "Next" to continue.
Fig. (similar) 2.27: Install ecoDMS Client: License Agreement
8. In the start menu, select the folder in which you want to create the application shortcuts. You can specify a name to
create a new folder. Click "Next" to continue.
ecoDMS Version 18.09 (apu) Installation | EN2. Windows 22
Fig. (similar) 2.28: Install ecoDMS Client: Start Menu Shortcut
9. ecoDMS Client is now ready for installation.
a) Select the language in which you want to install ecoDMS Client on this computer.
i. You can install the client in German or English language.
b) Click "Install" to start installing.
Fig. (similar) 2.29: Install ecoDMS Client: Select Language and Start Installation
10. Depending on the system environment, Windows displays a confirmation prompt for "User Account Control" during
installation. Confirm with "Yes" when asked whether you want to allow the following programme to make changes to
this computer.
ecoDMS Version 18.09 (apu) Installation | EN2. Windows 23
Fig. (similar) 2.30: Install ecoDMS Client: Windows Confirmation Prompt
11. The installation is executed. This process may take a while.
Fig. (similar) 2.31: Install ecoDMS Client: Installation Process
12. Now the installation is complete. Click "Finish" to close the wizard.
ecoDMS Version 18.09 (apu) Installation | EN2. Windows 24
Fig. (similar) 2.32: Install ecoDMS Client - Installation complete
2.2.4 ecoDMS Printer
Use this file to install the ecoDMS virtual PDF/A printer (printer driver). It enables printing a PDF/A file from any
application that prints. The following explains the uninstall process of the ecoDMS Printer under Windows [1, 2, 7].
1. Download the file for the ecoDMS Printer at ecodms.de.
2. If this is a ZIP-file, unzip it first.
3. Execute the installation file "....exe".
4. The setup wizard opens. Click "Next" in the "Welcome Screen".
Fig. (similar) 2.33: Install ecoDMS Printer: Start Screen
ecoDMS Version 18.09 (apu) Installation | EN2. Windows 25
5. Select the installation folder. You can change the suggested folder by clicking "Browse".
Fig. (similar) 2.34: Install ecoDMS Printer: Installation Destination
6. Read the license agreement carefully and tick the check box "I accept the license". Click "Next" to continue.
Fig. (similar) 2.35: Install ecoDMS Printer: License Agreement
7. The ecoDMS printer is now ready for installation.
a) Select the language in which you want the ecoDMS printer to be installed on this computer.
i. You can choose German or English as the printer language.
b) Click "Install" to start installing.
ecoDMS Version 18.09 (apu) Installation | EN2. Windows 26
Fig. (similar) 2.36: Install ecoDMS Printer: Select Language and Start Installation
8. Depending on the system environment, Windows displays a confirmation prompt for the "User Account Control"
during installation. Confirm with "Yes" when asked whether you want to allow the following programme to make
changes to this computer.
Fig. (similar) 2.37: Install ecoDMS Printer: Windows Confirmation Prompt
9. The installation is executed. This process may take a while.
ecoDMS Version 18.09 (apu) Installation | EN2. Windows 27
Fig. (similar) 2.38: Install ecoDMS Printer: Installation Process
10. The installation is now complete. Click "Finish" to close the installation wizard.
Fig. (similar) 2.39: Install ecoDMS Printer - Installation Complete
2.3 Uninstall
The following section describes how to uninstall ecoDMS components under Windows [3, 4, 2].
2.3.1 Basics
ecoDMS Server Uninstalling the ecoDMS Server component will irrevocably delete all stored databases. You cannot undo
this operation.
ecoDMS Version 18.09 (apu) Installation | EN2. Windows 28
Recovery Recovering the data requires a new installation of ecoDMS and importing a clean and complete data backup.
An error has occurred while uninstalling.
Stop this process to continue: ecodmssinglesignon.exe
If this message displays, the Connection Manager was not closed before uninstalling. As soon as you have closed the
Connection Manager, you can start uninstalling ecoDMS.
Fig. (similar) 2.40: Error Message During Uninstall Process: ecodmssinglesignon.exe
Stop Connection Manager Please disconnect all user profiles connected with ecoDMS before uninstalling and exit the
Connection Manager. The Connection Manager establishes the connection to the ecoDMS Server. To uninstall
ecoDMS and/or other ecoDMS applications, for example, you must exit the Connection Manager. To exit the
Connection Manager, complete the following steps:
1. Right-click the Connection Manager icon in the toolbar of your operating system.
2. Now click "Exit".
Attention: The connection to the ecoDMS Server is only terminated if the ecoDMS Client is closed and the con-
nections have been disconnected in the Connection Manager at the respective workstation. Merely disconnecting the
Connection Manager or closing the client will not unblock a License. To do this, close or disconnect all ecoDMS
components and the Connection Manager at the workstation.
Note: You can find the Connection Manager on your toolbar. In Windows the icon usually displays next to the time.
Depending on the number of other applications running on your PC, Windows hides some icons. Use the arrow to
display the hidden icons. The same applies to Ubuntu and MacOS.
Fig. (similar) 2.41: Exit Connection Manager
ecoDMS Version 18.09 (apu) Installation | EN2. Windows 29
2.3.2 ecoDMS Server
The following explains the uninstall process of the ecoDMS Server under Windows [3, 4, 2].
1. First, Close all active ecoDMS Clients and Connection Managers and make sure that no user is connected with the
server.
Fig. (similar) 2.42: Exit Connection Manager
2. In the Windows Control Panel, open the interface to uninstall installed software ("Uninstall Program").
3. Select the "ecoDMS Server" software in the list of installed programmes.
4. The Uninstall wizard starts.
a) Select "Remove all components".
b) Now click "Continue".
Fig. (similar) 2.43: Uninstall ecoDMS Server - Select Components
5. Click "Uninstall" to start uninstalling. Click "Cancel" to abort the process.
a) Please note that by uninstalling the ecoDMS Server under Windows, the entire database of ecoDMS will be
deleted. The ecoDMS Server component as well as the postgreSQL database with all archived documents,
settings and information are deleted. You can only restore the data again if you created a complete and clean
backup before uninstalling.
ecoDMS Version 18.09 (apu) Installation | EN2. Windows 30
Fig. (similar) 2.44: Uninstall ecoDMS Server - Delete Data Store
6. The uninstall process is executed. This operation may take a while.
Fig. (similar) 2.45: Uninstall ecoDMS Server - Uninstall Process
7. You have now uninstalled the plugin. The ecoDMS Server has been removed from your system.
a) If you want to reinstall the system afterwards, restart the computer first.
ecoDMS Version 18.09 (apu) Installation | EN2. Windows 31
Fig. (similar) 2.46: Uninstall ecoDMS Server - Uninstall Complete
2.3.3 ecoDMS Client
The following explains the uninstall process of the ecoDMS Client under Windows [2].
1. First, Close all active ecoDMS Clients and Connection Managers and make sure that no user is connected with the
server.
Fig. (similar) 2.47: Exit Connection Manager
2. In the Windows Control Panel, open the interface to uninstall installed software ("Uninstall Program").
3. Select the "ecoDMS Client" software by double-clicking it in the list of installed programmes.
4. The Uninstall wizard starts.
a) Select "Remove all components".
b) Now click "Continue".
ecoDMS Version 18.09 (apu) Installation | EN2. Windows 32
Fig. (similar) 2.48: Uninstall ecoDMS Client - Select Components
5. Click "Uninstall" to start uninstalling. Click "Cancel" to abort the process.
a) Please note that all content from the listed folder will be irrevocably removed when you execute the uninstall
process.
Fig. (similar) 2.49: Uninstall ecoDMS Client - Delete Data Store
6. The following message only displays when the Connection Manager is still running. You must exit the Connection
Manager before uninstalling.
Note: You can find the Connection Manager on your toolbar. In Windows the icon usually displays next to the
time. Depending on the number of other applications running on your PC, Windows hides some icons.
Use the arrow to display the hidden icons. The same applies to Ubuntu and MacOS.
ecoDMS Version 18.09 (apu) Installation | EN2. Windows 33
Fig. (similar) 2.50: Exit Connection Manager
Fig. (similar) 2.51: Error Message During Uninstall Process: ecodmssinglesignon.exe
7. The uninstall process is executed. This operation may take a while.
Fig. (similar) 2.52: Uninstall ecoDMS Server - Uninstall Process
ecoDMS Version 18.09 (apu) Installation | EN2. Windows 34
8. The uninstall process is now complete. ecoDMS Client has been removed from your system.
Fig. (similar) 2.53: Uninstall ecoDMS Client - Uninstall Complete
2.3.4 ecoDMS Printer
The following explains the uninstall process of the ecoDMS Printer under Windows [2].
1. In the Windows Control Panel, open the interface to uninstall installed software ("Uninstall Program").
2. Select the "ecoDMS Printer" software by double-clicking it in the list of installed programmes.
3. The Uninstall wizard starts.
a) Select "Remove all components".
b) Click "Continue".
Fig. (similar) 2.54: Uninstall Printer - Select Components
ecoDMS Version 18.09 (apu) Installation | EN2. Windows 35
4. Click "Uninstall" to start uninstalling. Click "Cancel" to abort the process.
a) Please note that all content from the listed folder will be irrevocably removed when you execute the uninstall
process.
Fig. (similar) 2.55: Uninstall ecoDMS Printer - Delete Data Store
5. The uninstall process is executed. This operation may take a while.
6. The uninstall process is now complete. ecoDMS Printer has been removed from your system.
Fig. (similar) 2.56: Uninstall ecoDMS Printer - Uninstall Complete
Important Information for Chapter 2
ecoDMS Version 18.09 (apu) Installation | EN2. Windows 36
[1] During the installation the firewall might inquire whether the application is allowed to access the network. Confirm this
with Yes.
[2] Ensure you make a backup before updating or upgrading. If you wish to upgrade from a previous version to a new major
release, please follow the upgrade steps in the new installation manual. For a simple update of the same major release,
just install the software over the old version. You must always update all components. Do not mix the components
of an earlier ecoDMS version with this version. After an upgrade, a downgrade is only possible to an older ecoDMS
version when there is a full backup of the previous version.
[3] If ecoDMS has been uninstalled and you want to reinstall, the computer must be restarted first.
[4] If the installation is a standard installation (ecoDMS Server (ecoSIMS) including database via the ecoDMS installer)
and you delete ecoDMS server components, all ecoDMS data is also deleted irrevocably. You can only restore all the
archived files, information settings etc. if you created a comprehensive and clean backup of the entire database before
uninstalling. Without a backup you will not be able to restore your data after uninstalling.
[5] On Windows systems, the installation must be executed by a local administrator (not a domain administrator).
[6] The database folder (postgreSQL) must not contain any spaces, umlauts or special characters and must be located on
a local hard disk. To do so, do not use a network drive or an NAS drive (no share folder). If postgreSQL is already
installed, the installation of the ecoDMS server does not create a new instance. A new database (ecodms) is created
in the existing instance. If postgreSQL was installed manually, you must disable the postgreSQL installation when the
ecoDMS server is installed afterwards. If postgreSQL was installed manually, ensure that it was the postgreSQL version
supported by ecoDMS (postgreSQL 9.3.X - 32bit). During the installation, the access data for the existing postgreSQL
database is requested. If the existing postgreSQL version does not match the ecoDMS version, postgreSQL - if not
disabled in the ecoDMS installer - is installed parallel to the existing system. If postgreSQL was installed manually,
ensure that the postgre service is started before the ecoDMS server starts. Otherwise the ecoDMS server can not be
started.
[7] You can install server and client in different languages. The view of the classification attributes and messages depends
on the language you have selected for the ecoDMS server component.
ecoDMS Version 18.09 (apu) Installation | EN3. Linux-Distributions 37
3 Linux-Distributions
This chapter describes the necessary steps for installing and uninstalling ecoDMS components under Linux distributions.
In addition, it features a description of how to perform ecoDMS upgrades and important information about the individual
processes.
3.1 Upgrade
The following section describes the upgrade process to the major release version 18.09 (apu) under Linux distributions.
3.1.1 Basics
1. When upgrading from a previous version to version 18.09 (apu), make sure that the last update of your ecoDMS
version is installed on your system.
a) If this is not the case, you must update the previous version with the latest update before upgrading to version
18.09 (apu).
2. Ensure you create a backup before updating or upgrading.
3. Please note that existing data will be migrated and full-text indexed in the background after the upgrade.
a) The duration of the operation depends on the data volume.
b) Until the migration has completed, the server may show high capacity utilisation.
c) Leave the computer switched on until the migration is complete.
d) You can monitor the progress under "Settings - File Indexing" in the Settings dialogue box.
3.1.2 Process
Execute the upgrade by working through the following steps in the order specified. Please note the upgrade basics before
you start.
1. Create a full backup of the existing database.
a) You can create the backup from ecoDMS version 14.08 (krusty) with the oneClick Backup component or with
the console programme for manual backup.
2. Upgrade from 16.09 to 18.09:
a) Update sources.list in your system according to the apt sources listed in this manual.
b) Then update the package sources..
sudo apt-get update
c) Now install the individual ecoDMS components according to the installation guide in this manual.
3. Upgrade from 14.08 to 18.09:
a) Uninstall all existing ecoDMS components of the previous version according to the steps in your installation
manual of the existing ecoDMS version.
14.08 (krusty):
sudo apt-get remove ecodmsserver ecodmsclient ecoice ecodmsprinter
b) Do not under any circumstances uninstall the postgreSQL database.
ecoDMS Version 18.09 (apu) Installation | EN3. Linux-Distributions 38
i. Make sure that all components have been uninstalled.
ii. The components of the old and new version must not be mixed up.
c) Restart the computer after the uninstall process.
d) Now install the ecoDMS Server and the other components of the new ecoDMS version according to the new
installation manual.
e) Restart your computer.
f) Now make a clean and complete import of the backup.
i. You can find a detailed description of the restore process in the ecoDMS manual.
g) Please note that existing data will be migrated and full-text indexed in the background after the
upgrade.
i. The duration of the operation depends on the data volume.
ii. Until the migration has completed, the server may show high capacity utilisation.
iii. Leave the computer switched on until the migration is complete.
iv. You can monitor the progress under "Settings - File Indexing" in the Settings dialogue box.
3.1.3 License Information
Because of comprehensive innovations, changes and additional functions, you cannot use licenses from previous versions to
activate a new major release. Of course your ecoDMS license will remain valid and can be used with the respective ecoDMS
version.
3.2 Installation
The following section describes how to install the available ecoDMS components under Linux distributions.
3.2.1 Basics
Please read the following information before installing:
– Ensure you create a backup before updating or upgrading.
– If you wish to upgrade from a previous version to the current major release, please follow the upgrade steps.
– For a simple update of the same major release, just install the software over the old version.
– You must always update all components.
– Please note that the ecoDMS packages for Ubuntu and Debian are only available for 64-bit systems. There
is a 32-bit version for the Raspberry Pi.
– Important notes for Raspberry Pi users: We provided the ecoDMS Server version for Raspberry Pi as a playground
for tech-savvy ecoDMS users. However, we do not recommend productive use with large data volumes and/or in
companies. Due the limited performance we can not guarantee a remote access to the system with Raspberry Pi.
To best exploit the advantages of the archiving solution, we recommend you install the ecoDMS components on
high-performing software with respective storage capacity.
3.2.2 Install Editor
To install the ecoDMS components, you need an editor. To install, proceed the following steps:
1. Open the console (terminal) and enter the following command to install "mcedit":
sudo apt-get install mc
2. Confirm your entry with "Enter".
3. The editor will now be installed on your device.
a) The instructions, information, license agreements and system requirements of the respective manufacturer apply.
ecoDMS Version 18.09 (apu) Installation | EN3. Linux-Distributions 39
3.2.3 apt Sources
Before you can install the ecoDMS components, you must first define the necessary apt sources. Proceed as follows [2, 1,
4, 5].
1. Now open the "sources.list" file for editing as follows:
sudo mcedit /etc/apt/sources.list
a) You can also create your own sources list for the installation as follows:
sudo mcedit /etc/apt/sources.list.d/ecodms.list
2. Add the following rows (in accordance with your operating system) to the end of the file:
64bit / Ubuntu LTS 20.04 (Focal Fossa)
deb http://www.ecodms.de/ecodms_180964/focal /
64bit / Ubuntu LTS 18.04 (bionic)
deb http://www.ecodms.de/ecodms_180964/bionic /
64bit / Debian 10 (buster)
deb http://www.ecodms.de/ecodms_180964/buster /
64bit / Debian 9 (stretch)
deb http://www.ecodms.de/ecodms_180964/stretch /
32bit / Debian 9 (stretch) - Raspberry Pi
deb http://www.ecodms.de/ecodms_180964/raspi /
3. Save your entry with "F2".
4. Exit the editor with"F10" or "ESC" (depending on the operating system).
5. Import the "ecoDMS Key" of "ecoDMS Repositories":
wget -O - http://www.ecodms.de/gpg/ecodms.key | sudo apt-key add -
6. Before you can install the individual components, you must update the package sources with
sudo apt-get update
3.2.4 ecoDMS Server
As a client-server system, the ecoDMS Server forms the base of the entire application. The server is not a piece of hardware,
but a software component. The following explains the installation process of the ecoDMS server under Linux distributions
[2, 1, 4, 5].
– If you have installed several Java Runtime environments, please ensure that the following package is installed:
– Java 8:
oracle-java8-unlimited-jce-policy
ecoDMS Version 18.09 (apu) Installation | EN3. Linux-Distributions 40
– Java 7:
oracle-java7-unlimited-jce-policy
1. If this installation is an update, close all Connection Managers first and make sure that no user is connected with the
server.
Fig. (similar) 3.1: Exit Connection Manager
2. A precondition for this installation is that the apt-sources were edited as described in this manual.
3. Open the console.
4. Start the installation with
sudo apt-get install ecodmsserver
5. Confirm the displayed questions / warnings with YES by entering Y [...]Do you want to continue?[...] [...]Do you want
to install these packages without checking?[...]
a) This process may take a while.
6. Select the language for the installation and confirm your selection with "Enter".
a) You can install server and client in different languages.
b) The display of the classification attributes and messages depends, however, on the language selection of the
ecoDMS Server component.
7. Read the license agreement carefully and confirm them.
a) Use the Tab key to skip to "OK" and confirm with "Enter".
8. The installation is performed. This operation may take a while.
3.2.5 ecoDMS Client
Use this installation steps to install the ecoDMS Archive user interface. Moreover, the Connection Manager is a fixed
component of this software package. The following explains the installation process of the ecoDMS Client under Linux
distributions [1, 4, 5].
1. If this installation is an update, close all Connection Managers first and make sure that no user is connected with the
server.
Fig. (similar) 3.2: Exit Connection Manager
2. A precondition for this installation is that the apt-sources were edited as described in this manual.
ecoDMS Version 18.09 (apu) Installation | EN3. Linux-Distributions 41
3. Open the console.
4. Start the installation with
sudo apt-get install ecodmsclient
5. Confirm the displayed questions / warnings with YES by entering Y [...]Do you want to continue?[...] [...]Do you want
to install these packages without checking?[...]
a) This process may take a while.
6. Select the language for the installation and confirm your selection with "Enter".
a) You can install server and client in different languages.
b) The display of the classification attributes and messages depends, however, on the language selection of the
ecoDMS Server component.
7. Read the license agreement carefully and confirm them.
a) Use the Tab key to skip to "OK" and confirm with "Enter".
8. The installation is performed. This operation may take a while.
3.2.6 ecoDMS Printer
Use this steps to install the ecoDMS virtual PDF/A Printer (Printer driver). The following explains the installation process
of the ecoDMS Printer under Linux distributions [1, 4, 5].
1. If this installation is an update, close all Connection Managers first and make sure that no user is connected with the
server.
Fig. (similar) 3.3: Exit Connection Manager
2. A precondition for this installation is that the apt-sources were edited as described in this manual.
3. Open the console.
4. Start the installation with
sudo apt-get install ecodmsprinter
5. Confirm the displayed questions / warnings with YES by entering Y [...]Do you want to continue?[...] [...]Do you want
to install these packages without checking?[...]
a) This process may take a while.
6. Select the language for the installation and confirm your selection with "Enter".
a) You can install server and client in different languages.
b) The display of the classification attributes and messages depends, however, on the language selection of the
ecoDMS Server component.
7. Read the license agreement carefully and confirm them.
a) Use the Tab key to skip to "OK" and confirm with "Enter".
8. The installation is performed. This operation may take a while.
ecoDMS Version 18.09 (apu) Installation | EN3. Linux-Distributions 42
3.3 Uninstall
The following section describes how to uninstall ecoDMS components under Linux distributions [2, 3, 1].
3.3.1 ecoDMS Server
The following explains the uninstall process of the ecoDMS Server under Linux distributions [2, 3, 1].
1. First, Close all active ecoDMS Clients and Connection Managers and make sure that no user is connected with the
server.
Fig. (similar) 3.4: Exit Connection Manager
2. Open the console.
3. Perform the uninstall process with the following command:
sudo apt-get remove ecodmsserver
3.3.2 ecoDMS Client
The following explains the uninstall process of the ecoDMS Client under Linux distributions [1].
1. First, Close all active ecoDMS Clients and Connection Managers and make sure that no user is connected with the
server.
Fig. (similar) 3.5: Exit Connection Manager
2. Open the console.
3. Perform the uninstall process with the following command:
sudo apt-get remove ecodmsclient
3.3.3 ecoDMS Printer
The following explains the uninstall process of the ecoDMS Printer under Windows [1].
1. First, Close all active ecoDMS Clients and Connection Managers and make sure that no user is connected with the
server.
ecoDMS Version 18.09 (apu) Installation | EN3. Linux-Distributions 43
Fig. (similar) 3.6: Exit Connection Manager
2. Open the console.
3. Perform the uninstall process with the following command:
sudo apt-get remove ecodmsprinter
Important Information for Chapter 3
[1] Ensure you make a backup before updating or upgrading. If you wish to upgrade from a previous version to a new major
release, please follow the upgrade steps in the new installation manual. For a simple update of the same major release,
just install the software over the old version. You must always update all components. Do not mix the components
of an earlier ecoDMS version with this version. After an upgrade, a downgrade is only possible to an older ecoDMS
version when there is a full backup of the previous version.
[2] If ecoDMS has been uninstalled and you want to reinstall, the computer must be restarted first.
[3] If the installation is a standard installation (ecoDMS Server (ecoSIMS) including database via the ecoDMS installer)
and you delete ecoDMS server components, all ecoDMS data is also deleted irrevocably. You can only restore all the
archived files, information settings etc. if you created a comprehensive and clean backup of the entire database before
uninstalling. Without a backup you will not be able to restore your data after uninstalling.
[4] The database folder (postgreSQL) must not contain any spaces, umlauts or special characters and must be located on
a local hard disk. To do so, do not use a network drive or an NAS drive (no share folder). If postgreSQL is already
installed, the installation of the ecoDMS server does not create a new instance. A new database (ecodms) is created
in the existing instance. If postgreSQL was installed manually, you must disable the postgreSQL installation when the
ecoDMS server is installed afterwards. If postgreSQL was installed manually, ensure that it was the postgreSQL version
supported by ecoDMS (postgreSQL 9.3.X - 32bit). During the installation, the access data for the existing postgreSQL
database is requested. If the existing postgreSQL version does not match the ecoDMS version, postgreSQL - if not
disabled in the ecoDMS installer - is installed parallel to the existing system. If postgreSQL was installed manually,
ensure that the postgre service is started before the ecoDMS server starts. Otherwise the ecoDMS server can not be
started.
[5] You can install server and client in different languages. The view of the classification attributes and messages depends
on the language you have selected for the ecoDMS server component.
ecoDMS Version 18.09 (apu) Installation | EN4. NAS 44
4 NAS
This chapter describes the necessary steps for installing ecoDMS components on an NAS and as Docker image. In addition,
it features a description of how to perform ecoDMS upgrades and updates and important information about the individual
processes.
4.1 Upgrades
The following section describes the upgrade process to the major release version 18.09 (apu) on a NAS (Network Attached
Storage).
4.1.1 Basics
1. When upgrading from a previous version to version 18.09 (apu), make sure that the last update of your ecoDMS
version is installed on your system.
a) If this is not the case, you must update the previous version with the latest update before upgrading to version
18.09 (apu).
2. Ensure you create a backup before updating or upgrading.
3. Note: BEFORE upgrading the container, please make sure that no files are in the inbox and all documents
are saved to the archive.
4. Do not change or delete the data directory when you make an update / upgrade.
5. For a standard ecoDMS installation on a NAS you require:
a) a new, empty folder for the data (e.g. under "Container", example “ecodmsdata1809”)
i. Important! Create new folders for an upgrade installation!
ii. Do not use folders that you have already used for a previous installation of ecoDMS!
b) and shared folders for
i. Backup
ii. Restore
iii. Scaninput
A. Please note that if you want to share the folders, you must assign permissions to the shared
folders.
6. Please note that existing data will be migrated and full-text indexed in the background after the upgrade.
a) The duration of the operation depends on the data volume.
b) Until the migration has completed, the server may show high capacity utilisation.
c) Leave the computer switched on until the migration is complete.
d) You can monitor the progress under "Settings - File Indexing" in the Settings dialogue box.
4.1.2 Process
Execute the upgrade by working through the following steps in the order specified. Please note the upgrade basics before
you start.
1. Create a full backup of the existing database.
ecoDMS Version 18.09 (apu) Installation | EN4. NAS 45
2. Close all active ecoDMS Clients and Connection Managers and make sure that no user is connected with the server.
Fig. (similar) 4.1: Exit Connection Manager
3. Please note the upgrade basics before you start (folders on NAS).
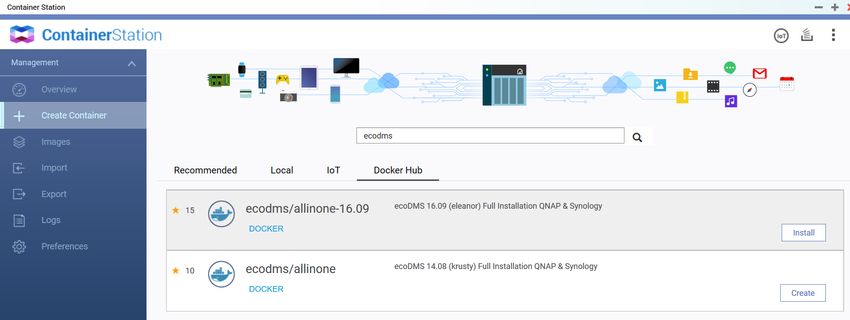
4. Stop the ecoDMS Server on your NAS system.
5. Search at "Docker - Registration" for the "ecoDMS/allinone-18.09" package.
6. Download this package.
7. Now click the loaded image under "image".
8. Click "Start" to start the image.
9. Now complete all installation steps for your system, starting with “Create Container”.
10. After creating the container, you can restore the backup.
4.1.3 License Information
Because of comprehensive innovations, changes and additional functions, you cannot use licenses from previous versions to
activate a new major release. Of course your ecoDMS license will remain valid and can be used with the respective ecoDMS
version.
4.2 Update
The following section describes the update process to a minor release of ecoDMS version 18.09 (apu) on a NAS (Network
Attached Storage).
4.2.1 Basics
1. Ensure you create a backup before updating or upgrading.
2. Before updating the container, deactivate the existing ecoDMS license.
a) Please follow the steps for deactivation and activation, as shown in the ecoDMS manual.
3. Before updating the NAS firmware, you must stop the running containers.
4. You must always update all installed components (ecoDMS Server, ecoDMS Client, ecoDMS Printer, Plugins).
5. The already existing ecoDMS folders on the NAS contain the ecoDMS data and are required for creating the container.
6. When installing an update, you must ensure that the existing folders on the NAS are assigned to the mount paths.
ecoDMS Version 18.09 (apu) Installation | EN4. NAS 46
4.2.2 Container-Update
If an ecoDMS container is already setup, you can update it as follows:
1. First, Close all active ecoDMS Clients and Connection Managers and make sure that no user is connected with the
server.
Fig. (similar) 4.2: Exit Connection Manager
2. Stop the ecoDMS container.
3. To update a container, delete the existing container and the local image of the installation.
a) Do not delete this data folder!
4. Then create the new container with the same data folder.
5. To do so, complete the steps described from section "Container Settings" for the Synology and QNAP installation
onwards.
4.2.3 License Information
1. If you are already using an ecoDMS license for the full version and want to use this license for the Docker container,
you must deactivate the license first. Otherwise, you cannot activate the new container.
2. Please follow the steps for deactivation and activation, as shown in the ecoDMS manual.
4.3 ecoWORKZ
Sofern Sie für Ihre ecoDMS-Lizenz die Freischaltung von ecoWORKZ erworben haben, beachten Sie bitte unbedingt die
Hinweise zur Installation im ecoWORKZ-Handbuch.
– Wenn Sie ecoWORKZ auf einem NAS installieren möchten, müssen die Ports des Containers angepasst werden.
– Eine Anpassung des Ports ist auch im ecoDMS Client erforderlich.
– Zur Verwendung des Datei Imports muss ein Verzeichnis in der File Station Ihres NAS für diesen eingerichtet und
ausgewählt werden.
4.4 Synology Installation (ecoDMS Server)
The following section describes how to install the available ecoDMS components on a Synology NAS (Network Attached
Storage).
4.4.1 Create Folder Structure for ecoDMS (Example)
For a standard ecoDMS installation on a NAS you require
1. a folder for the data (e.g. under "Container"),
ecoDMS Version 18.09 (apu) Installation | EN4. NAS 47
2. a shared folder for
a) Backup,
b) Restore
c) and Scaninput.
Figure 4.3: Synology - Create Shared Folder
To access folders in the "Shared Folders", set the respective permissions.
Figure 4.4: Synology - Shared Folder - Permissions
A typical folder structure could look like this:
ecoDMS data: Folder
ecoDMS: Shared Folder
ecoDMS Backup: Folder
ecoDMS Restore: Folder
ecoDMS Scaninput: Folder
Figure 4.5: Synology - Folder Structure (Example)
ecoDMS Version 18.09 (apu) Installation | EN4. NAS 48
4.4.2 Install & Open Docker
Install the "Docker" app in the "Package Centre" of your "Synology system" and then open the application.
Figure 4.6: Synology - Install Docker App
4.4.3 Search & Install ecoDMS Images
1. In the "Registration" area of the "Docker" app, search for the "ecoDMS image" with the name "ecoDMS/allinone-
18.09".
2. Then install the package by
a) right-clicking the image and
b) then clicking "Download This Image".
Figure 4.7: Synology - Install ecoDMS Image
4.4.4 Create Container
In the next step, create the container with the wizard.
1. Select the ecoDMS file in the "Image" area.
2. Now click "Start".
ecoDMS Version 18.09 (apu) Installation | EN4. NAS 49
4.4.5 Container Settings
1. In the next step, assign a name to the container.
Figure 4.8: Synology - Container Name
2. Click "Extended Settings".
3. Select the "Port Settings" tab.
Local Port Container Port
17001 17001
17002 17002
17004 8080
17005 8180
a) The following figure shows an example for the configuration of "Port Forwarding":
i. Container port: 17001 (ecoDMS) → Access via ecoDMS connection manager (17001)
A. Container port: 17002 (ecoDMS) → Database access
B. Container port: 8080 (web interface) → External access via port 17004
C. Container port: 8180 (API) → External access via port 17005
ecoDMS Version 18.09 (apu) Installation | EN4. NAS 50
Figure 4.9: Synology - Extended Settings (Port)
4. Now select the "Volume" tab.
4.4.6 Configure Mount Paths
1. On the "Volume" tab, click "Add Folder".
Figure 4.10: Synology - Extended Settings - Add Folder
2. Now select the location where you want to save your ecoDMS data on the NAS.
a) Please select the directories you created under "Volume from host".
Volume from host Mount Point
ecodmsdata1809 /srv/data
scaninput1809 /srv/scaninput
backup1809 /srv/backup
restore1809 /srv/restore
ecoDMS Version 18.09 (apu) Installation | ENYou can also read