Parallels Remote Application Server - Parallels Client for Mac User's Guide 18.1
←
→
Page content transcription
If your browser does not render page correctly, please read the page content below
Parallels Remote Application Server
Parallels Client for Mac User's Guide
18.1
Parallels International GmbH
Vordergasse 59
8200 Schaffhausen
Switzerland
Tel: + 41 52 672 20 30
www.parallels.com

© 2021 Parallels International GmbH. All rights reserved. Parallels and the Parallels logo are trademarks or registered
trademarks of Parallels International GmbH in Canada, the U.S., and/or elsewhere.

Apple, Safari, iPad, iPhone, Mac, macOS, iPadOS are trademarks of Apple Inc. Google and Google Chrome are
trademarks of Google LLC.

All other company, product and service names, logos, brands and any registered or unregistered trademarks mentioned
are used for identification purposes only and remain the exclusive property of their respective owners. Use of any brands,
names, logos or any other information, imagery or materials pertaining to a third party does not imply endorsement. We
disclaim any proprietary interest in such third-party information, imagery, materials, marks and names of others. For all
notices and information about patents please visit https://www.parallels.com/about/legal/
Contents
Getting Started .......................................................................................................... 5
      Parallels RAS 18 Release History ...................................................................................... 5
      System Requirements ....................................................................................................... 5
      Installing Parallels Client Using an Invitation Email .............................................................. 6
Using Parallels Client for Mac ................................................................................... 8
      Adding a New Connection ................................................................................................ 8
      Configuring a RAS Connection ........................................................................................ 11
            Connection ............................................................................................................................ 12
            Display .................................................................................................................................. 14
            Printing .................................................................................................................................. 15
            Local Resources.................................................................................................................... 17
            Experience ............................................................................................................................ 18
            Network ................................................................................................................................ 18
            Authentication ....................................................................................................................... 19
            Advanced .............................................................................................................................. 19
      Configuring an RDP Connection ...................................................................................... 20
            Connection ............................................................................................................................ 21
            Display .................................................................................................................................. 22
            Local Resources.................................................................................................................... 23
            Programs .............................................................................................................................. 24
            Experience ............................................................................................................................ 24
            Network ................................................................................................................................ 24
            Authentication ....................................................................................................................... 25
            Advanced .............................................................................................................................. 26
      Modifying Parallels Client Preferences ............................................................................. 27
      Using a RAS Connection ................................................................................................. 28
            Launching Published Resources............................................................................................ 29
            Working with Remote Applications ........................................................................................ 31
            Managing Sessions ............................................................................................................... 32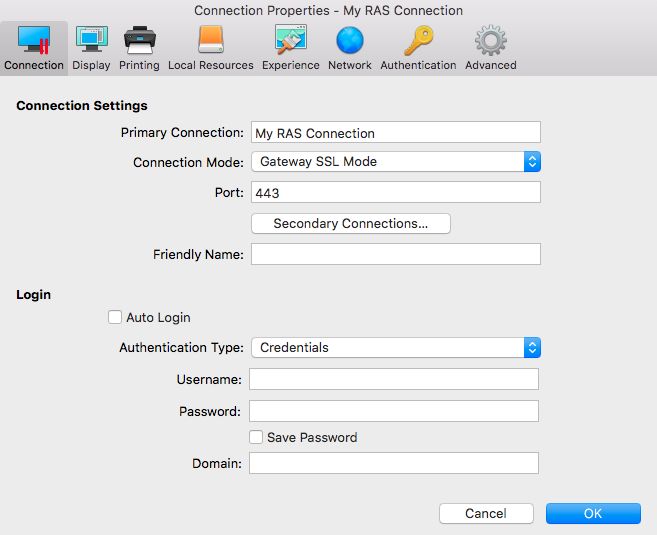
Contents

      Using an RDP Connection............................................................................................... 32
      Exporting and Importing Parallels Client Settings ............................................................. 33
Index ........................................................................................................................ 34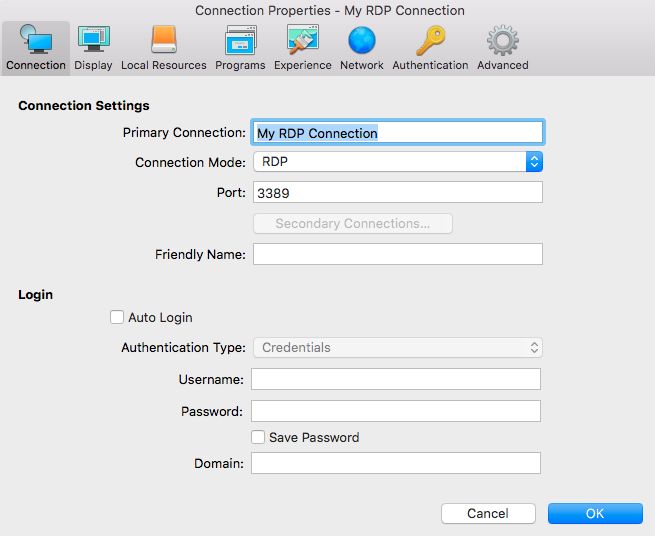
CHAPTER 1

Getting Started

Parallels® Client for Mac is an app that allows you to connect to Parallels RAS from a Mac
computer and run remote applications and desktops.

In This Chapter
Parallels RAS 18 Release History .............................................................................. 5
System Requirements .............................................................................................. 5
Installing Parallels Client Using an Invitation Email ..................................................... 6

Parallels RAS 18 Release History
The following table lists the Parallels RAS 18 release history. Parallels RAS documentation is
updated for every release. This guide refers to the latest Parallels RAS 18 release from the table
below. If you are using a newer Parallels RAS release or version, please download the current
version of the guide from https://www.parallels.com/products/ras/resources/
Parallels RAS Version       Release                        Date

18.0                        Initial release                12/14/2020
18.0                        Update 1                       03/03/2021
18.1                        Initial release                07/14/2021

System Requirements
Parallels Client for Mac is supported on Mac computers with the following CPUs:

•      Intel
•      Apple M1

Parallels Client for Mac is supported on the following macOS versions:

•      macOS 10.11 El Capitan up to macOS 11.0 Big Sur
Getting Started

Installing Parallels Client Using an Invitation Email
Your system administrator will send you an invitation email with the instructions on how to install
Parallels Client for Mac and configure a Parallels RAS connection. The invitation email will contain
the following information and action links:

•   A message from your system administrator.
•   A link to download and install Parallels Client for Mac from the Mac App Store (links to Parallels
    Client for other platforms may also be included if you are using other devices in addition to a
    Mac computer).
•   A link to automatically configure Parallels Client on your computer, so you can connect to
    Parallels RAS.
•   Parallels RAS connection properties. You can use this information to manually create a Parallels
    RAS connection. The automatic configuration via the link (described above) is the preferred and
    the easiest method, but you can use this information to create a connection manually if needed
    for any reason.

To install Parallels Client using an invitation email:

1   In the invitation email, click the Apple thumbnail. This will open the Parallels Client page in the
    web browser.
2   Click the link to view the app in the Mac App Store and then click Get > Install App.
3   Follow the instructions and install the app on your Mac.

To automatically create a Parallels RAS connection:

1   In the invitation email that you received from your system administrator, find the Configure
    section and click the Click Here to auto configure the downloaded client link and follow the
    instructions.
2   Once the Parallels Client is configured, it will open and ask you to log in to Parallels RAS.
3   Enter your credentials (e.g. your domain user name and password) and click Login.

6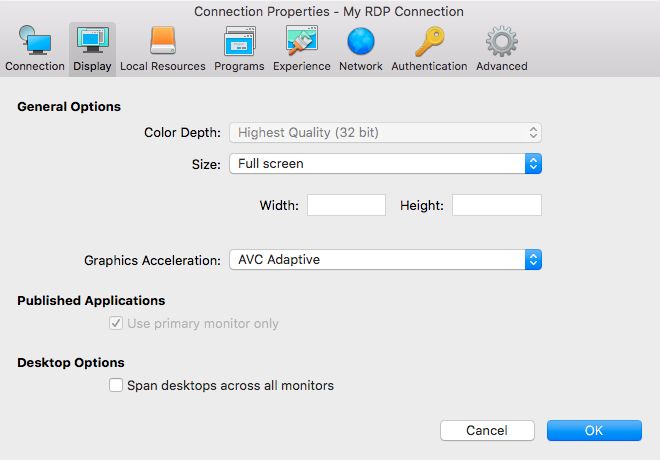
Getting Started

4   If the login is successful, the main Parallels Client window opens displaying the published
    resources that you can use.

Note: If you haven't received an invitation email from your system administrator, but would still like to
install Parallels Client on your Mac, you can visit the Mac App Store and search for the Parallels Client
app. You can then install it like any other app on your Mac. For the information on how to manually
configure a connection, please refer to Adding a New Connection section (p. 8).

                                                                                                            7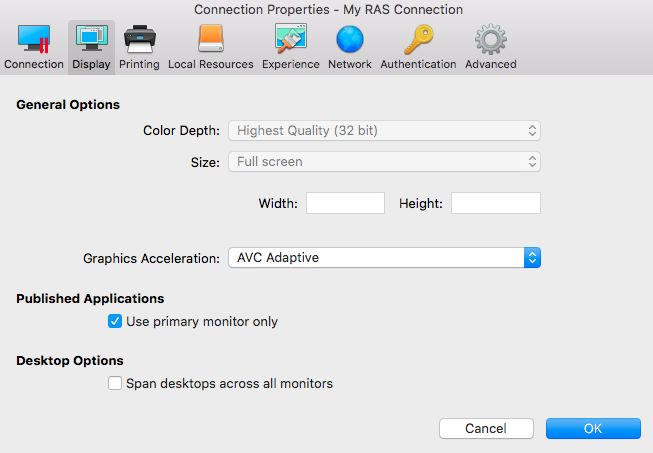
CHAPTER 2

Using Parallels Client for Mac
In This Chapter
Adding a New Connection ........................................................................................ 8
Configuring a RAS Connection ................................................................................. 11
Configuring an RDP Connection ............................................................................... 20
Modifying Parallels Client Preferences....................................................................... 27
Using a RAS Connection .......................................................................................... 28
Using an RDP Connection ........................................................................................ 32
Exporting and Importing Parallels Client Settings ...................................................... 33

Adding a New Connection
Parallels Client allows you to have more than one connection, so you could easily connect to
different servers or using different connection properties, etc.

To manually add a connection:

1    From the main menu, click File > New Connection.
2    Select the type of connection to create:
    • Click Remote Application Server to create a Parallels RAS connection. This will allow you
      to use applications, documents, or desktops published in Parallels RAS.
    • Click Standard RDP to create a standard Remote Desktop connection. This will allow you
      to connect to any remote computer desktop that accepts standard Remote Desktop
      connections.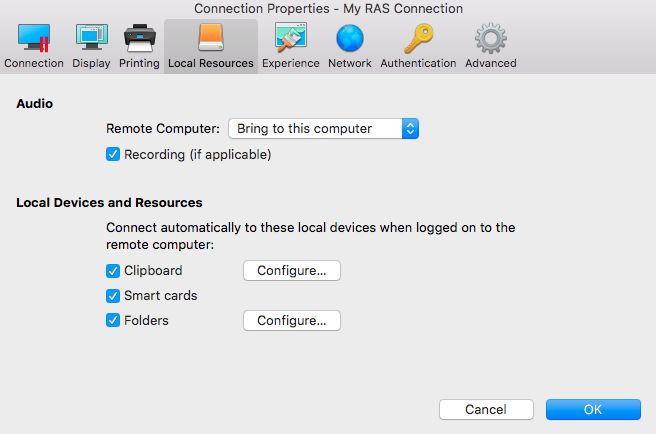
Using Parallels Client for Mac

3   On the next screen, enter the connection properties.

    When creating a connection, your system administrator should give you the connection
    information that must be specified in this dialog. If you received an invitation email from your
    administrator, you can find this information at the bottom of the message. The information will
    look similar to the following:
    To manually configure the RAS Connection, use the following
    settings:

    Server: 192.168.1.10
    Port: 443
    Connection Mode: Gateway SSL Mode
    When creating a Standard RDP connection, you need to know the IP address or hostname of
    the remote computer you want to connect to.
4   In the Server field, enter the Parallels RAS IP address or hostname (this should be the server
    where the RAS Secure Client Gateway resides). If creating a Standard RDP connection, specify
    the remote computer IP address or hostname.
5   The Connection mode drop-down list is enabled only when creating a Parallels RAS
    connection. Select one of the following options:
    • Gateway Mode. Parallels Client connects to the RAS Secure Client Gateway and the
      session connection is tunneled through the first available connection. This mode is ideal for
      servers that are only reachable via the gateway and do not require a high level of security.
    • Gateway SSL Mode. Same as the gateway mode above, but uses encryption to secure the
      data.
    • Direct Mode. Parallels Client first connects to the RAS Secure Client Gateway for the best
      available terminal server and then connects directly to that server. This is best used when
      the Parallels Client and the terminal server reside on the same network.
    • Direct SSL Mode. Same as the direct mode above, but uses encryption to secure the data.
6   In the Friendly name field, choose and type a friendly name for this connection.

                                                                                                       9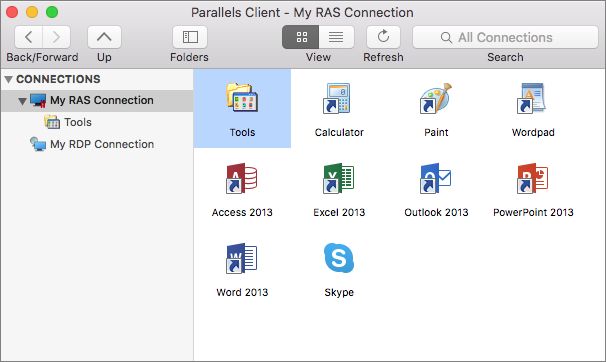
Using Parallels Client for Mac

7    The Advanced settings link opens the Connection Properties dialog where you can specify
     additional connection properties. For more information, please see Configuring a RAS
     Connection (p. 11) or Configuring an RDP Connection (p. 20).
8    Click OK to create a connection and connect to Parallels RAS.
9    This step may, or may not, appear depending on whether the two-factor authentication using
     the Google Authenticator app is configured in Parallels RAS by the administrator. If Parallels
     RAS is configured to use Google Authenticator, you will need to take additional steps. First you
     need to install the Google Authenticator app on your mobile device. When you click Connect in
     Parallels Client, you'll see a dialog displaying a barcode (also known as QR code) and a secret
     key. Scan the code (or enter the secret key) into the Authenticator app. The app will generate a
     one time password. Click Next in Parallels Client and enter the one time password in the OTP
     field. Click Connect. On every subsequent logon, you'll only have to enter the OTP. For step-
     by-step instructions, see the Using Google Authenticator subsection below.

On successful connect, the Grant access to Home folder dialog may (or may not, depending on
the server side configuration) open automatically. If you see the dialog, you can use it to specify
which folders on the local disk drive should be available to remote applications. For more
information about configuring local folders, see the description of the Disk drives option in
Configuring a RAS Connection > Local Resources or Configuring an RDP Connection >
Local Resources.

Using Google Authenticator

Use the following instructions when you see the multi-factor authentication dialog during the login
procedure. The dialog is displayed when your IT administrator configures two-factor authentication
using the Google Authenticator app.

 Important: To use Google Authenticator, the time on your computer must be synchronized with a global
 NTP time server, such as time.google.com. Otherwise, Google authentication will fail.

To use Google Authenticator, you need to install the Authenticator app on your iOS or Android
device. Simply visit Google Play or App Store and install the app. Once the Authenticator app is
installed, you are ready to connect to Parallels RAS using two-factor authentication.

To connect to Parallels RAS:

1    Opens Parallels Client and log in using your credentials.
2    The multi-factor authentication dialog opens displaying a barcode (also known as QR code) and
     a secret key.
3    Open the Google Authenticator app on your mobile device:
     • If this is the first time you use it, tap Begin and then tap Scan a barcode.
     • If you already have another account in Google Authenticator, tap the plus-sign icon and
       choose Scan a barcode.
4    Go back to your computer and scan the barcode displayed in the Parallels Client login dialog.

10
Using Parallels Client for Mac
If scanning doesn't work for any reason, go back in the Authenticator app, choose Enter a
provided key and then enter the account name and the key displayed in the Parallels Client
login dialog.
5 Tap Add account. This will create an account for your RAS connection and display a one time
password.
6 Go back to Parallels Client, click Next and enter the one time password in the OTP field.
On every subsequent logon, you only need to type your credentials (or nothing at all if the Save
password options was selected) and enter a one time password obtained from the Google
Authenticator app (the app will continually generate a new password). Please note that your IT
administrator has an ability to reset user accounts in Google Authenticator. If your account is reset,
you'll need to repeat the registration procedure described above.
Configuring a RAS Connection
To modify Parallels RAS connection properties, right-click it and choose Connection Properties.
The following subsections describe the tabs that you can click to view and configure the groups of
connection properties.
11Using Parallels Client for Mac
Connection
Configuring the Primary Connection
On the Connection tab page, you can define a primary connection and one or more secondary
connections.
The primary connection is established with the specified RAS Secure Client Gateway. To specify
the primary connection information:
1 In the Primary Connection field, specify the server name or IP address. To connect to a
specific RAS Theme, specify its name after the server name or IP address separated by a slash.
For example, workspaceus.parallelsras.net/theme1. If not sure which Theme you should use,
ask your system administrator.
2 In the Connection Mode drop-down menu, select one of the following options:
12Using Parallels Client for Mac
• Gateway Mode. Parallels Client connects to the RAS Secure Client Gateway and the
session connection is tunneled through the first available connection. This mode is ideal for
servers which are only reachable via the gateway and do not require a high level of security.
• Gateway SSL Mode. Same as the gateway mode above, but uses encryption to secure the
data.
• Direct Mode. Parallels Client first connects to the RAS Secure Client Gateway for the best
available terminal server and then connects directly to that particular server. This is best
used when the Parallels Client and the terminal server are on the same network.
• Direct SSL Mode. Same as the direct mode above, but uses encryption to secure the data.
3 In the Port field, specify the port on which the gateway listens for incoming connections.
4 In the Friendly Name field, choose and type a name of your choice for the connection.
Configuring a Secondary Connection
If the Parallels RAS farm you are connecting to has more than one RAS Secure Client Gateway,
you can define a secondary connection, which will be used as a backup connection in case the
primary gateway connection fails.
To add a secondary connection:
1 Click the Secondary Connections button.
2 In the Secondary Connections dialog, click the + button and specify a server name or IP
address. This should be a server hosting a secondary RAS Secure Client Gateway (the primary
gateway is used by the primary connection).
3 Select the connection mode and modify the port number if necessary.
4 If you have more than one secondary connection, you can move them up or down in the list. If
the primary connection cannot be established, Parallels Client will use secondary connections in
the order listed.
5 Click OK to close the Secondary Connections dialog.
Configuring the Logon Information
In the Logon section, specify the following properties:
1 Select Auto Start to enable Parallels Client to connect automatically on startup using this
connection.
2 In the Authentication Type field, select one of the following:
• Credentials. Enter credentials to log in to Parallels RAS.
• Smart card. Insert a smart card into the card reader and then enter a PIN when prompted.
• Web. Use the SAML SSO authentication.
3 If you select Credentials in the previous step, enter your username, password, and domain
information.
13Using Parallels Client for Mac
Display
On the Display tab page, specify display properties as follows.
General Options
• Color Depth. Specify the desired color depth.
• Size. This option is available for standard RDP connections only.
• Graphics Acceleration. Choose the graphics acceleration type. The more advanced the
acceleration, the better will be the quality of the graphics. Please keep in mind that higher
quality accelerations require more processing power and faster network.
Note: The acceleration setting does not affect connections with color depth less than 32 bit.
• None. No graphics acceleration.
• Basic. Basic acceleration.
• RemoteFX. More powerful graphics acceleration using the RemoteFX codec.
• RemoteFX Adaptive. Best graphics acceleration using RemoteFX Adaptive and H.264
codecs.
14Using Parallels Client for Mac
Note: If you select RemoteFX or RemoteFX Adaptive, the color depth is forced to 32 bit.
• Published Applications - Use primary monitor only. If selected, only the primary monitor
connected to your Mac will be used to display remote applications.
• Desktop Options - Span desktops across all monitors. If selected, remote desktops will be
spanned across all connected monitors.
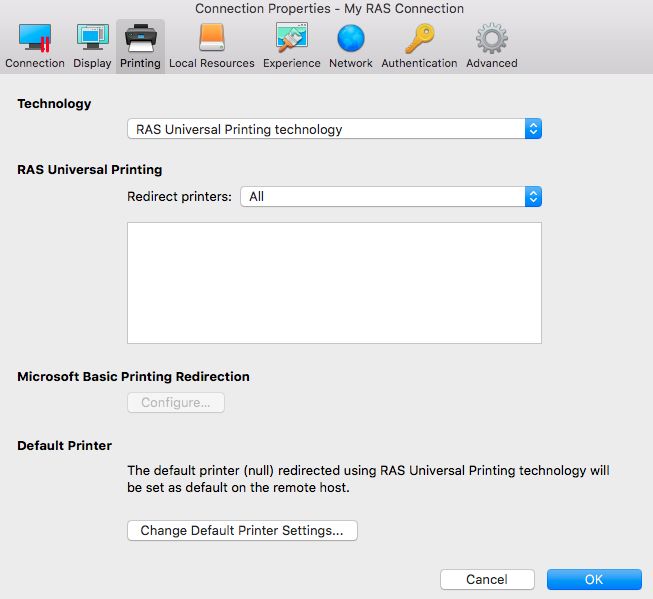
Printing
The Printing tab page allows you to configure printing options.
15Using Parallels Client for Mac
Technology
In the Technology drop-down menu, select the technology to use when redirecting printers to a
remote computer:
• None. Printers will not be redirected.
• RAS Universal Printing technology. Select this option if you want to use RAS Universal
Printing technology.
• Microsoft Basic Printing Redirection technology. Select this option if you want to use
Microsoft Basic printing technology.
• RAS Universal Printing and Microsoft Basic redirection technologies. Select this option to
use both Parallels RAS and Microsoft technologies.
RAS Universal Printing
If you selected RAS Universal Printing technology, select printers to redirect in the Redirect
Printers drop-down menu:
• All. All printers on the client side will be redirected.
• Default only. Only your Mac's default printer will be redirected.
• Specific only. Select the printers to redirect in the provided list. The list becomes enabled for
selection only if you select this option.
Microsoft Basic Printing Redirection
Click the Configure button (enabled if Microsoft Basic Printing is selected above) and configure the
following options:
• Select Destination. Select a destination printer.
• Driver. Specify the printer driver to use.
• Open PDF in Preview. Opens a PDF document when previewing the material being printed.
Default printer settings
To configure default printer settings, click the Change Default Printer settings button.
The default printer list shows the available printers that are ready to be redirected by the client to
the remote computer. The list also includes the printing technology that the available printers will
use. The technology reflects the setting selected, as described in the Technology section above.
For example, if the technology was set to RAS Universal Printing technology, only the printers
using RAS Universal Printing will be listed.
16Using Parallels Client for Mac
To disable the default printer, select . To redirect the default local printer on the client side
to the remote computer, select . When is selected, you
can specify a custom printer on the remote computer if one exists. The first printer that matches
the printer name inserted in the custom text box, will be set as the default printer on the remote
computer.
Select Match exact printer name to match the name exactly as inserted in the custom text box.
Please note that the remote printer name might differ from the original printer name. Also note that
local printers might not be redirected due to server settings or policies.
Printing to a PDF file
Parallels Client for Mac gives you the ability to print to a PDF file. For that, a special option "Print to
PDF for %user% by Parallels" is added to the standard Print dialog. When you choose this option,
the document will be converted to PDF on the server side and then sent to Parallels Client for
printing.
Local Resources
Use the Local Resources tab page to configure how local resources are handled by the remote
computer.
17Using Parallels Client for Mac
Audio
Use the Remote Computer drop-down menu to specify whether the remote computer sound
should be played on your local computer.
Select the Recording (if applicable) option to enable audio recording.
Local Devices and Resources
Clipboard. Select this option to enable the clipboard in a remote session. Click the Configure
button and choose clipboard redirection from one of the following: Bidirectional (allows to copy in
both directions), Server to client only, Client to server only.
Smart cards. Enables or disables smart card redirection to be used for authentication.
Folders. Allows you to specify local folders to automatically mount in a remote session. Click the
Disk drives option, then click the Configure button and add the desired folder(s) to the list. When
you run a remote application, you will see these folders mounted in the "Drives on user's
" folder.
Experience
The Experience tab page allows you to tweak the connection speed to optimize the performance
of the connection with the remote server.
If you are connecting to a remote computer on a local network that runs at 100 Mbps or higher, it is
usually safe to have all of the experience options turned on. It is also recommended to enable
compression to have a more efficient connection.
Network
Use the Network tab page to configure a proxy server if you have to use one to connect to
Parallels RAS.
To configure a proxy server, select the Use proxy server option and then select the protocol from
the following list:
• SOCKS4. Enable this option to transparently use the service of a network firewall.
• SOCKS4A. Enable this option to allow a client that cannot connect to resolve the destination
host’s name to specify it.
• SOCKS5. Enable this option to be able to connect using authentication.
• HTTP 1.1. Enable this option to connect using the standard HTTP 1.1 protocol connections.
Specify the proxy host domain name or IP address and the port number.
18Using Parallels Client for Mac
For SOCKS5 and HTTP 1.1 protocols, select Proxy requires authentication and enter user
credentials.
Authentication
Use the Authentication tab page to specify what happens if Network Level Authentication fails.
In the If authentication fails drop-down menu, select one of the following options:
• Connect. The user can ignore the certificate of the server and still connect.
• Warn. The user is alerted about the certificate and still has the ability to choose whether to
connect or not.
• Do not connect. The user is not allowed to connect.
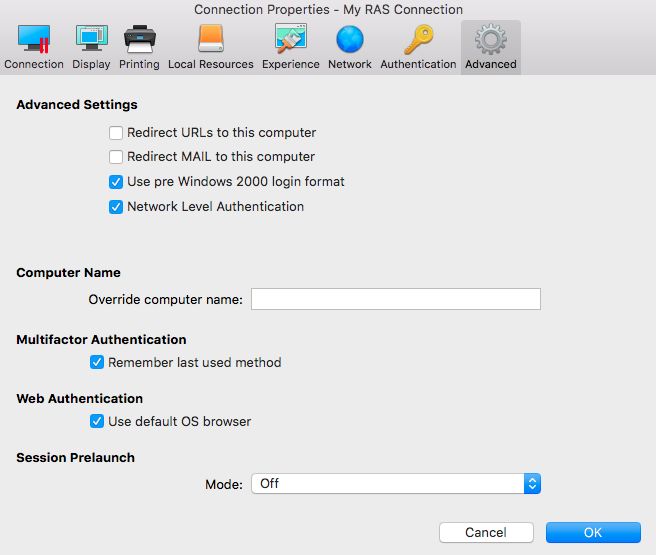
Advanced
19Using Parallels Client for Mac
The Advanced tab page allows you to specify the following properties:
• Redirect URLs to this computer. Enable this option to use the local web browser when
opening 'http:" links.
• Redirect Mail to this computer. Enable this option to use the local mail client when opening
‘mailto:’ links.
• Use Pre Windows 2000 login format. If this option is selected, it allows you to use legacy
(pre-Windows 2000) login format.
• Network Level Authentication. Check this option to enable network level authentication,
which will require the client to authenticate before connecting to the server.
• Override computer name. Specifies the name that your computer will use during a remote
session. If set, this will override the default computer name. Any filtering set by the administrator
on the server side will make use of the name specified here.
• Multifactor Authentication - Remember last used method. Select this option to remember
the last authentication method and use it the next time.
• Web Authentication - User default OS browser. Select this option to use the default web
browser. If cleared, the built-in browser will be used.
• Session prelaunch. Enables session prelaunch. This will make a remote application appear to
start faster. Use the Mode drop-down list to select Basic or Machine Learning. If you select
Basic, a session will be launched when Parallels Client gets the application listing. Because
the session will be launched some time before you start an application, it will take less time to
open the app. Please note that for the Basic mode to start working for this connection, you
need to enable it and then run an application using this connection for at least 15 minutes. This
is to prevent session prelaunch in connections that are not actively used.
The Machine Learning option will record and analyze your habits of starting applications and
will prelaunch a session a few minutes before you usually open an application on a given day of
the week.
Configuring an RDP Connection
To modify a standard RDP connection properties, right-click it and choose Connection
Properties. This opens the connection properties dialog. The following subsections describe the
tabs that you can click to view and configure the groups of RDP connection properties.
20Using Parallels Client for Mac
Connection
To specify the connection information:
1 In the Primary Connection field, specify the remote computer host name or IP address.
2 The Port field contains the TCP port 3389 by default, which is the standard port for RDP
connections. You can modify it if the port number was changed on the remote computer.
3 In the Friendly Name field, choose and type a name of your choice.
In the Logon section, specify the following properties:
1 Select the Auto Start options to enable Parallels Client to connect automatically (using this
connection) on startup.
2 Enter your username, password, and domain information.
21Using Parallels Client for Mac
Display
On the Display tab page, specify display properties as follows.
General Options
• Color Depth. Choose the color quality.
• Size. Choose the size of a remote desktop as it will appear on your screen.
• Graphics Acceleration. Choose the graphics acceleration type. The more advanced the
acceleration, the better will be the quality of the graphics. Please keep in mind that higher
quality accelerations require more processing power and faster network.
Note: The acceleration setting does not affect connections with color depth less than 32 bit.
• None. No graphics acceleration.
• Basic. Basic acceleration.
• RemoteFX. More powerful graphics acceleration using the RemoteFX codec.
• RemoteFX Adaptive. Best graphics acceleration using RemoteFX Adaptive and H.264
codecs.
Note: If you select RemoteFX or RemoteFX Adaptive, the color depth is forced to 32 bit.
22Using Parallels Client for Mac
Desktop Options
Span desktops across all monitors. If selected, a remote desktop will be spanned across all
monitors connected to your local Mac.
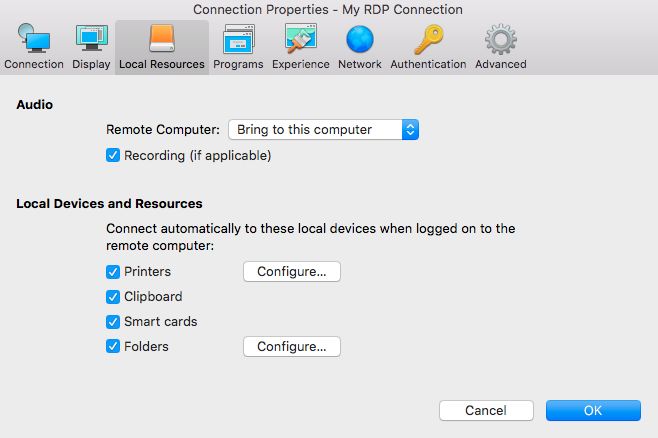
Local Resources
Use the Local Resources tab page to configure how local resources are handled by the remote
computer.
Audio
Use the Remote Computer drop-down menu to specify whether the remote computer sound
should be played on your local computer.
Select Recording (if applicable) to enabled audio recording.
Local Devices and Resources
Clipboard. Select this option to enable the clipboard in a remote session. Clear the option to
disable the clipboard.
23Using Parallels Client for Mac
Disk drives. Allows you to specify local folders to automatically mount in a remote session. Click
the Disk drives option, then click the Configure button and add the desired folder(s) to the list.
When you run a remote application, you will see these folders mounted in the "Drives on user's
" folder.
Smart cards. Enables or disables smart card redirection to be used for authentication.
To specify local printers:
1 Select Printers and then click Configure.
2 In the Select Destinations drop down list, specify All printers or a specific printer.
3 In the Driver drop-down list, select the printer driver to use.
4 Select the Open PDF in Preview option to be able to open PDF documents in preview before
printing.
Programs
On the Program tab page, you can specify a program to start automatically on the remote
computer when you establish a Remote Desktop connection with it.
Select the Start the following program on connection option, then specify the program path and
file name, and the start-in folder, if needed.
Experience
The Experience tab page allows you to tweak the connection speed to optimize the performance
of the connection with the remote host.
If you are connecting to a remote computer on a local network that runs at 100 Mbps or higher, it is
usually safe to have all of the experience options turned on. It is also recommended to enable
compression to have a more efficient connection.
Network
Use the Network tab page to configure a proxy server if you have to use one to connect to a
remote computer.
To configure a proxy server, select the Use proxy server option and then select the protocol from
the following list:
• SOCKS4. Enable this option to transparently use the service of a network firewall.
• SOCKS4A. Enable this option to allow a client that cannot connect to resolve the destination
host’s name to specify it.
• SOCKS5. Enable this option to be able to connect using authentication.
24Using Parallels Client for Mac
• HTTP 1.1. Enable this option to connect using the standard HTTP 1.1 protocol connections.
Specify the proxy host domain name or IP address and the port number.
For SOCKS5 and HTTP 1.1 protocols, select Proxy requires authentication and enter the
credentials.
Authentication
Use the Authentication tab page to specify what happens if Network Level Authentication fails.
In the If authentication fails drop-down menu, select one of the following options:
• Connect. The user can ignore the certificate of the server and still connect.
• Warn. The user is alerted about the certificate and still has the ability to choose whether to
connect or not.
• Do not connect. The user is not allowed to connect.
25Using Parallels Client for Mac
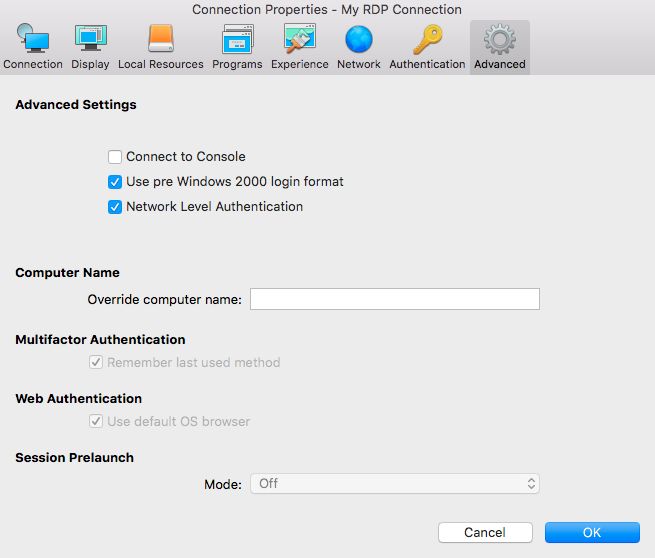
Advanced
The Advanced Settings tab page allows you to customize the default behavior or Parallels Client.
You can specify the following properties:
• Connect to Console. This option is used for administration of a Remote Desktop Session Host
server. It acts as if a standard Remote Desktop connection is initiated from the command line
with the /admin option.
• Use Pre Windows 2000 login format. If this option is selected, it allows you to use legacy
(pre-Windows 2000) login format.
• Network Level Authentication. Check this option to enable network level authentication,
which will require the client to authenticate before connecting to the server.
26Using Parallels Client for Mac
• Override computer name. Specifies the name that your computer will use during a remote
desktop session. If set, this will override the default computer name. Any filtering set by the
administrator on the server side will make use of the name specified here.
Modifying Parallels Client Preferences
To modify Parallels Client preferences, click Parallels Client > Preferences in the main menu.
General
• Sort connection list automatically. Sort the Connections list automatically (e.g. when a new
connection is added to it).
• Sort application list automatically. Sort the Published Applications list automatically.
• Logging. Allows you to set logging level. The View Log and Clear Log buttons allow you to
view and erase the log file.
Shortcuts
On the Shortcuts tab page, specify the following options:
• Create shortcuts configured on server. For each published application, the administrator can
configure shortcuts that can be created on the client's desktop. Select this option to create the
shortcuts, or clear the option if you don't want to create them.
• Shortcuts folder. Specifies the target shortcut folder (e.g. /Applications)
• Desktop shortcuts folder. Specifies the desktop shortcut folder (e.g.
/Users/username/Desktop).
27Using Parallels Client for Mac
Keyboard
On the Keyboard tab page, you can choose keyboard shortcuts to send Windows-specific
commands to remote applications or desktops:
• Send Ctrl key using: Select one or more options to send the Ctrl key command.
• Send Windows logo key using: Select one or more options to send the Windows logo key
(the key on a standard PC keyboard with the Windows logo on it).
Advanced
• Show connections. Shows or hides the Connections list (left pane in the main window).
• Do not warn if server certificate is not verified. When connected over SSL, and the
certificate is not verified, a warning message will be displayed. You can disable this warning
message by enabling this option.
• Raw printing support. When this option is enabled, printing will work for applications sending
data in RAW format.
• Swap Mouse Buttons. When enabling this setting, the mouse buttons will be swapped on the
remote computer.
• DPI aware. Select this option when running a remote desktop session on a Retina display for
best image quality. Please note that if you are already connected to Parallels RAS, you will need
to fully sign out and then sign in for this option to take effect. Please also note that a Windows
application must have proper support for HiDPI scaling to look crisp on a Retina display.
Using a RAS Connection
To connect to Parallels RAS, double-click a connection in the Connections list (or right-click >
Connect). You can have multiple active connections at the same time (both Remote Application
Server and standard RDP). To switch between active connections in Parallels Client, click a
connection in the left pane.
28Using Parallels Client for Mac
Note: If your domain password has expired or will expire soon, you will see a notification when you
connect to Parallels RAS. You can change your domain password at this time or (if it's still valid) you can
change it later.
On successful connect, the Grant access to Home folder dialog may (or may not, depending on
the server side configuration) open automatically. If you see the dialog, you can use it to specify
which folders on the local disk drive should be available to remote applications. For more
information about configuring local folders, see the description of the Disk drives option in
Configuring a RAS Connection > Local Resources.
Launching Published Resources
To launch a published resource, double-click it (or right-click and then chose Open). The resource
will open on your macOS desktop. Please note that there could be a slight delay before the
application opens. If during this delay you double-click the resource again, Parallels Client will
ignore it (i.e. the application will not be launched twice).
You can have multiple published resources open at the same time. To switch between resources,
click Window in the main menu and then select a resource from the list (or simply select a resource
on your local desktop). To switch between apps using the keyboard, use "cmd + tilda" key
combination to switch between all running published app windows and the RAS Client
window/launcher. Please note that in Parallels RAS 18.1, this works with macOS 10.15 and
macOS 11 only.
29Using Parallels Client for Mac
Using the full screen mode
To view Parallels Client in full screen, click View > Enter Full Screen. To exit full screen, move the
mouse pointer all the way up to display the menu and click View > Exit Full Screen. Please note
that there is a delay displaying the menu, so it doesn't distract the user if the mouse pointer is
moved to the top of the screen unintentionally.
When you launch a remote application while in the full screen mode, Parallels Client will be
minimized to Dock and the application will be displayed on the macOS desktop. To switch to the
Parallels Client main window, click Window > Main Window in the main menu. To switch to a
remote application, move the mouse pointer up and click the application name in the Window
menu list.
To search for a resource, type its name in the Search box. The list will be filtered as you type to
match the search string. To remove the filter, empty the Search box.
Toolbar
The toolbar is displayed at the top of the main Parallels Client window. Using the toolbar items you
can:
• Navigate the Connections tree by clicking left, right, and up arrows.
• Hide or show the Connections tree pane (folders).
• Change the published resources view to display resources as icons or as a list.
• Refresh the published resources view.
To see toolbar options, right-click on it and then select or clear the desired options:
• Icon and Text. Display toolbar items as icons with text.
• Icon Only. Display toolbar items as icons only (no text).
• Text Only. Display toolbar items as text only.
• Hide Toolbar. Hide the toolbar. To show the toolbar, click this item again. You can also
hide/show the toolbar by clicking View > Hide Toolbar (or Show Toolbar) in the main menu.
• Use Small Size. Display text on the toolbar suing small font size.
• Customize Toolbar. Customize the toolbar appearance. Click this item to open a dialog where
you can add or remove toolbar items and customize the icons/text and view options. You can
also customize the toolbar by clicking View > Customize Toolbar in the main menu.
Creating shortcuts
You can create a shortcut for a resource on your local desktop. To see the shortcut menu, right-
click a resource. The following options are available:
• Create Shortcut on Desktop. Creates a shortcut on your local desktop.
30Using Parallels Client for Mac
• Create Shortcuts for all visible Applications. Creates shortcuts for all applications that are
currently visible on the your local desktop.
• Delete Shortcuts from Desktop. Deletes all shortcuts from your local desktop.
Changing desktop resolution
When you change your macOS desktop resolution, the resolution of a remote application or
desktop has to be adjusted on the server side to match the local resolution. In order to do so,
Parallels Client needs to disconnect from Parallels RAS and then connect to it again. This is done
automatically and transparently to the user.
Getting Help
To read the Parallels Client for Mac User's Guide, click Help > Parallels Client Help. This will
open an online version of this guide.
Working with Remote Applications
When a remote application is launched on your Mac, you can work with it just like you would with a
local application.
You can perform any of the following tasks:
• Open local files in the application.
• Create new files and save them locally.
• Maximize and minimize the application (if it has the controls for it).
• Move the application around macOS desktop.
• Print documents or graphics to a local printer.
Drag and drop functionality
You can drag and drop files to and from remote applications. For example, you can drag and drop
a local file to a remote application to open it, or you can drag and drop a file from the remote
Windows Explorer to the local Explorer. You can also drag and drop object like images and text
from/to remote applications. Some limitations apply, so it may not work for all types of files and
applications. The list bellow describes formats that are supported:
• Files — files can be dragged from Finder and dropped to a remote application. The remote
application will open the file given that it has access to the file itself. Any changes are done to
the original file.
• Virtual file contents — dragging of virtual files similar to dragging attachments from a mail
client to a remote application. A copy of the file is used temporarily. Usually the original file is not
modified.
31Using Parallels Client for Mac
• Global data formats — dragging of elements like images or text blocks. This highly depends
on the format itself, so it is not guaranteed that all applications and formats will work.
• EMF format — when combining images and text, some applications convert the data into EMF
(Enhanced Metafile), which is supported.
Please note that while drag and drop is in progress, you cannot interact with the source and
destination folders or applications. If the amount of data being transferred is large, you may have to
wait until the transfer is complete.
Managing Sessions
When you connect to Parallels RAS and launch a published resource, a session is created on the
server side. You can manage sessions from the Sessions menu as follows:
• Connect. This item is disabled if an active connection with Parallels RAS exists.
• Refresh. Refresh the published resources view. The information is re-retrieved from the remote
server.
• Disconnect. Disconnect from the remote server. The session, and all opened remote
applications, will continue to run on the server. To reconnect to the section, open any published
resource.
• Log Off. Log off and end the session on the remote server. All opened remote applications will
be closed, so you should save your work before using this option.
• Session Information. Display the session information. For this menu to be enabled, you need
to select a running published resource.
• Disconnect all RAS sessions. Disconnect all active sessions (not just the current one). The
sessions will continue to run on the remote server.
• Change Domain Password. Allows you to change the current user's domain password.
Opens the Logon dialog where you need to type your current domain password to be
authenticated. Click OK to open the Change Domain Password dialog and type a new
password in both fields. The password must meet the requirements set by your system
administrator. The requirements are displayed in the dialog, and the password that you enter is
validated against these requirements. To proceed with changing your password, all of the
requirements must be met.
• Log Off All RAS Connections. End all active sessions.
Using an RDP Connection
After adding a Standard Remote Desktop connection, double-click it (or right-click > Connect) to
establish a connection with the remote computer.
32Using Parallels Client for Mac
On successful connect, the Grant access to Home folder dialog may (or may not, depending on
the server side configuration) open automatically. If you see the dialog, you can use it to specify
which folders on the local disk drive should be available to remote applications. For more
information about configuring local folders, see the description of the Disk drives option in
Configuring an RDP Connection > Local Resources.
You can have multiple active connections at the same time. To switch between active connections
in Parallels Client, click a connection in the left pane.
When you connect to Parallels RAS and launch a remote a desktop, a session is created on the
server side. You can manage sessions from the Sessions menu as follows:
• Disconnect. Disconnect from the remote server. The session continues to run on the remote
server. To re-connect, double-click the RDP connection again.
• Send Ctrl+Alt+Del. Send a Ctr-Alt-Del key combination to the remote computer. For this item
to be enabled, you must select a running remote desktop.
• Session Information. Display the session information. For this item to be enabled, you must
select a running remote desktop.
• Disconnect all RDP sessions. Disconnect all active RDP sessions. The sessions continue to
run on their respective remote servers.
To switch to the main Parallels Client window when a remote desktop is in full-screen mode, click
Window > Main Window in the main menu.
Exporting and Importing Parallels Client Settings
You can export current Parallels Client settings to a file to have a backup or to import the settings
into a Parallels Client installed on a different computer. The following settings are exported:
• All existing connections including all individual connection properties.
• Parallels Client preferences.
To export the current Parallels Client settings to a file, click File on the main menu and then click
Export Settings. In the dialog that opens, specify a file name and a destination folder. Click Save
to export the settings. The file is saved with the ".2xc" extension.
To import the settings, click File > Import Settings. In the dialog that opens, select the ".2xc" file
and click Open. Please note that the Parallels Client settings stored in a file will override the current
Parallels Client settings.
33Index
Index
A S
Adding a New Connection - 8 System Requirements - 5
Advanced - 19, 26
U
Authentication - 19, 25
Using a RAS Connection - 28
C
Using an RDP Connection - 32
Configuring a RAS Connection - 11 Using Parallels Client for Mac - 8
Configuring an RDP Connection - 20
W
Connection - 12, 21
Working with Remote Applications - 31
D
Display - 14, 22
E
Experience - 18, 24
Exporting and Importing Parallels Client
Settings - 33
G
Getting Started - 5
I
Installing Parallels Client Using an Invitation
Email - 6
L
Launching Published Resources - 29
Local Resources - 17, 23
M
Managing Sessions - 32
Modifying Parallels Client Preferences - 27
N
Network - 18, 24
P
Parallels RAS 18 Release History - 5
Printing - 15
Programs - 24You can also read