Inteset Secure Lockdown ver. 2.0 - User Guide - Chrome Edition Windows
←
→
Page content transcription
If your browser does not render page correctly, please read the page content below
Inteset Secure Lockdown™
          ver. 2.0
      Chrome Edition
           for

         Windows

       User Guide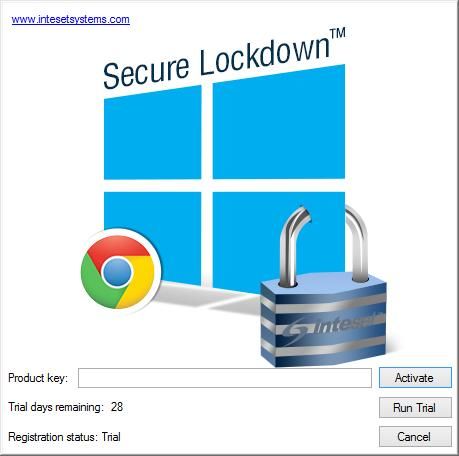
Contents

  Welcome ................................................................................................................................................... 3
  System Requirements ............................................................................................................................... 4
  Use with Tablets and Touch Devices ........................................................................................................ 4
  Installation ................................................................................................................................................ 5
  Product Activation .................................................................................................................................... 5
     Deactivate the Secure Lockdown License ............................................................................................. 6
     Managing Licenses ................................................................................................................................ 6
  Secure Lockdown™ v2 Usage .................................................................................................................... 6
     Password Tab ........................................................................................................................................ 6
     System Lockdown Tab........................................................................................................................... 8
     Chrome Lockdown Tab ....................................................................................................................... 11
         General Options .............................................................................................................................. 11
         Layout Options ................................................................................................................................ 13
         Browser Reset ................................................................................................................................. 13
         Allowed Sites ................................................................................................................................... 14
         Kiosk Helper Chrome Extension ...................................................................................................... 15
     Background Apps Tab ......................................................................................................................... 16
     Help Tab .............................................................................................................................................. 17
         About............................................................................................................................................... 17
         Export / Import ............................................................................................................................... 18
         Deactivate License .......................................................................................................................... 18
  OS Image Installations and Remote Management ................................................................................. 19
  On-screen Keyboard Helper .................................................................................................................... 19
  Windows System Modifications to Consider .......................................................................................... 19
  Support ................................................................................................................................................... 20

Secure Lockdown™ v2 – Chrome Edition - User Guide                                                                                                     Page 2
Welcome
Thank you for purchasing Inteset Secure Lockdown™ v2 – Chrome Edition for Windows. This simple, but
powerful program will enable you to run the Google Chrome browser as a kiosk platform uninhibited by
the Windows Desktop and unwanted keystrokes. Secure Lockdown™ will run in the background and
enable Chrome to run exclusively and customized to your needs. It will ensure that Chrome stays
running.
Inteset Secure Lockdown™ v2 – Chrome Edition includes the following features:
Secure Lockdown runs as a hidden background application
Removes the Windows Task bar and Start button
Removes Desktop actions and features such as:
o Desktop right-click menu
o Task Manager access
o CTRL-ALT-Delete functions
o System shutdown or logoff
o Windows Ease of Access
o Windows Help and Support
Disables numerous keystrokes including:
o Alt-tab
o Alt-F4
o Alt-Esc
o Alt -Shift-Esc
o CTRL-Esc
o CTRL-Shift-Esc
o Windows Keys
o F1 (Windows Help) F3 (Windows Search)
Allows for independent user accounts that use or do not use Secure Lockdown on one computer
Off-line trial and product activation (Internet connection not needed)
Runs Google Chrome as the exclusive kiosk type program
Command-line and unattended installation and enable/disable handling
Allows for many Google Chrome customizations not available through the Chrome interface.
o Run Chrome in Kiosk mode
o Keeps Chrome running (if it is closed)
o Keep Chrome maximized (if it is minimized)
o Ability to remove individual menu bars and menu options
o Prevent printing, Open dialog, files downloads, and other potentially unwanted features
of Chrome
o Restrict access to only certain websites (white listing)
o Return to the homepage and delete browser history and cache after a defined period of
inactivity
o More…
Page 3 Secure Lockdown™ v2 – Chrome Edition - User Guide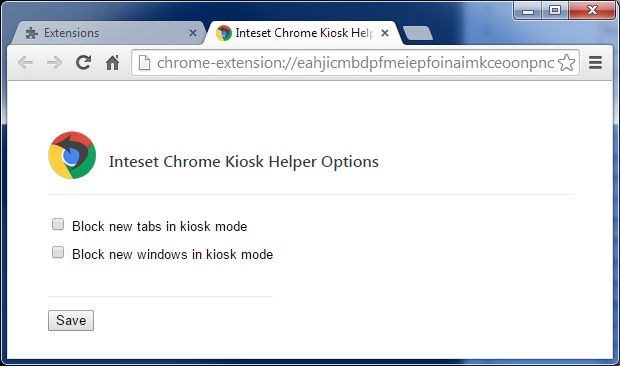
Users of your system will only have access to Chrome. Administrators of the locked down system, can
easily and quickly manage the Secure Lockdown™ settings with just a few button presses.
It is recommended that you read the following sections of this guide to ensure that you have a complete
understanding of the capabilities of Secure Lockdown™ v2 - Chrome Edition.
System Requirements
The list below describes the system requirements of Secure Lockdown™.
Runs with any version of Windows (XP, Vista, 7, 8, 10)
Windows XP - Service Pack 3
.Net 3.5 or higher
Google Chrome version 28 or higher
Secure Lockdown™ must run under an administrator account (the logged in user must have
administrator privileges). Secure Lockdown cannot “Run as administrator” under a Standard
User account.
Note: Secure Lockdown, when enabled, effectively converts the administrator account into a highly
restricted Standard User account. In addition, it adds many security enhancements and access limitations
both fixed and customizable.
An Internet connection on the system in which the software is installed is recommended for
simple product activation (off-line activation is available).
Windows User Account Control (UAC) should be disabled. If it is not disabled while Secure
Lockdown is enabled, upon logging into the locked down account, users can answer “no” to the
UAC prompt, then bypass many of the lockdown features Secure Lockdown employs.
Antivirus software should be either configured to allow Secure Lockdown to run uninhibited or
disabled entirely as Secure Lockdown needs to write to the HKLM portion of the Windows
Registry and some antivirus software prevents this. Antivirus software can also prevent the Alt-
Shift-S Secure Lockdown configuration tool from launching. This could prevent the ability to
disable Secure Lockdown if it has been enabled.
It is highly recommended that a second, password protected local administrative account be
setup on the system as a security and recovery measure.
Use with Tablets and Touch Devices
Secure Lockdown supports tablets and other Windows touch devices that do not use physical
keyboards. However, certain precautions need to be taken particularly during the Secure Lockdown
testing phase. During the testing phase, it is recommended that a physical keyboard such as a USB or
blue-tooth keyboard be configure before enabling Secure Lockdown. This will ensure that you have
access to the Alt-Shift-S hotkey that invokes the Secure Lockdown configuration utility and allows you to
disable Secure Lockdown. In addition, you may need to setup a virtual keyboard (on-screen keyboard)
that starts when Windows starts (see the On-screen Keyboard Helper topic later in this guide.) The
default Windows on-screen keyboard does not include an “Alt” key that is needed for the Alt-Shift-S key
Secure Lockdown™ v2 – Chrome Edition - User Guide Page 4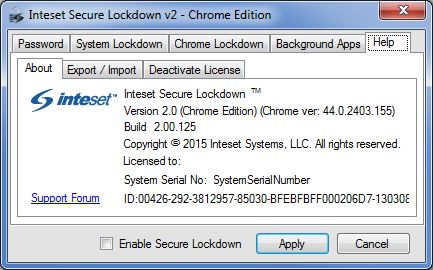
sequence. Thus, if Secure Lockdown senses that no physical keyboard is available, it will automatically
set the default virtual keyboard to “Compatibility Mode” which will convert it to a full keyboard.

Installation
Installing Secure Lockdown™ v2 is simple and quick. It is the same installation process as required by
many standard Windows applications. The only requirements of the installation are that you must be
logged in as an administrator of the system. Assuming that you have the proper privileges and that you
have downloaded the Secure Lockdown™ v2 installation file, you can begin the installation procedure by
double-clicking on the “IntesetSecureLockdown_v2_CME.exe” file and following the instructions
displayed by the installation application. Once the installation is complete, you can launch Secure
Lockdown™ by selecting the Windows Start button, then All Programs, then Inteset, then Secure
Lockdown v2.

Product Activation
The Inteset Secure Lockdown™ software has a trial period of 30 days whereby you can use it without
purchasing it. This is ample time to determine if it is right for your needs. Just select the Run Trial button
to run the full featured trial.

Note: The trial activation process requires that the computer has connection to the Internet. If it does not, you will
be prompted to use an off-line method of activating the trial version of Secure Lockdown.

If you wish to activate the product, you should purchase it from the http://www.intesetsystems.com
store and obtain a Product Key which will be emailed to you. Upon starting Secure Lockdown™, you will
notice the following splash screen that allows you to enter the product key you’ve purchased.

Paste the product key from the email in the Product Key field, then press the Activate button.

Note: This process requires that the computer has connection to the Internet. If it does not, you will be prompted
to use an off-line method of activating Secure Lockdown. In addition, for high volume license purchases, Inteset

Page 5                                                    Secure Lockdown™ v2 – Chrome Edition - User Guide
provides Off-line Licensing (where no internet connection is ever used on the system.) Please contact Inteset sales
to learn more about this type of licensing.
The software will be activated and the splash screen will close. At this point, Secure Lockdown™ will be
running in the background and there is no visible indication that it is running. To display the Secure
Lockdown™ application, press the Alt-Shift-S keyboard sequence.
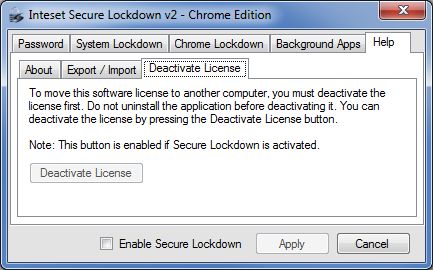
Deactivate the Secure Lockdown License
If you purchase Secure Lockdown and activate the license on a computer, and decide later that you want
to move the license to another computer, you must deactivate the license on the initial computer first.
Do not uninstall the application before deactivating it. You can deactivate a license by going to the Help
> About tab in the Secure Lockdown configuration utility, then press the Deactivate button. Note that
the Deactivate button will only appear if the Secure Lockdown license has been activated on the
computer.
Managing Licenses
If you purchase more than one license, you can view the status and manage your licenses on our
website. This is useful if you need to:
View how many licenses are activated for a particular purchase/order
View the Secure Lockdown machine ID’s of each activation
Determine which computers are activated under which product key
Merge a product key (and its associated licenses) into a previous product key
To access these features, go to http://shop.inteset.com and log into your account. Choose the My
Account menu option, then select the Manage Licenses option.
Secure Lockdown™ v2 Usage
Once Secure Lockdown is installed, from the Windows Start button, All Programs, Inteset menu, double-
click on Secure Lockdown v2. From here, Secure Lockdown will be running in the background. The
configuration screen can be invoked by pressing the Alt-Shift-S keyboard key sequence.
Password Tab
Once Secure Lockdown™ is running in the background, press the Alt-Shift-S keyboard key sequence to
display the configuration screen (as shown below). From here, you will need to enter a password into
the Password field before using it. For first time use, there is no password required and full access to the
configuration utility is available. A password can be created later which will restrict access to the
configuration screen.
Secure Lockdown™ v2 – Chrome Edition - User Guide Page 6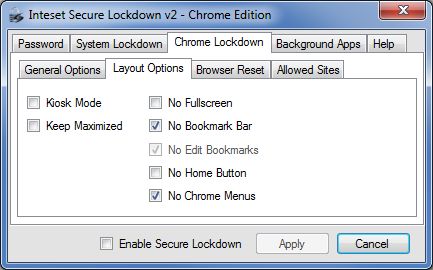
If you’ve previously entered a password, enter the password, then press the password Apply button to
reveal the features of the application. The following screen will be displayed.

Set – this button allows you to set the password for accessing Secure Lockdown. Press the Set button to
reveal the following password entry fields.

         New Password – To add a password requirement to access the Secure Lockdown configuration
         screen, enter a password in the New Password field. A password can be any alpha numeric and
         special key combination. Passwords are not case sensitive.

         Confirm Password – Enter the same password in the Confirm Password field, then press the
         Apply button to apply the new password.

         VERY IMPORTANT: Be sure to remember the password as you will not be able to access the
         application in the future without it. And, if Secure Lockdown™ is enabled, the system will be
         locked and you will not be able to unlock it without the password (in this case an OS re-build
         would be necessary).

Enable Secure Lockdown – Check the Enable Secure Lockdown checkbox to put Windows in a locked
down state. Before doing this, you should review and edit the many lockdown options available, then
press the Apply button. You will need to restart the system in order to fully enable Secure Lockdown.
Note that you cannot exit Secure Lockdown when it’s enabled. While enabled, it will run in the
background and can be invoked by pressing the Alt-Shift-S keyboard key sequence.

Page 7                                               Secure Lockdown™ v2 – Chrome Edition - User Guide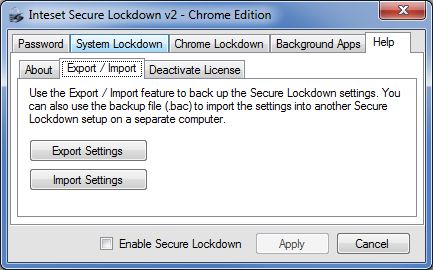
Once Secure Lockdown is enabled, you can disable it by press the Alt-Shift-S keyboard key sequence. The
Secure Lockdown application will appear. Enter the password (if one exists), then press the password
Apply button. Uncheck the Enable Secure Lockdown checkbox, then select the Apply button. You will
need to restart the system in order to fully disable Secure Lockdown.

System Lockdown Tab
Under the System Lockdown tab (shown below), you can disable various system level Windows features.
Some of these features are machine level features which apply to all users of the computer. Disabling
machine level options will affect all local computer users even if Secure Lockdown is not running under
that account.

Local Level Options

Local Level settings allow you to disable various local user account options of Windows. These settings
do not affect other user accounts of the system. Each option is listed below.

No Logoff – When enabled, Secure Lockdown prevents access to all logoff/sign out features of Windows.
Users will not be able to log out of their account.

No Local Drives – When enabled, Secure Lockdown blocks access to the A, B, and C drives when
attempting to access the file system from an application’s Open, Save, or other file access dialog. A user
can, however access drives beyond the C drive if the No Local Drives option is unchecked. This will allow
access to removable drives and devices beyond the operating system drive. Check this option if you do
not want to allow access to any local drives or devices through Open, Save, or other file access dialogs.

Note: this feature does not block an applications access to the file system, it only blocks direct user access. Also, by
default the Windows Library folders point to locations on the “C:\” drive (ie: “C:\users\”). Many
Windows programs will use the Library locations as their default and the user will be directed to those folders
when prompted with the application’s Open and Save dialogs. Secure Lockdown will not block this access. Thus, it
is important to move the Library folders to a drive other than “C:\”. Refer to the “Windows System Modifications
to Consider > Create a Separate Hard Drive Partition” section later in this guide for instructions on how to move
Windows Library folders.

No Auto Play – When enabled, Secure Lockdown prevents the Windows Auto Play feature. The Auto
Play dialog appears when external media such as a USB flash drive is inserted.

Secure Lockdown™ v2 – Chrome Edition - User Guide                                                               Page 8
No System Keys – “System Keys” include the following keyboard keys and key sequences: Windows
Key, Alt-Tab, Alt-Shift-Tab, Alt-Esc, Alt-Shift-Esc, Ctrl-Alt-Esc, Ctrl-Esc, Alt-F4, F1, and F3. These keys can
be enabled or disable independently by selecting the associated ellipse button (…) next to the option.
The F1 key is used to invoke Windows Help and help features in other applications which could lead to
security risks if there are links to external applications or web sites within the help screens. Similarly, the
F3 key invokes the Windows Search feature. The ALT-F4 key can close the active program. Alt-Tab, Alt-
Esc, Ctrl-Esc key sequences can disrupt the active window (Master Application). If you do not want to
provide these abilities, check this option.

No Desktop – Check this option to remove the Windows Desktop and run Secure Lockdown as the
Windows Shell. No features of the Windows Desktop will be available. Windows Embedded
environments frequently do not use the Windows Desktop - "No Desktop" creates a similar
environment. Should your application require some features of the Windows Desktop, do not check this
feature.

No Action Center – Check this option to remove the Notifications and Action Center from the Taskbar
and prevent, in Windows 10, the left-to-right sweep touch gesture from revealing the Action Center
feature.

Note: This feature is not available if the “No Desktop” option is enabled.

Machine Level Settings
Machine Level options (shown below) allow you to disable various machine level Windows features.
Machine level features are those that apply to all users of the computer. Enabling machine level options
will affect all local computer users even if Secure Lockdown is not running under that account. All of the
following options are machine level settings.

No User Switching – Fast user switching provides a quick way for users to switch from one account to
another without logging off. This option can be accessed by pressing the CTRL-ALT-DELETE key
sequence. If you do not want to provide this ability, check this option.

No Shutdown – Select this checkbox if you do not want to allow the user to shut down or restart the
system. When Secure Lockdown is enabled, the user can press the CTRL-ALT-DELETE keys. They will no
longer have the option to logoff or shutdown the computer from this screen or the Windows Start menu
if that feature is activated.

Page 9                                                    Secure Lockdown™ v2 – Chrome Edition - User Guide
No Ease of Access – The Windows Ease of Access feature provides many features including access to
various features of Windows via voice commands. This could pose a security risk. This option can be
accessed by pressing the CTRL-ALT-DELETE key sequence. If you do not want to provide this ability,
check this option.

No Help and Support – Windows Help and Support provides help for Windows features, but can lead to
security risks if there are links to external applications or web sites within the help screens. If you do not
want to provide this ability, check this option.

No App Install – When enabled, the Windows Installer will be disabled. Users will not be able to install
applications when this option is checked.

No Removable USB Drives – When enabled, the system will no longer allow access to removable USB
storage devices such as USB hard drives and flash drives.

No New USB Devices – When enabled, the system will no longer allow newly plugged in USB devices to
register with the operating system. USB devices already connected will continue to work on the USB
port to which they are attached. The same device will not connect to other ports unless it was previously
connected while secure Lockdown was disabled.

No Safe Mode (not available in Windows 8 or 10) – When enabled, the Windows (F8) boot option to enter
Windows “Safe Mode” is disabled. Users will not be able to boot the computer into Safe Mode.

No Ctrl+Alt+Del – When enabled, users will not be able to use the Windows Ctrl+Alt+Del key sequence
to display the Ctrl+Alt+Del screen. Enabling this option disables the Delete key while Secure Lockdown is
enabled.

Note: Be cautious when enabling the “No Ctrl+Alt+Del” option. Users will not be able to access the Ctrl+Alt+Del
screen where they can switch users, log in and off, or shut down the system. In addition, if the system is Windows
7 or previous and on a domain network, users will not be able to press the Ctrl+Alt+Del key sequence to log into
Windows. It is recommended that systems under these conditions use the Windows Auto Login capability and
should be set up before enabling the Secure Lockdown “No Ctrl+Alt+Del” option.

Log off / Restart
The Log off / Restart feature (shown below) allows you to specify times when you want the computer to
either log off, or restart. This option is ideal if you need to run a login script periodically, or if you want
to incorporate system restore tools such as Toolwiz - Time Freeze, or Horizon Datasys - Reboot Restore
RX into your Secure Lockdown implementation. You can set the computer to restart either at a specific
time of the day, or when the computer has been inactive for a defined amount of time or both.

Secure Lockdown™ v2 – Chrome Edition - User Guide                                                         Page 10
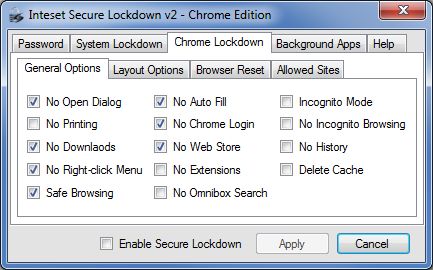
Log off after x inactivity minutes - When enabled, the computer will log off the current account when
the computer has not been active for the specified number of minutes.

Restart at – When enabled, the computer will restart at the specified time each day.

Restart after x inactive minutes – When enabled, the computer will restart when the computer has not
been active for the specified number of minutes.

Chrome Lockdown Tab
Under the Chrome Lockdown tab (shown below), you can modify the layout and lockdown various
features of Google Chrome version 28 and above.

Note: The Chrome browser offers many customizations on its own. These options are available by accessing the
top right Customizations button in the Chrome browser. If needed, these customizations should be performed
before any Secure Lockdown customizations are done.

General Options
The General Options section allows you to choose various elements in Chrome to restrict. In addition,
this section allows you to reset Chrome to its initial state before use.

Page 11                                                Secure Lockdown™ v2 – Chrome Edition - User Guide
No Open Dialog (ctrl-o) – Prevents the ability to open the “Open” dialog that allows running files, etc.
The ctrl-o keyboard key sequence is disabled.

No Printing (ctrl-p) – Prevents the ability to print the current web page by using the ctrl-p keyboard key
sequence or from the File menu option.

No Downloads – Prevents the ability to download files onto the computer.

No Right-click Menu – This option removes the ability to display the browser right-click menu that
appears when the user right-clicks on a web page, menu, or title bar.

Safe Browsing – This option sets the Chrome browser to Safe Browsing mode. Safe Browsing mode
helps protect against the three most common threats on the web: phishing, drive-by malware, and
harmful downloads. Check this option to enable Safe Browsing.

No Auto Fill – Enable this feature to prevent the Chrome Auto Fill capability from functioning. Auto Fill
information is generally private/personal information that should not be available on a public system.

No Chrome Login – Enable this feature to prevent users from signing into their Chrome account.

No Web Store – Enable this option to restrict users from accessing the Chrome Web Store via integrated
the buttons available on the browser (ie: the “Apps” and “Web Store” button.)

No Extensions – Choose this option to remove all installed Chrome extensions from the browser. Also,
users will not be able to install Chrome extensions.

No Omnibox Search – Enable this feature to remove the ability to perform Google searches and other
lookup information within the omnibox (address box).

Incognito Mode – When this option is enabled, Chrome will launch in “incognito mode” whereby no
browser cache or history will be retained upon closing the browser. When this option is enabled, the
“No Incognito Browsing”, “No History”, and “Delete Cache” options are disabled and not accessible.

No Incognito Browsing (ctrl-shift-n) – Disable the “Incognito” browsing capability. When this option is
checked, no incognito mode is allowed.

Secure Lockdown™ v2 – Chrome Edition - User Guide                                                  Page 12
No History – Select this option to automatically remove all browser history upon closing the browser.

Delete Cache – Select this option to automatically delete all file and memory based cookies, cached web
pages images and all other browser cached files upon closing the browser. The browser will be returned
to its original state before enabling Secure Lockdown when restarted.

Layout Options
The Layout Options section allows you to hide various layout elements in Chrome such as bookmarks,
home button, and Chrome menus.

Kiosk Mode – Enable this checkbox to starts Google Chrome in kiosk mode. The browser opens in a
maximized window that does not display the address bar, the navigation buttons, or the bookmark bar.

Keep Maximized – To keep Chrome maximized at all times, check the Keep Maximized checkbox.

No Fullscreen – Enable this checkbox to disallow users to put Chrome into Fullscreen mode. Fullscreen
mode does not contain any navigation buttons or menus, or the Bookmark bar. It is applied by pressing
the F11 key and disabled again by pressing the F11 key.

No Bookmark Bar – Enable this checkbox to remove the Bookmark bar.

No Edit Bookmark – Enable this option to disallow editing, adding or removing a bookmark entry on the
Bookmark bar. This option requires that the “No Bookmark Bar” option be unchecked.

No Home Button – When enabled, this option removes the home button found to the left of the
Address bar.

No Chrome Menus – Select this option to remove access to the Customizations button found at the top
right corner of the Chrome window. If enabled, this will also disallow access to other Chrome menus
such as the right-click menu.

Browser Reset
Under this section, various settings allow resetting Chrome to its originally started state after a specified
increment of no user activity (no keyboard, mouse, or touch activity.)

Page 13                                               Secure Lockdown™ v2 – Chrome Edition - User Guide
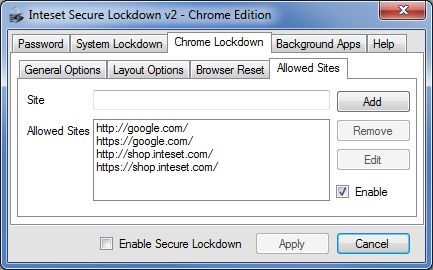
Inactive Minutes - Set this option to the number of minutes of user inactivity whereby Secure Lockdown
will reset the browser. Note: playing a video or music is not considered activity. If playing a video and no
interaction occurs, the browser will be reset in the specified period even if the video is still playing. In
this case, as a solution, you could set the inactivity period equal to or greater than the time length of the
video.

Close Chrome – Select this option to close all instances of Chrome at the specified “Inactivity”
increment. Note that this option clears memory based user sessions, but not file-based cookies. Choose
the “Delete History” option in combination with the “Close Chrome” option to remove all memory-
based user sessions and file-based cookies.

Return Home – Select this option to return to the defined Chrome homepage at the specified
“Inactivity” increment. This will only occur if Chrome is the foreground application.

Allowed Sites
If you need to restrict access to only certain sites and/or pages, use the Allowed Sites feature.
Sometimes described as white listing, you can prevent users from going to undesired sites.

Site – To add an allowed site URL enter it in the Site textbox, then press the Add button. Include the URL
Scheme prefix in the link (ie: HTTP, FTP, File, HTTPS, etc). Malformed URLs are not allowed. The asterisk
(*) wildcard can be used in Allowed Sites URLs (ie: “http://*.google.com/*”).

Note: If a Chrome Extension is being used, you will need to add the extension’s URL to the Allowed Sites list. For
example, you would add its extension ID to the “chrome-extension://” protocol prefix such as:

Secure Lockdown™ v2 – Chrome Edition - User Guide                                                           Page 14
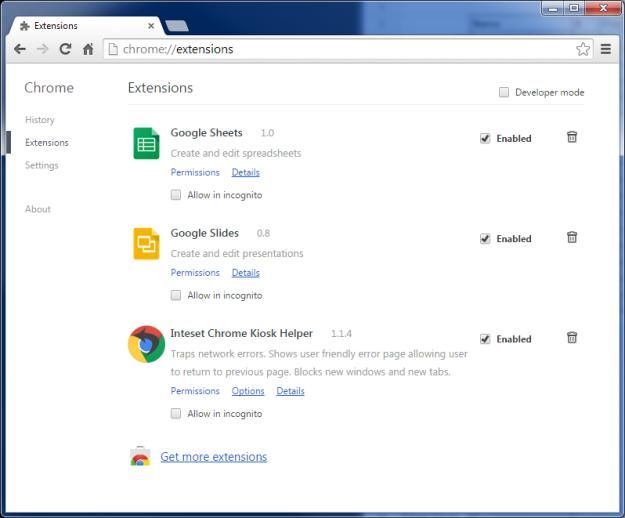
“chrome-extension://gighmmpiobklfepjocnamgkkbiglidom”. Within Chrome, you can determine the extension ID
by going to Settings > Extensions > Developer Mode.

Remove – To remove a link from the list, select it, then press the “Remove” button.

Edit – To edit a link in the list, select it, then press the Edit button. The URL will appear in the Allowed
Sites textbox for editing.

Enable – If this check box is checked, Chrome will only allow access to the sites in the Allowed Sites list.
Disable this option if all websites are allowed. Note that Enable works only when Secure Lockdown is
enabled.

Kiosk Helper Chrome Extension
In addition to the Chrome lockdown features Secure Lockdown provides, Inteset has developed a
Chrome extension that compliments these capabilities.

When running in Chrome's Kiosk Mode, the browser suffers from some undesired functionality. For
example, in kiosk mode, there is no browser navigation, tabs or menus available. This becomes a
problem if your kiosk application tries to open a new window, tab, or leads to a website that is blocked
(black listed). When in kiosk mode, if a new window or tab is open, the main kiosk application will be
inaccessible as it will be covered by the new window or tab page. Also, if the user clicks to other
websites that are black listed, Chrome will throw an error page, but will give no means to return to the
main kiosk website causing the user to be stuck on the error page.

The Chrome Kiosk Helper alleviates these problems by trapping the above scenarios and offering the
user an easy way to return to the main kiosk application. The Kiosk Helper simply advises the user of the
situation with a friendly dialog and gives them the opportunity to return to the previous page.
If you plan to use Chrome in kiosk mode, this extension is recommended. You can install and configure
the extension directly from the Chrome browser. In the browser, go to Settings > Extensions > Get more
extensions, then type “Inteset Chrome Kiosk Helper” into the Chrome Web Store search box. From there
you can install the extension.

Once the extension is installed, you can configure it by selecting the Options link and selecting the
following options:

Page 15                                                Secure Lockdown™ v2 – Chrome Edition - User Guide
Block new tabs in kiosk mode – This option will block any new tabs that are generated based on a link
within a webpage.

Block new windows in kiosk mode – This option will block any new windows that are generated based
on a link within a webpage.

Note: these features work ONLY when the browser is in Full-screen (F11) or Kiosk mode.

Background Apps Tab
Under the Background Apps tab (shown below), you can run any number of background applications
that may be necessary to support Chrome. An example of a background app is an on-screen keyboard.
For security purposes, when Secure Lockdown is enabled, programs that normally run on Windows login
are disabled by Secure Lockdown (these are programs that run based on settings in the Windows
Registry under the following Registry key:
“HKEY_CURRENT_USER\Software\Microsoft\Windows\CurrentVersion\Run”). To substitute this
functionality, Secure Lockdown allows you to define the specific background apps you’d like to start
when Secure Lockdown is enabled. These applications will start upon user login and immediately after
your master application is launched. They are launched with administrative privileges.

Path - Select the Path ellipse button to choose the location of the background application executable.

Arguments (optional) - Enter any desired arguments that are accepted by the executable in the
Arguments field.

Secure Lockdown™ v2 – Chrome Edition - User Guide                                                Page 16
Start in (optional) – With some applications, a startup directory (working directory) needs to be specified.
Enter the working directory path in the Start in field. Note that system variables can be used (ie:
“%PROGRAMFILES%”, “%HOMEDRIVE%”, “%HOMEPATH%”, “ %WINDIR%”, etc)

Add – Once an executable path is defined, press the Add button to add the path to the background apps
list.

Remove – To remove a background app from the background apps list, first select the app to remove in
the list, then press the Remove button.

Edit – To edit a background app in the background apps list, first select the app to edit in the list, then
press the Edit button. The information will be moved to the Path, Arguments, and Start in fields where
they can be edited, then added back to the list.

Enable – Select the Enable checkbox to run the background apps upon user login when Secure
Lockdown is enabled.

Help Tab
Under the Help tab, you will be able to get pertinent support information about your Secure Lockdown
software and license, communicate with the user community and Inteset support technicians, export
and import Secure Lockdown settings, and deactivate the Secure Lockdown license.

About
Under the About section (shown below), you can get information regarding the version and build
number of Secure Lockdown as well as the system serial number and machine ID of the computer. This
is important information for Inteset Systems technical support should they ask for it. Note that the
machine ID can be highlighted and copied to the clipboard (ctrl+c) for easy pasting into emails. You can
also easily access the Inteset support forum for quick answers to common questions and response from
the community and Inteset’s support team.

Shutdown – Press the Shutdown button to shut down the computer. This button is only available when
Secure Lockdown is enabled and the password has been entered to access Secure Lockdown settings.

Note: shutting down the computer with this button will not disable Secure Lockdown.

Page 17                                                Secure Lockdown™ v2 – Chrome Edition - User Guide
Logoff – Press the Logoff button to log out of the current Windows user session. This button is only
available when Secure Lockdown is enabled and the password has been entered to access Secure
Lockdown settings. Note that logging off with this button will not disable Secure Lockdown.

Export / Import
Under this section, you can export the Secure Lockdown settings into a single file (.bac). This file can
serve as a backup, and/or to import into other Secure Lockdown systems using the Import Settings
feature.

Export Settings – Press the Export Settings button to export the Secure Lockdown settings into a single
“.bac” file in a location of your choosing.

Import Settings – Press the Import Settings button to import the Secure Lockdown settings into Secure
Lockdown. After pressing the Import Settings button, you will need to locate a “.bac” export file
previously created.

Note: these functions can also be performed from a command line (See the “Using the Command Line” section
later in this guide.)

Deactivate License
Under this section, you will be able to deactivate the Secure Lockdown license in order to move it to a
different computer.

Secure Lockdown™ v2 – Chrome Edition - User Guide                                                   Page 18
Deactivate License – If you purchase Secure Lockdown and activate the license on a computer, and
decide later that you want to move the license to another computer, you must deactivate the license on
the initial computer first. Do not uninstall the application before deactivating it. You can deactivate a
license by pressing the Deactivate button. Note that the Deactivate button will be enabled if the Secure
Lockdown license has been activated on the computer.
OS Image Installations and Remote Management
Secure Lockdown has built-in handling of product activation (auto/unattended activation) and
automated password assignment. These tools along with using Secure Lockdown command-line
capabilities can be very useful for bulk implementation scripts, unattended installations, OS Image
creation, and remote management. In addition, Secure Lockdown has several “hidden” features that
allow administrators to fine-tune its functionality to suit their needs. Please see the accompanying
Secure Lockdown – Administrator’s Guide if you’re interested in these capabilities.
On-screen Keyboard Helper
Secure Lockdown includes a special free utility called “Inteset On-screen Keyboard Helper.” This virtual
keyboard tool can help you with touch screen setups where no mouse or physical keyboard is needed. It
makes use of and improves on the on-screen keyboards that are included with Windows. To learn more
about this utility, see the “On-screen Keyboard Helper User Guide” included with the Secure Lockdown
installation.
Windows System Modifications to Consider
When preparing the system for use with Secure Lockdown™, it makes sense to customize and optimize
the operating system for that purposes. Some recommendations include:
Create a Separate Hard Drive Partition – Create separate drive letter (ie: “M:\”) and move all
user libraries (ie: Documents, Downloads, Pictures, Videos, Music, etc) to that new drive. By
default, Secure Lockdown does not allow access to the “C:\” drive where these libraries
originally reside when using the standard Windows Open and Save dialogs. If your application
requires access to these folders, move them to the new partition (drive letter) for uninhibited
access.
Note: Do not move these libraries to removable media such as a USB drive. Also, if the System Lockdown >
Local Level > No Local Drives option is selected, no local drives including the new drive letter created will
be accessible.
Change UAC settings to “Never notify” – This will prevent potential unwanted UAC dialogs from
appearing.
Disable Windows AutoPlay – This will prevent a popup or the start of media playing
automatically if the media or device is inserted into a system port.
Remove the Windows username and password login requirement, or enable automated login –
This will allow a seamless system start into the master application.
Page 19 Secure Lockdown™ v2 – Chrome Edition - User Guide Remove unneeded Windows services and applications – This will ensure a fast system boot-up
and best performance of the master application.
Disable Windows Updates – This will ensure the system does not perform any unexpected
restarts due to the Windows Update process. It will also ensure nothing undesired is installed on
the system.
Disable Windows Aero – This will enable a slight improvement on screen redraw speeds.
Modify the Windows Welcome (logon) screen image – This will give the system a custom look
during the boot process.
The detailed steps to accomplish the above recommendations are beyond the scope of this
document, but can be quickly found by searching the Internet.
Support
Support for Secure Lockdown™ v2 is available through the http://www.intesetsystems.com Forum
pages. Here, you can ask questions to the community and to Inteset technicians. If the question is
directed toward an Inteset technician, you can expect a response in 24 hours or less.
Secure Lockdown™ v2 – Chrome Edition - User Guide Page 20You can also read