CHECKRIDE CONSOLE USER MANUAL - VERSION 1.0.X COPYRIGHT 2021, BAJUSOFTWARE LLC. ALL RIGHTS RESERVED.
←
→
Page content transcription
If your browser does not render page correctly, please read the page content below

®

                  CheckRide® Console
                        User Manual
                                                  Version 1.0.X

Copyright © 2021, BajuSoftware LLC. All rights reserved.
CheckRide® Console – User Manual V1.0.X                                                                                                                                                              2 of 42

T ABLE OF C ONTENTS
Introduction ............................................................................................................................................................................................... 3
Starting the Console................................................................................................................................................................................... 4
Feature Overview....................................................................................................................................................................................... 5
   Free Flight .............................................................................................................................................................................................. 5
       Flight Set Up ....................................................................................................................................................................................... 5
       Flight Set Up - Custom Locations ....................................................................................................................................................... 7
       Flight Set Up - Custom Weather ...................................................................................................................................................... 13
       Moving Map ..................................................................................................................................................................................... 15
       Failures ............................................................................................................................................................................................. 17
       Record a Free Flight ......................................................................................................................................................................... 18
       Replay a Recorded Flight.................................................................................................................................................................. 19
   Scenarios .............................................................................................................................................................................................. 25
       Scenario Administration .................................................................................................................................................................. 26
       Starting a Scenario ........................................................................................................................................................................... 28
       The Scenario Run Screen.................................................................................................................................................................. 29
       The Scenario Debrief Screen ............................................................................................................................................................ 30
   User Administration ............................................................................................................................................................................. 36
       Adding Users .................................................................................................................................................................................... 37
       Deleting Users .................................................................................................................................................................................. 37
       Assign Scenarios ............................................................................................................................................................................... 38
       Show Scenario History ..................................................................................................................................................................... 39
       Show Scenario Statistics .................................................................................................................................................................. 40
Appendix .................................................................................................................................................................................................. 41
   Triggers ................................................................................................................................................................................................ 41
   Activities ............................................................................................................................................................................................... 41

Copyright © 2021, BajuSoftware LLC. All rights reserved.                                                                                  Checkride® is a registred trademark of BauSoftware LLC
CheckRide® Console – User Manual V1.0.X                                                                                                   3 of 42

I NTRODUCTION
This document describes the operation of the CheckRide® Console (“Console”). The CheckRide® Console is used as the User Interface
for the Flight Student. It allows to select and execute scenarios and provides an Instructor Station for Free Flights. There are three
editions: Instructor Station, Scenarios and Professional. Licensing is for Home, Academic or Commercial Use.

Here is an overview of the major differences:

     Feature                                                              Instructor    Scenarios     Professional       Professional
                                                                                                                            (Academic &
                                                                            Station                                         Commercial)

     Free Flight Instructor Station                                           X                              X                  X
     Record Free Flights                                                      X                              X                  X
     Replay recorded Free Flights                                             X                              X                  X
     Export recorded Free Flight telemetry (CSV file)                         X                              X                  X
     Select and execute scenarios                                                           X                X                  X
     Replay current scenario after finish                                                   X                X                  X
     Import new scenarios                                                                   X                X                  X
     Saving of each scenario flown                                                          X                X                  X
     Replay of every scenario flown                                                         X                X                  X
     Export of scenario telemetry (CSV file)                                                X                X                  X
     Build scenarios using CheckRide® Builder                                                                X                  X
     Multi User/Student Support                                                                                                 X
     Central Data Storage (SQL Server) across multiple simulators.                                                              X
     Control Multiple Simulators                                                                                                X

The main difference between Home and Commercial Licenses is that Home Licenses can only be used in a home environment. Any
other application requires a Commercial or Academic License.

All licenses are sold either via a download license that require software activation or as a USB key license. The USB key license can be
moved from computer to computer. The download licenses require software activation and are bound to a specific computer.

If no license is detected, the CheckRide® Console reverts to a Trial License with the same functionality as the Professional License.
The runtime is limited to 15 Minutes.

The installation and configuration of the program is described in a separate document called ‘CheckRide® Installation Manual’.

Copyright © 2021, BajuSoftware LLC. All rights reserved.                                  Checkride® is a registred trademark of BauSoftware LLC
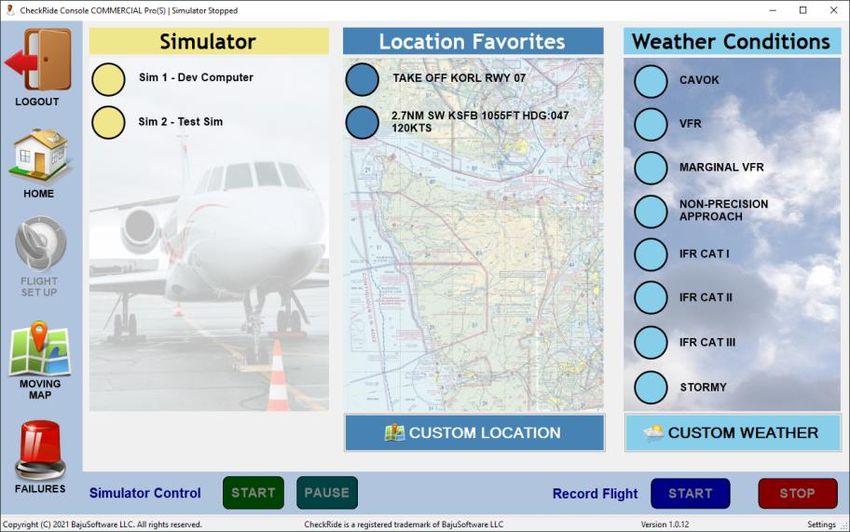
CheckRide® Console – User Manual V1.0.X                                                                                                  4 of 42

S TARTING THE C ONSOLE
After the installation of the Console, a desktop shortcut will be available on your device, typically a Windows Tablet Computer.
Depending on your version, the start screen will appear:

Home Standard Version                                           Home Professional Version & Commercial Professional Version (Single-User)

Commercial Standard Version                                     Commercial Professional Version (Multi-User)

The Standard Versions jump right to the Free Flight (Instructor Station) screen, whereas the Home Pro versions display the Operating
Mode screen and the Commercial Pro version requires a user logon.

The system comes with the default administrator logon of User Name: ADMIN, Password: PASSWORD (all usernames and passwords
are uppercase!). You can either use a keyboard or the on-screen touch keyboard. Enter this information to continue with the
Commercial Pro Version.

Note: The Commercial Pro Version can be configured for Multi-User (default) or Single-User Mode. In Single User Mode it behaves
like the Home Pro Version. See the ‘CheckRide® Installation Manual’.

Note: The RECORDED (FREE FLIGHT) button is on different pages depending on the version you have. This option allows you to
‘replay’ recorded free flights. For Standard Versions, the button is on the ‘Free Flight Page’, whereas in the Professional Versions it is
on the ‘Select Operating Mode (Home)’ page.

Note: The Free Flight Setup screen can also be configured to include Aircraft Favorites. See chapter Feature Overview/Free
Flight/Setup for an example. Refer to the ‘CheckRide® Installation Manual’ on how to setup Aircraft Favorites. The installation
default is not to show Aircraft Favorites.

Copyright © 2021, BajuSoftware LLC. All rights reserved.                                    Checkride® is a registred trademark of BauSoftware LLC
CheckRide® Console – User Manual V1.0.X                                                                                                  5 of 42

F EATURE O VERVIEW
   This chapter describes each feature available in the four versions. Again, not all features are available in all versions. See the
   chapter Introduction for an overview.

   F REE F LIGHT
   The Free Flight feature provides an Instructor Station to control your simulator for a flight anywhere in the world. You can place
   the aircraft anywhere in the world, starting from the ground or in the air. You can set weather conditions and simulate aircraft
   system failures. Furthermore, you can save favorite startup locations to facility a quick start option. It also provides a moving map
   display to show your location. The map is fully configurable, see the CheckRide® Installation Manual.

       F LI G H T S E T U P              Simulator Status

       Note: The left menu button’s availability depends on the version.

       If you have Aircraft Favorites configured, the following screen is shown:

       The number of Location Favorites has been reduced from 16 to 8 to fit Aircraft Favorites.

Copyright © 2021, BajuSoftware LLC. All rights reserved.                                    Checkride® is a registred trademark of BauSoftware LLC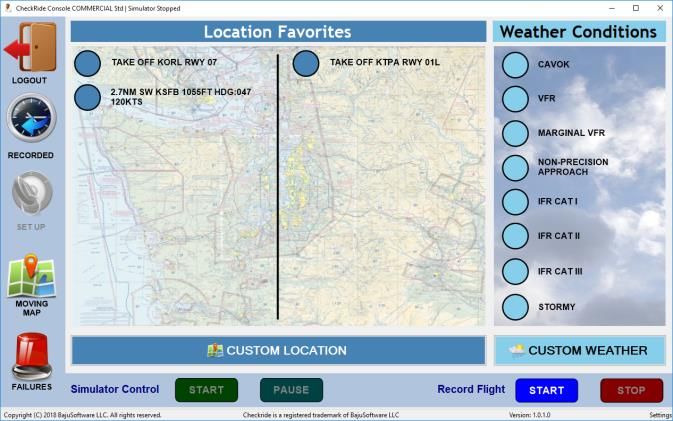
CheckRide® Console – User Manual V1.0.X                                                                                                  6 of 42

       If you have Simulator Favorites configured, the following screen is shown:

       The number of Location Favorites has been reduced from 16 to 8 to fit Simulator Favorites.

       If you have Aircraft or Simulator Favorites configured, tap on one of the yellow buttons to select an Aircraft/Simulator. The
       chosen Aircraft will be loaded immediately or the Simulator Control switches immediately.

       Note: Aircraft Favorites are only supported by using X-Plane and Prepar3D as your simulator.

       On the Set Up screen on the left side (or middle if you have Aircraft Favorites) you can select a startup location from the
       favorites list. There can be up to 16 favorites (or 8 if you have Aircraft Favorites). Click/Tap on the blue button in front of the
       description. At this point the aircraft will be repositioned in the flight simulator. Wait until the relocation action finishes.

       On the right side you can change the weather environment of the simulator. Select from up to 8 different weather favorites.
       You can also change the weather during a flight.

       Once the simulator has finished relocating the aircraft, the simulator is set to Pause. There are 2 simulator control buttons
       on the bottom of the screen, [Start] and [Pause]. Use those buttons to control your simulator.

       If you want to record your flight, click/tap on the blue [Start] button.

       IMPORTANT! Using any functions on the Instructor Station requires your simulator to be in the running or paused state.
       The current state of the simulator is displayed on the top of the instructor station. If the Simulator is stopped, the Simulator
       Control Buttons, the Favorite Buttons, the Update Weather and Set Location buttons are disabled.

Copyright © 2021, BajuSoftware LLC. All rights reserved.                                    Checkride® is a registred trademark of BauSoftware LLC
CheckRide® Console – User Manual V1.0.X                                                                                                 7 of 42

       F LI G H T S E T U P - C U S T O M L O C A T I ON S

       If you want to start from a different location than is provided in the location favorites, click/tap on [Custom Location]:

       By default, the current airport is loaded. To change the airport, click on the Airport ICAO field. This will show the airport
       search screen:

       ICAO Search                                                       Name Search

       Use the keyboard on the screen to enter the search criteria. This is an incremental search meaning that whenever the text
       box changes a search is performed. You can change the search criteria by clicking/tapping on the airport list column headers.
       This allows you to either search by ICAO or Name.

       When the airport you wanted is shown in the list, select it by clicking/tapping on its name (black bar).

       Click/Tap on [OK] to return to the previous screen where the selected airport will be shown.

       Click/Tap on [Cancel] to return to the previous screen without changing the airport.

Copyright © 2021, BajuSoftware LLC. All rights reserved.                                   Checkride® is a registred trademark of BauSoftware LLC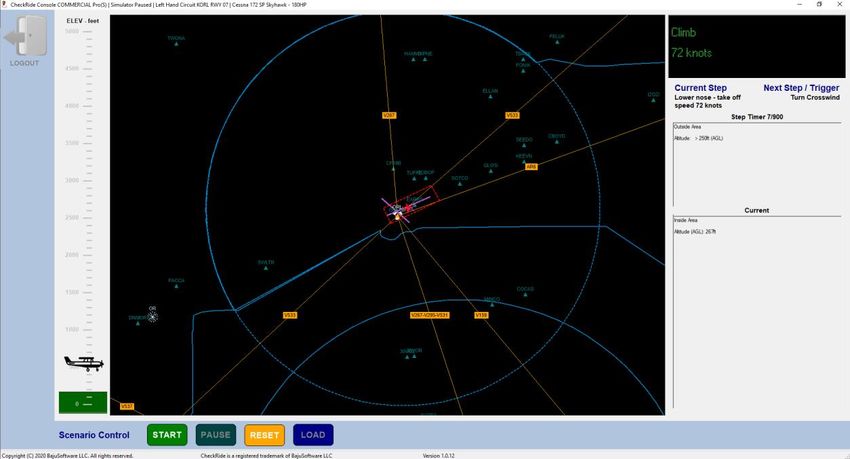
CheckRide® Console – User Manual V1.0.X                                                                                                8 of 42

       The next option specifies whether you want to start ‘On the Ground’, make an ‘Approach’ or start ‘In the Air’. Use the drop
       down to select the appropriate function.

       On the Ground

       There are 3 ways to specify the startup location for On the Ground start:

        1. Select a runway (or helipad) from the Runway list. This places the aircraft at the start of the runway and sets the
           heading to the runway heading.

        2.   Click/Tap on the map to set the location on the map. Make sure the map is in Select Mode by clicking on              . You can
             move the map by choosing the drag mode          and dragging the map and using the Zoom In/Out buttons.

             You have to enter the Heading as well by clicking on the Heading text box:

        3.   Enter the LAT/LON Coordinates. Click on the LAT and LON text boxes to enter the coordinates in decimal degrees:

                                                           Click on   to save your changes.

Copyright © 2021, BajuSoftware LLC. All rights reserved.                                  Checkride® is a registred trademark of BauSoftware LLC
CheckRide® Console – User Manual V1.0.X                                                                                              9 of 42

       Approach

       After you select the Approach option from the dropdown, select a Runway for the approach. Then select a distance by
       clicking on the appropriate Distance Button. If you want to select a different distance to what is provided by the hard-wired
       buttons, click on the [ ? ] button. A text entry box will appear to allow you to enter a custom distance (Note, only full
       numbers work):

                                   As soon as a distance has been set, the Altitude will be calculated based on a 3-degree glideslope
                                   to the selected runway threshold, i.e. the lower the Distance, the lower the Altitude.
                                   To resize the map display, you can move the map by choosing the drag mode               and dragging
                                   the map and/or using the Zoom In/Out buttons.

                                   If you want to further adjust the heading, altitude or airspeed, you can change any setting by
                                   clicking/tapping in the text boxes:

                                       Altitude                    Airspeed                    Heading

       Note: Select the Runway and Distance first, then make adjustments to the Altitude and Heading. If you change the Runway
       and/or Distance again, the Altitude and Heading will be reset to the calculated values. The Airspeed can be adjusted anytime.

Copyright © 2021, BajuSoftware LLC. All rights reserved.                                Checkride® is a registred trademark of BauSoftware LLC
CheckRide® Console – User Manual V1.0.X                                                                                              10 of 42

       In the Air

       After you select the In the Air option from the dropdown, the Altitude will be pre-set to 1000ft above airport altitude and the
       Airspeed will be set to 120 knots. You need to change the Heading as required. You can change any setting by
       clicking/tapping in the text boxes:

       Altitude                     Airspeed                    Heading

       There are 3 ways to specify the location for In the Air start:

        1.   Click/Tap on the map to set the location on the map. Make sure the map is in Select Mode by clicking on             .

        2.   The current location of the aircraft in the simulator by clicking on [CURRENT POSITION]. The flight simulator has to be
             running for this function to be enabled.

        3.   Specify a distance and bearing to/from a VOR, NDB or Waypoint (WPT). Clicking on the Distance and Bearing box will
             bring up a data entry box similar to the entry boxes for the Altitude, Airspeed and Heading. Right afterwards the Nav
             Aid Selector will be shown. Or you can click on the Nav Aid entry box first. Note, after a Nav Aid has ben selected and
             then changing the distance and/or bearing will always require to select the Nav Aid again.

Copyright © 2021, BajuSoftware LLC. All rights reserved.                                 Checkride® is a registred trademark of BauSoftware LLC
CheckRide® Console – User Manual V1.0.X 11 of 42
The Nav Aid Browser works similar to the Airport Browser. Select a Nav Aid Type from the Drop Down. VOR, NDB and
WPT (waypoints) are available. Start entering the first letters of the ID will show what has been found in the database.
Select the entry wanted and click on [OK].
Click on the column header (ID or NAME) to change the sort and search fields. Waypoint have names only, no IDs.
After clicking on [OK], the aircraft marker will be placed in the appropriate position.
Selecting from the to/from dropdown box will also set the appropriate heading.
You can move the map by choosing the drag mode and dragging the map and the Zoom In/Out buttons.
If you want to start the flight, click on [Set Location] and the aircraft will be relocated in the simulator. You can now click on
the Moving Map and start the flight using the Simulator Control Buttons.
Copyright © 2021, BajuSoftware LLC. All rights reserved. Checkride® is a registred trademark of BauSoftware LLCCheckRide® Console – User Manual V1.0.X 12 of 42
If you want to save this location to the favorites (on the Start Up screen), select a slot number (1 to 16 or 1 to 8) next to the
button [Add to Favorites] and then click the button. If a slot has already been taken, it will ask if you want to overwrite this
slot.
A description will be generated and displayed in the Favorites Edit box:
On the ground
In the Air
You can accept the suggestion or enter a new description using the on-screen keyboard. Click on to save it.
IMPORTANT! For Elite XTS, moving the aircraft to an airport requires that the correct map is selected in Elite during the
startup of Elite. Otherwise CheckRide® is not able to relocate the aircraft to the selected startup location.
There is no restriction in any other Flight Simulator.
Copyright © 2021, BajuSoftware LLC. All rights reserved. Checkride® is a registred trademark of BauSoftware LLCCheckRide® Console – User Manual V1.0.X 13 of 42
F LI G H T S E T U P - C U S T O M W E A TH E R
If you want to create a customized weather situation, click/tap on [Custom Weather]:
Use the sliders and buttons to select the weather condition required and whether you want to fly at a specific time of day.
You can either enter a specific time or use the slider for presets for Dawn, Day, Dusk or Night.
Notes:
• Cloud Tops and Base are entered in feet MSL (Mean Sea Level). The black label below shows the equivalent in AGL
(Above Ground Level) based on the current location of the aircraft (the simulator has to be running and connected to
update this label).
• Wind Shear is not supported in FSX and P3D.
• Wind Gusts and Wind Shear is not supported in Elite
Instead of using the buttons to increase/decrease a value, you can click/tap on any of the LCD style displays to enter a value
directly, example for Air Temp:
Click on to save the entered value.
You can change the units for the AIR TEMP, DEW POINT and AIR PRESSURE, by clicking/tapping on the description label
under the digit display.
Copyright © 2021, BajuSoftware LLC. All rights reserved. Checkride® is a registred trademark of BauSoftware LLCCheckRide® Console – User Manual V1.0.X 14 of 42
Click on [UPDATE WEATHER] to immediately update the weather in the simulator. This button is only enabled of the flight
simulator is running or paused.
Alternatively, you can save the selected weather condition to the weather favorites. The CheckRide® console is
preconfigured with 8 weather favorites. All of them can be overridden by a new weather environment:
▪ Select a ‘slot number’ by clicking/tapping the up/down buttons next to the [ADD TO FAVORITES] button.
▪ Then click/tap on [ADD TO FAVORITES].
Because all of the favorites are already filled, you will get a confirmation box to overwrite the selected favorite:
If you click/tap on [NO], the operation will be aborted and no changes to the favorites will be made.
After confirming the overwrite, you can enter a description of the weather you have created:
Use the displayed keyboard to enter a description. Then click/tap on the blue save button . The favorite will now be
available on the Free Flight Startup Page.
Copyright © 2021, BajuSoftware LLC. All rights reserved. Checkride® is a registred trademark of BauSoftware LLCCheckRide® Console – User Manual V1.0.X 15 of 42
M OV I NG M A P
Once you have selected a location favorite or a custom location, you can display the moving map by selecting the button on
the left menu:
Zoom In/Out
The moving map shows your current position. On the right side is the aircraft performance data display. On the left is an
Altitude/Elevation displays that show the aircrafts elevation over ground. Furthermore, if you have tuned an ILS/Localizer
and it is in range, a glideslope indicator is shown in the elevation display (if the ILS has a glideslope facility) and the localizer
is drawn on the map. If you tuned a VOR station and are in range, a VOR compass with OBS heading indicator is drawn.
Clicking on the button [Engine Data] displays Engine Data and the button changes to [Flight Data]. Click on [Flight Data] to
display the aircraft performance data again.
To start a new flight, Pause the flight using the Simulator Control Buttons. Then select the [Set Up] button on the left menu
bar (if you are not already on the Set Up page).
Copyright © 2021, BajuSoftware LLC. All rights reserved. Checkride® is a registred trademark of BauSoftware LLCCheckRide® Console – User Manual V1.0.X 16 of 42
Glideslope & Localizer Display
If you have tuned a Nav Radio to the correct ILS frequency and the radio has received a valid localizer/glideslope signal, the
playback screen will show a localizer graphic on the map and glideslope indicator in the altitude display.
There are 3 lines to indicate the glideslope. The middle line shows the ‘On Glideslope’, the upper and lower are the upper
and lower boundaries of the glideslope (in ‘faint’ red). As you get closer to the touchdown point, the bars will move closer
together as the glideslope band narrows the closer you get.
For ILS facilities with a localizer only (no glideslope), only the localizer graphic will show in the map.
VOR Display
If you have tuned a VOR1
and/or VOR2 station and are
in range, a VOR Compass
with OBS indicator is drawn
on the map.
Copyright © 2021, BajuSoftware LLC. All rights reserved. Checkride® is a registred trademark of BauSoftware LLCCheckRide® Console – User Manual V1.0.X 17 of 42
F A I LU R E S
This feature allows you to simulate aircraft system failures during a flight. Select the [Failures] button on the left menu bar.
There are a preset number of failure types available. On the left side are system and engine failures, on the right side are
instrument and radio failures. Depending on the number of engines in the aircraft, you will see one or more engines that can
be failed. In this example we have a single engine aircraft. The type of aircraft is also displayed in the top bar:
The activate a failure, click/tap on the green button next to the failure. When a failure has been set, the button turns red.
The clear the failure, click/tap the button again and it will turn green again.
Twin Engine Failures: Four Engines Failures:
IMPORTANT! For Elite XTS, certain failures will also trigger instrument failures. You cannot clear instrument failures when
they are triggered by another failure, like PITOT TUBE BLOCKED. To clear those failures, you need to clear the failure that
triggered them. It is possible though to trigger Instrument Failures on their own.
Note: The following failures will only work in X-Plane: Alternator/Generator, Flaps Actuator, Gear Actuator, PFD, MFD,
Garmin 530 and Garmin 430. For the PFD, MFD and the Garmin GPS, if you fail any of the radios, they will also fail in the
GPS’s Radios.
Copyright © 2021, BajuSoftware LLC. All rights reserved. Checkride® is a registred trademark of BauSoftware LLCCheckRide® Console – User Manual V1.0.X 18 of 42
R E C OR D A F R E E F LI GH T
To record a free flight, select your starting location. Then use the Record Flight buttons to start or stop recording. A variety of
telemetry information is saved at an interval of 1 second. It includes also positional data that allows to playback the flight
path at a later stage (see next chapter).
When you are done with recording, at the end of a flight or at any time during the flight, click/tap the [STOP] Button.
You will be presented with a dialog box to confirm the description of the recorded flight. By the default the closest starting
location airport (when pressing the [START] button) and the closest ending airport (when pressing the [STOP] button) will be
used as an automatic description. If you want to change the description, you can do this by using the onscreen keyboard:
Once you are done with the description, press the [Save] button. The flight has been recorded and is now available for
playback.
Note: If you pause the flight, recording also pauses.
Copyright © 2021, BajuSoftware LLC. All rights reserved. Checkride® is a registred trademark of BauSoftware LLCCheckRide® Console – User Manual V1.0.X 19 of 42
R E P LA Y A R E C OR D E D F LI GH T
To replay a previously recorded flight, select the Recorded menu. Depending on your version, this will be at different
locations within the CheckRide® Console:
Standard Versions Professional Versions
The recorded flights page shows you a list of all recorded flights, sorted by date/time in reverse. The latest is always on top:
Select the recording by clicking/tapping on it. You can now:
[LOAD] Load the recorded flight for replay.
[DELETE] Delete the selected flight.
[CLEAR] Clear all recorded flights. Just at it says, it will clear ALL recorded flights!
A confirmation box will be shown before clearing all recordings.
Copyright © 2021, BajuSoftware LLC. All rights reserved. Checkride® is a registred trademark of BauSoftware LLCCheckRide® Console – User Manual V1.0.X 20 of 42
After selecting [LOAD], the recording will be loaded and the replay page will appear:
The first page shows an overview with the flight path (yellow) and an altitude profile.
There are several functions available to give details about the scenario flown:
• Yellow line shows the flight path flown.
• On the bottom is an altitude profile.
• Drag the map for a better view
• Inspect the flight path
• Center the map
• Export the flight telemetry
• Replay the flight
6 buttons on the top right of the map are available. 2 Buttons for zooming the map and 4 Buttons as described below:
Select Mode: Used to ‘hover’ over flight path to get flight telemetry information.
Drag Mode: Used to ‘drag’ the map for better viewing. This is the default mode.
Drag the cursor to move the map. (Hold mouse down or tap and hold and drag map)
Zoom Mode: Zoom the map to enlarge/reduce the map. Drag a rectangle to enlarge an area.
Hold mouse down or tap and hold and drag to draw a rectangle for zooming.
Drag from left to right to enlarge (zoom in) or right to left to reduce (zoom out).
Center Mode: Center the map to the flight path. Click/tap on it to center the map.
(Useful if you get ‘lost’ on the map)
Copyright © 2021, BajuSoftware LLC. All rights reserved. Checkride® is a registred trademark of BauSoftware LLCCheckRide® Console – User Manual V1.0.X 21 of 42
Select Mode
When the cursor is over the flight path (‘hovering’), information about the elapsed time, airspeed, altitude, heading and
vertical speed is displayed for that point in the flight:
Hover over flight path.
There are 2 more buttons on the bottom of the screen:
Export Exports all flight telemetry to a CSV (Comma Separated Values) File. This file can then be used for further flight
analysis using a different program, like Microsoft Excel. The file is saved to the Windows Desktop.
Playback Start the playback function. It plays back the flight progress on the moving map and shows telemetry
data on the right-hand side:
There is also an elevation reference display that shows the aircraft elevation (GPS) and the ground elevation (green). The
symbol changes when the gear has been retracted (if equipped) and when flaps are lowered:
Copyright © 2021, BajuSoftware LLC. All rights reserved. Checkride® is a registred trademark of BauSoftware LLCCheckRide® Console – User Manual V1.0.X 22 of 42
Aircraft gear down or fixed gear, no flaps.
Aircraft gear up, no flaps.
Aircraft gear up, flaps deployed.
Aircraft gear down or fixed gear, flaps deployed.
Or
Helicopter (The symbol can be configured in Settings for aircraft or helicopters).
Copyright © 2021, BajuSoftware LLC. All rights reserved. Checkride® is a registred trademark of BauSoftware LLCCheckRide® Console – User Manual V1.0.X 23 of 42
Glideslope & Localizer Display
If you have tuned a Nav Radio to the correct ILS frequency and the radio has received a valid localizer/glideslope signal, the
playback screen will show a localizer graphic on the map and glideslope indicator in the altitude display.
There are 3 lines to indicate the glideslope. The middle line shows ‘On Glideslope’, the upper and lower are the upper and
lower boundaries of the glideslope (in ‘faint’ red). As you get closer to the touchdown point, the bars will move closer
together as the glideslope band narrows the closer you get.
For ILS facilities with a localizer only (no glideslope), only the localizer graphic will show in the map.
VOR Display
If you have tuned a VOR1 and/or VOR2 station and are in range, a VOR Compass with OBS indicator is drawn on the map.
Copyright © 2021, BajuSoftware LLC. All rights reserved. Checkride® is a registred trademark of BauSoftware LLCCheckRide® Console – User Manual V1.0.X 24 of 42
Playback functions:
Play Starts the playback
Pause Pauses the playback – click Play again to resume
Rewind Rewinds the playback to the beginning.
Export Exports the flown scenario data to a CSV File on the Windows Desktop
Path Returns to the flight path display
▪ When the playback is paused, you can slide the trackbar to go forward or backward.
▪ Playback Speed can be changed by using the [+] and [-] buttons in the playback speed control.
▪ The map buttons on the top right of the map can also be used to drag, zoom and center the map. The select button only
works in the flight path display and is disabled here.
▪ You can click on Engine Data to show Engine Performance Data
▪ Click on Flight Data to show Flight Data again.
Note: The example below shows a single engine aircraft’s data. For twin engine aircraft, the display also shows the 2nd
engine.
Copyright © 2021, BajuSoftware LLC. All rights reserved. Checkride® is a registred trademark of BauSoftware LLCCheckRide® Console – User Manual V1.0.X 25 of 42
S CENARIOS
Scenarios are only available in the Home Professional and Commercial Professional Versions.
Available Scenarios shows all available scenarios (Home Pro Version)
shows scenarios assigned to current user logged in (Commercial Pro Version)
Left side buttons (main menu bar)
LOGOUT Logout from current session - return to login screen (Commercial Pro Version)
HOME Return to main scenario screen
SCENARIOS Scenario selection screen.
SCENARIO
ADMIN Go to scenario admin screen (requires admin privileges for Commercial Pro)
Scenario Control buttons
(The buttons will only be enabled/visible if a connection to a simulator has been established and a scenario has been selected/loaded)
START Starts a loaded scenario
PAUSE Pauses the running scenario
RESET Aborts/Reset running scenario
LOAD Load the selected scenario
Copyright © 2021, BajuSoftware LLC. All rights reserved. Checkride® is a registred trademark of BauSoftware LLCCheckRide® Console – User Manual V1.0.X 26 of 42
S C E N A R I O A D M I NI STR A T IO N
In order to execute scenarios, they need to be imported/loaded into the Console. The Console has a few example scenarios
pre-loaded. CheckRide® Scenarios are available separately from various vendors. Scenarios are typically delivered via a
download file and imported into the Console.
Select the Scenario Admin section (login as administrator in the Commercial Pro version first):
All currently available scenarios with their author and the date it was updated/created are displayed. The date/time is not
when it was loaded into the console, but the date/time it was created or updated by the author. There are two functions
available:
IMPORT
Import/load a new scenario from file. After downloading a new scenario file, click this option and browse to the location
where you have saved the file, typically your Downloads folder. Then select it and click on [Open].
The next option allows you to optionally place the scenario into a category. See chapter Starting a Scenario.
Copyright © 2021, BajuSoftware LLC. All rights reserved. Checkride® is a registred trademark of BauSoftware LLCCheckRide® Console – User Manual V1.0.X 27 of 42
If the scenario to be imported requires a password, enter it here and press the [DONE] button:
Note: If a scenario with the same name by the same author already exists, you will be prompted if you’d like to overwrite it.
Commercial Pro Version only: Continue to the User Admin section to assign this scenario to the different users to make it available for
them.
DELETE
Select the scenario to be deleted from the Console and press the [Delete] button. This removes the scenario and it will no longer be
available.
Copyright © 2021, BajuSoftware LLC. All rights reserved. Checkride® is a registred trademark of BauSoftware LLCCheckRide® Console – User Manual V1.0.X 28 of 42
S TA R TI N G A S C E NA R I O
Select a scenario from the list. The selected scenario will display the briefing and an optional briefing image. You can also
filter the scenario list by using the scenario category buttons. They show how many are in each category and are only
enabled if at least one scenario is in the category.
To start the scenario, it has to be loaded (LOAD button). This will initialize the simulator for the selected scenario. This means
that
1. Your aircraft will be placed at the starting position of the scenario (this can also be in mid-air!).
(See note about Elite XTS on page 9).
2. The weather is set as specified in the scenario (this can be overwritten by Console options and is also optional)
In order to be able to load a scenario, a connection to the simulator has to be established. This can be verified by checking
the header of the Console. It should show ‘Simulator Running’ or ‘Simulator Paused’. If ‘Simulator Stopped’ is displayed, a
connection to the simulator could not be made during the startup of the Console. Make sure your simulator is running. For
further information, review the CheckRide® Installation Manual or inform your system administrator.
Scenario Categories Scenario Briefing Graphic/Image Thumbnail
AUTHOR clicking on this button shows you information about the author of the scenario. This information
can be used to contact the author for any questions, problem reports etc.
PRINT Print the briefing to the configured device or PDF.
Thumbnail If a scenario briefing includes a graphic or image, click on the thumbnail to enlarge it.
START Starts the scenario and switches to the scenario run screen (see next page).
The START button will only become enabled once the simulator has finished setting up the scenario after
pressing the LOAD button.
PAUSE Pauses the scenario. A scenario has to be started before the button will be enabled.
To continue after a pause, press the START button.
RESET This button resets the scenario back to its starting point. This allows you to start it again or make
another scenario selection.
LOAD Load the scenario into the simulator and prepare it for START.
Copyright © 2021, BajuSoftware LLC. All rights reserved. Checkride® is a registred trademark of BauSoftware LLCCheckRide® Console – User Manual V1.0.X 29 of 42
T H E S C E NA R I O R U N S C R E E N
As soon as a scenario is started, the scenario run screen is displayed. Depending on the scenario difficulty set by the author
(or overwritten by system settings), certain information is displayed:
There are up to three blocks of information available to be shown during the scenario:
1. A moving map showing your position and altitude. The map will also show in red any positional objective you have to
reach. This will be updated as you progress through the scenario, but only shown if the Scenario Step Preview is also
displayed (set in the scenario as a difficulty or overwritten in system settings).
2. A display containing up to 2 lines of information. This is a display that has been configured by the scenery author as a
reminder of the instructions or other information pertinent to the current scenario objective.
3. The Scenario Preview Information. This box contains information about what you have to perform in order to progress to
the next step. This can include reaching a certain position, an altitude, an airspeed or a heading or a combination. Setting
radios to the correct frequencies or reading back radio communications can also be part of an objective. The top part is
what the requirement is for this step, the bottom part (‘Current’), shows the actual values. Any positional requirements
are drawn on the map as red-dotted areas.
In the example above, we have to be outside of the marked area on the map and reach and Altitude of greater than 250ft
AGL. The current values indicate that one of those conditions have been, the Altitude as we are at 373 feet. But we are
still inside the marked area.
Each objective has a timeout. If you don’t fulfill the objective before the timeout period expires, you fail the scenario,
continue to the next step or a new scenario is loaded. This depends on how the scenario has been designed. The timeout
and current expired time are displayed in seconds next to Step Timer.
Note: Not all three blocks of information might be visible. This depends on the scenario as it determines what information is
displayed. You might only get the line display or the map, or nothing at all. This is part of the difficulty setting for each
scenario.
Continue following the instructions, voice prompts etc. until you reach the end of your scenario.
Copyright © 2021, BajuSoftware LLC. All rights reserved. Checkride® is a registred trademark of BauSoftware LLCCheckRide® Console – User Manual V1.0.X 30 of 42
T H E S C E NA R I O D E BR IE F S C R E E N
Once a scenario has been completed, the debrief screen will be shown.
Professional Versions only: When you load a user’s history, this screen will also be displayed to review the scenario.
You will see the flightpath flown in yellow and below under the map, an altitude profile.
There are several functions available to give details about the scenario flown:
• Yellow line shows the flight path flown.
• Yellow altitude profile below map.
• Each step in the scenario is flagged by a dot and a description of the time elapsed and the name of the step.
• Red dot and step name indicate a failed interrogation/monitor step.
• Drag the map for a better view
• Inspect the flight path
• Inspect the steps performed
• Center the map
• Export the flight telemetry
• Print a Debrief Report
• Replay the flight
• If scoring has been enabled for the scenario, the score will also be shown next to the [Playback] Button:
Copyright © 2021, BajuSoftware LLC. All rights reserved. Checkride® is a registred trademark of BauSoftware LLCCheckRide® Console – User Manual V1.0.X 31 of 42
4 buttons on the top right of the map are available. Use those buttons to interact with the map:
Select Mode: Used to ‘hover’ over flight path to get flight progress information and clicking on the step to
display step information (see below for more information about the select mode).
Drag Mode: Used to ‘drag’ the map for better viewing. This is the default mode.
Drag the cursor to move the map. (Hold mouse down or tap and hold and drag map)
Zoom Mode: Zoom the map to enlarge/reduce the map. Drag a rectangle to enlarge an area.
Hold mouse down or tap and hold and drag to draw a rectangle for zooming.
Drag from left to right to enlarge (zoom in) or right to left to reduce (zoom out).
Center Mode: Center the map to the flight path. Click/tap on it to center the map.
(Useful if you get ‘lost’ on the map)
In addition to those buttons, there are also 2 Zoom Buttons for Zooming in or out.
Select Mode
There are two functions in the select mode, ‘hovering’ over the flight path and step information. When the cursor is over the
flight path (‘hovering’), information about the elapsed time, airspeed, altitude, heading and vertical speed is displayed for
that point in the scenario:
Hover over flight path.
Copyright © 2021, BajuSoftware LLC. All rights reserved. Checkride® is a registred trademark of BauSoftware LLCCheckRide® Console – User Manual V1.0.X 32 of 42
Clicking on a step point will display the scenario step that has been performed. It displays the triggers for the step and the
step activity that has been performed.
Step point
The following information is displayed to the right of the map:
Time Elapsed:
the elapsed time since start (minutes:seconds or hours:minutes:seconds)
Step Name:
Name of Step: Turn Down Wind
Trigger:
DISTANCE: a distance greater than 0.8 nm from a point has to be reached
There can be multiple triggers per step. See appendix for a list of possible triggers.
Flight data that fulfils trigger requirement.
Shown is the distance fulfils the trigger condition.
Activity performed for the step.
Here a voice script was played. See appendix for a list of possible activities.
The actual spoken voice output by the Instructor
Copyright © 2021, BajuSoftware LLC. All rights reserved. Checkride® is a registred trademark of BauSoftware LLCCheckRide® Console – User Manual V1.0.X 33 of 42
There are 2 more buttons on the bottom of the screen:
Export Exports all flight telemetry to a CSV (Comma Separated Values) File. This file can then be used for further flight
analysis using a different program, like Microsoft Excel. The file is saved to the Windows Desktop.
Print Print a debrief report. The report will be shown or printed directly to the printer, depending on settings
configured.
Playback Start the playback function. It plays back the flight progress on the moving map and shows telemetry
data on the right-hand side:
There is also an elevation reference display that shows the aircraft elevation (GPS) and the ground elevation (green). The
aircraft symbol changes when the gear has been retracted (if equipped) and when flaps are lowered:
Aircraft gear down or fixed gear, no flaps.
Aircraft gear up, no flaps.
Aircraft gear up, flaps deployed.
Aircraft gear down or fixed gear, flaps deployed.
Or
Helicopter (The symbol can be configured in Settings for aircraft or helicopter).
Copyright © 2021, BajuSoftware LLC. All rights reserved. Checkride® is a registred trademark of BauSoftware LLCCheckRide® Console – User Manual V1.0.X 34 of 42
Glideslope & Localizer Display
If you have tuned a Nav Radio to the correct ILS frequency during the scenario and the radio has received a valid
localizer/glideslope signal, the playback screen will show a localizer graphic on the map and glideslope indicator in the
altitude display. Unlike in the Scenario run screen, this information is always shown.
There are 3 lines to indicate the glideslope. The middle line shows the ‘On Glideslope’, the upper and lower are the upper
and lower boundaries of the glideslope (in ‘faint’ red). As you get closer to the touchdown point, the bars will move closer
together as the glideslope band narrows the closer you get. For ILS facilities with a localizer only (no glideslope), only the
localizer graphic will show in the map. If the scenario includes a RNAV approach, a similar graphic will be drawn showing the
RNAV approach track and glideslope when the aircraft is within 20nm.
VOR Display
If you have tuned a VOR
station and are in range, a
VOR Compass with OBS
indicator is drawn on the
map.
Copyright © 2021, BajuSoftware LLC. All rights reserved. Checkride® is a registred trademark of BauSoftware LLCCheckRide® Console – User Manual V1.0.X 35 of 42
Playback functions:
Play Starts the playback
Pause Pauses the playback – click Play again to resume
Rewind Rewinds the playback to the beginning.
Export Exports the flown scenario to a CSV File on the Windows Desktop
Print Prints a report about the flown scenario.
Path Returns to the flight path display
▪ When the playback is paused, you can slide the trackbar to go forward or backward.
▪ Playback Speed can be changed by using the [+] and [-] buttons in the playback speed control.
▪ The map buttons on the top right of the map can also be used to drag, zoom and center the map. The select button only
works in the flight path display and is disabled here.
▪ You can click on Engine Data to show Engine Performance Data
▪ Click on Flight Data to show Flight Data again.
Note: The example below shows a single engine aircraft’s data. For twin engine aircraft, the display also includes the 2nd
engine.
Once you are finished with the debrief, click on the [Home] button on the left to return to the main screen. Now you can
select a different scenario or logout.
Copyright © 2021, BajuSoftware LLC. All rights reserved. Checkride® is a registred trademark of BauSoftware LLCCheckRide® Console – User Manual V1.0.X 36 of 42 U SER A DMINISTRATI ON This section only applies to the Commercial Pro Version. User administration allows you to maintain a group of students with their own login. You can assign scenarios to them and track their progress. Select the User Admin function (you need to login as administrator first): ADD add a new user EDIT change existing user – select a user from the list first. DELETE delete user from the Console. Attention! This also deletes the user history! ASSIGN SCENARIOS assign scenarios to selected user SCENARIO HISTORY shows each scenario flown by the selected user SCENARIO STATS summarized statistics for each scenario for the selected user The following pages contain a detailed description for each function. Copyright © 2021, BajuSoftware LLC. All rights reserved. Checkride® is a registred trademark of BauSoftware LLC
CheckRide® Console – User Manual V1.0.X                                                                                               37 of 42

       A D D IN G U SE R S

       Click on the [ADD] button. The following entry screen will appear:

       Enter the user’s login name and password. You can also give the user admin privileges be using the dropdown and selecting
       ‘YES’.

       Click on [SAVE] to save the information, otherwise [CANCEL] cancels the operation.

       D E LE T I NG U SE R S

       Select the user name in the list (it will be highlighted by a blue bar) and click the [DELETE] button. A confirmation dialog
       appears to confirm your action.

       Attention! Deleting a user also deletes all user history!

Copyright © 2021, BajuSoftware LLC. All rights reserved.                                  Checkride® is a registred trademark of BauSoftware LLC
CheckRide® Console – User Manual V1.0.X 38 of 42
A SS I GN S C E NA R I O S
Before users can select scenarios, they have to be assigned to them. Users with administration rights have all scenarios available.
Select a user from the list, then click on the button [SCENARIOS]:
Every scenario that is available to the user is highlighted with a blue bar. In the example above, Final RWY 07 KORL, Oscar Pattern and
Vertical ’S’ Maneuver is assigned.
When a user logs in, only assigned scenarios will be shown. If a user with admin privileges logs in, all scenarios will be shown.
Now click on each scenario that you wish to assign, they will be highlighted in blue as you click them.
[ALL] assigns all scenarios listed to the user
[CLEAR] clear all assigned scenarios from users
[SAVE] saves the assignments you have made.
To go back to Users without making any changes, click on [USERS] on the left main menu bar.
Copyright © 2021, BajuSoftware LLC. All rights reserved. Checkride® is a registred trademark of BauSoftware LLCCheckRide® Console – User Manual V1.0.X 39 of 42
S H OW S C E N A R I O H I ST O R Y
The scenario history shows each scenario that has been flown by the selected user. It contains the date and time, the result
of the scenario and the last step performed.
Note: The scenario History is also available in the Home Pro Version and can be accessed from the main menu.
Select a user and click on [SCENARIO HISTORY]:
This example shows scenarios that have been flown at different times. It lists the date and time and what the result was. The
Result can be one of:
Completed A scenario has been flown from start to finish.
The Scenario Step column shows the last step in the scenario.
Failed A scenario objective has not been met and the scenario was aborted as a result.
The Scenario Step column shows which scenario step (objective) has not been met.
Reset User has reset the scenario before finishing it (pressed on the [RESET] button).
The Scenario Step column shows before which scenario step (objective) it has been reset.
Crashed The user crashed the aircraft and the scenario was aborted.
The Scenario Step column shows before which scenario step (objective) the user crashed.
The following functions are available:
LOAD Loads the currently selected history/scenario for replay/review.
(See chapter The Scenario Debrief Screen for a description)
DELETE The currently selected history record will be deleted
CLEAR All history records will be deleted from selected user. Selecting this option will require a confirmation:
To return to the Users screen, click on [USERS] in the left menu bar.
Copyright © 2021, BajuSoftware LLC. All rights reserved. Checkride® is a registred trademark of BauSoftware LLCCheckRide® Console – User Manual V1.0.X 40 of 42
S H OW S C E N A R I O S T A T IS TIC S
As opposed to the scenario history, the statistics screen summarizes all scenario records by scenario. Each scenario is listed
once with a count of each result achieved.
Select a user and click on [SCENARIO STATS]:
Click on [PRINT] to print the information displayed on the screen to the configured printer.
To return to the Users screen, click on [USERS] in the left menu bar.
Copyright © 2021, BajuSoftware LLC. All rights reserved. Checkride® is a registred trademark of BauSoftware LLCCheckRide® Console – User Manual V1.0.X 41 of 42
A PPENDIX
T RIGGERS
The following triggers are available within the CheckRide® Scenario system:
Follow On This is not a trigger as such, but the step follows immediately the previous step.
Timer Time expired from previous step performed.
Position A position that has to be reached specified by Lat/Lon coordinates or an area on a map.
Distance A distance to or from a point that has to be reached.
Radios Com/Nav Radios have to be set to the correct frequency or the transponder to the correct squawk code.
Avionics OBS Radials have to be tuned to the correct direction.
Performance The aircraft has to be above/below/between at a certain speed, altitude, vertical speed and/or heading.
Speech The user/pilot has to speak the required phrase/word(s).
A CTIVI TIES
When a trigger condition has been met, one of the following activities in a scenario will be performed:
Play Voice Script Voice output will be performed.
Those are typically instructions to the user/pilot from the virtual instructor.
Direction Direction and turn instructions will be given via voice output.
Set Avionics Avionics and radios will be set automatically (like radio frequencies etc.)
Failure An aircraft system failure is initiated or cancelled.
This activity has an optional randomizer meaning that it will not happen every time the scenario is flown.
Weather The weather condition is changed (Clouds, wind etc).
This activity has an optional randomizer meaning that it will not happen every time the scenario is flown.
Interrogate Various flight conditions are interrogated and a follow-on activity can be triggered if the specified flight
conditions have not been met. Flight conditions that can be interrogated include:
▪ Radio Frequencies set
▪ Transponder squawk set
▪ OBS Radials set
▪ Position reached
▪ Distance from/to a point (like a VOR/NDB etc.)
▪ Aircraft performance (Airspeed, Altitude, Vertical Speed, Heading, Bearing to Nav1/Nav2/Adf)
Start Monitor Similar to Interrogate, but the monitor can interrogate a condition throughout the whole scenario.
Interrogate checks a condition only once.
Copyright © 2021, BajuSoftware LLC. All rights reserved. Checkride® is a registred trademark of BauSoftware LLCCheckRide® Console – User Manual V1.0.X 42 of 42
BajuSoftware CheckRide® Console
User Manual Version 1.0.X
Copyright © 2021, BajuSoftware, LLC. All Rights reserved.
No reproduction without permission
Copyright © 2021, BajuSoftware LLC. All rights reserved. Checkride® is a registred trademark of BauSoftware LLCYou can also read