KNOWLEDGE MANAGEMENT (SHAREPOINT ADD-IN) - User Guide Enterprise Plus Version
←
→
Page content transcription
If your browser does not render page correctly, please read the page content below
Beyond Technologies LLC                                                 User Guide

          KNOWLEDGE MANAGEMENT (SHAREPOINT ADD-IN)

                                            Enterprise Plus Version

                                                        User Guide

                                             Updated: February 2021
                                                        Version 1.0.0.7

Copyright © Beyond Intranet 2017. All Rights Reserved                              i
Beyond Technologies LLC                                                                      User Guide

                                                                 Notice

                                  Beyond Technologies LLC.
                                  This is a controlled document. Unauthorized access,
                                  copying, replication or usage for a purpose other than for
                                  which it is intended, are prohibited.
                                  All trademarks that appear in the document have been
                                  used for identification purposes only and belong to their
                                  respective companies.

                                                  BEYOND TECHNOLOGIES LLC
                                                          INDIANA

                                                        Suite 305, 8N 3rd Street,
                                                          Lafayette, IN 47901
                                                Website: www.beyondintranet.com

                                              Email: contact@beyondintranet.com

Copyright © Beyond Intranet 2017. All Rights Reserved                                                  ii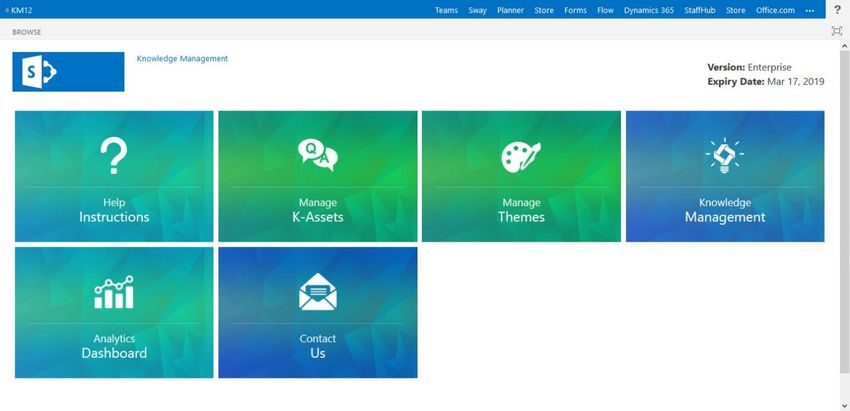
Beyond Technologies LLC                                                                                 User Guide

  About this Document

  Purpose
  This guide has been written to help you understand and use the Knowledge Management add-in. It presents
  the functional capabilities and operational details of Knowledge Management and contains the procedures
  that you should know for performing your business tasks using the add-in.

  Intended Audience
  This guide is intended for all the users of the add-in on SharePoint who are seeking capture, share and search
  key information of the company’s various departments or projects on a single platform.

  Products Supported
        ➢    SharePoint 2013+
        ➢    SharePoint Online

  Version Supported
  This user guide is relevant in all manner to explain and elaborate the functionalities which are available on our
  Trial & Enterprise Plus version of the Knowledge Management add-in.

Copyright © Beyond Intranet 2017. All Rights Reserved                                                              iii
Beyond Technologies LLC                                                                                                                    User Guide

  Contents

  Contents

  1.     Introduction .............................................................................................................. 1
       1.1     Features of Knowledge Management Add-In ......................................................................... 1
       1.2     User Roles and Access Rights .................................................................................................. 2
         1.2.1        User Roles ....................................................................................................................... 2

         1.2.2        Access Rights ................................................................................................................... 3

  2.     Getting Started .......................................................................................................... 4
       2.1     Installation of the Knowledge Management Add-in ............................................................... 4
       2.2     Knowledge Management – Homepage .................................................................................. 7

  3.     Managing Knowledge Management – Administrator role ........................................... 9
       3.1     Manage Categories ................................................................................................................. 9
       3.2     Manage Subcategories.......................................................................................................... 10
       3.3     Manage K-Assets ................................................................................................................... 11
         3.3.1        To Edit and approve any K-Asset .................................................................................. 12

       3.4     Manage Configuration .......................................................................................................... 13
         3.4.1        KM Admin User/ group permission rights. ................................................................... 15

         3.4.2        Ask Question group permission rights .......................................................................... 15

         3.4.3        Set default theme ......................................................................................................... 15

         3.4.4        Set default K-Asset status ............................................................................................. 15

         3.4.5        Enable / disable Ask question button ........................................................................... 15

         3.4.6        Enable / disable Automatic email notification.............................................................. 15

         3.4.7        Activate/ deactivate document search ......................................................................... 15

         3.4.8        Set default analytics retention period .......................................................................... 15

         3.4.9        Placeholder text for Ask a Question field ..................................................................... 15

         3.4.10        Language Settings ........................................................................................................ 16

         3.4.11       Change Placeholder text for search box field ............................................................... 21

         3.4.12       Enable or disable document attachment with questions ............................................. 21

         3.4.13       Advance Search settings- Azure search ........................................................................ 21

Copyright © Beyond Intranet 2017. All Rights Reserved                                                                                                  iv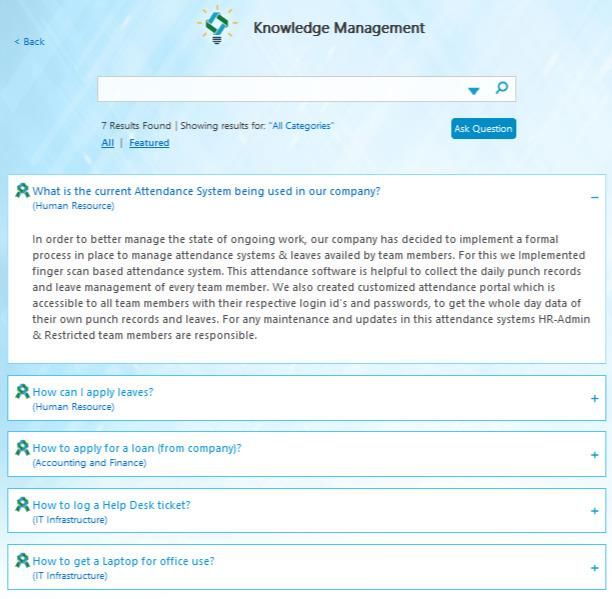
Beyond Technologies LLC                                                                                                                  User Guide

     3.5       Manage Themes.................................................................................................................... 24
     3.6       Manage Knowledge Management- User Role ...................................................................... 25
         3.6.1        Searching for K-Assets................................................................................................... 26

         3.6.2        Featured Items .............................................................................................................. 27

         3.6.3        Ask a Question .............................................................................................................. 28

         3.6.4        Automatic Email Notification ........................................................................................ 29

         3.6.5        Question approval process ........................................................................................... 30

     3.7       Analytics Dashboard ............................................................................................................. 32
     3.8       Adding KM Web-part (Standard and SPFx) ........................................................................... 33
         3.8.1        Adding Standard web-part ............................................................................................ 33

         a)        Ask a Question .................................................................................................................. 34

         b)        Search for keywords.......................................................................................................... 34

         c)        Read K-Assets .................................................................................................................... 34

         d)        Change Title of the add-in for self .................................................................................... 34

         e)        Change theme of own add-in web-part ............................................................................ 34

         f)        Change page size for self................................................................................................... 35

         g)        Add external theme by adding CSS ................................................................................... 35

         h)        Add categories (comma separated value) to provide a filter on search........................... 35

         3.8.2        Adding Modern (SPFx) web-part................................................................................... 35

         3.8.3        Adding a reference K-asset within another K-asset as a link ........................................ 41

     3.9       Manage Email Templates ...................................................................................................... 45
     3.10      Refer Help Instruction page and contact us for support. ..................................................... 46

Copyright © Beyond Intranet 2017. All Rights Reserved                                                                                                 v
Beyond Technologies LLC                                                                                                                                 User Guide

  Table of Figures
  Figure 1: Installation process – Knowledge Management ...................................................................................... 4
  Figure 2: Site Contents page ................................................................................................................................... 5
  Figure 3: SharePoint Store ...................................................................................................................................... 5
  Figure 4: App Source page ...................................................................................................................................... 6
  Figure 5: KM Admin home page ............................................................................................................................. 7
  Figure 6: Category admin dashboard ..................................................................................................................... 8
  Figure 7: User Dashboard ....................................................................................................................................... 8
  Figure 8: Category List page ................................................................................................................................... 9
  Figure 9: Add New Category ................................................................................................................................... 9
  Figure 10: Sub-category List ................................................................................................................................. 10
  Figure 11: Add new Sub-category ......................................................................................................................... 10
  Figure 12: K-Asset List ........................................................................................................................................... 11
  Figure 13: Adding new K-Asset ............................................................................................................................. 12
  Figure 14: Configuration Page .............................................................................................................................. 13
  Figure 15: KM Conjuration page (expanded) ........................................................................................................ 14
  Figure 16: Placeholder text for Ask a question field ............................................................................................. 16
  Figure 17: Language settings ................................................................................................................................ 17
  Figure 18: Language and settings on Delve .......................................................................................................... 18
  Figure 19: Mapping Table ..................................................................................................................................... 19
  Figure 20: Labels in preferred Language .............................................................................................................. 19
  Figure 21: Set Inbuilt language as default ............................................................................................................ 20
  Figure 22: Search Box Placeholder text ................................................................................................................ 21
  Figure 23: Placeholder text for search box ........................................................................................................... 21
  Figure 24: Azure search settings configuration .................................................................................................... 22
  Figure 25: Advance search results ........................................................................................................................ 23
  Figure 26: KM Theme list ...................................................................................................................................... 24
  Figure 27: Adding external theme through CSS URL ............................................................................................ 25
  Figure 28: KM User page ...................................................................................................................................... 25
  Figure 29: Searching keywords ............................................................................................................................. 26
  Figure 30: Featured Items and view answer......................................................................................................... 27
  Figure 31: Ask a Question ..................................................................................................................................... 28
  Figure 32: Automatic email Notification - Question submitted ........................................................................... 29
  Figure 33: Automatic email Notification - Question asked ................................................................................... 29
  Figure 34: Question approval process .................................................................................................................. 30
  Figure 35: Edit K-Asset .......................................................................................................................................... 31
  Figure 36: Automatic email Notification - Answer Shared ................................................................................... 31
  Figure 37: Analytics Dashboard ............................................................................................................................ 32
  Figure 38: KM properties tab ................................................................................................................................ 33
  Figure 39: KM Web-part ....................................................................................................................................... 34
  Figure 40: O 365 App launcher ............................................................................................................................. 36
  Figure 41: Admin Center ....................................................................................................................................... 36
  Figure 42: SharePoint admin center ..................................................................................................................... 37
  Figure 43: App Catalog page ................................................................................................................................. 37
  Figure 44: Add SPFx package ................................................................................................................................ 38
  Figure 45: Deploy web part .................................................................................................................................. 38
  Figure 46: SPFx file added ..................................................................................................................................... 39
  Figure 47: Add KM to SPFx file .............................................................................................................................. 39
  Figure 48: Publish Web part ................................................................................................................................. 40
  Figure 49: Properties Pane ................................................................................................................................... 41
  Figure 50: URL to add link to other K-asset .......................................................................................................... 42
  Figure 51: Anchor tag URL .................................................................................................................................... 42
  Figure 52: Edit K-Asset .......................................................................................................................................... 43
  Figure 53: Edit HTML editor tag ............................................................................................................................ 44
  Figure 54: Replace anchor tag with updated tag .................................................................................................. 44
  Figure 55: Reference link added ........................................................................................................................... 45

Copyright © Beyond Intranet 2017. All Rights Reserved                                                                                                                vi
Beyond Technologies LLC                                                                                                                      User Guide

  Figure 56: Manage Email templates ..................................................................................................................... 46

Copyright © Beyond Intranet 2017. All Rights Reserved                                                                                                    vii
Beyond Technologies LLC                                                                                    User Guide

      1. Introduction

Welcome to SharePoint based Knowledge Management Add-In provided by Beyond Intranet.

Knowledge management add-in is a customized, digital library which is accessible to your employees, partners, customers,
or anybody having access permissions to it. Users can search, share, add or access important company info whenever and
wherever they want. In short, this SharePoint based content collaboration tool can help teams to adopt a modern
communication strategy where they can switch to continuous sorting, sharing, and searching for knowledge within high-
level security measures. This is important to streamline your in-house critical education management system as well as to
make your customer support backbone even stronger.

Knowledge should never be accommodated in hard drives or brains. Such information becomes stale and useless. For
knowledge to be useful, it needs to be updated and flowing. Our Knowledge Management tools gives you a central
platform to keep your team's work organized and accessible, making it easier to find the information needed to keep work
moving forward.

This User guide gives you a detailed information about how you can use the add-in to build up your organized K-Asset
library and add value to your business.

Let’s get started!

1.1         Features of Knowledge Management Add-In

            The Knowledge Management add-in is facilitated with following interesting features:

      1.    Easily create, organize, and access K-Assets in one central location
      2.    Add documents to any K-Asset in form of attachments
      3.    Segregate information in categories and sub-categories for easy searching
      4.    Advanced Search options powered by Azure search service
      5.    Search filters run on K- assets as well as attachments.
      6.    User permissions can be defined to allow different user access levels.
      7.    KM admins have complete control on the add-in while KM category admins can only answer questions in the
            assigned category.
      8.    General users have permissions to ask questions and view K-Assets.
      9.    Admin can hide Ask question button or turn off automatic email notification whenever needed.
      10.   Admin can decide and control if questions posted by users should be approved to get published or rejected.
      11.   Automatic email notification with the link is sent whenever a new question or answer is added/ updated.
      12.   Set expiry date of K- assets.
      13.   Personalize add-in name to fit to your corporate brand, color theme, and logo.
      14.   View Page, search and user analytics to get a graphical summary of hot counts.

Copyright © Beyond Intranet 2021. All Rights Reserved                                                              1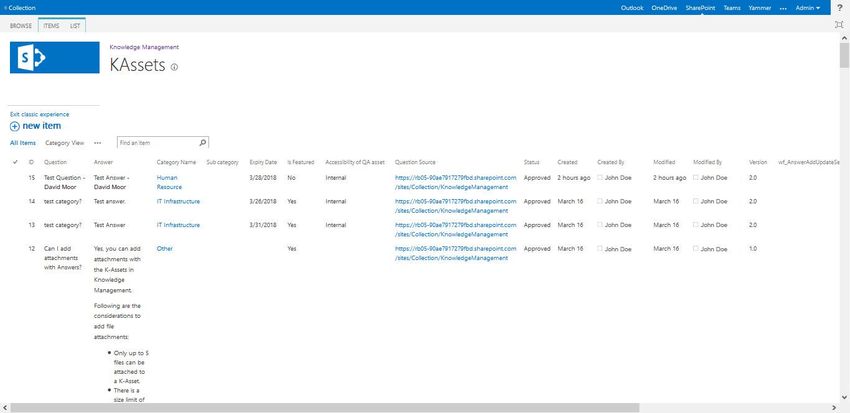
Beyond Technologies LLC                                                                                  User Guide

        1.2 User Roles and Access Rights

Knowledge Management (KM) is useful for employees in office to keep them informed and updated. It eliminates
duplicate documents and helps employees maintain a single copy of the current document with all versions saved at the
backend. For KM to function properly it is important that the platform is used by everyone and anyone within an
organizational hierarchy in any company.

User roles and access rights can be defined as per the user level in the hierarchy and can be demarcated for management,
administrator, and employees. We have discussed the most used roles and access rights which are needed by any typical
organization.

User permissions are working on two levels. There are Site collection permissions which are important while giving
permissions. Employees who have read-only permissions on site collection will not be able to access admin section so
before giving them KM admin permissions- their site collection permission should be at least edit permission.

The second level permissions are given from the Configurations section. Users must be added to KM admin filed or Ask a
question group for giving specific access.

                 1.2.1 User Roles

The three most common user types for the Knowledge Management are as follows:

     1) KM Administrator
     2) KM Category administrator
     3) Users

Copyright © Beyond Intranet 2021. All Rights Reserved                                                            2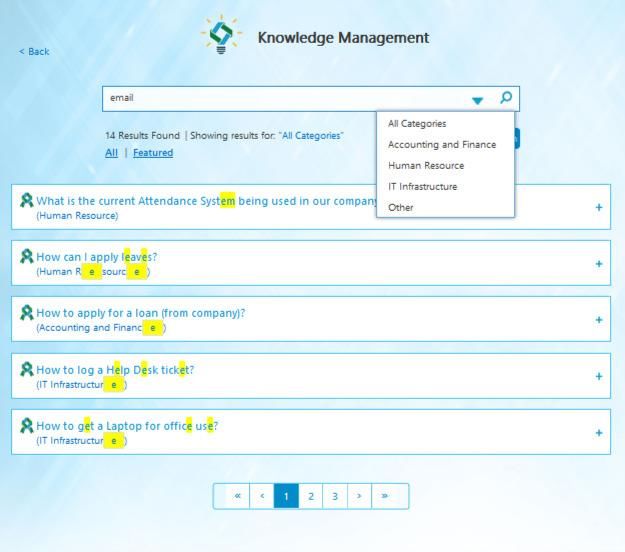
Beyond Technologies LLC                                                                              User Guide

               1.2.2       Access Rights

     1) KM Administrator

          a.        Viewing K-Assets posted in any/ all categories
          b.        Publishing content as question and answer
          c.        Attaching documents with the answers
          d.        Approving or disapproving any question posted by the user.
          e.        Removing or disapproving any answer posted by category user
          f.        Searching any keyword in the K-Assets list
          g.        Creating new categories and subcategories for K-Assets
          h.        Managing configuration section of add-in
          i.        Giving configuration access to any other user
          j.        Changing default color theme of the KM web part
          k.        Changing default status of the K- asset
          l.        Activating or deactivating ‘ask question’ functionality on the web part
          m.        Activating or deactivating automatic email notifications
          n.        Activating or deactivating document attachment in Question
          o.        Enabling or disabling document search
          p.        View page, user and search analytics
          q.        Changing default email templates
          r.        Change default analytics retention period
          s.        Giving category wise user permissions to answer questions.
          t.        Add, edit Web part to give user permissions
          u.        Change default language of labels on user access page.

     2) Category Administrator
          a.        Viewing K-Assets posted in any/ all categories
          b.        Ask questions in any categories, subcategories and with document attachment
          c.        Approving Question in an assigned category only
          d.        Publishing answer in the only assigned category
          e.        Performing quick searches on any keyword in the K-Assets list
          f.        Attaching document in the only assigned category
          g.        Changing default color theme of the KM web part
          h.        View page, user and search analytics

     3) Users

          a.        Viewing K-Assets posted in any/ all categories
          b.        Asking questions in all categories, subcategories and with document attachment
          c.        Performing quick Searches on any keyword in the K-Assets list
          d.        Changing his own web part to pre-defined color theme or title of add-in
          e.        Editing KM properties like page size or category CSV for his own web part
          f.        Applying external CSS for getting a new color theme

Copyright © Beyond Intranet 2021. All Rights Reserved                                                        3
Beyond Technologies LLC User Guide
2. Getting Started
Access to Knowledge Management is limited to authorized users only. To use it, you must first log on to Microsoft account
using your user ID and password. On logging in, it allows you to start any of the modules to which you have access rights.
2.1 Installation of the Knowledge Management Add-in
Before you start to understand the functional aspects of Knowledge Management Add-In, let us understand the steps for
installing it from the Office 365 SharePoint store as follows:
1. Login to your office 365 SharePoint user or use URL mentioned below:
https://.sharepoint.com/
2. Go to “Site contents” from the quick launch or go to the gear icon and click on “Site contents” tab available in the
drop-down.
Figure 1: Installation process – Knowledge Management
Copyright © Beyond Intranet 2021. All Rights Reserved 4Beyond Technologies LLC User Guide
3. In the ‘Site contents’ click on ‘New’ and ‘App’. Or if you are using Classic SharePoint then Go to “add an app”.
Figure 2: Site Contents page
4. Go to the SharePoint store.
Figure 3: SharePoint Store
5. Search for “Knowledge Management” version of the app on the store.
Copyright © Beyond Intranet 2021. All Rights Reserved 5Beyond Technologies LLC User Guide
Figure 4: App Source page
6. Click on the app to open the details page.
7. Sign into your Microsoft account using either personal mail or Skype credentials. This will not accept Office 365
account as it is working on windows live site.
8. Once signed in, Install the add-in on your computer and start using.
Copyright © Beyond Intranet 2021. All Rights Reserved 6Beyond Technologies LLC User Guide
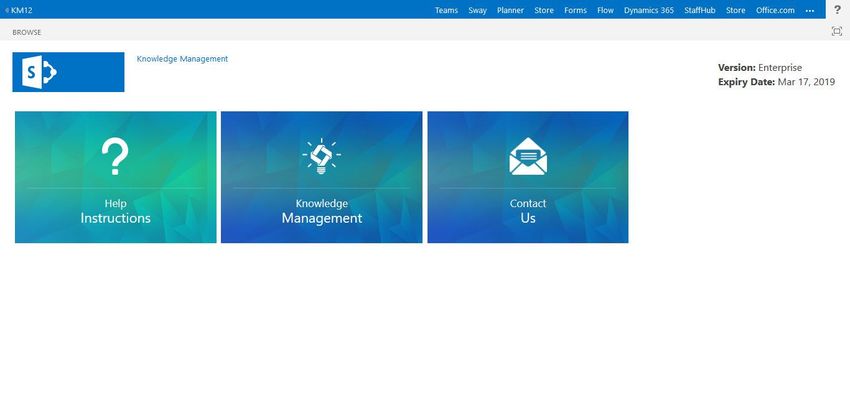
2.2 Knowledge Management – Homepage
The Homepage of the Knowledge Management is a beautifully laid down series of tiles. The Home page for each type of
user is different due to different access levels. The below dashboard is a complete view which is available only for the KM
administrator. Since this user has complete rights, he is able to view and click on each tile.
Each tile has a specific functionality and importance. Let us understand elaborate features as available on home page.
1. Manage Categories, subcategories, K-Assets and Email templates
2. Manage KM Configuration
3. Manage Theme and colors
4. Access KM web page to ask new questions, search keywords.
5. Check Page, search, and user Analytics.
6. Refer user guide
7. Adding SharePoint Framework (SPFx) web-part
8. Contact Beyond Intranet team for doubts or issues
9. Version information displayed.
Figure 5: KM Admin home page
Copyright © Beyond Intranet 2021. All Rights Reserved 7Beyond Technologies LLC User Guide
Figure 6: Category admin dashboard
Figure 7: User Dashboard
Copyright © Beyond Intranet 2021. All Rights Reserved 8Beyond Technologies LLC User Guide
3. Managing Knowledge Management – Administrator role
3.1 Manage Categories
1. To add New categories or manage old categories- click on Manage Category tile on the home page.
2. Categories list in SharePoint default list view opens up
3. Click on ‘New item’ link
4. Add Category name, description, and category username (group name can also be added) to give permissions to
users.
5. Click on save button
Figure 8: Category List page
Figure 9: Add New Category
Copyright © Beyond Intranet 2021. All Rights Reserved 9Beyond Technologies LLC User Guide
3.2 Manage Subcategories
To create and manage subcategories, follow steps as laid below:
1. To add new subcategory- Click on Manage Subcategory tile on the homepage
2. Click on the new item link on the list page
3. Enter the desired name of the subcategory
4. Select Category name from the drop down under which you want to place the new subcategory.
5. Click on save button.
6. To go back to the homepage, click on Knowledge management link near SharePoint logo
Figure 10: Sub-category List
Figure 11: Add new Sub-category
Copyright © Beyond Intranet 2021. All Rights Reserved 10Beyond Technologies LLC User Guide
3.3 Manage K-Assets
To add new K-Asset or edit previously added K-Asset, user needs to follow these simple steps mentioned below:
1. Click on Manage K-Assets tile on the homepage to open K-Asset list
2. Click on Add New Item link on the top of the page to add new K-Asset
3. User can add both- Question as well as answer through this link as well.
4. Fill in the question and answer in their respective field.
5. Select category name, subcategory name
6. User should ensure that he/ she should have permissions to add K-Assets for the listed category else, the
message will pop up restricting him to add the K asset.
7. Select expiry date of the K asset, if any. Adding Expiry date means that K asset will not be visible on the front end
after the set date is passed out.
8. Put a Check on the Featured box, if you want to post your K asset in the featured category.
9. Select status from the drop-down. By default, the status for all questions is set to ‘new’.
10. An additional status called “protected” is added which allows KM admin to send answers to the specific user
through email only. If the status of the answer is set to “Protected”, both the question as well as the answer will
not be visible on the frontend as well as in search panel.
11. To attach any document to the K asset, click on browse button, select the documents by going to the relevant
path and click on add.
12. Following are the considerations to add file attachments:
• Only up to 5 files can be attached to a K-Asset.
• There is a size limit of 10 MB on each file.
13. Only following file types are permitted as attachments: MS Word (.doc .docx), MS Excel (.xls & .xslx), MS
PowerPoint (.ppt, .pptx), Images (.jpg, .png. gif, .tiff, .bmp, jpeg, Text (.txt),
14. Click on the save button.
Figure 12: K-Asset List
Copyright © Beyond Intranet 2021. All Rights Reserved 11Beyond Technologies LLC User Guide
3.3.1 To Edit and approve any K-Asset
1. To edit any K-Asset select the K-Asset which you want to edit by clicking on it.
2. Click on the Items tab in the top menu.
3. Click on the Edit Item button.
4. Edit the K-Asset as required
5. Change status to approved and save changes.
Figure 13: Adding new K-Asset
Copyright © Beyond Intranet 2021. All Rights Reserved 12Beyond Technologies LLC User Guide
3.4 Manage Configuration
Only KM administrator have access to the tile. Admin can perform following functions from this section:
1. Can give administration permission rights from this section by adding people’s name here.
2. Can give User permission rights by adding the name in “ask a question” group.
3. Can also control visibility and position of Ask a question button for the users on the front-end panel.
4. Can stop or start automatic email notifications from this section as per their choice.
5. Can enable or disable search of keywords within documents.
6. Can set up default KM add-in theme color.
7. Can set up default K –asset status if they do not want to manage manually every time.
8. Can set up default analytics retention period.
9. Can configure Placeholder text for Ask Question field
10. Can configure placeholder text for the search box.
11. Can enable or disable document attachment in questions.
12. Can set default language or new language for displaying the labels on K-asset page.
Figure 14: Configuration Page
Copyright © Beyond Intranet 2021. All Rights Reserved 13Beyond Technologies LLC User Guide
Figure 15: KM Conjuration page (expanded)
Copyright © Beyond Intranet 2021. All Rights Reserved 14Beyond Technologies LLC User Guide
Let us check out how each function is completed in step-by-step process:
3.4.1 KM Admin User/ group permission rights.
1. Click on the field box of KM admin user/ group
2. Enter first few letters to username whom admin wants to give permissions
3. Select username/ group name from people Picker.
4. Click on save-to reflect the changes.
3.4.2 Ask Question group permission rights
1. Click on the field box of Ask a question group
2. Enter first few letters to username/ group whom admin wants to give permissions to ask questions
3. Select username/ group from the automatic drop down
4. Click on save to reflect the changes
3.4.3 Set default theme
1. Click on the drop-down arrow button for selecting default theme
2. Select the desired theme color from the pre-defined list
3. Click on save button to save changes.
To create your own custom CSS- select Custom CSS theme from the drop-down. You will get a sample CSS file
which is downloadable. You can replace custom theme with your own theme with this file.
3.4.4 Set default K-Asset status
1. Click on the drop-down arrow button for selecting K-Asset default status
2. Select any one status which you want to keep as default.
3. Click on save button
3.4.5 Enable / disable Ask question button
1. To hide or show Ask question button, simply put the indicator button to On or off.
2. Click on save button to save changes
3.4.6 Enable / disable Automatic email notification
1. Automated email notifications are received whenever a new K- asset (question or answer) is added or edited.
2. Admin can stop these email notifications by turning the indicator off.
3. Click on save button.
3.4.7 Activate/ deactivate document search
1. By default, Search of keywords works on K-Assets as well as attached documents.
2. If an admin wants to stop keyword search appearing in documents, Document search indicator should be turned
off.
3. Click on save button
3.4.8 Set default analytics retention period
1. To set default Analytics period in days, tap on the Analytics retention period field box.
2. Enter No. of days for which admin wants to check data, by default.
Click on save button to save changes.
3.4.9 Placeholder text for Ask a Question field
1. To change Placeholder text in Ask a Question field, simply change the text in the “ask question placeholder text”
field.
2. click on save button to save changes.
3. You can review the changes on Ask question pop up window in Knowledge Management tile.
Copyright © Beyond Intranet 2021. All Rights Reserved 15Beyond Technologies LLC User Guide
Figure 16: Placeholder text for Ask a question field
3.4.10 Language Settings
This is one of the latest features we have recently introduced in our Knowledge Management add-in. Your Knowledge
management is now MULTILINGUAL.
KM admin has rights to change KM default view in multiple languages and these settings can be done very easily from the
configuration section of the add-in.
Let us see how to use this multilingual functionality and make changes.
For ease of customers- we have provided 5 in-built languages viz- English (United States), Dutch (Belgium), German
(Germany), French (France) and Spanish (Mexico). Users are free to convert the labels of K-asset search page to any of
these languages directly from the configuration settings in just a single click.
Apart from this, we have also provided flexibility to customers to add any other custom language (other than these five
languages). There is a onetime process to add other language which we will understand here.
Copyright © Beyond Intranet 2021. All Rights Reserved 16Beyond Technologies LLC User Guide
Figure 17: Language settings
3.4.10.1 Auto detect user preference language
Users can set their preferred language on the SharePoint Delve page to any language of their choice and all the
labels on the Knowledge Management will be visible in the preferred language.
Let us see how we can do it:
1. Go to “My Profile” tab from your user profile section.
2. Click on “update profile”
3. Click on the question “How can I add additional information?’
4. Go to link “here”
5. Click on the details button
6. Select “Language and region” from the drop down
7. You can add your preferred language in the “My display languages” section from here.
8. Select language of your choice and move it to the top of the display list. This is mandatory because user
preference will be considered only for the language which is on the top.
9. Click on “Save all and close”
10. You will notice that your Delve profile is now available in the language you had chosen.
Copyright © Beyond Intranet 2021. All Rights Reserved 17Beyond Technologies LLC User Guide
Figure 18: Language and settings on Delve
11. Now on the Knowledge Management configuration page- go to language settings section.
12. Turn the indicator ON for “Auto detect user preference language” button.
13. Now to use your preferred language as the display language on the KM page- it is important that the labels of
the tool are mapped with the display labels in the new language.
Steps to map any language are as follows:
1. If your language is mapped, then – you will find all the fields of “Required Display text” columns filled up with
language of your choice.
2. If your language is not mapped then- fields of “Required Display text” column will appear blank.
3. To map- simply translate each label given in the “Standard Display text” table into your preferred language.
Add this new text in the respective “Required Display text” field by enabling Edit icon.
4. Save the field by clicking on the check mark icon.
5. There are in all around 27 standard display icons.
6. Repeat the process for each one of them until all your standard labels are translated.
7. Click on “Save” button on the top right corner to save changes.
Copyright © Beyond Intranet 2021. All Rights Reserved 18Beyond Technologies LLC User Guide
Figure 19: Mapping Table
To check if your preferred language is applied on the Knowledge Management page, go to Knowledge
management tile.
You will see that all the labels displayed on this tile are now available to you in your preferred language.
Figure 20: Labels in preferred Language
3.4.10.2 Applying one of the In-built languages as default in the tool
Copyright © Beyond Intranet 2021. All Rights Reserved 19Beyond Technologies LLC User Guide
We are providing our Add-in with Inbuilt five main languages such as:
• English (United States)
• Dutch (Belgium)
• French (France)
• German (Germany)
• Spanish (Mexico)
All the labels are already mapped in the backend so it is extremely simple for the admin to set this up as default display
language.
Steps to set up in built language as default language are:
1. Select any language from your Default language drop down.
2. Put “off” Auto detect user preference language
3. Click on “Save” button on the top right corner to save changes.
Figure 21: Set Inbuilt language as default
3.4.10.3 To add a Custom language and make it default
If you want to add a new language which is not in-built, follow the steps below:
1. Select language of your preference from “Manage Language Mapping” section drop down.
2. Now you will see that the “required display text” field for this language appears blank for each respective
“Standard Display text”.
3. Translate and fill in all the required display text labels for your preferred language.
4. Click on save button to save changes.
5. In case you want to reuse same required display texts as used in some other language- select that language in
“Same as “dropdown.
6. System will auto capture all required display text as your “same as” language lists down.
7. Put “make default language” indicator to on if you want to make your custom language as default.
8. Click on save.
9. English is the Default available language in the tool.
Copyright © Beyond Intranet 2021. All Rights Reserved 20Beyond Technologies LLC User Guide
3.4.11 Change Placeholder text for search box field
1. To change Placeholder text in Search box field, simply change the text in the “search box placeholder text”
field.
2. click on save button to save changes.
3. You can review the changes on search box tab in Knowledge Management tile.
Figure 22: Search Box Placeholder text
Figure 23: Placeholder text for search box
3.4.12 Enable or disable document attachment with questions
Users can attach only one document with one question. But this function can be configured as a default setting in Manage
configuration section by KM admin.
1. To enable or disable document attachment in questions simply turn off or turn on the indicator for “Ask
Question Upload attachment”.
2. Save changes.
3.4.13 Advance Search settings- Azure search
To enhance the user experience to one level up we have recently introduced Advanced search options within the K-
assets. This advance search is powered by Azure search services which has a clear benefit over other kind of search
services.
Pre-requisites:
1. It is mandatory for users to have a premium account on Azure Search services.
2. The user responsible for configuring the search service in Azure should have admin authority.
Copyright © Beyond Intranet 2021. All Rights Reserved 21Beyond Technologies LLC User Guide
Steps to configure Azure search within Knowledge management application are as
follows:
1. Configuration needs to be done on Azure search service portal. For this, users need to login to their premium
account on www.portal.azure.com
2. You can share the credentials with our support staff who can easily set up your search service on Azure
platform and create search index
3. A digital key is generated while we set up your service.
4. This key is now entered in a specific field on your SharePoint based Knowledge Management application.
5. To enter Service name and service API key in the application- click on Configuration tile in KM.
Figure 24: Azure search settings configuration
6. Go to Azure search settings tab
7. Here you will get two fields:
a) Service name
b) Service API key.
8. You will also find a button for “Sync Index data”. If you have been using KM add-in since long and have K
assets already existing, sync button can help you transfer all your existing K assets to Azure search services.
9. Click on “Save” to save the changes.
How does the search work?
Azure search services offer two types of searches:
a) Suggestive search
b) Fuzzy or corrective search.
Copyright © Beyond Intranet 2021. All Rights Reserved 22Beyond Technologies LLC User Guide
a) Suggestive search:
This allows web visitors to see search queries based on possible matches for that keyword what they have already
typed into the search box. Usually a drop-down list pops up immediately while typing and you don’t need to hit
on “search” button in order to see common search queries.
As you start typing your first word- it gives you all the matching results existing in the repository which start with
that word.
b) Fuzzy search:
A fuzzy search is done by means of a fuzzy matching program, which returns a list of results based on likely
relevance even though search argument words and spellings may not exactly match. Exact and highly relevant
matches appear near the top of the list.
Suggestive
search
Fuzzy
search
Figure 25: Advance search results
Copyright © Beyond Intranet 2021. All Rights Reserved 23Beyond Technologies LLC User Guide
3.5 Manage Themes
To manage theme colors of the KM webpage, we have provided admin with 5 predefined color themes. Admin is free to
choose any one of their choices and apply.
But if they want to add a new theme and customize the look and feel of the add-in, they can do this in the manage theme
section.
Steps to add external theme are as follows:
1. Click on Manage theme tile on the home page
2. You will get the predefined themes list
3. Click on new item link
4. You will get the field to add your external CSS file URL and give it a Theme title.
5. Insert CSS URL and Theme title.
6. Click on save button to save changes.
To help you create your own Custom CSS, we have provided users with a Sample CSS file which is downloadable.
Users can download this file and convert this CSS file into their desired CSS.
This file is available on Configuration tile of KM.
Figure 26: KM Theme list
Copyright © Beyond Intranet 2021. All Rights Reserved 24Beyond Technologies LLC User Guide
Figure 27: Adding external theme through CSS URL
3.6 Manage Knowledge Management- User Role
This is the main page in the add-in where users can perform sharing and searching for K-Assets. K-Assets are sorted under
pre-defined categories and sub-categories which makes it relatively simple for users to search for a specific answer.
Figure 28: KM User page
Copyright © Beyond Intranet 2021. All Rights Reserved 25Beyond Technologies LLC User Guide
This page is used equally by the KM Administrators as well as normal users. Functions which can be performed on this
page are as follows:
i. Searching for K-Assets
ii. Featured Items
iii. Ask a Question
iv. Automatic Email Notification
v. Question approval process
3.6.1 Searching for K-Assets
Searching for any K-Asset is a very simple process. Let us look at the step-to-step method for it:
1. Click on the search box panel given on the top of the page.
2. Type in the required keyword and click on the search icon to get results.
3. If you want to restrict your search result in only a particular category before performing a search, select
a specific category from the drop-down in the search panel.
4. This way you will get filtered results of the required keyword in the specific category.
5. Keyword search also works on the attached documents as well as individual K asset both.
6. To read full answers for the specific question- click on the + sign to expand answers.
Figure 29: Searching keywords
Copyright © Beyond Intranet 2021. All Rights Reserved 26Beyond Technologies LLC User Guide
3.6.2 Featured Items
While adding K-Assets from the Add manage K-Asset tile, there is a checkbox where you can mark your K asset as
a featured item.
The benefit of adding K asset in featured item list allows K asset to always appear on the front page or on the top
of the search results.
To read all answers for the specific question- click on the + sign to expand answers.
Figure 30: Featured Items and view answer
Copyright © Beyond Intranet 2021. All Rights Reserved 27Beyond Technologies LLC User Guide
3.6.3 Ask a Question
All the users can post their questions in the relevant category. Steps to ask the question are as follows:
1. Click on Ask question button
2. Pop up window opens where you can type the question. Type only one question at a time.
3. Select the Relevant category from the category drop-down.
4. Select the relevant sub-category from the subcategory drop-down.
5. Attach any one relevant document to the question, if any. This is optional.
6. Click on submit to save question.
Figure 31: Ask a Question
To ask a question- user’s name should be added to the Ask a question group with edit permissions on the
SharePoint list.
Copyright © Beyond Intranet 2021. All Rights Reserved 28Beyond Technologies LLC User Guide
3.6.4 Automatic Email Notification
As soon as the user posts a new question, an automatic email notification goes to the KM Admin as well as to the user who
is asking the question. The email has a link which the admin can follow to navigate directly to the add-in.
Following is the email which is sent to the user who is asking a question which the Subject line: Question submitted
Figure 32: Automatic email Notification - Question submitted
On the same question, KM admin also receives an automatic email notification with the link. Following is the content of
the email with the subject line: Question asked.
Figure 33: Automatic email Notification - Question asked
Copyright © Beyond Intranet 2021. All Rights Reserved 29Beyond Technologies LLC User Guide
3.6.5 Question approval process
The newly added question is always stored in the K-Asset list with a default status of “new”. This question will not be
visible on the KM main page until the Administrator approves the question.
To approve the question, the administrator will have to follow these steps:
1. Go to the Manage K-Asset tile on the homepage
2. Click on the tile to open the K Asset List page
3. Click on the newly added question to select it for which administrator wants to change status.
4. Click on the “Items” in the ribbon.
5. The administrator will get a new page where new questions can be answered as well as admin will change the
status of the question from new to approved.
6. Rich text editor is also provided to give your answer the required format.
7. Admin adds an answer to the question along with required document as the attachment.
8. Click on save button to save changes.
Figure 34: Question approval process
Copyright © Beyond Intranet 2021. All Rights Reserved 30Beyond Technologies LLC User Guide
Figure 35: Edit K-Asset
After the question is answered and submitted by the KM admin, User who has posted the question gets a new email
notification with the add-in link. The format of this email with subject line: Answer shared is given below:
Figure 36: Automatic email Notification - Answer Shared
Copyright © Beyond Intranet 2021. All Rights Reserved 31Beyond Technologies LLC User Guide
3.7 Analytics Dashboard
To see the usage pattern of your Knowledge Management, you can see the following data analytics information:
• Page Analytics - pages which are used a maximum number of times.
• Search Analytics - search keywords which are used most.
• User Analytics - users who have used knowledge management most.
Figure 37: Analytics Dashboard
As discussed previously in the guide, you can set your default Analytics retention period from the Manage Configuration
section of KM.
Refer section 3.4.8 for detailed information.
Copyright © Beyond Intranet 2021. All Rights Reserved 32Beyond Technologies LLC User Guide
3.8 Adding KM Web-part (Standard and SPFx)
3.8.1 Adding Standard web-part
KM Admin can create both modern (SPFx) as well as our standard web- part allows the capability to add this application
on SharePoint page or Intranet.
Let us now understand how a standard web part can help a user:
1. Ask a question
2. Search for keywords
3. Read K-Assets
4. Change Title of the add-in for self
5. Change theme for self only
6. Change page size for self
7. Add external theme by adding CSS
8. Add categories (comma separated value) to provide a filter on search.
Figure 38: KM properties tab
Copyright © Beyond Intranet 2021. All Rights Reserved 33Beyond Technologies LLC User Guide
Figure 39: KM Web-part
a) Ask a Question
1. User can simply click on the Ask Question button to post a new question
2. Add category & sub-category to the question
3. Click on Save button.
b) Search for keywords
1. User can simply type in the keyword in the search panel
2. If the search must be made in a specific category, it can be selected from the drop-down on the search
panel.
c) Read K-Assets
1. Click on the + sign in the question tab for which Answer is needed.
2. Answer can be read on the expanded page.
d) Change Title of the add-in for self
1. Click on the Edit web part button on the right-hand side top corner of the web part.
2. On the Right-hand side, a new column expands.
3. Click on the Knowledge management properties tab to expand it.
4. Click on the 1st field where you can enter the new title you want to give to your KM web part.
5. Save changes by clicking on the apply button
e) Change theme of own add-in web-part
1. To Change theme, click on the drop-down arrow in the select theme tab
2. Select the theme of your choice and click on apply
Copyright © Beyond Intranet 2021. All Rights Reserved 34Beyond Technologies LLC User Guide
f) Change page size for self
1. User can customize the appearance of no. of K assets he/ she wants to see on each page.
2. Click on the Page size tab and simply add the number of questions you want to see on each page.
3. Click on apply to save changes.
g) Add external theme by adding CSS
1. If the user wants to add a personal theme which is not listed in the predefined list, then the new theme
can be added by means of adding it through CSS.
2. Simply add the CSS URL in the tab called “External Theme CSS URL” and click on apply.
h) Add categories (comma separated value) to provide a filter on search.
If the user wants to see results of a search with respect to some specific categories and exclude others
from appearing on his own view, then this tab is extremely handy for the same.
1. Simply add all the categories which you want to see in the search with comma separated values.
2. Click on apply to save changes.
2.8.2 Adding Modern (SPFx) web-part
SharePoint online has started moving to modern experience developed using HTML, CSS and JavaScript which reduces the
page load time compared to post back model from classic SharePoint based on ASP .Net. The customizations in modern
sites are supported using SharePoint Framework (SPFx). SPFx is an open and connected platform. We have provided our
Knowledge Management web part users to choose if they want to add modern or standard web-part. Let us have a look
on how to add SPFx web-part in KM.
Pre- requisites:
i) It will work on only those site collections where the KM add-in is installed.
a) How to Install SPFx web-part
1. On KM home page, you will find a tile to “Download SPFx web part”.
2. Click on the tile and SPFx zip file will be downloaded.
3. This zip file will have two components-
i) SPFx package
ii) User guide on how to install SPFx web-part on any SharePoint page.
Let us check out all the steps to install SPFx web part on your site collection in detail.
(To perform this steps, you must have full permission over the SharePoint tenant.)
1. Sign into Office 365 as a global admin or SharePoint admin.
2. Select the app launcher icon in the upper-left and choose Admin to open the Office 365 admin center. (If
you don't see the Admin tile, that means you don't have Office 365 administrator permissions on the
SharePoint tenant).
Copyright © Beyond Intranet 2021. All Rights Reserved 35Beyond Technologies LLC User Guide
Figure 40: O 365 App launcher
3. On the left pane, choose Admin centers > SharePoint.
Figure 41: Admin Center
Copyright © Beyond Intranet 2021. All Rights Reserved 36Beyond Technologies LLC User Guide
4. Select apps on the left pane, and then select App Catalog.
Figure 42: SharePoint admin center
5. On the home page of the App Catalog site, select the tile labeled as ‘Distribute apps for SharePoint’.
Figure 43: App Catalog page
Copyright © Beyond Intranet 2021. All Rights Reserved 37Beyond Technologies LLC User Guide
6. Select New and browse to the SPFx Package you want to upload or drag the app into the library.
Figure 44: Add SPFx package
7. Check the box for “Make this solution available to all sites in the organization”.
Figure 45: Deploy web part
Copyright © Beyond Intranet 2021. All Rights Reserved 38Beyond Technologies LLC User Guide
The SPFx file has been added.
Figure 46: SPFx file added
8. Now, open the site collection where you want to add the web part.
9. Click on the ‘Edit’ button to edit the page on which you want to add this web part.
10. Now click on the + button and search for “Search Knowledge Management” and click on that.
Figure 47: Add KM to SPFx file
Copyright © Beyond Intranet 2021. All Rights Reserved 39Beyond Technologies LLC User Guide
11. SPFx web part is added on the page. Click on the ‘Publish’ button to publish the changes or you can save it as
a draft.
Figure 48: Publish Web part
Properties:
In classic SharePoint, web parts can be configured using the properties, generally referred to as Web Part
properties. In the SPFx world, they are referred to as property panes. The property panes allow controlling
the behavior and appearance of a web part.
Steps to configure properties in SPFx are:
1. Edit the page by clicking on pencil icon
2. Click on ‘Edit the web-part’ icon
3. Property pane opens up.
4. You can edit the add-in title, page size and category of K assets to be displayed on the web part through
the property pane.
Copyright © Beyond Intranet 2021. All Rights Reserved 40Beyond Technologies LLC User Guide
Figure 49: Properties Pane
Benefits of using SPFx web part-
1. Performance: It reduces the page load time compared to post back model from classic SharePoint.
2. UI: The look and feel of the web-part is far cleaner and attractive in comparison to classic
SharePoint.
3. Cost efficient: Development and maintenance are now less expensive
4. Flexible layout: You can choose to display the web part in single, double, or triple column. Flexible
layout patterns are available.
5. Responsive: Controls are responsive
2.8.3 Adding a reference K-asset within another K-asset as a link
Sometimes, user publishes one K-asset and there are few other relevant answers in same or different categories, which
user would like the readers to check, then this can be done by similar adding the link of reference answers in the primary
K-asset.
It is just like a common way of showcasing “other relevant results” or “Also refer similar answers” etc.
Let us see step by step process of adding this type of link in our K-asset.
1. Click on the Knowledge Management tile on the add-in home page
2. Copy the URL from the browser URL panel and save it on a notepad for further editing and using.
Copyright © Beyond Intranet 2021. All Rights Reserved 41Beyond Technologies LLC User Guide
Copy URL
Figure 50: URL to add link to other K-asset
3. On the notepad or WordPad- Paste URL and edit it to create an “Anchor tag” similar to the example
below.
Figure 51: Anchor tag URL
Copyright © Beyond Intranet 2021. All Rights Reserved 42Beyond Technologies LLC User Guide
4. On the URL- search for “&sFilter=” string and type the exact text of the question which you want to
add as a reference into another K-asset.
Eg: …………………………..&sFilter= How can I apply for leave&Theme……
5. You can also add the Category name to which your reference questions belong. This will help you
avoid multiple questions to be added in the link.
Eg: ……………………….&sCat= human resource&sFilter……………………..
6. After you have created your new URL, create an Anchor tag by pasting your URL in the below HTML
tag and in place of “place holder text” , you can use the text which you want your readers to click on
– like ‘read more’, ‘other relevant results’ or anything which you want to use.
Place holder text
7. Save this on your notepad.
8. Now click on Manage K-assets tile on home page and search for your primary K-asset into which the
reference answer has to be linked.
9. Click on edit button of that K-asset.
Figure 52: Edit K-Asset
10. Click on the source button.
Copyright © Beyond Intranet 2021. All Rights Reserved 43Beyond Technologies LLC User Guide
Figure 53: Edit HTML editor tag
11. This will open up the HTML preview text of the answer section. Now here you have to select the
anchor tag and make edits.
Figure 54: Replace anchor tag with updated tag
Copyright © Beyond Intranet 2021. All Rights Reserved 44Beyond Technologies LLC User Guide
12. Now simply copy your Anchor tag which you created earlier in the step no 6 and paste in place of
the selected tag.
13. Click on the save button and refresh your browser URL to get the desired link of reference K-asset
linked to main K-asset.
Figure 55: Reference link added
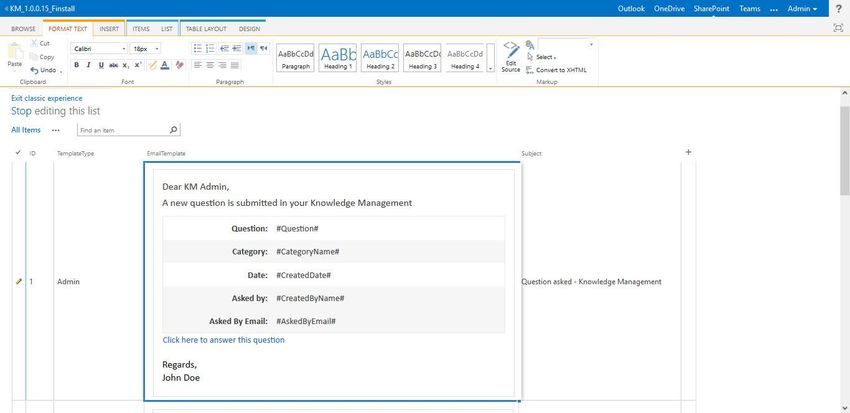
3.9 Manage Email Templates
KM admin now has the permission to customize all the content of various automated Email templates which are sent
across by the system.
To customize email templates, follow steps mentioned below:
1. Click on the Manage Email templates tile
2. You will open the Share Point list where all the default templates are displayed.
3. Click on the edit button on the top of the list. And YOU will be allowed to edit the text which is not written
between the Hashtags (#) or the Static content.
4. Text between the Hashtags represents text which is dynamic in nature and is picked up from the inputs in the
system. This cannot be edited.
5. Save changes before moving ahead will set your default email content as per your customization requirement.
Copyright © Beyond Intranet 2021. All Rights Reserved 45Beyond Technologies LLC User Guide
Figure 56: Manage Email templates
3.10 Refer Help Instruction page, product page and contact us for support.
Users can easily reach our crisp Help Instruction page from the second tile on the home page. This page provides quick
insights about how processes are performed in the KM add-in and this can be of great help for beginners.
To know more about our app, you can also refer our product page: https://www.beyondintranet.com/sharepoint-
knowledge-management
After referring to the help instruction page or this user guide, if you are stuck on any of the processes, our Contact us tile
can easily navigate you to the inquiry form. We encourage you to connect with us with any kind of questions or
suggestions you have, and we’d love to listen and respond to them.
Enjoy Knowledge sharing! Thank you!
Copyright © Beyond Intranet 2021. All Rights Reserved 46You can also read