USER GUIDE Microsoft Cloud Assessment Instructions to Perform a Microsoft Cloud Assessment - RapidFire ...
←
→
Page content transcription
If your browser does not render page correctly, please read the page content below
USER GUIDE
Microsoft Cloud Assessment
Instructions to Perform a Microsoft Cloud Assessment

                                                       9/20/2021 3:12 PM
Network Detective                   Microsoft Cloud Assessment Module — User Guide

Contents
  Performing a Microsoft Cloud Assessment                                        4

   Microsoft Cloud Assessment Overview                                           4
     What Does the Microsoft Cloud Assessment Cover?                             4
     What Does the Microsoft Cloud Assessment Do?                                4
     What You Will Need                                                          6
   Step 1 — Download and Install the Network Detective Application               7
   Step 2 — Create a New Site                                                    7
   Step 3 — Start a Microsoft Cloud Assessment Project                           8
     Use the Microsoft Cloud Assessment Checklist                               10
   Step 4 — Run the Cloud Data Collector                                        10
   Step 5 — (Optional) Document Compensating Controls                           15
   Step 6 — Generate Reports                                                    16

  Microsoft Cloud Assessment Reports                                           19

  Appendices                                                                   22

   Pre-Scan Network Configuration Checklist                                     23
     Checklist for Domain Environments                                          23
     Checklist for Workgroup Environments                                       25
   Completing Worksheets and Surveys                                            28
     Entering Assessment Responses into Surveys and Worksheets                  28
     Add Image Attachments to Surveys and Worksheets                            29
     Add SWOT Analysis to Surveys and Worksheets                                30
     Time Savings Tip to Reduce Survey and Worksheet Data Input Time            31
       Use the InForm Worksheet Tool Bar                                        31
       Bulk Entry for InForm Worksheets                                         31
       Create Word Response Form                                                34
          Important Note on Working with Word Response Forms                    35
       Import Word Response Form                                                36
   Integrate Network Detective with a PSA System                                38

                                                                                 2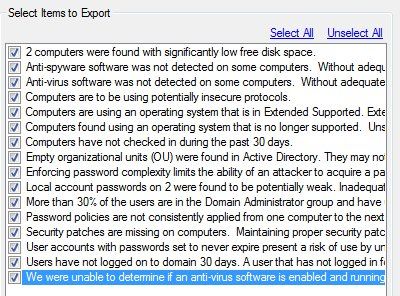
Step 1 — Gather Credentials and Set Up your PSA System                            38
Step 2 — Create a Connection Between Network Detective and Target PSA             40
Create Tickets from Assessment Issues and Recommendations from Network
Detective to PSA                                                                  43
Set Up Autotask Integration                                                       47
Set Up ConnectWise REST Integration                                               52
  Step 1 — Download and Install the ConnectWise Manage Internet Client Application 52
  Step 2 — Select the ConnectWise Ticket System API Member Account to Integrate
  with                                                                          52
  Create Minimum Permissions Security Role for API Member                         53
  Step 3 — Create an API Key in the ConnectWise Ticketing System                  54
  Step 4 — Configure Service Tables in ConnectWise                                54
Set Up ConnectWise SOAP Integration                                               56
Set Up Kaseya BMS Integration                                                     58

                                                                                   3
Network Detective                            Microsoft Cloud Assessment Module — User Guide

Performing a Microsoft Cloud Assessment

Microsoft Cloud Assessment Overview
 Network Detective’s Microsoft Cloud Assessment Module combines 1) automated
 data collection with 2) a structured framework for documenting your assessment. To
 perform a Microsoft Cloud Assessment, you will:

     l   Download and install the required tools
     l   Create a site and set up a Microsoft Cloud Assessment project
     l   Collect Microsoft Cloud Assessment data using the Network Detective Checklist
     l   Generate Microsoft Cloud Assessment reports

What Does the Microsoft Cloud Assessment Cover?
 This module helps you manage and assess risk across your entire Microsoft Cloud
 Assessment deployment. It assesses and documents several components, including:

     l   Microsoft 365 Cloud Services
             o   Office 365
             o   Teams
             o   SharePoint
             o   OneDrive (does not scan file content)
             o   Outlook/Exchange (does not scan email content)
     l   Microsoft Azure Cloud Services
             o   Azure Active Directory

What Does the Microsoft Cloud Assessment Do?
 As the computing world steadily moves more resources into the Cloud, it’s getting
 increasingly difficult for MSPs and other IT professionals to manage assets and
 configurations that are no longer physically present . . . and that they don’t have complete
 control over. By periodically running a full assessment on each Microsoft Cloud
 environment, MSPs can provide themselves, and their clients, with essential reports that
 will help control the flow, privacy, and security of the organization’s data.

  © 2021 RapidFire Tools, Inc. All rights reserved.

                                                                                            4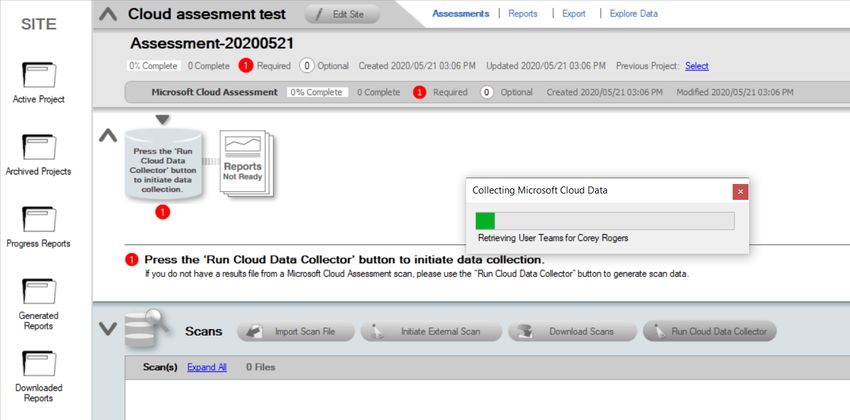
Microsoft Cloud Assessment Module — User Guide                              Network Detective

Having all this information, organized and at your fingertips, is essential for:

   l   A new technician who's trying to get a handle on the Microsoft Cloud environment
   l   A Cloud administrator who is trying to hunt down a misconfiguration that’s causing
       problems
   l   An MSP who needs to scope a proposal for a prospective new client
   l   Curbing the sprawl and potential HR headaches of Teams, SharePoint, and
       OneDrive

                                                    © 2021 RapidFire Tools, Inc. All rights reserved.

                                                                                                   5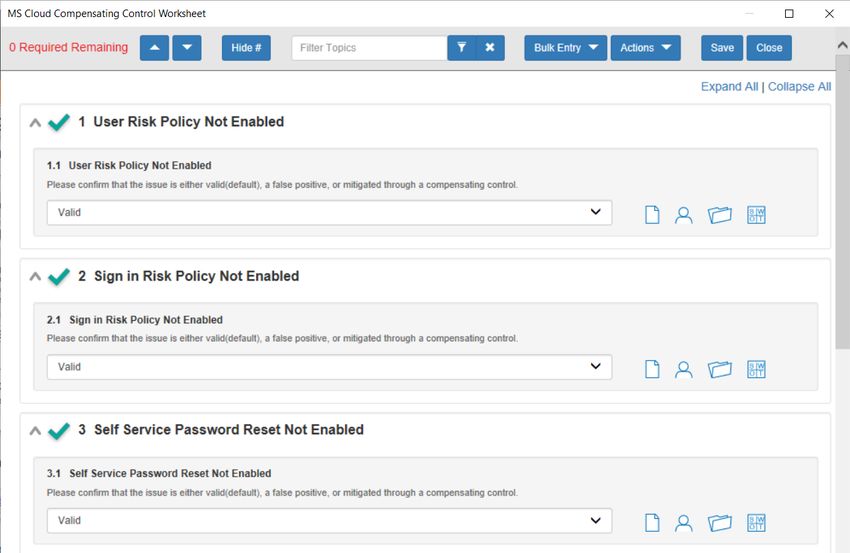
Network Detective                            Microsoft Cloud Assessment Module — User Guide

What You Will Need
 In order to perform a Microsoft Cloud Assessment, you will need the following
 components:

   Note: You can access these at https://www.rapidfiretools.com/nd.

   Microsoft Cloud
   Assessment            Description
   Component

   Network               The Network Detective Application and Reporting Tool guides you through the
   Detective             assessment process from beginning to end. You use it to create sites and
                         assessment projects, configure and use appliances, import scan data, and
                         generate reports. The Network Detective Application is installed on your
                         workstations/laptops; it is not intended to be installed on your client or prospect
                         sites.

   Admin                 You must have admin credentials for an admin role user who is a member of the
   Credentials for       Microsoft 365 tenant to be assessed. You will use these credentials to grant
   Microsoft 365         permission for Network Detective to connect to the Microsoft Graphs API. The
   tenant to be          following roles have been verified to work to create this connection:
   assessed
                         • Privileged role admin (Recommended)
                         • Cloud application admin (Recommended)
                         (Using one these roles will only grant permissions to the individual users who
                         enter their credentials to perform the scan.)
                         • Global admin (Using the Global admin role will grant scanning permissions to
                         all non-admin users in the Microsoft 365 tenant who have access to the Site in
                         Network Detective.)

                         If you attempt to sign in with another type of admin role than those listed
                         above, you will be unable to grant the necessary permissions.

                         See Assign Admin Roles in the Microsoft 365 documentation for more details.

  © 2021 RapidFire Tools, Inc. All rights reserved.

                                                                                                               6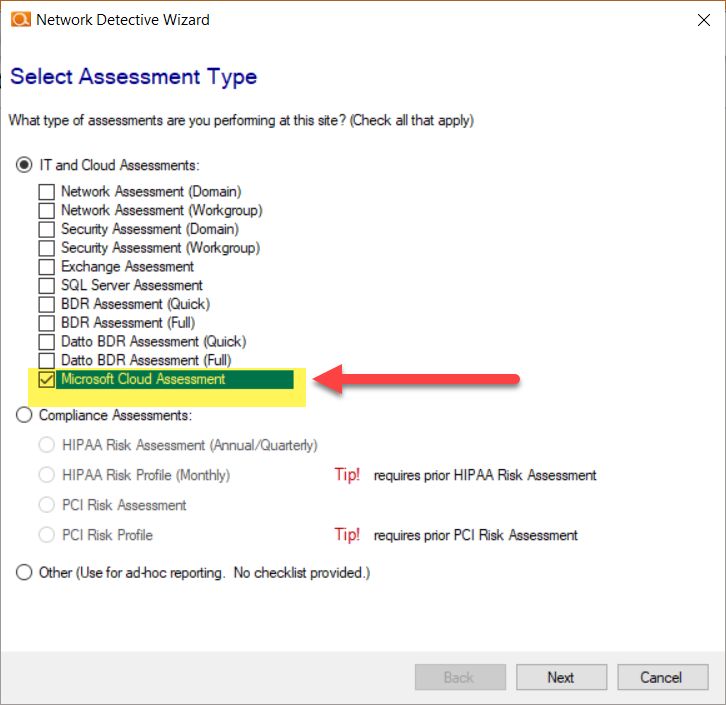
Microsoft Cloud Assessment Module — User Guide                         Network Detective

 Follow these steps to perform a Microsoft Cloud Assessment:

Step 1 — Download and Install the Network Detective
Application
   1. Visit https://www.rapidfiretools.com/nd. Download and install the Network Detective
      Application.
   2. Open the app and log in using your credentials.

Step 2 — Create a New Site
 To create a new site:

   1. Click New Site to create a new Site for your assessment project.

                                                 © 2021 RapidFire Tools, Inc. All rights reserved.

                                                                                                7
Network Detective                            Microsoft Cloud Assessment Module — User Guide

    2. Enter a Site Name and click OK.

Step 3 — Start a Microsoft Cloud Assessment Project
    1. From within the Site Window, click Start to begin the assessment.

    2. Next, select IT and Cloud Assessments, and then select Microsoft Cloud
       Assessment.

  © 2021 RapidFire Tools, Inc. All rights reserved.

                                                                                            8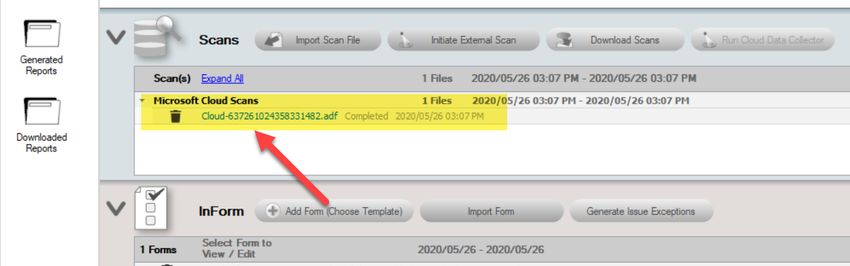
Microsoft Cloud Assessment Module — User Guide                        Network Detective

 3. Then follow the prompts presented in the Network Detective Wizard to start the new
    Assessment.

                                              © 2021 RapidFire Tools, Inc. All rights reserved.

                                                                                             9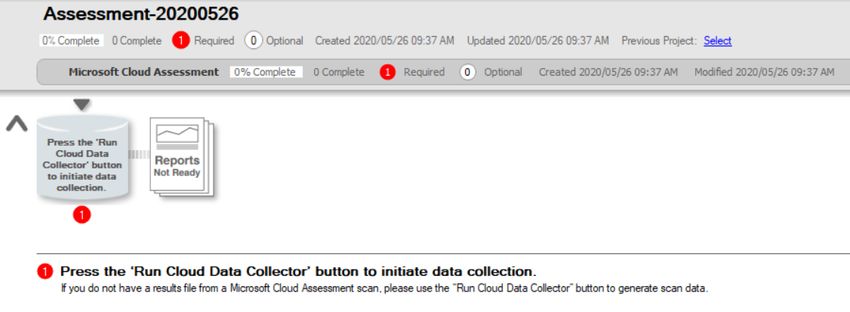
Network Detective                            Microsoft Cloud Assessment Module — User Guide

Use the Microsoft Cloud Assessment Checklist
  Once you begin the Microsoft Cloud Assessment, a Checklist appears in the
  Assessment Window. The Checklist presents the Required         and Optional      steps
  that are to be performed during the assessment process. The Checklist will be updated
  with additional steps to be performed throughout the assessment process.

  Complete the required Checklist Items in the exact numerical order presented. Use the
  Refresh Checklist feature to guide you through the assessment process at each step
  until completion.

  When you complete a step, that item will be updated with a green check mark         in the
  checklist. Different assessment types have a different number of steps to complete.

  You may also print a copy of the Checklist for reference purposes by using the Printed
  Checklist feature.

Step 4 — Run the Cloud Data Collector

  © 2021 RapidFire Tools, Inc. All rights reserved.

                                                                                           10
Microsoft Cloud Assessment Module — User Guide Network Detective
Note: Before you can Run the Cloud Data Collector, you need admin credentials for
the Microsoft 365 tenant to be assessed.
1. To start your assessment, click Run Cloud Data Collector under Scans.
A Microsoft login window will appear.
2. Enter admin credentials for the Microsoft Cloud environment to be assessed. To do
this, click Use Another Account.
3. Consent to the permissions needed for Network Detective to scan the Microsoft
© 2021 RapidFire Tools, Inc. All rights reserved.
11Network Detective Microsoft Cloud Assessment Module — User Guide
Cloud environment. Check the box and click Accept.
© 2021 RapidFire Tools, Inc. All rights reserved.
12Microsoft Cloud Assessment Module — User Guide Network Detective
Note: If you attempt to sign in with an account that does not have the required
admin access, you will be prompted to sign in with an admin account. See
"Admin Credentials for Microsoft 365 tenant to be assessed" on page 6 for the
specific admin roles.
The scan will begin and a progress window will appear. This process may take
several minutes.
When the scan completes, the "Run Cloud Data Collector" step will be marked
complete in the Checklist.
© 2021 RapidFire Tools, Inc. All rights reserved.
13Network Detective Microsoft Cloud Assessment Module — User Guide
At the same time, the data file will appear in the Scans menu under Microsoft Cloud
Scans.
The optional Compensating Controls Worksheet will then become available to
complete.
Finally, you can choose to generate reports based on the current scan data without
choosing to enter information on Compensating Controls.
© 2021 RapidFire Tools, Inc. All rights reserved.
14Microsoft Cloud Assessment Module — User Guide Network Detective
Step 5 — (Optional) Document Compensating Controls
Next, complete the optional Compensating Controls Worksheet (CCW). While not
necessary to generate reports, the CCW details security exceptions that will be (or have
been) implemented to mitigate risks in the cloud environment. Here you can document
and explain why various discovered items are not true issues and possible false positives.
1. Double click on the Compensating Controls Worksheet from the assessment
checklist.
2. Ensure you save your changes to the form before you close it.
© 2021 RapidFire Tools, Inc. All rights reserved.
15Network Detective Microsoft Cloud Assessment Module — User Guide
3. You may add notes, respondent names, SWOT details, responses, and file
attachments.
When you complete all of the fields, this step will appear as complete in the check
list.
Step 6 — Generate Reports
1. From your site, click the Reports Ready button at the end of the assessment
checklist.
2. Select which of the Microsoft Cloud Assessment reports that you want to generate.
© 2021 RapidFire Tools, Inc. All rights reserved.
16Microsoft Cloud Assessment Module — User Guide Network Detective
You can use the Reports drop-down menu to filter reports related to the active
assessment project, reports that are ready to generate, or to browse all available
reports.
3. Click the Create Reports button and follow the prompts to generate the reports you
selected.
i. If you have not previously edited your Report Preferences, you will be
prompted to do so before generating reports.
Tip: See the Network Detective User Guide for instructions on how to customize your
reports with your company's branding.
Click Generated Reports from the left-hand Site menu to access previously generated
reports. Double click a set of assessment reports to open the folder in Windows Explorer.
© 2021 RapidFire Tools, Inc. All rights reserved.
17Network Detective Microsoft Cloud Assessment Module — User Guide
© 2021 RapidFire Tools, Inc. All rights reserved.
18Microsoft Cloud Assessment Module — User Guide Network Detective
Microsoft Cloud Assessment Reports
The Microsoft Cloud Assessment Module can generate the following reports and
supporting documents:
Report Name Description
Azure AD Detail The Azure AD Detail Report goes through the entire Azure Active
Report Directory environment and documents all organizations, domains, and
support services that are turned on for the AD environment. Every
detail is presented in line-item fashion in an editable report document,
including: installed special applications, web URLs to those apps,
organizational contacts, distribution lists, proxy addresses, Microsoft
service plans and SKUs being used, groups, users, permissions,
devices, and more. The report is organized by section with a table of
contents to help you locate the specific findings of interest, and
problem areas are conveniently highlighted in red, making it easy to
spot individual problems to be rectified.
Cloud The Cloud Management Plan takes issues identified in the Risk
Management Report, organizes them by severity, and includes specific
Plan recommendations on how to remediate them. The report’s information
is pulled directly from the Microsoft controls from multiple Cloud
components, including SharePoint, OneDrive, Teams, Azure AD itself.
It also identifies other types of issues related to misconfigurations and
operations.
Cloud Risk The Cloud Risk Report, like the Risk Reports in all of our other Network
Report Detective modules, spans all of the Microsoft Cloud components. It
includes an overall Risk Score, an overall Issues Score, as well as a
summary list of issues discovered. The issues come from both the
Microsoft controls as well as other best practices. It identifies specific
risks that are due to misconfigurations as well as risks created from
turning on or off specific running components.
Compensating The report is used present the details associated with security
Control exceptions and how Compensating Controls will be or have been
Worksheet implemented to mitigate risks in the cloud environment. Here you can
explain document and explain why various discovered items are not
true issues and possible false positives. The benefit of this feature is
that it adds back in the human element into the assessment and allows
for explanation of special circumstances and specific environment
© 2021 RapidFire Tools, Inc. All rights reserved.
19Network Detective Microsoft Cloud Assessment Module — User Guide
Report Name Description
requirements. The Compensating Controls Worksheet does not
alleviate the need for safe guards but allows for description of
alternative means of mitigating the identified security risk.
Microsoft Cloud The Microsoft Cloud Configuration Change Report is a very detailed
Configuration technical report that identifies entity and configuration changes. The
Change Report changes are grouped by properties, showing the old values vs. the
new values, and then the changes are grouped together into bands
called “Change Sets.” This report gives you the ability to look at a
group of changes together, as well as see how all the properties have
changed for that particular time period. This is useful for change
management and for capturing and documenting unwanted changes in
the event you need to roll back those changes in the user interface.
Microsoft Cloud The Microsoft Cloud Security Assessment report brings together all of
Security the security aspects of Microsoft Cloud under one umbrella. It not only
Assessment includes your own Microsoft Control Score and Secure Score from
Microsoft; it also shows your trending against the average score of
your peers.
Microsoft The Microsoft Teams Assessment Report provides detail about each
Teams team in the system, including who the owners are, what channels they
Assessment have, and what kind of user identity audits have been conducted on the
Report channels. There are individual entries that can be used for audits of the
member settings, the guest settings, the message settings, the fun
settings, the tab settings. This information goes beyond the Microsoft
security score controls and includes other types of misconfigurations
that might cause security problems, such as having guest members
that are able to remove and delete channels.
OneDrive The OneDrive Assessment Report provides a high-level summary
Assessment report of all OneDrive usage. This is critical to know, since it includes
Report every user the system has, all the Teams, and all the sites created by
the client. This overview report gives you a solid handle on how the
OneDrive platform is growing, and looks for spikes in that growth that
need to be managed. It also looks for spikes in activity that may need
to be investigated. The report provides trends over of 30-, 60-, and 90-
day increments to give you a solid indicator of storage and bandwidth
utilization.
Outlook Mail The Outlook Mail Activity Report is the perfect complement to the
Activity Report Network Detective Exchange Assessment module, which provides
© 2021 RapidFire Tools, Inc. All rights reserved.
20Microsoft Cloud Assessment Module — User Guide Network Detective
Report Name Description
deep dive information about Office 365 usage. The Outlook Mail
Activity Report provides a high-level summary of what emails are being
sent and received by your top 10 active senders and active receivers
for the reporting period. This report is meant to be run month-over-
month to identify the power users who may need more capacity, and
which mailboxes are not being read at all and likely represent recently
inactive users that need to be cleaned up.
SharePoint The SharePoint Assessment Report is a detailed assessment that
Assessment shows the total number of sites started under management, how many
Report active SharePoint sites there are, what storage requirements there
are, and includes daily trends in the number of sites and storage
usage. It then takes the site collections and breaks down all the
individual sites so you can understand what is being published in each,
how they are organized, and even what groups they contain. Among
other things, the report helps understand growth trends and better
predicts backup needs.
© 2021 RapidFire Tools, Inc. All rights reserved.
21Network Detective Microsoft Cloud Assessment Module — User Guide
Appendices
Refer to the appendices listed below for the supplementary information referenced in this
user guide:
Pre-Scan Network Configuration Checklist 23
Checklist for Domain Environments 23
Checklist for Workgroup Environments 25
Completing Worksheets and Surveys 28
Entering Assessment Responses into Surveys and Worksheets 28
Add Image Attachments to Surveys and Worksheets 29
Add SWOT Analysis to Surveys and Worksheets 30
Time Savings Tip to Reduce Survey and Worksheet Data Input Time 31
Use the InForm Worksheet Tool Bar 31
Bulk Entry for InForm Worksheets 31
Create Word Response Form 34
Import Word Response Form 36
Integrate Network Detective with a PSA System 38
Step 1 — Gather Credentials and Set Up your PSA System 38
Step 2 — Create a Connection Between Network Detective and Target PSA 40
Create Tickets from Assessment Issues and Recommendations from Network Detective to
PSA 43
Set Up Autotask Integration 47
Set Up ConnectWise REST Integration 52
Step 1 — Download and Install the ConnectWise Manage Internet Client Application 52
Step 2 — Select the ConnectWise Ticket System API Member Account to Integrate with 52
Create Minimum Permissions Security Role for API Member 53
Step 3 — Create an API Key in the ConnectWise Ticketing System 54
Step 4 — Configure Service Tables in ConnectWise 54
Set Up ConnectWise SOAP Integration 56
Set Up Kaseya BMS Integration 58
© 2021 RapidFire Tools, Inc. All rights reserved.
22Microsoft Cloud Assessment Module — User Guide Network Detective
Pre-Scan Network Configuration Checklist
RapidFire Tools products can gather a great deal of information from the target network
with little advance preparation – and with very little footprint! However, if you are having
trouble with scans, or you have the ability to configure the target network in advance, we
recommend the settings below.
These checklists detail the recommended network configurations for both Windows
Domain and Workgroup environments.
Note: You must have the .NET 3.5 framework installed on machines in order to use all
data collector and server/appliance tools.
Checklist for Domain Environments
Share this checklist with your IT Administrator and ask them to configure your network's
Domain Controller as follows:
Complete Domain Configuration
GPO Configuration for Windows Firewall (Inbound Rules)
Allow Windows Management Instrumentation (WMI) service to operate through
Windows Firewall
This includes the following rules:
l Windows Management Instrumentation (ASync-In)
l Windows Management Instrumentation (WMI-In)
l Windows Management Instrumentation (DCOM-In)
Allow File and printer sharing to operate through Windows Firewall
This includes the following rules:
l File and Printer Sharing (NB-Name-In)
l File and Printer Sharing (SMB-In)
l File and Printer Sharing (NB-Session-In)
Enable Remote Registry “read only” access on computers targeted for scanning.
© 2021 RapidFire Tools, Inc. All rights reserved.
23Network Detective Microsoft Cloud Assessment Module — User Guide
Complete Domain Configuration
Note: Remote Registry access should be restricted for use by the user access
account credentials to be used during network and local computer scan.
Enable the Internet Control Message Protocol (ICMP) to allow authorized ICMP echo
request messages and ICMP echo reply messages to be sent and received by
Windows computers and network devices.
Windows firewall rules on Windows computers may need to be created/enabled to
allow a computer:
l operating a Kaseya-RapidFire Tools product network data collector to issue
ICMP echo request messages to be sent to Windows computers and network
devices
l to send ICMP echo reply messages in response to an ICMP echo request
Note: ICMP requests are used to detect active Windows computers and network
devices to scan.
GPO Configuration for Windows Services
Windows Management Instrumentation (WMI)
• Startup Type: Automatic
Windows Update Service
• Startup Type: Automatic
Remote Registry
• Startup Type: Automatic
Remote Procedure Call
• Startup Type: Automatic
Network Shares
• Admin$ must be present and accessible using supplied credentials (usually a local
admin or user in the local Computer's Administrative Security group)
© 2021 RapidFire Tools, Inc. All rights reserved.
24Microsoft Cloud Assessment Module — User Guide Network Detective
Complete Domain Configuration
3rd Party Firewalls
• Ensure that 3rd party Firewalls are configured similarly to Windows Firewall rules
described within this checklist.
Note: This is a requirment for both Active Directory and Workgroup Networks.
Checklist for Workgroup Environments
Before you perform a workgroup assessment, run the following PowerShell commands
on the target network and the machine that will perform the scan. These three
configurations should help you avoid most issues in a workgroup environment. Each
command is followed by an explanation and link to Microsoft documentation.
1. reg add
HKLM\SOFTWARE\Microsoft\Windows\CurrentVersion\Policies\syst
em /v LocalAccountTokenFilterPolicy /t REG_DWORD /d 1 /f
By default, UAC only allows remote administration tasks to be performed by the
Built-in Administrator account. To work around this, this command sets the
LocalAccountTokenFilterPolicy registry key to 1. This allows any local admin to
perform remote administrative tasks (i.e. access to system shares C$, Admin$,
etc.).
https://support.microsoft.com/en-us/help/951016/description-of-user-account-
control-and-remote-restrictions-in-windows
2. netsh advfirewall firewall set rule group="windows
management instrumentation (wmi)" new enable=yes
This command creates an Inbound firewall rule to allow access to the WMI service
and namespaces.
https://docs.microsoft.com/en-us/windows/win32/wmisdk/connecting-to-wmi-
remotely-starting-with-vista
3. netsh advfirewall firewall set rule group="File and Printer
Sharing" new enable=Yes
© 2021 RapidFire Tools, Inc. All rights reserved.
25Network Detective Microsoft Cloud Assessment Module — User Guide
This command creates an Inbound firewall rule which enables File and Printer
Sharing on the machine. File and printer sharing is required in order to access the
Admin$ share on remote machines.
https://answers.microsoft.com/en-us/windows/forum/all/turning-on-file-and-printer-
sharing-windows-10/bb3066eb-f589-4021-8f71-617e70854354
You can also share this checklist with your IT Administrator and ask them to configure
each computer in your workgroup as follows:
Complete? Workgroup Configuration
Network Settings
• Admin$ must be present on the computers you wish to scan, and be
accessible with the login credentials you provide for the scan
• File and printer sharing must be enabled on the computers you wish to scan
• Ensure the Windows Services below are running and allowed to communicate
through Windows Firewall:
• Windows Management Instrumentation (WMI)
• Windows Update Service
• Remote Registry
• Remote Desktop
• Remote Procedure Call
• Workgroup computer administrator user account credentials.
Note: Before configuring scan settings for workgroups, prepare a list of the
workgroup computer(s) adminstrator user account credentials for entry into the
scan settings wizard.
Enable the Internet Control Message Protocol (ICMP) to allow authorized ICMP
echo request messages and ICMP echo reply messages to be sent and received by
Windows computers and network devices.
Windows firewall rules on Windows computers may need to be created/enabled to
allow a computer:
© 2021 RapidFire Tools, Inc. All rights reserved.
26Microsoft Cloud Assessment Module — User Guide Network Detective
Complete? Workgroup Configuration
l operating a Kaseya-RapidFire Tools product network data collector to issue
ICMP echo request messages to be sent to Windows computers and
network devices
l to send ICMP echo reply messages in response to an ICMP echo request
Note: ICMP requests are used to detect active Windows computers and
network devices to scan.
© 2021 RapidFire Tools, Inc. All rights reserved.
27Network Detective Microsoft Cloud Assessment Module — User Guide
Completing Worksheets and Surveys
Throughout the assessment process, assessment data is gathered though the use of
automated scans and by documenting information in a series of surveys and worksheets.
These surveys and worksheets are dynamically generated when the assessment is
initially started and when data is collected throughout the assessment process.
Assessment response data is collected through:
l use of automated scans
l importing responses from Word documents
l typing the information directly into surveys and worksheets forms
Entering Assessment Responses into Surveys and Worksheets
Throughout the assessment process a number of Surveys and Worksheets will be
generated and require completion.
EXAMPLE:
To complete an InForm worksheet (or survey or questionnaire), follow these steps:
i. Review the Topic (i.e. the specific field or question within the form).
ii. Review the Instructions. The instructions appear immediately below the topic
label. Instructions provide guidance and are not included in the reports.
iii. Enter the Response. There are three types of responses:
© 2021 RapidFire Tools, Inc. All rights reserved.
28Microsoft Cloud Assessment Module — User Guide Network Detective
Response
Description Example Use
Type
Text Free-form text response "Describe the condition of the data
Response center."
Multiple Multiple fixed responses "Does the firewall have IPS?"
Choice (Yes/No)
Checklist An item that is marked off if "Check the security of the door
Item completed locks."
Note: With few exceptions, you must respond to each form entry to
complete the all of the surveys within the Microsoft Cloud Assessment
process.
iv. (Optional) Enter any Notes relevant to the topic’s response.
v. (Optional) Enter the name of Respondent (i.e. the person who provided you
with the information, if applicable).
vi. (Optional) Add any relevant Attachments. See "Add Image Attachments to
Surveys and Worksheets" below for more details.
Note: Only image attachments (.png, .jpg) are supported at this time.
vii. (Optional) Add a SWOT Analysis, examining Strengths, Opportunities,
Weaknesses, and Threats. See "Add SWOT Analysis to Surveys and
Worksheets" on the facing page for more details.
viii. Save your answers periodically and Save and Close when you are done.
Add Image Attachments to Surveys and Worksheets
You can add images to worksheets and surveys. You might include pictures of key
personnel or diagrams that explain certain security exceptions.
Attachments can be added to each item or question listed in a worksheet. To do this:
1. Open the InForm in your assessment in Network Detective.
2. Underneath an InForm item, click on the folder icon.
© 2021 RapidFire Tools, Inc. All rights reserved.
29Network Detective Microsoft Cloud Assessment Module — User Guide
3. Click Add.
4. Select the attachment from your computer and click Open.
5. Continue adding attachments until you are finished.
Note: Once you complete your assessment and generate reports, your attached
images will appear alongside the form item in the published report and/or
supporting document.
Add SWOT Analysis to Surveys and Worksheets
The IT SWOT analysis is a structured method used to evaluate the Strengths,
Weaknesses, Opportunities, and Threats affecting an IT network. The analysis involves
identifying internal and external issues that are favorable and unfavorable to increasing
the overall network health and security of the environment.
To add SWOT to your inform items:
1. Open the InForm in your active assessment in Network Detective.
2. Underneath an InForm item, click on the SWOT icon.
3. Fill in the required fields for each SWOT entry:
l Bullet Point: Enter a short description of the issue here.
l Key Point: Check this to make the entry appear in the SWOT table in the
report. Otherwise, it will appear with the rest of the issues in the SWOT list in
the report.
4. When you have finished entering all SWOT items for an InForm, click Actions and
select Generate IT SWOT Report.
© 2021 RapidFire Tools, Inc. All rights reserved.
30Microsoft Cloud Assessment Module — User Guide Network Detective
Note: A folder will open with your generated IT SWOT Report. You must
generate this report separately for each InForm in your assessment.
Time Savings Tip to Reduce Survey and Worksheet Data Input Time
Use the InForm Worksheet Tool Bar
Use the InForm tool bar to save time when completing worksheets.
Bulk Entry for InForm Worksheets
InForm allows you to enter bulk responses for worksheet questions. Note that you can
only enter bulk responses for questions that require the same types of responses. To use
the bulk entry feature:
© 2021 RapidFire Tools, Inc. All rights reserved.
31Network Detective Microsoft Cloud Assessment Module — User Guide
1. Click Bulk Entry from the Inform tool bar.
Check boxes will appear next to the response topics.
2. Select the check boxes for the topics for which you wish to enter bulk responses.
© 2021 RapidFire Tools, Inc. All rights reserved.
32Microsoft Cloud Assessment Module — User Guide Network Detective
Note: You can select individual topics, or you can click the check box next to the
section heading to select all topics within the section. You can also Filter topics
using terms like "Admin." Note that each topic within the section must require the
same types of responses in order to enter bulk responses.
3. Select the response from the Bulk Entry menu. You can likewise enter any relevant
notes or the name of a respondent.
4. Then click Apply to Selected.
© 2021 RapidFire Tools, Inc. All rights reserved.
33Network Detective Microsoft Cloud Assessment Module — User Guide
Your chosen response will be entered into the selected topics.
Create Word Response Form
You can export InForm worksheets in your assessment project to Word. This allows you
or others to complete worksheets without using Network Detective. For example, you can
create a Word response form and send it to a client at a site. The client can then help you
gather the required information and enter it in the response form.
Important: In order to import your data, you must enter your responses in the fields
contained in the Word document. See "Important Note on Working with Word
Response Forms" on the next page for detailed instructions.
To create a Word response Form:
1. From the Active Assessment screen in Network Detective, open the worksheet that
you want to export to Word.
2. From the InForm tool bar, click Actions.
a. Click Blank Response Form to generate a Word document with blank fields
ready for data entry.
b. Click Populated Response Form to generate a Word document with the
© 2021 RapidFire Tools, Inc. All rights reserved.
34Microsoft Cloud Assessment Module — User Guide Network Detective
responses already entered using InForm.
3. Select the location to save the file. Click Save.
A confirmation message will appear.
Important Note on Working with Word Response Forms
When you export a Word response form from your assessment, keep in mind the
following important tips:
l DO NOT DELETE the field controls embedded in the response form! The response
fields appear in the images below for your reference:
Important: If you delete these fields, your data cannot be imported into the
assessment!
Multiple choice response field
Text response field
© 2021 RapidFire Tools, Inc. All rights reserved.
35Network Detective Microsoft Cloud Assessment Module — User Guide
l You must use the Word fields to enter your responses. Any content you enter not
included in these fields will not be imported into your assessment.
Import Word Response Form
You can import a Word response form into your assessment using InForm. This allows
you to collaborate with others to gather information and complete worksheets.
EXAMPLE:
Step 1: Create/export a Word response form for one of the worksheets in your
assessment.
Step 2: Send it to a client to enter additional information about the site using Word.
Step 3: The client can then send you the worksheet as an email attachment.
Step 4: Import the Word document back into your assessment with the client's
responses and make any final changes to the worksheet.
To import a Word response form:
1. From the Active Assessment screen in Network Detective, open the worksheet that
you want to export to Word.
2. From the InForm tool bar, click Actions.
3. Click Import Word Response Form.
4. Select the file to import. Click Open.
© 2021 RapidFire Tools, Inc. All rights reserved.
36Microsoft Cloud Assessment Module — User Guide Network Detective
A confirmation message will appear. The InForm worksheet fields will be updated
with the imported responses.
© 2021 RapidFire Tools, Inc. All rights reserved.
37Network Detective Microsoft Cloud Assessment Module — User Guide
Integrate Network Detective with a PSA System
With Network Detective, you can export important information uncovered during your
assessment into your preferred Professional Services Automation (PSA) system. This
includes technical information on computer assets discovered on the network, contact
information for network users, and issues for remediation. This topic covers how to
integrate Network Detective with your chosen PSA System.
Step 1 — Gather Credentials and Set Up your PSA System
Before you begin, you will need:
l Valid Login Credentials for Network Detective
l A Network Detective "Site" for which you wish to export items or create tickets in
your PSA
l Valid Login Credentials for your PSA system account (if you wish to integrate
Network Detective with multiple PSA accounts, gather credentials for each PSA
account)
l Other prerequisites specific to your chosen PSA system (refer to the table below)
PSA System PSA Prerequisites
Note: To set up a connection between the
Network Detective application and the
Autotask system, you will need to create an
API User in Autotask. See "Set Up Autotask
Integration" on page 47.
l Autotask API Username
l Autotask API Password
l ConnectWise REST Public Key
l ConnectWise REST Private Key
l ConnectWise Company ID
l ConnectWise PSA URL
© 2021 RapidFire Tools, Inc. All rights reserved.
38Microsoft Cloud Assessment Module — User Guide Network Detective
PSA System PSA Prerequisites
Note: You must configure ConnectWise
correctly before you can integrate with
Network Detective. See "Set Up
ConnectWise REST Integration" on page 52
for detailed instructions.
l ConnectWise Username
l ConnectWise Password
l ConnectWise Company ID
l ConnectWise PSA URL
Note: You must configure ConnectWise
correctly before you can integrate with
Network Detective. See "Set Up
ConnectWise SOAP Integration" on page 56
for detailed instructions.
l Tigerpaw Username
l Tigerpaw Password
l Tigerpaw API URL
l Kaseya Username
l Kaseya Password
Note: The Kaseya User must be in the
Kaseya Administrator Role. See for
"Set Up Kaseya BMS Integration" on
page 58 detailed instructions.
l Kaseya Tenant (i.e. company name)
l Kaseya API URL,
example: "https://bms.kaseya.com" (you
© 2021 RapidFire Tools, Inc. All rights reserved.
39Network Detective Microsoft Cloud Assessment Module — User Guide
PSA System PSA Prerequisites
should receive the exact URL in an email
from Kaseya)
Step 2 — Create a Connection Between Network Detective and
Target PSA
1. If you have not already done so, visit https://www.rapidfiretools.com/nd-downloads
to download and install Network Detective.
2. Start Network Detective and log in with your credentials.
3. Open the Site for which you wish to create tickets in the target PSA.
Note: You must have completed your assessment project and must have
reports ready to generate in order to create tickets.
4. Within the Assessment window, click Export.
5. Choose an export option from the drop-down menu.
6. Select your Target Ticketing/PSA system from the list of supported options.
© 2021 RapidFire Tools, Inc. All rights reserved.
40Microsoft Cloud Assessment Module — User Guide Network Detective
7. Click Manage Connections.
The Connections Manager window will be displayed.
© 2021 RapidFire Tools, Inc. All rights reserved.
41Network Detective Microsoft Cloud Assessment Module — User Guide
8. Select the New button in the Connections Manager window to create a new PSA
connection.
The PSA Credentials window will be displayed
9. Enter the credentials for chosen PSA.
Important: To generate login credentials for ConnectWise REST, see "Set Up
ConnectWise REST Integration" on page 52. To generate login credentials for
ConnectWise SOAP, see "Set Up ConnectWise SOAP Integration" on page 56.
10. Click OK.
The new Connection will be listed in the Saved Connections list in the Connections
Manager window.
Tip: If you wish to export items to multiple, separate PSA accounts, repeat this
process and add Connections for each account.
11. Click Close to dismiss the Connection Manager.
12. From the Export screen, verify the connection by selecting it from the drop-down
menu.
© 2021 RapidFire Tools, Inc. All rights reserved.
42Microsoft Cloud Assessment Module — User Guide Network Detective
Note: If the connection is successful, some of the Mappings fields should
automatically populate with values from the PSA system.
13. Proceed to export information to your PSA. Refer to the instructions below.
Once you have created the connection, you can then use the Export features:
l "Create Tickets from Assessment Issues and Recommendations from Network
Detective to PSA" below
Create Tickets from Assessment Issues and Recommendations from
Network Detective to PSA
Network Detective allows you to create tickets from Issues and Recommendations
identified during the assessment. To create and export tickets to your preferred
PSA system:
1. Open the Site and Assessment Project for which you wish to create tickets.
2. Within the Assessment window, click Export.
3. Click Create Ticket from Issues/Recommendations.
4. Select your preferred Target PSA from the menu.
© 2021 RapidFire Tools, Inc. All rights reserved.
43Network Detective Microsoft Cloud Assessment Module — User Guide
5. The Export Issues/Recommendations window will appear.
6. Select a Connection from the drop-down menu. The Connection determines the
specific PSA account to which the tickets will be exported.
Important: If you have not yet created a connection, see "Integrate Network
Detective with a PSA System" on page 38 and follow the instructions there.
Then return to this help topic.
© 2021 RapidFire Tools, Inc. All rights reserved.
44Microsoft Cloud Assessment Module — User Guide Network Detective
Note: When the Connection between Network Detective and the PSA is
established, some of the fields in the Mapping menu will automatically populate.
This may take up to 60 seconds.
7. Map the issues to service ticket fields in your PSA. These mappings allow you to
configure how the issues in Network Detective are created as tickets in your PSA.
Important: You configure the values for the mapping fields in your PSA system.
Ensure the values are correctly configured in your PSA before continuing.
Note: In the Export Issues and Recommendations window select the Create
Multiple Tickets option to create a ticket for each Issue and Recommendation
contained within the Items to Export list. Unselect this option to create a single
ticket with all of the issues.
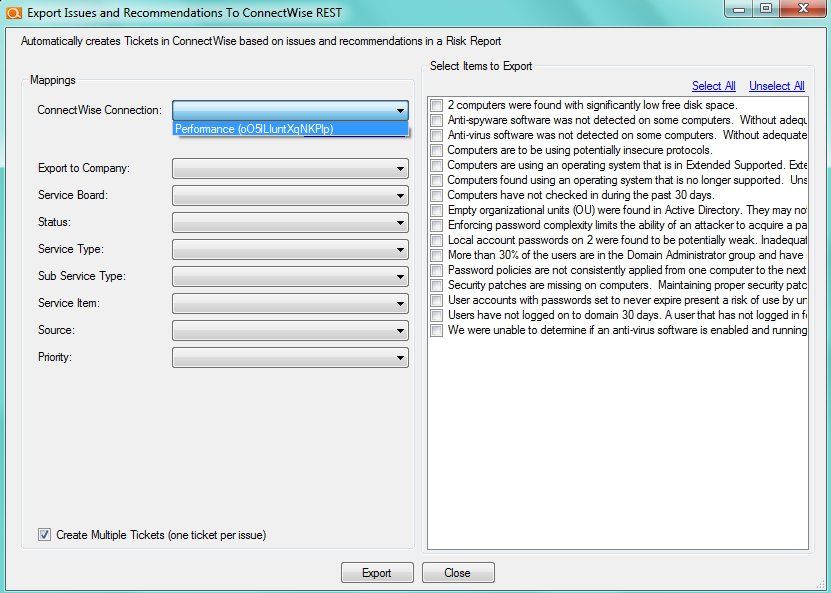
8. From the list, Select Items to Export to the PSA.
© 2021 RapidFire Tools, Inc. All rights reserved.
45Network Detective Microsoft Cloud Assessment Module — User Guide
9. Click Export. Confirm that you wish to export the issues.
After the export is complete, an Export Complete status window will be displayed
indicating the number of Issues tickets created in the PSA.
Note: You can then log in to your PSA and confirm that your tickets have been
created.
© 2021 RapidFire Tools, Inc. All rights reserved.
46Microsoft Cloud Assessment Module — User Guide Network Detective
Set Up Autotask Integration
To set up a connection with the Autotask system, you will need to create an API User in
Autotask. To do this:
1. Log in to Autotask with your admin user credentials.
2. Click on the Autotask home button on the left, then click Admin.
3. From the Admin menu, click Features & Settings.
© 2021 RapidFire Tools, Inc. All rights reserved.
47Network Detective Microsoft Cloud Assessment Module — User Guide
4. Next click Resources/Users (HR) from the Features & Settings menu.
5. Click Resources/Users.
© 2021 RapidFire Tools, Inc. All rights reserved.
48Microsoft Cloud Assessment Module — User Guide Network Detective
6. Click New to begin creating a new API user.
7. Enter information about the API user. Autotask will prompt you to enter the
mandatory fields.
© 2021 RapidFire Tools, Inc. All rights reserved.
49Network Detective Microsoft Cloud Assessment Module — User Guide
8. On the Security tab, enter the user credentials and save these for use later.
9. While still on the Security tab, you must also:
a. Select API User from the Security Level drop-down menu (pictured above)
b. Select None under API Tracking Identifier.
© 2021 RapidFire Tools, Inc. All rights reserved.
50Microsoft Cloud Assessment Module — User Guide Network Detective
c. You can also optionally select Resource is not required to Submit
Timesheets.
10. Complete any remaining prompts required by Autotask to create the user or to
comply with your company's user and security policies.
11. When you are finished, click Save & Close. The new user will appear in the list.
© 2021 RapidFire Tools, Inc. All rights reserved.
51Network Detective Microsoft Cloud Assessment Module — User Guide
Set Up ConnectWise REST Integration
To set up a connection to ConnectWise Ticketing system using the REST API you will be
required to:
Step 1 — Download and Install the ConnectWise Manage Internet Client
Application
To enable the integration, you will need to use the ConnectWise Manage Internet Client
application. Download and install the app from http://university.connectwise.com/install/.
Then log in using your credentials.
If you are using the ConnectWise Manage web app, you can continue to use the web app
after you have completed the steps in this guide and enabled the integration.
Step 2 — Select the ConnectWise Ticket System API Member Account to
Integrate with
1. From the ConnectWise dashboard, click System from the side menu.
2. Next, click Members.
3. Click on API Members Tab. The API Members screen will appear.
Note that the API Members Tab may not show by default and may need to be
added. You can add this tab from the Tab Configuration menu on the Members
page .
4. Click on the button to create a new API Member. Fill in all required information.
5. Confirm that the API Member has been assigned Admin rights by checking the
member’s Role ID under Security Information.
© 2021 RapidFire Tools, Inc. All rights reserved.
52Microsoft Cloud Assessment Module — User Guide Network Detective
Important: By default, the API Member must have Admin rights for the
integration to function correctly. However, we provide a "least privilege" custom
solution for the API Member Role ID below. See "Create Minimum Permissions
Security Role for API Member" below.
Create Minimum Permissions Security Role for API Member
If you do not wish to assign the API member full Admin rights, create this custom security
role and assign it to the API member:
1. Go to System > Security Roles.
2. Click the button to create a new security role.
3. Set the permissions for the Role as detailed in the table below and click Save.
4. Assign this custom Security Role to the API Member instead of full Admin.
Add Edit Delete Inquire
Module
Level Level Level Level
Companies
Company Maintenance All
Configurations All All All
Contacts All All All
Service Desk
Service Tickets All All All
System
API Reports All
Table Setup All All
Customized Table Setup: Allow
Company / Configuration,
Opportunities / Opportunity Status,
Opportunities / Opportunity Type
© 2021 RapidFire Tools, Inc. All rights reserved.
53Network Detective Microsoft Cloud Assessment Module — User Guide
Step 3 — Create an API Key in the ConnectWise Ticketing System
1. Select the API Member that you created previously.
2. From the API Member details screen, click API Keys.
3. Click the button.
4. Enter a Description for the API Key.
5. Click Save.
6. The newly generated API Key will appear.
7. Write down or take a screen shot of the Member’s Public and Private API Key
strings. This information will be required to set up the integration with ConnectWise.
Important: Note that the Private Key is only available at the time the key is
created. Be sure to copy the keys for your records.
Step 4 — Configure Service Tables in ConnectWise
In order to export issues as tickets in ConnectWise, you will need to configure several
Service Tables in ConnectWise. These tables ensure that the issues are “mapped”
correctly to the tickets created within ConnectWise. You must configure the Service
Tables correctly in order to establish the connection with ConnectWise.
You can configure the Service Tables in ConnectWise from System>Setup
Tables>Category>Service. Configure the Service Tables as detailed below:
1. Service Board
© 2021 RapidFire Tools, Inc. All rights reserved.
54Microsoft Cloud Assessment Module — User Guide Network Detective
You must have a Service Board created within ConnectWise. In addition, within the
Service Board, you must create values for the following fields. You can create
values for these fields from the Service Board page:
a. Statuses
b. Types
c. Teams
You must create at least one value for each of these fields.
In addition, you must define values for two additional Service Tables:
2. Source
You must include at least one Source.
3. Priority
You must include at least one Priority level.
If your existing Service Tables already contain values for the fields listed above, you
do not need to create new values.
© 2021 RapidFire Tools, Inc. All rights reserved.
55Network Detective Microsoft Cloud Assessment Module — User Guide
Set Up ConnectWise SOAP Integration
This topic covers how to integrate Network Detective with ConnectWise via the
ConnectWise SOAP API.
Important: The ConnectWise SOAP API is in the process of being deprecated
by ConnectWise. We recommend that you use the ConnectWise REST API instead.
To set up the ConnectWise SOAP integration:
1. Navigate to System-> Setup Tables.
2. Type “Integrator” into the Table lookup and hit Enter.
3. Click the Integrator Login link.
4. Click the “New” Icon to bring up the New Integrator login screen as shown on the
right.
5. Enter and record Username and Password values which you will need later on
when creating a connection in Network Detective.
6. Set the Access Level to “All Records.”
7. Using the ConnectWise Enable Available APIs function, enable the following
APIs:
l ServiceTicketApi
l TimeEntryApi
l ContactApi
l CompanyApi
l ActivityApi
l OpportunityApi
© 2021 RapidFire Tools, Inc. All rights reserved.
56Microsoft Cloud Assessment Module — User Guide Network Detective
l MemberApi
l ReportingApi
l SystemApi
l ConfigurationApi
8. Click the Save icon to save this Integrator Login.
Note: If you already have an Integrator Login configured, you may use it as long
as the Company and Configuration APIs are enabled.)
© 2021 RapidFire Tools, Inc. All rights reserved.
57Network Detective Microsoft Cloud Assessment Module — User Guide
Set Up Kaseya BMS Integration
To export items to Kaseya BMS, you will need Administrator credentials in Kaseya BMS.
To assign a Kaseya user to the Administrator role, follow these steps:
1. Log in to Kaseya BMS.
2. Go to Security > Roles.
3. Click Open/Edit on the Administrator Role.
4. Click the Role Users tab.
5. Click Add.
© 2021 RapidFire Tools, Inc. All rights reserved.
58Microsoft Cloud Assessment Module — User Guide Network Detective
6. Search for the user to who will become a Kaseya Administrator and Select that
user.
7. Click OK. This user can now invoke the Kaseya BMS API.
© 2021 RapidFire Tools, Inc. All rights reserved.
59You can also read