Amazon WorkMail User Guide Version 1.0 - AWS Documentation
←
→
Page content transcription
If your browser does not render page correctly, please read the page content below
Amazon WorkMail User Guide Version 1.0
Amazon WorkMail User Guide

Amazon WorkMail: User Guide
Copyright © 2019 Amazon Web Services, Inc. and/or its affiliates. All rights reserved.
Amazon's trademarks and trade dress may not be used in connection with any product or service that is not Amazon's, in any manner
that is likely to cause confusion among customers, or in any manner that disparages or discredits Amazon. All other trademarks not
owned by Amazon are the property of their respective owners, who may or may not be affiliated with, connected to, or sponsored by
Amazon.
Amazon WorkMail User Guide

Table of Contents
  What Is Amazon WorkMail? ................................................................................................................. 1
        Amazon WorkMail System Requirements ....................................................................................... 1
        Amazon WorkMail Pricing ........................................................................................................... 1
        Amazon WorkMail Limits ............................................................................................................. 1
        Amazon WorkMail Languages ...................................................................................................... 1
  Getting Started .................................................................................................................................. 3
        Getting Started with the Amazon WorkMail Web Application ........................................................... 3
              Changing Default Settings ................................................................................................... 6
        Getting Started with Microsoft Outlook ........................................................................................ 9
              Connect Microsoft Outlook to Your Amazon WorkMail Account ................................................ 9
              Manually Connect Microsoft Outlook to Amazon WorkMail .................................................... 10
        Getting Started with a Mobile Device ......................................................................................... 12
              Connect Your Android Device ............................................................................................. 12
              Connect Your iOS Device ................................................................................................... 13
              Manually Connect Your Mobile Device ................................................................................. 13
        Getting Started with the Windows 10 Mail App ........................................................................... 14
        Getting Started with the macOS Mail App ................................................................................... 15
        Getting Started with an IMAP Client Application .......................................................................... 15
  Working with Email .......................................................................................................................... 18
        Working with Email Messages .................................................................................................... 18
              Sending Email Messages ................................................................................................... 18
              Sending Email from an Alias .............................................................................................. 19
              Copying or Moving Email Messages .................................................................................... 19
              Printing Email Messages .................................................................................................... 20
              Deleting Email Messages ................................................................................................... 20
        Working with Email Rules .......................................................................................................... 21
        Working with Attachments ........................................................................................................ 22
              Adding Attachments to Email Messages .............................................................................. 22
              Downloading Attachments ................................................................................................ 22
              Unsupported Attachment Types ......................................................................................... 22
        Working with Shared and Full Access Inboxes .............................................................................. 23
              Opening Shared Inboxes ................................................................................................... 23
              Opening Full Access Inboxes .............................................................................................. 24
        Sending Encrypted or Signed Email ............................................................................................ 24
  Working with Folders ........................................................................................................................ 27
        Managing Folders ..................................................................................................................... 27
              Creating New Folders ........................................................................................................ 27
              Copying, Moving, or Renaming Folders ................................................................................ 27
              Deleting Folders ............................................................................................................... 28
              Emptying the Deleted Items Folder .................................................................................... 28
              Marking Items as Read or Unread ....................................................................................... 28
              Viewing Folder Size .......................................................................................................... 28
        Sharing Folders and Folder Permissions ...................................................................................... 29
              Sharing Email Folders with Other Users .............................................................................. 29
              Opening Shared Email Folders ........................................................................................... 29
              Viewing Folder Permissions ............................................................................................... 30
              Changing Folder Permissions ............................................................................................. 30
              Stop Sharing Folders ........................................................................................................ 30
  Working with Calendars .................................................................................................................... 31
        Managing Calendars ................................................................................................................. 31
              Creating Appointments ..................................................................................................... 31
              Creating Meeting Requests ................................................................................................ 32
              Editing Meetings and Appointments ................................................................................... 32
              Moving Meetings and Appointments ................................................................................... 32

                                                                 Version 1.0
                                                                      iii
Amazon WorkMail User Guide
Canceling or Declining Meeting Requests ............................................................................ 33
Printing Calendar Items ..................................................................................................... 33
Deleting Meetings and Appointments ................................................................................. 33
Working with Calendar Settings ................................................................................................. 34
Changing Your Calendar View ............................................................................................ 34
Changing Calendar Settings ............................................................................................... 34
Viewing Multiple Calendars ............................................................................................... 34
Sharing Calendars .................................................................................................................... 35
Sharing Calendars with Other Users ................................................................................... 35
Opening Shared Calendars ................................................................................................ 35
Working with Contacts ...................................................................................................................... 36
Managing Contacts ................................................................................................................... 36
Creating Contacts ............................................................................................................. 36
Editing Contacts ............................................................................................................... 36
Copying or Moving Contacts .............................................................................................. 37
Printing Contacts ............................................................................................................. 37
Deleting Contacts ............................................................................................................. 37
Creating Distribution Lists ......................................................................................................... 37
Sharing Contacts ...................................................................................................................... 38
Sharing Contacts with Other Users ..................................................................................... 38
Opening Shared Contacts .................................................................................................. 38
Working with Delegates .................................................................................................................... 40
Sending Email on Behalf of Someone Else .................................................................................. 40
Sending Email as Someone Else ................................................................................................. 40
Scheduling Meetings on Behalf of Someone Else .......................................................................... 41
Sharing Your Inbox with Another User ........................................................................................ 42
Working with Accessibility Features .................................................................................................... 43
Supported Screen Readers ......................................................................................................... 43
Using Shortcut Keys with Amazon WorkMail ................................................................................ 43
Working with General and Email Settings .................................................................................... 44
General Settings ............................................................................................................... 44
Email Settings .................................................................................................................. 45
Using the Global Address Book .................................................................................................. 46
Working with Email .................................................................................................................. 46
Working with Folders ................................................................................................................ 48
Troubleshooting ............................................................................................................................... 50
Document History ............................................................................................................................ 51
Version 1.0
ivAmazon WorkMail User Guide
Amazon WorkMail System Requirements
What Is Amazon WorkMail?
Amazon WorkMail is a managed email and calendaring service with strong security controls and
support for existing desktop and mobile email clients. You can access your email, contacts, and
calendars wherever you use Microsoft Outlook, your browser, or your iOS and Android mobile devices.
Administrators can integrate Amazon WorkMail with existing corporate directories, controlling both the
keys that encrypt their data and the location where the data is stored.
Amazon WorkMail System Requirements
Amazon WorkMail works with all major mobile devices and operating systems that support the Exchange
ActiveSync protocol. These include the iPad, iPhone, Amazon Fire, Amazon Fire Phone, Android, Windows
Phone, and BlackBerry 10. Users of macOS can add their Amazon WorkMail account to their Mail,
Calendar, and Contacts apps.
You can access Amazon WorkMail from Microsoft Outlook. You must have a valid Microsoft Outlook
license to use it with Amazon WorkMail, which offers native support for the following versions:
• Office Outlook 2007, Outlook 2010, Outlook 2013, Outlook 2016, and Outlook 2019
• Outlook 2010 and Outlook 2013 Click-to-Run
• Outlook for Mac 2011, Outlook 2016 for Mac, and Outlook 2019 for Mac
Amazon WorkMail supports IMAP clients. For the required configuration, see Getting Started with an
IMAP Client Application (p. 15). POP3 clients are not currently supported.
You can access Amazon WorkMail using the web application: https://alias.awsapps.com/mail.
Warning
To help protect your computer from malicious email attachments, we recommend that you
install antivirus software.
Amazon WorkMail Pricing
With Amazon WorkMail, there are no upfront fees or commitments; you pay only for active user
accounts. For more information, see Pricing.
Amazon WorkMail Limits
Amazon WorkMail has the following limits, which cannot be increased:
• The maximum size for a mailbox is 50 GB per user.
• The maximum size of an outgoing or incoming email message is 25 MB.
• The maximum number of aliases per user is 100.
Amazon WorkMail Languages
Amazon WorkMail is available in the following languages:
Version 1.0
1Amazon WorkMail User Guide
Amazon WorkMail Languages
• English
• Russian
• French
Version 1.0
2Amazon WorkMail User Guide
Getting Started with the Amazon
WorkMail Web Application
Getting Started with Amazon
WorkMail
Amazon WorkMail integrates with most popular email apps and devices so that you can synchronize your
email, calendar, and contacts.
Topics
• Getting Started with the Amazon WorkMail Web Application (p. 3)
• Getting Started with Microsoft Outlook (p. 9)
• Getting Started with a Mobile Device (p. 12)
• Getting Started with the Windows 10 Mail App (p. 14)
• Getting Started with the macOS Mail App (p. 15)
• Getting Started with an IMAP Client Application (p. 15)
Getting Started with the Amazon WorkMail Web
Application
Amazon WorkMail has a web-based application that you use to access your Amazon WorkMail account
from a web browser. The Amazon WorkMail web application includes integrated applications, such as
Mail, Calendar, and Contacts. To get started with the Amazon WorkMail web application, you need a
broadband internet connection and the latest version of one of the following web browsers:
• Google Chrome
• Mozilla Firefox
• Safari
• Microsoft Edge
• Internet Explorer
Your Amazon WorkMail system administrator provides you with your initial login credentials, which
consist of a user name and a password. To recover a lost or forgotten password, contact your
administrator.
You also need your unique Amazon WorkMail web application URL. This URL contains an alias, a unique
name for your mail domain which is chosen by your Amazon WorkMail site administrator when they add
your organization. The web application URL looks like this: https://alias.awsapps.com/mail.
To sign in to the Amazon WorkMail web application
1. In the address bar of your browser, type or paste the web application URL.
2. On the Amazon WorkMail web application sign-in screen, type your user name and password.
Note
Do not type your email address here.
3. Choose Sign In. You are ready to work.
Version 1.0
3Amazon WorkMail User Guide
Getting Started with the Amazon
WorkMail Web Application
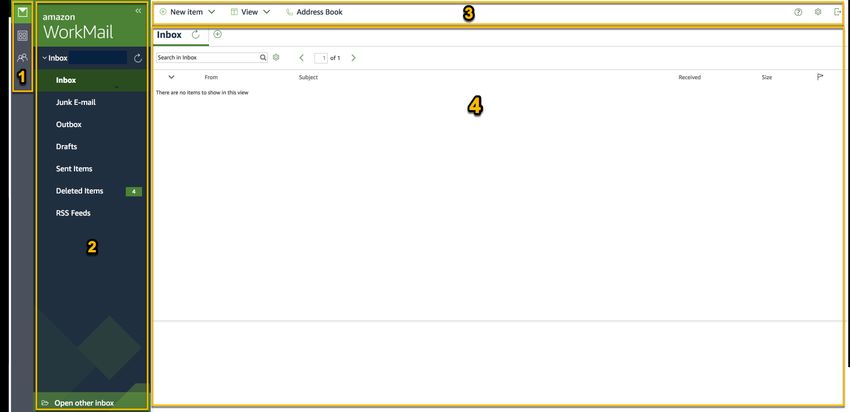
The Amazon WorkMail web application consists of the following areas:
Version 1.0
4Amazon WorkMail User Guide
Getting Started with the Amazon
WorkMail Web Application
Version 1.0
5Amazon WorkMail User Guide
Changing Default Settings
1. Shortcut Bar
Contains shortcuts to the Mail, Calendar, and Contacts applications in the Amazon WorkMail web
application. The currently active application is highlighted in the shortcut bar.
2. Navigation Pane
Allows you to move through the active application, such as the folders in the Email application or
the calendars in the Calendar application.
3. Menu Bar
Controls the most important functions for the Mail, Calendar, and Contacts applications. The
controls that are available vary depending on the application that is active. Depending on the
application in use, you can create new items, change the view, print, or access the address book.
4. Contents Pane
This is where data displays, such as the contents of an email message, the calendar, or the list of
contacts. Use the Search field at the top of the results pane to search for items in the current folder.
Use the tabs to switch between email messages, appointments, and contacts. Choose the plus
button (+) in the row of tabs to add a new item on its own tab. The item created depends on the
active application. For example, choosing the plus button in the mail application creates a new
email; in the calendar application, it creates a new appointment, and so on.
For more information about changing the language and other settings, see Changing Amazon WorkMail
Web Application Default Settings (p. 6).
Changing Amazon WorkMail Web Application Default
Settings
You can change many of the default settings for the Amazon WorkMail web application.
To change the Amazon WorkMail web application default settings
1. In the Amazon WorkMail web application, on the menu bar, choose Settings (gear icon).
2. In the navigation pane, select the General tab, Email tab, Email Rules tab, Automatic response tab,
or Calendar tab to update the settings as appropriate.
3. Press the F5 key to refresh and activate the new settings.
Topics
• General Settings (p. 6)
• Email Settings (p. 7)
• Email Rules Settings (p. 8)
• Automatic Response Settings (p. 8)
• Calendar Settings (p. 8)
General Settings
View mailbox usage and set your password, preferred language, and default address book from the
General tab using the following settings.
Change password
To change your password, choose Change password, and then follow the instructions on the screen.
Version 1.0
6Amazon WorkMail User Guide
Changing Default Settings
Note
If Amazon WorkMail is integrated with your corporate directory, you might have to change
your password using Microsoft Windows or corporate password management tools.
Language
To change the language in which Amazon WorkMail is displayed, select a language from the list. To
change your date format and time format, select a format from the list.
Mailbox Usage
Shows the current amount of storage space used. To reduce your mailbox size you can empty the
Deleted Items folder, delete older messages, or delete messages with large attachments from your
folders.
Address Book
To select a default address book, in Select Default Folder, select the address book to use.
The default address book is loaded when choosing Address book from the main menu bar or when
selecting the To, Cc, or Bcc field when composing a new email.
Email Settings
Change email preview, formatting, font, and other options from the Email tab using the following
settings.
Display preview pane
You can choose to view a preview of items to the right of the content pane or below the content
pane. You can also choose to turn off the preview pane.
Note
Changing the view from the mail application using the View menu updates this Display
preview pane setting.
Close email when responding
When this setting is off, if you open an email in a new tab, a new tab is opened next to the existing
one when you reply to the email.
Format
You can compose new mails as Plain text or HTML.
Default font
Specifies the default font used in all new email messages.
Default font size
Specifies the size of the default font.
Always request a read receipt
Select this check box to automatically request read receipts for every message you send.
Respond to read receipt
Select whether Amazon WorkMail should always send a read receipt, never send a read receipt, or
whether you should be prompted before sending a read receipt.
Signatures
You can create several signatures for different purposes. For example, you can create a signature for
business and one for private use, or create a long signature one for new emails and a short signature
for replies and forwards.
Version 1.0
7Amazon WorkMail User Guide
Changing Default Settings
After you have created one or more signatures, you can (optionally) specify which one to use for new
messages and which one to use for replies and forwards.
Email Rules Settings
Email rules can help you focus on important emails and keep your inbox tidy. Rules are stored on the
server so that they can filter the mail before it arrives in your inbox.
You can create as many rules as you want and with each rule, you can set various conditions to trigger
the rule. You can also set various follow-up actions after the rule has been triggered.
You can construct complex rules to deal with large email volumes or complex workflows.
To create a new email rule
1. From the Email Rules tab, choose New.
2. In the New email rule dialog box, define the rule.
You can set various conditions and actions that Amazon WorkMail performs on every message that
meets the criteria you define.
Automatic Response Settings
Mark yourself in or out of the office from the Automatic Response tab. Specify the message that is sent
automatically in reply to all incoming messages while you are away.
To prevent someone who is sending you several emails per day from getting a reply on each message,
automatic responses are only sent one time to any specific email address. This also prevents a mail flood
in case the person who sends you the email also has automatic responses turned on.
When Automatic response is enabled, and you sign on to the Amazon WorkMail web application, a
warning message is shown to remind you that the Automatic response is set. The warming message
prompts you to turn it off.
Calendar Settings
Set your calendar format, default reminder time, and other options using the following settings.
First day of the week
If your week starts on another day than Monday, you can set it to any other day using this setting.
The calendar then always starts with this day.
First week of the year
Specify how the calendar should begin the year.
Start of workday, End of workday
Specify the part of the day that is marked as your workday. The calendar shows this time period in a
slightly different color so you can easily see when an appointment or meeting is scheduled outside
office hours. The default values for office hours are 8:30 - 17:30 (8:30 AM - 5:30 PM).
Calendar resolution
If your appointments frequently start at other times than each half or entire hour, or have a duration
other than (multiples of) 30 minutes, then you can change this value to better fit your needs.
Version 1.0
8Amazon WorkMail User Guide
Getting Started with Microsoft Outlook
Note
Setting the value to less than 30 minutes makes the Amazon WorkMail web application
zoom in on the calendar, so you scroll more when you are using a smaller screen.
View multiple calendars
Specify how multiple calendars should be displayed by default in the Calendar. Side-by-side displays
all calendars next to each other. Overlay displays all calendars transparently on top of each other,
where each calendar has its own color.
Note
This setting has no effect when you are only displaying one calendar.
Default reminder time
Specify how long before the start of the appointment the default reminder should occur. This
setting can be overruled for any appointment by editing it manually in the calendar. The default is
15 minutes.
Default all-day appointment reminder time
Specify the reminder time that is automatically set when you create a new all-day appointment. The
default is 18 hours. This setting can be overruled for any appointment by editing it manually in the
calendar.
Getting Started with Microsoft Outlook
To get started with Microsoft Outlook, connect Microsoft Outlook to your Amazon WorkMail account.
Topics
• Connect Microsoft Outlook to Your Amazon WorkMail Account (p. 9)
• Manually Connect Microsoft Outlook to Amazon WorkMail (p. 10)
Connect Microsoft Outlook to Your Amazon WorkMail
Account
Amazon WorkMail uses auto-discover to configure your Outlook client. To set up your Outlook client,
you need your Amazon WorkMail email address and password. Amazon WorkMail integrates with the
following versions of Outlook:
• Office Outlook 2007, Outlook 2010, Outlook 2013, Outlook 2016, and Outlook 2019
• Outlook for Mac 2011, Outlook 2016 for Mac, and Outlook 2019 for Mac
Note
If automatic configuration fails, you can manually configure most Outlook clients, except for
Outlook 2016 and Outlook 2019 for Windows. For more information, see Manually Connect
Microsoft Outlook to Amazon WorkMail (p. 10).
To connect Microsoft Outlook to your Amazon WorkMail account
1. In Windows, open Control Panel, and choose Mail (32-bit).
2. In the Mail Setup - Outlook dialog box, choose Show Profiles; and in the Mail dialog box, choose
Add.
3. In the New Profile dialog box, type WorkMail in the Profile Name field, and choose OK.
Version 1.0
9Amazon WorkMail User Guide
Manually Connect Microsoft Outlook to Amazon WorkMail
4. In the Add Account dialog box, in the E-mail Address field, type your Amazon WorkMail email
address and choose Next.
Note
If you're prompted to enter your user name and password, make sure that you enter your
full email address as your user name.
If you're prompted to configure server settings in the Allow this website to configure
dialog box, select the Don't ask me about this website again check box, and choose Allow.
5. When your account is set up, and you see a message that says your account is ready to use, choose
Finish.
For more information about adding accounts in Outlook, see Set Up E-Mail in Outlook 2010 or
Outlook 2013.
To connect Outlook 2016 for Mac or Outlook 2019 for Mac to your Amazon WorkMail
account
1. In Outlook 2016 for Mac or Outlook 2019 for Mac, do one of the following:
• If this is the first account you're creating in Outlook 2016 for Mac or Outlook 2019 for Mac, on
the Welcome screen, choose Add Email Account, type your email address, choose Continue, and
under Choose the provider, choose Exchange.
• If you already have an email account for a different email address, in the Tools menu, choose
Accounts. In the Accounts dialog box, choose + (plus sign) and New Account. Type your Email
Address, choose Continue, and under Choose the provider, choose Exchange.
2. In the Enter your Exchange account information dialog box, for Method, choose User Name and
Password and type your email address.
3. For Domain\Username or Email, type your email address, and for Password, type your password.
4. Choose Add Account to complete setup.
Note
Outlook attempts to detect your email server settings.
If Outlook prompts you to allow the server to configure your settings, select the Always use
my response for this server check box, and choose Allow.
After your account is successfully set up, it displays in the Accounts dialog box.
For more information about adding accounts in Outlook for Mac, see the following:
• Add an email account to Outlook for Mac 2011
• Add an email account to Outlook (Outlook 2016 for Mac, Outlook 2019 for Mac)
Manually Connect Microsoft Outlook to Amazon
WorkMail
If automatic configuration fails, you can manually configure the following versions of Outlook:
• Office Outlook 2007, Outlook 2010, and Outlook 2013
• Outlook for Mac 2011, Outlook 2016 for Mac, and Outlook 2019 for Mac
Note
Outlook 2016 and Outlook 2019 for Windows can be configured only by using auto-discover.
Version 1.0
10Amazon WorkMail User Guide
Manually Connect Microsoft Outlook to Amazon WorkMail
To manually configure Outlook
Follow these steps to manually configure Office Outlook 2007, Outlook 2010, or Outlook 2013.
1. In Windows, open Control Panel, and choose User Accounts and Mail (32-bit).
2. In the Mail Setup - Outlook dialog box, choose Show Profiles, and in the Mail dialog box, choose
Add.
3. In the New Profile dialog box, in the Profile Name field, type WorkMail, and choose OK.
4. Choose Manual configure server settings or additional server types, then choose Next.
5. For Server, type the endpoint matching the AWS Region where your mailbox is located.
• us-west-2
outlook.mail.us-west-2.awsapps.com
• us-east-1
outlook.mail.us-east-1.awsapps.com
• eu-west-1
outlook.mail.eu-west-1.awsapps.com
Note
If you don’t know the AWS Region where your mailbox is located, contact your system
administrator.
6. For User name, enter your Amazon WorkMail email address, then choose More settings.
7. On the Security tab, for Logon network security, choose Anonymous authentication.
8. From the Connection tab, choose Connect to Microsoft Exchange using HTTP.
9. Choose Exchange proxy settings, and type the same endpoint matching the AWS Region where
your mailbox is located, as you typed in step 5.
10. Select On fast network connect use HTTP first, then connect using TCP/IP.
11. For Proxy authentication settings, choose Basic authentication, choose OK, then choose OK again.
12. Choose Check name, type your Amazon WorkMail email address and password, then choose Next.
13. After Outlook sets up your account, you’ll see a message that says your account is ready for use.
Choose Finish.
For more information about adding accounts in Outlook, see Set Up E-Mail in Outlook 2010 or
Outlook 2013.
To manually configure Outlook for Mac 2011, Outlook 2016 for Mac, and Outlook 2019 for
Mac
Follow these steps to manually configure Outlook for Mac 2011, Outlook 2016 for Mac, and Outlook
2019 for Mac.
1. In the Tools menu, choose Accounts. In the Accounts dialog box, choose + and New Account, type
your Email Address, choose Continue, and under Choose the provider, choose Exchange.
• If you’re using Outlook for Mac 2011, uncheck Configure automatically in the Enter your
Exchange account information dialog box. For Authentication, choose User Name and Password.
2. Type your Email address, Password, and User name where indicated. Make sure to type your full
password.
3. For Server, type the endpoint matching the AWS Region where your mailbox is located.
Version 1.0
11Amazon WorkMail User Guide
Getting Started with a Mobile Device
• us-west-2
https://ews.mail.us-west-2.awsapps.com/EWS/Exchange.asmx
• us-east-1
https://ews.mail.us-east-1.awsapps.com/EWS/Exchange.asmx
• eu-west-1
https://ews.mail.eu-west-1.awsapps.com/EWS/Exchange.asmx
Note
If you don’t know the AWS Region where your mailbox is located, contact your system
administrator.
4. Choose Add Account to complete setup.
5. After your account is successfully set up, it displays in the Accounts dialog box.
For more information about adding accounts in Outlook for Mac, see the following:
• Add an email account to Outlook for Mac 2011
• Add an email account to Outlook (Outlook 2016 for Mac, Outlook 2019 for Mac)
Getting Started with a Mobile Device
Get started with Amazon WorkMail by connecting your Android or iOS mobile device.
Topics
• Connect Your Android Device (p. 12)
• Connect Your iOS Device (p. 13)
• Manually Connect Your Mobile Device (p. 13)
Connect Your Android Device
Amazon WorkMail supports Exchange ActiveSync for integration with Android devices, so to connect
your Android device to your Amazon WorkMail email account you need your Amazon WorkMail email
address and password.
To connect your Amazon WorkMail account to your Android device
1. On your Android device, choose Apps, Email, Add Account.
2. Depending on which options are available in your mail app, choose Exchange or choose Microsoft
Exchange ActiveSync. For more information, see Set up email in Android email app.
3. In the dialog box, type your Amazon WorkMail email address, password, a description for the
account, and then choose Next.
Note
If your account cannot be found, you are prompted to provide the name of your Exchange
server, domain, user name, and password. For more information, see Manually Connect Your
Mobile Device (p. 13).
4. In the Exchange confirmation dialog box, select the items to synchronize with your device, and then
choose Save.
Version 1.0
12Amazon WorkMail User Guide
Connect Your iOS Device
You can now use your Android email app with your Amazon WorkMail email account.
Note
Amazon WorkMail does not support draft synchronization with Android devices.
Connect Your iOS Device
Amazon WorkMail supports Microsoft Exchange ActiveSync for integration with iOS devices. To connect
your iOS device to your Amazon WorkMail email account, you need only your Amazon WorkMail email
address and password.
Note
If your organization has enabled mobile device management, you may be required to set a
password to connect your device.
To connect your Amazon WorkMail account to your iOS device
1. On your iOS device, choose Settings, and then scroll down to Accounts & Passwords (or in older
versions, Mail).
2. Choose Add Account and Exchange.
Note
In older versions, select Accounts, Add Account, Exchange.
3. In iOS 11, type your Amazon WorkMail email address and a description for the account, choose Next,
Sign in, and type the password associated with your email address.
Note
In older versions, type your Amazon WorkMail email address, password, a description for
the account, and choose Next.
In iOS 11, automatic configuration works if you use a complementary domain, such
as awsapps.com, or if you use a customer domain and Autodiscover Phase 2. For more
information, see Use AutoDiscover to Configure Endpoints.
If your account cannot be found, you are prompted to provide the name of your Exchange
server, domain, user name, and password. For more information, see Manually Connect Your
Mobile Device (p. 13).
4. In the Exchange confirmation dialog box, select the items to synchronize with your device, and then
choose Save.
You can now use your iOS device with your Amazon WorkMail account.
Note
Amazon WorkMail does not support draft synchronization with iOS devices.
Manually Connect Your Mobile Device
If your mobile device doesn't support auto-discover or if automatic configuration failed, you can
manually configure the client by providing the following information:
Required Information Description
Type of account Exchange
Protocol ActiveSync
Domain Empty
Version 1.0
13Amazon WorkMail User Guide
Getting Started with the Windows 10 Mail App
Required Information Description
User name Email address associated with your Amazon WorkMail
account
Password Your password
Server The endpoint matching the AWS Region where your mailbox
is located:
• us-west-2
mobile.mail.us-west-2.awsapps.com
• us-east-1
mobile.mail.us-east-1.awsapps.com
• eu-west-1
mobile.mail.eu-west-1.awsapps.com
Note
If you don't know the AWS Region where
your mailbox is located, contact your system
administrator.
Getting Started with the Windows 10 Mail App
If you have the Mail app on Windows 10, you can add your Amazon WorkMail account.
To connect your Amazon WorkMail account to your Mail app
1. In Windows 10, open Mail, and choose Accounts.
2. Choose Add Account, Advanced Setup.
3. Choose Exchange ActiveSync, and provide the following information:
Required Information Description
Email address Email address associated with your Amazon WorkMail
account
Password Your password
User name Email address associated with your Amazon WorkMail
account
Domain Empty
Server The endpoint matching the AWS Region in which your
mailbox is located:
• us-west-2
mobile.mail.us-west-2.awsapps.com
• us-east-1
Version 1.0
14Amazon WorkMail User Guide
Getting Started with the macOS Mail App
Required Information Description
mobile.mail.us-east-1.awsapps.com
• eu-west-1
mobile.mail.eu-west-1.awsapps.com
Note
If you don't know the AWS Region where
your mailbox is located, contact your system
administrator.
Server requires encrypted (SSL) Enabled
connection
Account name Your account name
4. Choose Sign in.
Getting Started with the macOS Mail App
If you have the Mail app on macOS, you can add your Amazon WorkMail account.
To connect your Amazon WorkMail account to your Mail app
1. Open Mail, and then do one of the following:
• If you haven't set up a Mail account - Create an account and choose Exchange for the account
type.
• If you already have a Mail account - On the Mail menu, choose Preferences, and on the Accounts
tab, choose the plus sign (+) at the bottom of the navigation pane to open the Add Account
window.
2. For Add Account, do one of the following:
• If using macOS Mojave - Enter your full name and email address, choose Sign In, then choose
Configure Manually or Sign In. Enter your password and choose Sign In.
• If using macOS High Sierra or earlier version - Enter your full name, email address, and
password, then choose Continue.
3. The Mail app uses the information provided in step 2 to set up your email account automatically.
Getting Started with an IMAP Client Application
You can connect any IMAP-compatible client software to Amazon WorkMail by providing the following
information:
Required Information Description
Type of account IMAP
Protocol IMAPS
Version 1.0
15Amazon WorkMail User Guide
Getting Started with an IMAP Client Application
Required Information Description
Port 993
Secure connection Required; SSL
Incoming username Email address associated with your Amazon WorkMail
account
Incoming password Your password
Incoming server The endpoint matching the AWS Region where your mailbox
is located:
• us-west-2
imap.mail.us-west-2.awsapps.com
• us-east-1
imap.mail.us-east-1.awsapps.com
• eu-west-1
imap.mail.eu-west-1.awsapps.com
Note
If you don't know the AWS Region where
your mailbox is located, contact your system
administrator.
To send emails, you also need to configure an outgoing SMTP server in your client software.
Required Information Description
Protocol SMTPS (SMTP, encrypted with TLS)
Port 465
Secure connection Required; SSL (STARTTLS not supported)
Outgoing username Email address associated with your Amazon WorkMail
account
Outgoing password Your password
Outgoing server The endpoint matching the AWS Region where your mailbox
is located:
• us-west-2
smtp.mail.us-west-2.awsapps.com
• us-east-1
smtp.mail.us-east-1.awsapps.com
• eu-west-1
smtp.mail.eu-west-1.awsapps.com
Version 1.0
16Amazon WorkMail User Guide
Getting Started with an IMAP Client Application
Required Information Description
Note
If you don't know the AWS Region where
your mailbox is located, contact your system
administrator.
Version 1.0
17Amazon WorkMail User Guide
Working with Email Messages
Working with Email
You can send and receive email, add or remove attachments, share inboxes, and send signed or
encrypted email with the Amazon WorkMail web application.
Topics
• Working with Email Messages (p. 18)
• Working with Email Rules (p. 21)
• Working with Attachments (p. 22)
• Working with Shared and Full Access Inboxes (p. 23)
• Sending Encrypted or Signed Email (p. 24)
Working with Email Messages
Send, copy, move, print, and delete email messages from Amazon WorkMail. If your administrator has
created an alias for you, you can also send email as an alias.
Topics
• Sending Email Messages (p. 18)
• Sending Email from an Alias (p. 19)
• Copying or Moving Email Messages (p. 19)
• Printing Email Messages (p. 20)
• Deleting Email Messages (p. 20)
Sending Email Messages
You can create and send a message to one or more recipients, include attachments, set the priority, or
add a flag to indicate that the message is important.
To send a message
1. In the Amazon WorkMail web application, choose the mail icon on the shortcut bar.
2. On the menu bar, choose + New item and New email.
Tip
You can also choose the plus sign (+) on the tab bar.
3. To add recipients, for To, type one or more names. Amazon WorkMail suggests previously used email
addresses. You can remove suggestions from this list by selecting a name and choosing Delete.
To add users from the address book or to add them to the CC or BCC fields, choose To, and select
one or more users from the address book as appropriate.
4. (Optional) Do one of the following:
• To add an attachment, choose Attach. For more information on attachments, see Working with
Attachments (p. 22).
Version 1.0
18Amazon WorkMail User Guide
Sending Email from an Alias
• To mark the message as important or high priority, low priority, or for follow-up, choose the
exclamation mark (!), down arrow, or flag icon.
• To mark the message for follow-up or as a completed task, choose the flag or the checkmark icon.
• To save the message as a draft in the Drafts folder, choose Save.
5. Enter your text in the lower half of the contents pane, and choose Send.
Sending Email from an Alias
You can send and receive email using an alias that your administrator configures for you. Recipients
outside of your organization then see the sender as your alias address instead of your primary address.
For information about configuring aliases, see Edit User Email Addresses.
Note
If you send an email from an alias to someone in your organization, the message is still received
from your primary address.
To send an email from an alias
1. In the Amazon WorkMail web application, choose the mail icon on the shortcut bar and choose +
New item, New email.
2. For From, type the alias from which to send email.
Tip
To include a display name, use the SMTP standard format Your Name
.
3. When you're ready to send the email, choose Send.
Note
For information about sending email as a delegate, see Working with Delegates (p. 40).
Copying or Moving Email Messages
You can copy or move a message from one folder to another.
To copy or move a message
1. In the Amazon WorkMail web application, choose the mail icon on the shortcut bar.
2. Do one of the following:
• To copy an item, select the message in the contents pane and choose Copy/Move.
• To copy more than one message, press the Ctrl key while you select each message in the contents
pane, and then choose Copy/Move.
Version 1.0
19Amazon WorkMail User Guide
Printing Email Messages
• To move a single message, drag the item to its new location.
Tip
The folder names directly under the dragged message are highlighted and show the
target location when you release the message.
• To move multiple consecutive messages, press the Shift key while you select all the messages to
move, and then drag them to the desired folder.
• To move messages that are not consecutive, press the Ctrl key while you select each message to
move, release the Ctrl key, and then drag them into the designated folder.
3. In the Copy/move messages dialog box, select the destination folder and choose either Copy or
Move.
Printing Email Messages
If you have a printer attached to your computer and your computer is set up to print documents, you can
print your messages.
To print a message
1. In the Amazon WorkMail web application, on the shortcut bar, choose the mail icon.
2. In the navigation pane, select the folder that contains the message to print.
3. In the contents pane, select the message to print and choose Print on the menu bar.
Deleting Email Messages
When you no longer need an email message, you can delete it. Deleting unwanted email also helps you
to free up space in your inbox.
To delete a message
1. In the Amazon WorkMail web application, choose the mail icon on the shortcut bar.
2. Do one of the following:
• In the contents pane, select a message and press the Delete key.
• In the contents pane, open the message and choose Delete.
• In the Message tab, choose Delete.
If you mistakenly delete a message, calendar item, or contact, you can restore it. All deleted email,
calendar items, and contacts are stored in the Deleted Items folder in the application.
Note
You can only restore items that are still in the Deleted Items folder. If you've emptied the
Deleted Items folder, those items are unrecoverable.
To restore a deleted item
1. In the Amazon WorkMail web application, choose the mail icon on the shortcut bar.
2. In the Deleted Items folder, select the message to restore and choose Copy/Move.
Tip
You can also choose the plus sign (+) on the tab bar.
3. In the Copy/move messages dialog box, select the destination folder and choose Move.
Version 1.0
20Amazon WorkMail User Guide
Working with Email Rules
Working with Email Rules
Use email rules to route emails from your mailbox in Amazon WorkMail. You can forward or redirect
emails to external email addresses and to Amazon WorkMail users, resources, or groups, but not to
personal distribution lists in your Contacts folder.
To create an email rule
1. In the Amazon WorkMail web application, choose the gear icon.
2. Choose Email rules, New.
3. For Rule name, enter a name, and select Active rule.
4. For Conditions, choose the conditions for the rule, such as is sent only to me.
Note
To match a string with special HTML characters for the condition Includes these rules in
the body, remove any left angle brackets from the string. This allows matching against
email body text that contains HTML markup.
5. For Actions, choose the actions for the rule, such as Move message to folder.
6. Choose OK, Save changes.
To create an email forwarding rule
1. In the Amazon WorkMail web application, choose the gear icon.
2. Choose Email rules, New.
3. For Rule name, enter a name, and select Active rule.
4. For Actions, choose Forward the message to, Select recipient(s). Enter the email addresses to
forward email to, and choose To, OK.
• Optionally, choose additional actions, such as Delete the message or Move message to folder.
5. Choose OK, Save changes.
6. The recipient of the forwarded email sees that it was forwarded from you, and a copy of the email
remains in your mailbox.
Bounced emails are not forwarded.
To create an email redirect rule
1. In the Amazon WorkMail web application, choose the gear icon.
2. Choose Email rules, New.
3. For Rule name, enter a name, and select Active rule.
4. For Conditions, choose is sent to, Select recipient(s). Enter the user account from which to redirect
email, and choose To, OK.
• Optionally, choose additional conditions such as received from or includes these words in the
subject.
5. For Actions, choose Redirect the message to, Select recipient(s). Enter the email addresses to
redirect email to, and choose To, OK.
6. Choose OK, Save changes.
7. The recipient of the redirected email sees it as coming from the original sender.
Emails that bounce and do not pass Sender Policy Framework (SPF) and DomainKeys Identified Mail
(DKIM) key checks are not redirected.
Version 1.0
21Amazon WorkMail User Guide
Working with Attachments
Working with Attachments
When sending an email, you can attach files from your hard drive or Amazon WorkDocs. You can also
download email attachments to your hard drive or Amazon WorkDocs.
Topics
• Adding Attachments to Email Messages (p. 22)
• Downloading Attachments (p. 22)
• Unsupported Attachment Types (p. 22)
Adding Attachments to Email Messages
To attach a file, create an email message, then choose Attach.
If your IT administrator has enabled you to use Amazon WorkDocs, you can add files from Amazon
WorkDocs to messages and send them to other recipients.
To attach a file from Amazon WorkDocs
1. In the Amazon WorkMail web application, choose the new mail icon + on the shortcut bar.
2. Choose Attach and browse to the Amazon WorkDocs folder.
3. Select the files to attach and choose Attach Files.
Note
The total size of the attached files can’t exceed 25 MB.
Downloading Attachments
You can download attachments that you've received and save them to your hard drive.
To download attachments
1. In the Amazon WorkMail web application, choose the mail icon on the shortcut bar.
2. Open the context (right-click) menu for the attachment and choose Download.
If your IT administrator has enabled you to use Amazon WorkDocs, you can also save your email
attachments to Amazon WorkDocs for archiving or collaboration purposes.
To save an attachment to Amazon WorkDocs
1. Open the message with the attachment to save.
2. Open the attachment and choose Save to WorkDocs. The file is saved to your My Documents folder
in Amazon WorkDocs.
Unsupported Attachment Types
The following attachment types aren't supported:
Unsupported Attachment Types
.ade .fxp .mag .msc .prg .url
Version 1.0
22Amazon WorkMail User Guide
Working with Shared and Full Access Inboxes
.adp .gadget .mam .msh .reg .vb
.app .hlp .maq .msh1 .scf .vbe
.asp .hta .mar .msh2 .scr .vbs
.bas .inf .mas .mshxml .sct .vps
.bat .ins .mat .msh1xml .shb .vsmacros
.cer .isp .mau .msh2xml .shs .vss
.chm .its .mav .msi .sys .vst
.cmd .js .maw .msp .ps1 .vsw
.com .jse .mda .mst .ps1xml .vxd
.cpl .ksh .mdb .ops .ps2 .ws
.crt .lib .mde .pcd .ps2xml .wsc
.csh .lnk .mdt .pif .psc1 .wsf
.der .mad .mdw .plg .psc2 .wsh
.exe .maf .mdz .prf .tmp .xnk
Working with Shared and Full Access Inboxes
You can open inboxes that other users share with you or that your administrator grants you permission
to access.
For information about sharing your inbox with another user, see Sharing Your Inbox with Another
User (p. 42).
Topics
• Opening Shared Inboxes (p. 23)
• Opening Full Access Inboxes (p. 24)
Opening Shared Inboxes
You can open an inbox that another user has shared with you.
To open a shared inbox
1. In the Amazon WorkMail web application, on the shortcut bar, choose the mail icon.
2. At the bottom of the navigation pane, choose Open other inbox.
3. In the Open other folders dialog box, choose Name.
4. For Address Book, select the owner of the inbox to open, and choose OK.
5. In the Open other folders dialog box, for Folder type, choose Inbox.
6. Choose Show subfolders, OK.
The shared mail folders are now visible in the navigation pane.
Version 1.0
23Amazon WorkMail User Guide
Opening Full Access Inboxes
Note
The shared folders are stored in your Amazon WorkMail web application profile. The next
time you log in to the Amazon WorkMail web application, the opened folders are still
displayed.
If you receive a message saying You have insufficient privileges to open this
folder, contact the owner of the folder and ask them to grant you access.
To change folder permissions, in the navigation pane, right-click the folder, choose
Properties, Permissions.
7. To close a shared folder, open the context (right-click) menu for the shared folder, and choose Close
store.
Opening Full Access Inboxes
You can open all the folders in an inbox for which your administrator has given you full access.
To open a full access inbox
1. In the Amazon WorkMail web application, on the shortcut bar, choose the mail icon.
2. At the bottom of the navigation pane, choose Open other inbox.
3. In the Open other folders dialog box, choose Name.
4. For Address Book, select the owner of the inbox to open, and choose OK.
5. In the Open other folders dialog box, for Folder type, choose All.
The shared inbox is now visible in the navigation pane.
Note
The shared inboxes are stored in your Amazon WorkMail web application profile. The next time
you log in to the Amazon WorkMail web application, the opened inboxes are still displayed.
If you receive a message saying You have insufficient privileges to open this
folder, contact your administrator and ask them to grant you access.
To close a shared inbox, open the context (right-click) menu for the shared inbox, and then choose Close
store.
Sending Encrypted or Signed Email
With S/MIME, you can send signed or encrypted emails inside and outside of your organization. After
you configure S/MIME in the email client settings, all emails that you send are automatically signed.
Encryption options depend on different email clients and respective platforms.
Note
The Amazon WorkMail web app client is not supported.
To configure S/MIME in Windows Outlook
1. Get the certificate (*.p12) file from your administrator or third-party provider and save it to a
folder.
2. Right-click the file and choose Install PFX.
3. Choose Current User, Next, select the *.p12 file, and then choose Next.
4. Enter the password and choose Next.
5. Make sure that Automatically select the certificate store is selected and choose Next.
Version 1.0
24Amazon WorkMail User Guide
Sending Encrypted or Signed Email
6. Choose Finish.
7. Perform the following steps in Windows Outlook:
1. Choose File, Options, Trust Center, Trust Center Settings, Email Security, and Settings.
2. In the Change Email Security dialog box, choose Choose and select the installed certificate.
3. Choose OK, select one or all applicable options, and choose OK.
8. If all email recipients have certificates in the Global Address List (GAL) or Contacts, then all emails
sent are automatically encrypted. Otherwise, you receive a warning message and can decide to send
an unencrypted message or cancel.
To configure S/MIME in iOS Mail
1. Get the certificate (*.p12) file from your administrator or third-party provider in an email.
2. Open the email attachment and choose Install.
3. Enter the PIN and follow the instructions.
4. Choose Settings, Mail, Accounts, select your account, and then choose Account, Advanced Settings.
5. Enable S/MIME and choose one or both of the options to sign or encrypt emails. If you chose
Encrypt by Default, then all emails sent are automatically encrypted.
6. When you type an email address in the To field, iOS loads the user certificate from the Global
Address List (GAL) or from Contacts. If the certificate is not found, then the red unlocked icon means
that the email can’t be encrypted.
To configure S/MIME in Android Nine and the Samsung Mobile devices native mail app
1. Get the certificate (*.pfx or *.p12) file from your administrator or third-party provider in an email.
2. Download the attached certificates.
3. Open the Android Nine app and choose Email Settings, Accounts, select your account, and then
choose Security options.
4. To enable encryption, choose Encrypt ongoing emails. Under Email encryption cert, choose Install,
select your certificate used for encrypting your email message, and then choose Allow.
Note
If you allow Email encryption cert, when you send an email, the app loads and validates
the user certificate from the Global Address List (GAL) or from a contact. If the certificate is
found for the recipient, the email is sent as encrypted. Otherwise, an error is displayed and
the email is not sent. You must disable the Email encryption cert setting.
5. To enable signing, choose Sign all outgoing emails. Under Email signing cert, choose Install, select
your certificate used for signing your email message, and then choose Allow.
To configure S/MIME in Outlook for Mac 2016
1. Install the certificate on macOS:
a. Get the certificate (*.p12) file from your administrator or third party provider, and save the file
to a folder.
b. Double-click the certificate file to open Keychain Access and approve to add the certificate to
your keychain.
c. In the list of certificates in your keychain, view the newly installed certificate.
2. In Outlook for Mac, choose Tools, Accounts, select your account, and then choose Advanced,
Security.
3. In Digital signing and Encryption, choose the newly installed certificate from the list and choose
from the following options:
Version 1.0
25You can also read