Digital Presentations - ncert

Page created by Clara Baker
 
CONTINUE READING
Digital Presentations - ncert
5
                                                                  Digital
                                                               Presentations

                  Introduction
                  Presenting information clearly and effectively is a key
                  skill to get your message or opinion across the audience.
                  Today, presentation skills are highly required in almost
                  every field. Presentation skills include content as well as
                  flow of presentation. There are a number of advantages
                  of using a presentation prepared with computer.
                  A presentation includes
                      • Regular text
                      • Lists items
                      • Table
                      • Graphics elements
                      • Sound and Video
                      • Animation
                      Presentation is used to present the project proposal
                  in business organisations. Presentation is highly used
                  in teaching and training. The concepts that are difficult
                  to explain, can be easily presented to the audience in
                  a simple way using any presentation software. For
                  example, a teacher wants to teach any biological system

Unit 5.indd 137                                                                 9/26/2018 10:08:30 AM
Digital Presentations - ncert
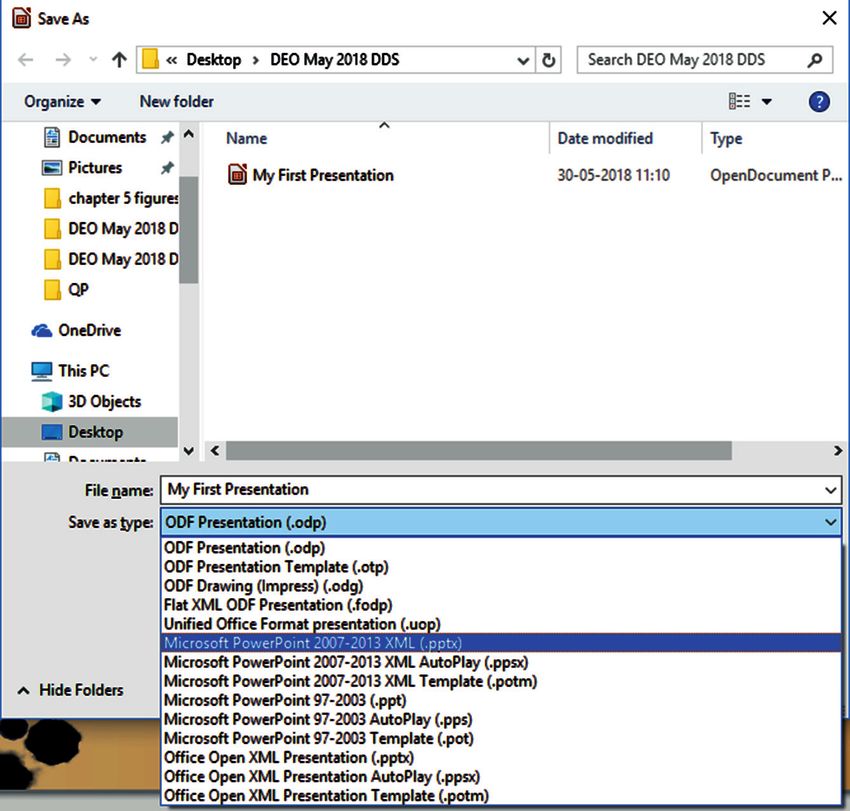
Notes   of human a complete system can be demonstrated
                                using pictures and animation very effectively through
                                a presentation. Machine parts and operation of various
                                machines can be easily shown. We can also print the
                                presentation in different ways.
                                    Impress is one of the important components of
                                LibreOffice suite from The Document Foundation. It is
                                free, open source and widely used by large community
                                to create presentation. You can create presentation
                                using text, graphics and animations for class lecture,
                                corporate training and invited talk. The presentation
                                created in LibreOffice Impress can be opened in other
                                presentation software like MS PowerPoint.
                                    Using Impress, we can read MS PowerPoint
                                presentations and its templates. We can also open
                                any Impress presentation in MS Power Point but with
                                slightly different look and feel. LibreOffice Impress
                                runs on Windows, Linux, and Mac. It may look slightly
                                different on different operating system.
                                    If you don’t have any presentation software on
                                your computer and you have an Internet connection
                                then you can easily use the presentation software. The
                                presentation software like MS-Office 365 PowerPoint,
                                Google Presentation or Microsoft SkyDrive PowerPoint are
                                available to make your presentation. These are the software
                                available under the cloud platform in the Internet.
                                    In LibreOffice Impress, an effective presentation can
                                be created by using different multimedia elements. The
                                text editing and formatting, such as bold, colours, text
                                alignment, borders, drawing, etc., of presentation in
                                Impress uses the same commands and options as that
                                of Writer and Calc.
                                Characteristics of a good quality presentation
                                A good quality presentation is required to convey the
                                message clearly to the audience. The following points
                                or guidelines have to be taken care of while preparing a
                                good quality presentation.
                                  (a) Number of lines: On one page or slide try to
                                      include 5 to 8 lines. Adding more number of lines
                                      or a paragraph may take more time to read as the
                                      font size may become too small.
                  138                                  Domestic Data Entry Operator – Class IX

Unit 5.indd 138                                                                             9/26/2018 10:08:30 AM
Digital Presentations - ncert
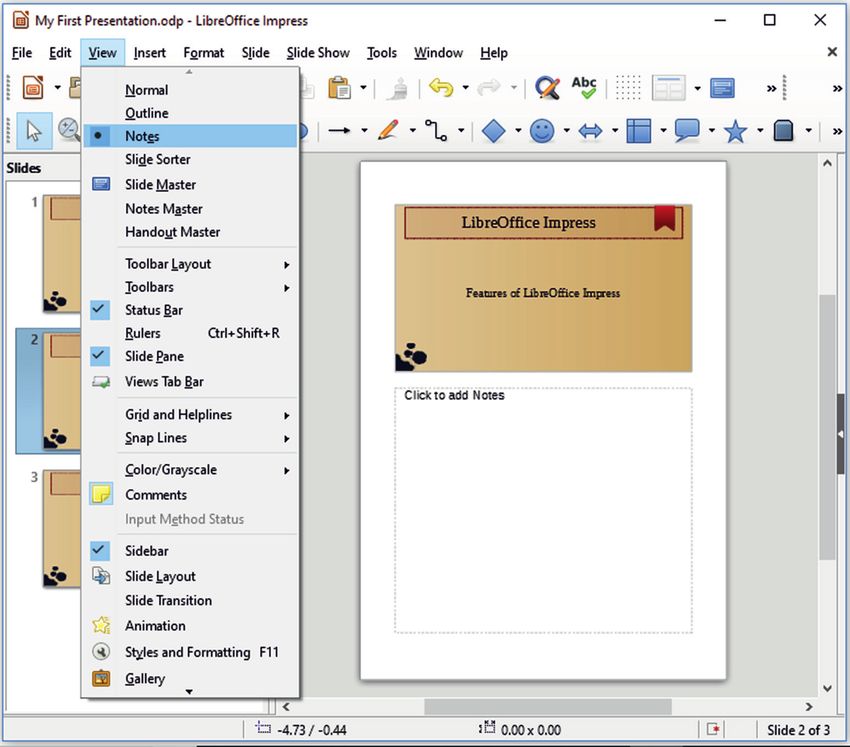
(b) Font-size: While preparing the presentation,           Notes
                        you need to take care of the room size, distance
                        between the screen and the audience. Accordingly
                        the font size of the texts in the presentation may
                        be decided. It will be appropriate to keep the font
                        size at 32 points or more, so that the audience
                        can easily read the contents.
                    (c) Correct use of grammar and language: The
                        grammar and language should be correct in your
                        presentation, because if you make a mistake that
                        will replicate to the number of persons in the
                        audience. So you must present the contents error
                        free in terms of grammar, spellings of language by
                        reading the slides carefully.
                    (d) Inserting    images,    drawings,   tables    or
                        graphs: Try to avoid inserting more than two
                        graphics (images, drawings, tables or charts) in
                        any slide. Inserting too many graphics becomes
                        confusing for the audience.
                    (e) Use of colours: Try to use dark colours, bold
                        letters with different fonts to highlight certain
                        points. Use fair or silent background colours
                        and dark colours for fonts. Give attention to the
                        contrast of background and foreground colours.
                        Bring the variation in colours of the fonts as per
                        the readability. Use of dark-coloured fonts over a
                        dark background, or taking only one colour red
                        throughout the whole presentation is not a good
                        practice. Consider the factor that which colour
                        will be more comfortable for the human eyes to
                        see. Use different colours somewhere in between
                        the presentation to show the importance of words.
                   (f)   Animation and videos: Do not include more
                         than one animation or video in one slide. Including
                         more than one, will overlap the sounds and may
                         cause confusion to the audience.
                   (g)   Pay attention to target group: While creating
                         the presentation, give attention to meet the
                         requirements of the target audience. Focus on
                         the contents, sequence of the topics in such a
                         way that it makes a flow to attract the attention
                         of the audience from the objectives. Otherwise,

                  Digital Presentations                                                139

Unit 5.indd 139                                                                        9/26/2018 10:08:30 AM
Digital Presentations - ncert
the audience might be lost. For example, if you
                                                          include a video or animation of 5 minutes, it will
                                                          divert the attention of the audience and the whole
                                                          objective of the presentation may be lost.

                                                     Let's Practice 1
                                                       1. List the advantages of Impress with multimedia
                                                          projector for presentation purpose.
                                                       2. List the possible multimedia contents that are
                                                          included while creating a presentation.
                                                       3. List the important points to be considered while
                                                          making an attractive presentation.
                                                       4. Prepare the storyboard of presentation that you
                                                          wish to create.

                                                    Getting started with LibreOffice Impress

                                                    Starting LibreOffice Impress
                                                    To start LibreOffice Impress, just double click its shortcut
                                                    icon on the desktop. In general, you will find a shortcut
                                                    of LibreOffice on the desktop or on the Quick Launch
                                                    Taskbar. The process may slightly differ according
                                                    to the operating system (Windows or Linux) that you
                                                    are using.
                                                        To start LibreOffice Impress in Windows, double
                                                    click its shortcut icon on the desktop. Or click on the
                                                    Start or Windows button, select LibreOffice → LibreOffice
                                                    Impress from application window.
                                                        In Ubuntu Linux, open the LibreOffice Impress by
                                                    any of the following options.
                                                        • Find the LibreOffice Impress icon on the
                                                           application launcher, and click it to start the
                   Fig. 5.1: Starting LibreOffice
                              Impress
                                                           application.
                                                        • Find the LibreOffice Impress icon through “Show
                                                           Applications” icon on the launcher. To search,
                                                           enter the word “impress’’ and select LibreOffice
                                                           Impress from the search results.
                                                        After starting Impress, its initial window will open as
                                                    shown in Figure 5.1. It shows the various parts of the
                                                    Impress application window.

                  140                                                       Domestic Data Entry Operator – Class IX

Unit 5.indd 140                                                                                                  9/26/2018 10:08:30 AM
Digital Presentations - ncert
(a)    Parts of Impress window: The parts of Impress
                          main window are shown in the Figure 5.2.
                          (i) Title bar: It contains the name of presentation
                          file with extension (.odp) and presentation
                          application as LibreOffice Impress. It is always of
                          the top of the LibreOffice Impress title bar window.
                          Window manipulation buttons are located in the
                          right corner. These are Minimize, Maximize/
                          Restore and Close buttons.

                                               Fig. 5.2: Parts of the Impress window
                          (ii) Menu Bar: It contains the menus with logically
                          grouped commands. All the commands required
                          to create the presentation are found here. The
                          various menus are as under:
                      •   File: File menu is used to perform basic operations
                          on the presentation (saving, opening an existing
                          one, creating a new one, etc.).
                      •   Edit: This menu contains functions for copying,
                          cutting and pasting text segments.
                      •   View: It is used for window view adjustment
                          (different view types are selected, zooming, etc.)
                          and for adding toolbars.
                      •   Insert: This menu is used to insert various
                          objects like tables, shapes, textbox, and charts
                          into a presentation.

                  Digital Presentations                                                141

Unit 5.indd 141                                                                        9/26/2018 10:08:31 AM
Digital Presentations - ncert
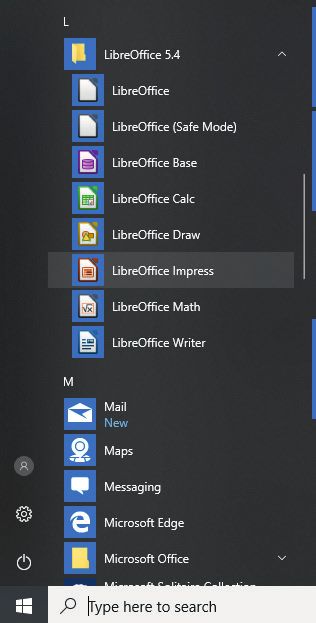
Notes     • Format: It contains functions for text formatting.
                                  • Slide: It is used to insert new slide, duplicate
                                    slide or delete slide.
                                  • Slide show: It is a tool for viewing presentations.
                                  • Tools: They are used to control spelling in a
                                    presentation.
                                  • Window: It is used for viewing already opened
                                    presentations.
                                  • Help: It is used to see the help of any topic on Impress.
                                (iii) Various toolbar: There are various toolbar to
                                      manage GUI of Impress. You can use these toolbar
                                      as and when required for various tasks.
                                   • Standard toolbar: Each menu of the menu bar
                                      are placed here as icons for easy operations.
                                   • Slide pane: It is a vertical pane to see the slide
                                      in small size to navigate on any slide easily. As
                                      you click on particular slide, that slide will be
                                      displayed in larger size in middle of the window.
                                      Now you can modify and make required changes,
                                      add or remove effects to complete the slide.
                                   • Workspace: This is the central part of the window,
                                      where the presentation slides are created, text is
                                      entered, images and other objects are inserted.
                                   • Slides: This is in the left part of the window,
                                      display presentation slides in the thumbnail form.
                                      The pane can be closed and opened if you click on
                                      the Slide Pane command in the View menu.
                                   • Tasks pane: Task pane is on the right part of the
                                      window. Task pane is made up of five components.
                                      All components are NOT open as you start this
                                      pane. You need to select the relevant object to
                                      open it.
                                   • Master pages: You can modify the base
                                      architecture of slide. You can make the
                                      presentation base and the common style for all
                                      slides using this. There are a few default slide
                                      master pages available in Impress.
                                   • Layouts: You can prepare your own layout and
                                      keep these safe for future use using this software.

                  142                                  Domestic Data Entry Operator – Class IX

Unit 5.indd 142                                                                             9/26/2018 10:08:31 AM
Digital Presentations - ncert
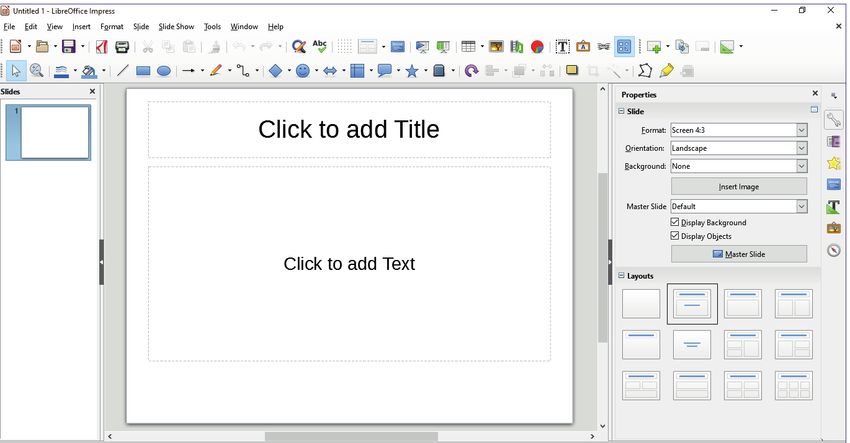
You can select any of these and modify it or use it    Notes
                          as required.
                      •   Table design: This gives styles for creating tables.
                          Anyone can modify the style according to his or
                          her own choice.
                      •   Custom animation: There are many animation
                          features for the texts, drawings, etc., in a slide.
                          Using this feature you can add, change or remove
                          animation features.
                      •   Slide transition: Using slide transition, you can
                          set the way, how the slide will appear during
                          presentation. There are too many ready-made
                          alternatives available. You can also modify
                          features like speed of transition, sound effects,
                          automated transition, etc.
                      •   Drawing toolbar: Using drawing toolbar, you can
                          make various artistic works in the presentation to
                          make your presentation effective.
                      •   Insertion point: It is a location of the cursor
                          where your text will appear as you type anything
                          (means location where the cursor is blinking).
                      •   Status bar: It displays information about the
                          active presentation, the current position of the
                          cursor and the zoom slider. It can be adjusted
                          according to user preferences. Status bar can
                          be turned off in the View menu by selecting the
                          Status bar command.
                      •   Zoom control: This tool is used to zoom in or
                          zoom out the slide.
                  Closing LibreOffice Impress
                  To close the Impress application directly, select
                  the manipulation button Close (×), or select the File
                  Menu→Exit command or use the keyboard shortcut
                  Alt+F4 or Ctrl+Q.
                  Creating a Presentation
                  Creating a presentation using template
                  To create a new blank presentation, select the File
                  Menu→New or click on the icon New or use the
                  combination of keys Ctrl+N.

                  Digital Presentations                                                  143

Unit 5.indd 143                                                                          9/26/2018 10:08:31 AM
Digital Presentations - ncert
A window ‘Select
                                                                     a      Template’      will
                                                                     appear.      Choose     a
                                                                     template as per your
                                                                     choice     by    clicking
                                                                     on the template as
                                                                     shown in Figure 5.3
                                                                     to start preparing the
                                                                     presentation.
                                                                         Prepare your
                                                                     presentation using
                                                                     template. The selected
                                                                     template appears in
                                                                     the form of title slide
                                                                     layout as shown in
                                                                     Figure 5.4.
                                                                         When creating a
                                                                     presentation, the first
                        Fig. 5.3: Select a template                  slide is normally the
                                                                     title slide. You can use
                                   either a blank layout or one of the title layouts as per
                                   your title slide. Now enter the title text in this slide as
                                   shown in Figure 5.5.

                            Fig. 5.4 : Creating a Presentation using template

                  144                                          Domestic Data Entry Operator – Class IX

Unit 5.indd 144                                                                                     9/26/2018 10:08:31 AM
Digital Presentations - ncert
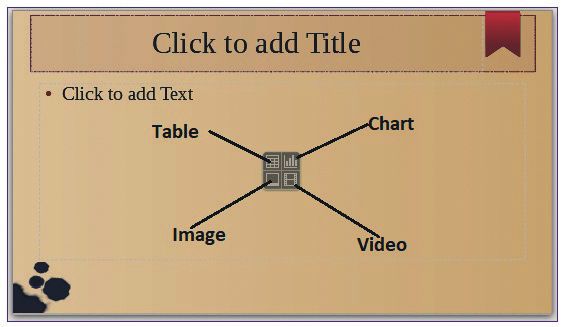
Fig. 5.5 : Enter title of the slide
                                                                                                        Fig. 5.6: Slide Layouts

                  Selecting slide layout
                  The appropriate layout can be
                  selected from Layouts section
                  in the Properties window. The
                  layouts included in LibreOffice
                  range from a blank slide
                  to a slide with six content
                  boxes and a title as shown in
                  Figure 5.6.
                     You can also select a slide
                  layout by using menu, Slide
                  → Slide Layout → Title slide
                  as shown in Figure 5.7. The
                  layout you have selected will
                  be applicable in the right side
                  of the window. Alternatively,
                  you can select the slide in the
                  Slides Pane, it will appear in
                  the Workspace and here you
                  can select the required layout
                  from the Layouts section in
                  the Sidebar.
                                                                            Fig. 5.7: Selecting slide layout – Title slide

                  Digital Presentations                                                                                           145

Unit 5.indd 145                                                                                                                   9/26/2018 10:08:31 AM
Digital Presentations - ncert
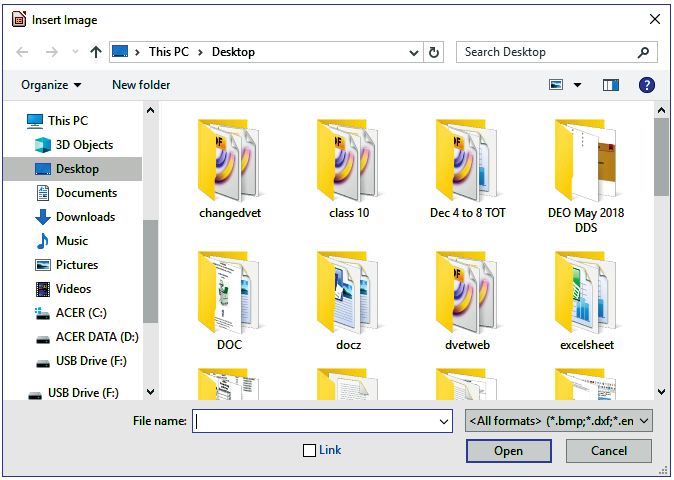
Notes         (a)   Adding text: To add text to a slide that
                                            contains a text frame, click on Click to add
                                            text in the text frame and then type your
                                            text. The Outline styles are automatically
                                            applied to the text as you insert it. The
                                            Figure 5.5 shows the slide after adding
                                            the text.
                                      (b)   Saving a presentation: While creating a
                                            presentation, you can save it to the disk with
                                            some name, so that the content may not be
                                            lost or to use the presentation further.
                                   (i) To save the presentation, you are working
                                       on, follow the steps as given below: Select
                                       the File Menu→Save, or, use the shortcut
                                       key combination Ctrl+S, or click on the Save
                                       button on the Standard Toolbar.
                                 This will open the Save dialog box as shown in
                                	 
                                 Figure 5.8, which allows to select the location
                                 on the disk and assign the name to save
                                 the presentation.

                                             Fig. 5.8 : Saving the presentation

                  146                                 Domestic Data Entry Operator – Class IX

Unit 5.indd 146                                                                            9/26/2018 10:08:31 AM
(ii) To change the location in drive open the           Notes
                               directory in which you want to save the file
                         (iii) Enter a name of presentation file
                         (iii) Click Save
                         (vi) If the presentation is already saved the
                              contents will be updated in that presentation
                              file.
                      • Saving a presentation with different name:
                        To save the presentation with a different name,
                        select File→ Save As or, use the shortcut key
                        combination Shift+Ctrl+S. In Save As dialog
                        box, a new file name can be entered as shown in
                        Figure 5.9 in the File Name field. Saving is finished
                        by using the Save button.

                              Fig. 5.9: Saving presentation in different format

                     •   Saving with a different format: By default the
                         presentation is saved with .odp extension. To
                         save a presentation as another file type, select
                         File→Save As. In the Save As dialog box, click on

                  Digital Presentations                                                   147

Unit 5.indd 147                                                                           9/26/2018 10:08:31 AM
Notes          the All Formats drop-down menu and select the
                                       choice from the offered programs, for example,
                                       Microsoft PowerPoint 97/2000/XP/ 2003 (*.ppt)
                                       or (*.pptx) as shown in Figure 5.9.
                                (c)    Running a slide show
                                       (i) To run the slide show, click Slide Show→Start
                                           from First Slide on the main menu bar or
                                           Click the Slide Show icon on the Presentation
                                           toolbar or the Slide Sorter toolbar or Press F5.
                                           The slide show starts to run.
                                      (ii) By clicking the mouse button, you can move
                                           to the next slide. Or you can use the arrow
                                           keys on the keyboard to go to the next slide
                                           or the previous one. You can also Press the
                                           Spacebar key on the keyboard to proceed to
                                           the next slide.
                                      (iii) Right-click anywhere on the screen to open a
                                            menu for navigating the slides and set other
                                            options.
                                      (iv) In the last slide, you will get a message Click
                                           to exit presentation. Just click the mouse
                                           button or press any key on the keyboard to
                                           exit the presentation.
                                      (v) If you want to exit the slide show at any time,
                                          just press the Esc key.
                                 •     Saving a presentation as HTML: To publish
                                       the presentation on the web or to open the
                                       presentation in the web browser, save it in HTML
                                       format (HyperText Markup Language), which
                                       could be opened in any web browser. To save the
                                       presentation as html:
                                          (i) Click on File → Export
                                         (ii) Select the directory in which you want to
                                              save the file
                                        (iii) Enter a file name
                                        (iv) Click Save
                                 •     Save a file in PDF format: A Portable Document
                                       Format (PDF) of the presentation can be created
                                       by saving a file in the PDF format, which can
                                       be viewed with the free Adobe Acrobat Reader.

                  148                                   Domestic Data Entry Operator – Class IX

Unit 5.indd 148                                                                              9/26/2018 10:08:31 AM
However, it cannot be edited. To save a file in the
                           PDF format:
                           (i) Click on File → Export as PDF
                          (ii) Select the directory in which you wish to save
                               the file
                         (iii) Enter a file name
                         (iv) Click Save
                   (d) Closing a presentation
                        (i) To close a presentation, select File Menu→
                            Close or use the keyboard shortcut keys Ctrl+W.
                       (ii) To open a presentation again, select File→
                            Open command, or, use the keyboard shortcut
                            keys Ctrl+O.
                      (iii) It will open the Open dialog box. Specify the
                            location of the file that is to be opened in the
                            Look in field, select the files and, open it with
                            the Open command.
                   (e)    Using Help
                          Help function is located in the Help menu. By
                                                                                       Fig. 5.10 : Help Function
                          selecting the LibreOffice Help tab, a window
                          is opened with a list of available help topics.

                                                Fig. 5.11 : LibreOffice Impress Help

                  Digital Presentations                                                                        149

Unit 5.indd 149                                                                                                    9/26/2018 10:08:32 AM
In the Search item text box you can enter a term
                                                     to explore. The quickest way to open the Help
                                                     function is by using the F1 function key.

                                            Working with slides
                                            Now to carry forward the presentation work, the next
                                            slide has to be added. The new slide can be inserted
                                            into the presentation by inserting a new slide as well as
                                            inserting a duplicate slide. Inserting a duplicate slide
                                            will insert the copy of the existing or current slide into
                                            the presentation.

                                            Inserting a duplicate slide
                                            Sometimes, you may wish to insert the same slide as
                                            the previous ones just like the first page of the book has
                                            the title of the book and the same title also appears on
                                            the cover page of the book. In such a case you may copy
                                            the slide to the next slide. In simple words, you want
                                            to duplicate an already created slide. So to insert the
                                            duplicate slide:
                                                    (i) Select the slide you want to duplicate from
                                                        the Slides Pane.
                                                   (ii) Select from menu bar Slide → Duplicate Slide.
                                                 (iii) Or, right-click on the slide and select
                                                        Duplicate Slide from the menu.
                                                                        (iv) Or, right-click on a slide
                                                                             in Workspace and select
                                                                             Slide → Duplicate Slide
                                                                             from the menu.
                                                                        (v) Or, click the Duplicate
                                                                             Slide     icon    in    the
                                                                             Presentation toolbar.
                                                                        (vi) You     can    insert   the
                                                                             duplicate slide in your
                                                                             presentation by using
                                                                             one of the above options.
                                                                             After inserting a duplicate
                                                                             slide the presentation
                                                                             will look like as shown in
                                                                             Figure 5.12.
                        Fig. 5.12 : Inserting duplicate slide

                  150                                               Domestic Data Entry Operator – Class IX

Unit 5.indd 150                                                                                          9/26/2018 10:08:32 AM
Inserting new slides
                  To insert a new slide, use any of the following way.
                         (i) Select from menu bar Slide → New Slide.
                        (ii) Or, right-click on a slide and select New Slide
                             from the context menu.
                       (iii) Or, right-click in an empty space in the
                             Workspace and select Slide → New Slide
                             from the context menu.
                       (iv) Or, click the New Slide icon in the Presentation
                             toolbar.
                        (v) Or, use the keyboard shortcut Ctrl+M.
                       (vi) Now insert the new (third) slide into the
                             presentation by using one of the options given
                             in the ‘Insert new slide’. After inserting a new
                             slide the presentation will look as shown in
                             Figure 5.13 (b).

                    Fig. 5.13 (a) After inserting new slide      Fig. 5.13 (b) Inserting new slide

                  Slide layout
                  After inserting a new slide, the layout contains one or
                  more content boxes. Each of these content boxes can be
                  configured to contain text, movies, images, charts or
                  tables. You can select the icon based on the content by

                  Digital Presentations                                                              151

Unit 5.indd 151                                                                                      9/26/2018 10:08:32 AM
clicking on the corresponding icon that you want to
                                         display as shown in the middle of the content box
                                         (Figure 5.14).
                                                                       To change the layout of
                                                                   a slide, just select the slide
                                                                   in the Slides Pane. It will
                                                                   appear in the Workspace
                                                                   and select the desired
                                                                   layout from the Layouts
                                                                   section in the Sidebar.
                                                                   Several layouts contain one
                                                                   or more content boxes. To
                                                                   use the content box for text,
                                                                   click on Click to add text.
                                                                   Enter the text as you want
                        Figure 5.14: Selecting content type        to display in the slide.

                                     Copying and moving slides
                                     The slides once created can be reused within the
                                     presentation or in another presentation. To move the
                                     slide to another location use cut and paste process. To
                                     copy the slide, use the process of copy and paste.
                                       (a)     Cut and paste: To cut and paste something in a
                                               presentation
                                               (i) Select the slide by marking it in the Slide
                                                   Shorter view, or on the left side of the screen
                                                   in the Normal view.
                                              (ii) Click on the right mouse button, and select
                                                   the Cut option (if you want to move it) or
                                                   Copy option (if you want to copy it), from the
                                                   context menu.
                                             (iii) Mark the place in the presentation where you
                                                   want to move or copy the slide.
                                             (iv) Right click the mouse button, select the Paste
                                                   option from the context menu.
                                       (b)     Using keyboard shortcuts: Cut, Copy and
                                               Paste operations can also be performed by the
                                               combination of keys:
                                               (i) Cut – Ctrl + X		   (ii)  Copy – Ctrl + C
                                             (iii) Paste – Ctrl + V

                  152                                          Domestic Data Entry Operator – Class IX

Unit 5.indd 152                                                                                     9/26/2018 10:08:32 AM
(c)      Drag and drop copying and moving method:
                            The copy, cut and paste operations can also be
                            performed by ‘Drag and Drop’ method:
                            (i) Select the slide that you want to copy.
                           (ii) Click and hold the left mouse button on the
                                marked slide, and at the same time press and
                                hold the Ctrl button.
                          (iii) Move the mouse cursor to the desired location.
                          (iv) Release the left mouse button, and then
                                release the Ctrl button. The copy is pasted to
                                another location.
                           (v) Moving the text via ‘drag and drop’ method
                                can be done in the same way like copying, but
                                without using the Ctrl button.

                         Fig. 5.15 (a) Cut slide          Fig. 5.15 (b) Copy slide     Fig. 5.15 (c) Paste slide

                   (d) Deleting slides: To delete any slide from a
                        presentation, first it should be selected. To delete
                        one or more slides
                        (i) Select the slide(s) by marking them in the
                            Slide Pane
                       (ii) Right click the mouse button on the selected
                            slide
                      (iii) Select the Delete Slide option in the context
                            menu
                                                                                     Fig. 5.16 Delete slide

                  Digital Presentations                                                                       153

Unit 5.indd 153                                                                                               9/26/2018 10:08:32 AM
(iv) Another quick way to delete the slide is just
                                                                   select the slide and press the Delete button
                                                                   from the keyboard
                                                        (e)     Renaming a slide: The slides are named as
                                                                slide1, slide2,… by default. It is possible to give
                                                                the name to the slide by renaming it. To rename a
                                                                slide:
                                                                (i) Select the slide by marking them in the Slide
                                                                    Pane
                                                               (ii) Right click the mouse button on the selected
                                                                    slide
                                                              (iii) Select the Rename slide option in the context
                                                                    menu
                                                              (iv) A Rename Slide dialog box will appear where
                        Fig. 5.17 : Rename slide                    you can assign the new name to the slide

                             Fig. 5.18: Rename Slide dialog box                   Fig. 5.19 : After renaming a Slide

                                                      Copying, moving and deleting content
                                                      Impress is the component of LibreOffice. So you can
                                                      use the same commands and options that of LibreOffice
                                                      Writer for text editing in LibreOffice Impress. To copy
                                                      or move some text or an object in the presentation to
                                                      another location (in the same presentation or another
                                                      presentation), it is necessary to first select the text.
                                                             (i) Select the text and click the right mouse button.
                                                            (ii) Select the Copy option from the context menu
                                                                 (keyboard shortcut: Ctrl + C) for copying or Cut
                                                                 option (keyboard shortcut: Ctrl + X) to cut.
                                                           (iii) Position the cursor on the location on the
                                                                 slide, to which you want to move or copy the
                                                                 content.

                  154                                                           Domestic Data Entry Operator – Class IX

Unit 5.indd 154                                                                                                        9/26/2018 10:08:32 AM
(iv) Press the right mouse button and select the         Notes
                              Paste option from the context menu (keyboard
                              shortcut: Ctrl + V).
                   (a)    Deleting the text: It is easy to delete the text of
                          the slides. The delete and backspace button on
                          keyboard is used to delete the text. The delete key
                          deletes the character on the right of the cursor,
                          and the backspace button deletes the character
                          on the left of the cursor. Pressing delete key or
                          backspace keys deletes one character at a time.
                          To delete the line or paragraph of text, first select
                          the text and then press the delete key. Alternately
                          you can use the cut option to delete the text.
                   (b)  Undoing and returning the changes: Impress
                        keeps the history of recent changes made. When
                        we execute a command on some text, for example
                        delete the text, we are able to reverse what we have
                        done. This is known as the undo function. It is also
                        possible after having undone the change, get it
                        back. This is called the redo function. These options
                        are located in the Standard toolbar, and can also be
                        performed using keyboard shortcut keys Ctrl + Z is
                        used for Undo and Ctrl + Y is used for Redo.
                     Sometimes you may apply any command or option
                  by mistake. To revert this mistake, there is a function
                  called as Undo. It returns the document to its previous
                  state. Pressing the key combination Ctrl+Z undoes
                  the last change you have made. Pressing it again, will
                  undoes one before that, and so on.
                           Alternately, use Edit→Undo. Using this
                           method, the menu will indicate what type of
                           operation you will be undoing. Another way to
                           do this is to press the undo icon on the function
                           bar.
                           Redo function is used to revert the result of
                           the Undo function. It can be used many times,
                           as the Undo function was used. To use this
                           function use Edit →Redo. If you want to rollback
                           your undo command, you can use redo. You
                           can also execute the redo function by pressing
                           the redo icon on the function bar, or by using
                           the keyboard shortcut Ctrl+Y.

                  Digital Presentations                                                   155

Unit 5.indd 155                                                                           9/26/2018 10:08:32 AM
View a presentation
                                               The presentation created in Impress can be viewed in a
                                               number of ways. One may wish to view the presentation
                                               in larger or smaller or in medium size. It is possible to
                                               view the presentation as per the user’s requirement.

                                               Controlling the size of the view
                                                    Zoom and View Layout dialog box opens in the View tab.
                                                    It is possible to select among the proposed values to
                                                            increase zoom, or enter your own value, which
                                                            must be a whole number.
                                                                Other ways to zoom are:
                                                                  (i) use of the Zoom slider on the Status bar
                                                                 (ii) use of the Zoom button on the Standard
                                                                      toolbar
                                                                (iii) use the menu option View → Zoom →
                                                                      Zoom, the Zoom and View Layout dialog
                                                                      box will open. Select the appropriate
                   Fig. 5.20 (a) Zoom & View Layout dialog
                                                                      option from it
                                                                Zoom slider on the Status bar has two
                                                            marked sections. If you are positioned in the
                                                            first highlighted section, the entire slide will
                   Fig 5.20 (b) Zoom in out using slider    display within the Workspace. If you position
                                                                              yourself to the second one, the
                                                                              increase of 100% of the slide,
                                                                              will be displayed.

                                                                         Workspace views
                                                                         The various workspace views are
                                                                         in the drop-down list of the View
                                                                         menu. These views are Normal,
                                                                         Outline, Notes, Slide Sorter, Slide
                                                                         Master, Notes Master, Handout
                                                                         Master. The appropriate view
                                                                         can be selected from the View
                                                                         menu.
                                                                         (a) Normal view: As shown in
                                                                         Figure 5.21, it is the main view
                                                                         for working with individual
                  Fig. 5.21: Normal View
                                                                         slides. This view is used to

                  156                                                   Domestic Data Entry Operator – Class IX

Unit 5.indd 156                                                                                              9/26/2018 10:08:32 AM
format and design and to add text, graphics,
                         and animation effects. In this view, the slide is
                         displayed in the
                         middle     of    the
                         window. On the
                         left side of the
                         window, the pane
                         with          slides
                         thumbnails (slides)
                         is displayed (if the
                         Slide    Pane      is
                         selected, from the
                         View menu).
                   (b)   Outline     view: As
                         shown in Figure
                         5.22, it contains all
                         the slides of the
                         presentation in a
                         sequence. It shows
                         each slide in the
                         outline format. Only
                         the text contained                     Fig. 5.22 :Outline View
                         in each slide is
                         displayed inside the
                         Workspace. It
                         displays slide text
                         in the form of a
                         structure.
                   (c)   Notes      view: As
                         shown in Figure
                         5.23, it is used to
                         add notes to a slide
                         for the information
                         of presenter. It is not
                         seen by the audience
                         while showing the
                         presentation.
                         It displays the
                         area in which the
                         notes, are used to
                         help during the
                         presentation.
                                                                Fig. 5.23 : Notes View

                  Digital Presentations                                                   157

Unit 5.indd 157                                                                           9/26/2018 10:08:32 AM
Notes    (d) Slide Sorter view: As shown in Figure 5.24, it
                                      contains all of the slide thumbnails. It is suitable
                                      for rearranging the slide order. It is used to sort
                                      slides with the ‘drag and drop’ method. Use this
                                      view to work with a group of slides or with only
                                      one slide.

                                                   Fig. 5.24 : Slide Sorter View

                                Formatting text
                                The contents of the slides can be formatted in various
                                ways. The most common way is to use the formatting
                                icons on the Formatting toolbar. Another way is by
                                selecting Format→Text from the menu bar, and the
                                third way is by using the keyboard shortcuts. The
                                various formatting options are explained below and
                                shown in the Figure 5.25.

                                             Fig. 5.25 : Formatting toolbar options

                  158                                     Domestic Data Entry Operator – Class IX

Unit 5.indd 158                                                                                9/26/2018 10:08:33 AM
(i) Font name: Click on the font type drop-down
                             display to see the list of fonts and select a
                             font name.
                        (ii) Size: Click on the font size drop-down display
                             to see the list of font sizes from where you can
                             select the font size.
                        (iii) Increase font size: Clicking on a with upward
                              arrow, will increase the size of the text
                              (Keyboard shortcut: Ctrl+]).
                        (iv) Decrease font size: Clicking on a with
                             downward arrow, will decrease the size of the
                             text (Keyboard shortcut: Ctrl+[).
                         (v) Bold: Clicking on a changes the text to bold
                             (Keyboard shortcut: Ctrl+B).
                        (vi) Italic: Clicking on a changes the text to italic
                             (Keyboard shortcut: Ctrl+I).
                       (vii) Underline: Clicking on a changes the text to
                             underline (Keyboard shortcut: Ctrl+U).
                      (viii) Strikethrough: Clicking on a draws a line
                             through the selected text.
                        (ix) Superscript : Clicking on ab raises the selected
                             text above baseline (Keyboard shortcut:
                             Shift+Ctrl+P).
                        (x) Subscript: Clicking on ab lowers the selected
                            the text above baseline (Keyboard shortcut:
                            Shift+Ctrl+B).
                        (xi) Font colour: Clicking on drop-down box (▼)
                             to the right of font colour icon opens the
                             colour pallet from where you can change the
                             font colour.
                       (xii) Highlighting: Clicking on drop-down box (▼)
                             to the right of highlight colour icon opens the
                             colour pallet from where you can change the
                             highlight colour.
                  There are other text formatting options that are used
                  sometimes while working with paragraphs.

                  Digital Presentations                                         159

Unit 5.indd 159                                                                 9/26/2018 10:08:33 AM
(i)     The alignment
                                                                                                        icons
                                                                                     are used to align the
                                                                                     text to the Left, Center,
                                                                                     Right, or Justify.
                                                                             (ii)    Align top, align center
                                                                                     vertically, align bottom
                                                                                     are used to align the
                                                                                     selected text to the top,
                                                                                     center or bottom of the
                                                                                     text box.
                                                                             (iii)   Bullets and
                                                                                     numbering: Creates
                                                                                     a bulleted or
                                                                                     numbered list from
                                                                                     selected paragraphs.
                                                                                     Click on the small
                                                                                     triangle to the right
                                Fig. 5.26: Selecting numbers                         of the icon to select a
                                                                                     bullet or numbering
                                                                                     formatting option from
                                                                                     a drop‑down list as
                                                                                     shown in Figure 5.26.
                                                                             (iv)    Clicking on More
                                                                                     Options at the bottom
                                                                                     of these drop-down
                                                                                     lists open the Bullets
                                                                                     and Numbering
                                                                                     dialog as shown in
                                                                                     Figure 5.27.
                                                                             (v)     Increase paragraph
                                                                                     spacing, decrease
                                                                                     paragraph spacing: It
                                                                                     increases or decreases
                                                                                     the spacing above and
                                                                                     below the selected
                                                                                     paragraphs.
                        Fig. 5.27 : Bullets and numbering dialog box         (vi)    Line spacing: Adjust
                                                                                     the spacing between
                                                                                     the lines of a selected

                  160                                                  Domestic Data Entry Operator – Class IX

Unit 5.indd 160                                                                                             9/26/2018 10:08:33 AM
paragraph. Click on the small triangle to the
                     right of the icon and select the type of line
                     spacing from the drop-down list (Figure 5.28).
                  Working with tables
                  				              Inserting tables
                                             Tables are inserted by selecting
                                             the Table icon on the Standard
                                             toolbar, or by selecting the Table
                                             command on the Insert tab. In
                                             the Insert Table dialog box, the
                                             Number of columns and the
                                             Number of rows are specified.
                                                We have already seen that
                                             when we insert a blank slide in
                                             the presentation, we can create a
                                             table by clicking on the table
                                             icon. Tables can also be inserted
                                             by selecting the Table icon on
                                                                                         Fig. 5.28 : Line Spacing
                                             the Standard toolbar as shown
                                             in Figure 5.29. By clicking on
                    Fig. 5.29 Creating table
                                             the arrow next to the Table icon,
                                             the Table drop‑down menu
                  opens, by dragging the cursor, the desired
                  number of rows or columns can be selected.
                      A Table can be inserted from the Insert
                  menu by selecting Insert → Table. In the
                  Insert Table dialog box, the Number of
                  columns and the Number of rows are specified
                  as shown in Figure 5.30. In the Insert Table
                  dialog box, the Number of columns and the
                  Number of rows are specified.                              Fig. 5.30: Insert Table Dialog

                  Entering and editing data in a table
                  The content is put in table by placing the insertion point
                  in a table cell and entering text. Moving the insertion
                  point in a table can be done in three ways:
                     • by pressing the left mouse button
                     • by pressing the TAB key on a keyboard
                     • by using arrow keys on the keyboard

                  Digital Presentations                                                                             161

Unit 5.indd 161                                                                                                     9/26/2018 10:08:33 AM
(a)   Selecting a cell: To select a cell within a table,
                                                             position the mouse cursor along its left edge, and
                                                             when the cursor changes to a sloped white arrow,
                  Fig. 5.31: Selecting a table cell          press right mouse button (Figure 5.31).
                                                                                (b) Selecting a row/column:
                                                                                To select a row or column in
                                                                                a table, position the row or
                                                                                column to select, and when
                                                                                the mouse cursor changes
                                                                                to a sloped white arrow
                                                                                press the left mouse button
                                                                                and drag it to the end of
                                                                                the row or column. A row or
                                                                                column can also be selected
                                                                                by pressing the right mouse
                                                                                button on the row or column
                                                                                you want to select, and
                                                                                selecting the row or column
                                                                                and Select the option from
                                                                                the context menu as shown
                                                                                in Figure 5.32.
                                                                                  (c)   Selecting a table: To
                                                                                  select an entire table, first
                                  Fig. 5.32: Selecting column in a table
                                                                                  click on its edge. When the
                                                               mouse cursor changes to a sloped white arrow,
                                                               click on the left mouse button. To move the
                                                               table, position on its edge, and when the cursor
                                                               changes to a sloped white arrow, drag the table
                                                               to a specified location.

                                                      Adjusting column width and row height using
                                                      the mouse
                                                      To change the width of the column, position on the
                                                      border line between the two columns, and when the
                                                      cursor changes to a (↔) sign, press the left mouse
                                                      button, hold and drag it until the column achieves the
                                                      desired width. The same can be done for adjusting the
                                                      row height.

                                                      Table borders and background
                    Fig. 5.33 : Selecting Table       The various table formatting options can be applied on
                            Properties                the table just like Writer. The borders and background

                  162                                                        Domestic Data Entry Operator – Class IX

Unit 5.indd 162                                                                                                   9/26/2018 10:08:33 AM
can be assigned to the table. To
                  do this, right click on the table
                  border, the Table Properties
                  dialog box will open as shown
                  in Figure 5.34, from where you
                  can change the borders and
                  background of the table.
                        (a)   Deleting a table: To
                              delete a table, Click
                              on the slide and
                              drag a selection box
                              over the table to
                              select it, then press
                              the Delete key, Or
                              Click on the table
                              border to select the
                              table and press the
                              Delete key.
                                                                   Fig. 5.34 : Table Properties Dialog box
                  Adding and formatting images
                  Graphics can be inserted in the presentations for giving
                  more information. Images can be inserted from the
                  gallery, files stored in the computer.

                  Inserting an image from a file
                          (i) To insert an image into presentation, select
                              Insert → Image on the menu bar or, click
                              on the Insert Image
                              icon located on the
                              standard toolbar. The
                              Insert Image dialog
                              opens.
                         (ii) Select the file from the
                              desired directory. By
                              selecting the Preview
                              option, a thumbnail
                              of the selected image
                              will be displayed in
                              the preview pane on
                              the right as shown in
                              Figure 5.35.                     Fig. 5.35: Insert Image Dialog box

                  Digital Presentations                                                                      163

Unit 5.indd 163                                                                                              9/26/2018 10:08:33 AM
Inserting an image from the gallery
                                                    The Gallery contains the images that can be used in a
                                                    presentation. To insert an image from the gallery:
                                                           (i) Select Insert → Media → Gallery from the
                                                               menu. The Gallery displays the available
                                                               themes with images (Figure 5.36).
                                                          (ii) Select a theme and scroll to find a suitable image.
                                                         (iii) Click on the image and drag it onto the
                                                               workspace.
                                                         (iv) Release the mouse button and the image will
                                                               be placed into your slide.

                                                    Formatting images
                                                    Formatting an image includes moving, resizing, rotating
                                                    an image. The image inserted into a presentation can be
                                                    formatted.

                                                    			            Moving images
                   Fig. 5.36: Insert from gallery
                                                                    (i) To move the image in the slide, click
                                                                        on an image, observe that the cursor
                                                                        changes to hand shape (Figure 5.37).
                                                                   (ii)   Click and drag the picture to the
                                                                          desired position.
                                                                   (iii) Release the mouse button.

                                                                   Resizing images
                               Fig. 5.37 : Moving Image
                                                                    (i) Select the image by clicking on
                                                                         it. Observe that selection handles
                                                                         displayed.
                                                                   (ii) Position the cursor over one of
                                                                         the selection handles. The cursor
                                                                         changes the shape giving a graphical
                                                                         representation of the direction of the
                                                                         resizing.
                                                                   (iii) Click and drag to resize the image
                                                                         (Figure 5.38).
                                                                   (iv) Release the mouse button when
                               Fig. 5.38: Resizing Image                 satisfied with the new size.

                  164                                                        Domestic Data Entry Operator – Class IX

Unit 5.indd 164                                                                                                   9/26/2018 10:08:33 AM
Rotating images
                         (i) The image can be rotated
                             in any direction using the
                             Rotate icon. To manually
                             rotate an image:
                          • Select the image to display
                             the selection handles.
                          • Click the Rotate       icon on
                             the Line and Filling toolbar.
                          • Click again on the selected
                             image and the selection
                             handles change shape and
                             colour (Figure 5.39).
                          • Click the mouse and move                Fig. 5.39: Rotating image
                             in the direction in which you
                             want to rotate the image.
                          • When satisfied, release the mouse button.

                  Formatting using the Image toolbar
                  When an image is selected, the Image toolbar becomes
                  available under the Properties window as shown
                  in Figure 5.40. This toolbar provides a number of
                  formatting options. The Image toolbar can also be
                  displayed by selecting View → Toolbars→Image from
                  the menu bar.

                  Managing graphic objects

                  Drawing tools                                                    Fig. 5.40: Image toolbar

                  Impress provides various drawing tools. The Drawing
                  toolbar having the majority of the tools used to create
                  graphical objects as shown in Figure 5.41. To activate
                  this toolbar, select View → Toolbars →Drawing from
                  the main menu bar.

                                          Fig.5.41: Drawing toolbar

                   (a)   Drawing lines: To draw a line follow the below
                         given procedure.

                  Digital Presentations                                                                       165

Unit 5.indd 165                                                                                               9/26/2018 10:08:33 AM
(i) Click on the small triangle to the right of the
                                                           line tool and select the desired line from the
                                                           available selection (Figure 5.42).

                        Fig. 5.42 : Lines       Fig. 5.43 Select Drawing shapes         Fig. 5.44: Dragging to slide

                                                       (ii) Click and drag on the slide to create the line
                                                            or shape and release the mouse button.
                                                 (b)   Drawing shapes: As similar to drawing a line,
                                                       you can draw shapes by selecting the desired
                                                       shapes from the available selection and clicking
                                                       and dragging on the slide. An example of drawing
                                                       the human face shape has been illustrated in
                                                       Figure 5.45.

                                                Grouping objects
                                                More than one object can be grouped together and
                                                treated as a single object. A group formed by grouping
                                                the objects can be formatted as a single object, moved,
                                                rotated, deleted, and so on. To group objects together:
                    Fig. 5.45: Grouped object
                                                     (i) Select the objects to be grouped using selection
                                                         tool on the Drawing toolbar and draw a rectangle
                                                         around the objects to be grouped, or hold down the
                                                         Shift key and click on each object. To select all the
                                                         objects, go to Edit → Select All on the main menu
                                                         bar or use the keyboard combination Ctrl+A.
                                                    (ii) When the selection handles are displayed, go
                                                         to Format→Group on the main menu bar or
                                                         use the keyboard combination Ctrl+Shift+G
                                                         or right-click on an object within the selected
                                                         group and select Group from the context menu.
                                                         An example of grouped objects has been shown
                                                         in Figure 5.45.

                  166                                                       Domestic Data Entry Operator – Class IX

Unit 5.indd 166                                                                                                        9/26/2018 10:08:34 AM
Ungrouping
                  To ungroup objects follow the
                  below given procedure:
                        (i) Select the group by
                            clicking on any one
                            of the objects in the
                            group.
                       (ii) When the selection
                            handles are displayed,
                            go to Format →
                            Group → Ungroup
                            on the menu bar or
                            use the keyboard
                            combination
                            Ctrl+Alt+Shift+G
                            or right-click on the
                            group and select
                            Ungroup from the
                            context menu.

                  Working with Slide
                  Masters
                  Impress comes with various
                  slide masters. These slide
                  masters are available in the
                  Master Pages section of the
                  Sidebar. There are three
                  subsections, namely Used in
                  this Presentation, Recently
                  Used, and Available for Use.
                  Click the expand marker next
                  to the name to expand it (see
                  Figure 5.46). It will show
                  thumbnails of the slides. Just
                  click the collapse marker to
                  collapse the subsection to
                  hide the thumbnails. Every
                  slide masters shown in the
                  Available for Use, lists form
                  templates with the same name.
                                                     Fig.5.46: Sidebar Master Section

                  Digital Presentations                                                 167

Unit 5.indd 167                                                                         9/26/2018 10:08:34 AM
Adding transitions
                                                              (i) In the Sidebar, select the Slide Transition
                                                                  icon to open the Slide Transition section.
                                                             (ii) In the Slides pane or Slide Sorter view,
                                                                  select the slides to apply the transition. If you
                                                                  want to apply the transition to all the slides,
                                                                  do not select any slides.
                                                            (iii) In the Apply to selected slides list, select a
                                                                  transition.
                                                            (iv) Modify the selected transition by changing
                                                                  the speed or adding a sound, in the Modify
                                                                  transition section. To play a sound during
                                                                  transitions, select a sound from the Sound
                                                                  list.
                                                              (v) If a sound is selected, the Loop until next
                                                                  sound option becomes active. Select this
                                                                  option to play the sound repeatedly until
                                                                  another sound starts.
                                                             (vi) Select how to advance to the next slide:
                                                                  manually (By mouse click) or automatically
                                                                  (Automatically      after).  To    select    an
                                                                  automatically advance, you will have to
                                                                  specify how long the slide should remain
                                                                  visible before it automatically advances to the
                                                                  next slide.
                                                            (vii) To apply transition to all slides, click Apply
                                                                  to All Slides.
                                                           (viii) To start the slide show from the current slide,
                        Fig. 5.47: Transition effects             check transitions, click Slide Show.

                   Let's Practice 2
                   Make a presentation on the basis of clue given below.

                                                             Model Story Board
                    Slide 1                            (Font size: 28)
                    Subject: ICT Mela, PSSCIVE, Bhopal Background: Sky blue
                    Color: Green                       Animation: Fade in
                    Various ICT Techniques             Slide transition:.................
                                                       Various ICT Techniques with different Colour

                  168                                                          Domestic Data Entry Operator – Class IX

Unit 5.indd 168                                                                                                     9/26/2018 10:08:34 AM
Slide 2                                    Font size: (Study objectives : 44)
                    Objectives of the Study                    Others: 32 Color: Red
                    1. To find out the reason behind of ICT    Background color: Light Yellow
                       Mela.                                   Animation : Fade in
                    2. To find out the areas of ICT Mela.      Slide Transition: ................
                    3.
                    4.
                    Slide 3                            Font size : (Preparation Steps : 24)
                    Preparation steps for showing your Others : 32 Colour : Blue
                    method of learning.                Background colour : Light Yellow
                    1.                                 Animation : Fade in
                    2.                                 Slide Transition: ................

                  Check Your Progress
                   A. Multiple Choice Questions

                      1. Which of the following option is not available on
                         Presentation Wizard?
                         (a)    Empty presentation
                         (b)    Form template
                         (c)    Open new presentation
                         (d)    Open existing presentation
                      2. Which of the following is not a part of main Impress
                         window?
                          (a)   Slides pane      (b) Workspace
                          (c)   Work pane		      (d) Task pane
                      3. Which of the following is not a section of tasks pane?
                          (a)   Master pages     (b) Layouts
                          (c)   Custom View      (d) Custom animation
                      4. Which view button listed below is not one of those available
                         in the workspace?
                          (a)   Normal view      (b) Outline view
                          (c)   Thumbnail view   (d) Notes
                      5. Which view is generally used for creating, formatting and
                         designing slides?
                          (a)   Normal view      (b) Outline view
                          (c)   Notes		          (d) Slide Sorter view
                      6. The slide show can be exited at any time during the show
                         by pressing which of the following keys?
                          (a)   Space bar        (b) End key
                          (c)   Break key		      (d) Esc key

                  Digital Presentations                                                             169

Unit 5.indd 169                                                                                     9/26/2018 10:08:34 AM
7. Which of the following features is used to create a new
                             slide show with the current slides but presented in a
                             different order?
                              (a)   Rehearsal			             (b) Custom Slide show
                              (c)   Slide Show Setup 		      (d) Slide Show View
                          8. Which of the following feature is used to progress the slide
                             show automatically while speaking on the topic?
                              (a)   Custom Animation         (b) Rehearse Timing
                              (c)   Slide Transition		       (d) Either (a) or (b)
                        B. Fill in the blanks

                          1. ___________________ is used to maintain consistency in
                             design and colour in the presentation.

                          2. ________________view is used to view all the slides
                             simultaneously.

                          3. ________________is used to perform basic operations on the
                             presentation

                          4. Master Page is used to modify the _____________of the
                             slide.

                          5. To create a new blank presentation, use the key
                             combination ____________.

                          6. In   every   presentation,     first   slide   should    be
                             ___________________.

                          7. To save a presentation, we can use key combination
                             _______________ .

                          8. In LibreOffice Impress, by default the presentation is saved
                             with _________extension.

                          9. The keyboard shortcut key for slide show is _____________.

                         10. The short cut key to close the LibreOffice impress is
                             _______________.

                         11. The short cut key to insert a new slide is ________________.
                         12. The ____________ view is used to apply animation on the
                             content of slide

                         13. A paper copy of presentation given to the audience is
                             known as ________________.

                         14. To play a sound during transitions, select a sound from
                             the ______________ list.

                         15. To play the sound repeatedly, the __________________is
                             used.

                  170                             Domestic Data Entry Operator – Class IX

Unit 5.indd 170                                                                         9/26/2018 10:08:34 AM
C. State whether the following statements are True or False

                      1. The order of the slides cannot be changed in slides pane

                      2. Slide design or layout can be changed for multiple slides
                         simultaneously.

                      3. Every slide in a presentation has exactly one slide master.

                      4. Animations once applied can be changed but cannot be
                         removed.

                      5. Slide names are included in outline view.

                      6. The notes added to slides can be seen during the
                         presentation.

                      7. A presentation can have multiple slide masters.

                      8. A user can create his/her own slide master.

                      9. Once a pre-defined slide master is selected, the background
                         of slide cannot be changed.

                    10. The text added to the header is displayed on the first slide
                        only.

                    11. The text added to the footer is displayed on the last slide
                        only.

                    12. User can create his/her own template and use it in the
                        Presentation Wizard.

                    13. The Notes View is used for the audience.

                    14. It is not possible to insert audio or video clips in the
                        presentation.

                    15. Header and footer can be inserted in the presentation.

                   D. Short answer questions (50 words)

                      1. List the possible multimedia contents that are included
                         while creating a presentation.

                      2. List the important points to be considered while making
                         an effective presentation.

                      3. What are the advantages of using a presentation?

                      4. What objects can be inserted to slides in Impress?

                      5. What are the steps to add picture or object to the slide?

                      6. How can text be added to header or footer on the sliders?

                      7. Describe the use of fields available in header and footer.

                  Digital Presentations                                                171

Unit 5.indd 171                                                                        9/26/2018 10:08:34 AM
8. Write the steps to create a template.

                         9. Write down the steps to add slide transition in your
                            presentation.

                        10. How will you add the slide number at the bottom of each
                            slide?

                        11. How will you insert a company’s logo (picture) in first slide
                            of your presentation?

                        12. How will you add the name of the company on the top of
                            the each slide?

                        13. Write down the steps to create a table in a presentation.

                        14. Write down the steps to insert a chart in slide.

                        15. What are the five views of presentation?

                                            Practical Exercise

                          1. Create a presentation which gives an overview of the
                              science subject. This presentation should contain the
                              following slides:
                                (i) Title of the subject (use title slide layout only)
                              (ii) Index
                             (iii) Introduction of each chapter (Minimum one slide
                                    per chapter should be prepared.)
                          2. For the presentation created in Q.1 above, do the
                              following:
                                (i) Rename each slide with the chapter name.
                              (ii) Change the font for the slide title.
                             (iii) Add a footer that contains the current date and your
                                    school name.
                             (iv) Apply at least one master page to your presentation.
                               (v) Hide slides of even chapters and see the effect.
                             (vi) Start the slide show after setting the option as
                                    Change slides manually. (Navigator should be
                                    visible during the presentation).
                          2. For the presentation created in Q.1, do the following:
                                (i) Convert the presentation to a PDF file.
                              (ii) Set the Handout view such that there are 4 slides
                                    per page.

                  172                            Domestic Data Entry Operator – Class IX

Unit 5.indd 172                                                                         9/26/2018 10:08:34 AM
3. Create a presentation which demonstrates details of a
                           car launched by any company of your choice. Include the
                           following sliders:
                            (i) Introduction of the company
                           (ii) List of cars the company sells.
                          (iii) Introduction of the new car launched.
                       4. For the presentation created in the question above, add
                           the following functionalities:
                            (i) All models of the car should be displayed in tabular
                                format. (Model name, Basic Price, Average, Capacity)
                           (ii) Modify the appearance of the table and set animation
                                effect as box
                          (iii) Add the image of the each model with its description.
                          (iv) Change the background colour of each slides of your
                                presentation.
                           List of General Shortcut Keys used in LibreOffice
                    Shortcut keys for controlling dialogs

                     Shortcut
                                                                 Effect
                     Keys
                     Enter key      Activates the focused button in a dialog
                     Esc            Terminates the action or dialog
                     Spacebar       Toggles the focused check box in a dialog
                                    Changes the active control field in an option section of a
                     Arrow keys
                                    dialog
                     Tab            Advances focus to the next section or element in a dialog
                                    Moves the focus to the previous section or element in a
                     Shift+Tab
                                    dialog
                                    Opens the list of the control field currently selected in a
                     Alt+Down       dialog These shortcut keys apply not only to combo boxes
                     Arrow          but also to icon buttons with pop-up menus. Close an
                                    opened list by pressing the Escape key

                    Shortcut keys for controlling documents and windows

                     Shortcut
                                                                 Effect
                     Keys
                     Ctrl+O         Opens a document
                     Ctrl+S         Saves the current document
                     Ctrl+N         Creates a new document
                     Ctrl+Shift+N   Opens Templates and Documents dialog
                     Ctrl+P         Prints document
                     Ctrl+F         Activates the Find toolbar

                  Digital Presentations                                                           173

Unit 5.indd 173                                                                                   9/26/2018 10:08:34 AM
Ctrl+H           Calls the Find & Replace dialog
                         Ctrl+Shift+F     Searches for the last entered search term

                         Ctrl+Shift+J     Toggles the view between full screen mode and normal mode
                                          in Writer or Calc
                         Ctrl+Shift+R     Redraws the document view
                         Ctrl+Shift+I     Enable or disable the selection cursor in read-only text
                         F1               Starts the LibreOffice Help
                         Shift+F1         Context Help
                         Shift+F2         Turns on Extended Tips for the currently selected command,
                                          icon or control
                         F6               Sets focus in next sub-window (for example, document/data
                                          source view)
                         Shift+F6         Sets focus in previous sub-window
                         F10              Activates the first menu (File menu)
                         Shift+F10        Opens the context menu
                         Ctrl+F4     or   Closes the current document (close LibreOffice when the last
                         Alt+F4           open document is closed)
                         Ctrl+Q           Exits application

                        Shortcut keys for editing or formatting documents

                         Shortcut Keys       Effect
                         Ctrl+Tab            When positioned at the start of a header, a tab is inserted
                         Ctrl+X              Cuts out the selected elements
                         Ctrl+C              Copies the selected items
                         Ctrl+V              Pastes from the clipboard
                                             Pastes unformatted text from the clipboard. The text is
                         Ctrl+Alt+Shift+V
                                             pasted using the format that exists at the insertion point
                         Ctrl+Shift+V        Opens the Paste Special dialog
                         Ctrl+A              Selects all
                         Ctrl+Z              Undoes last action
                         Ctrl+Y              Redoes last action
                         Ctrl+Shift+Y        Repeats last command
                                             The Italic attribute is applied to the selected area. If the
                         Ctrl+I              cursor is positioned in a word, this word is also marked
                                             in italic
                                             The Bold attribute is applied to the selected area. If the
                         Ctrl+B
                                             cursor is positioned in a word, this word is also put in bold
                                             The Underlined attribute is applied to the selected area.
                         Ctrl+U              If the cursor is positioned in a word, this word is also
                                             underlined
                                             Removes direct formatting from selected text or objects
                         Ctrl+M
                                             (as in Format - Clear Direct Formatting)

                  174                                      Domestic Data Entry Operator – Class IX

Unit 5.indd 174                                                                                              9/26/2018 10:08:34 AM
Answer Key
                  Unit 2: Data Entry       and   Keyboarding Skills
                  A. Multiple choice questions
                     1.d               2. a                  3. c             4. d           5. d
                  B. Fill in the blanks
                     1. muscle                2. words per minute                    3. Alpha Numeric
                     4. current               5. 12         6. Numeric               7. Cursor
                     8. Last                  9. right-hand 		                       10. four, five
                  C. State whether the following statements are True or False
                     1. T 2. F   3. F                4. T          5. T      6.T   7. T             8. T
                     9. F 10. F 11. T               12. F         13. F     14. F 15. F

                  Unit 3: Digital Documentation
                  A. Multiple choice questions
                     1. c      2. c           3. b          4. b          5. c       6. a    7. b
                     8. a      9. c           10. c         11. d         12. d      13. a   14. a
                     15. b     16. b          17. a         18. b         19. a      20. b   21. b
                     22. c     23. d          24. b         25. a
                  B. Fill in the blanks
                     1. dialog box 2. another submenu 3. formatting a document
                     4. beginning of the line, the end of a line 5. redo  6. word
                     7. top, bottom 8. landscape 9. print preview 10. data source
                  C. State whether the following statements are True or False
                      1. T      2. F           3. F          4. T          5. T       6. T    7. F
                      8. T      9. F          10. T         11. T         12. T      13. T   14. T
                     15. F     16. F          17. T         18. T         19. T      20. T

                  Unit 4: Electronic Spreadsheet
                  A. Multiple choice questions
                      1.   a     2.    a       3.   c        4.   a        5. d       6. d    7. a
                      8.   d     9.    c      10.   d       11.   a       12. c      13. a   14. d
                     15.   a    16.    c      17.   a       18.   b       19. d      20. d   21. c
                     22.   a    23.    a      24.   c       25.   b
                  B. Fill in the blanks
                     1. AA     2. .ods  3. Fill handle 4. =MIN(D1:D5) 5. =D2+E3
                     6. I8     7. mixed 8. right       9. 20          10. Relative

Unit 5.indd 175                                                                                            9/26/2018 10:08:34 AM
Notes   C. State whether the following statements are True or False.
                                   1. F       2. T       3.F         4.T           5. T
                                D. Solve the following in a spreadsheet
                                   a. 50,   b. -35,   c. =$B$5 + D5      d. =$B5 + D5         e. =$B5 + D5

                                Unit 5: Digital Presentations
                                A. Multiple choice questions
                                   1. a     2. b      3. b       4. a      5. d           6. d    7. c
                                   8. a     9. b      10. c      11. d     12. c          13. d   14. b
                                   15. b    16.       17.        18.       19.            20
                                B. Fill in the blanks
                                   1. Master slide 2. slide sorter 3. File Menu 4. Base architecture
                                   5. Ctrl + N     6. Title Slide 7. Ctrl + S    8..odp
                                   9. F5          10. CTRL + W 11.Ctrl+M        12. Normal View
                                   13. Handouts 14. Sound        15. loop until next sound
                                C. State whether the following statements are True or False
                                   1. T     2. T      3. T       4. F      5. T           6. T   7. F
                                   8. T     9. F      10. F      11. T     12. T          13. F 14. F
                                  15. T

                  176                                         Domestic Data Entry Operator – Class IX

Unit 5.indd 176                                                                                           9/26/2018 10:08:34 AM
List of Credits
                  Dipak D. Shudhalwar

                  Cover
                  4th image from top.

                  Unit 2
                  Figs 2.1–2.4 (a&b), 2.8–2.23

                  Unit 3
                  Figs 3.2–3.38

                  Unit 4
                  Figs 4.1–4.44

                  Unit 5

                  Figs 5.1–5.4

                  Creative Commons
                  Unit 2
                  Fig. 2.5        https://bit.ly/2LTsWGp
                  Fig. 2.6        https://bit.ly/2HReNH4
                  Fig. 2.7        https://bit.ly/2LU32lB

Unit 5.indd 177                                            9/26/2018 10:08:34 AM
Notes

Unit 5.indd 178           9/26/2018 10:08:34 AM
You can also read