Lecture Notes for the Course Reference Management with Endnote - Advanced Course-mediaTUM
←
→
Page content transcription
If your browser does not render page correctly, please read the page content below
University Library
Technical University of Munich

                     Lecture Notes for the Course
         Reference Management with Endnote
                                 – Advanced Course –

This work is licensed under a Creative Commons attribution - Circulation under similar terms 4.0
International License.

                                                                                              1 / 41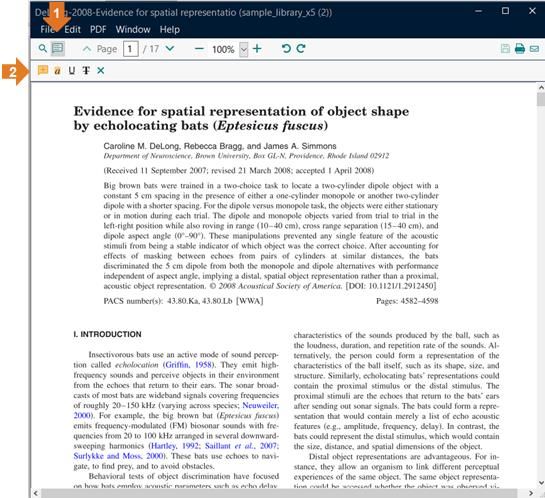
University Library
Technical University of Munich

                                         Table of Contents
1    Contents of the EndNote Introductory Course .......................................................................... 4
2    Handling PDFs in EndNote ...................................................................................................... 4
     2.1 Annotating PDFs ............................................................................................................ 4
     2.2 Importing PDF Folders ................................................................................................... 5
     2.3 Auto Import Folder.......................................................................................................... 6
     2.4 Renaming PDF Attachments .......................................................................................... 6
     2.5 Find Full Texts................................................................................................................ 7
3    Organising and Finding References in EndNote....................................................................... 9
     3.1 Displayed Columns ........................................................................................................ 9
     3.2 Rating & Read/Unread Status ...................................................................................... 10
     3.3 Groups ......................................................................................................................... 10
     3.3.1     Group Sets ............................................................................................................... 11
     3.3.2     Custom Groups ........................................................................................................ 11
     3.3.3     Smart Groups........................................................................................................... 11
     3.3.4     Combined Groups .................................................................................................... 12
     3.4 Keywords ..................................................................................................................... 12
     3.5 Term Lists .................................................................................................................... 13
     3.6 How Does EndNote Deal with Duplicates? ................................................................... 14
     3.7 Searching within EndNote ............................................................................................ 14
     3.7.1     Simple search & Advanced search........................................................................... 14
     3.7.2     Saving Searches or Converting Them into Smart Groups ........................................ 15
     3.7.3     Searching Multiple EndNote Libraries ...................................................................... 15
4    Citing with EndNote’s Word Add-In CWYW (Cite While You Write) ........................................ 16
     4.1 Inserting Citations ........................................................................................................ 16
     4.2 Adding Footnotes ......................................................................................................... 17
     4.3 Adding Page References.............................................................................................. 17
     4.4 Formatting Reference Lists - Changing Citation Styles ................................................. 17
     4.5 Grouping Reference Lists ............................................................................................. 17
     4.6 Changing EndNote Style Sheets in Word ..................................................................... 19
     4.7 The Travelling Library................................................................................................... 20
     4.8 Showing Cited References in EndNote?....................................................................... 21
     4.9 Faster Speed in Word – Instant Formatting .................................................................. 21
5    Creating Bibliographies by Keywords, Authors or Years ........................................................ 21
6    Changing and Creating Citation Styles ................................................................................... 23
     6.1 In-Text Citations and Footnotes.................................................................................... 25
     6.2 The Entry in the Reference list ..................................................................................... 27
     6.3 Capitalisation in the Reference list ............................................................................... 28
     6.3.1     Capitalisation in Titles .............................................................................................. 28
     6.3.2     Capitalisation of Author and Editor Names ............................................................... 29
7    Collaboration and Synchronisation with EndNote Web........................................................... 29
     7.1 Activating EndNote Web .............................................................................................. 29
     7.2 Synchronisation between EndNote Desktop and EndNote Web ................................... 30
     7.3 Sharing a Group ........................................................................................................... 30
     7.4 Sharing an EndNote Library ......................................................................................... 31

                                                                                                                                     2 / 41
University Library
Technical University of Munich

   7.5 CWYW for EndNote Web ............................................................................................. 33
   7.6 Collaborative Use of the EndNote Library with the Desktop Version ............................. 33
   7.7 Compatibility with Programs like Evernote, Scrivener, etc... ......................................... 33
8 Manuscript Matcher – How Do I Find an Appropriate Journal for my Article? ......................... 34
9 Further Import Options ........................................................................................................... 36
   9.1 EndNote Capture Bookmarklet ..................................................................................... 37
   9.2 Import from Google Scholar ......................................................................................... 38
10 Contact and Support .............................................................................................................. 40
   10.1 Help from EndNote ....................................................................................................... 40
   10.2 Help from the TUM ....................................................................................................... 40
   10.3 Miscellaneous .............................................................................................................. 40

We appreciate your feedback.

This script is updated regularly. If you nevertheless find out that the information is no longer up-to-
date or you have suggestions for improvement, we look forward to receiving an e-mail to work-
shop@ub.tum.de.

The current version of this script can always be found under the following link: https://media-
tum.ub.tum.de/1342402

                                                                                                                                 3 / 41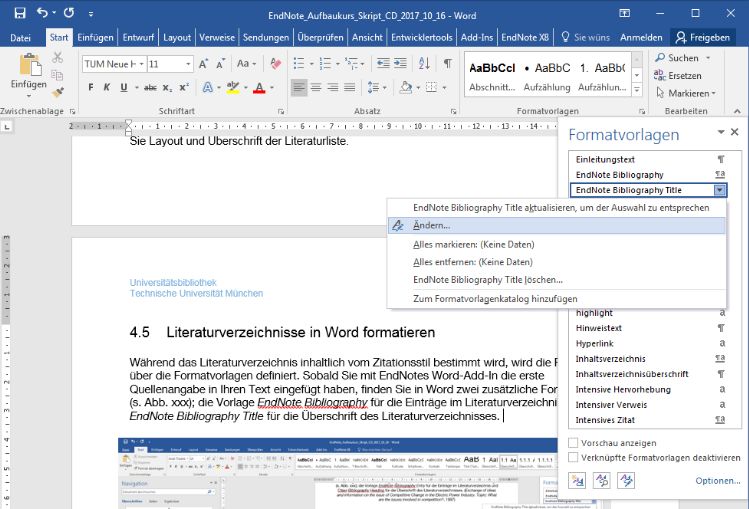
University Library
Technical University of Munich

1 Contents of the EndNote Introductory Course

The EndNote Introductory Course covers the following topics which are required for the EndNote
Advanced Course:
• Importing titles into EndNote (manual entry, import from the TUM online catalogue, import from
    a database, importing references into EndNote via the online search function)
• Basic knowledge of how to organise references into groups in EndNote and how to find refer-
    ences in one's own library via the search function in EndNote
• Working with the Word add-in (inserting references into Word and formatting reference lists in a
    chosen citation style)
The current lecture notes for the EndNote introductory course can be found here:
https://mediatum.ub.tum.de/node?id=1100719

2 Handling PDFs in EndNote

In EndNote, you can read and annotate PDFs. You can add comments to the PDF which you can
later search using the search function in EndNote. You can also change the often meaningless file-
names of downloaded PDFs to descriptive names. In addition, EndNote provides a feature to
search the web for freely available full texts or to import PDFs already stored on your computer into
EndNote.

2.1 Annotating PDFs

In the summary tab of the preview
and edit area you can see if your
reference is linked with a PDF file.
Use the button Open in the drop-
down menu to open the PDF file in a
new window. Here you can add
comments and highlights to your
PDF (Fig. 1).

Click on the comment symbol (1) to
open the bar with the editing func-
tions (2). Highlighted text passages,
underlined text, crossed out text
(Strikeout Text), and comments
(Sticky Note) that you make in End-
Note's PDF Reader will also be dis-
played when you open the docu-              Figure 1: PDF Viewer in EndNote
ment in Adobe Acrobat Reader. If
you make further changes via Acrobat Reader, make sure to replace the existing linked file when
saving. Otherwise, a copy of the file is created which is not linked to the dataset in EndNote.

                                                                                                4 / 41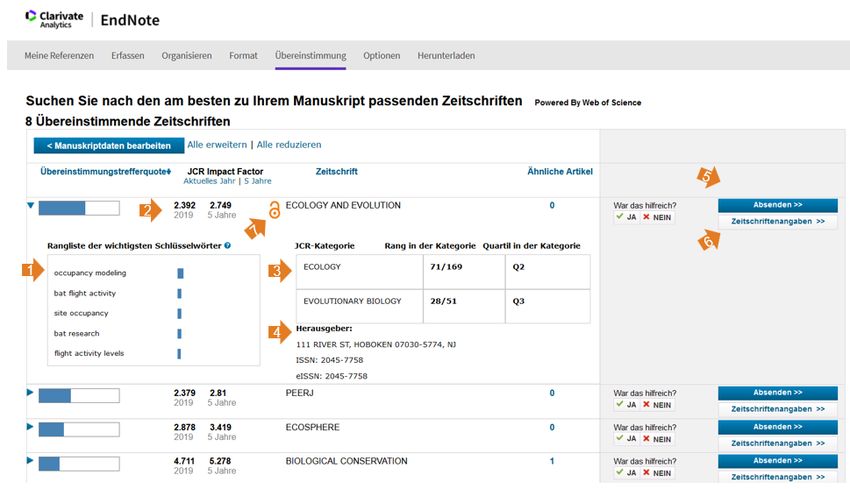
University Library
Technical University of Munich

In the advances search in EndNote, the search categories Any Field, Any Field + PDF notes, PDF,
and PDF-Notes provide both the possibility to search for your own comments and to search the
PDF's full text. This only applies to PDF documents that are machine-readable. Scanned texts that
have not been edited with OCR recognition cannot be searched.

2.2 Importing PDF Folders

In EndNote you have the option of importing an entire folder including subfolders containing PDFs.
From the menu choose File => Import => Folder. The Import Folder dialogue box will open (Fig. 2).
In the field Import Folder select the desired folder from your computer. In the Duplicates field, se-
lect how duplicates are to be handled.

You also have the option of including
subfolders and have a Group Set created for
this folder. If your selected folder contains
subfolders, these are taken over as Custom
Groups.

After importing - if you have selected this op-
tion - the imported folder will be displayed as
a Group Set in the navigation of your local li-
brary. Any subfolders are taken over as Cus- Figure 2: Dialogue box for the PDF import
tom Groups. Otherwise, the PDFs will ap-
pear in the Imported References folder.

You may find that EndNote does not import the correct title data for all PDFs when importing.

EndNote first searches the PDF for a DOI and researches the corresponding title data on the Inter-
net. However, if the PDF does not contain a DOI or is a scanned PDF and not machine-readable,
EndNote uses the document's metadata as title data. In many cases, only the name of the file is
available here (see Fig. 3).

Figure 3: List of imported PDF titles

In this case, subsequent editing of the data is required. If you know the DOI of the article, enter it
into the corresponding field and select the function Find Reference Updates in the References
menu. If no DOI is known, manually enter the author, title and year into the corresponding fields

                                                                                                   5 / 41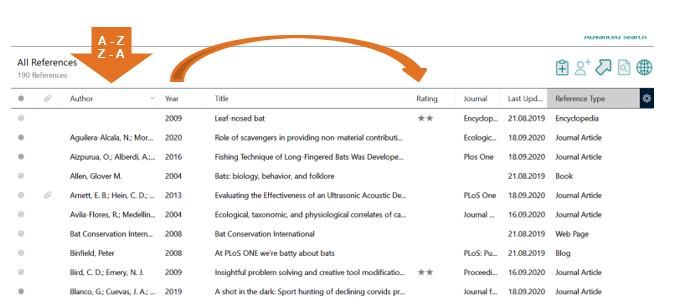
University Library
Technical University of Munich

and select the function Find Reference Updates.
For all datasets, check if the retrieved information is correct - even for those which EndNote added
automatically.

2.3 Auto Import Folder

In addition to manually importing PDFs or folders of PDFs, you can also specify a folder from which
new PDFs are automatically imported into EndNote; i.e. each time you open EndNote, the program
checks to see if new PDFs have been added to the selected folder and then automatically imports
them.

To set this up, go to Preferences in the Edit menu and then to the item PDF Handling. There you
can specify a folder in the section PDF Auto Import Folder, from which PDFs are automatically im-
ported (Fig. 4).

If there are subfolders in the selected folder, the PDFs (unlike with a normal import) cannot be im-
ported from these subfolders.

   Figure 4: Setting up Auto Import Folder

2.4 Renaming PDF Attachments

Often, PDF documents that you download from databases have cryptic, not very descriptive
names. EndNote allows you to rename them according to a scheme you specify.

It could be, for instance, the scheme Author - Year - Title. You can set this up in the menu Edit =>
Preferences => PDF Handling => PDF Auto Renaming Options (Fig. 5).

                                                                                                6 / 41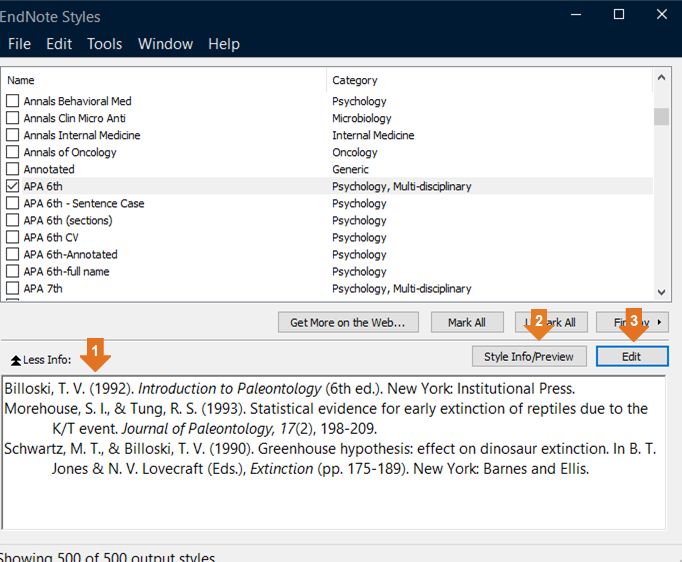
University Library
Technical University of Munich

    Figure 5: Renaming PDF attachments

2.5 Find Full Texts

With the command Find Full Text in the References menu, EndNote automatically searches for
freely available full texts. This function can also be found in the context menu (right-click, Fig. 6).

Select all references which are to be included in the full-text search. EndNote can search for a
maximum of 150 titles.

   Figure 6: Starting the Find Full Text search

In order to always save a copy of the file in the EndNote Library, choose Preferences from the Edit
menu. Under the item URLs and Links, check the box Copy new file attachments to the default file
attachment folder and create a relative link. Like that, even if you move the original files where
EndNote would not find it, you still have the data at hand.

                                                                                                     7 / 41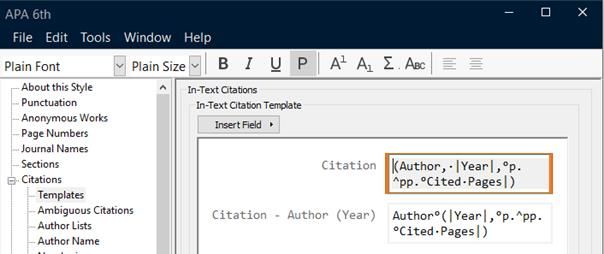
University Library
Technical University of Munich
To avoid having to re-run the Find Full Text search every time you add new references to your li-
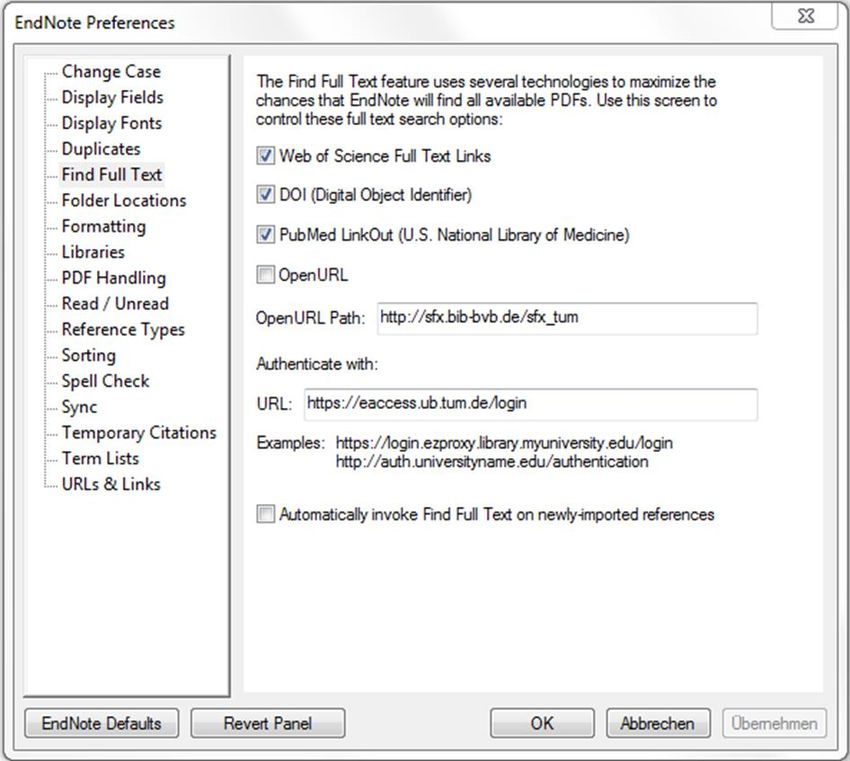
brary, you can automate this. Select Edit => Preferences => Find Full Text and check the box Au-
tomatically invoke Find Full Text on newly imported references (see Fig. 7).
In order to be able to use the function Find Full Text also to retrieve full texts licensed by the TUM,
go to the item OpenURL Path in the menu Edit => Preferences => Find Full Text and enter this
URL: http://sfx.bib-bvb.de/sfx_tum (Fig. 7).
Figure 7: Enter the OpenURL Path
If you are not logged into the campus network or you use a VPN client, add the URL
https://eaccess.ub.tum.de/login under the heading Authenticate with. This allows you to search out-
side the campus network for full texts licensed by the TUM.
In this case, when you call up the Find Full Text function, you will first be directed to the TUM's
eAccess Log-in page. Here, authenticate yourself with your TUM ID (TUM email address + pass-
word), click on Log-in and then Continue.
8 / 41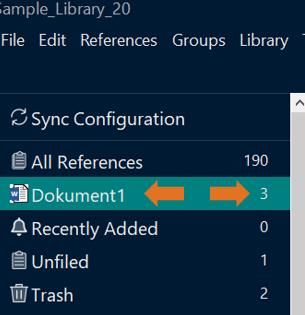
University Library
Technical University of Munich

Note that you will not be able to find all the licensed electronic full texts available at the TUM. If the
Find Full Text search does not yield any re-
sults, it thus makes sense to do an additional
search in the licensed databases at TUM (ac-
cess via DBIS). If you search for licensed full
texts, you may also experience longer search
times.
                                                   Figure 8: Pausing or cancelling full-text search
If you want to cancel the full-text search, click
on the status Searching under the item Find Full Text in the navigation (Fig 8). Pause or cancel the
search.

Full texts in EndNote Web / Online
Full texts can either be saved directly in EndNote Web or added and synchronised with other de-
vices via the synchronisation feature.

While you can share your references via EndNote Web with other EndNote Web users, this is not
possible for full texts up to and including version X7.1. Only version X7.2 offers this option.

3 Organising and Finding References in EndNote

What options do you have for sorting your references in EndNote?

Decide what information you want to see displayed in which order in the content window. Arrange
your references in Custom, Combo and Smart Groups. Rate your references and keep track of
how much of it you have already read and have yet to read.

Use keywords to find titles on a topic quickly, and keep your data consistent using term lists and
the search for duplicates.

3.1 Displayed Columns

                                                                                                      9 / 41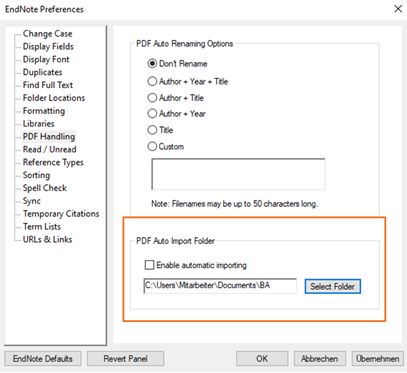
University Library
Technical University of Munich

By left-clicking on one of the column headers (Author, Title, etc.), your entries are sorted alphabeti-
cally or by size. The order of the columns can easily be changed through drag and drop (Fig. 9).

  Figure 9: Sorting and moving columns

By right-clicking on a column header, you choose which information should or should not be
displayed (Fig. 10).

3.2 Rating & Read/Unread Status

In the Rating field, you rate your references using a 5-star system.
You can also specifically search for references with a certain rat-
ing. In addition, you can use your rating as a criterion for a new
Smart Group.

To keep track of which reference you have already read and which
you have not, EndNote offers the Read/Unread category. Unread
references have a small grey dot in the Read/Unread category,
ones already read are displayed with a small dot with a tick.
                                                                        Figure 10: Displayed Columns
3.3 Groups

EndNote makes it possible to subdivide the data into groups and differentiates between Custom
Groups, Smart Groups and Combined Groups (see Fig. 11). To Custom Groups you assign da-
tasets manually. The Smart Groups are based on a search query you have created and are up-
dated automatically. The Combined Groups (From Groups) combine the titles of several Custom
and Smart Groups. They, too, are updated automatically. Content-related groups can be bundled
into Group Sets. Group Sets are headlines that bundle several groups, they themselves contain no
references.

                                                                                                   10 / 41
University Library
Technical University of Munich
Figure 11: The different Groups in EndNote
3.3.1 Group Sets
To create a Group Set:
1. From the Groups menu, select the command Create Group Set.
2. Assign a name to the new Group Set.
3.3.2 Custom Groups
To create a Custom Group:
1. Right-click on the Group Set in which you want to create the Custom Group.
2. Open the context menu and select Create Group.
3. Assign a name to the new Custom Group.
To include data into a Custom Group:
1. Select the datasets in the overview.
2. Drag and drop the datasets into the desired group or select the desired datasets, then go to
Add References To in the context menu and select the desired Custom Group.
3.3.3 Smart Groups
To create a Smart Group:
1. Right-click on the Group Set in which the Smart Group is to be created.
2. Open the context menu and select the command Create Smart Group.
3. Assign a name to the new Smart Group.
11 / 41University Library
Technical University of Munich
4. In the opened search mask, enter your search strategy for the Smart Group and click the Cre-
ate button. Here you can combine any criteria with each other; including Keywords, Rating,
Year, etc.
3.3.4 Combined Groups
To create a Combined Group:
1. Right-click on the Group Set in which you want to create the Combined Group.
2. Open the context menu and select the command Create From Groups.
3. Assign a name to the new Combined Group.
4. Indicate from which Custom and/or Smart Groups you want to combine titles in your new Com-
bined Group.
5. If you want to change the search query for the Smart Group again, click on the Smart Group
and select Edit Group in the context menu.
CAUTION
A dataset can belong to several groups, but it is still saved only once in the database. If a dataset
is removed from the Custom Group, it will not be entirely deleted from the EndNote Library but only
from the Custom Group.
On the other hand, if you delete a title from a Smart Group or a Combined Group, it will be entirely
deleted from the library without any prior warning! Until you close EndNote, you will find the deleted
records in the Trash folder.
How do I know which groups a reference is assigned to?
Select the respective reference and choose Reference Summary from the context menu. All
groups assigned to this reference are displayed. There is no distinction between Custom and
Smart Groups.
3.4 Keywords
In order to have your literature on a certain topic quickly to hand, it makes sense to assign descrip-
tive terms - so-called Keywords. You can search EndNote for these Keywords, with the result that
you find your references even if the topic is named differently in the title or does not appear in the
title at all. You can use them as criteria for Smart Groups and create corresponding bibliographies.
You can assign any number of Keywords to a dataset. Enter the keywords in the Keyword field,
each one in a new line. EndNote collects all keywords in a Term List. With the Term List you al-
ways have a good overview of which keywords you have already used.
The Term List can be opened with the key combination Ctrl + 1, if the cursor is in the keyword field,
or via the menu Library => Open Term Lists => Keywords Term List.
12 / 41University Library
Technical University of Munich
3.5 Term Lists
EndNote automatically maintains lists for the fields Author, Journal and Keyword. In other words,
every item entered in this field is saved in the corresponding list. This serves to standardise terms.
For instance, it is quite common that an author whose works are imported from different databases
is named differently. Sometimes the first name is written out in full, other times only the initials are
given. With the Term Lists you ensure that an author from whom you quote several works is al-
ways named the same way in your reference list.
Term Lists are created automatically with the first entry (in the program you will recognise a new
entry by the red font colour). You can also create them yourself or import ready-made Term Lists
from EndNote. Especially in the case of Journals' Term Lists, it is worth importing ready-made lists
from EndNote, as different versions of abbreviations for individual journal titles are stored here
(Fig. 12). EndNote supplies lists for various areas of studies, they are stored in the folder Terms
Lists.
Figure 12: Journals Term List in EndNote
Via the menu Library => Open Term Lists, the individual Term Lists can be opened. The tab Terms
shows you all terms contained in the Term List. In the tab Lists you can switch between the lists
and import or export your Term Lists.
For journals: If you have already collected journals in your EndNote Library, first delete all titles in
the Terms tab. Then import the desired lists in the Lists tab and complete the imported list with
your existing terms via the Update List button.
13 / 41University Library
Technical University of Munich
3.6 How Does EndNote Deal with Duplicates?
In the EndNote Preferences, you specify whether and how EndNote checks your library for dupli-
cates. To do this, go to the menu Edit => Preferences => Duplicates. Decide which fields should be
considered in the duplicate check and how to deal with found duplicates.
From now on, EndNote will duplicate-check the imported references for existing entries in the open
library.
Datasets which are added to the library via direct import are not checked. If you wish to check all
datasets in your library for duplicates, select the command Find Duplicates in the References
menu.
3.7 Searching within EndNote
You have two options in EndNote to search within your references. The Simple Search and the Ad-
vanced search.
3.7.1 Simple search & Advanced search
The Simple search is shown above the content area. The Advanced search can be opened via the
Advanced search button (Fig. 13), via the Library menu or via the shortcut Ctrl + F.
Figure 13: Search options in EndNote
The Simple search searches all fields in the library, including PDF full text and PDF comments.
The term you are looking for is highlighted in colour in the hit list. Enter one or more terms and
press the Enter key. If you enter several terms, they are connected with AND. This search is useful
for fast, general searches.
14 / 41University Library
Technical University of Munich
The Advanced search performs special searches. To this end, there are any number of search
boxes on hand that you can use to search through a specific field, such as Author, Title, Keyword,
etc. These search boxes can be combined with AND, OR, or NOT. Via the drop-down menu in the
field Contains you can determine more exactly how the entered term shall appear in the searched
field. (Fig. 14) You can add more search boxes via the + button to the right of the search slot.
Again, a search in the entire library including full texts and PDF comments is possible.
Figure 14: Search fields in EndNote
3.7.2 Saving Searches or Converting Them into Smart Groups
You can save these searches via the Search options button or convert them into a Smart Group.
3.7.3 Searching Multiple EndNote Libraries
When you conduct searches within EndNote, only the currently opened library is searched.
The only way to perform a search across multiple EndNote libraries is through the Insert Citations
feature in Word. If you have installed the EndNote plug-in for Word CWYW (Cite while you write),
use this feature to search for sources as you write. This feature searches across all opened End-
Note libraries on your computer. The status bar of the search window shows the EndNote Library
in which the title you are looking for is stored (Fig. 15).
15 / 41University Library
Technical University of Munich
Figure 15: Searching across libraries via the Insert Citation feature in Word
4 Citing with EndNote’s Word Add-In CWYW (Cite While
You Write)
With the EndNote Word add-in, reference information can be quickly and easily inserted into the text.
When entering the first reference into your text, EndNote automatically creates the reference list. As
you work on your text, it will be constantly updated and supplemented in the chosen citation style.
4.1 Inserting Citations
1. Start Microsoft Word and open a new document.
2. In Word, open the EndNote commands in the EndNote 20 menu.
3. Place your cursor where you want to insert a citation in the text and select Insert Citation (Fig.
16).
4. Enter one or more search terms (e.g. the author, a keyword, or a term from the title of the
source you want to cite) in the opening search window and click the Find button. All references
that meet your search criteria will be displayed. This feature searches in all opened EndNote
16 / 41University Library
Technical University of Munich
libraries. This is the only way to search for your references across libraries. If you want to dis-
play all the references you have saved in your EndNote Library, insert a * in the search field.
5. Select the reference(s) you wish to insert in the text and click the Insert button.
6. EndNote inserts the reference(s) in your document and creates the corresponding entry in the
reference list in the selected style (Output Style).
CWYW is also available for the Open Office Writer in Windows, as well as for Apple Pages.
Figure 16: EndNote Menu in Word
4.2 Adding Footnotes
If you want to use a footnote style, first set a footnote using the Word feature Insert footnote in the
References menu. Then place the cursor in the footnote and select your reference, as described in
Section 4.1., 2-6.
4.3 Adding Page References
The button Edit & Manage Citation(s) adds additional information such as page references for the
cited source. If you were to include this information by hand in the reference within the text, End-
Note would overwrite your additions during the next update of the document, as the in-text refer-
ence is a field function that is automatically matched to the EndNote Library.
4.4 Formatting Reference Lists - Changing Citation Styles
As soon as you insert the first reference into your text via the EndNote Word add-in, EndNote auto-
matically creates a reference list at the end of the text document that is constantly updated.
Use the Style drop-down menu to select the desired citation style. Here you can see the most com-
monly used citation styles. With the button Select another style you can choose from all citation
styles installed in EndNote. In addition to the citation styles installed in EndNote, there are many
more styles to add via the EndNote website.
To add a new citation style, save the new style in the Styles folder (on Windows: C:\Program Files
(x86)\EndNote 20\Styles).
Use the button Bibliography (also Configure Bibliography or Bibliography Settings) to determine the
layout and heading of the reference list.
4.5 Grouping Reference Lists
17 / 41University Library
Technical University of Munich
Reference lists are usually sorted alphabetically or in the order of appearance. Sometimes, how-
ever, it is desirable to display some of the sources separately from the others - e.g. internet
sources separately from the rest of the cited literature or separated into primary and secondary lit-
erature. To do this, you can use the Categorize References function in the Word add-In (see Fig.
17). Create the required categories using Configure Categories.
Figure 17: Creating Categories in Word
The categories (Category Headings) Primary Sources and Secondary Sources are already added.
Use +Category Headings to create new categories (see Fig. 18). Drag and drop the references
from the All References in Bibliography into the desired category. An automatic assignment e.g. via
Custom or Smart Groups is not possible.
Figure 18: Creating new categories and assigning literature
18 / 41University Library
Technical University of Munich
4.6 Changing EndNote Style Sheets in Word
While the content of the reference list is determined by the citation style, the formatting is mostly
defined by the style sheets. Once you've inserted the first source into your text using EndNote's
Word add-in, you'll find two additional style sheets in Word (see Fig. 19); the sheet EndNote Bibli-
ography for the entries in the reference list and EndNote Bibliography Title for the title of the refer-
ence list.
You can use the small drop-down menu next to the name of the sheet to change this style sheet
(see Fig. 19).
Figure 19: EndNote style sheets in Word
The style sheet lets you adjust the font and font size, line spacing, as well as the spacing between
individual entries in the reference list (see Fig. 20).
19 / 41University Library
Technical University of Munich
Figure 20: Adjusting style sheets in Word
4.7 The Travelling Library
A Travelling Library is created as soon as the first source is inserted into a text document with End-
Note. The Travelling Library contains the bibliographic data of all sources cited in this Word docu-
ment, with the exception of the fields Notes, Abstract, and Research Notes.
A Travelling Library can be exported to EndNote by other EndNote users from the Word document.
If these datasets are then changed in EndNote, the changes are also displayed in Word. The pre-
requisite for all updates in Word is always that the EndNote Library used is opened. Otherwise, the
data stored in the Travelling Library will be used for updating.
When importing a Travelling Library, the datasets are checked for duplicates.
20 / 41University Library
Technical University of Munich
4.8 Showing Cited References in EndNote?
EndNote creates a temporary folder with the name of the Word
file (Fig. 21). This can only be seen as long as the Word docu-
ment is open and contains all sources cited up to this point.
4.9 Faster Speed in Word – Instant Formatting
If you notice that it takes a particularly long time for Word to in-
sert new references, temporarily disable the Instant Formatting
feature while working on the document. In the EndNote menu
in Word, select the button Instant Formatting is On and disable
instant formatting. Additional settings for instant formatting can Figure 21: List of cited references
be made in the EndNote Preferences in Word under Prefer-
ences > Tab General. In order to format citations and reference list at a later time, enable this fea-
ture again.
5 Creating Bibliographies by Keywords, Authors or Years
In order to create bibliographies by different criteria such as keyword, author or year, select Tools
=>Subject Bibliography in the menu.
Figure 22: Creating reference lists by keywords, authors or years
In the Subject Fields dialogue box, select the criterion or criteria by which the list should be sorted.
If you wish to obtain a list sorted by author, it is possible to have each author displayed individually
(List each author separately, see Fig. 22). This means that works by more than one author are
listed under each author name and thus multiple times in the list. Then click on OK.
21 / 41University Library
Technical University of Munich
In the following dialogue window, all entries based on the criterion are listed and the respective
amount of found references are displayed.
If you, for instance, choose a list to be sorted by keywords, all keywords are listed here with the
corresponding number of titles (Fig. 23).
Choose Select All if you want a complete list, or mark all the terms you wish to include by clicking
on them. Then click on OK.
Figure 23: Selecting keywords for reference lists
Your bibliography will be created and displayed in a preview window (Fig 24).
22 / 41University Library
Technical University of Munich
Figure 24: Preview for the reference list by keywords
For each keyword, a number in parentheses will show you how many corresponding titles there are
in your library. Then corresponding references are listed. You can make a few changes to the lay-
out using the Layout button. In the drop-down menu Output Style you choose the citation style in
which the list should be displayed. Or you can once again hide or show additional keywords using
the Terms... button.
Decide if you want to print or save the list.
6 Changing and Creating Citation Styles
EndNote offers a variety of different citation styles (Output Styles). These can be found in EndNote
via the menu Tools => Output Styles => Open Style Manager. There you will find a selection of all
available styles offered by EndNote. More styles can be found at: http://endnote.com/down-
loads/styles.
In the Style Manager, you will find a preview window, below which the selected citation style is dis-
played (Fig. 25, 1). You might have to change the view to preview using the button Style Info / Pre-
view (2).
23 / 41University Library
Technical University of Munich
Figure 25: Output Style Manager
If you cannot find a suitable style either here or on the EndNote page, you have the option of cus-
tomising an existing style or creating a style yourself. We recommend selecting and customising a
style that is as similar as possible, as creating your own style requires a great deal of work.
If you wish to customise a style, select it in the Style Manager and click Edit to change it (3). The
Style editor will open (Fig. 26).
The citation style defines what a citation should look like in the text (Citations, 2) or in the footnote
(Footnotes, 4) and how the reference is displayed in the reference list (Bibliography, 3). Depending
on whether it is a footnote style or an author-year style, make the settings either under field 2 or 4.
Field 1 contains general information, such as how page numbers and journal titles are displayed
and whether a reference list is created for each chapter or for the entire document. Section 5 (Fig-
ures & Tables) determines how figures and tables are displayed. Since this function is no longer
24 / 41University Library
Technical University of Munich
maintained by EndNote, we recommend that you do not use it, but instead use the original Word
features.
Figure 26: Output Style editor
6.1 In-Text Citations and Footnotes
In the Citations (2) or Footnotes (4) area (Fig. 26) on the left in the navigation, select the item Tem-
plates to specify the information in the text or in the footnote. In the citation style, all fields available
in EndNote can be used, such as the fields Author, Title, Year, etc. In addition to the contents of
the database fields, you can also use punctuation marks, letters and special operators. Database
fields and operators can be found via the Insert Field button (Fig. 27). If, when using the Insert
Field feature, you were to insert e.g. the field Author, it would not be the word author, but rather the
content of this database field that is displayed in the citation. Punctuation marks separating each
piece of information are entered by hand.
25 / 41University Library
Technical University of Munich
Figure 27: Customising in-text citation
It is important to remember that it is still possible that a field has no content. This could cause two
punctuation marks to follow each other, or leave a piece of information such as p. for the page ref-
erence without a subsequent page indication. To prevent this there are special operators with
which text elements can be linked to the content of a field. Details like p. or preceding punctuation
are displayed only if there is also a page number.
Link Adjacent Text operator
The Link Adjacent Text operator (Fig. 28) helps to link text elements and field content. The text ele-
ment is displayed only if the database field also has content. In Fig. 27 this operator is represented
by a diamond-like symbol. Likewise, punctuation marks are linked with their subsequent elements.
A Link Adjacent Text operator always sets a whitespace automatically. The Link Adjacent Text op-
erator can be found e.g. between the indication pp. and the field Cited Pages. Whitespaces are
represented by a simple dot at the centre of the line height (following e.g. the comma after the au-
thor's name).
Figure 28: Operators for the definition of citation styles
26 / 41University Library
Technical University of Munich
If the linked text is the same as the name of the field, e.g. after the editor the word “editor” should
appear, the text will be put into back apostrophes `editor`
Forced Separation operator
If the content of a field is missing, there are pieces of text and characters in the immediate vicinity
of this information, which should also not be displayed, while all other information should be given
as normal. A definition for an in-text citation therefore contains a subdivision into sections of mean-
ing. To show EndNote these sections, the operator Forced Separation (vertical bar) is used.
If EndNote now encounters a forced separator when reading this definition, it first checks whether
the following database field has any content. If this is the case, the citation will be written on with-
out displaying the operators. If the database field is empty, EndNote skips all information until the
next forced separator and only continues to write after it. To stay with the example of the page ref-
erence in Fig. 27, with an empty Cited Pages field, the entire content between the preceding forced
separator and the following forced separator would be ignored, while the closing parenthesis after
the forced separator would be displayed again.
Singular/plural operator
So far, the indication p.ᶺpp has remained unexplained. This feature can be used to make different
textual statements for singular or plural. Depending on whether the linked database content con-
tains one or more pieces of information, either the singular or the plural version is displayed. This is
especially used in English citation styles for editors’ and page details. If there is a single editor, this
is often indicated by (Ed.). If there are several, the specification is (Eds.). The singular version al-
ways precedes the singular/plural operator (upside down circumflex), while the plural version is
given behind it.
Formatting
If one piece of information is to be given a particular format, e.g. printed in italics, highlight the re-
spective area and click on the appropriate formatting symbol at the top (Fig. 28).
In the section Citation => Author Lists you can specify how to proceed with several authors. Should
all or only the first x authors be named? And by which type of punctuation should several author
names be separated from each other?
In the section Citation => Author Name you specify how the author names should be displayed.
Should first and middle names be mentioned? Should they be written out in full or abbreviated with
initials? And in what order should they be named?
In the section Citation => Sort Order you can specify the order in which the sources are given if
you name several sources in one place.
6.2 The Entry in the Reference list
In the Bibliography section, select the item Templates to define the specification of entry in the ref-
erence list (Fig. 29). Define all document types (Reference Types) that you use in your work. To
define a document type, select it in the Reference Types field (2). An empty field for the selected
document type is displayed.
27 / 41University Library
Technical University of Munich
Use the Insert Field command (top right) to insert all the fields you need. Create your definition ac-
cording to the description in chapter 6.1.
2
1
Figure 29: Defining the specification of different document types in the reference list
You also have additional options for the reference list in which you can specify how authors' and
editors’ names are to be displayed, how the reference list should be sorted, and the like.
6.3 Capitalisation in the Reference list
You may have noticed that there are databases that import titles or authors in uppercase letters. If
you want the titles and authors to be consistent in your reference list, there are several ways to
achieve this.
6.3.1 Capitalisation in Titles
This feature changes the case of titles for all cited
references. It does not affect the view in End-
Note, but only the output in the reference list.
To do this, edit your citation style => Menu Tools
=> Output Style => Open Style Manager. Choose
your citation style and click Edit.
Under the heading Bibliography you will find the
item Title Capitalization (Fig. 30).
Select whether the title should be specified in the
reference list as it was entered in EndNote, in the
Figure 30: The capitalisation in the citation style
28 / 41University Library
Technical University of Munich
headline style (all words capitalised except for articles and prepositions) or in the sentence style
(first word in uppercase, otherwise only uppercase nouns).
6.3.2 Capitalisation of Author and Editor Names
You can indicate directly in the citation style how author and editor names should be displayed.
To do this, edit your citation style => menu Tools => Output Style => Open Style Manager. Choose
your citation style and click Edit.
Under the headings Citations, Bibliography, and Footnotes you will find the items Author Name and
Editor Name.
Figure 31: Setting the capitalisation of author names
Use the drop-down menu Capitalization to choose how the names appear in the reference list, in-
text citation, or footnote (see Fig. 31).
7 Collaboration and Synchronisation with EndNote Web
EndNote Web is a web-based reference management program that enables location- and com-
puter-independent work and collaboration. TUM members can use EndNote Web both in conjunc-
tion with EndNote Desktop and without a desktop version.
7.1 Activating EndNote Web
If you have already installed EndNote Desktop, you can, as long as you are connected to the Inter-
net, create your EndNote Web Account directly from within EndNote Desktop. To do this, go to the
29 / 41University Library
Technical University of Munich
item Preferences in the Edit menu, go to Sync and click on the button Enable Sync. Follow the in-
structions. Create your account with your TUM email address. Alternatively, you can go there via
Library > Sync or click on Sync Configuration on the left in the program.
In EndNote Web, you also have the option to download the EndNote Web plug-in, which helps you
to capture web pages quickly.
If you already have an EndNote Web account when installing EndNote Desktop, you can also in-
corporate it directly at that point.
In order to use EndNote Web without EndNote Desktop, go to the Web of Science database, follow
the link to EndNote in the Tools menu and create an EndNote Web account using your TUM email
address (Fig. 32).
Figure 32: Link to EndNote Web in the Web of Science
7.2 Synchronisation between EndNote Desktop and EndNote Web
You can transfer data from your computer to your EndNote Web account as well as, conversely,
copy it from your EndNote Web account to your computer.
If you want to synchronise data between different devices, synchronisation will always occur via
EndNote Web. The data transfer is triggered by the end device in use.
All references including full texts, Group Sets and all types of groups are synchronised. Group
Sets, Smart and Combined Groups are not displayed in EndNote Web, however, after the synchro-
nisation to another end device they reappear in EndNote.
Since everything is always transferred during synchronisation, it is advisable to create one single
EndNote library in total. If you work on several projects, it makes sense to organise the projects us-
ing Group Sets and groups.
7.3 Sharing a Group
As with the Custom Groups in EndNote Desktop, you can also create groups here. You can share
them with up to 1,000 other EndNote Web users, to whom you individually assign either read-only
or read and write permissions.
To share a Group with others in EndNote Desktop, (from EndNote X9 onwards)
30 / 41University Library
Technical University of Munich
1. go with your cursor to the group you want to share and right-click it to open the context menu.
Choose Share Group.
2. in section Invite More People insert the e-mail addresses of the people you want to share your
group with.
3. choose for each person, whether they shall have read-only or read and write access.
4. You may enter a personal note to the recipient in the field Add A Message.
The e-mail address doesn’t have to be the one the other person registered their EndNote Web ac-
count with.
To share a group with others in EndNote Web,
1. go to Manage My Groups in the Organise menu,
2. create a new group or select an already existing group whose entries you wish to share and
go to the Manage Sharing button.
3. Now add collaborators and assign the desired editing rights. To add collaborators, you need
the email address with which the person created their EndNote web account. Note, however,
that you cannot share file attachments (e.g. PDFs).
Your shared groups are displayed as such in your own library af-
ter synchronisation (see Fig. 33) while a shared library appears as
a new library for the others (see Chapter 7.4). Groups others
shared with you are displayed in your EndNote Desktop under the
heading Groups shared by others. First the e-mail address of the
group’s owner is displayed, then the name of the group (s. Fig.
34). The name is linked to the shared group in EndNote Web.
Clicking on the title will open the group in EndNote Web. How- Figure 33: Displaying shared
groups in EndNote Desktop
ever, you will no longer see in EndNote Desktop how many refer-
ences are stored in the group or which references are included.
Figure 34: Displaying groups others shared with you in EndNote Desktop
7.4 Sharing an EndNote Library
You can share your entire EndNote Library with up to 100 other EndNote Web users. References,
full texts and groups are shared. Up to EndNote X8 all collaborators have full editing rights. From
X9 onwards you can also assign a read-only right.
To invite others to share your library, open the library in your desktop version and click Share in the
File menu. In the following dialogue box, enter the email addresses of all persons with whom you
wish to share your library (Fig. 35). This does not have to be the email address with which the par-
ticular person created their EndNote web account. Furthermore, you define whether the person
31 / 41University Library
Technical University of Munich
shall have read-only or read and write access. Invitees
receive an invitation via email, which they must accept
before they can access your library.
As long as the invitation has not yet been accepted,
the status will be indicated as Pending, once the invi-
tation has been accepted it will change to Member.
You can share one library of your own, but you can
use any number of other libraries to which you have
been invited by others. To edit someone else's library,
choose the command Open Shared Library in the File
menu in EndNote. Depending on your rights, you can
now either read or read and edit the library as usual.
Libraries shared with you are only visible in your desk-
top version, not in your EndNote web account.
Changes made in a shared library can be tracked via
the Activity Feed (see Fig. 36). The last 500 changes
Figure 35: Inviting other EndNote users to a
are displayed.
shared library
Figure 36: Activity Feed
32 / 41University Library
Technical University of Munich
7.5 CWYW for EndNote Web
In the Cite While You Write Preferences, choose
whether to allow CWYW to access EndNote Desktop
or your EndNote Web Library. In the tab Application,
choose EndNote online instead of EndNote and con-
firm with OK (Fig. 37).
7.6 Collaborative Use of the EndNote Li-
brary with the Desktop Version
An EndNote Library is not designed to be edited by
more than one person at a time. Even if the file is
stored on a shared drive, it can only ever be edited by
one person. For all others the file is locked. Even a
read-only copy cannot be opened in this case. Figure 37: Cite While You Write Preferences in
Word
However, the following solution would be conceivable:
There is a team member who has stored and maintains the EndNote Library locally on their com-
puter or drive. They save a read-only copy of the library on the shared drive for all colleagues to
view and regularly replaces it with the updated file. The team members can open the read-only file
simultaneously and are able to search in it, create bibliographies, copy datasets, and cite in Word.
7.7 Compatibility with Programs like Evernote, Scrivener, etc...
In contrast to Microsoft Word and also the OpenOffice Writer for Windows, there is no Cite While
You write plug-in (CWYW) for other programs. If you work with another program such as Scrivener,
you have the following options:
If you would like to add a source to your text, mark the corresponding entry in EndNote and copy it
into your text via Ctrl+C/Ctrl+V. In your text-processing program, the citation will look like this: {Au-
thor's Last Name, Year #EndNote ID}. Once you have finished writing your work and inserting all
the sources, save your text as an .rtf or .odt file.
You can then feed them into EndNote via the menu Tools => Format Paper. A dialogue box opens
in which EndNote displays all the citations it can match (Fig. 38). Use the Output Style drop-down
menu to specify in which citation style the citations and reference list are formatted. Then click on
Format and select location, file format and file name.
The temporary citations in curly brackets are replaced and the reference list is created. Unlike in
Word, this reference list is not automatically updated when you insert a new reference, since it con-
sists of static text, not active field functions. If you want to add or change citations at a later date,
please use your original text, which still contains the citations in curly brackets, otherwise you will
be provided with a second reference list when reformatting. Adapt this text and format the docu-
ment again.
33 / 41University Library
Technical University of Munich
Figure 38: Zitation und Literaturverzeichnisse in .rtf- oder. odt-Dateien formatieren
8 Manuscript Matcher – How Do I Find an Appropriate
Journal for my Article?
Via the EndNote web account, EndNote allows you to search for journals appropriate to the con-
tents of your article, to which you can then submit it. This feature is called Manuscript Matcher. You
can find the feature in your EndNote Web Account via the menu Match (Fig 39).
Figure 39: Manuscript Matcher in EndNote Web
34 / 41University Library
Technical University of Munich
There you enter the title and abstract of your article. Including your references is not mandatory,
but allows a much better search result. If you have collected your references in a group in EndNote
Web, select this group in the field References (Fig. 40).
Figure 40: Manuscript Matcher – Entering details of the article
From EndNote X9 you find this function also in EndNote desktop and Word.
EndNote Desktop: Menu Groups > Manuscript Matcher (For this function to be active you need to
have selected a group.)
Word aAdd-in: EndNote toolbar > Manuscript Matcher (see Fig. 41)
Starting the Manuscript Matcher from EndNote desktop or Word, the references from the selected
group respectively the Word document are automatically transferred.
Figure 41: Manuscript Matcher in Word
35 / 41University Library
Technical University of Munich
On the basis of the title, the abstract and possibly the sources, the Manuscript Matcher searches
the Web of Science for journals in which similar articles are published. The result might appear as
in e.g. Fig. 42:
Figure 42: Journal recommendations in the Manuscript Matcher
You will receive up to ten suggestions. For each journal, you can see in a ranking which terms, re-
garding content, correspond to the topics discussed therein (1), the Impact Factor (2), and the spe-
cialist area this journal can be associated with (3). You will receive information about the publisher
of the journal (4), a link to the homepage where you can find further information (5), and a direct
link to submit your article to the respective journal (6). In Fig. 42 you can also see that Open Ac-
cess journals are marked as such (7). You can find a video about the Manuscript Matcher here:
https://youtu.be/rt0rT0wemrI.
Please note that this does not guarantee that your article will be accepted.
9 Further Import Options
In addition to what the EndNote Introductory Course has already introduced as options for import-
ing preferences into EndNote (manual, export from the online catalogue, export from databases,
online search via EndNote), there are further import options. For example, Endnote offers a book-
marklet to quickly take over Internet sources, while Google Scholar provides a special download
link for the import into Endnote.
36 / 41University Library
Technical University of Munich
9.1 EndNote Capture Bookmarklet
The EndNote Capture bookmarklet allows you to capture Internet sources. The bookmarklet can
be found in your Endnote Web Account in the Download menu. Drag and drop the bookmarklet
Capture Reference into the toolbar of your browser (Fig 3).
Figure 43: Setting up the EndNote Capture Bookmarklet
For example, if you want to save a website as a reference, click on the bookmarklet in your
browser. The following window will open (s. Fig. 44):
Figure 44: Saving an Internet page with the EndNote Capture Bookmarklet
37 / 41University Library
Technical University of Munich
EndNote takes over the data it can find as reference. Especially with websites, this information is
often incomplete and incorrect. Therefore, check and complete the data carefully. Then choose
whether to save the reference in Endnote (Desktop) or directly in your EndNote Web account
(my.endnote.com). Click on Save To to save the reference (Fig. 44).
9.2 Import from Google Scholar
In Google Scholar, you have the option to obtain a direct link to the import of references in End-
Note (see Fig.45).
Figure 45: EndNote import link in Google Scholar
38 / 41University Library
Technical University of Munich
To set this up, go to Google Scholar's Settings and then to the tab Search Results. There, under
Bibliography manager, select Show links to import citations into EndNote to be presented with the
links to import references into EndNote (Fig. 46). Select EndNote from the drop-down menu. Save
the changed settings. With your next search you will see a link under each title, which allows direct
import into EndNote. Import the data just as you import from databases or catalogues, via direct
import, by opening the import file directly with Endnote.
Figure 46: Setting up the EndNote import link in Google Scholar
39 / 41University Library
Technical University of Munich
10 Contactand Support
If you have any questions about EndNote, you can get help and support in a number of ways:
10.1 Help from EndNote
Manual
Within the program, you can find the EndNote manual via the shortcut F1.
Technical support
You can get technical support via: https://support.clarivate.com/s/
10.2 Help from the TUM
If you have questions, you are also very welcome to contact the university library: literaturverwal-
tung@ub.tum.de.
Video Tutorials and Lecture Notes
Video tutorials and scripts can also be found in our E-Course at:
https://www.ub.tum.de/en/ecourse/reference-management-with-endnote-advanced-course
TUM Citation Guide
If you have questions about citing, the TUM Citation Guide can help: https://media-
tum.ub.tum.de/1225458
Reference Management and Citation Consulting Hours by the TUM University Library
In addition to our reference management courses, we also offer a weekly reference management
consulting hour in Munich, where individual questions can be discussed. On top of this, appoint-
ments for an online consultation can be arranged. All information can be found on our homepage
at: https://www.ub.tum.de/en/consultation-citation
10.3 Miscellaneous
To safeguard your data, do regular backups. You have two options for this: Either save your data
in the form of a compressed library in .enlx format or export the library in .txt, .rtf, .htm or .xml for-
mat. Both options can be found in the File menu.
Connection Files, Import Filters & Output Styles
You can customise your own installed copy of EndNote according to your needs.
Connection Files*
Connection files to additional catalogues and databases can be downloaded from the EndNote
website: http://www.endnote.com/support/enconnections.asp
Import filters*
Downloads for additional import filters are also available on the EndNote website: http://www.end-
note.com/support/enfilters.asp
40 / 41You can also read


