User Manual (POC) Jurisdiction Point of Contact - CDC
←
→
Page content transcription
If your browser does not render page correctly, please read the page content below
User Manual
Jurisdiction Point of Contact
            (POC)

                                v2 | Feb 12 2021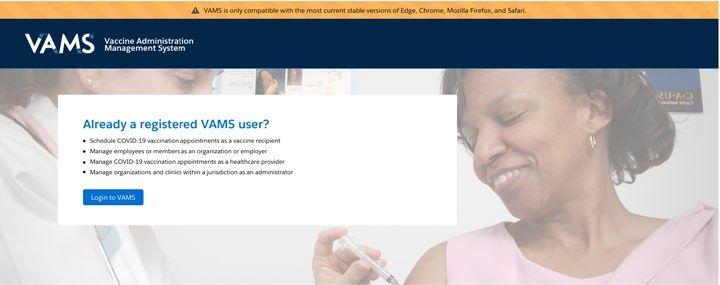
User Manual Jurisdiction POC

                    Table of Contents
Title                                                                                       Page
Introduction
• Welcome to VAMS ______________________________________________________________               2
• Your Role and Activities in VAMS___________________________________________________          3
• User Manual Guidance___________________________________________________________              4
• Navigating VAMS _______________________________________________________________              5
• Notifications from VAMS__________________________________________________________            6
Section 1 | Clinics in VAMS_____________________________________________________               7
• Clinic Types ____________________________________________________________________            7
• Add Clinics in VAMS______________________________________________________________            8
• Add Clinics One at a Time_________________________________________________________           9
• Add Clinics via Bulk Upload_______________________________________________________          10
• Search and View Clinics___________________________________________________________          13
• Manage Clinics_________________________________________________________________             14
Section 2 | Organizations in VAMS_______________________________________                      15
• Policy Enabled Registration (PER)___________________________________________________        15
• Add Organizations One at a Time___________________________________________________          17
• Add Organizations via Bulk Upload_________________________________________________          18
• Search and View Organizations____________________________________________________           21
Section 3 | Inventory Request Management in VAMS __________________________                   22
• View and Manage Inventory Requests ______________________________________________           22
• Access Inventory Request Record___________________________________________________          23
Section 4 | Enable Recipient Registration in VAMS for Jurisdiction and Clinic
Staff_________________________________________________________________                        24
• Add Jurisdiction as an Organization ________________________________________________        25
• Register Jurisdiction as an Organization _____________________________________________      26
• Add Jurisdiction Staff as Organization Members ______________________________________       28
• Register as a Recipient ___________________________________________________________         33
• Add Clinics as Organizations ______________________________________________________         34
Section 5 | Access Support_____________________________________________________               35
Glossary of Terms _____________________________________________________                       37

                                               1
                                                                                               v2 | Feb 12 2021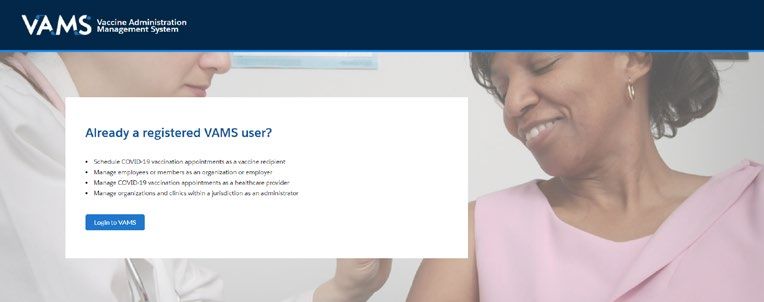
User Manual Jurisdiction POC

             Welcome to VAMS
The Vaccine Administration Management System (VAMS) is an easy-to-use, secure, online tool to manage
vaccine administration from the time the vaccine arrives at a clinic to when it is administered to a recipient.
VAMS is free for public-health-approved clinics, and can be used on computers, tablets, and other mobile
devices. It is not a smartphone app, and no installation or download is required for this web-based platform.
It supports operations as well as vaccine inventory and administration data collection and tracking for
analysis and reporting.

VAMS Portals | Each of the four portals were designed with end users in mind.

                        Jurisdiction Portal users can use VAMS to:
                        • Designate specific organizations that serve priority groups (including volunteers) for
                          initial allocation.
                        • Identify at-risk populations that are a high priority for vaccination.
   Jurisdiction         • Build a database of COVID-19 vaccination clinics in their jurisdiction.
      Portal            • Access COVID-19 vaccine inventory and administration data for analysis and reporting.

                        Clinic Portal users can use VAMS to:
                        • Register their clinic location and add clinic staff as users.
                        • Set up their clinic schedule with ability to cancel, modify, and/or change recipient
                           appointments (standard and mobile clinics only).
                        • Document and track COVID-19 vaccine administration and waste.
  Clinic Portal
                        • Monitor vaccine inventory levels.
                        • View clinic-level reports.

                        Organization* Portal users can use VAMS to:
                        • Add priority group members to VAMS to be considered for COVID-19 vaccination.
                        • Automatically send email notifications to those individuals to register in VAMS and
  Organization            schedule their vaccination appointment(s).
     Portal

                        Recipient Portal users** who receive vaccine at a standard or mobile clinic and can use
                        VAMS to:
                        • Register their account online or using a mobile device.
                        • Locate a clinic and schedule or cancel vaccination appointments.
    Recipient
                        • Receive notifications about upcoming appointments or documents for the day of
     Portal
                          vaccination.
                        • Schedule and track follow-up vaccination appointments (if applicable).
                        • Receive proof of vaccination.
                        NOTE: Vaccine recipients at third-party clinics will not use VAMS at all.
*”Organization” refers toany institution, association, company, or other group that identifies and adds members (individuals eligible for COVID-19
vaccine) in VAMS.
**To use VAMS, vaccine recipients must have an email address, internet access, and the ability to navigate the system or have someone assist them.

Introduction | Return to Table of Contents                             2
                                                                                                                                         v2 | Feb 12 2021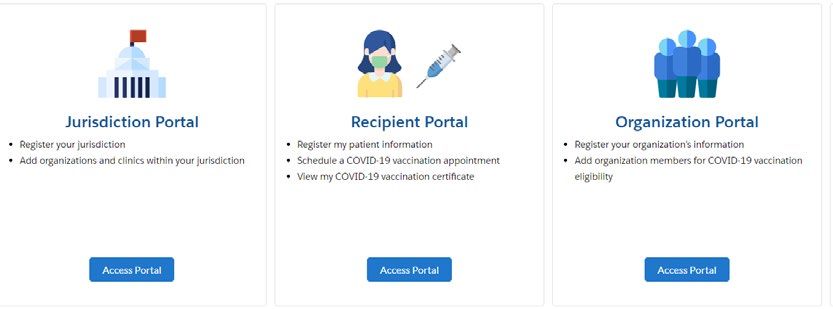
User Manual Jurisdiction POC
Your Role and Activities in VAMS
As a jurisdiction POC, VAMS serves as your primary tool for managing critical functions and oversight
of COVID-19 vaccine distribution to clinics in your jurisdiction and enables you to:
• Collect accurate, near real-time, de-identified, record-level data on COVID-19 vaccine administration
consistently across your jurisdiction, avoiding variations in data quality and availability.
• Track and monitor vaccine administration.
• Promote real-time awareness of all of the above.
Below are additional details about your role as well as the three groups you will interact with during the
ongoing COVID-19 vaccination efforts.
• Centers for Disease Control and Prevention (CDC).
• Vaccination clinics who will administer the COVID-19 vaccines in your jurisdiction.
• Organizations of priority group workers (including volunteers) in your jurisdiction.
You likely already have a CDC point of contact (POC). However, vaccination clinics and organizations need to
select someone in their organization to be your POC.
In addition to your own role, this diagram
CDC POC
provides an overview of the roles and
Role: Add jurisdictions responsibilities for each group’s POC and shows
Monitor COVID-19 vaccine inventory the flow of information from one POC to another.
Monitor national COVID-19 vaccination data Quick Tip: Additional details about these groups
are available in other VAMS training resources.
Jurisdiction POC
Role: Add vaccination clinics and organizations
Respond to inventory requests
Monitor inventory data
Monitor/report jurisdictional vaccination data
Add clinics as organizations to facilitate vaccination for clinic staff
Vaccination Clinic POCs Organization POCs
Known as clinic administrators in VAMS Known as organization coordinators in VAMS
Role: Set clinic hours and appointment times Role: Connect with jurisdiction POC to
Manage clinic staff’s access to VAMS determine eligibility as an essential
organization
Order vaccine inventory
Register their organizations and upload
Connect with jurisdiction POC to be
members in VAMS
added as an organization in VAMS
Introduction | Return to Table of Contents 3
v2 | Feb 12 2021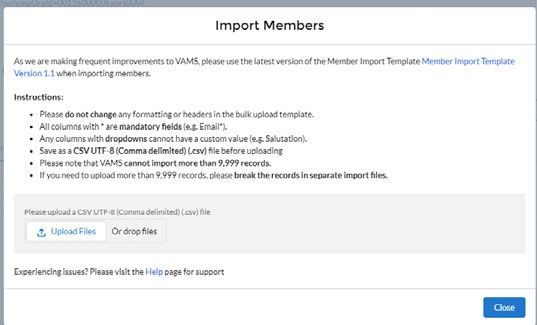
User Manual Jurisdiction POC
Jurisdiction POC User Manual
This user manual is designed for you.
This manual describes your role and responsibilities (referred to as “tasks” or “activities” in this user manual) in
VAMS. Detailed instructions on how to perform your tasks are included in each section. This manual also
includes an overview of other VAMS user roles and responsibilities to provide context on how you will work
with other users in the system.
How to Use this User Manual
Throughout this user manual, you will see the following components.
Component Description
NOTE: Notes are need-to-know pieces of information you should be aware of.
Quick Tip: Quick Tips are good-to-know pieces of information and tips for getting the most out of VAMS.
Arrows Arrows indicate action items (e.g., “Click the button”).
Circular bullets indicate information about steps in a process that don’t require action (e.g., “A
• Bullets
pop-up window will appear”).
Bright blue hyperlinks Bright blue hyperlinks link to external pages (e.g., https://vams.cdc.gov/vaccineportal/s).
Gray hyperlinks in the footer link to section dividers and to this manual’s table of contents (e.g.,
Gray hyperlinks
“Return to Table of Contents” links in the page footers).
Dark blue hyperlinks link to other pages in this manual (e.g., Step 1: Activate Your Account in
Dark blue hyperlinks
VAMS).
Buttons like the one pictured also link to other pages in this user manual.
Introduction | Return to Table of Contents 4
v2 | Feb 12 2021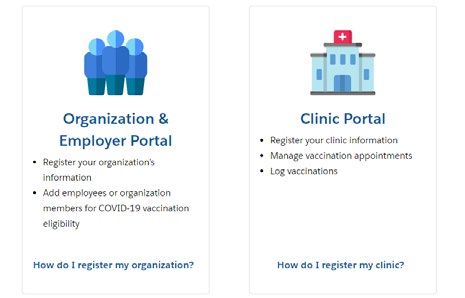
User Manual Jurisdiction POC

           Navigating VAMS
Quick Tip: VAMS works best in the Google Chrome browser but can be accessed via any browser except
Internet Explorer. VAMS also works on mobile browsers.

To access VAMS once registered, visit the landing page
(https://vams.cdc.gov/vaccineportal/s) and log in with your
user name and password.

The components listed below are in VAMS to help you navigate the system.

Header/Banner

The VAMS logo takes you to your portal’s first tab. The Help link takes you to a list of frequently asked questions
(FAQs) that will help you navigate the system. Click the drop-down arrow next to your name in the top right corner of
the page to log out of the system.

Buttons
Buttons like those shown on the right allow you to start,
advance, and complete tasks.

Tabs
Click tabs on a page to move between pages or page
sections. The tab you are currently viewing will be
underlined and bolded. Tabs not being viewed will be
grayed out.

Tables
Tables allow users to sort or filter information previously
entered in VAMS. You can view entry details by clicking
the links in each row.

A Note About Privacy
To receive COVID-19 vaccine, vaccine recipients must enter data that are considered personally identifiable
information (PII) and protected health information (PHI). PII is any data that could potentially identify a
specific individual. PHI is information, including demographic information, that relates to the individual’s
past, present, or future physical or mental health or condition. VAMS complies with the Health Insurance
Portability and Accountability Act of 1996 (HIPAA) privacy and security rules. For more information about
HIPAA, visit https://www.cdc.gov/phlp/publications/topic/hipaa.html.

Introduction | Return to Table of Contents                    5
                                                                                                                v2 | Feb 12 2021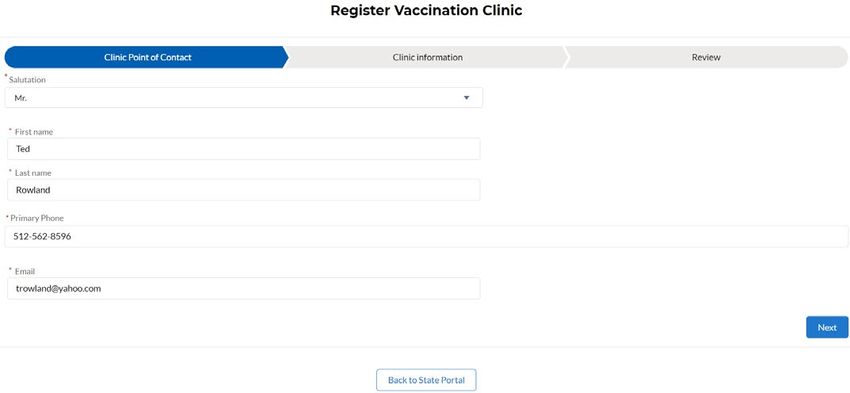
User Manual Jurisdiction POC
Notifications from VAMS
Types of Email Notifications Users Should Expect From VAMS
While users can select their preferred method of communication to be email or SMS text, some
communications will always be sent through email.
Email notifications from…
vams@cdc.gov will be auto-generated emails related to Clinic, Jurisdiction, Organization Portal messages
such as:
Registration links to new VAMS users
Re-occurring two-factor authentication for logins
Updates on inventory requests
no-reply@mail.vams.cdc.gov and no-reply@envelope.mail.vams.cdc.gov will be auto-generated emails
related to the Recipient Portal such as:
The initial two-factor authentication code
Links for recipients to complete Prevaccination Questionnaires
Reminders about upcoming recipient appointments
VAMSHelp@cdc.gov will be:
Communications from the VAMS Help Desk
*@salesforce.com: Depending on some email server configurations, we have heard of rare cases where
emails are delivered directly from Salesforce. Potential cases include password resets and interacting with
VAMS Help Desk agents.
Introduction | Return to Table of Contents 6
v2 | Feb 12 2021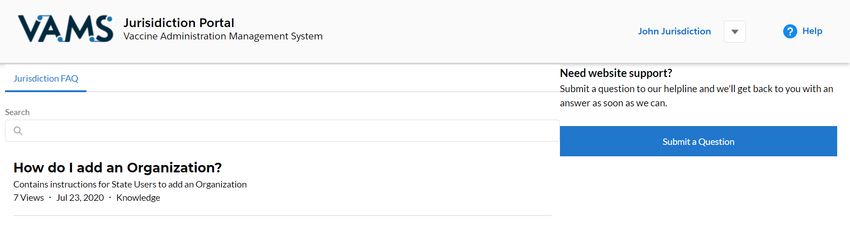
User Manual Jurisdiction POC
Section 1
Clinics in VAMS
Clinic Portal Roles in VAMS
There are four roles available in the Clinic Portal - clinic administrator (CA), inventory manager (IM), front
desk (FD), and healthcare professional (HP). Depending on the clinic type, only some of the roles must be
filled for a clinic to operate successfully. The matrix below provides a brief summary of the Clinic Portal roles
and their activities in VAMS. CA IM* FD** HP
Serve as the clinic POC for your jurisdiction
Manage clinic information (e.g., physical address)
Set and manage clinic schedule (standard and mobile clinics only)
Manage clinic’s COVID-19 vaccine inventory
Manage (add, edit, remove) VAMS clinic users
Check in vaccine recipients, create walk-ins, or cancel appointments (standard and
mobile clinics only)
Administer vaccine to recipients
*optional role for all clinic types since the clinic administrator can also perform inventory management tasks
**front desk role is not used in VAMS for third-party clinics since they do not check in recipients in VAMS
Clinic Types in VAMS
In VAMS, clinics are categorized within three main types - standard, mobile, and third-party. Within the
standard clinic type, there are 4 sub-types. Below is a brief description of the different clinic types along with
a list of accompanying clinic users, and examples of each type.
Standard - utilizes all four clinic user roles, searchable by recipients in VAMS
Sub-type Description Examples
Clinic Healthcare setting providing outpatient care with Urgent care centers, retail clinics, federally
one permanent location for vaccination qualified health centers
Hospital Healthcare setting providing inpatient and/or For-profit community hospitals, Veterans
outpatient care with one permanent location for Affairs medical centers, nongovernment
vaccination not-for-profit community hospitals
Pharmacy Clinic with one permanent location for vaccination Retail, community, or clinical pharmacies
Pop-up Temporary clinic location for vaccination Temporary vaccination sites at workplaces,
schools, government facilities
Mobile - utilizes all four clinic user roles, searchable by recipients in VAMS
Clinic with multiple locations for vaccination Mobile clinic bus, mobile clinic van
Third-party - does not utilize front desk clinic user role, not searchable by recipients in VAMS
Clinics responsible for both adding and managing recipient Long-term care facility (LTCF), employees-
records as well as administering and tracking recipients in VAMS only clinic within a hospital, etc.
Other - “other” can be selected if a clinic doesn’t fall within one of the categories listed above.
Section 1 | Return to Table of Contents 7
v2 | Feb 12 2021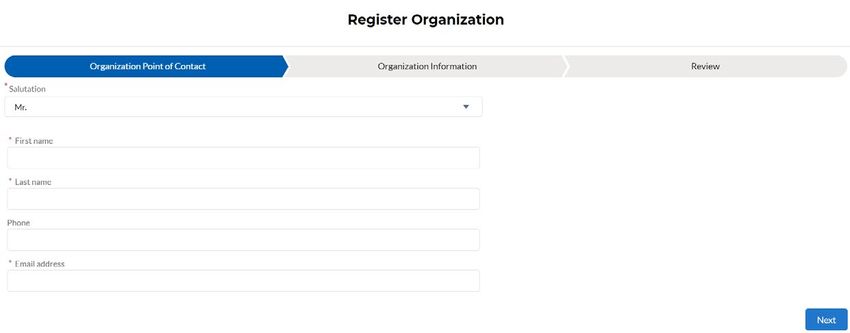
User Manual Jurisdiction POC

           Add Clinics in VAMS
Once you add clinics in VAMS, clinic POCs will be able to activate their account, register their clinic, set the
clinic schedule, and add clinic staff as VAMS users.

Information You’ll Need to Add Clinics in VAMS
• Clinic POC’s information (the clinic administrator is typically your POC for the clinic): first name, last
  name, phone number, email address.
• Clinic name
• Clinic type*: clinic, hospital, pharmacy, other, pop-up, mobile, third-party
• Clinic address(es): primary and shipping (mobile clinics are required to have a permanent shipping
  address to receive inventory but can change their mobile clinic’s physical address as needed)
• Clinic identifiers - Facility ID, Provider PIN, and Parent Organization ID: the clinic’s Facility ID is
  required for reporting to CDC and the Parent Organization ID is required for HL7 integration. Based upon
  your jurisdiction’s policies, you may also require a clinic’s Provider PIN which identifies their facility for
  ordering in VTrckS.
  NOTE: HL7 messages will be held if required clinic identifiers (e.g., facility ID and/or parent organization
  ID, where applicable) are missing. These messages will be released once the required identifier(s) have
  been populated.

Before Adding New Clinics in VAMS
Ensure you have proactively communicated with them about the IT recommendations below to expressly
permit VAMS notifications from specific email and IP (internet protocol) addresses to be received by their
systems. Ensure you have also communicated with and trained new clinics before providing access to the
live VAMS site.
Allow notifications from the following email addresses
To ensure communications do not get delayed or blocked by a clinic’s exchange servers, advise them to work
with their IT departments to allow notifications from the following email addresses:
• vams@cdc.gov
• no-reply@mail.vams.cdc.gov
• no-reply@envelope.mail.vams.cdc.gov
• VAMSHelp@cdc.gov
• *@salesforce.com
Allow notifications from the following IP addresses
Allowing email from specific IP addresses will also greatly improve email deliverability in a timely fashion.
Advise clinics coordinate with their IT department to allow the email addresses above as well as email from
the following IPs:
                                                                 Amazon Web Services
Salesforce                                                       23.251.255.1 - 23.251.255.150
96.43.152.64 - 96.43.152.80 (subnet mask = 255.255.255.0)        23.251.253.228 - 23.251.254.250
96.43.153.64 - 96.43.153.80 (subnet mask = 255.255.255.0)        54.240.40.1 - 54.240.40.54

   Section 1 | Return to Table of Contents               8
                                                                                                         VAMS 1.0
                                                                                                               v2 ||Feb
                                                                                                                     rev12Oct
                                                                                                                          2021 26 2020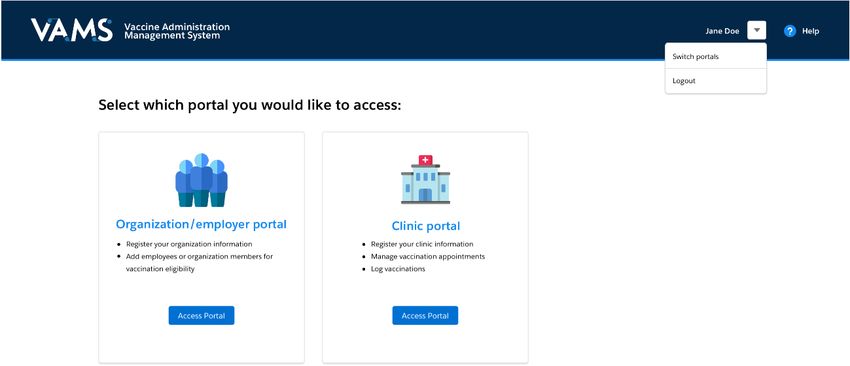
User Manual Jurisdiction POC
Add Clinics One at a Time
You can add clinics one at a time or you can add multiple clinics at once via bulk upload from the Manage
Clinics page. First, we will learn how to add one clinic at a time, then how to bulk upload them.
Click Add Clinic on
the Manage Clinics
page.
Enter the clinic POC’s information.
Click Next.
Quick Tip: Click the Back to State Portal button to
cancel this process. Cancelling the process deletes
any clinic information entered so far in the process.
Note the fields marked with a red asterisk (*) are required.
Enter the clinic’s information.
Although the Provider PIN, Facility ID, and Parent Organization
ID fields are not marked with a red asterisk, you must enter
that information when adding clinics in VAMS unless you are
told it is not required for your jurisdiction.
• The Facility ID is required for CDC reporting, the Parent
Organization ID is required for HL7 integration, and the
Provider PIN identifies the facility for ordering in VTrckS.
Review all information entered on the Register Vaccination Clinic
pages and verify it is correct. If so, click Next. If not, click Previous
to make corrections.
NOTE: Once added, you cannot change any information
associated with a clinic in VAMS, so review carefully prior to clicking
Next on the Review page.
• After clicking Next, a message appears confirming the clinic is
added to the system.
• Once they are added, clinic POCs receive an email from vams@cdc.gov with a link to activate their account
and register their clinic in VAMS.
NOTE: To prevent duplication of clinic entries, VAMS will not add a clinic with the same address as a
previously added clinic. If this occurs, you will receive an error message stating a clinic located at that
address is already entered in the system.
Section 1 | Return to Table of Contents 9
v2 | Feb 12 2021User Manual Jurisdiction POC
Add Clinics via Bulk Upload
Bulk uploading allows you to add multiple clinics at once by adding their information in a comma delimited
(.csv) template and uploading it in VAMS.
Click Import Clinics on the Manage
Clinics page.
Click the Clinic Import Template link in the pop-up
window that appears. After clicking the link, the
template file will download to your computer.
NOTE: Always ensure you download and use the
latest version of the import template each time you
attempt to bulk upload clinics in VAMS to take
advantage of constant improvements and to avoid
data issues/inconsistencies.
Important Notes about the Clinic Import Template File:
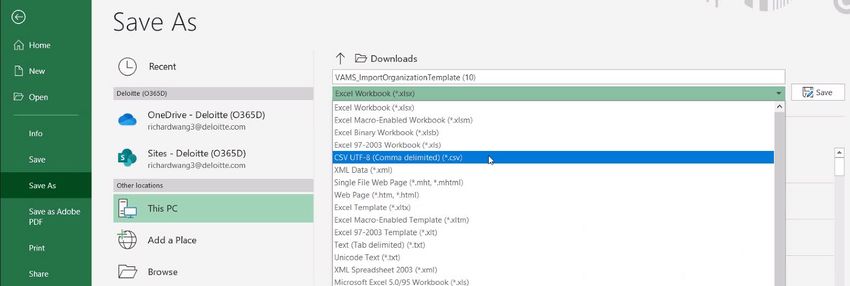
• The file opens on your computer as an .xlsx file, but you must save it as a CSV UTF-8 (Comma
delimited) (.csv) file after entering all information and before uploading it to VAMS. No other types
of csv files are accepted.
• You must use the latest version of the template when uploading a list of clinics in VAMS.
• All fields marked with an asterisk in the
template are required.
• VAMS will not upload a clinic if any of the
required fields are blank.
• Fields that contain a pick list or drop-down
options must contain a selection.
• VAMS will not upload duplicates if a clinic is Quick Tip: A comma-separated values (CSV) file is a
listed in the csv file multiple times or if the delimited text file that uses a comma to separate
clinic has already been added in VAMS. values. A CSV file stores tabular data (numbers and
text) in plain text.
Section 1 | Return to Table of Contents 10
v2 | Feb 12 2021User Manual Jurisdiction POC
Add Clinics via Bulk Upload (continued)
Open the file and enter the clinics’ information.
Save the file as a CSV UTF-8 (Comma delimited)
(.csv) file. You can find this option under the Save
As drop-down menu in Excel.
Click Upload Files in the Import Clinic List pop-
up window. You can also drag and drop your
clinic list in the Drop Files area of the page.
Click Close.
Confirm Bulk Upload
After importing a list of clinics, these processes automatically occur in VAMS:
• A message appears on screen that your list is in the import queue.
• VAMS sends a registration email to each clinic POC if their information was entered in the .csv file
completely.
• After your list has processed, you will receive an email from vams@cdc.gov, stating it has been uploaded
• A result log appears on the Clinic Imports page.
Click the Clinic Imports tab to check the results of your bulk upload.
• On the Clinic Imports page, you see information about your upload, including the system-generated
Import ID number, who imported the list, and when it was imported.
Click the Import ID number of the clinic import to open the Import Details page.
Section 1 | Return to Table of Contents 11
v2 | Feb 12 2021User Manual Jurisdiction POC
Add Clinics via Bulk Upload (continued)
Confirm Bulk Upload (continued)
There are two main sections on the Import Details page:
• Import details, which includes the import
ID, jurisdiction name, who created it, and
the date created
• Notes and Attachments table, which
includes two files: a Result Log for Bulk
Upload and the clinic import file you
uploaded
o The Result Log for Bulk Upload file shows the results of your file upload.
Click the Result Log for Bulk Upload link to open the file.
Scroll to the right until you see the status column. The status column shows whether a clinic was added
in the system.
• If there were duplicates or missing information in the .csv file, you will see an error message telling
you why a clinic was not uploaded.
• All clinics that have a status of Success are uploaded in the system. Clinics with a status that includes
an error message have not been uploaded in the system.
Section 1 | Return to Table of Contents 12
v2 | Feb 12 2021User Manual Jurisdiction POC
Search and View Clinics
Click the Manage Clinics tab to search for and view details of the clinics you’ve entered in VAMS.
NOTE: You will only be able to view the clinics added in your jurisdiction.
Search for a Clinic
The Manage Clinics page
offers multiple ways to
search and sort data.
On the Manage Clinics page, scroll to the bottom of the list and click the View All link.
On the View All page, you can sort by clicking the arrows in the columns to sort them by the column
headers (e.g., name, email) or use the search bar to enter information such as clinic name, clinic POC,
email address, or status.
View Details of a Clinic in Your Jurisdiction
Click the name of a clinic to see detailed information.
NOTE: All fields on the details page are read-only for the jurisdiction
POC.
Section 2 | Return to Table of Contents 13
v2 | Feb 12 2021User Manual Jurisdiction POC
Manage Clinics
Clinic Status
The list of clinics you entered will appear on the Manage Clinics page. The far-right column shows the clinic’s
status. This field is read-only and shows a clinic's registration status as one of the below.
• Pending clinic admin registration: The clinic is
entered in VAMS, but the clinic’s administrator has
not registered their account.
• Active: The clinic’s administrator registered their
account.
• Inactive: The clinic is deactivated in VAMS
(information on when and how to deactivate a clinic
in VAMS is below).
Deactivate Clinics in VAMS
You can deactivate a clinic when it is no longer needed to administer vaccines.
NOTE: Caution should be taken in deactivating a clinic in VAMS as it signals the system to do the
following:
• Send an email to the clinic’s administrators telling them the clinic is deactivated.
• Send a cancellation email to recipients with booked appointments.
• Cancel all appointments booked by recipients at the clinic.
• Remove the clinic from the list of searchable clinics.
• Deactivate all clinic inventory requests.
• Close all open appointments.
Click the name of the clinic you want to deactivate on the Manage
Clinics page.
Click Deactivate Clinic in the top right corner of the clinic’s account page.
Review the data shown in the Deactivate Clinic pop-
up window, which includes the number of total booked
appointments and vaccines in the clinic’s inventory.
124
300
Click Deactivate Clinic. If you do not want to deactivate
the clinic, click Cancel to close the pop-up window and
return to the clinic’s account page.
Section 2 | Return to Table of Contents 14
v2 | Feb 12 2021User Manual Jurisdiction POC
Section 2
Organizations in VAMS
Once you add organizations in VAMS, organization coordinators will receive a registration email so they can
activate their user account and register their organization in VAMS. After successfully registering their
organization, the organization coordinator can provide their members with two ways to register themselves
in VAMS:
1. The organization coordinator can add them in the system one at a time or via bulk upload which will
trigger a registration email to be sent from VAMS to each member.
2. The organization coordinator can provide them with a common registration link that is established when
an organization is authorized for Policy Enabled Registration or PER.
Policy Enabled Registration (PER)
Policy enabled registration allows an organization to provide a common registration link to their members.
The benefit of using PER is that an organization coordinator does not have to add each organization
member into VAMS. For an organization to use PER for their members, you must authorize them to do so,
and they must provide you with at least one but up to three email domain names (e.g., fultoncounty.gov,
fultoncounty.org, etc.) to enter in their organization record. The caveat is that whoever gains access to the
common registration link and possesses an email address with one of the domain names provided by the
organization coordinator, can register as a recipient.
How PER Works for Organizations and their Members
• After registering, the organization coordinator will see an organization-specific registration link above the
tabs within their portal that they can distribute to their members.
• Members will access VAMS using the URL that is distributed from the organization, entering their name
and organization email address that has the domain provided to you by the organization coordinator.
• The system will validate the email entered by the member has the same domain as one of the domains
entered in the organization’s record.
• VAMS will send a unique registration link to the member email (e.g., username@domain.com).
• Members will click the registration link and start the standard registration flow at prescreening. They will
then enter personal and insurance (if applicable) information.
NOTES:
• Third-party email domains such as Yahoo Mail or Gmail cannot be used for PER. Domains used must be
owned by the organization or an affiliate.
• Members cannot change their email after they’ve registered in VAMS.
Section 2 | Return to Table of Contents 15
VAMS 1.0
v2 ||Feb
rev12Oct
2021 26 2020User Manual Jurisdiction POC
Add Organizations in VAMS
Information You’ll Need to Add Organizations in VAMS
• Organization POC’s information (first name, last name, email address). Note that the organization POC is
referred to as the organization coordinator in VAMS. An organization POC can add additional coordinators
in the system after registering but there can only be one POC per organization.
• Organization name
• Organization category (e.g., inpatient healthcare professionals, etc.)
• Organization state, ZIP/postal code, and country
• Whether organization has or has not been authorized for PER
NOTE: This must be done when you first add the organization in VAMS as you cannot edit an
organization’s record after adding it in the system.
Before Adding New Organizations in VAMS
Ensure you have proactively communicated with them about the IT recommendations below to expressly
permit VAMS notifications from specific email and IP (internet protocol) addresses to be received by their
systems. Ensure you have also communicated with and trained new organizations before providing access to
the live VAMS site.
Allow notifications from the following email addresses
To ensure communications do not get delayed or blocked by an organization’s exchange servers, advise
them to work with their IT departments to allow notifications from the following email addresses:
• vams@cdc.gov
• no-reply@mail.vams.cdc.gov
• no-reply@envelope.mail.vams.cdc.gov
• VAMSHelp@cdc.gov
• *@salesforce.com
Allow notifications from the following IP addresses
Allowing email from specific IP addresses will also greatly improve email deliverability in a timely fashion.
Advise organization coordinators to coordinate with their IT department to allow the email addresses above
as well as email from the following IPs: Amazon Web Services
Salesforce 23.251.255.1 - 23.251.255.150
96.43.152.64 - 96.43.152.80 (subnet mask = 255.255.255.0) 23.251.253.228 - 23.251.254.250
96.43.153.64 - 96.43.153.80 (subnet mask = 255.255.255.0) 54.240.40.1 - 54.240.40.54
Section 2 | Return to Table of Contents 16
v2 | Feb 12 2021User Manual Jurisdiction POC
Add Organizations One at a Time
You can add organizations one at a time or you can add multiple organizations at once via bulk upload from
the Manage Organizations page. First, we will learn how to add one organization at a time, then how to
bulk upload them.
Click Add Organization on the
Manage Organizations page.
Enter the organization POC’s information.
Click Next.
Enter the organization’s information.
Click Next.
• If an organization becomes authorized or
unauthorized for PER after you have added
them in VAMS, you can submit a help desk
ticket to change their record. More
information on how to submit a help desk
ticket can be found in the Access Support
section of this manual.
Review all information entered on the Register Organization pages and verify it is correct.
If so, click Next. If not, click Previous to make corrections.
NOTE: Once added, you cannot change any information associated with an organization in VAMS, so
review carefully prior to clicking Next on the Review page.
• After clicking Next, a message appears confirming the organization is created in the system. Their status
will be Pending Organization Admin Registration until the organization’s coordinator activates their
account and registers the organization in VAMS.
• Once added, the organization coordinator receives an email from vams@cdc.gov with a link to activate
their account and register their organization in VAMS. If an organization coordinator has yet to register in
VAMS 5 days after receiving their registration link, VAMS automatically sends a reminder email to the
member. Reminder emails will continue until the organization coordinator registers or until 5 consecutive
reminders have been sent.
Section 2 | Return to Table of Contents 17
v2 | Feb 12 2021User Manual Jurisdiction POC
Add Organizations via Bulk Upload
Bulk uploading allows you to add multiple organizations at once by adding their information in a comma
delimited (.csv) template and uploading it in VAMS. NOTE: The template does not have a place to record PER
information, so organizations that have been authorized to use PER must be added in VAMS individually.
Click Import Organizations on
the Manage Organizations page.
Click the Organization Import Template link in the
pop-up window that appears. After clicking the link,
the template file will download to your computer.
NOTE: Always ensure you download and use the
latest version of the import template each time you
attempt to bulk upload organizations in VAMS to
take advantage of constant improvements and to
avoid data issues/inconsistencies.
Important Notes about the Organization Import Template File:
• The file opens on your computer as an .xlsx file, but you must save it as a CSV UTF-8 (Comma
delimited) (.csv) file after entering all information and before uploading it to VAMS. No other types of
csv files are accepted.
• You must use this template when uploading a list of organizations in VAMS. Always ensure you
download and use the latest version of the import template each time you attempt to bulk upload
organizations in VAMS to take advantage of ongoing improvements and to avoid data
issues/inconsistencies.
• All fields marked with an asterisk are required.
• Fields that contain a pick list or drop-down
options must contain a selection.
• VAMS will not upload an organization if any of
the required fields are blank.
• VAMS will not upload duplicates if someone is Quick Tip: A comma-separated values (CSV) file is a
listed in the csv file multiple times. delimited text file that uses a comma to separate
values. A CSV file stores tabular data (numbers and
text) in plain text.
• NOTE: The template does not have a place to record PER information, so organizations that have
been authorized to use PER must be added in VAMS individually.
Section 2 | Return to Table of Contents 18
v2 | Feb 12 2021User Manual Jurisdiction POC
Add Organizations via Bulk Upload
(continued)
Open the file and enter the organizations’
information.
Save the file as a CSV UTF-8 (Comma delimited)
(.csv) file. You can find this option under the Save
As drop-down menu in Excel.
Click Upload Files in the Import Organization List
pop-up window. You can also drag and drop your
organization list in the Drop Files area of the
page.
Click Close.
Confirm Bulk Upload
After importing a list of organizations, these processes automatically occur in VAMS:
• A message appears on screen that your list is in the import queue
• VAMS sends a registration email to each organization’s coordinator if their information was entered in the
csv file completely
• After your list has processed, you will receive an email from vams@cdc.gov, stating it has been uploaded.
• A result log appears on the Organization Imports page
Click the Organization Imports tab to check the results of your bulk upload.
On the Organization Imports
page, you see information about
your upload, including the
system-generated Import ID
number, who imported the list,
and when it was imported.
Click the Import ID number of the organization import to open the import details page.
Section 2 | Return to Table of Contents 19
v2 | Feb 12 2021User Manual Jurisdiction POC
Add Organizations via Bulk Upload
(continued)
Confirm Bulk Upload (continued)
There are two main sections on the Import Details page:
• Import details, which includes the import
ID, jurisdiction name, who created it, and
the date created.
• Notes and Attachments table, which
includes two files: a Result Log for Bulk
Upload and the organization import file you
uploaded.
o The Result Log for Bulk Upload file
shows the results of your file upload.
Click the Result Log for Bulk Upload link to open the file.
Scroll to the right until you see the status column. The status column shows whether an organization
was added in the system.
• If there were duplicates or missing information in the csv file, you will see an error message telling you
why an organization was not uploaded.
• All organizations who have a status of Success are uploaded in the system. Organizations whose
statuses include an error message have not been uploaded in the system.
Section 2 | Return to Table of Contents 20
v2 | Feb 12 2021User Manual Jurisdiction POC
Search and View Organizations
Click the Manage Organizations tab to search for and view details of the organizations you’ve entered in
VAMS.
NOTE: You will only be able to view the organizations added in your jurisdiction.
Search for an Organization
The Manage Organizations
page offers multiple ways to
search and sort data.
On the Manage Organizations page, scroll to the bottom of the list and click the View All link.
On the View All page, you can sort by clicking the arrows in the columns to sort them by the column
headers (e.g., name, email) or use the search bar to enter information such as clinic name, clinic POC,
email address, or status.
View Details of an Organization in Your Jurisdiction
Click the name of an organization to see detailed information.
NOTE: All fields on the details page are read-only for the jurisdiction POC.
Section 2 | Return to Table of Contents 21
v2 | Feb 12 2021User Manual Jurisdiction POC
Section 3
Inventory Requests Management in VAMS
Clinic inventory managers or clinic administrators will submit COVID-19 vaccine inventory requests in VAMS
for you to receive and fulfill.
You can view and manage inventory requests from clinics on the Inventory Requests page. From here, you
can access their inventory request record to review request details as well as communicate with clinics about
the status of their request.
NOTE: While you will receive inventory requests in VAMS, you will place all vaccine orders from
manufacturers outside of VAMS through your existing supply ordering processes.
View and Manage Inventory Requests
Click the Inventory Requests tab.
The Inventory Requests page shows you a list of all inventory requests received from clinics in your
jurisdiction. The list includes a system-generated inventory request number, clinic name, product type
(vaccine type), date requested and required by, number of doses requested, and the inventory request
status.
Sort requests on this page by clicking the arrows in the columns to sort them by the column headers (e.g.,
clinic name, product, etc.).
Section 3 | Return to Table of Contents 22
v2 | Feb 12 2021User Manual Jurisdiction POC
Inventory Requests Management in VAMS
(continued)
Access Inventory Request Record
The inventory request record gives you important details about the inventory request and a way to monitor
it and communicate with the requestor.
Click the Inventory Request Number in the list to access the inventory request record.
From the inventory request record, you can:
View inventory Communicate with the requestor. Monitor or follow comments
request details. Send the requestor a message by typing in the made to your posts.
This section of the Post box and clicking Share. When Like you would on a social media
record has details communicating with the requestor, make sure platform, click the Follow button to
about the to include relevant information about the receive email notifications when
inventory request. shipment. For example, if you split up inventory the requestor responds to a post
to send to multiple locations, be sure to that you make in the inventory
communicate the Unit of Sale National Drug request record. You will not receive
Code or UoS NDC to the receiving clinics. notifications for new posts.
In this example…
“State User 2” types a message in the
Post box about their ability to fulfill
only half of the inventory request and
shares it with “Mike Inventory Mgr.”
“Mike Inventory Mgr.” responds to
“State User 2’s” post by writing in the
comment bar found under each post.
If “State User 2” clicks the Follow
button, they will receive an email
notification alerting them that “Mike
Inventory Mgr.” has responded to
their post.
Section 3 | Return to Table of Contents 23
v2 | Feb 12 2021User Manual Jurisdiction POC
Section 4
Enable Recipient Registration for Jurisdiction and
Clinic Staff
This section shows you how to complete the specific tasks you need to do so that you, other jurisdiction
staff, and clinic staff can register as recipients in VAMS.
The boxes below are clickable links to the corresponding pages in this user manual.
Enable Recipient Registration in VAMS for Jurisdiction Staff
Add Jurisdiction as an
Organization Add your jurisdiction as an organization in VAMS.
Register Jurisdiction as an Register your jurisdiction as an organization to gain access to the Organization
Organization Portal.
Add Jurisdiction Staff as Add jurisdiction staff as organization members one at a time or through bulk
Organization Members upload so they can register to become eligible to receive COVID-19 vaccination.
Register as a recipient in VAMS to become eligible to receive COVID-19
Register as a Recipient
vaccination.
Enable Recipient Registration in VAMS for Clinic Staff
Add clinics as organizations in VAMS so clinic staff can become eligible to receive
Add Clinics as Organizations
COVID-19 vaccination.
Section 4 | Return to Table of Contents 24
VAMS 1.0
v2 ||Feb
rev12Oct
2021 26 2020User Manual Jurisdiction POC
Add Jurisdiction as an Organization
Multi-Portal Users in VAMS
VAMS users can perform tasks in multiple portals if they become multi-portal users. You will need this multi-
portal user access for you and your staff to receive COVID-19 vaccination.
Multi-portal users use the same email address and password to log into VAMS for every user role they have.
However, once logged in, they have multiple portals to select from depending on what they want to do in
the system.
To better explain this functionality in VAMS, let’s make you a multi-portal user.
Add Your Jurisdiction as an Organization
For you and other staff in your jurisdiction to become eligible to receive COVID-19 vaccination, your
jurisdiction must be added in VAMS as an organization. Once added as an organization, add yourself and
jurisdiction staff as members of that organization. Then, members will receive emails to register as vaccine
recipients.
To add your jurisdiction as an organization in VAMS, you will follow a similar process as what is described in
Step 2 in Section 1 of this user manual. However, there are a few adjustments to the process, as explained
below.
Within the Jurisdiction Portal, click the Manage Organizations tab.
Click the Add Organization button to access the Register Organization page.
Enter yourself as the organization coordinator using the same email address you use to log into VAMS
as a jurisdiction POC. Click Next.
Quick Tip: Name your organization to match your jurisdiction (e.g., State of Georgia) to prevent
confusion from jurisdiction employees receiving a VAMS recipient registration email.
Enter your organization’s (jurisdiction’s) information (address, phone number, etc.). Click Next.
Review all information entered in the Register Organization pages and verify everything is correct. If so,
click Next. If not, click Previous to make corrections.
Section 4 | Return to Table of Contents 25
v2 | Feb 12 2021User Manual Jurisdiction POC
Register Jurisdiction as an Organization
After clicking Next, a message will appear confirming the organization is created in the system. You will then
receive an email notification from vams@cdc.gov with a link to register your organization in VAMS.
If you’re currently logged into VAMS, log out by clicking the drop-down arrow next to your name in the
upper right corner of the page, then click Logout.
Open your email notification and click the organization registration link.
Click Login to VAMS.
Enter the email address you use for your jurisdiction login.
This should be the same email you entered for yourself as the
organization coordinator.
Enter the same password you use when logging in as a
jurisdiction POC, complete the reCAPTCHA, then click Login.
NOTE: You must use the same email address and password to log into
VAMS for every user role you hold.
• After logging in, you will be taken to the Portal Selection screen where you now have two portals to
choose from: the Jurisdiction Portal and the Organization Portal.
You are now officially a multi-portal user!
Click Access Portal below the Organization Portal
to complete the registration of your jurisdiction’s
organization.
NOTE: Use the Jurisdiction Portal for your role as the
jurisdiction POC and the Organization Portal for the
new organization account you just registered for your
jurisdiction.
Quick Tip: While logged into VAMS, you can
switch portals by clicking the drop-down arrow
next to your name in the upper right corner and
selecting Switch Portals.
Section 4 | Return to Table of Contents 26
v2 | Feb 12 2021User Manual Jurisdiction POC
Register Jurisdiction as an Organization
(continued)
After accessing the Organization Portal, you will be taken to the Register Organization page.
Verify the information entered for the
jurisdiction is correct and click Next.
Enter additional required information about your
jurisdiction (if applicable) in the Organization
Information page. Click Next.
Review all of your jurisdiction’s information. If
everything is correct, click Next. If not, click
Previous to make corrections.
Quick Tip: After completing your registration,
you can add coordinators to your jurisdiction
organization by clicking Add Coordinator at the
top right of the screen. Note that, once added,
coordinators cannot be removed.
Section 4 | Return to Table of Contents 27
v2 | Feb 12 2021User Manual Jurisdiction POC
Add Jurisdiction Staff as Organization
Members
Add Jurisdiction Organization Members in VAMS One At a Time
We use the term organization “member” to signify any worker, staff member, volunteer, or other personnel of
your jurisdiction added in VAMS to receive COVID-19 vaccination.
Adding jurisdiction staff as members allows them to register as COVID-19 vaccine recipients and schedule
vaccination appointments in VAMS.
There are two ways to add members so they can be vaccinated: one at a time or via bulk upload by
importing a list of names. First, we’ll learn how to add members one at a time, then how to bulk upload
them.
Click the Add Member button on the My Members tab within the Organization Portal.
Enter the member’s first and last name and email address, then click Save.
Note the following field requirements:
o First name is limited to 255 characters
o Last name is limited to 255 characters
o Email address must contain an "@" sign and valid
domain (.com, .gov, etc.) or an error message will
appear NOTE: Fields marked with an asterisk are required.
o If the email address you entered already exists in
VAMS, you will receive an error message that states, “A
member with this email already exists.”
After adding a member, a registration email is sent to them from vams@cdc.gov
with a link to register as a COVID-19 vaccine recipient.
Quick Tip: Don’t forget to add yourself as a
member! Use the same email address you use to log in
as a jurisdiction POC and organization coordinator.
Follow the process outlined in Register as a Recipient.
Once registered, you will have access to three portals:
Jurisdiction, Organization, and Recipient.
Section 4 | Return to Table of Contents 28
v2 | Feb 12 2021User Manual Jurisdiction POC
Add Jurisdiction Staff as Organization
Members (continued)
Add Jurisdiction Members in VAMS via Bulk Upload
You can add multiple members in VAMS at one time with bulk upload.
Within the Organization Portal, click
the My Members tab.
Click the Import Members button
in the top right corner of the page.
Click the Member Import Template link in the pop-up window that
appears. After clicking the link, the template file downloads to your
computer.
Important Notes about the Member Import Template File:
• The file opens on your computer as an .xlsx file, but you must save it as a CSV UTF-8 (Comma
delimited) (.csv) file after entering all information and before uploading it to VAMS. No other types
of csv files are accepted.
• You must use this template when uploading a list of members in VAMS. Please ensure you download
and use the latest version of the import template each time you attempt to bulk upload members in
VAMS to take advantage of constant improvements and to avoid data issues/inconsistencies.
• All fields marked with an asterisk are required.
• Fields that contain a pick list or drop-down
options must contain a selection.
• VAMS will not upload a member if any of the
required fields are blank.
• VAMS will not upload duplicates if someone is
listed in the csv file multiple times.
NOTE: A comma separated values (csv) file is a plain text file that contains a list of data. These files are
often used for exchanging data between different applications.
Open the file and enter your members’ information.
Save the file as a CSV UTF-8 (Comma delimited) (.csv)
file. You can find this option under the Save As drop-down
menu in Excel.
In the Import Member List pop-up window, click the
Upload Files button or drag and drop your member list
in the Drop Files area of the page.
Click Close.
Section 4 | Return to Table of Contents 29
v2 | Feb 12 2021User Manual Jurisdiction POC
Add Jurisdiction Staff as Organization
Members (continued)
Confirm Bulk Upload
Once you have imported a list of members, these processes will occur automatically in VAMS:
• A message appears on screen that your list is in the import queue.
• VAMS sends a registration email from vams@cdc.gov to each member if their information was entered
in the csv file completely.
• After your list has processed, you will receive an email from vams@cdc.gov, stating that it is uploaded.
Depending on the size of the import file, your member list may not upload immediately.
• A Result Log for Bulk Upload file appears in the Member Imports page. This file shows you all the
members added to the system and explains why some may not be added. See the instructions below to
view the Result Log for Bulk Upload file.
Click the Member Imports tab to check the results of your bulk upload.
• The Member Imports page shows
information about your uploads including
the system-generated Import ID number,
who imported the list, and when it was
imported.
Click the Import ID number of the member
import to open the import details page.
Below the import details is the Notes and
Attachments table. This includes two files: a
Result Log for Bulk Upload and the member
import file you uploaded.
Click the Result Log for Bulk
Upload link to open the file.
Scroll to the right until you see the status
column. This column indicates whether a
member was added in the system.
• If there were duplicates or missing
information, you will see an error
message saying why a member was not
uploaded in VAMS.
• All members who have a status of Success are uploaded in the system. Members whose statuses
include an error message have not been uploaded in the system.
Section 4 | Return to Table of Contents 30
v2 | Feb 12 2021User Manual Jurisdiction POC
Add Jurisdiction Staff as Organization
Members (continued)
View Member List and Search
View a comprehensive list of jurisdiction members entered in VAMS by clicking the My Members tab. You
can also search for a particular member on this page (see below).
The default view on this page is an abbreviated list of all members added in VAMS. To view them all, click the
View All link at the bottom of the list.
There are multiple ways to search for members on the My Members page.
• You can search by clicking the arrows in the columns to sort them by the column headers (e.g., first
name, email, etc.).
• You can also use the search bar to enter information such as first name, last name, or email.
Resend Member Registration Email
From the My Members page, select the checkbox next to the names of the members you want to resend the
registration email to, then click the Resend Registration Email button at the top right of the screen.
NOTE:
• You can only resend the email one time per hour.
• You can only resend a registration email a maximum of five times per individual.
• You cannot resend a registration email to an individual who has already registered their VAMS account.
Section 4 | Return to Table of Contents 31
v2 | Feb 12 2021User Manual Jurisdiction POC
Add Jurisdiction Staff as Organization
Members (continued)
Edit Member Information
You can edit first name, last name, and email address for individuals in your organization after uploading
them to your organization in VAMS.
• From the My Members tab, hover your mouse over the name or email address you want to edit.
• Click the pencil icon on the right side of the cell.
• Enter the updated information, then click enter.
• The updated information will then be highlighted yellow to confirm it has been updated.
NOTE:
• You cannot change the information of an individual who has already registered their VAMS account.
• The recipient can edit their own first name and last name during the recipient registration process and
once their account is registered.
• Recipients cannot change their email address.
Remove Members
You can remove members from your organization after uploading them to your organization in VAMS.
• From the My Members tab, select the checkbox next to the names of the members you wish to remove
from your organization.
• After ensuring the boxes are checked, click the Remove Registration button on the right side of the page.
• You will then see a success message on the top of the screen confirming the employees were removed.
NOTE:
• You cannot remove members after they have registered their account.
• If members try to register after being removed, VAMS will inform them there was an error processing their
registration and that they should contact their administrator for more information.
Section 4 | Return to Table of Contents 32
v2 | Feb 12 2021User Manual Jurisdiction POC
Register as a Recipient
After you’re added as a member in VAMS, a registration email is sent to you
from vams@cdc.gov with a link to register as a COVID-19 vaccine recipient.
If you’re logged into VAMS, log out by clicking the drop-down arrow
next to your name in the upper right corner of the page, then click
Logout.
Open the recipient email notification you received and click the link
to register your account.
Quick Tip: If this email is not in your inbox, you may need to check your
junk or spam mail folders.
On the next screen, enter the email address you use for your clinic user log-in.
Enter the same password you use when logging in as a clinic user. Complete the
reCAPTCHA, then click Login.
NOTE: Every time you log into VAMS, you must verify your identity by entering
your password, and a number you receive via email or SMS, depending on the
preferred contact method you choose (two-factor authentication process). After
five log-in attempt failures, you will be locked out of the system for one hour.
After logging in, you will be taken to the Portal Selection screen where you now have multiple portals to
choose from including Jurisdiction, Organization, and Recipient.
Click Access Portal below
the Recipient Portal to
complete your recipient
registration.
Quick Tip: While logged into
VAMS, you can switch
portals by clicking the drop-
down arrow next to your
name and selecting Switch
Portals.
Section 4 | Return to Table of Contents 33
v2 | Feb 12 2021User Manual Jurisdiction POC
Add Clinics as Organizations
A vaccination clinic must register as an organization in VAMS for their staff to be eligible to receive COVID-19
vaccination.
Add a clinic as an organization if requested to do so by the clinic administrator. The clinic administrator can
be the organization coordinator or they can select a delegate from the clinic to be this coordinator. Whether
they fill the role themselves or choose a delegate, they must provide you with the organization coordinator’s
first and last name and the email address the coordinator currently uses to log into VAMS.
Once the clinic is added as an organization in VAMS, the system sends a registration email from
vams@cdc.gov to the clinic’s organization coordinator with a link to register their organization.
You can add a clinic as an organization in VAMS the same way you add other organizations.
Within the Jurisdiction Portal, Click the Manage Organizations tab.
Click Add Organization to get to the Register Organization page.
Enter the coordinator’s contact information. Be sure to use the same email address the coordinator uses
to log into VAMS in their normal role. Click Next.
Quick Tip: Naming the organization to match the name of the clinic is helpful in preventing duplications.
Enter all required information on the
Register Organization pages (e.g.,
Organization POC, Organization
Information).
Review all information on the Register Organization pages and verify everything is correct. If so, click
Next. If not, click Previous to return to make corrections.
Section 4 | Return to Table of Contents 34
v2 | Feb 12 2021You can also read


