Joomla User Guide
Volume 3: Forms, Events and SEO
←
→
Page content transcription
If your browser does not render page correctly, please read the page content below
Joomla User Guide Volume 3: Forms, Events and SEO

Forms, Events and SEO

Contents
Note: To jump to a section, hold down the CTRL button on your keyboard, then click the title of the section.

1.     Working with email forms ...................................................................................................................................... 1
       1.1           Accessing the Forms component .......................................................................................................... 1
       1.2           Creating new forms ................................................................................................................................. 2
       1.3           Description of the Form components .................................................................................................... 4
          1.3.1      General description of the form fields ........................................................................................................ 4
          1.3.2      Form Fields ............................................................................................................................................... 6
          1.3.3      General description of the form properties tab ........................................................................................ 10
          1.3.4      Form Info tab ........................................................................................................................................... 10
          1.3.5      Form Attributes ........................................................................................................................................ 13
          1.3.6      Meta Tags ............................................................................................................................................... 13
          1.3.7      General description of the form emails tab .............................................................................................. 14
       1.4           Edit forms .............................................................................................................................................. 17
       1.5           Adding new fields to a form ................................................................................................................. 17
       1.6           Edit fields already in form .................................................................................................................... 18
       1.7           Deleting fields from a form ................................................................................................................... 18
       1.8           View form submissions ........................................................................................................................ 19

2.     Adding and Updating Events ............................................................................................................................... 20
       2.1           Accessing the Events Component ...................................................................................................... 20
       2.2           Create event categories ........................................................................................................................ 20
       2.3           Rename event categories ..................................................................................................................... 21
       2.4           Create event locations .......................................................................................................................... 22
       2.5           Create or edit an event .......................................................................................................................... 24
          2.5.1      Event Details Tab .................................................................................................................................... 25
          2.5.2      Categories & Tags Tab ........................................................................................................................... 26
          2.5.3      Event Registration Tab ............................................................................................................................ 27
          2.5.4      Recurring Tab.......................................................................................................................................... 27
          2.5.5      Files Tab ................................................................................................................................................. 28
          2.5.6      Contact tab: ............................................................................................................................................. 28
          2.5.7      Meta-Info tab: .......................................................................................................................................... 28
          2.5.8      Front-end tab: .......................................................................................................................................... 29
          2.5.9      Event Images tab: ................................................................................................................................... 29
          2.5.10 Event Buttons tab: ................................................................................................................................... 29
       2.6           Republish a past event ......................................................................................................................... 30
       2.7           Duplicate an event................................................................................................................................. 30

3.     Search Engine Optimisation tools ....................................................................................................................... 31
       3.1           Updating description tags for search engines ................................................................................... 31
          3.1.1      Master Metadata settings: ....................................................................................................................... 31
          3.1.2      Metadata settings in pages: .................................................................................................................... 32
       3.2           SEO Module functionality ..................................................................................................................... 32

©2013, Impartmedia | All rights reserved. This document is copyright to Impartmedia and is supplied commercially in confidence.
Forms, Events and SEO

1. Working with email forms
Your website includes a dynamic form builder. This allows you to create any kind of form you need, whenever you want.
The forms can be embedded into your site, inside articles or in modules.

1.1   Accessing the Forms component
To access the Forms component, go to the top menu, then go to Components > Forms.
Alternatively, you can go to the Forms button, on your website control panel.

Copyright 2013 – Impartmedia | www.impartmedia.com                                                        Page | 1
Forms, Events and SEO
1.2 Creating new forms
Making new email forms is very simple. The Form Creation Wizard provides a fast, simple solution for creating forms.
In this article we will provide a step-by-step guide on how to use it.
Steps
To start the wizard, go to Components >> Forms >> Manage Forms
Click on the “New” button at the top of the screen.
You will then be presented with the Form Wizard. This will step you through creating a new form.
When ready, pressthe “NEXT”button.
Enter the general form information
What do you want to name your form ?
Enter the form's title here. This will be displayed in the frontend.
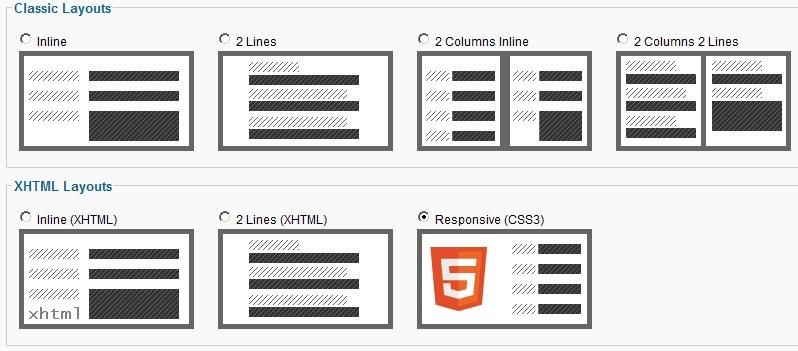
How do you want to arrange your form ?
Choose the way the form layout will be
appear in the frontend. The layout can be
later edited to suit your needs.
The predefined layouts as displayed
below.
Copyright 2013 – Impartmedia | www.impartmedia.com Page | 2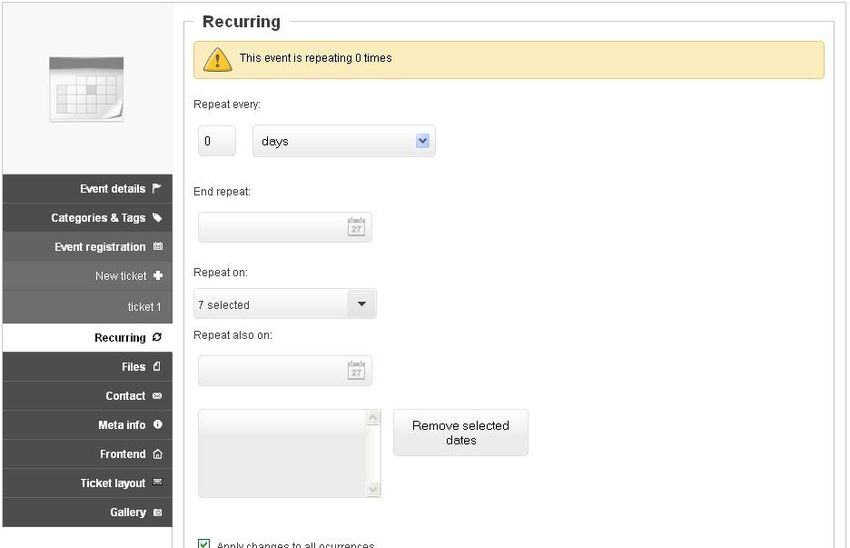
Forms, Events and SEO
Emailing of results
The settings you make here will control where the email formsubmissions are sent to.
Do you want to receive the results in your email ?
Setting this to Yes will enable the Admin Email.
Where do you want the results to be emailed ?
This fields corresponds with the To field of the Admin Email.
Do you want to email a confirmation copy to the submitter ?
This corresponds to the User Email, setting this field to Yes will enable the User Email.
Successful submission
Here you can specify the action to be taken after the form has been successfully submitted.
Selectable options:
Just refresh the form page - As the name implies, the form page will be refreshed.
Show a "Thank you" message to the submitter: - The "Thank you" message will be displayed.
Redirect the submitter to a specified URL(web address) - The submitter will be redirected to a URL of your
choosing. Selecting this option will add one more field to the wizard, which is “Where do you want the submitter to
be redirected ?” You can then specify the web address in that field.
When ready, pressthe “NEXT”button.
Predefined forms
Choose whether to start with a predefined form or not. This will help you when creating the options in your final form.
Selectable options:
Blank form - don't use a predefined form and buildit all from scratch
Simple contact form - A contact form we have designed as an example, that can suit some general needs.
You can modify this form by adding/editing/deleting fields and changing it's settings.
When ready, pressthe “FINISH”button.
Form Editor Screen
You will now be presented with the Form editor screen. This is where you enter the questions and answer fields that your
form will require. These items are the “FORM COMPONENTS”
Copyright 2013 – Impartmedia | www.impartmedia.com Page | 3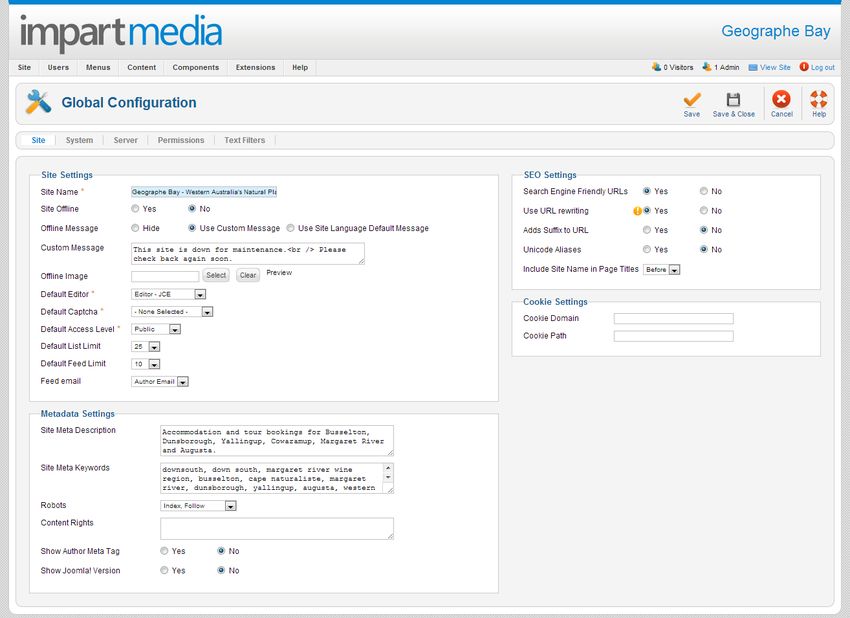
Forms, Events and SEO
1.3 Description of the Form components
This tutorial shows every component used in forms, so there shouldn't be any problem in finding one you need.
Every form component is defined with properties. A property describes a specific part of that components' behavior.
We can find general properties, found in all components (name and caption, for example) and some specific for every
component (the possible values that should appear in a select list, for example).
1.3.1 General description of the form fields
In this section, you'll learn about the parts that make a component. From our point of view, a component has three distinct
areas:
The General tab provides information such as:
Name: the name of the form component. This needs to be unique for each form. It can contain only alphanumeric
chars. The name of the field is only used for internal reference - it will not be displayed in the front-end area.
Caption: the caption or label is the text or HTML that is being displayed in the actual form.
Default value: the value will be automatically filled in when displaying the form. This is available for Text
boxes or Text areas. Inside the Default Value area you can use custom PHP codes in between the // and
// tags.
Items: this is available for drop-downs (or select lists), radio groups and check-box groups. The items should be
specified one per line. This too, can incorporate custom scripts in between the code tags.
The selectable items are composed out of two parts: value and label, separated by the pipeline character (|).
For example: Steve Matt|Steve Matt, marketing director.
Using this formula, the selection will display Steve Matt, marketing director, but Steve Matt will be stored into the
database.
You can even have an option selected by default, by using the [c] syntax.
For example: Steve Matt|Steve Matt, marketing director[c]
Or you can choose to disable a particular option, by using the [d] syntax.
For example: Steve Matt|Steve Matt, marketing director[d]
You can use the placeholder{field_name:text} in the Thank You message or Email messages(the value
"field_name" should be replaced with the actual name of the field).
The placeholder will return the label of the selection and not the actual value and it is available for radio button,
checkbox and drop-down fields.
Description: text/HTML area that provides a description of the field. This can be useful for providing explanations or
indications for that particular field.
Copyright 2013 – Impartmedia | www.impartmedia.com Page | 4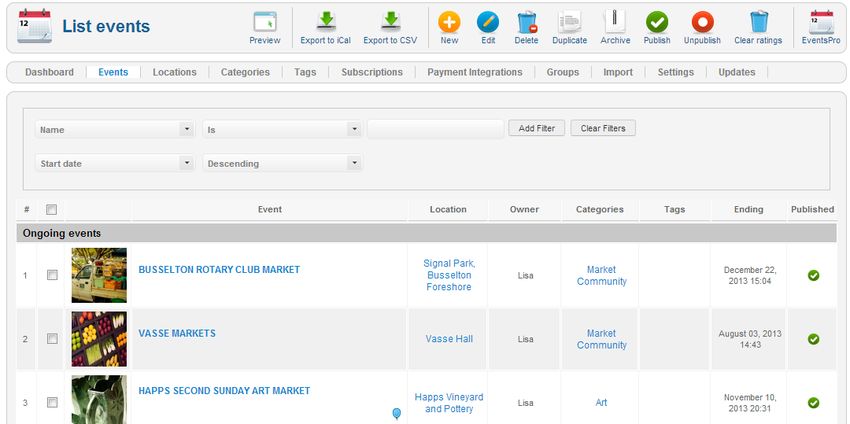
Forms, Events and SEO
Before a form can be submitted, all fields need to pass the validation rules.
Required: Yes / No - if this is enabled some text needs to be typed in or a selection to be made.
Validation Rules:
o Email: if selected, only email valid email addresses (format wise) will pass the validation rule.
o Email Address /w DNS check: besides the email address format check, RSform!Pro performs an
additional email domain check, thus reducing the chance to validate dummy email addresses.
o Numeric: only numbers will be accepted
o Unique Field: if enabled, this validation will only allow a field value that hasn't been submitted before, for
that particular form.
o Phone Number: only the following phone number format will be validated: "123-456-7890"
o Credit Card: if selected, credit card numbers from the following vendors will be validated: AMEX, Diners,
Discover, Master Card and Visa
o Alphanumeric: numbers and letters (ASCII standard) are accepted.
o Alpha: only standard letters will be accepted
o Custom Validation: this can be used in combination with any other validation rule (apart from
"password"). Using this you can validate additional chars. This is particularly usefull if your language has
special chars - thus these can be validated.
o Passphrase: the typed in value will be accepted only if it matches with the value specified in the Default
Value area. This is oftently used for password fields, but can be applied for plain text box fields.
o IP Address: will only validate valid IP addresses. Example: 192.168.1.1
o Valid URL: will only validate a valid URL. Example: http://site.com, https://site.com/path/here. Note that the
protocol specification is required (http/https).
o Regex: this can be used for more advanced users to create their own validation patterns. Standard regular
expressions specifications can be used.
o Same Value as Other Field: using this will check if two fields have the same value, selecting this validation
another field will appear called "Field Name To Compare With" where you can add that field's exact name
you want it to compare to.
Copyright 2013 – Impartmedia | www.impartmedia.com Page | 5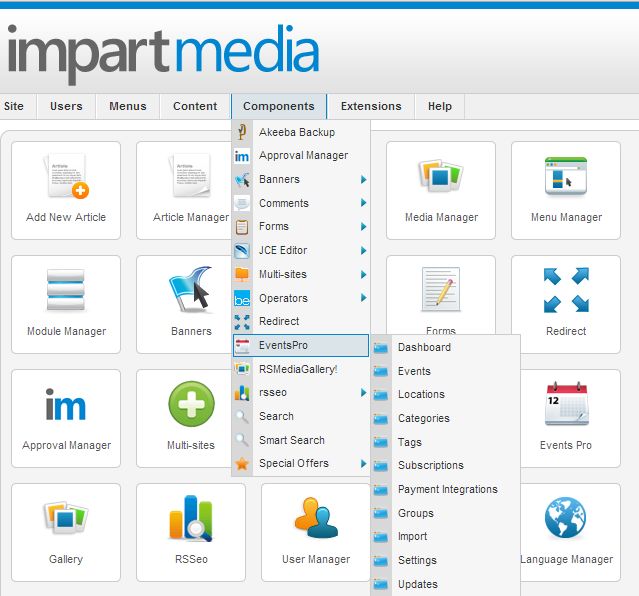
Forms, Events and SEO
Validation Message: text / HTML area that will allow you to set up a message that will be displayed if the field
validation fails.
The Attributes area allows you to add JavaScript triggers, custom style (for that particular field), impose size
restrictions, etc. Anything filled in this area, will be added directly to the HTML tag. Each field type can have its own
specific attributes (we will provide details in the field listing types).
1.3.2 Form Fields
This creates a Standard text input box. Besides the General and Validation options, the text box, has the following specific
attributes:
Size: Sets or returns the width of a text field (in number of characters)
Max size: how many chars can be typed in
This creates a Standard text input area that caters for multiple lines of text.
Besides the General and Validation options, the text area, has the following specific attributes:
Cols: Specifies the visible width of a text-area
Rows: Specifies the visible number of rows in a text-area
Enable WYSIWYG Editor: if enabled the default configured editor will be added
This creates a dropdown list of selectable options.
As a validation rule, this can only be set to be Required or not.
Attributes:
Size: how many items will be displayed. By default this has an empty value - making it a drop-down element. If a
size is specified, this will be displayed as a select list.
Multiple: yes / no - if enabled, you will be able to have multiple selections by holding the CTRL or SHIFT keys
Copyright 2013 – Impartmedia | www.impartmedia.com Page | 6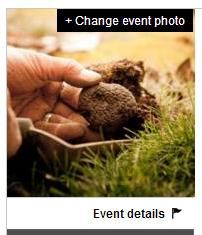
Forms, Events and SEO
Creates a list of options that can be selected by checkboxes.
If multiple checkbox items are used, these will need to be specified each on a new line, in the Items area. As a field
validation it can be set as required or not. Attributes:
Flow: Horizontal / Vertical - If horizontal flow is set, the items will be displayed in one row. If vertical is set, the items
will be displayed one below the other
Creates options that can be selectedby a radio button.
A radio group can be set to be required or not.As in the case of checkbox, the radio group has the same Attributes:
Flow: Horizontal / Vertical - If horizontal flow is set, the items will be displayed in one row. If vertical is set, the items
will be displayed one below the other
Standard HTML input password field.
Essentially being input text element, it has the same properties, just that the typed in values are obscured.
It can be made mandatory required and can have any validation rule.
Standard file upload field.
Attributes:
File size: the maximum size of an accepted file. This should be specified in KB.
Accepted files: a list of accepted file extensions. These should be specified each on a new line.
File prefix: to prevent file replacements in the upload folder, Forms adds a random prefix to the uploaded file
names. If you specify a prefix - this will be added instead.
Destination: the path to the upload folder.
Attach: the file can be attached to the User, Admin emails and as well as to the configured Additional Emails.
The Free text form element is a simple HTML block. This can be very useful when trying to add a form header or footer, for
example. Since this is a static text, it does not have any configuration parameters, apart from Name and Content.
This is a standard text button. This has no submitting function.
Attributes:
Reset: Yes / No :If enabled a complementary reset button will be added.
Reset Label: the label of the button.
Copyright 2013 – Impartmedia | www.impartmedia.com Page | 7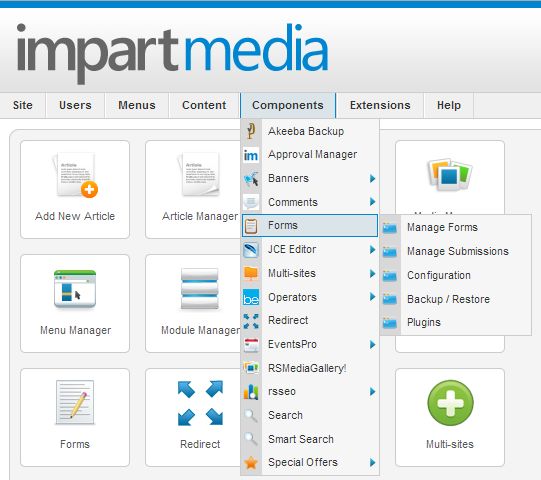
Forms, Events and SEO
Using this option will ensure that everyone will specify the date in the same format with just a few simple selection clicks.
Validations:
Required: you can choose to make the calendar mandatory.
Date Modifier: used to modify another calendar(within the same form) which will inherit
the minimum or maximum possible date, based on what is selected in this calendar.
Validation Message: here you can type your own validation message.
Attributes:
Date format: the format of the selected date. By default dd.mm.yyyy is being used. Notes: If triple lettering is
used, short day and month naming will be returned (ddd.mmm.yyyy, for example). Four letters can be used to
specify the day and month names in full (dddd.mmmm.yyyy).
Max date: the submitter will not be able to select a date past the one specified in this field.
Min date: the submitter will not be able to select a date below the one specified here.
Calendar layout: Flat / Popup - controls how the calendar is displayed.
Read only: Yes / No - If set to No, the submitter can type in the date.
Popup label: if the Popup layout is being used, you can set up the label of the button that triggers it.
Standard image upload tool. This includes a submit function. Clicking on the image will submit the form.
Attributes:
Image button: the path to the submit image.
Image reset: the path to the reset image.
Reset: yes / no.
The Captcha field is composed out of a text input and an image that displays some random chars. This is often used to
prevent spam form submissions.
Attributes:
Image Generation: Use FreeType / No FreeType / Invisible.
Length: how many characters will be generated.
Background Colour: the background colour code of the generate image. Example: #FFFFFF.
Text Colour: the text colour of the generated image. Example: #000000.
Type: Alpha / Numeric / Alphanumeric - the generated image can contain standard chars and/or numbers.
Flow: Vertical / Horizontal - the input box can be displayed in-line with the image or below it.
Show Refresh: Yes / No - if enabled a refresh link can be displayed. If clicked, this will generate a new image.
Refresh Text: the text of the refresh link.
Size: the font size of the generated chars.
If a Pagebreak element is being added, the form will have multiple pages. The actual element is composed out of the
buttons: Next and Previous. As configuration parameters, besides the mandatory field Name, it has the following attributes:
Next Button Label: the label of the button that will move to the next page.
Previous Button Label: the label of the button that will move to the previous page.
Validate When Changing Page: Yes / No. If enabled, all form fields will be validated when clicking on the Next.
Advanced Form Fields
Copyright 2013 – Impartmedia | www.impartmedia.com Page | 8Forms, Events and SEO
This is often used to store additional information that does not need to be displayed.
The Birthday Field element allows the user to select a date.
Validations:
Allow Incorrect Dates: enabling this will allow users to input any date regardless of being correct or not, example
31-Feb-2013.
Validation Rule: available validations are From today(including today), From tomorrow, Until today(including
today), Until today(excluding today).
Attributes:
Field Ordering: you can choose the order of the date drop-downs.
Date Separator: the date separator, by default "/".
Show Day Selector: enable/disable the day selector.
Show 'Please Select' on Day Selector: name of the first item that will represent the according drop-down, leave
blank to remove.
Day Display: select how the numbers will display.
Show Month Selector: enable/disable the month selector.
Show 'Please Select' on Month Selector: name of the first item that will represent the according drop-down, leave
blank to remove.
Month Display: select how the numbers will display.
Show Year Selector: enable/disable the month selector.
Show 'Please Select' on Year Selector: name of the first item that will represent the according drop-down, leave
blank to remove.
Start Year: the starting year.
End Year: the ending year.
Copyright 2013 – Impartmedia | www.impartmedia.com Page | 9Forms, Events and SEO 1.3.3 General description of the form properties tab In this section, we will explain the Form properties area, which provides configuration aspects that directly relate to the general form functionality. 1.3.4 Form Info tab The Form Info tab (in the Properties area) enables you to set various global form aspects. Copyright 2013 – Impartmedia | www.impartmedia.com Page | 10
Forms, Events and SEO
Basic options
Published: is the form currently visible in your website - yes / no
Form Title: The title will be used when displaying the form in the front-end / back-end area.
Form Name: The form name will be used for internal reference.
Use Ajax Validation: yes/no
Show Thank You Message: If enabled, you will be allowed to setup up a Thank you message (by clicking on
the Edit the Thank You Message link). This will displayed after the form has been submitted. If a Continue button is
displayed and the Return URL option is set, you will be redirected to the specified URL once the button is clicked
Show Continue Button: yes / no
Return URL: After the form is submitted you can be redirected to the specified URL. For example: http://site.com
Copyright 2013 – Impartmedia | www.impartmedia.com Page | 11Forms, Events and SEO
Save data to database: yes / no. If the option is to set to "no" the submitted information will not be stored in the
default form submission area, but emails will still sent when the form is submitted.
Enable Confirmation by Email: yes / no. If enabled the user will receive a confirmation link
Required fields will be marked with: Choose what to mark the fields with.
Error Message: This is the error message the user will receive on an unsuccessful attempt to submit the form.
** Remember to add the {error} placeholder to the form layout.
Multiple Selections Separator: Form fields that have multiple selectable values (checkboxes, multiple drop-downs)
can be shown to the submitter (either by email or in the Thank You Message) with a custom separator. The default
separator is a new line.
Display Text area New Lines as Tags: yes / no - New lines will be converted to tags so that they can be properly
shown in the Thank You message. If you set this to No, new lines will be ignored.
SPECIAL TIP
Clicking on the Toggle Quick Add button on the right hand side, will show / hide all available field placeholders
that can be used.
Copyright 2013 – Impartmedia | www.impartmedia.com Page | 12Forms, Events and SEO
1.3.5 Form Attributes
The Form Attributes section is also in the Properties area.
Using the Form Attributes area you can control the actual HTML form tag properties. Unless you are very familiar with CSS
and HTML, it is recommended that you do not touch the settings in this area.
Action: This is the action where the form will be submitted to. You will only need to edit this in rare cases. Leave
blank for default (RSForm! Pro will detect the current URL).
CSS ID: This is the id attribute of the form. By default it is set to "userForm".
CSS Class: You can assign a CSS class to the form tag. For example: class="myClass".
Name: This is the name attribute of the form. It has been deprecated in XHTML and should only be relied upon in
rare cases.
Additional HTML Attributes: You can add here HTML attributes. For example: style="background: green"
onsubmit="return myfunction();".
1.3.6 Meta Tags
The form's meta tags will be used whenever this is being displayed directly linked to a menu item.
When the form is embedded into a page, the meta data for the page will be used.
Meta description: You can add your description here (for example: This is my Joomla! contact form).
Meta keywords: You can add y keywords here, separated by commas (eg: Joomla, contact, form).
Use form title as page title: Yes / No
Copyright 2013 – Impartmedia | www.impartmedia.com Page | 13Forms, Events and SEO 1.3.7 General description of the form emails tab The Emails section is also in the Properties area. With the Forms, you can send custom emails to the users that submitted the form. Naturally, you can customize forms to send another email to you, as the administrator. These two types of email (User and Admin) are configured separately, in the two corresponding areas of the back-end form properties management. In both cases, you can use simple placeholders to display information. Because both forms are identical, we will cover them both. In all of these fields you can use placeholders to write important data. We defined for your ease of use general and form specific placeholders. Form specific placeholders are used just like layout placeholders are. Supported options for component placeholders are: value: this returns the value typed by the user in the corresponding component. name: the name of the component, as defined in the back-end. caption: the caption of the component, as defined in the back-end. Copyright 2013 – Impartmedia | www.impartmedia.com Page | 14
Forms, Events and SEO
The fields that can be configured are:
Email Form data TO: the address where the email should be sent.
Email Form data FROM: whenever the user receives the email, this will be the senders' address (i.e. from who the
mail came from).
Email From Name: whenever the user receives the email, this will be the senders' name (i.e. the person's name the
mail came from).
Email Subject: the subject of the email.
Email Mode: you can send your email as plain text, or, if you wish to add more "colour" to your message, you can
send a HTML email.
Email Text: the actual text of the email. If you set the last parameter (Email mode) to HTML, then you'll be able to
put HTML code here for a nicer email look.
Important note! If you write HTML tags BUT haven't set the Email mode option to HTML, the HTML tags will not be
interpreted and the user, instead of seeing a nice bold message, may see the actual HTML code. Please take
caution.
Email Text Preview: here you can preview the email that will be sent to the user. This way you can see if the email
message contains any HTML errors or if the email text was correctly written.
As a side note, the User Emails has one extra configuration option: the possibility to add file, as an attachment.
Simply set the Attach File option to Yes and set the location of the file.
Example:
Suppose that your form has a text field that requires the user to input his/her name. This component is called fullname.
If you want to use that value in your user message, write this in your email text field as {fullname:value}
If a user typed "John Doe", the email that he would receive after he submitted the form will contain "John Doe" and
not the placeholder.
Let's see now the second category, the general placeholders.
General placeholders are used like this:{global:placeholder_name}
Consult the following table for all the placeholders supported in forms:
Placeholder name Description Logged in user required?
username If the user is registered to your Joomla website, his username will Yes
appear when using this placeholder
userid If the user is registered to your Joomla website, his user id will appear Yes
when using this placeholder
useremail If the user is registered to your Joomla website, his email will appear Yes
when using this placeholder
fullname If the user is registered to your Joomla website, his full name will appear Yes
when using this placeholder
userip The IP of the user that submitted the form No
date_added The date the user submitted the form No
sitename The name of your site, as defined in your Joomla configuration No
siteurl The URL of your site No
confirmation The URL of used for the submission confirmation No
confirmed The status of the submission No
submissionid / The id of the submission No
submission_id
Copyright 2013 – Impartmedia | www.impartmedia.com Page | 15Forms, Events and SEO
Example:
So, let's say that in the admin email you want to track the IP address of your submissions. Just add {global:userip}
in your admin email message and every time you receive an email, the IP of the user that submitted the form will show.
You can also easily control whether or not to display certain placeholder information (including the according description) by
using an "IF" statement. This means you can have text display only if it was entered into a specific field.
This avoids getting form submission emails with blank info areas.
The syntax is as follows:
{if {field_name:value}}this text gets displayed only if the placeholder has a value{/if}
This is useful because no additional scripting is needed in order to remove the placeholders along with the text if the user has
skipped that field.
Example:
Assuming my form has a textbox where users can input some data, I can add the following line in the email:
{if {textbox_name:value}}You are interested in {textbox_name:value}.{/if}
When opening the email this will be replaced with something like:
You are interested in bungee jumping.
If nothing was inserted in that textbox, it would have not been shown.
The above scripting language can be used in the User, Admin & Additional Emails as well as the Thank You Message.
Additional Emails
You can also set up additional emails to be sent when the form is submitted.
Similar to the User and Admin emails, these have the same, standard configuration fields:
From
From name
Reply To
To
CC
BCC
Subject
Mode
Message
There is no limit on the number of configured emails.
Scripts andExtras
It is very highly recommended that the options available in the “Scripts”
and the “Extras” area, are not edited.
Altering the settings and parameters in these areas may stop your forms
from working correctly.
Copyright 2013 – Impartmedia | www.impartmedia.com Page | 16Forms, Events and SEO 1.4 Edit forms You can edit the current forms on your site very easily. If you edit a form that is currently being used publicly, then be aware that the changes will take effect when you save it. Steps Go to Components >> Forms >> Manage Forms You will then be presented with the forms list. Choose the form you want to alter, by clicking the title. You will now be presented with the Form editor screen. This is where you enter change the form. 1.5 Adding new fields to a form Choose the form component from the list on the left Edit the component attributes,in the pop-up window that appears, then press “Save” at the bottom The new field will be added to the bottom of the existing fields. Adjust where you want it to appear, via the blue arrows, in the “Ordering” coloumn. When you are finished, press “Save & Close”. Copyright 2013 – Impartmedia | www.impartmedia.com Page | 17
Forms, Events and SEO 1.6 Edit fields already in form Choose the form component from the list, by checking the box on the left of it. Edit the field by pressing the “EDIT” icon When you are finished, press “Save & Close”. The order of the fields in the form can be changed by using the blue arrows in the “Ordering” column” You can also change if a field is mandatory of not, by clicking on the icon in the “required” column. A green tick means it must be filled in before the form can be submitted. A red circle means it does not need to be completed by the user. 1.7 Deleting fields from a form Choose the form component from the list, by checking the box on the left of it. Remove the field by pressing the “DELETE” icon. When you are finished, press “Save & Close”. Copyright 2013 – Impartmedia | www.impartmedia.com Page | 18
Forms, Events and SEO
1.8 View form submissions
In the Manage Submissions tab you can view the submissions for your forms.
Steps
From the Forms section, choose the”Manage submissions” tab, from the forms menu.
You will be presented with filters, to allow you to search for the submissions.
These filtering options let you search by the form name, or search within these submissions by date range or keywords.
You can select the form you want to display submissions for and also choose what fields to display from that form.
Another feature is the possibility to search submissions based on a fixed search word or between certain time ranges.
In order to hide certain form fields you simply need to click the Choose which columns to show button and uncheck the fields
you do not want to view.
When you have the list, there are a number of options available to you.
You can Resend Emails for submissions and also Edit or Delete them.
You can also export the submissions, in 4 different formats:
Export to CSV: export the selected submissions in a CSV file.
Export to Excel: export the selected submissions in a XLS file.
Export to XML: export the selected submissions in a XML file.
Export to PDF: when editing a submission you will have the possibility to export it to PDF file
Copyright 2013 – Impartmedia | www.impartmedia.com Page | 19Forms, Events and SEO 2. Adding and Updating Events 2.1 Accessing the Events Component To access the EVENTS component, go to the top menu, then go to Components > Events. Alternatively, you can go to the Events button, on your website control panel. 2.2 Create event categories Before you begin adding events, you need to ensure that you have some categories set up. This is required so that so that the events can be grouped, so events of the same type can be found together. Steps Go to Components > Events and choose the “Categories” option from the menu that pops out. This will open the Category list. (See screenshot below) Copyright 2013 – Impartmedia | www.impartmedia.com Page | 20
Forms, Events and SEO
Click on the “New” button at the top of the screen.
You will then be presented with the “New Category” screen. Fill in the field as required.
Choose if category can be viewed on your website
Add a name for the category
Choose a colour code for the category.
Press the colour box icon
Click in the colour selector that pops up, to pick your
colour.
When done, press “Select” button at bottom of colour
selector pop-up.
Choose if the category should be a sub-category of
another category. Click to select.
Add a description of the category, which can be
viewed in the Category list screen (optional)
When you are finished, press “Save & Close”.
2.3 Rename event categories
To rename Event Categories, select the item you want to edit, from the Categories List screen.
Edit the “Name” field of the Category.
When you are finished, press “Save & Close”.
Copyright 2013 – Impartmedia | www.impartmedia.com Page | 21Forms, Events and SEO 2.4 Create event locations Before you begin adding events, you should also take time to add any locations that you know will be used regularly. This is required so that so that the events can show a map of the location and links to Google maps directions. You can also add locations on the fly-when adding Event information. Steps Go to Components > Events and choose the “Locations” option from the menu that pops out. This will open the Locations list. (See screenshot below) Click on the “New” button at the top of the screen. You will then be presented with the “New Location” screen. Copyright 2013 – Impartmedia | www.impartmedia.com Page | 22
Forms, Events and SEO
Fill in the fields on the left of the screen, as required.
Choose if location can be viewed on your website
Add a name for the location
Choose to link to an external website, if desired.
Add physical address of the location, so a Google
map link can be generated.
Add a description of the location, which can be
viewed on the Location page (optional)
Adjust the map marker location on the map sample on the right side of the screen.
You can click on the red map marker and drag it to
the correct spot on the sample map, if it is
incorrectly placed.
When you are finished, press “Save & Close”.
Copyright 2013 – Impartmedia | www.impartmedia.com Page | 23Forms, Events and SEO
2.5 Create or edit an event
Steps
Go to Components > Events and choose the “Events” option from the menu that pops out.
This will open the Events list. (See screenshot below)
Click on the “New” button at the top of the screen.
You will then be presented with the “Add/Edit Event” Screen.
This screen will let you create or edit an event.
The event editing screen is divided into sections, which makes it easier to
manage. This will also allow you to change just the required information if you need
to edit the event, in the future.
The tabs are located in the left column of the page.
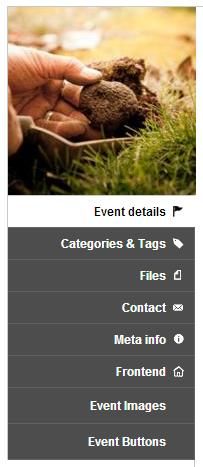
They are:
Event details
Categories and tags
Event Registration
Recurring
Files
Contact
Meta Info
Frontend
Event Image
Event Buttons
Copyright 2013 – Impartmedia | www.impartmedia.com Page | 24Forms, Events and SEO
2.5.1 Event Details Tab
Main event photo
This is located above the tabs menu on the left hand side.
Mouse over the default image icon and you will see a pop-up message appear saying
“+Add Event Photo”.
Click on this message to add a default event image.
This will appear in the initial events results list on your website, as well as become the main
image in the event information page on your site.
A cropping tool is also provided, so you can properly select the thumb image.
To change the photo, mouse over the default image icon and you will see a pop-up message
appear saying “+Change Event Photo”.
Click on this message to edit the image.
Event Information section
Here, you can set up general event information, such as the Event name, the start and end dates and the Location.
The following options are available for configuration:
Event name: the name of the event. Only text input is allowed.
Publish: check / uncheck.
Starting date: the date on which the event will start.
Ending date: the date on which the event will end. This needs to be AFTER the starting date.
Recurring: check / uncheck. If checked, this will make an additional Recurring tab appear.
Location: by typing in a keyword, a list of results will be displayed will be displayed that match your already loaded
locations. If it doesn't match anything, you can add new location, without leaving this page.
Copyright 2013 – Impartmedia | www.impartmedia.com Page | 25Forms, Events and SEO
Plain Text Description
Plain text Date, Time & Cost: write this info in the way you want it to appear. If this is filled in, it will over-ride the
default way this information is displayed on the event.
Description: a WYSIWYG area that allows you to offer a more in depth description of your event. Via the
WYSIWYG editor, you can add photos, links and event description. The event description will be shown on the event
page (website front-end).
Event restrictions: You can select what groups can view / participate at this event.
Comments: check / uncheck. If checked, commenting options will appear on the event page.
Registration: check / uncheck. If checked, visitors will be able to subscribe to an event or purchase tickets. For
more details see the optional Event Registration step.
2.5.2 Categories & Tags Tab
An event can be assigned to multiple categories and tags. This is particularly useful for filtering events according to specific
event types (.(eg: “Art”, “Community” and “Free”) You can select as many categories as you like.
You can even quickly add a new category by clicking on the “Add new category” button.
The tags input will allow you to specify as many tags as you like, separated by comma. These are used to match with, when
a website user is searching your events on your website.
Copyright 2013 – Impartmedia | www.impartmedia.com Page | 26Forms, Events and SEO
2.5.3 Event Registration Tab
This section is not used in Impartmedia websites, as event ticketing is handled by the Bookeasy system.
You will be able to add links to the booking page, to allow user to book directly from an event.
2.5.4 Recurring Tab
This section allows you to add the event into as many categories as required. (eg: an event could be in “Art”, “Community”
and “Free” at the same time)
You can also ad specific tags (keywords) to the event. These are used to match with, when a website user is searching your
events on your website.
If the Recurring option has been checked within the Event details area, this screen will become available.
Note: Using the repeating events feature, implies that event duplicates will be created.
The following options are available for configuration:
Repeat every: will allow you to specify an interval and time frame. Example - repeat every 2 weeks.
End repeat: allows you to set on which date the repeat process will end.
Repeat on: allows you to select the days on which the events will be repeated (from Monday to Sunday). This is
available for the daily and weekly repeating time frame only.
Repeat also on: if you don't have a fixed interval for repeating events, you can select the actual dates on when the
event will occur. This is useful for multi day events or recurring events that don’t happen at regular intervals.
Apply changes to all occurrences: by checking this option during the event editing process, you can choose to
apply the modifications to all instances of your repeated event.
Copyright 2013 – Impartmedia | www.impartmedia.com Page | 27Forms, Events and SEO 2.5.5 Files Tab For each event you can add downloadable files. By default, these will be listed below the main event information. You can add as many files as you need, by clicking on the “+ Add more files” button. 2.5.6 Contact tab: The event contact information can be specified here. Here you can add / adjust the event owner, web address, phone and a contact email address. This Information appears in the front-end website. 2.5.7 Meta-Info tab: Standard meta data information can be specified here, such as Page title, keywords and description. Copyright 2013 – Impartmedia | www.impartmedia.com Page | 28
Forms, Events and SEO
2.5.8 Front-end tab:
The Frontend configuration allows you to control what is displayed on the event details
page.
Sharing options
Enable event rating: if enabled, this will allow you to grade the event from a
scale of 1 to 5 (star pattern).
Enable Facebook like button: if enabled, a Facebook like button will be
displayed.
Enable Twitter share button: if enabled, a Twitter share button will be
added to the frontend area.
Enable Google+ share button: if enabled, a Google+ share button will be
added to the frontend area.
Event options
Show start date: the start date of the event will be displayed. The format will
be according to the date format setting.
Show end date: the end date will be displayed.
Show description: the event description will be displayed.
Show location: location info will be displayed.
Show categories: the categories in which the event has been published.
Note that you can assign an event to multiple categories.
Show tags: enabling this option will display the tags of the event.
Show files: enabling this will display a download link for each of the
configured event files.
Show contact information: having this enabled will display the information
added within the Contact area.
Show map: if the Google Maps is being used, you can choose whether to
display it or not.
Show export event: if enabled, an export to calendar option will be
displayed. This generates a standard ICS file.
Show invite: if enabled, an invite button will be displayed on the event
details page. Clicking on it will open a standard invitation form. This also
allows you to import contact from Gmail and Yahoo.
Show posted by: if enabled, the event poster will be displayed within the
front-end area.
Show posted by: if enabled, the event poster will be displayed within the
front-end area.
Show repeated events: if enabled, a drop-down menu that contains all of the child events, along with their start
date and end date, will appear in the initial event of the recurring cycle.
2.5.9 Event Images tab:
This section is not used in Impartmedia websites.
2.5.10 Event Buttons tab:
This section is not used in Impartmedia websites
When you are finished, press “Save & Close”.
Copyright 2013 – Impartmedia | www.impartmedia.com Page | 29Forms, Events and SEO
2.6 Republish a past event
When an event has passed the set End-date, it will be moved to the “Past events” category.
This category can be seen in the main Events List.
If you want to re-publish a past event, simply press the archive icon at the end of the event item.
The event will be re-published into the past events section.
You will then need to open the event and edit it’s details to ensure the information is brought up to date.
2.7 Duplicate an event
You can easily copy an event, so that you can use it as a template to make another similar event
Steps
Use the search filter to find the event you are looking to duplicate.
Then tick the box on the left of the item.
Go to the topbar and choose the “Duplicate”option
You will then be presented with the Event Editing screen. It will be already completed with the previous event’s
information. Change the details, dates, times, images, etc as required.
When you are finished, press “Save & Close”.
NOTE: You do not need to duplicate events to make Recurring events. Simply select the “Recurring Events”
tick box in the Event Details tab. This will automatically duplicate all events for the required date range.
Copyright 2013 – Impartmedia | www.impartmedia.com Page | 30Forms, Events and SEO
3. Search Engine Optimisation tools
3.1 Updating description tags for search engines
Your website has Metadata settings available in every page, via the articles, modules and menus on your site. This is the
information that Search engines will refer to when indexing your website.
As well, you have a “master” Metadata setting for the website, which acts as the backup information if you do not add custom
metadata to your individual pages.
3.1.1 Master Metadata settings:
Steps
From the top menu in your admin area, go to Site > Global Configuration. Then choose the “Site” tab.
The SEO and Metadata settings appear in two locations on this screen.
Edit the Metadata settings as required.
It is recommended that you use the following settings:
Robots – set to Index, follow
Show Author Meta Tag – set to “No”
Show Joomla Version – set to “No”
Edit the SEO settings as required.
It is strongly recommended that you use the following settings:
Search Engine Friendly URLs - Yes
Use URL rewriting - Yes
Adds Suffix to URL - No
Unicode Aliases - No
Include Site Name in Page Titles - Before
Copyright 2013 – Impartmedia | www.impartmedia.com Page | 31Forms, Events and SEO
3.1.2 Metadata settings in pages:
In the Right hand column of the editing screens for Articles, Menus and Modules, you will normally see a section to allow you
to add custom Keywords and Meta Description, to improve Search Engine Optimisation for your page.
You should ensure that any information added to these locations contains customised keywords, or a customised description,
that reflects the specific item you are working with.
This will help to improve your rankings with Search Engines.
Add a custom description for the page
Add page specific keywords
Change how Search Engines crawl the page
When you are finished, press “Save & Close”.
3.2 SEO Module functionality
Your website includes an SEO component, which offers you a range of highly useful tools, to improve your Search Engine
Optimisations, as well as to understand your website traffic.
With the SEO component, each of your website's page is checked and analysed, displaying a SEO grade, with possibility of
editing it, thus improving your page grade on the spot.
It includes warning messages, which provide a description explaining how to correct the problem.
It also includes a tool for automatic sitemap generation. Essentially the sitemap facilitate search engine crawlers in their
scans thorough your website. By default this tool offers two formats: sitemap.xml (for Google) and ror.xml (accepted by all
search engines).
Keyword tracking has never been easier. The SEO component allows you to track keyword performance on Google.
You can also mass-add keywords that will be tracked, each keyword performance being tested against your website pages.
The following attributes are assigned to each keyword: importance, search volume, position and performance.
The SEO Component provides the following features;
SEO performance: Pages: Keywords:
Page rank SEO grade keyword importance
Alexa rank meta data editing position
Google pages meta data sizing make keyword underline/bold
Yahoo pages title and image status internal anchor link
Bing pages permanent redirects for old pages
Google back-links
Yahoo back-links
Bing back-links
Copyright 2013 – Impartmedia | www.impartmedia.com Page | 32You can also read