User's Guide V3.7 Avalon Offshore for iOS Avalon Offshore for Android January 31th, 2018 - weather routing navigation cartography
←
→
Page content transcription
If your browser does not render page correctly, please read the page content below

User’s Guide
      V3.7

  Avalon Offshore for iOS
Avalon Offshore for Android

    January 31th, 2018

         Page 1 of 53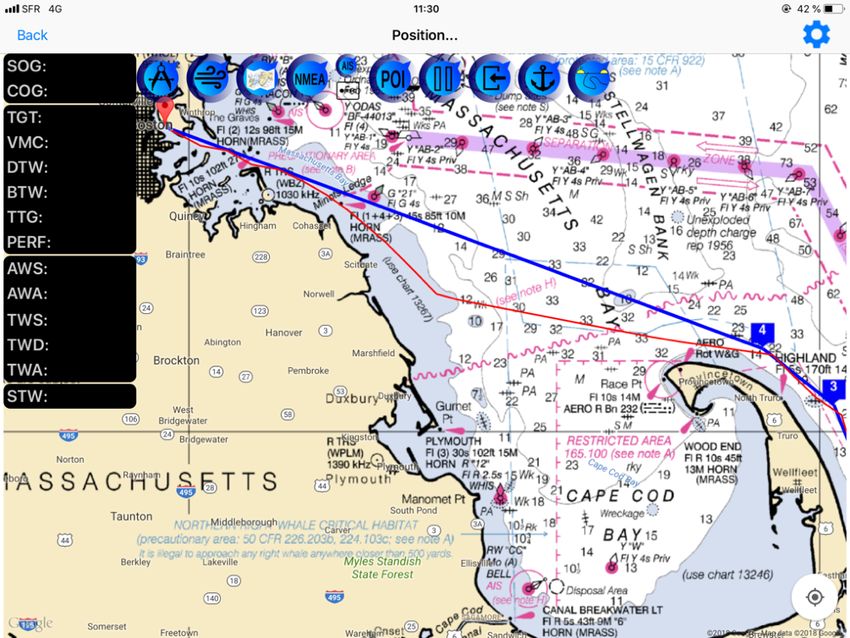
A. Important Notice                                                               4
B. Main Menu                                                                      5
  Main Menu Settings                                                              7
        Apple iOS                                                                 7
        Android                                                                   8
C. Boat setup                                                                    10
  I.     Selecting boat and sail sets                                            10
        1. Use your own VPP file                                                 10
        2. Select a boat in the Avalon library                                   11
        3. Create your own set of polars with Avalon VPP                         12
  II.    Tuning you VPPs by Sail Set                                             13
        1. On Apple iOS:                                                         13
        1. On Android;                                                           14
D. Sources Setup (Weather)                                                       15
        Download weather data via Iridium Satellite connection (or equivalent)   16
E. Managing route points in route calculation and navigation mode                17
        In Routing mode                                                          17
        In Navigation mode                                                       17
F. Routing and settings                                                          18
        Routing screen icons definition                                          19
        Calculating a route with the Easy Routing fonction                       22
        Routing settings (standard)                                              23
        Routing settings (advanced)                                              25
        Racing settings (Apple iOS)                                              27
        Routing example: from New York to Boston                                 28
        Calculating a return route                                               31
        Waypoints and stopovers settings                                         33
        Resume and details of the passage                                        34
G. Navigation and settings                                                       41
        Navigation screen icons.                                                 43
        Navigation indicators                                                    44
        Navigation settings                                                      45
        NMEA instruments display                                                 47
        Anchor alarm                                                             48
H. Nautical maps on Avalon Offshore                                               49
        Managing nautical maps on the tablet                                     49

                                          Page 2 of 53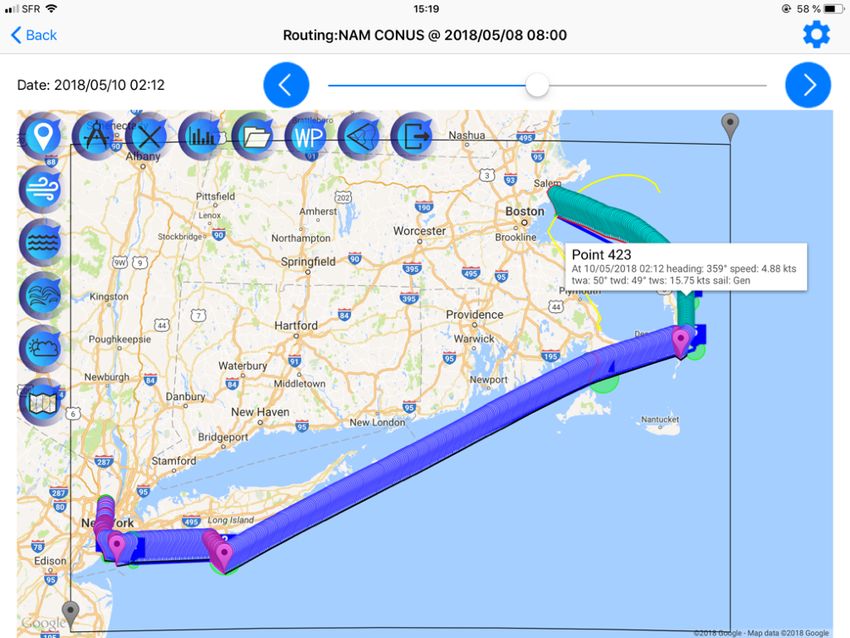
I.   Weather                   51
J. Board book                  52
K. Help                        53

                Page 3 of 53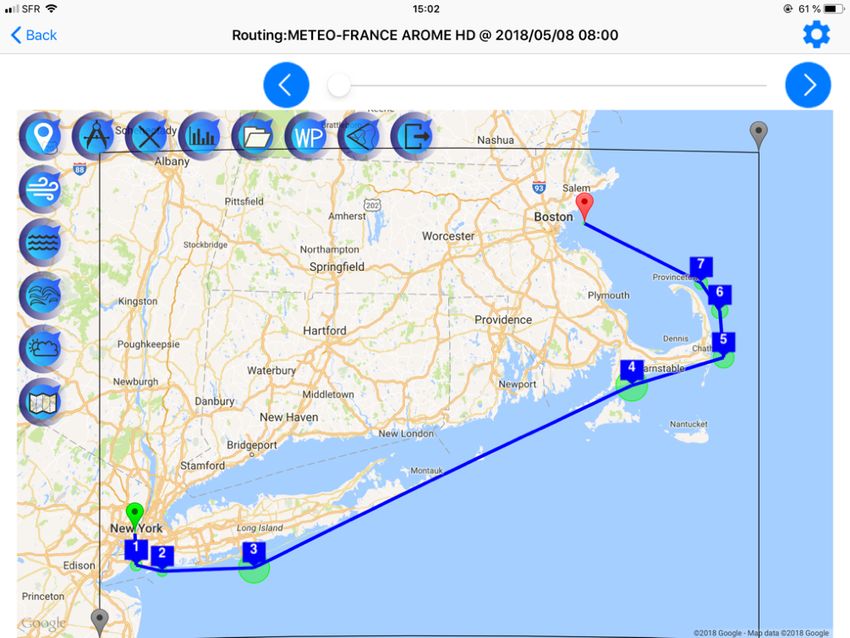
A. Important Notice
Avalon Navigation Systems makes no warranties or representations, express or implied with
respect of this product. The skipper remains the sole responsible for the navigation on his boat.

Avalon Navigation Systems have not verified or quality assured the information provided in the
nautical maps, be them provided free of charge or purchased within Avalon Offshore.

The product and the maps are not to be used for navigation. the use of those products for the
planning and execution of passages will not meet the requirements of SOLAS.

Nautical maps provided by Avalon Offshore do not replace legal documents required by national
or international regulations.

When iOS and Android screenshots are similar, we have only included iOS screenshots in order to
minimise the size of the document.

                                          Page 4 of 53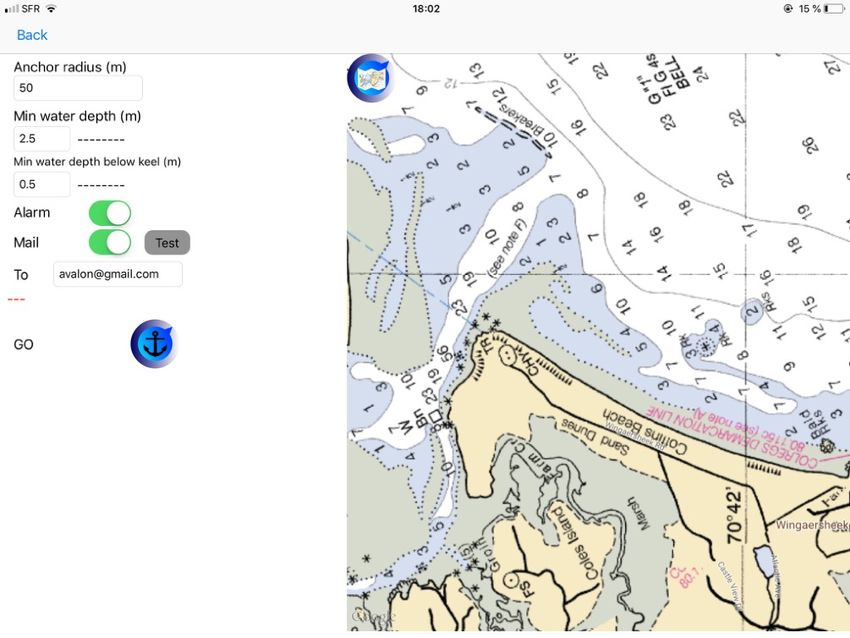
B. Main Menu
Apple iOS

Android

               Page 5 of 53
The main menu contains the following modules:
 • Routing: Calculate a route
 • Boat setup: Setup your boat, your sail sets and their related efficiency
 • Navigation: Establish your detailed route and monitor it at seat
 • Sources setup: Specify your preferred weather sources (wind, current, wave and general
   weather)
 • Board book: Access and visualize your recorded passages
 • Charts setup: Load public (free of charge) maps, your private maps or purchased our packs
   of maps derived from the UKHO (British Admiralty) or the SHOM (French Navy).
 • Weather: Display weather on your navigation zone, without having to recalculate the route.
 • Help: Access Avalon web site, support documents and video tutorials

Other flags and switches:
• Internet : Specify required connection type
        • WIFI/4G : If you have a full connection to the Internet.
        • OFF : If you are at sea without Internet connection. If you are only connected to your
            boat intranet (NMEA or AIS wifi routeur), Avalon will wrongly consider that you have a
            real Internet connection and will try to load refreshed weather data, without any
            success. In such a case, Internet needs to be set to « OFF ».
        • IRIDIUM: This option enables you to better control your satellite data transfer volumes
            (and costs). Avalon will inform you about the volume of data to be transferred and will
            tell you if your selected wind source is not our highly compressed source: NOAA GFS
            Iridium 1 degree.

• iCloud flag (Apple iOS only): When the icon is white, it confirms that Avalon has been authorized
  to use iCloud. iCloud access is mandatory to be able to share your purchased maps amongst
  several iOS devices. It is also mandatory to be able to reload your purchased maps when you
  reinstall the application. This is not needed on Android.

• « synchronize » icon. If you have an Avalon Cloud identifier, tapping on this icon will enable you
  to synchronise your routes and waypoints amongst several devices (of the same type: iOS or
  Android). The synchronisation is also useful to get free access to the racing option after having
  sent us your Avalon Cloud Id and confirmation that your pseudo has been validated to access
  the racing option.

                                           Page 6 of 53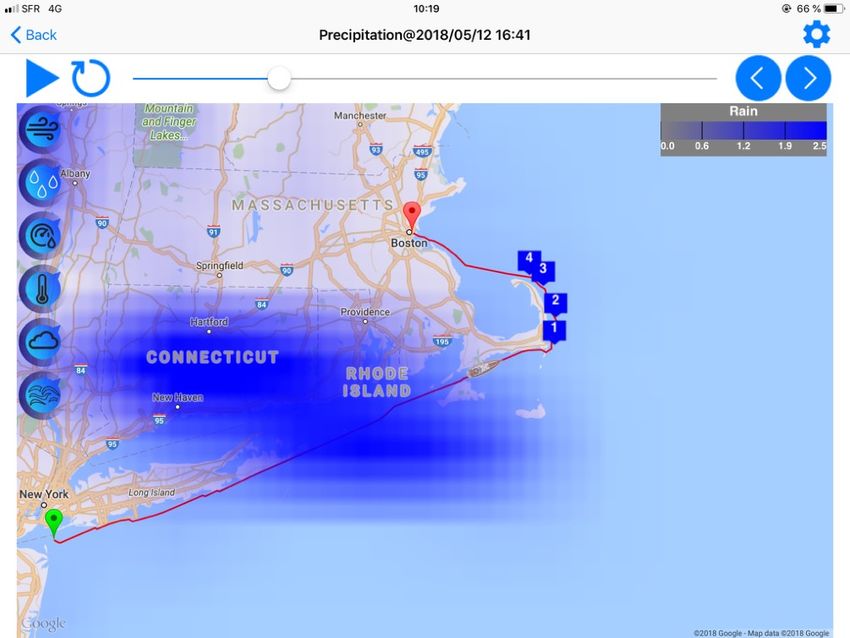
Main Menu Settings

     Apple iOS

Below is the description of the Settings menu on Apple iOS (blue gearbox top right of the screen:

       • Reset the application. Erase active route and its waypoints. Reset the app to its default
         settings. (can be useful in case one route is corrupted).
       • Reload internal cartography. This cartography is used in the routing engine to avoid land
         areas. In case of a wrong network transmission at installation time, this cartography can
         be corrupted and it can be necessary to reload it from our server.
       • Charts zoom to set the zooming level on nautical maps. We recommend to set this
         option to “x4".
       • Subscribe to the Premium option.
       • Restore Premium and Restore Purchases. In case of re-install of the application or new
         install on another tablet, using the same Apple Id or part of the Apple family program.
         • Imperative: Avalon should be authorized to use iCloud in your iOS device settings
         • Restore purchases to install your already purchased maps on the new device.
         • Restore Premium to validate your Premium subscription on the new iOS device.
       • Connect or create a new Avalon Cloud account.

                                          Page 7 of 53
Android
There are 3 options at the top right of the main manu:
  • Purchase in-app products
  • Login
  • Settings
Select “purchase in-app products” to subscribe to the Premium option or to the SHOM or UKHO
packs of maps. You can also purchase our packs of maps in the “chart setup” menu.

                                          Page 8 of 53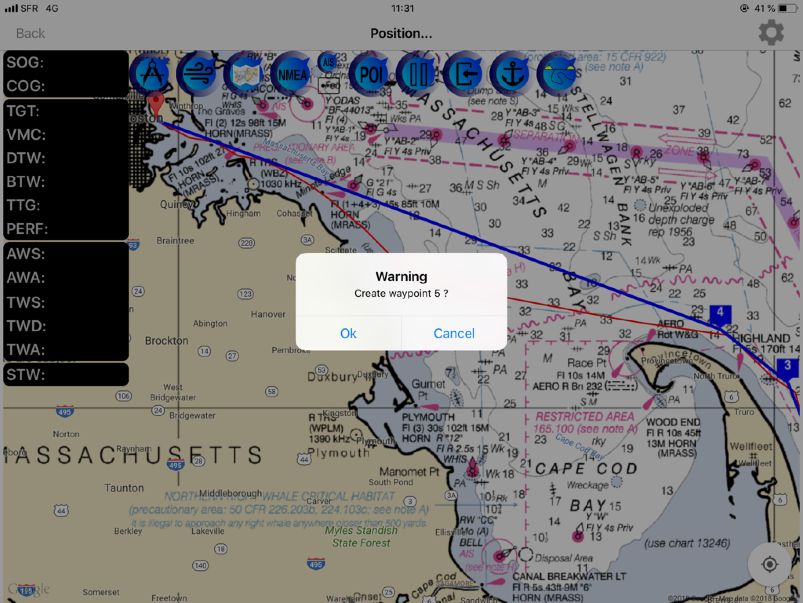
Select “login” to create or connect to your Avalon Cloud account. This account will enable you to
get access to the racing option (free of charge)

Or “settings” to use your Navionics maps in navigation. It is also mandatory to enter your
Navionics credentials in the Navigation menu to access the maps.

                                          Page 9 of 53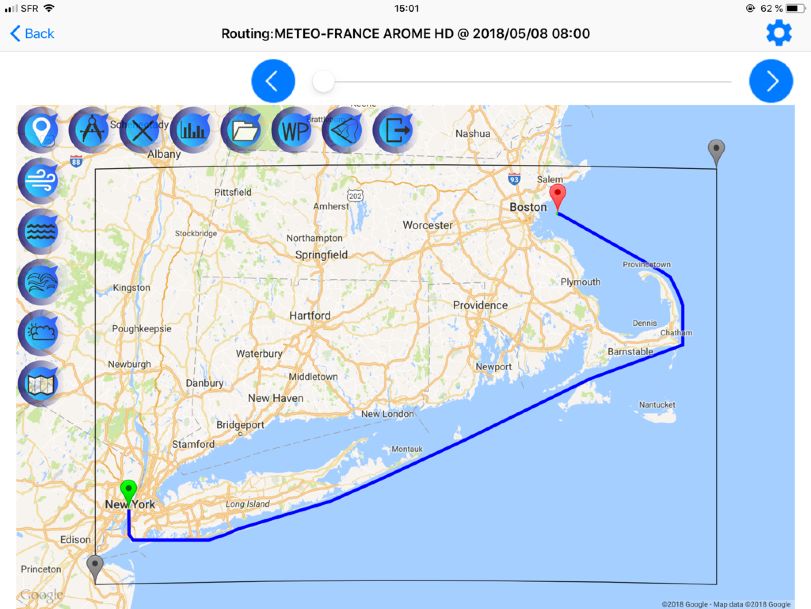
C. Boat setup

 I.         Selecting boat and sail sets

 To be able to compute optimized routes, Avalon needs to know which boat and sail sets you
 are using. Avalon offers you 3 possibilities to enter your boat velocity prediction (VPP).

      1. Use your own VPP file

 If you have your own polars in the “pol” format, you can directly load them by sending them to
 your tablet:
      1. By email or Google drive if you are on Android
      2. By email or iTunes File Transfer if you are on Apple iOS.

 The .pol file should be built as follows:

 TWS (True Wind Speed) are in columns and TWA (True WInd Angle) are in rows. You can create
 as many rows and columns as needed.

 TWA/TWS         4      8         12           16      20       ...       ...

      30

      35

      40

      45

      50

      60

      ...

 Once filled in, save your table as "txt" with tab as separator.
 Once done, modify your file extension from ".txt" to “.pol” and send the file to the tablet.

                                             Page 10 of 53
2. Select a boat in the Avalon library
Avalon Offshore includes a library of more than 450 boats. To select one of them, tap on Boat
setup,
Boats are sorted by shipyard.
Select your boat display available sail sets.
Switch on the sail sets you want to use during your passage. You can tune the efficiency of the
VPP Polar for every sail set, useful to differentiate between performance sails and used
cruising sails.
You can also display the VPP polar curve itself by tapping on the gear box.
Page 11 of 533. Create your own set of polars with Avalon VPP
When it comes to boat velocity prediction, the “One Size Fits All” concept is not a good
solution.
Indeed, nobody is skipping the same standard boat and sail sets and nobody has the same
sailing habits or the same crew.
This is why we have developed Avalon VPP and made it available free of charge on the net.
Avalon VPP is able to calculate precise velocity predictions for your boat. It takes into
consideration your boat precise characteristics (additional displacement, propellor type, sail
type, etc ...) as well as you sailings habits (maximum healing, number of crew, etc.…)
Another advantage of using polars calculated with Avalon VPP is that you will then get the
forecasted healing and reefing for every route point.
To create a boat from scratch with Avalon VPP, tap on “create new boat ….”
To add/deletes/tune a sail set on an already created boat, tap on “modify my …”
You can also archive and restore your current VPPs if you want to try an other boat for
example.
For more info, please refer to Avalon VPP User’s Guide here:
http://www.avalon-routing.com/wp-content/uploads/2018/11/Avalon-VPP-en.pdf
Page 12 of 53II. Tuning you VPPs by Sail Set
Avalon Offshore enables you to:
• activate/deactivate sail sets depending upon the planned cruise.
• tune the efficiency of a sail set
• edit the values of the VPP by using our VPP editor.
1. On Apple iOS:
The gearbox will display a VPP Polar editor for the selected sail set.
You can see your detailed speed data. You can also change some of the values. This can be
necessary in case Avalon has calculated a weird value (this may happen ….).
Page 13 of 531. On Android;
Same principle on Android devices.
You access the polar editor by tapping on the rectangle with the sail set name and a pencil.
Page 14 of 53D. Sources Setup (Weather)
Avalon Offshore enables you to load manually your own weather data files under grib1 or grib2
format (standard file format). However, this method present some disadvantages vs direct
download from Avalon servers.
• You need to get your grib files from the internet, possibly via tools like Saildocs or equivalent.
• Files downloaded via Saildocs have a 30% overweight, due to the text format used in the
transmission.
• On the contrary, Avalon weather data files are ultra compressed, up to half the weight of a
standard grib files. This can be useful in area where the 3G signal is week or where you have
to get the gribs via Iridium.
• We recommend to calculate at least 2 routes with different meteo sources to see if the 2
routes are similar. This double calculation becomes awkward if you have to get manually the
grib files.
For those reasons, we have decided to regroup (and compress) a large choice of weather data
files on our servers and make the use of those weather sources fully automatic to Avalon Offshore
users.
As a consequence, you have to indicate to the system what are your preferred weather sources
for the wind, currents, waves and general weather data.
Note: The 4 sources have to be specified. If not, the system will not be able to calculate any
route.
From the main menu, tap on « Sources setup » then select Wind models. Wind sources are sorted
by provider: NOAA, Meteo France, CEP, OpenWRF Skiron and NAM.
This list will be enriched.
Important Notice: Beware to select the most appropriate source, depending upon your
navigation area and start date. For example:
• Choose a worldwide model (NOAA GFS) for a transoceanic passage. There will be no more
coastal impact on the wind.
• If you a planning a coastal passage with a start date 2 days later, consider the forecasting
period provided by the model. Météo France Arome has only 30 hours of forecasts available
while Météo France Arpege has 96 hours. You can then tune the route using Arome when you
are close enough to the departure.
• As soon as you are in the open sea (offshore), high granularity model (0.05 degrees and less)
will not give you any additional precision but will cost more in terms of transmission time. Best
is then to choose average granularity models (around 0.1 degree).
Go to « wind models », the select your preferred wind source, then return.
Same for current models.
Then "wave models ». We advise you to avoid NOAA as its geographical coverage is not
complete. There are almost no data provided by this model in the Mediterranean sea.
For the « Weather model », there is only one source available at present: NOAA GFS.
Description of available weather sources is maintained on our site:
www.avalon-routing.com/en/weather-sources/
Page 15 of 53Download weather data via Iridium Satellite connection (or
equivalent)
Getting up to date weather data via a satellite connection can be done via 2 ways:
1. If the tablet is connected to the Internet via a wifi connection to your Iridium device, automatic
download of the winds will work. Prior to your departure, please ensure that you have a real
Internet connection, by trying to connect your tablet to a simple page like Google for example.
In case of a connection interrupt, the downloading will restart where it stopped, in order to limit
your Iridium costs.
We strongly adise you to switch the Internet connection type to « Iridium » on the main menu and
to select te wind source NOAA GFS Iridium 1 degree. This source has been optimized for Iridium
connections to reduce transmitted data volumes.
Please also select your planned cruise duration (in the route calculation settings) to avoid
downloading useless data.
When the Iridium option is selected, Avalon will deactivate the download of waves, currents and
general weather data, unless you decide to download this data.
2. If you Iridium connection is made via a PC or a Mac, you will get a grib file via a mail file and
you will have to send this grib file to your tablet via Itunes on iOS or via an USB key on
Android.
Iridium Go special case:
The Iridium Go has an embedded firewall and the Avalon servers need to be authorized in this
firewall. Please add the 2 firewall exceptions to your Iridium Go
IP adresses:
• 198.100.144.78
• 91.121.30.95
and select « all ports »
Page 16 of 53E. Managing route points in route calculation and
navigation mode
In Routing mode
• Create a new route: Tap on then «new route».
• Set up starting and arrival points. Long tap on the map.
• Moving starting or arrival points. Long tap on the point. The icon will slightly move upward.
You can then slide it to its desired position.
• Modify start and arrival points settings: Quick tap on the point. Then quick tap a second
time on the point itself. Then you can change latitude, longitude or time between heading
changes between the start point and the next waypoint.
• New waypoint or stopover: zoom on blue line then short tap on the line.
• Moving a waypoint : Long tap on the waypoint. Number will slightly move forward. Then
slide the point to its desired position.
• Modify a waypoint settings: Short tap on the point, then second short tap on the point. The
waypoints settings will pop up. you can then modify the settings, transform a waypoint into
a stopover by changing the time, change the time between heading changes between this
waypoint and the next one, etc …. Please refer to chapter on waypoint settings.
• Delete a waypoint or a stopover: Short tap on the point, then second short tap on the point.
Point settings will appear. Tap on « delete ». You will be prompted to confirm its deletion.
In Navigation mode
• Create a navigation route from a calculated route: In the routing module, tap on .
Start, arrival, waypoints as well as the calculated route will be created in the
navigation module. In this mode, start and arrival points cannot be modified.
• Add a new navigation waypoint: Zoom and short tap on the blue line. Waypoint will be
created. They are automatically renumbered.
• Moving a navigation waypoint : Long tap on the waypoint. Number will slightly move
forward. Then slide the point to its desired position.
• Delete a navigation waypoint: Short tap on the point, then second short tap on the point.
Point settings will appear. Tap on « delete ». You will be prompted to confirm its deletion.
Warning: Every time you will create a navigation route by exporting a calculated route, the
navigation points will be erased.
Page 17 of 53F. Routing and settings
Enter the routing menu. Long tap on the starting point, the long tap on the arrival point.
If the starting and arrival points are correctly positioned (no « x » displayed on the markers
indicating that the point is not at sea), a blue line connecting starting to arrival point is
automatically displayed. This line, composed of several segments, defines approximatively the
minimum distance route.
If you want to move the starting or the arrival, long tap on the point until the marker slightly moves
upward then slide to the correct position. Beware not to set the point in the harbor itself as a pier
may prevent Avalon to find a route.
A rectangle defining the navigation area is positioned. It defines the minimum weather data that
will be automatically downloaded when the route is calculated.
If you tap on , waypoints will be automatically placed for each of the line segments.
This is useful for a route that crosses important land areas or to exit a narrow bay. Of course,
Those waypoints can be moved or modified.
To initiate route calculation, tap on (isochron).
Next screen is the route settings. We will be back on the definition of those settings further in this
document. Tap on « Compute route » to launch the calculations.
Route is quickly computed and displayed. If you have selected « Show details » in the compute
route settings, the route summary is displayed first. Tap on return to see the route itself..
Page 18 of 53Routing screen icons definition
Icons are white when activated and black when deactivated. The work like a switch: one tap to
activate, a second tap to deactivate
Example
Wind display deactivated.
Wind display activated.
This system is working the same way in all Avalon modules.
Display route points. Click on a route point to see point information (speed,
heading, TWS,TWD, TWA, Sail set, etc..
Display wind and gusts, synchronized with the previously selected route point.
You can then display wind data by hitting a specific wind arrow.
Display currents. Click on a current arrow to get more current info.
Display wave height. Tap on wave symbol to see wave height.
Display other weather data (temperature, pressure, cloud coverage, rain) symbol.
Click on symbol to get weather details.
Page 19 of 53Display installed and active nautical maps. See specific chapter on cartography.
Display compass. Position points A and B. Click on point A to get distance and
heading to point B…. or reverse.
Create a navigation exclusion zone or line. Position the end points of the segment
or the 4 points of the zone and the calculated route will never cross this line nor
enter the zone. You can create multiple zones or lines.
Display route resume and details. See more further in this document.
Automatic positioning of waypoints at every heading change of the minimum
distance route.
Open the route management menu: create new route, return route, save and
retrieve previously created routes.
Launch the Easy Routing calculation
Display the route calculation settings and launch the calculation route.
Export calculated route and its associated waypoints/stopovers to the navigation
module to establish a precise navigation route.
Page 20 of 53Android only: switch to full screen mode.
Page 21 of 53Calculating a route with the Easy Routing fonction
In the routing module, tap on the magic wand icon:
The Easy Routing screen gets displayed.
About 800 harbors are sorted by country and state/navigation area. This list is regularly updated.
If we have forgotten a harbor or missed a navigation zone, thanks to let us know.
Select:
• The start harbor
• The arrival harbor
• The start date
And tap on “compute route”.
The required weather data is automatically downloaded, the waypoints that are necessary to pass
the capes are automatically placed and the route is calculated and displayed within seconds.
The resulting route can easily be modified as it was calculated using the advanced mode:
waypoints edition, deletion, edition, move, etc ….
Page 22 of 53Routing settings (standard)
Apple iOS
Android
Page 23 of 53• Iteration time: Time between heading changes. It can be necessary to decrease this value in a
narrow bay for example to enable quick tacks. During a long cruise, it is better to fix this value at
30 or 60 minutes.
• Compute time limit: In case of “time out” error message, you need to increase this value to
give your device enough time to complete route computation.
• Target zone size: Radius of the arrival circle in miles.
• Waypoint zone size: Default radius of the waypoint(s) circle(s) in miles.
• Estimated duration: You should fix a value that is higher than the planned duration of your
passage. This value fix the quantity of wind, currents and weather data that will be downloaded
to the tablet. We are using a very efficient data compression algorithm: One wind point (TWS,
TWD and Gust) cost only 2.7 bytes, to save iridium phone cost on offshore cruises.
• Wind max speed: Maximum wind speed (gust) acceptable for the boat and the crew.
• Start at my position: to easily recalculate the route you are at sea.
• Motoring speed: your preferred speed when motoring.
• Use engine if speed below: Self explanatory.
• Polar efficiency: decrease this value if your boat is not at 100% of its theoretical performance
(used sails, crew experience, and difficult weather conditions). Better alternative is to tune the
VPP polar efficiency at sail set level in the boat setup menu.
• Night efficiency: decrease this value when you plan to decrease your sail area at night. Please
note that the night period is automatically calculated by the system.
• Use streams: Integrate stream in route calculations and in the route display. We have 5 days of
stream data with a 1 hour step.
• Use waves: Eliminate routes with wave (combination of wind and swell waves) above value
defined below.
• Wave max height: Maximum acceptable waves. The route summary will then give you more
information above waves, for swell, wind waves and combined: Height, period and wave angles
versus boat.
• Force wind refresh: Forces Avalon to reload the winds, because Avalon will not reload weather
data if there are no new winds available, to save data transfer.
• Show details: Display route summary just after route calculation.
• Starting date: beware to have enough wind forecast available for route calculations.
Tap on and you will get selected forecast models production date/time and the length of
available forecasts
Page 24 of 53Routing settings (advanced)
Apple iOS
Android
Page 25 of 53• Search angle: Increasing this angle can avoid waypoints but will slow down calculation time.
• Angle step: 5 or 10 degrees are good values, but it can be necessary to decrease this value in a
narrow passage, together with a decrease of iteration time to enable quick tacks.
• Precision: The longest is the passage; the higher should be the required precision. This value is
automatically set but advanced users can try different values.
• Tacking time: Estimated time lost when tacking. Warning: This value should not exceed 10 or
20% of Iteration Time defined above.
• Sail change time: Estimated time lost when changing sails. Warning: This value should not
exceed 10 or 20% of Iteration Time defined above.
• Wind extension: Avalon enables to calculate a route up to 500 hours. As we only have 240 of
wind forecast, Avalon will use the latest value of the wind forecast to calculate a route. However,
beware that wind forecast becomes less and less reliable as we extend its horizon. To use this
facility, please switch on this option.
• Earth Detection: To disable detection of earth.
• Minimum TWA: to force Avalon to avoid routes that are “too much” closed hauled.
Warning: fixing a high minimum TWA may prevent Avalon to find a route.
• Search interval: When Avalon will calculate best starting time, it will calculate by default 6
possibilities with 1 hour interval. You can change those default values with “search interval” and
“step value”.Calculating best starting time requires heavy device resources. We recommend
using this option on 24 hours passages only.
Click on save to come back to previous menu and click on « compute route
To calculate best starting time, tap on « Compute best start ».
Page 26 of 53Racing settings (Apple iOS)
See separate documentation on our site here:
http://www.avalon-routing.com/wp-content/uploads/2019/01/Avalon-Racing-en.pdf
Page 27 of 53Routing example: from New York to Boston
Go into the Routing module.
Long tap to position starting point.
Long tap to position the arrival point.
Page 28 of 53After the arrival point is placed, a blue line representing approximately the minimum distance
route is displayed.
Note: The first time you calculate a route in a given area, a detailed cartography is downloaded to
the tablet. We recommend to run a dummy calculation in the area, and once down, this precise
cartography will be in place and you will be able to place route points close to the shore.
Once start and arrival points are roughly placed, you can move them. Refer to “Managing route
points” chapter.
For a complex route such as this one, it is necessary to place waypoints.
Waypoints can be automatically created by tapping on .
Those waypoints can of course be moved, deleted or transformed in stopovers.
Page 29 of 53To launch the calculation of the route, tap on
The routing settings get displayed. Please check the parameters are correct and tap on “compute
route”.
Required weather data is loaded and the route is calculated very quickly and displayed.
Note: If you have checked “Show details” in the settings, the passage summary gets displayed
first. Tap on return to see the route.
By tapping on the different icons, you can display wind, currents, waves and other weather data,
synchronized with the selected route point. You can also display the route on the active nautical
map and possibly reposition some waypoints.
Color coding:
A. If real wind forecast were used.
• Magenta: Wind comes from port
• Red: Wind comes from starboard
• Blue: Motoring
B. If the route point has been calculated using wind extension
• Cyan: Wind comes from port
• Jaune: Wind comes from starboard
• Blanc: Motoring
The yellow line represents the last isochronic, i.e. all the points that the boat could reach at the
same time as the arrival
Page 30 of 53Calculating a return route
Tap on then « New roundtrip route”.
Position starting point. The arrival point is placed automatically with the starting point.
Position then the planned stopover or waypoint.
Enter the stopover time in hours. Leave it to 0 if this is only a waypoint.
You can add other waypoints or stopovers by tapping on the blue line.
Page 31 of 53Then “compute route”, same as for a standard route.
Page 32 of 53Waypoints and stopovers settings
Short tap on the number of the waypoint to edit. Waypoints coordinates are displayed. Second
short tap on the number and the waypoint settings pop up. You can then edit them.
• Precise latitude and longitude.
• Waypoint zone in nautic miles.
• Stopover duration in hours (0 for a standard waypoint).
• Time between heading changes from this waypoint to the next one or to the arrival. This
setting can be useful when you need quick tacks to leave a narrow bay and then longer tacks
when you are in the open sea.
Page 33 of 53Resume and details of the passage
Tap on to see the route resume and its details.
• Cruise
• Previously calculated cruise (useful to compare between different weather sources)
• Wind
• Waves
• Weather
• Détails
• Export GPX via email
• Export KML via email
On iOS, those sub menus appear as a list. On Android, you have to switch laterally from one page
to another.
The page « Cruise » will show the synthesis of your cruise to help you decide if you leave the
harbor or not.
• Cruise duration: Total, motoring and sailing
• Number of sail set changes and number of tacks.
• Comparison between minimum distance route and Avalon optimized route.
• Histogram of the cruise splitter by par:
• Point of sail
• Sea status
• Wind status
Page 34 of 53The page “Cruise (Previous route)” shows the same information for the previously computed
route. This can be very useful to compare the results coming from 2 different weather sources,
boats, route options, etc … Comparing results from 2 or more weather sources will enable you to
assess the reliability of the forecast.
Moreover, the 2 routes (current and previous) will appear on the map. If you select one route point
on the current route, the position of the boat on the previous route will display, enabling you to
easily compare the 2 options.
Weather bulletin displays the main weather data:
Page 35 of 53La wind summary page displays wind and gust details (TWS and Gust). It shows also the TWA
(True Wind Angle).
Just use the slide bar bottom of the screen to get the data for a given date and time.
Page 36 of 53Same thing for the waves.The system will give you, for the swell and the wind waves: Height,
Direction and Frequency.
Page 37 of 53The weather page gives a synthesis of the weather during the cruise. Be careful with the CAPE
indicator. If it goes over 500, you may encounter storms during your cruise.
If this is the case, a popup window will warn you as soon as the route calculation is completed.
Page 38 of 53Route details are a point by point road map of the route. Sail set changes and tacks are
highlighted by a color change.
Page 39 of 53“Export Route GPX and KML” enables you to export the Avalon calculated route to other
navigation systems such as OpenCPN, iNavX, etc …
Page 40 of 53C. Navigation and settings
If you want to use your Navionics maps with Avalon, please refer to our Cartography document:
http://www.avalon-routing.com/wp-content/uploads/2019/01/Carto-Avalon-en.pdf
If you have a tablet equipped with a GPS chip or connected to your NMEA network, you can use
Avalon Offshore as a navigation system at sea.
GPS is available on most Android devices, on all the iPhones but only iPad cellular models have a
built-in GPS.
If you use onboard GPS (thru a connection between the tablet to the NMEA network), please
uncheck “use device GPS” in the Navigation menu settings.
The navigation module allows you to create a “navigation” route automatically from the calculated
route
In navigation mode, you can adapt the route by adding waypoints to follow the calculated route
and avoid dangerous areas.
At sea, you just have to activate the next waypoint (short tap on the waypoint number) and the
system will provide you with the navigation data to this active waypoint. You will get:
• Course Over Ground
• Speed Over Ground
• TGT: Target = Active waypoint
• VMC: Velocity Made to Course (to active waypoint)
Page 41 of 53• DTW: Distance To Waypoint
• BTW: Bearing To Waypoint
• TTG: Time To Go (to waypoint)
To add a waypoint, short tap on the blue line. To move it, long tap on the waypoint until the
number moves upward and slide it to its position.
For more info, please refer to chapter “Managing route points in route calculation and navigation
mode”.
Page 42 of 53Navigation screen icons.
Import from routing. Creates a navigation route from the calculated route. This
function also manages navigation routes and associated waypoints.
Display compass.
Display forecasted winds.
Display installed and active nautical maps. See specific chapter on cartography.
Display NMEA 0183 instruments.
AIS connection indicator.
To record a new Point Of Interest.
Page 43 of 53To simulate calculated route (demo function)
Anchoring alarm menu
Manage regatta start (iOS only)
Navigation indicators
GPS data
• COG: Course Over Ground
• SOG: Speed Over Ground
• TGT: Target = Active waypoint number)
• VMC: Velocity Made to Course (to active waypoint)
• BTW: Bearing to Waypoint
• DTW: Distance To Waypoint
• TTG: Time To Go (to active waypoint)
NMEA 0183 data (assumes tablet is Wifi connected to the boat NMEA network)
• PERF: Performance Indicator. Real boat speed vs theoretical speed ratio. Can be very precise
if VPP polar has been calculated using Avalon VPP.
• AWS: Apparent Wind Speed
• AWA: Apparent Wind Angle
• TWS: True Wind Speed (on the water)
• TWD: True Wind Direction (on the water)
• TWA: True Wind Angle (on the water)
• STW: Speed Thru Water
Page 44 of 53Navigation settings
Apple iOS
Page 45 of 53Android
Screens slightly differ but settings are similar between iOS and Android:
• GPS precision: Self explanatory. Recommended value is “Max” ( i.e. 5 meters).
• Record: Record the route point at the desired frequency (10s, 1mn, 10 mn or 30 m
• Update route: to recompute dynamically the route according to the new boat position.
• View mode: to center the boat on the screen or not.
• Line of sight duration: defines te length of the vector at the front of the boat to anticipate
its position in 10 min, 30 min, etc.
• AIS/NMEA: Enable AIS or NMEA connection to a WiFi router.
• Use device GPS: To select between tablet of boat GPS. Using boat GPS will save tablet
battery.
• AIS / NMEA wifi mode: Choose TCP, if you have only one tablet to connect and UDP if you
have several (assumes sur router supports UDP mode).
• AIS/NMEA Host and Port: Wifi connection information. This information is available in your
Wifi router documentation.
• Filter still boats: To avoid displaying boats that are not on route.
• Collision Alarm: triggers a sound alarm when a boat meets CPA and TCPA conditions.
• CPA: Closest Point of Approach in miles
• TCPA: Time to CPA in minutes
• Repeat GPS/AIS/NMEA: When you want this device to transmit its own GPS data and
optionally AIS and NMEA frames to other wifi devices on board. This can be very useful if
you have a non cellular (.i.e. without the built in GPS chip) for example.
Page 46 of 53NMEA instruments display
Tap on to display NMEA connected instruments.
This screen can be fully customized. Long tap on the indicator and choose the parameter to
display amongst:
• TWS: True Wind Speed
• TWD: True Wind Direction
• TWA: True Wind Angle
• Water Speed
• Engine RPM
• Water Depth Efficiency in meters
• Water Depth Efficiency in feet
• Polar Efficiency
• Wind AWS
• Wind AWD
• Wind AWA
• Ground Wind Speed
• Ground Wind Direction
• Water DFT: Current Speed
• Water SET Current Direction
Page 47 of 53Anchor alarm
At Avalon, we consider that anchoring is an integral part of navigation. Therefore we decided to
integrate the anchor alarm in Avalon Offshore rather than creating a specific application for that
purpose.
Tap on to enter the Anchor alarm menu.
This system combines an alarm based on a circle around the anchor and another alarm based on
the water depth (total or below keel).
Using the water depth alarm requires the depth indicator to be connected to an NMEA network,
and also the tablet to be connected via a wifi connection to this NMEA network (via a ShipModul
3 WI or equivalent).
Tap on the screen to position the anchor. You can move the anchor icon if necessary (long tap and
slide).
Adapt the anchor circle radius in the parameters left of the screen. Optionally do the same for the
water depth alarm.
If you would like to receive an alarm email in your phone, please activate the email and indicate
your email on your phone.
Tap on to activate the alarm. The icon becomes white when Alarm is active.
Page 48 of 53D. Nautical maps on Avalon Offshore
Details on available maps and how to install them are available in this document:
http://www.avalon-routing.com/wp-content/uploads/2018/04/Carto-Avalon-en.pdf
Managing nautical maps on the tablet
Once downloaded, nautical maps will reside on the tablet until you decide to remove them. But,
depending upon the planned passage, you may need only a subset of them.
Furthermore, you may face map display conflicts. Best is to have activated only one large quilted
map covering your navigation area.
To activate or deactivate loaded maps, go to “Chart setup” and then “My charts”, middle top of
the page.
Page 49 of 53The list of your charts will get displayed. Click to activate or deactivate.
Page 50 of 53E. Weather
The Weather module displays weather data synchronized with the planned route of the boat
• Wind
• Rain
• Pressure and Isobaric
• Temperature`
• Cloud coverage
• Wave height
It is possible to reload the full set of weather data on your navigation area without having to
recalculate the route. You just need to go to the weather screen settings (blue gearbox) and tap on
“reload weather”.
Beware that the previously calculated route will then be disconnected from the weather data.
The arrow top left of the screen will scroll the selected weather data synchronized with the
planned position of the boat.
Page 51 of 53F. Board book
Ce menu allows you to view your previously recorded routes. Select a route and tap on “view” to
display it.
Page 52 of 53G. Help
To reset the App itself and access various video tutorials.
Note: on iOS, you need to go to the main menu settings to access various reset fonctions. The
help only contains access to video tutorials.
Page 53 of 53You can also read