Department for International Tax Cooperation - Department for International Tax ...
←
→
Page content transcription
If your browser does not render page correctly, please read the page content below
Department for International Tax Cooperation

                 CAYMAN ISLANDS

          DITC Portal – User Guide
                                            DITC Portal Team: CaymanAEOIPortal@gov.ky

                                  DITC Economic Substance Team: CaymanESportal@gov.ky

                                                    DITC Portal URL: ditcportal.secure.ky

                                                                   DITC Website: ditc.ky
                                                                                v.6.0 8/21

                                                                             1|Page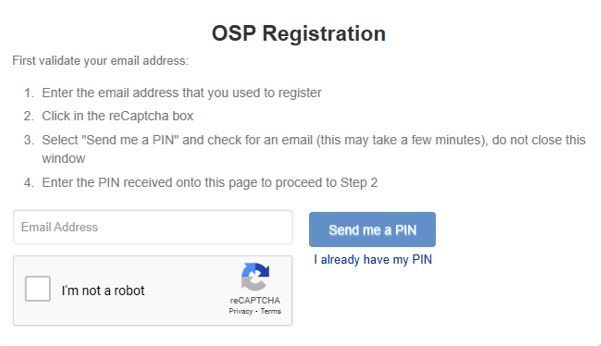
Introduction:
The purpose of this User Guide is to provide a guide of the most commonly used functionalities in the DITC Portal with respect to Entities meeting their Notification (Registration)
and Reporting requirements across all frameworks. This User Guide is not intended to provide business or policy/regulatory guidance to Entities; it includes only technical
guidance on the use of the DITC Portal.

Please refer to the Legislation and Resources pages on the DITC website for further guidance on the relevant frameworks.

Contacting the DITC Portal Team:
To report a User issue, please email the correct DITC Portal Team as follows:

CRS/ FATCA - CaymanAEOIPortal@gov.ky
Economic Substance (ES) - CaymanESportal@gov.ky

A User must provide their name, the Entity name, Entity Reference Number, associated Return name and brief details of the issue being experienced.

Unless exceptional circumstances apply, the Portal Team only corresponds with an Authorising Person, a PPoC, a Responsible Person, a Secondary User or an approved
outsource service provider (OSP). That is, the person sending the correspondence must have authorisation to access the information on the Portal or the Portal Team will be
unable to assist.

Supported Browsers:
The Portal supports the following browsers:

         o   Chrome
         o   Firefox

                                                                                                                                                                       2|Page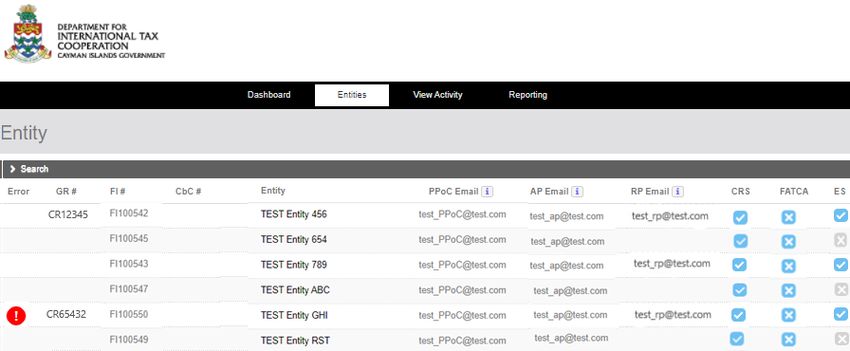
The DITC Portal Registration and Login Page
The DITC Portal currently includes Reporting functionality for the CRS, FATCA and ES frameworks and registrations of outsource service providers (OSPs). Reporting
functionality for CbCR will be added at a later date.

This page allows you to submit a new CRS and FATCA Registration or to login to your User Account. For guidance on how to submit a new OSP Registration please refer to the
section headed “Outsource Service Provider (OSP) Registration & Account Activation”.

           This is your email address.

                                                                                                               Users of the AEOI Portal
        Click here to reset your password.
                                                                                                               If you had access to the AEOI Portal as an AP or PPoC, an
                                                                                                               activation email has been automatically sent to the same
                                                                                                               email address.

                                                                                                               - Check your spam folder before contacting the Portal
      Click here to submit a Notification to                                                                     Team regarding a missing activation email.
          register a new FI on the Portal                                                                      - A new activation email can be requested via the
            regarding CRS and FATCA.                                                                             Forgot Password link by inserting the email address
                                                                                                                 registered on the AEOI Portal.

        Click here to register a new OSP on
             the Portal regarding ES.

                                                                                                                                                                3|Page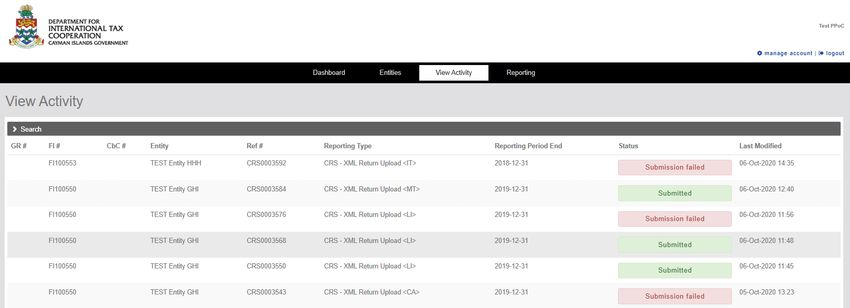
Contents
Accessing the Portal (All Frameworks)                                          By clicking on the blue links below you can jump
                                                                               to the relevant section within the User Guide
    -       New Users
            o Submit a new CRS & FATCA Registration (Notification)
            o Activating your new User Account
    -       Existing Users from the AEOI Portal
            o Activating an AP/PPoC User Account from the AEOI Portal
            o Activating a Secondary User Account from the AEOI Portal
    -       Forgotten Password

Navigating the Portal (All Frameworks)

-       Dashboard
        o Messages from the DITC
        o Error messages

-       Entities
        o View all of your assigned Entities
        o View Entity Profile

-       View Activity
        o    View all created forms/returns for all assigned FIs

-       Reporting
        o Submit all forms and returns on the Portal

Forms & returns per framework

-       CRS & FATCA
        o Specific forms and returns related to CRS & FATCA

-       Economic Substance
        o Outsource Service Provider (OSP) Registration & Account Activation
        o Economic Substance Return (“ES Return”)
        o OSP Verification Process
        o Entity Tax Resident in another Jurisdiction Form (“TRO Form”)
        o Retrieving an incomplete/saved ES Return or TRO Form

                                                                                                                  4|Page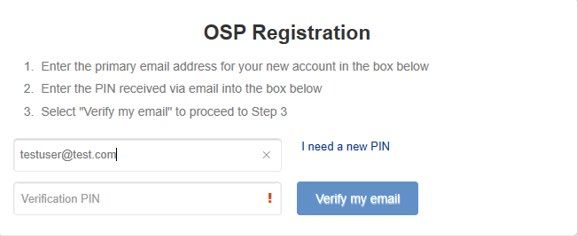
o   Viewing/retrieving a submitted ES Return or TRO Form
o   Submission Statuses (Economic Substance)
o   Saving as a PDF after Submission (ES Return only)
o   Assigning Secondary Users (Economic Substance)
o   Removing Secondary User (Economic Substance)

                                                           5|Page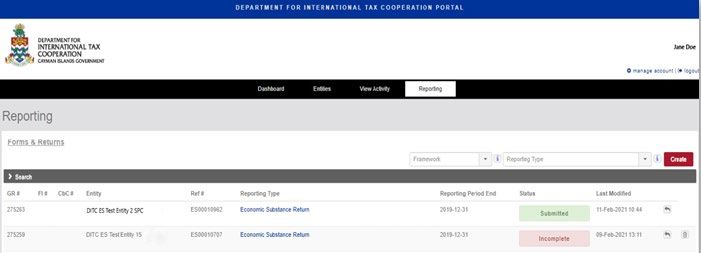
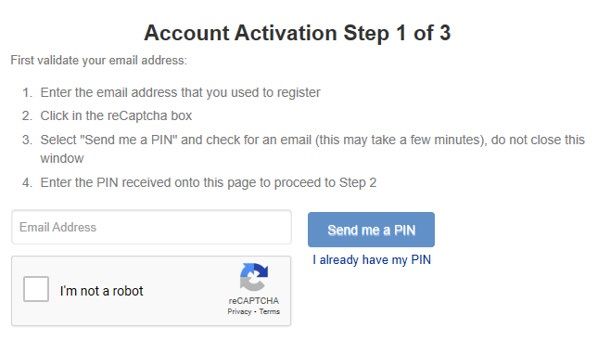
Account Activation
To set up your User Account on the DITC Portal click the link within the email received from the DITC Portal Team.
The email is sent from no-reply@ditc.ky.
If you have not received the email:
    1. Check your spam folder. If it has been moved there, add no-reply@ditc.ky to your safe senders list.
    2. Contact the DITC Portal Team at CaymanAEOIPortal@gov.ky or CaymanESportal@gov.ky

Step 1:
Insert your email address and check the reCAPTCHA box.
Click Send me a PIN.

Step 2:
Insert the PIN sent via email.
Click Verify my email.

Step 3:

CRS/FATCA - Create a strong password for your User Account. Passwords
must follow this format:
  o Must be at least 8 characters
  o Must include uppercase letter, lowercase letter, number and a special character
       (space, punctuation, symbol).

  ES – In addition to the above (which also applies to ES), Responsible Persons must also specify
  which type of person they are on the user activation screen:
  o Responsible Persons who are natural persons/individuals should check the “Individual” box
      and input their first/given name and surname/family name into the “Individual First Name”
      and “Individual Surname” fields as appropriate.
  o Responsible Persons who are legal persons/institutions (such as registered office providers)
      should check the “Entity (Institutional User)” box and input their name into the “Entity
      Name” field instead.

                                                                                                                     6|Page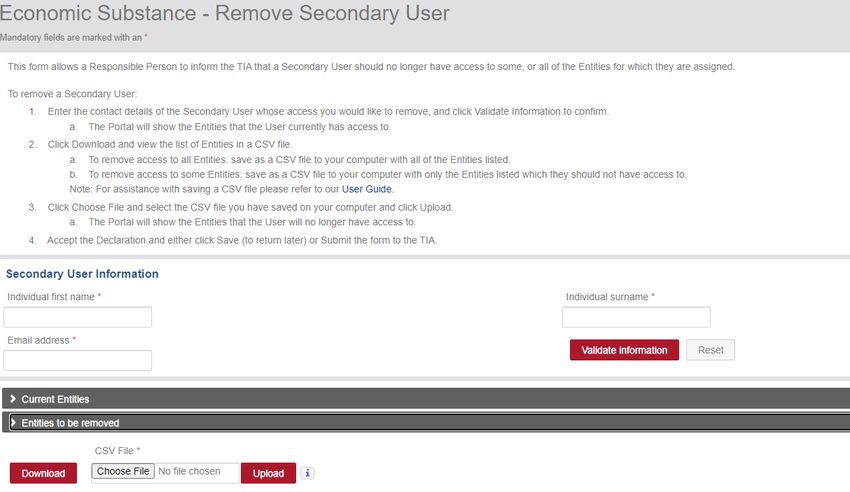
Step 4:
Select and answer the security question. Ensure this is a memorable
combination as you will be asked for this when resetting your password.

Step 5:
Agree to the Terms of Use.
You should now have access to your user account on the DITC Portal.

                                                                          7|Page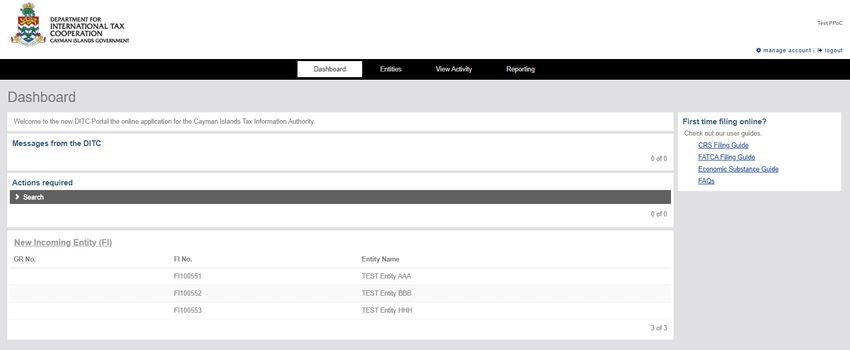
Activate Existing Secondary User (migrated from the Cayman Islands AEOI Portal)
Reporting page > Framework drop down = CRS & FATCA > Reporting Type drop down = Activate Secondary User > Create
This form allows a PPoC migrated from the Cayman Islands AEOI Portal to activate a Secondary User assigned via the Cayman Islands AEOI Portal. To allow the user access to
the same FIs on the DITC Portal, activate their account via this form.
Note; that as PPoC you are responsible for the administration and monitoring of any Secondary Users assigned.

                                                                                                            Select which users you would like to
                                                                                                               activate by checking the boxes

    o   Read and agree to the Declaration and either click Save (to return later) or Submit to activate the Secondary User(s) accounts on the Portal.

    o   The Secondary User will receive instructions via the email address displayed, on how to activate their Portal account.

                                                                                                                                                              8|Page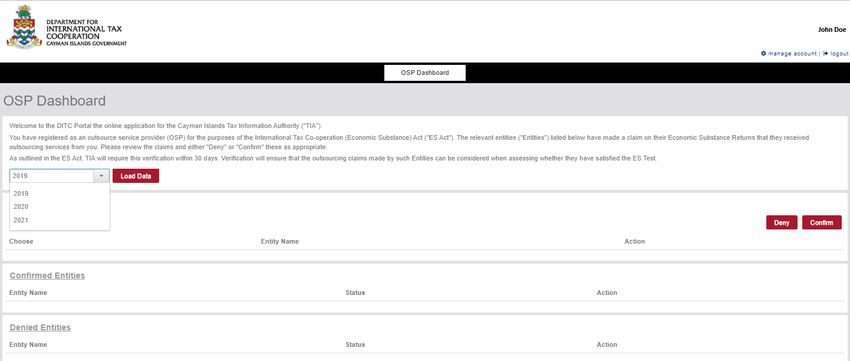
Dashboard
This is your homepage on the Portal. It displays messages from the DITC, both specific to your Entities and also general news bulletins.

Generic messages                                                                                                                      You can change            Your User
 from the DITC                                                                                                                      your password here        Account name

Specific messages                           Newly registered Entities assigned to                                                                Help and assistance
 regarding your                             your User Account are shown here on                                                                   with submitting
assigned Entities.                            the first log in after assignment.                                                                     reporting.

                                                                                                                                                                 9|Page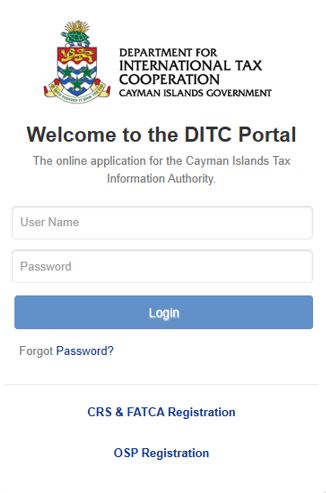
Entities Page
       This page displays all of the Entities that are assigned to your user account. These are listed in alphabetical order with both the PPoC, AP and RP email addresses displayed
       alongside the applicable frameworks. Click on the Entity name to see the information on that Entity.

                                                          Click the Entity                                         A PPoC can change                An RP can add
                                                         name to view the                                           the AP via an AP                Secondary Users
                                                           Entity Profile.                                           Change Form.

  Shown where the
information appears
  to be erroneous.

 Click on the Entity
name to review the
  error message.

                                      Shown where the                               An AP can change the                            Entity can submit reporting for this framework
                                        Entity holds a                                PPoC via a PPoC
                                      General Registry                                 Change Form.                                 Entity cannot submit reporting for this framework
                                          number.
                                                                                                                                    CRS / FATCA - Entity has not provided Notification.
                                                                                                                                    ES – Entity is not in scope to submit an ES Return or
                                                                                                                                    TRO Form

                                                                                                                                                                       10 | P a g e
Entity Profile Page
Entities page > Click Entity Name
This page displays the Entity information across all frameworks. To make changes to the Entity’s reporting obligations under CRS or FATCA submit an FI Change Form via the
Reporting Page. To make changes to the Entity’s reporting obligations under ES submit a corrected ESN (if the ESN Year is still available in CAP for that purpose) before the
applicable submission deadline. Please note that the content of the page may differ depending on the Entity’s reporting obligations.
FATCA Reporting
obligations can be Incorrect information for TEST Entity ABC
added via the FI Change
Form.
The Portal will flag where
information submitted does
CRS Reporting not appear to match
obligations can be external sources.
changed via the FI
Change Form.
User information is
change either using
a PPoC Change or
AP Change Form.
Activate Secondary Users from
the AEOI Portal. Shows whether the
User has activated
Assign new Secondary Users.
their account.
Or remove them via the
Remove Secondary User Form.
11 | P a g eView Activity Page
This page displays all the forms and returns created for your assigned Entities by all users across all frameworks. It is listed by last modified date and shows the status of each
submission. Please also refer to the section headed “Submission Statuses (Economic Substance)” for submission statuses under ES.
Not yet processed by the Portal.
Saved on the Portal, but not submitted.
Submission failed Portal validations, errors need to be corrected.
Submitted to the DITC.
Processed by the IRS no errors currently identified.
Processed by the IRS/partner jurisdiction for CRS and a correction is required.
12 | P a g eReporting Page
This page is used to create and submit all forms and returns across all frameworks. The forms and returns listed will depend on your user account and each Entity’s reporting
obligations. Only submissions made by your User Account are listed below the search bar and they are in last modified date order. To download a list of your submissions,
expand Search Forms & Returns and click Download CSV.
To create a form/return:
o Select the relevant Framework from the drop down menu
o CRS & FATCA = Administration forms under this framework
o CRS = CRS Reporting
o FATCA = FATCA Reporting
o ES = ES Reporting and Administration forms under this framework
o Select the relevant form/return from the Reporting Type drop down menu
o Click Create
Download a list of your Click the reporting type Shows the You can delete a
created forms/returns. to view the form. status of the return which is
form/return. not yet submitted
to the Portal.
13 | P a g eForgotten Password
If you forget your password you can reset this from the log in page.
You will need the answer to your security question to complete this process.
Step 1: On the log in page click on Forgot Password?
Step 2: Insert your email address and check the reCAPTCHA box.
Click Answer security question.
Step 3: Answer the security question which was set at account activation.
Click Send me a password.
Step 4: The Portal will send a temporary password via email. Return to the log in page and use
this along with your username to log on. You will be prompted to create your own password.
14 | P a g eCRS & FATCA
In This Section
DITC Issued Resources
Reporting tools
DITC CRS Legislation & Resources
- CRS & FATCA Notification / Registration
- CRS XML Upload DITC FATCA Legislation & Resources
- CRS XML Generator Tool External Resources
- Corrections / Deletions of Data for a CRS XML Upload
- CRS Filing Declaration OECD CRS Schema
- CRS Compliance Form (smart form)
IRS FATCA Schema
- CRS Compliance Form (bulk upload)
- Correcting a CRS Compliance Form (bulk upload) Validation Error
- FATCA XML Upload
- FATCA XML Generator Tool Existing User Accounts from the AEOI Portal
- FI Change Form (edit reporting obligations)
Activate an Existing AP/PPoC Account from the AEOI Portal
- FI Deactivations (released 2021)
Activate an Existing Secondary User Account from the AEOI Portal
Managing Users
- PPoC Change
- AP Change
- Assign Secondary User
- Remove Secondary User
15 | P a g eCRS & FATCA Notification / Registration
To notify the TIA of a reporting obligation under the CRS or FATCA, an FI is required to submit the registration form via the DITC Portal.
This is a one-off process and is not required to be completed annually and will create both the PPoC and AP accounts.
Step 1:
Click CRS & FATCA Registration on the Portal homepage.
Step 2:
Insert your email address and check the reCAPTCHA box.
Click Send me a PIN.
Step 3:
Insert the PIN sent via email.
Click Verify my email.
Step 4:
Read and accept the Terms and Conditions to access the Registration Form.
Ensure to complete the FIs information, reporting obligations and User contact information accurately. Any inaccuracies could lead to a submission failure.
16 | P a g eCompleting the Registration Form
o FI Name - This must match the certificate of incorporation (or the legal
name of the entity)
o General Registry Number
o If held, insert the number as per the certificate of incorporation.
o If the entity is not registered with the General Registry confirm why.
o FATCA Reporting obligations
o Insert the issued GIIN as per the IRS FFI List and select all relevant reporting
categories.
Note; Sponsoring entities are not permitted to register on the DITC Portal.
The Sponsored Entity must register in its own right, with its own GIIN.
If the entity held a CRS only profile on the AEOI Portal then the GIIN must be added
to that profile via the FI Change Form and not submit a new notification
(registration).
o CRS Reporting obligations
o Confirm whether the entity is reporting or non-reporting under the CRS.
o If yes, select all relevant categorisations
o Where Investment Entity is checked, you must confirm if the Investment Entity
has no financial accounts by virtue of Schedule 1 to the CRS Regulations, Section
VIII.C.1.a)
o If Yes is selected the CRS reporting functionality will be disabled
o If No is selected the FI will be required to submit CRS Reporting annually
17 | P a g eo CRS Reporting obligations
o If the entity is non-reporting for CRS, select only the applicable categorisation.
o If the entity is a Trustee Documented Trust (TDT), also confirm the Trustee’s name and FI number issued by the Portal.
o Contact Information
o Provide contact information for the Authorising
Person and Principal Point of Contact for the FI.
o Ensure contact information is entered accurately as
User Accounts are created based on this data.
o Refer to the CRS Guidelines for more information on
the Entity and Individual user types.
o Letter of Authorisation - Upload the PDF Letter of Authorisation
where required.
o Download the template here.
o Max size 500kb
Note; this will not be required if a valid CIMA number is entered
for either the AP or PPoC.
o Read and agree to the Declaration.
o Submit the CRS & FATCA Registration to complete the notification
Note; if a valid CIMA Licence Number is
to the TIA.
inserted, the letter of authorisation will
not be required and the AP and PPoC can
If the AP and PPoC do not receive account activation emails within be the same.
24 hours contact the Portal Team on CaymanAEOIPortal@gov.ky
18 | P a g eCRS & FATCA PPoC Change
Reporting page > Framework drop down = CRS & FATCA > Reporting Type drop down = PPoC Change Form > Create
A CRS & FATCA PPoC Change can only be submitted by an Authorising Person unless the PPoC is an Entity (Institutional User), refer to the CRS Guidelines for more information.
o Click Download and view the list of FIs that you are assigned to as AP in a CSV format.
o To change the PPoC for all of your assigned FIs: save the CSV file to your computer
without making any changes.
o To change the PPoC for some of your assigned FIs: save the CSV file to your computer
with only the FIs listed that the new PPoC should have access to.
o Note: any FIs you remove from the CSV file will remain assigned to the current PPoC.
o Click Upload to confirm which FIs the PPoC should have access to.
o Once uploaded, the entities will be listed on the page for review.
o If any additional entities need to be removed, click on the trash can icon.
o Select the Person Type – either an Entity (Institutional User) or an Individual.
o Refer to the CRS Guidelines for more information on these user types.
o Enter the name and email address of the new PPoC and click Validate
Name & Email.
o Where a valid CIMA License Number is inserted for an Entity, the requirement
to upload the Letter of Authorisation will be removed.
o For individuals, the Letter of Authorisation must be uploaded in a PDF format.
o Read and agree to the Declaration and either click Save (to return later) or
Submit to assign the FIs to the new AP.
o New Users will receive confirmation via email that a User Account on the Portal has
been created. Existing Users will be notified that new Entities have been added to
19 | P a g eAuthorising Person Change
Reporting page > Framework drop down = CRS & FATCA > Reporting Type drop down = AP Change Form > Create
A CRS & FATCA AP Change can only be submitted by a Principal Point of Contact unless the AP is an Entity
(institutional user), refer to the CRS Guidelines for more information.
o Click Download and view the list of FIs that you are assigned to as PPoC in a CSV format.
o To change the AP for all of your assigned FIs: save the CSV file to your computer
without making any changes.
o To change the AP for some of your assigned FIs: save the CSV file to your computer
with only the FIs listed that the new AP should have access to.
o Note: any FIs you remove from the CSV file will remain assigned to the current AP.
o Click Upload to confirm which FIs the AP should have access to.
o Once uploaded, the entities will be listed on the page for review.
o If any additional entities need to be removed, click on the trash can icon.
o Select the Person Type – either an Entity (Institutional User) or an Individual.
o Refer to the CRS Guidelines for more information on these user types.
o Enter the name and email address of the new AP and click Validate Name & Email.
o Where a valid CIMA License Number is inserted for an Entity, the
requirement to upload the Letter of Authorisation will be removed.
o For individuals, the Letter of Authorisation must be uploaded in a PDF
format.
o Read and agree to the Declaration and either click Save (to return later) or
Submit to assign the FIs to the new AP.
o New Users will receive confirmation via email that a User Account on the Portal has
been created. Existing Users will be notified that new Entities have been added to
20 | P a g eAssign Secondary User
Reporting page > Framework drop down = CRS & FATCA > Reporting Type drop down = Assign Secondary User > Create
This form allows a PPoC to assign a Secondary User to your assigned entities.
Note that as PPoC you are responsible for the administration and monitoring of
any Secondary Users assigned.
o Complete the contact information for the individual Secondary User
and click Validate Name & Email.
o Click Download and view the list of FIs that you are assigned to
as PPoC in a CSV format.
o If the Secondary User should have access to all FIs assigned to you, save
and upload the CSV file without changes.
o If the Secondary User should have access to only some of your assigned
FIs save the CSV file to your computer with only the FIs listed that the
Secondary User should have access to.
o Once uploaded, all of the entities will be listed on the page for your review.
o If any additional entities need to be removed, click on the trash can icon.
o Read and agree to the Declaration and either click Save (to return later) or
Submit to assign the FIs to the Secondary User.
o The Secondary User will receive confirmation via email to the address
provided that a User Account on the Portal has been created.
21 | P a g eRemove Secondary User
Reporting page > Framework drop down = CRS & FATCA > Reporting Type drop down = Remove Secondary User > Create
This form allows a PPoC to remove a Secondary User’s access to your assigned entities.
Note that as PPoC you are responsible for the administration and monitoring of any
Secondary Users assigned.
o Complete the contact information for the individual Secondary User
you would like to remove and click Validate Name & Email.
o The FIs associated with that User will be displayed.
o Click Download and view the list of FIs that the Secondary User is assigned
to in a CSV format.
o If the Secondary User should no longer have access to all FIs assigned,
upload the CSV file without changes.
o If the Secondary User should no longer have access to only some of the
assigned FIs save the CSV file to your computer with only the FIs listed
that the Secondary User should not have access to.
o The FIs displayed in Entities to be updated are those which will be removed
from the Secondary User.
o Click the trashcan icon if the Secondary User should continue to have
access to an FI.
o Read and agree to the Declaration and either click Save (to return later) or
Submit to remove access to the FIs listed.
22 | P a g eFI Change Form
Reporting page > Framework drop down = CRS & FATCA > Reporting Type drop down = FI Change Form > Create
This form is used by a PPoC to make changes to the FI information and reporting obligations submitted to the DITC. Only certain pieces of information can be changed using
this form, please refer to the table below.
o Select the relevant FI from the drop down menu and click Load Data.
o The form will populate with the data held on this entity.
If the FI does not have a
General Registry
number the FI name
can be changed.
Where a GIIN is not held, this information
can be added by clicking ‘Yes’.
Where a GIIN is shown, please contact
the DITC on CaymanAEOIPortal@gov.ky
CRS Reporting obligations
can be changed.
o Once the required changed have been made read and
agree to the Declaration and either click Save (to return
later) or Submit the changes to the DITC.
23 | P a g eCRS XML Generator Tool
CRS Returns must be submitted to the Portal in XML format. The CRS XML Generator
Tool allows Users with 50 accounts or less to input information into an Excel
spreadsheet which will then convert the data into an XML file.
Downloading the XML Generator Tool:
o The Tool is downloaded from the CRS XML Upload Page on the Portal.
Always refer to our published version to ensure you have the most recent
document.
o This tool is not compatible for MAC users.
o Macros must be enabled for the tool to function correctly.
o Read this guide in conjunction with the CRS XML Schema and the CRS
legislation and resources issued by the DITC.
Completing the XML Generator Tool:
o Save the XML Generator Tool to your computer to prevent losing your work.
o Ensure all of the required information is included within the three tabs
(where needed)
o Reporting information
o Individual account
o Organisation accounts
o The XML is generated when you click Generate Return on the fifth tab
o Save the XML to your computer, submit this via the Portal. See CRS XML
Upload Page for assistance.
24 | P a g eCRS XML Return Upload
Reporting page > Framework drop down = CRS > Reporting Type drop down = CRS XML Upload > Create
CRS Returns can only be submitted to the DITC in an XML file format. Both a PPoC and a Secondary User can upload a CRS XML Return. An XML file can include one or more
FIs, however, the accounts included in each XML must be reporting to the same Receiving Country.
If you would like to use our XML Generator Tool (for a maximum of 50 accounts) to help create an XML file, you can download the Excel template from the Portal. Macros
must be enabled for the Tool to function correctly. Click here to view a more in-depth explanation of how to use this tool.
Step 2:
Step 1: Select the Receiving Country.
Select the Reporting Year. Only select Cayman Islands if reporting Undocumented Accounts.
Step 4:
Step 3: Once validated click Submit Now.
Upload the XML file and click Validate Information. Max file size 150mb.
The system will validate that you have permission to submit returns for the FI(s) included
within the XML file.
o The Portal will then validate the data you have included within the return. This may take a few minutes
but can be longer depending on the file size and the volume of traffic on the Portal.
o If the return is free from validation errors it will be displayed with the status of Submitted.
o If you have no further CRS returns to submit you can now create the CRS Filing Declaration.
o If the return includes invalid data you will see Submission failed.
o Refer to Correcting a CRS validation error for assistance.
25 | P a g eCorrecting a CRS Validation Error
Reporting page > Click the Reporting Type of the failed return
A CRS XML Return must always comply with the DITC Portal’s CRS validation rules. Understanding the rules will help avoid errors when submitting a CRS XML Return to the
DITC Portal. It is recommended you review these CRS validation rules before preparing and submitting your CRS XML Returns.
If your return is in a status of Submission failed:
o You can either correct the XML and re-upload or delete the attempted submission by returning to the reporting screen and using the trashcan icon.
o To correct: Click the Reporting Type of the failed return.
o Click on the red error icon to review the error.
o The error message will be displayed on screen and will explain
what needs to be corrected.
If your return is in a status of submitted, but you need to edit/delete:
o Click the Reporting Type of the return you would like to edit from the Reporting page.
o Click the Delete/Edit button.
o This may take a few moments, but the system will revert the return from Submitted to a status of
Incomplete.
o You can now either upload a different XML, or delete the return from the Reporting page.
Note; this function is only available up to the reporting deadline of any given year.
26 | P a g eCorrections / Deletions of Data for a CRS XML Upload
Reporting page > Framework drop down = CRS > Reporting Type drop down = CRS XML Upload > Create
After the reporting deadline has passed you can no longer edit/delete your submitted return. If you need to make changes, or have been requested to make a correction by
the DITC, an XML using MessageTypeIndic CRS702 must be submitted.
These can also be created using our XML Generator Tool (for a maximum of 50 accounts), which can be downloaded from the Portal. Macros must be enabled for the Tool to
function correctly. Click here to view a more in-depth explanation of how to use this tool.
Creating a Correction/Deletion of data:
o The MessageTypeIndic must be set to CRS702 - “The message contains corrections for previously sent information”.
o New unique DocRefIDs must be created for the submission.
o The DocTypeIndic for the Reporting FI/Account Report sections must be set to either:
o OECD0 – Resent Data – used only when the Reporting FI section has not been modified
o OECD2 – Corrected Data – used when correcting the Reporting FI and/or
Account Report(s)
o OECD3 – Deletion of Data – used when deleting both the Reporting FI and
Account Report(s)
o The CorrDocRefID must be the DocRefID of the previously submitted report you
are correcting/deleting.
o A Corrected Return can contain either corrections (OECD2) or deletions (OECD3)
or both, as well as a resent Reporting FI element (OECD0), but may not contain
new data (OECD1).
Note; you must submit
another CRS Filing Declaration
for the same reporting year
after completing any
corrections/deletions to
indicate the reporting is
complete.
27 | P a g eCRS Validation Rules
XML Generator Cell Ref XML Generator Cell Name CRS XML Schema Element Name/Page # DITC Portal Specific Validations
Reporting FI Information
SendingCompanyIN
C2 FI number* FI number issued by the DITC Portal
p.232
MessageTypeIndic
C5 Message type indicator* Value must be CRS701 or CRS702
p.234
Reporting period end date* ReportingPeriod
C6 Format = YYYY-MM-DD
(YYYY) p.235
Unique message identifier*
C7 N/A N/A
(8 or more characters)
Message reference MessageRefID Suggested format =
C8
(Autogenerated from C7) p.234 TransmittingCountryCodeReportingYearReceivingCountryCodeFINumberUniqueNumbersLetters
Name* Name
C10 Ensure an exact match to the DITC Portal
(Reporting FI Name) p.235
ReceivingCountry
C11 Receiving Country* Only select Cayman Islands if reporting an undocumented account
p.233
Identification number IN
C12 This should be the FI Number
(Autogenerated from C2) p.243
IN
Reporting FI tax residence
C13 issued by Must be KY
(Autogenerated from C2)
p.243
AddressType
Type
C14 legalAddressType
(Legal Address Type)
p.240
CountryCode
C15 Country*
p.239
CountrySubentity
C16 Country subentity (state or Territory)
p.241
Street
C17 Street
p.240
BuildingIdentifier
C18 Building identifier
p.240
SuiteIdentifier
C19 Suite identifier
p. 240
FloorIdentifier
C20 Floor identifier
p.240
POB
C21 Post office box
p.241
PostCode
C22 Post code
p.241
City
C23 City*
p.241
The DITC Portal only permits the following values:
- OECD1 - New Data
DocTypeIndic
C24 Document type* - OECD2 - Corrected Data
p.253
- OECD3 - Deletion of Data
- OECD0 - Resent Data
Unique document identifier*
C25 N/A N/A
(up to 10 Characters)
Document reference DocRefID Format =
C26
(Autogenerated from C25) p.254 TransmittingCountryCodeReportingYearReceivingCountryCodeFINumberUniqueNumbersLetters
CorrDocRefID Only used when correcting or deleting a previously submitted report. Must match a previously
C27 Corrected document reference identifier
p.254 submitted return in the Portal
28 | P a g eXML Generator Cell Ref XML Generator Cell Name CRS XML Schema Element Name/Page # DITC Portal Specific Validations
Individual Account Report
AccountNumber
A2 Account number*
p.245
AccountNumber
B2 Account number type AcctNumberType
p.246
AccountNumber
C2 Closed Account ClosedAccount Value must be either "true" or "false"
p.246
NamePerson_Type
D2 Name type xnlNameType OECD201 not accepted
p.237
Title
E2 Title
p.238
FirstName
F2 First name* xnlNameType
p.238
MiddleName
G2 Middle name
p.238
LastName
H2 Last name* xnlNameType
p.239
GenerationIdentifier
I2 Generation identifier
p.239
Suffix
J2 Suffix
p.239
GeneralSuffix
K2 General suffix
p.239
ResCountryCode
L2 Tax Residence*
p.236
TIN
M2 Identification number
p.237
TIN
N2 TIN Issued By issuedBy
p.237
AddressType
O2 Address Type
p.240
CountryCode
P2 Country*
p.239
CountrySubentity
Q2 Country subentity
p.241
Street
R2 Street
p.240
BuildingIdentifier
S2 Building identifier
p.240
SuiteIdentifier
T2 Suite identifier
p. 240
FloorIdentifier
U2 Floor identifier
p.240
DistrictName
V2 District name
p.240
POB
W2 Post office box
p.241
PostCode
X2 Post code
p.241
City
Y2 City*
p.241
BirthDate
Z2 Birth Date Format = YYYY-MM-DD. Must not be prior to 1900 and not after the current year
p.241
29 | P a g eXML Generator Cell Ref XML Generator Cell Name CRS XML Schema Element Name/Page # DITC Portal Specific Validations
Individual Account Report
AccountBalance
AA2 Account balance* Must not be less than zero
p.250
AccountBalance
AB2 Currency* currCode
p.250
PaymentAmnt
AC2 Dividend
p.252
PaymentAmnt
AD2 Currency currCode
p.252
PaymentAmnt
AE2 Interest
p.252
PaymentAmnt
AF2 Currency currCode
p.252
PaymentAmnt
AG2 Gross proceeds
p.252
PaymentAmnt
AH2 Currency currCode
p.252
PaymentAmnt
AI2 Other payment
p.252
PaymentAmnt
AJ2 Currency currCode
p.252
The DITC Portal only permits the following values:
DocTypeIndic - OECD1 - New Data
AK2 Document type*
p.253 - OECD2 - Corrected Data
- OECD3 - Deletion of Data
Unique identifier*
AL2 N/A N/A
(up to 10 Characters)
Document reference DocRefID Format =
AM2
(Autogenerated from AL2) p.254 TransmittingCountryCodeReportingYearReceivingCountryCodeFINumberUniqueNumbersLetters
CorrDocRefID Only used when correcting or deleting a previously submitted report. Must match a previously
AN2 Corrected document reference
p.254 submitted return in the Portal
XML Generator Cell Ref XML Generator Cell Name CRS XML Schema Element Name/Page # DITC Portal Specific Validations
Organisation Account Report
AccountNumber
A3 Account Number*
p.245
AccountNumber
B3 Account number type AcctNumberType
p.246
AccountNumber
C3 Closed Account ClosedAccount Value must be either "true" or "false"
p.246
AcctHolderType
D3 Account holder type*
p.247
NamePerson_Type
E3 Name type
p.244
30 | P a g eXML Generator Cell Ref XML Generator Cell Name CRS XML Schema Element Name/Page # DITC Portal Specific Validations
Name
F3 Name* nameType
p.244
ResCountryCode
G3 Tax Residence*
p.243
IN
H3 Identification number
p.243
IN
I3 TIN Issued By issuedBy, IN Type
p.243
AdressType
J3 Address Type
p.240
CountryCode
K3 Country*
p.243
CountrySubentity
L3 Country subentity
p.241
Street
M3 Street
p.240
BuildingIdentifier
N3 Building identifier
p.240
SuiteIdentifier
O3 Suite identifier
p. 240
FloorIdentifier
P3 Floor identifier
p.240
DistrictName
Q3 District name
p.240
POB
R3 Post office box
p.241
PostCode
S3 Post code
p.241
City
T3 City*
p.241
NamePerson_Type
U3 Name type NameType OECD201 not accepted
p.237
Title
V3 Title
p.238
FirstName
W3 First name* xnlNameType
p.238
MiddleName
X3 Middle name xnlNameType
p.238
LastName
Y3 Last name* xnlNameType
p.239
GenerationIdentifier
Z3 Generation identifier
p.239
Suffix
AA3 Suffix
p.239
GeneralSuffix
AB3 General suffix
p.239
31 | P a g eXML Generator Cell Ref XML Generator Cell Name CRS XML Schema Element Name/Page # DITC Portal Specific Validations
CtrlgPersonType
AC3 Controlling person Type
p.248
ResCountryCode
AD3 Tax Residence*
p.236
TIN
AE3 Identification number
p.237
TIN
AF3 TIN Issued By issuedBy
p.237
AddressType
AG3 Address Type
p.240
CountryCode
AH3 Country*
p.239
CountrySubentity
AI3 Country subentity
p.241
BirthDate
AR3 Birth Date Format = YYYY-MM-DD. Must not be prior to 1900 and not after the current year.
p.241
AccountBalance
AS3 Account balance* Must not be less than zero
p.250
AccountBalance
AT3 Currency* currCode
p.250
PaymentAmnt
AU3 Dividend
p.252
PaymentAmnt
AV3 Currency currCode
p.252
PaymentAmnt
AW3 Interest
p.252
PaymentAmnt
AX3 Currency currCode
p.252
PaymentAmnt
AY3 Gross proceeds
p.252
PaymentAmnt
AZ3 Currency currCode
p.252
PaymentAmnt
BA3 Other payment
p.252
PaymentAmnt
BB3 Currency currCode
p.252
The DITC Portal only permits the following values:
DocTypeIndic - OECD1 - New Data
BC3 Document type*
p.253 - OECD2 - Corrected Data
- OECD3 - Deletion of Data
Unique Identifier*
BD3 N/A N/A
(up to 10 Characters)
Document reference DocRefID Format =
BE3
(Autogenerated from BD3) p.254 TransmittingCountryCodeReportingYearReceivingCountryCodeFINumberUniqueNumbersLetters
CorrDocRefID Only used when correcting or deleting a previously submitted report. Must match a previously
BF3 Corrected document reference
p.254 submitted return in the Portal
32 | P a g eCRS Filing Declaration
Reporting page > Framework = CRS > Reporting Type = CRS Filing Declaration > Create
Every CRFI and every Trustee Documented Trust, MUST submit a CRS Filing Declaration in order to complete its CRS reporting obligations in respect of the relevant calendar
year. This is the final step which the CRFI must take after submitting all other necessary CRS Receiving Country Returns by XML Upload for that calendar year.
The CRS Filing Declaration generated displays the number of Reportable Accounts the CFI has reported on for each Reportable Jurisdiction. Reportable Accounts in the case
of the Cayman Islands refers to Undocumented Accounts.
o Select the Reporting Year from the drop down menu.
o Click Download and view the list of FIs in Excel.
o To generate the Filing Declaration for all FIs: save as a CSV file to your computer with all of the FIs listed.
o To generate the Filing Declaration for some FIs: delete the relevant FIs and save as a CSV file to your computer
with only the FIs listed that you would like to generate the report
o Click Choose File and select the CSV file you have saved on your computer and click Upload.
o The list of FIs will appear on the screen - review this list:
o If incorrect, use the trashcan function to remove FIs
Test Entity BBB
33 | P a g eo When correct, click Generate Report to review the list of reportable accounts submitted.
Save allows you to return to the
Declaration at a later date.
Note that until it is submitted CRS reporting Submits the CRS Filing Declaration
obligations are not considered at complete. and confirms CRS reporting is
Download the report in a CSV complete for the FIs listed.
format to review the reporting
submitted for each FI.
Note; you cannot download this
once the Declaration is submitted.
o Download and save the report then carefully review the list of reportable accounts submitted;
o If incorrect; use the trashcan function to remove FIs from the list (see above) then click Generate Report again to update the list of reportable accounts
submitted - once correct click Save (to return later) or Submit.
o If reporting is missing, return to the Reporting page to submit this and recreate the CRS Filing Declaration once complete.
Note; it is the FIs responsibility to ensure that the reporting obligations (including any remediation of errors) is complete for each reporting period.
o If correct; read and agree to the declaration and either click Save (to return later) or Submit.
Number of accounts
submitted per receiving
Number of FIs included country
Receiving countries
within the report
34 | P a g eCRS Compliance Form (smart form)
Reporting page > Framework = CRS > Reporting Type = CRS Compliance Form (smart form) > Create
This form can be submitted by a Principal Point of Contact and Secondary User. It must be completed annually by all FIs with CRS reporting obligations. FIs that do not have
CRS reporting obligations are not required to submit CRS Compliance Forms. The form should be completed as at the end of the relevant reporting period and is required to
be filed each year for the same period as the CRS return.
For an overview of all sections and data points refer to the CRS Guidelines. For instructions on how to upload this form in bulk by CSV click here.
Section 1: Financial Institution Information
o Select the FI Name from the drop down menu and click Validation Information.
o The Portal will populate the FI Number.
o Select the Reporting Period.
o Select whether the reporting FI (or in the case of a TDT the trustee) is licenced with CIMA.
o Where Yes, insert the CIMA Number
Note; section 3 does not apply when a valid CIMA number is provided.
o Where not licenced with CIMA, select from the options provided.
o Certain FIs are not required to be licensed or registered with CIMA.
The list of options provided as a response are taken from the list of
non-fund arrangements outlined in the Private Funds Law.
o When reporting a trust select Other and write “Trust”.
35 | P a g eSection 2: Financial Account Data
FI's should complete this section using the same rules as are outlined in the CRS Regulations, for example,
joint accounts should be counted as two separate accounts.
The currency used to complete this form should be the
same as that used in the CRS report. Where multiple
currencies are used, FIs should use the currency most
frequently used.
o Select the currency.
o Confirm the total value of the FIs Financial Accounts.
o Select whether the FI has non reportable accounts.
o If Yes, confirm the reason why from the selection provided.
o The terms used in this question are those as defined in
Section VIII Part D of the CRS Regulations.
o Provide further classification details of the financial
account(s) where the account holder and all controlling
persons are not reportable jurisdiction persons.
o If No, or existence is unknown move on to the next section.
Section 3: AML/KYC and Accounting
If a CIMA number was provided this section will be hidden on the smartform.
o Confirm if the FI has audited financial statements.
o If No, confirm which entity carries out the AML/KYC obligations.
o If Other, provide the location of the entity/service provider.
o Location provided should reflect the location of where the
work is actually performed.
o Then confirm if the AML/KYC obligations were performed in
accordance with Cayman Islands law.
36 | P a g eSection 4: CRS Process
o Select which entity reviews the account holder information and drafts the
reportable accounts list.
o If Other, provide the name of the entity and the location.
o Location provided should reflect the location of where the work is
actually performed.
o Confirm whether the FI has established and maintained written
policies and procedures which comply with the FI's obligations
under the Cayman Islands CRS Regulations.
o Read and agree to the Declaration and either click Save (to return later) or Submit the CRS Compliance Form to the DITC.
o For an overview of all sections and data points refer to the CRS Guidelines.
37 | P a g eCRS Compliance Form (bulk upload by CSV)
Reporting page > Framework = CRS > Reporting Type = CRS Compliance Form (bulk upload by CSV) > Create
This form can be submitted by a Principal Point of Contact and Secondary User via a smartform or in bulk by uploading a CSV file. It must be completed annually by all FIs with
CRS reporting obligations. FIs that do not have CRS reporting obligations are not required to submit CRS Compliance Forms. The form should be completed as at the end of the
relevant reporting period and is required to be filed each year for the same period as the CRS return. For an overview of all sections and data points refer to the CRS Guidelines.
Note: The bulk upload template is suited to Users who have access to a large number of FIs. Users with fewer FIs may find it easier to use the smartform. A maximum of 2,000
FIs can be included per upload.
o Download the template in either Excel or CSV format from the Portal or our website.
o Complete all columns, leaving no blanks cells or empty rows. Please refer to the Excel template for instructions on each question.
Note: the file must be saved and submitted to the Portal as a CSV file.
o Once the file is prepared, select the Reporting Year (ensure the same
year is included within the file).
o Click Browse and upload the CSV file.
o Read and click I agree to accept the Declaration.
o Click Submit Now to submit the CRS Compliance Form to the DITC.
o The Portal will then validate the data you have included within the CSV file. This may take a few minutes but can be longer depending on the file size and the volume of
traffic on the Portal.
o If the CSV file is free from validation errors it will be displayed with the status of Submitted.
38 | P a g eCorrecting a CRS Compliance Form Validation Error
o If the CSV file includes validation errors you will see a status of Submission failed.
o Click on the blue writing to view the errors.
o Scroll to the bottom of the page and click on the red
exclamation icon to view the error.
o The error, including the FI number and affected cell reference will
be shown.
o Correct the CSV file and re-upload the CSV file to the Portal.
39 | P a g eDelete/Edit function
If you need to make changes to, or delete a submitted form you can do this up until the deadline for that reporting period. For example, you can delete or edit a
submitted 2020 Compliance Form on or before 15 September 2021.
Note: Only the user who submitted the form can delete or edit that specific form. Please contact the DITC Portal Team if the user who submitted the form is no
longer an assigned user for that FI.
o On the Reporting page click on the blue wording of the CRS Compliance Form you would like to delete/edit.
o Click on the red Delete/edit button.
o The submitted form will then be reverted to a status of ‘incomplete’.
Note: this is now no longer a submitted CRS Compliance Form.
o To delete the form click on the trashcan icon.
o To edit the form click on the blue wording, make the required changes and submit the CRS Compliance
Form again to the DITC.
40 | P a g eFATCA XML Generator Tool
FATCA Returns must be submitted to the Portal in XML format. The FATCA XML
Generator Tool allows Users with 50 accounts or less to input information into an Excel
spreadsheet which will then convert the data into an XML file.
Downloading the XML Generator Tool:
o The Tool is downloaded from the FATCA XML Upload Page on the Portal. Always
refer to our published version to ensure you have the most recent document.
o This tool is not compatible for MAC users.
o Macros must be enabled for the tool to function correctly.
o Read this guide in conjunction with the IRS issued FATCA XML Schema and the
FATCA legislation and resources issued by the DITC.
Completing the XML Generator Tool:
o Save the XML Generator Tool to your computer to prevent losing your work.
o Ensure all of the required information is included within the three tabs (where
needed)
o Reporting information
o Individual account
o Organisation accounts
o The XML is generated when you click Generate Return on the fifth tab
o Save the XML to your computer, submit this via the Portal. See FATCA Return
Upload Page for assistance.
41 | P a g eFATCA XML Return Upload
Reporting page > Framework = FATCA > Reporting Type = XML Return Upload > Create
FATCA Returns can only be submitted to the DITC in an XML file format. Both a PPoC and a Secondary User can upload a FATCA XML Return.
An XML file can include one or more FIs.
If you would like to use our XML Generator Tool (for a maximum of 50 accounts), to help create an XML file you can download the Excel template from the Portal. Macros
must be enabled for the Tool to function correctly. Click here to view a more in-depth explanation of how to use this tool.
To submit a FATCA Return:
Step 2:
Step 1: Upload the XML file and click Validate Information. Max file size 150mb.
Select the Reporting Year. The system will validate that you have permission to submit returns for
the FI(s) included within the XML file.
1TEST2.99999.SL.136.09876554334556 1TEST2.99999.SL.13 ABC Fund Ltd.
Step 3:
Once validated click Submit Now.
o The Portal will then validate the data you have included within the return. This may take a few minutes
but can be longer depending on the file size and the volume of traffic on the Portal.
o If the return is free from validation errors it will be displayed with the status of Submitted.
o If the return includes invalid data you will see Submission failed.
o Refer to Correcting a FATCA validation error for assistance.
42 | P a g eCorrecting a FATCA Validation Error
Reporting page > Click Reporting Type
A FATCA XML Return must always comply with the DITC Portal’s validation rules. Understanding the rules will help avoid errors when submitting a FATCA XML Return to the
DITC Portal. It is recommended you review these FATCA business rules before preparing and submitting your FATCA XML Returns.
If your return is in a status of Submission failed:
o You can either correct the XML and re-upload or delete the attempted submission by returning to the reporting screen and using the trashcan icon.
o To correct: Click the Reporting Type of the failed return.
TEST Entity ABC
TEST Entity 123
o The error message will be displayed on screen
and will explain what needs to be corrected.
o Click on the red error icon to review the error.
1TEST2.99999.SL.136.EDF4567443335 1TEST2.99999.SL.136.EDF45674433
1TEST2.99999.SL.136 TEST Entity ABC
FATCA013
If your return is in a status of submitted, but you need to edit/delete: o Click the Reporting Type of the return you would like to edit from the
Reporting page.
o Click the Delete/Edit button.
o This may take a few moments, but the system will revert the return
from Submitted to a status of Incomplete.
o You can now either upload a different XML, or delete the return from
the Reporting page.
1TEST2.99999.SL.136.EDF4567443335 1TEST2.99999.SL.136 Note; this function is only available up to the reporting deadline of any
given year.
43 | P a g eFATCA Validation Rules
XML Generator Cell Ref XML Generator Cell Name FATCA XML Schema Element Name/Page # DITC Portal Specific Validations
Reporting FI Information
CorrMessageRefId
C6 Corrected message identifier Only used when correcting or deleting a previously submitted report. Must match a previously submitted return in the Portal
p.21
ReportingPeriod
C7 Reporting period end date* Format = YYYY-MM-DD
p.21
Message reference MessageRefId
C8 Recommended format = ReportingFIGIIN.UniqueNumbersLetters
(Autogenerated from C7) p.20
Name
C10 Name* Ensure an exact match to the DITC Portal
p.37
TIN The GIIN or TIN of the reporting finanical institution
C13 Tax identification number TIN (GIIN)
p.30 Where reporting a TDT use the GIIN of the Sponsoring Entity
FI number
C14 N/A N/A
(Issued by the DITC Portal)
AddressType
C15 Type
p.26
CountryCode
C16 Country*
p.27
CountrySubentity
C17 Country subentity (state or territory)
p.28
Street
C18 Street
p.28
District Name
C19 District
p.28
Building Identifier
C20 Building identifier
p.28
Suite identifier
C21 Suite identifier
p.28
Floor identifier
C22 Floor identifier
p.28
POB
C23 Post office box
p.28
Post code
C24 Post code
p.28
City
C25 City*
p.28
The DITC Portal only permits the following values:
FilerCategory - FATCA602
C26 Filer category*
p.38 - FATCA603
- FATCA605
The DITC Portal only permits the following values:
- FATCA1 - New Data
DocTypeIndic
C27 Document type* - FATCA2 - Corrected Data
p.23
- FATCA3 - Void Data
- FATCA4 - Amended Data
Document reference DocRefId
C28 Recommended format = ReportingFIGIIN.UniqueNumbersLetters
(Autogenerated from C13) p.25
CorrMessageRefId
C29 Corrected message identifier Only used when correcting or deleting a previously submitted report. Must match a previously submitted return in the Portal
p.25
CorrDocRefId
C30 Corrected document reference identifier Only used when correcting or deleting a previously submitted report. Must match a previously submitted return in the Portal
p.26
NoAccountToReport
C32 Nil report*
p.46
DocRefId
C33 Document reference Recommended format = ReportingFIGIIN.UniqueNumbersLetters
p.25
CorrMessageRefId
C34 Corrected message identifier Only used when correcting or deleting a previously submitted report. Must match a previously submitted return in the Portal
p.25
CorrDocRefId
C35 Corrected document reference identifier Only used when correcting or deleting a previously submitted report. Must match a previously submitted return in the Portal
p.26
44 | P a g eXML Generator Cell Ref XML Generator Cell Name FATCA XML Schema Element Name/Page # DITC Portal Specific Validations
Sponsor Information (where applicable)
Name
C38 Name
p.37
Name
C39 Name Type
p.37
ResCountryCode
C40 Country of residence
p.29
TIN
C41 Tax identification number (GIIN or TIN) The GIIN of the Sponsor
p.30
FI number
C42 N/A N/A
(Issued by the DITC Portal)
AddressType
C43 Type
p.26
CountryCode
C44 Country
p.27
CountrySubentity
C45 Country subentity (state or territory)
p.28
Street
C46 Street
p.28
DistrictName
C47 District
p.28
BuildingIdentifier
C48 Building identifier
p.28
SuiteIdentifier
C49 Suite identifier
p.28
FloorIdentifier
C50 Floor identifier
p.28
POB
C51 Post office box
p.28
Postcode
C52 Post code
p.28
BuildingIdentifier
C53 City
p.28
The DITC Portal only permits the following values:
FilerCategory
C54 Filer category* - FATCA607
p.38
- FATCA609
DocRefId
C55 Document reference Recommended format = ReportingFIGIIN.UniqueNumbersLetters
p.25
CorrMessageRefId
C56 Corrected message identifier Only used when correcting or deleting a previously submitted report. Must match a previously submitted return in the Portal
p.25
CorrDocRefId
C57 Corrected document reference identifier Only used when correcting or deleting a previously submitted report. Must match a previously submitted return in the Portal
p.26
Individual Account Report
AccountNumber
A3 Account number*
p.48
AccountNumber/Type
B3 Account number type
p.48
The DITC Portal only permits the following values:
AccountClosed
C3 Closed account - true
p.49
- false
Title
E3 Title
p.32
FirstName
F3 First name*
p.32
45 | P a g eXML Generator Cell Ref XML Generator Cell Name FATCA XML Schema Element Name/Page # DITC Portal Specific Validations
MiddleName
G3 Middle name
p.32
LastName
H3 Last name
p.33
GenerationIdentifier
I3 Generation identifier
p.32
Suffix
J3 Suffix
p.32
GeneralSuffix
K3 General suffix
p.32
TIN Valid TIN formats:
p.30 - 9 consecutive digits without hyphens or other separators (XXXXXXXXX)
M3 Tax identification number
- 9 digits with two hyphens (XXX-XX-XXXX)
See IRS Reporting FAQ #6 re: TIN Codes - 9 digits with a hyphen entered after the second digit (XX-XXXXXXX)
AddressType
O3 Type
p.26
CountryCode
P3 Country*
p.27
CountrySubentity
Q3 Country Subentity
p.28
Street
R3 Street
p.28
BuildingIdentifier
S3 Building identifier
p.28
SuiteIdentifier
T3 Suite identifier
p.28
FloorIdentifier
U3 Floor identifier
p.28
DistrictName
V3 District name
p.28
POB
W3 Post office box
p.28
Post code
X3 Post code
p.28
City
Y3 City*
p.28
BirthDate
Z3 Birth Date
p.34
City
AA3 City*
p.34
CountrySubentity
AB3 City Subentity
p.34
CountryCode
AC3 Country
p.34
FormerCountryName
AD3 Former country name
p.34
Account balance
AE3 Account balance*
p.53
AccountBalance/currCode
AF3 Currency*
p.53
46 | P a g eXML Generator Cell Ref XML Generator Cell Name FATCA XML Schema Element Name/Page # DITC Portal Specific Validations
PaymentAmt
AG3 Dividend
p.55
PaymentAmt/currCode
AH3 Currency
p.55
PaymentAmt
AI3 Interest
p.55
PaymentAmt/currCode
AJ3 Currency
p.55
PaymentAmt
AK3 Gross proceeds
p.55
PaymentAmt/currCode
AL3 Currency
p.55
PaymentAmt
AM3 Other payment
p.55
PaymentAmt/currCode
AN3 Currency
p.55
DocRefId
AO3 Document reference Recommended format = ReportingFIGIIN.UniqueNumbersLetters
p.25
CorrMessageRefId Only used when correcting or deleting a previously submitted report. Must match a
AP3 Corrected message identifier
p.25 previously submitted return in the Portal
CorrDocRefId Only used when correcting or deleting a previously submitted report. Must match a
AQ3 Corrected document reference identifier
p.26 previously submitted return in the Portal
Organisation Account Report
AccountNumber
A4 Account number*
p.48
AccountNumber/Type
B4 Account number type
p.48
The DITC Portal only permits the following values:
AccountClosed
C4 Closed account - true
p.49
- false
The DITC Portal only permits the following values:
AcctHolderType
D4 Account holder type* - FATCA102
p.51
- FATCA104
Name Insert the legal name of the entity or organisation
F4 Name*
p.37 account holder
TIN Valid TIN formats:
p.36 - 9 consecutive digits without hyphens or other separators (XXXXXXXXX)
H4 Tax identification number
- 9 digits with two hyphens (XXX-XX-XXXX)
See IRS Reporting FAQ #6 re: TIN Codes - 9 digits with a hyphen entered after the second digit (XX-XXXXXXX)
AddressType
J4 Type
p.26
CountryCode
K4 Country*
p.27
CountrySubentity
LM Country Subentity
p.28
Street
M4 Street
p.28
BuildingIdentifier
N4 Building identifier
p.28
SuiteIdentifier
O4 Suite identifier
p.28
47 | P a g eXML Generator Cell Ref XML Generator Cell Name FATCA XML Schema Element Name/Page # DITC Portal Specific Validations
FloorIdentifier
P4 Floor identifier
p.28
DistrictName
Q4 District name
p.28
POB
R4 Post office box
p.28
Post code
S4 Post code
p.28
City
T4 City*
p.28
Name
V4 Title Substantial owner (Controlling person) details
p.37
FirstName
W4 First name*
p.32
MiddleName
X4 Middle name
p.32
LastName
Y4 Last name
p.33
GenerationIdentifier
Z4 Generation identifier
p.32
Suffix
AA4 Suffix
p.32
GeneralSuffix
AB4 General suffix
p.32
TIN Valid TIN formats:
p.30 - 9 consecutive digits without hyphens or other separators (XXXXXXXXX)
AD4 Tax identification number
- 9 digits with two hyphens (XXX-XX-XXXX)
See IRS Reporting FAQ #6 re: TIN Codes - 9 digits with a hyphen entered after the second digit (XX-XXXXXXX)
AddressType
AF4 Type
p.28
CountryCode
AG4 Country*
p.28
CountrySubentity
AH4 Country Subentity
p.28
Street
AI4 Street
p.28
BuildingIdentifier
AJ4 Building identifier
p.28
SuiteIdentifier
AK4 Suite identifier
p.28
FloorIdentifier
AL4 Floor identifier
p.28
DistrictName
AM4 District name
p.28
POB
AN4 Post office box
p.28
Post code
AO4 Post code
p.28
City
AP4 City*
p.28
48 | P a g eXML Generator Cell Ref XML Generator Cell Name FATCA XML Schema Element Name/Page # DITC Portal Specific Validations
BirthDate
AQ4 Birth Date Substantial owner (Controlling person) details
p.34
City
AR4 City*
p.34
CountrySubentity
AS4 City Subentity
p.34
CountryCode
AT4 Country
p.34
FormerCountryName
AU4 Former country name
p.34
Account balance
AV4 Account balance*
p.53
AccountBalance/currCode
AW4 Currency*
p.53
PaymentAmt
AX4 Dividend
p.55
PaymentAmt/currCode
AY4 Currency
p.55
PaymentAmt
AZ4 Interest
p.55
PaymentAmt/currCode
BA4 Currency
p.55
PaymentAmt
BB4 Gross proceeds
p.55
PaymentAmt/currCode
BC4 Currency
p.55
PaymentAmt
BD4 Other payment
p.55
PaymentAmt/currCode
BE4 Currency
p.55
DocRefId
BF4 Document reference Recommended format = ReportingFIGIIN.UniqueNumbersLetters
p.25
CorrMessageRefId
BG4 Corrected message identifier Enter the value of the MessageRefId in the file that contained a record to be voided, amended or corrected.
p.25
CorrDocRefId
BH4 Corrected document reference identifier Enter the value of the MessageRefId in the file that contained a record to be voided, amended or corrected.
p.26
49 | P a g eYou can also read


