PAYSABER & IPHONE APPLICATION USER GUIDE
←
→
Page content transcription
If your browser does not render page correctly, please read the page content below
                     PaySaber
                         &
                 iPhone Application
                    User Guide
                                     v1.0.14

               USAePay                             For More Information:
       4929 Wilshire Blvd. Ste 800               Visit www.USAePay.com
        Los Angeles, CA 90010                      www.paysaber.com
       Phone: 1 (866) 872 - 3729               Email: support@USAePay.com
         Fax: 1 (323) 931 - 2231               Sales: sales@USAePay.com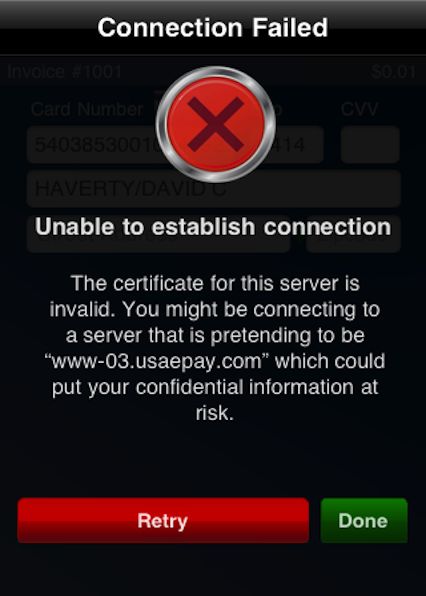
         Contents


Section 1: Getting to Know Your PaySaber………………………………………………….....                                                                        4
       Operating & Storage Precautions………………………………………………….........                                                                      4
       Installing & Replacing the Paper Roll……………………………………………………                                                                        4
       Installing the Battery…………………………………………………...............…….......                                                                4
       Charging the Battery…………………………………………………...............…….......                                                                  5
       Docking Your iPhone & iPod Touch………………………………………………….....                                                                         5
Section 2: PaySaber Functions………………………………………………….......................                                                                 6
       Using the Magnetic Card Reader…………………………………………....................                                                               6
       Self Test…………………………………………………................................................                                                     6
       Safety Information………………………………………………….................................                                                           7
Section 3: Getting Started …………………………………………………..............................                                                            7
       Signing In…………………………………………………............……………………….                                                                              7
       Familiarizing Yourself with the USAePay Application............………………………...                                                      8
       Main Terminal: Quick Payment (Manual Entry) ............………………………………                                                             9
       Amount………………………………………………….................................................                                                       9
       Description…………………………………………………............................................                                                       9
       Card Number…………………………………………………........................................                                                           10
                    Capture Signature…………………………………………………......................                                                          10
                    Add/Adjust Tip…………………………………………………............................                                                       10
                    Email Receipt………………………………………………….............................                                                       11
       New Order…………………………………………………............................................                                                         11
                    Select Customer…………………………………………………........................                                                          11
                    Order Details…………………………………………………..............................                                                      12
                    Add Item………………………………………………….....................................                                                    13
                    Take Payment – Manual Credit Card Entry…………………………………….                                                              13
                    Capture Signature ………………………………………………….....................                                                          13
                    Take Payment – Card Swipe………………………..………………..................                                                        13
                    Capture Signature…………………………………………………......................                                                          13
                    Add/Adjust Tip…………………………………………………............................                                                       14
                    Email Receipt………………………………………………….............................                                                       14
                    Take Payment – Cash…………………………………………………...............                                                               14
                    Email Receipt………………………………………………….............................                                                       15
                    Take Payment – Check…………………………………………………..............                                                               15
                    Customer Payment…………………………………………………....................                                                             15
                    Split Payment………………………………………………….............................                                                       15
       Issue Refund………………………………………………….........................................                                                         16
       Post Voice Authorization………………………………………………….......................                                                               17
Section 4: History…………………………………………………............................................                                                       17
       Batches………………………………………………….................................................                                                      17
                    Currently Open Batch…………………………………………………................                                                             17
                    Queued Transactions………………………………………………….................                                                             18
                    Batch History…………………………………………………..............................                                                      18
       All Transactions…………………………………………………....................................                                                          19
       Orders…………………………………………………...................................................                                                     19
                    Open Orders…………………………………………………..............................                                                        19
                    Partially Paid…………………………………………………..............................                                                     20
                    Paid Orders…………………………………………………................................                                                      20
                    Cancelled Orders………………………………………………….......................                                                          20
Wireless
  ePay
  for
  iPhone/iPod
  &
  PaySaber
  Installation
  &
  Configuration
  Guide


  v1.0.14
          2
Section 5: Products………………………………………………….........................................                                                         20
      Add New Category…………………………………………………................................                                                               21
      Add New Product…………………………………………………..................................                                                              21
Section 6: Customers…………………………………………………......................................                                                           21
      Add New Customer…………………………………………………...............................                                                                22
      Edit Existing Customer………………………………………………….........................                                                                22
      Delete Customer…………………………………………………...................................                                                             22
      Synchronize Customers…………………………………………………........................                                                                  23
Section 7: Settings …………………………………………………........................................                                                         23
      General………………………………………………….................................................                                                       23
             Auto-Lock…………………………………………………...................................                                                            24
             Change PIN…………………………………………………...............................                                                               24
             App Restrictions………………………………………………….........................                                                               24
      Quick Payment………………………………………………….....................................                                                             24
      Orders…………………………………………………...................................................                                                      24
      Receipts…………………………………………………................................................                                                       25
      About…………………………………………………....................................................                                                      25
Section 8: Setting Up Your Products Database (Online Merchant Console)……………….                                                           26
      Database Key………………………………………………….......................................                                                            27
      Customize Display…………...…………………………………….................................                                                           27
      Categories……………….……………………………...................................................                                                   27
             View Products by Category……………….……………………….....................                                                             28
             Add Category…………………………………………........................................                                                       28
             Edit Category………………………………………………….............................                                                              28
             Delete Category………………………………………………….........................                                                                28
      Warehouses…………………………………………………..........................................                                                           28
             View Products by Warehouse……………………………………………………                                                                             28
             Add Warehouse………………………………………………….........................                                                                  29
             Delete Warehouse………………………………………………….....................                                                                   29
      Locations…………………………………………………..............................................                                                        29
             Edit Product…………………………………………………...............................                                                             29
      Inventories…………………………………………………............................................                                                        30
             POS Locations…………………………………………………...........................                                                                30
      Description…………………………………………………............................................                                                        31
      Bulk Edit…………………………………………………................................................                                                      31
      Enable…………………………………………………...................................................                                                      31
      Add Products…………………………………………………........................................                                                           31
      Import Products……………………………………………............................................                                                      32
      Map Fields…………………………………………………............................................                                                         33
      Confirm Import………………………………………………..........................................                                                        33
             Import Completed/Import Saved……………………….……………….............                                                                 33
      Export…………………………………………………...................................................                                                      33
      Print…………………………………………………......................................................                                                    33
Section 9: Additional Information………………………………………………….....................                                                               34
      Voice Authentication………………………………………………….............................                                                              34
      USAePay Customer Support……………………………………..................................                                                          34
      Sample Declined Transactions….……………………………………………………….                                                                              35
      Sample Failed Transactions………….....……………………………………………….                                                                            36
      PA DSS Implementation Guide……………………………………..............................                                                           37
             Wireless…………………………………………................................................                                                   37
             Legal……………………………………............................................................                                            37

Wireless
  ePay
  for
  iPhone/iPod
  &
  PaySaber
  Installation
  &
  Configuration
  Guide


  v1.0.14
          3
Section 1
Getting to know your PaySaber
PaySaber Operating and Storage Precautions
Please follow the precautions below to enjoy and maintain the full performance of the
PaySaber.
1. Before using the PaySaber for the first time, fully charge the battery pack.
2. Be careful not to drop or bump the PaySaber on a hard surface.
3. Do no store the PaySaber in direct sunlight
4. Suitable environment for the PaySaber is as follows:
§ Operation temperature: 10-40° C (50-100° F)
§ Relative Humidity: 10-90%
5. Do not install the PaySaber near devices that generate strong electromagnetic fields
such as copy machines.
6. Do not touch the connectors of the communication cable or close up the infrared
Installing and Replacing Paper Roll
1. Before installing a new roll of paper, make sure
that the PaySaber is not processing a
transaction as changing the paper during a
transaction-in-progress may cause transaction
details to be lost.
2. Open the paper cover by placing your fingers
under the paper cover and pulling up the paper
cover lock.
3. Place the new paper roll inside with the end of
the roll feeding up towards you from the bottom
of the roll.
4. Close the paper cover and use the edge of the
door to tear off excess paper.
*Please note: Use only rolls of paper on which the paper is not glued to the core, as the
PaySaber is incompatible with glued paper rolls.
**Paper specifications: 25’ Length x 2.25” Width x 1.25” Diameter (with ½” core)**
Installing and Charging the Battery
To install the battery pack:
1. Secure the battery against the bottom of the PaySaber at the angle shown.
2. Press down to click battery securely into place.
Wireless
ePay
for
iPhone/iPod
&
PaySaber
Installation
&
Configuration
Guide
v1.0.14
4
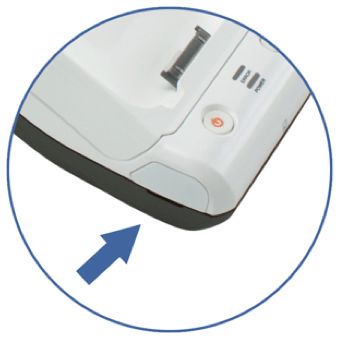
To charge the battery:
To charge the battery, install the battery in the PaySaber
and plug the charger into the port to the left of the power
button.
§ Use a DC 8.4V/0.8A Battery Charger.
§ Avoid using a power source with an extremely high
current.
§ Be sure to turn the PaySaber off before installing
or removing the battery pack.
§ Remove the battery pack if you plan to leave the
PaySaber unused for an extended period of time.
Please Note:
§ Turn the PaySaber off before and during charging.
§ Do not remove the battery during charging.
§ The duration of time that the battery’s charge lasts will diminish over time. (6 month
battery warranty)
§ Recharging time will vary based on voltage level and ambient temperature of the
battery.
§ Unplug the power cord from the PaySaber if you plan to leave it unused for an
extended period of time.
§ Red Light = Charging, Green Light = Battery is fully charged.
§ Blinking Yellow/Red = Processing/Working
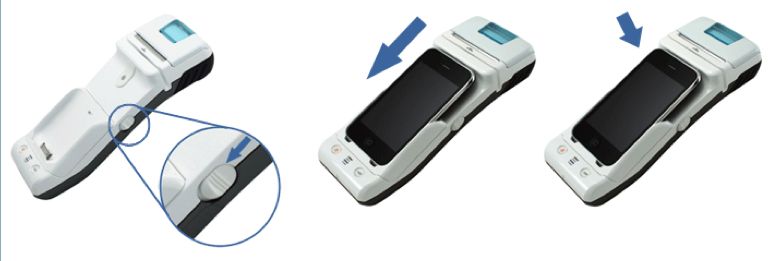
Docking your iPhone & iPod Touch
Docking the iPhone
1. Press down the cradle open switch to raise the cradle.
2. Put an iPhone is the cradle.
3. Press it down until it latches securely into position.
Docking the iPod Touch
Please note: To dock the iPod Touch, you will need to use additional equipment (the iPod
Guide and iPod cap), which came with your PaySaber.
Wireless
ePay
for
iPhone/iPod
&
PaySaber
Installation
&
Configuration
Guide
v1.0.14
5

1. Install the guide in the PaySaber cradle as shown.
2. Unscrew and remove the iPhone cap (located above the cradle, just below the credit
card swiper) and replace it with the iPod cap, screwing securely into place.
3. Once you have installed the additional equipment, dock your iPod according to the
iPhone docking instructions above.
Section 2
PaySaber Functions
§ To turn the PaySaber on or off,
press and hold the Power button
for three or more seconds.
§ When the PaySaber is on, you
can automatically feed paper
through the printer by pressing
and holding the Feed button for
more than one second.
§ The Power light indicates the
status of your PaySaber as follows:
o Green Light = PaySaber is on and fully charged
o Orange Light = the battery is partially charged
o Red Light = the battery is low
o Blinking Red Light = the battery needs to be charged.
§ The Error Light (red) will turn on to indicate when a problem is preventing the
PaySaber from functioning normally. (no paper, paper cover open, etc.)
§
Using the Magnetic Card Reader
§ The magnetic stripe should face you as shown.
§ The card can be swiped in either direction.
Self Test
The self-test procedure will test most of the PaySaber
functions. To conduct the self-test, turn on the power
while holding down the feed button.
The self-test:
§ Ensures that the paper roll has been installed correctly.
§ Prints current status.
§ Prints a test pattern using the built-in character set.
§ Ends automatically once it has completed the preceding test.
The PaySaber will be ready to receive data as soon as it has completed the self-test.
Wireless
ePay
for
iPhone/iPod
&
PaySaber
Installation
&
Configuration
Guide
v1.0.14
6
Safety Information
§ Do not disassemble the PaySaber; USAePay is not responsible to PaySaber damage
due to disassembly.
§ Use only the adapter that came with your PaySaber; using other adapters may cause
damage.
§ Turn the PaySaber off before connecting or removing the cord in order to guard
against damage due to static electricity.
§ Store the PaySaber in a dry, temperate place; do not leave the PaySaber in direct
sunlight; paper may begin to change color at temperatures over 70º. (158º F)
§ Always use caution when tearing paper along the sharp edge of the printer cover.
Section 3
Getting Started
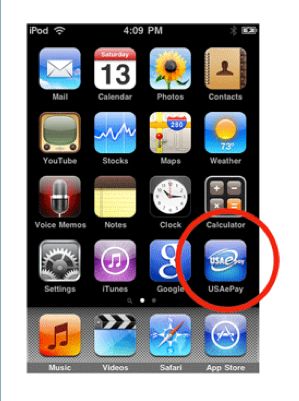
Download the USAePay app from the iTunes store and install it on your iPhone or iPod
Touch. Once you have installed the USAePay app on your device, touch the icon to get
started.
The USAePay app will launch with a splash page, you will be
taken automatically to the main Terminal from where you can
accept a quick payment, make a new order, issue a refund or
post a voice authorization. To add products or customers, view
your transaction history or personalize your settings, use the
touch icons at the bottom of your screen.
Signing In
The first time you access the
application (or anytime you start
the application after signing out),
you will be prompted to enter your
USAePay username and
password on this screen:
*When changing your password, you must do so through
your online merchant console. You cannot reset a
password through the USAePay App.
*New Merchants must log into Online Merchant Console
and change temporary password before proceeding to use
the USAePay iPhone App.
Wireless
ePay
for
iPhone/iPod
&
PaySaber
Installation
&
Configuration
Guide
v1.0.14
7
Familiarizing yourself with the USAePay App
  The USAePay App will launch with a splash page. You will be taken automatically to the
  main Terminal from which you can accept a quick payment, make a new order, issue a
  refund or post a voice authentication. To add products or customers, view your transaction
  history or personalize your settings, you the touch icons at the bottom of your screen.

      *****


  *****See pg. 34 (Additional Information) for Voice Authentication phone numbers

  From the main Terminal of the USAePay App, you can access the quick payment function,
  process new orders, issue refunds to a customer and post a voice authentication for offline
  transactions.

  Along the bottom of the screen you will also find icons to access your transaction history,
  product list and application settings.

Wireless
  ePay
  for
  iPhone/iPod
  &
  PaySaber
  Installation
  &
  Configuration
  Guide


  v1.0.14
     8
Main Terminal:


  Quick Payment (Manual Entry)
  The quick payment screen is the perfect place to start if you
  need to accept payment from a customer without listing
  individual items or additional information.

  Amount
  Begin by entering the amount you would like to charge along
  with any necessary tax:

  Use the NEXT arrow on the right hand side of the screen to
  move to the next field and the PREVIOUS arrow on the left
  hand side of the screen to go back and make any necessary
  changes. When you have entered the amount and the tax,
  simply touch the NEXT arrow to proceed to the description screen.

                                                  TIP: You can set a default tax percentage on the Quick
                                                  Payment screen in the Settings section of the application.

                                                  Description
                                                  Enter as detailed a description as you like along with the
                                                  invoice number and purchase order if applicable.

                                                  TIP: Enter a description that will
                                                  help you remember the details of
                                                  the transaction later, such as
                                                  “Monthly Hosting Fee” or “8-
                                                  Piece Glassware Set” rather than
                                                  generic descriptions such as
                                                  “Sale” or “Fee.”

                               Note that the amount of the
  transaction appears at the top right of your screen, so thee is
  no need to go back to double check.

  When you have entered the description, invoice number and
  purchase order number, touch the NEXT arrow to proceed to
  the payment screen.

  TIP: To automatically record incremental invoice numbers, turn the Increment Invoice on the
  Quick Payment screen of the Settings section of the App to ON.

Wireless
  ePay
  for
  iPhone/iPod
  &
  PaySaber
  Installation
  &
  Configuration
  Guide


  v1.0.14
     9
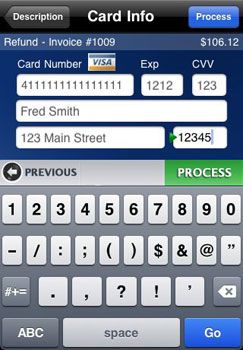
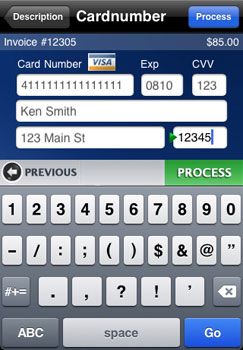
Card Number
  Enter the credit card details necessary to process the transaction. On the screen you will
  enter the 13-16 digit credit card numbers, expiration date and CVV/CVV2, the cardholder’s
  name as it appears on the card, as well as the cardholder’s billing address and zip code.

  Once al the credit card information has been entered, the NEXT arrow will automatically
  transform into a PROCESS key. When you are ready to process the transaction, touch the
  PROCESS key and the transaction will be processed immediately.

                                                  If the transaction was successful, you will receive instant
                                                  confirmation of the transaction via this screen:

                                                  Or if the transaction has been declined, the screen will have a
                                                  red “X” on it displaying a “Transaction Declined” message.

                                                  You may retry the transaction or touch DONE to return to the
                                                  main terminal.

                                                  Capture Signature
                                  To capture and record the
                                  customer’s signature digitally,
                                  touch the CAPTURE
                                  SIGNATURE bar and ask the
                                  customer to use the touch screen
  to enter their signature for the sale on this screen.

  The customer will sign their name on the line and touch the
  ACCEPT bar when they are finished. Once the customer’s
  signature has been captured and recorded, you will be
  returned to the Transaction Approved screen, from which you
                                can choose to email a receipt to
                                the customer or touch the DONE
                                button to close the Transaction
                                Approved screen and return to the Terminal.

                                                  *To clear the signature, shake the iPhone, iPod or iPad.

                                                  Add/Adjust Tip
                                                  If you have set your Quick Payment terminal settings to
                                                  “Prompt for Tip”, the customer will have the opportunity to
                                                  adjust the tip percentage before signing.

Wireless
  ePay
  for
  iPhone/iPod
  &
  PaySaber
  Installation
  &
  Configuration
  Guide


  v1.0.14
     10
Email Receipt
If the customer would like a receipt via email (or if you would like to send a copy of the
transaction to your own email) simply touch EMAIL RECEIPT and enter the email address
you would like to send the receipt to in the field provided on the next screen.
Enter the email to which a receipt should be sent and touch “Send.” The emailed receipt will
be sent and you will be returned to the Transaction Approved screen from which you may
touch DONE to return to the Terminal or EMAIL RECEIPT to send another copy of the
receipt to an additional email address.
You can customize your customer receipt template and
information on the Receipts screen in the Settings section of
the App as well as set your PaySaber to automatically print
paper receipts.
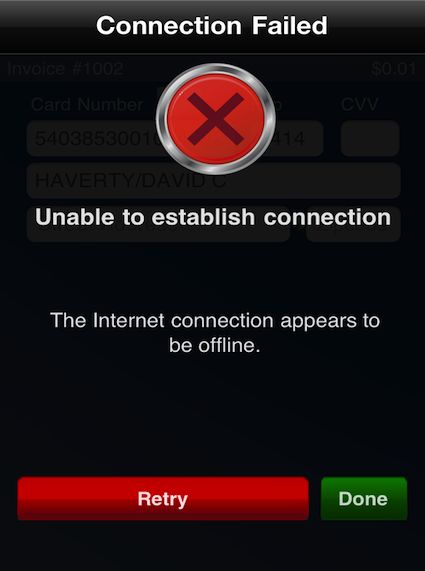
TIP: Transactions may be denied for a number of reasons,
including mismatched customer name, address or zip code.
Recheck your information and try the transaction again
before taking further action.
New Order
To process a new order with more detailed information, or
accept payment via credit card, check or cash, you can use
the NEW ORDER option, which allows you to ender
individual items and accept and track payments in a variety
of forms (credit card, check and cash). Your customer can pay for their purchase with any of
these methods or may use a combination of methods. This function allows you to accept
partial payment for an item and save the transaction to complete it later.
Using the three icons at the bottom of the screen, you can
select a customer from your customer database, add details
such as billing and shipping information, PO number, email
address and additional notes, and add items to the order from
your products database.
Select Customer
To select a customer from your database, touch the
CUSTOMER button at the bottom of the screen. You can
touch the name of the customer for whom the order is to be
placed, using the search field at the top of the Select Customer
screen to find a specific customer. You can search by Name,
Phone Number or Customer ID.
*You may only select one customer per order.
Wireless
ePay
for
iPhone/iPod
&
PaySaber
Installation
&
Configuration
Guide
v1.0.14
11
Order Details
  From the Order Details screen you are able to view and edit and additional details that
  should be recorded with the transaction such as the customer’s billing and shipping
  addresses, email and telephone number, as well as order specific details such as Purchase
  Order (PO) Number and any notes that may be relevant.

  If you have added the customer from your database to the order, the details screen will
  appear pre-filled with the customer’s stored information. You can add additional details
  desired by touching the space provided and adding or editing the information as needed.

  Entering a Billing and/or Shipping
  Addresses
  Touch the empty space beneath the Billing Address heading
  to add or edit the billing address and the space beneath the
  Shipping Address to add or edit shipping information.

  When you have entered the information, touch the blue
  SAVE button at the top right of the screen to save the
  information and return to the order.

  Entering a PO Number, Phone Number
  and/or Email Address
  Touch the line that you would like to edit and enter the required information in the space
  provided.

  NOTE: Be sure to enter the email address in the correct format of name@emailprovider.com to
  ensure that your emails will be deliverable.

  Entering Notes on an Order
  You may include a note to yourself or to your colleagues on any order by touching the Notes
  field at the bottom of the order details screen.

  Add Item to Order - Manually
  To add an item manually, touch the red ADD ITEM icon at the bottom right of the order
  screen. You will be taken directly to your Product Database from which you can select an
  item from the list, or use the search box at the top of the screen to find an item via any
  keyword, the item’s SKU or vendor.

  Touch the item you would like to add and you will go to the it’s full information screen on
  which you can ensure that all details are accurate as well as adjust the price and quantity of
  item for your order.

  When you are ready, touch the green NEXT arrow or the blue ADD button at the top of the
  screen to confirm the item’s details and add the item to the order.
Wireless
  ePay
  for
  iPhone/iPod
  &
  PaySaber
  Installation
  &
  Configuration
  Guide


  v1.0.14
     12
When you have added all of the desired items, simply touch
  the green TAKE PAYMENT bar on the Order Summary
  screen to complete the order and process payment.

  Take Payment
  Your customer can pay for their order in several different
  ways. Choose the desired payment method from the Take
  Payment screen to proceed with the transaction.

  Credit Card
  Swipe the customer’s card or enter the payment information
  manually. The default payment screen will include fields for the
  credit card information, including card number, expiration date,
  CVV/CVV2, cardholder’s name, billing street address and zip code.

  Enter the required information and touch the PROCESS button at the top right of the screen
  (which will appear as soon as the card number an expiration date have been entered) to
  process the transaction and complete the sale.

  PaySaber Payment
  To swipe a credit card, hold the
  card with the magnetic strip
  facing toward you or facing
  toward your mobile device

  Capture Signature
  To capture and record the
  customer’s signature digitally,
  touch the CAPTURE
  SIGNATURE bar and ask the
  customer to use the touch
  screen to enter their signature
  for the sale on this screen.

  The customer may sign their name on the line, and touch the ACCEPT bar when they are
  finished. Once the customer’s signature has been captured and recorded, you will be
  returned to the Transaction Approved screen, from which you can choose to email a receipt
  to the customer, or touch the DONE button to close the Transaction Approved screen and
  return to the Terminal.

Wireless
  ePay
  for
  iPhone/iPod
  &
  PaySaber
  Installation
  &
  Configuration
  Guide


  v1.0.14
     13
Add/Adjust Tip
  If you have set your Order terminal settings to “Prompt for Tip,” the customer will have the
  opportunity to adjust the tip percentage on the capture signature screen before signing.

  Email Receipt
  If the customer would like a
  receipt via email (or if you would
  like to send a copy of the
  transaction to your own email)
  simply touch EMAIL RECEIPT
  and enter the email address you
  would like to send the receipt to
  in the field provided on the next
  screen.

  Enter the email to which a receipt
  should be sent and touch “Send.”
  The emailed receipt will be sent
  and you will be returned to the
  Transaction Approved screen
  from which you may touch DONE to return to the Terminal or EMAIL RECEIPT to send
  another copy of the receipt to an additional email address.

  You can customize your customer receipt template and information on the Receipts screen
  in the Settings section of the App as well as set your PaySaber to automatically print paper
  receipts.

  TIP: Transactions may be denied for a number of reasons, including mismatched customer
  name, address or zip code. Recheck your information and try the transaction again before
  taking further action.

  Cash
   The easy-to-use cash payment screen allows you to use
  visual dollar bill touch icons to enter the exact amount of cash
  handed to you by the customer and calculate how much
  change to give them instantly. If they pay with exact change,
  simply touch the red EXACT button in the cash tendered line.

  Once you have entered the correct amount of cash, touch the
  blue PROCESS button on the top right of your screen, or the
  green PROCESS button above the keypad that will appear as
  soon as the cash tendered field has been filled; the sale will be
  recorded and a summary of the order will be displayed on the
  screen including the amount of change due if applicable.

  ***Cash transactions can be found on the Online Merchant
  Console in your reports.
Wireless
  ePay
  for
  iPhone/iPod
  &
  PaySaber
  Installation
  &
  Configuration
  Guide


  v1.0.14
     14
Email Receipt
  If the customer would like a receipt via email (or if you would like to send a copy of the
  transaction to your own email) simply touch EMAIL RECEIPT and enter the email address
  you would like to send the receipt to in the field provided on the next screen.

  Enter the email to which the receipt should be sent and touch “Send.” The emailed receipt
  will be sent and you will be returned to the Transaction Approved Screen from which you
  may touch DONE to return to the Terminal or EMAIL RECEIPT to send another copy of the
  receipt to an additional email address.

  Check

  You can now accept Check payments from your customers by
  selecting the Check option from the Take Payment screen. On
  the Check page you should enter the Check number as well as
  any additional information such as the customer’s driver’s
  license number and/or telephone number.

  Once you have entered the information, touch the green NEXT
  arrow at the top of the keypad and a confirmation screen with
  the Check number, amount paid and a reference number will
  be displayed.

  ***Entering a check payment through the App will only
  document the transaction. This will not process the
  check. You will need to go to your Online Merchant
  Console and enter the check to process the transaction.

  Customer Payment
  The Customer Payment function may be used if you have saved payment methods unique
  to individual customers in your customer database.

  Split Payment
  To submit multiple payment methods for a single order, use the split payment function. You
  can accept multiple credit cards, cash or checks in any combination.

  Type in the amount of the initial payment using the touch screen keypad. The adjusted
  balance due will be displayed directly to the right of the payment amount. The amount that
  has been paid will be displayed directly to the left of the payment amount.

  When you have entered the amount to be paid, select the method of payment (credit card,
  check or cash) and you will proceed to the payment information screen. Swipe the
  customer’s credit card or enter the card, cash or check information manually.

Wireless
  ePay
  for
  iPhone/iPod
  &
  PaySaber
  Installation
  &
  Configuration
  Guide


  v1.0.14
     15
Following submission of payment, you will then proceed to the confirmation screen as usual
  but when you touch the DONE button, instead of being returned to the main terminal, you
  will return to the ORDER screen which will display the new balance, as well as the total
  amount of the order and any payment information that has already been entered.

  From this screen you can take additional payment or return to the main TERMINAL. If you
  choose to return to the main terminal without completing the order, the order will be saved in
  the HISTORY section under PARTIALLY PAID ORDERS.

  Issue Refund
  To issue a credit card refund to a customer for any reason, touch the ISSUE REFUND bar
  on the main TERMINAL screen and use the NEXT arrow to proceed through a quick series
  of steps and enter the necessary information. The process is similar to that of accepting a
  quick payment but the word REFUND will appear at the top left of the screen.

  Enter the subtotal and tax in the fields provided, then touch
  NEXT to proceed to the following screen and enter a brief
  description of the reason for the refund, or the product(s) being
  returned as well as the invoice and purchase order (if desired).

  On the next screen you can manually enter (or swipe to enter)
  the customer’s credit card number, expiration date and
  CVC/CVV2 as well as the cardholder’s name billing street and
  zip code.

  NOTE: only the card number and expiration date are required
  to process the refund. Once these pieces of information have
  been entered, a blue PROCESS button will appear near the
  top right of the screen. You may touch it at any time to process
  the refund.

Wireless
  ePay
  for
  iPhone/iPod
  &
  PaySaber
  Installation
  &
  Configuration
  Guide


  v1.0.14
     16
When you have entered the required information, touch PROCESS to proceed and issue
the refund to the customer’s credit card. You will receive notification when the refund was
accepted, including a reference number and authorization code.
You ay send an email receipt for the transaction to the customer, or to any other email
address by touching the EMAIL RECEIPT bar and following the instructions on the screen
to enter the desired recipient’s email address and send a receipt.
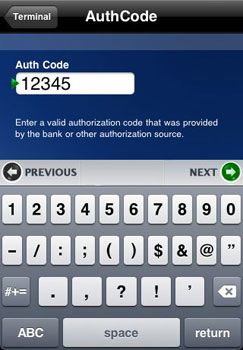
Post Voice Authorization
To post authorization for an offline transaction, touch the POST VOICE AUTHORIZATION
bar on the main TERMINAL screen. In the space provided, enter a valid authorization code
that was provided by a bank or other institution and then touch the NEXT arrow above the
keypad.
On the next screen, type in the amount that has been
authorized; including subtotal and any applicable tax.
Touch the NEXT arrow to proceed to the next screen where
you can enter a description of the transaction as well as
invoice and purchase order numbers. Touch the NEXT arrow
when you’re done and enter the credit card information on the
next screen.
To view your recent transaction history, touch the HISTORY
icon at the bottom of any main screen. From this screen you
will be able to review all of your current and recent batches; a
full list of all transactions; as well as orders that are pending,
paid or cancelled.
Section 4
History
Batches
From the batches screen of the history section you can view your open, queued and closed
batches.
Once you have closed the batch you will be able to view the batch details as necessary.
Currently Open Batch
Allow you to see all transactions in your currently open batch. You can also see individual
transactions and transaction details. You also have the option to close your batch.
Wireless
ePay
for
iPhone/iPod
&
PaySaber
Installation
&
Configuration
Guide
v1.0.14
17
Queued Transactions
  All queued transactions will be displayed on the QUEUED TRANSACTIONS screen. To
  synchronize your queued transactions, touch the arrow at the top right of your screen.

  Batch History

  From the batch screen you can view all settled batches. To synchronize your closed
  batches and download your complete batch history, touch the arrow at the top right of the
  screen.

Wireless
  ePay
  for
  iPhone/iPod
  &
  PaySaber
  Installation
  &
  Configuration
  Guide


  v1.0.14
     18
All Transactions
  To view all past transactions, touch the ALL TRANSACTIONS bar on the HISTORY screen.
  A full list of transactions will be pulled up and can be synchronized by touching the circular
  arrow at the top right of your screen.

  Touch any line to view the details for that individual transaction. The transaction will be
  displayed like the examples below:

  From this screen you have a number of options for further action including voiding the
  transaction, issuing a quick credit or a quick credit of a quick additional sale for the same
  customer using the same payment information.

  Touch the arrow in the top right hand corner:

                                                                                                  Orders
                                                                                                  To view your order history, touch
                                                                                                  the ORDERS bar on the
                                                                                                  HISTORY screen. From the
                                                                                                  ORDERS HISTORY screen you
                                                                                                  can view all of your open,
                                                                                                  partially paid, paid and cancelled
                                                                                                  orders.

Wireless
  ePay
  for
  iPhone/iPod
  &
  PaySaber
  Installation
  &
  Configuration
  Guide


  v1.0.14
     19
Open Orders
  The open orders screen will include a list of all currently open
  orders.

  To view the details for a particular order, simply touch the line
  on which it appears and you will be able to see all of the order
  details including customer information, items purchased and
  more, as well as take the payment for the order or place the
  order on hold.

                                                   Partially Paid
                                                   From this screen you are able to
                                                   view all orders for which
                                                   payment method has been
                                                   made in part. To view and/or complete a particular order,
                                                   touch the line on which the order appears and you will be
                                                   taken to the order screen from which you can view the details
                                                   of the order, including the amount paid and amount due. The
                                                   amount of the payment made will be clearly marked and the
                                                   total still due will appear in red.

                                                   Paid
                                On the PAID screen you can view a list of all orders for which
                                payment has been received in full. To view the details for an
  order, including customer details and item information, touch the line on which the order
  appears.

  Cancelled Orders
  From this screen you can view all cancelled orders will be listed chronologically by date.

             Section 5

             Products

  Products
  The product inventory screen allows you to view and synchronize your complete product list
  as well as adds, edit and delete individual products.

  To synchronize your product list, touch the REFRESH button at the top right of the screen.

Wireless
  ePay
  for
  iPhone/iPod
  &
  PaySaber
  Installation
  &
  Configuration
  Guide


  v1.0.14
     20
Add New Category
To add a category touch the
+ (plus) button at the top right of
the main PRODUCTS screen, then
enter the same of the new
category and touch the blue SAVE
button at the top of the screen, or
the blue DONE button at the
bottom right of the screen.
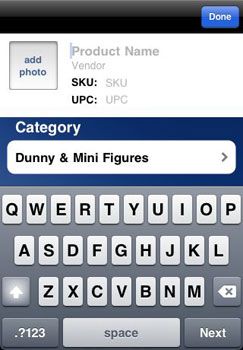
Add New Product
Enter the items details such as
Product Name, Vendor, SKU, UPC
and a product image. (iPod Touch
users must transfer the photos from a computer or other device and save them in the iPod’s
Photo Album.)
You can touch the CATEGORY
line to change the items’
category. Scroll down to enter
additional details such as price,
list price, wholesale price, the
items’ taxable status, quantity,
shipping information and
description as well as delete the
product from your list.
Section 6
Customers
Customers
The customer database allows you to store and edit customer information easily and
securely. By saving your customer’s details you will be able to quickly find names,
companies, email addresses, billing and shipping addresses and other essential
information.
Wireless
ePay
for
iPhone/iPod
&
PaySaber
Installation
&
Configuration
Guide
v1.0.14
21
Add New Customer

  To add a new customer to your
  database, first touch the EDIT
  button at the top left of your
  screen.

  The list will unlock and you can
  then add a new customer by
  touching the + (plus) button at the
  top right hand corner of the
  screen.

  You will then have access to a
  new customer information screen
  from which you can add the customer’s name company, email, phone number, billing and
  shipping addresses as well as customer identification number, notes and other pertinent
  information.

  When you have finished entering the new information, touch the blue EDIT button at the top
  left of your screen.

  Edit Existing Customer
  To edit existing customer information in your database, first touch the EDIT button at the top
  left of your screen.

  The list will unlock and you can then edit any customer by touching the name of the
  customer whose information you would like to edit. You can then touch any item on the
  customer’s information screen to change the customer’s name, company, email, phone
  number, billing and shipping address as well as customer identification number, notes and
  any other pertinent information.

  Delete Customer
  To delete an existing customer’s
  information from the database,
  first touch the EDIT button at the
  top left of your screen. The list will
  unlock and then you can delete
  any customer record by touching
  the red minus (-) icon directly to
  the left of the customer record
  that you would like to delete.
  Then touch the red DELETE
  button to the right of the
  customer’s name.

Wireless
  ePay
  for
  iPhone/iPod
  &
  PaySaber
  Installation
  &
  Configuration
  Guide


  v1.0.14
     22
NOTE: You will not be asked to
  confirm the customer deletion.
  Once you touch the delete
  button, all information will be
  permanently deleted. You cannot
  undo this action.

  Synchronize
  Customers
  To synchronize the customer
  information on your app with the
  main customer database, simply
  touch the CIRCULAR ARROW
  button at the top right of the main
  customer database screen.

             Section 7

             Settings
  Personalize Your Settings
  To personalize your USAePay app settings, touch the
  SETTINGS icon at the bottom of your screen.

  From the settings screen you can adjust your General, Orders,
  Quick Payment and Receipt settings as well as view additional
  information about your version of the software and copyright
  and library acknowledgement details.

  General
  The general settings screen allows you to change the auto-
  lock function and to change your PIN.

  You can also set restrictions to determine who uses your app
  and how they are able to use it. By setting the Manager PIN, you can restrict all or some of
  the following actions.

  To require a manager PIN code to be entered for any of the above functions, first set your
  manager on the Manager PIN screen. You will be asked to enter the number a second time
  to confirm. Then go to the Restrictions screen to turn the PIN requirements on or off for
  specific functions.

Wireless
  ePay
  for
  iPhone/iPod
  &
  PaySaber
  Installation
  &
  Configuration
  Guide


  v1.0.14
     23
You can also read