Forcepoint Security Manager Help - Forcepoint Security Solutions v8.6.x
←
→
Page content transcription
If your browser does not render page correctly, please read the page content below
Forcepoint Security Manager Help
                 Forcepoint Security Solutions

                                       v8.6.x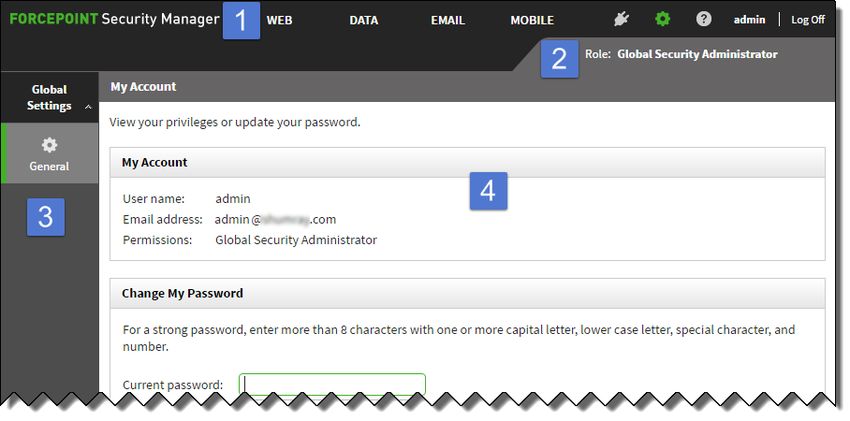
©2021 Forcepoint

Forcepoint and the FORCEPOINT logo are trademarks of Forcepoint. All other trademarks used in this document are the property of
their respective owners.

Published 2021

Every effort has been made to ensure the accuracy of this document. However, Forcepoint makes no warranties with respect to this
documentation and disclaims any implied warranties of merchantability and fitness for a particular purpose. Forcepoint shall not be liable
for any error or for incidental or consequential damages in connection with the furnishing, performance, or use of this manual or the
examples herein. The information in this documentation is subject to change without notice.

Last modified 18-Jun-2021
Contents
Topic 1 Getting Started . . . . . . . . . . . . . . . . . . . . . . . . . . . . . . . . . . . . . . . . . . . . . . . . . . . 1
Logging on to the Security Manager . . . . . . . . . . . . . . . . . . . . . . . . . . . . . . . . . . . 2
Logging on with RSA SecurID authentication . . . . . . . . . . . . . . . . . . . . . . . . . 4
Logging on with certificate authentication . . . . . . . . . . . . . . . . . . . . . . . . . . . . 4
Security certificate alerts. . . . . . . . . . . . . . . . . . . . . . . . . . . . . . . . . . . . . . . . . . 5
Security Manager session timeouts . . . . . . . . . . . . . . . . . . . . . . . . . . . . . . . . . . 5
Navigating the Security Manager. . . . . . . . . . . . . . . . . . . . . . . . . . . . . . . . . . . . . . 6
Using the Forcepoint Support Portal . . . . . . . . . . . . . . . . . . . . . . . . . . . . . . . . . . . 8
Topic 2 Configuring Global Settings . . . . . . . . . . . . . . . . . . . . . . . . . . . . . . . . . . . . . . . 11
Viewing your account information. . . . . . . . . . . . . . . . . . . . . . . . . . . . . . . . . . . . 12
Setting user directory information . . . . . . . . . . . . . . . . . . . . . . . . . . . . . . . . . . . . 13
Introducing administrators . . . . . . . . . . . . . . . . . . . . . . . . . . . . . . . . . . . . . . . . . . 15
Global Security Administrator . . . . . . . . . . . . . . . . . . . . . . . . . . . . . . . . . . . . 15
Security Manager administrators . . . . . . . . . . . . . . . . . . . . . . . . . . . . . . . . . . 16
Enabling access to the Security Manager. . . . . . . . . . . . . . . . . . . . . . . . . . . . . . . 17
Adding a local account . . . . . . . . . . . . . . . . . . . . . . . . . . . . . . . . . . . . . . . . . . 18
Adding a network account. . . . . . . . . . . . . . . . . . . . . . . . . . . . . . . . . . . . . . . . 20
Editing a local account . . . . . . . . . . . . . . . . . . . . . . . . . . . . . . . . . . . . . . . . . . 22
Editing a network account. . . . . . . . . . . . . . . . . . . . . . . . . . . . . . . . . . . . . . . . 23
Setting email notifications . . . . . . . . . . . . . . . . . . . . . . . . . . . . . . . . . . . . . . . . . . 25
Configuring two-factor authentication . . . . . . . . . . . . . . . . . . . . . . . . . . . . . . . . . 26
How RSA SecurID authentication works . . . . . . . . . . . . . . . . . . . . . . . . . . . . 29
Creating a custom agent for RSA SecurID authentication . . . . . . . . . . . . . . . 29
Test connection to RSA Manager results . . . . . . . . . . . . . . . . . . . . . . . . . . . . 30
How certificate authentication works . . . . . . . . . . . . . . . . . . . . . . . . . . . . . . . 31
Deploying the master certificate file . . . . . . . . . . . . . . . . . . . . . . . . . . . . . . . . 32
Setting up attribute matching . . . . . . . . . . . . . . . . . . . . . . . . . . . . . . . . . . . . . 32
Global Settings audit log . . . . . . . . . . . . . . . . . . . . . . . . . . . . . . . . . . . . . . . . . . . 33
Topic 3 Accessing Appliances . . . . . . . . . . . . . . . . . . . . . . . . . . . . . . . . . . . . . . . . . . . . . 35
Managing appliances . . . . . . . . . . . . . . . . . . . . . . . . . . . . . . . . . . . . . . . . . . . . . . 35
Registering an appliance . . . . . . . . . . . . . . . . . . . . . . . . . . . . . . . . . . . . . . . . . 36
Editing appliance details . . . . . . . . . . . . . . . . . . . . . . . . . . . . . . . . . . . . . . . . . 38
Configuring an existing appliance for single sign-on . . . . . . . . . . . . . . . . . . . 39
Forcepoint Security Manager Help iContents
Topic 4 Backup and Restore of Global Settings Data. . . . . . . . . . . . . . . . . . . . . . . . . . 41
Scheduling management infrastructure backups . . . . . . . . . . . . . . . . . . . . . . . . . 42
Running immediate backups . . . . . . . . . . . . . . . . . . . . . . . . . . . . . . . . . . . . . . . . 43
Restoring management infrastructure backup data . . . . . . . . . . . . . . . . . . . . . . . 43
Changing backup settings. . . . . . . . . . . . . . . . . . . . . . . . . . . . . . . . . . . . . . . . . . . 44
ii Forcepoint Security Manager1 Getting Started
Security Manager Help | Web, Data, and Email Protection Solutions | June 18, 2021
Applies to:
● Forcepoint Web Security and Forcepoint URL Filtering, v8.5.x
● Forcepoint DLP, v8.5.x, v8.6.x, v8.7.x, v8.8.x
● Forcepoint Email Security, v8.5.x
● Forcepoint appliances, v8.5.x
The Forcepoint Security Manager is a browser-based management console that
provides a central, graphical interface to the general configuration, policy
management, and reporting functions of your security software.
The Security Manager includes one or more of the following modules, depending on
your subscription:
● The Web Security module allows Forcepoint Web Security and Forcepoint URL
Filtering administrators to develop, monitor, and enforce Internet access policies.
● The Data Security module allows Forcepoint DLP administrators to create
policies that protect organizations from information leaks and data loss at the
perimeter and inside the organization.
● The Email Security module allows Forcepoint Email Security administrators to
protect their organization against the threats of malware, spam, and other
unwanted content in email traffic.
If your subscription includes Forcepoint Mobile Security, the Security Manager also
provides a link to a cloud-based console used to manage threat protection and data
loss prevention for mobile devices.
Forcepoint Security Manager Help 1Getting Started
To learn to use Security Manager, browse this guide or select one of the following
topics as a launch point.
First steps Manage administrators
● Logging on to the Security Manager ● Introducing administrators
● Navigating the Security Manager ● Setting user directory information
● Using the Forcepoint Support Portal ● Enabling access to the Security
● Viewing your account information Manager
● Setting email notifications
Other administrator tasks Backup and restore
● Configuring two-factor authentication ● Scheduling management infrastructure
● Global Settings audit log backups
● Managing appliances ● Restoring management infrastructure
backup data
Logging on to the Security Manager
Security Manager Help | Web, Data, and Email Protection Solutions | June 18, 2021
Related topics:
● Logging on with RSA SecurID authentication, page 4
● Logging on with certificate authentication, page 4
● Security certificate alerts, page 5
● Security Manager session timeouts, page 5
The Forcepoint Security Manager is the central configuration interface used to
manage software configuration and settings for Forcepoint software modules. This
web-based tool runs on a variety of popular browsers (see the Certified Product
Matrix for details).
Although it is possible to launch the Security Manager using non-supported browsers,
the application may not display properly and some features may not appear.
Security Manager requirements
● Certain animations in the Security Manager depend on the browser settings. In
Internet Explorer, to ensure animations display properly, select the option Tools >
Internet Options > Advanced > Multimedia > Play animations in webpages.
● The Security Manager frequently uses pop-up dialog boxes for user interaction.
Be sure to disable pop-up blockers before accessing the Security Manager.
2 Forcepoint Security ManagerGetting Started
● Adobe Flash Player v8 or higher is required for the Web Security module, Data
Security module, and Email Security module dashboards. All the other functions
of the Security Manager can operate without Flash.
If Flash Player is not installed, administrators are prompted to install it at logon.
Click the provided link to download Flash Player from the Adobe download
center.
In Google Chrome, Flash blocking may need to be disabled to allow
administrators to view dashboards.
● On the Windows 7 operating system, the browser may need to be run as
administrator to allow ActiveX controls. Right-click the browser application and
select Run as administrator.
Launching the Security Manager
To open the Security Manager, do one of the following:
● On Windows machines, launch Forcepoint Security Manager from the Start
screen or Start > All Programs > Forcepoint.
● Double-click the Forcepoint Security Manager shortcut placed on the desktop
during installation.
● Open a supported browser on any machine in your network and enter the
following:
https://:9443/
Substitute the IP address or hostname of the management server machine. It is
recommended that you use the IP address, particularly when launching Security
Manager from a remote machine.
After installation, the default user, admin, has full administrative access to all
Security Manager modules. The account cannot be deleted and the user name cannot
be changed. The admin password is configured during installation.
At the logon page, enter an administrator User name and Password, then click Log
On. If your organization is using two-factor authentication, see Logging on with
certificate authentication, page 4.
Note
When a local administrator account created in the Security
Manager has the same credentials as a network account
(same user name and password), the local account takes
precedence.
If you are unable to connect to the Security Manager from a remote machine, make
sure that your firewall allows communication on that port.
Forcepoint Security Manager Help 3Getting Started
Logging on with RSA SecurID authentication
Security Manager Help | Web, Data, and Email Protection Solutions | June 18, 2021
The process of logging in with RSA® SecurID is described in How RSA SecurID
authentication works, page 29.
If RSA SecurID authentication is enabled, and administrators encounter an issue in
which authentication is failing, it is still possible to log on to the Security Manager as
follows:
1. Open a browser on the Forcepoint management server machine (for example, via
a Remote Desktop Connection).
2. Go to the URL https://127.0.0.1:9443/ (or https://localhost:9443/).
3. Log on using the admin user name and password.
Next, configure the RSA SecurID authentication options to provide a fallback for
other administrators (see Configuring two-factor authentication, page 26).
Logging on with certificate authentication
Security Manager Help | Web, Data, and Email Protection Solutions | June 18, 2021
When certificate authentication is enabled, the process works as described in How
certificate authentication works, page 31.
If no certificate match is found, the logon process depends on the fallback options that
have been set up:
● Attribute matching checks if the client certificate contains a property matching a
specific LDAP attribute in the configured user directory.
● Password authentication can be enabled in case certificate matching and attribute
matching fails.
If neither of these options is available, administrators cannot log on without a
matching certificate.
If all administrator accounts are configured to use certificate authentication, and an
issue arises in which administrators do not have client certificates or certificate
matching is failing, it is possible to log on to the Security Manager as follows:
1. Open a browser on the Forcepoint management server machine (for example, via
a Remote Desktop Connection).
2. Go to the URL https://127.0.0.1:9443/ (or https://localhost:9443/).
3. Log on using the admin user name and password.
Next, configure certificate authentication options to provide a fallback for other
administrators (see Configuring two-factor authentication, page 26).
4 Forcepoint Security ManagerGetting Started
Security certificate alerts
Security Manager Help | Web, Data, and Email Protection Solutions | June 18, 2021
An SSL connection is used for secure, browser-based communication with Security
Manager. This connection uses a security certificate issued by Forcepoint LLC.
Because the supported browsers do not recognize Forcepoint LLC as a known
Certificate Authority, a certificate error displays when the Security Manager is
launched from a new browser. To avoid seeing this error, install or permanently accept
the certificate within the browser.
Once the security certificate has been accepted, the Security Manager logon page is
displayed in the browser window.
Note
If you are using Internet Explorer, the certificate error
remains present after you accept the certificate. Close and
reopen your browser to remove the error message.
Security Manager session timeouts
Security Manager Help | Web, Data, and Email Protection Solutions | June 18, 2021
A Security Manager session ends 22 minutes after the last action taken in the user
interface (for example, clicking from page to page, entering information, caching
changes, or saving changes). A warning message is displayed two minutes before the
session ends.
● Any uncached or unsaved changes are lost when the session ends. Remember to
save and deploy changes regularly.
● If the Security Manager is open in multiple tabs of the same browser window, all
instances share the same session. If the session times out in one tab, it times out in
all tabs.
● If the Security Manager is open in multiple browser windows on the same
computer, the instances share the same session by default.
If the session times out in one window, it times out in all windows.
● To open multiple Security Manager instances that do not share a session, open
each instance in a different browser (for example, Internet Explorer and Chrome).
In this situation, if one window times out, the others are not affected.
If an administrator closes the browser without logging off from the Security Manager,
or if the remote machine from which the Security Manager is being accessed shuts
down unexpectedly, the administrator account may be temporarily locked out. The
software typically detects this issue within about two minutes and ends the interrupted
session, allowing the administrator to log on again.
If the administrator has multiple browsers running in this scenario, they may not be
able to log on again for a longer period. If this occurs, close all browsers. The software
Forcepoint Security Manager Help 5Getting Started
then can correctly detect the dropped session and allow a new logon within two
minutes.
Configuring encrypted connection to SQL Server
Forcepoint Security Manager communicates with your organization’s SQL Server
database. It is recommended to implement SSL encryption for these communications
to increase the level of security in the SQL database. Use the following steps to enable
the encrypted connection.
1. From the Windows Start menu, click Forcepoint Security Setup.
The Forcepoint Security Setup Installer Dashboard displays. The Installer
Dashboard stays on-screen during installation. Various subinstallers and dialog
boxes are displayed over it.
2. From Forcepoint Management Infrastructure, click Modify.
The Forcepoint Management Infrastructure Setup wizard displays.
3. Click Next on the Welcome and Installation Directory screens.
4. On the SQL Server screen, mark the check box Encrypt connection and click
Next.
5. Complete the Forcepoint Management Infrastructure Setup wizard and click
Finish.
If you have additional Forcepoint products installed, they must also be modified.
All installed products display on the Forcepoint Security Setup Installer
Dashboard.
6. From Forcepoint Web Security, Forcepoint DLP, or Forcepoint Email Security,
click Modify.
The relevant setup wizard displays.
7. Repeat steps 3–5 for each Forcepoint product.
8. On the Forcepoint Security Installer Dashboard, click Close.
Navigating the Security Manager
Security Manager Help | Web, Data, and Email Protection Solutions | June 18, 2021
The Global Settings interface can be divided into four main areas. Certain menu
options were changed in version 8.5.3.
6 Forcepoint Security ManagerGetting Started
The following image displays the interface for Security Manager version 8.5 through
8.5.2:
The following image displays the interface for Security Manager version 8.5.3 and
later:
1. Security Manager toolbar
2. Module toolbar
3. Navigation pane
4. Content pane
The Security Manager toolbar shows:
● (Versions 8.5 through 8.5.2) The current logged on account
● (Versions 8.5 through 8.5.2) A Log Off button to end the administrative session
● (Versions 8.5.3 and later) The User Details drop-down list, which shows the
current logged-on account and provides a Log Off button to end the administrative
session
Forcepoint Security Manager Help 7Getting Started
● Icons used to configure appliances and global settings, and to open Help
● Which module is active
■ (Versions 8.5 through 8.5.2) Use the Web, Data, Email, and Mobile module
tabs in the Security Manager toolbar to switch between modules.
■ (Versions 8.5 through 8.5.2) When administrators log on to the Security
Manager, the module they last accessed is active and the tab for that module is
green in the Security Manager toolbar.
■ (Versions 8.5.3 and later) Use the Module drop-down list in the Security
Manager toolbar to switch between modules.
■ (Versions 8.5.3 and later) When administrators log on to the Security
Manager, the module they last accessed is active indicated by a green icon in
the Module drop-down list.
The module toolbar contains information and options relevant to the Security
Manager module that is currently active. For the Global Settings or Appliances pages,
it shows the current administrator account.
The navigation pane contains the available navigation choices for the current
Security Manager module or configuration option.
The content pane varies according to the selection in the navigation pane.
For more information about specific modules, see:
● Forcepoint DLP Administrator Help
● Forcepoint Email Security Administrator Help
● Forcepoint Web Security Administrator Help
Using the Forcepoint Support Portal
Security Manager Help | Web, Data, and Email Protection Solutions | June 18, 2021
Forcepoint maintains a customer support portal at support.forcepoint.com. Use the
My Account link to create a support account that can be used to access product
updates, patches and hotfixes, product news, evaluations, and technical support
resources.
● When you create an account, the account is associated with your organization’s
Forcepoint subscription key or keys. This helps to ensure your access to
information, alerts, and patches relevant to your product and version.
● Multiple members of an organization can create My Account login accounts
associated with the same subscription key.
Technical information about your software and services is available 24 hours a day at
support.forcepoint.com, including:
● A searchable knowledge base of articles and documents
● Webinars and show-me videos
8 Forcepoint Security ManagerGetting Started
● Answers to frequently asked questions
For additional questions, click the Contact Support link in the toolbar near the top of
the page.
● The contact page includes information for finding solutions, opening an online
support case, and calling Forcepoint Technical Support.
● For telephone requests, please have ready:
■ Forcepoint subscription key
■ Access to the management console for your solutions (for example, Security
Manager and Content Gateway manager)
■ Access to the machine running reporting tools and the database server
(Microsoft SQL Server or SQL Server Express)
■ Familiarity with your network’s architecture, or access to a specialist
Forcepoint Security Manager Help 9Getting Started 10 Forcepoint Security Manager
2 Configuring Global Settings
Security Manager Help | Web, Data, and Email Protection Solutions | June 18, 2021
Use the Forcepoint Security Manager to manage Forcepoint Web Security, Forcepoint
DLP, and Forcepoint Email Security configuration, policies, and reporting from a
central management console.
To facilitate this centralized management, Global Security Administrators (including
the default admin account) can use the Global Settings pages to create and configure
administrator accounts with:
● Full management access to all Security Manager modules
● Full management access to a single Security Manager module
● Limited access (for example, reporting-only access) to one or more Security
Manager modules
See Introducing administrators, page 15.
Note
Changes to Global Settings (such as new administrator
accounts) can take between 30 and 90 seconds to
propagate to other Security Manager modules.
Global Settings can also be used to:
● View account information and change passwords. See Viewing your account
information, page 12.
● Set up a connection to a directory service to allow administrators to use their
network accounts to log on to the Security Manager. See Setting user directory
information, page 13.
● Configure a connection to an SMTP server so that administrators can receive
email notifications when they are granted access to the Security Manager or when
their account changes. This also allows administrators to request a password reset,
when needed. See Setting email notifications, page 25.
● Configure two-factor authentication for administrators. See Configuring two-
factor authentication, page 26.
Forcepoint Security Manager Help 11Configuring Global Settings
● Audit administrator logon attempts and changes to Global Settings. See Global
Settings audit log, page 33.
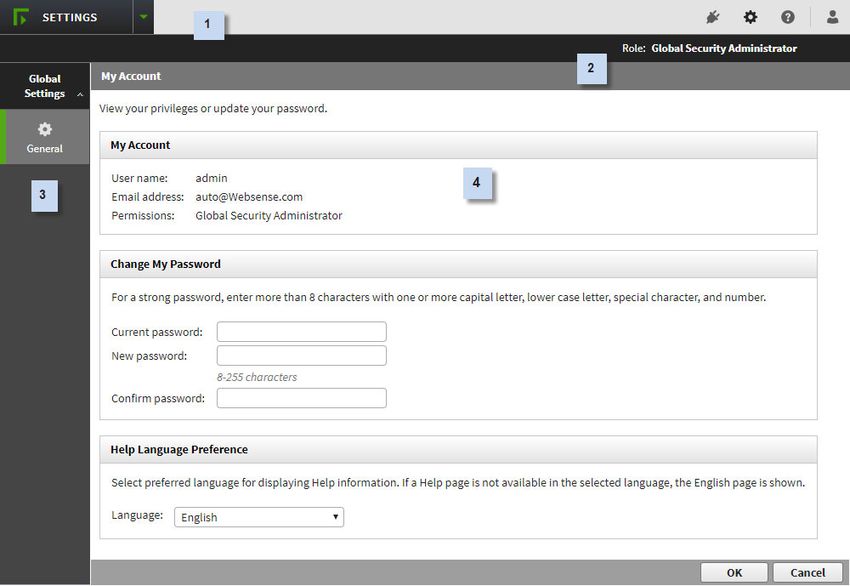
Viewing your account information
Security Manager Help | Web, Data, and Email Protection Solutions | June 18, 2021
Use the page Global Settings > General > My Account to view permissions
information for your administrator account and select a language other than English as
your preferred Help language. If you have been assigned a local user name and
password for the Security Manager, you can also change your password on this page.
If you log on to the Security Manager with network credentials, password changes are
handled through your network directory service. Contact your system administrator
for assistance.
The toolbar at the top of the page displays the permissions allocated to your account:
● Global Security Administrator means you have full access to all Security Manager
settings and all policy, reporting, and configuration settings in all of the modules
that are part of your subscription. See Global Security Administrator, page 15.
● If you do not have Global Security Administrator permissions, the Security
Manager you can access and manage are listed.
To change your password:
1. In the section Change My Password, enter your Current password.
2. Enter and confirm a New password.
■ The password must be at least 8 characters.
■ The password must include at least one uppercase letter, lowercase letter,
number, and special character (such as hyphen, underscore, or blank).
3. Click OK.
The changes are saved.
To change the Help language:
1. In the section Help Language Preference, select an entry in the drop-down list
Language.
2. Click OK.
The changes are saved.
Not all Help pages are available in all languages. If a particular Help page is not
available in the selected language, the English page is displayed.
12 Forcepoint Security ManagerConfiguring Global Settings
Setting user directory information
Security Manager Help | Web, Data, and Email Protection Solutions | June 18, 2021
Use the page Global Settings > General > User Directory to configure directory
communication for administrators using their network accounts. The same directory
must be used to authenticate all administrative users.
● A user directory stores information about a network’s users and resources.
● To allow administrators to use their network accounts to log on to the Security
Manager, configure the Security Manager to retrieve information from a user
directory.
Note
User directory configuration for administrators is
performed separately from directory service configuration
for end users. Set up end user directory service
configuration within each Security Manager module.
The Security Manager can communicate with the following Lightweight Directory
Access Protocol (LDAP) directories:
● Windows Active Directory (Native Mode)
● Novell eDirectory
● Oracle Directory Service
● Lotus Notes/Domino
It can also communicate with other generic LDAP-based directories.
● Duplicate user names are not supported in an LDAP-based directory service.
Ensure that the same user name does not appear in multiple domains.
● With Windows Active Directory or Oracle Directory Service, user names with
blank passwords are not supported. Make sure that all users have passwords
assigned.
To enable administrators to log on to the Security Manager using a network account:
1. Select a user directory type from the drop-down list User directory server;
Active Directory, Generic Directory, Lotus Notes, Norvell eDirectory, or
Oracle Directory Server.
Configuration options display for your selection.
2. Enter the IP address or host name to identify the directory server.
3. Enter the communication Port for the directory.
4. Enter a User distinguished name and Password for the administrative account
that the software should use to retrieve user name and path information from the
directory.
Forcepoint Security Manager Help 13Configuring Global Settings
■ The account must be able to query and read from the directory, but does not
need to be able to make changes to the directory, or be a domain
administrator.
■ In the field User distinguished name, enter the account details as a single
string. You can use the format “CN=user, DC=domain” or, if your
organization uses Active Directory, “domain\username”.
5. To confirm that the directory exists at the specified IP address or name and port
number, and that the specified account can connect to it, click Test Connection.
6. Enter the Root naming context that the Security Manager should use to search
for user information. This is required for generic LDAP directories, Lotus Notes/
Domino, and Oracle Directory Service, and optional for Active Directory and
Novell eDirectory. If you supply a value, it must be a valid context in the domain.
If the Root naming context field is left blank, the software begins searching at the
top level of the directory service.
Note
Avoid having the same user name in multiple domains. If
the software finds duplicate account names for a user, the
user cannot be identified transparently.
7. If the LDAP schema includes nested groups, mark the check box Perform
additional nested group search.
8. To encrypt communication with the directory service, mark the check box Use
SSL encryption.
9. If the directory service uses LDAP referrals, mark the check box to indicate
whether the software should follow the referrals.
10. For Generic Directory, configure the following additional settings:
■ Email attribute: The attribute name used to locate a user’s email address in
LDAP entries. The default is mail.
■ User logon ID attribute: The attribute name used to locate a user’s logon ID
in LDAP entries.
■ User logon filter: The filter to apply when searching for user details at logon.
This string must contain the %uid token, which is then replaced with the user
name entered by the user when logging on.
■ User lookup filter: The filter used to find users for import on the Add
Network Account page. You can enter %query in this field as a placeholder,
and then click Refine search on the Add Network Account page to enter a
new context for finding network users.
■ Group object class (optional): The LDAP object class that represents a
group. The default is group.
■ Group Properties: Specify whether your directory schema uses the
memberOf attribute. If it does, in the Group attribute field enter the attribute
used to reference the groups that the user is a member of.
14 Forcepoint Security ManagerConfiguring Global Settings
If it does not, in the User group filter field enter the query used to resolve
groups containing the specific user. You can enter %dn, which will be
replaced by the distinguished name of the user.
11. Click OK.
The settings are saved.
Note
If you change your user directory settings at a later date,
existing administrators become invalid unless you are
pointing to an exact mirror of the user directory server. If
the new server is not a mirror, you may not be able to
distinguish between your new and existing users.
Introducing administrators
Security Manager Help | Web, Data, and Email Protection Solutions | June 18, 2021
The page Global Settings > General > Administrators is used to create and manage
the accounts that administrators use to access the Security Manager.
Administrators can access the Security Manager to configure one or more security
solutions, manage policies, generate reports, or perform some combination of these
tasks. The specific permissions available depend on the type of administrator.
● Global Security Administrators have full access and management permissions in
all available Security Manager modules. See Global Security Administrator, page
15.
● Other types of administrators have more restricted access to Security Manager
modules. An administrator may be given permission to manage or audit one or
more Security Manager modules using the same account. See Security Manager
administrators, page 16.
Administrators can be identified using either network logon credentials or local
accounts used only for the Security Manager. See Adding a network account, page 20,
and Adding a local account, page 18.
Global Security Administrator
Security Manager Help | Web, Data, and Email Protection Solutions | June 18, 2021
A default Global Security Administrator role is created during installation and the
default user, admin, is assigned to this role. When you first log on with the password
set during installation, you have full administrative access to all configuration settings
in the Security Manager, and also the following permissions in the modules that are
part of your subscription:
● Web Security module: Added to the Super Administrator role with unconditional
permissions.
Forcepoint Security Manager Help 15Configuring Global Settings
● Data Security module: Assigned Super Administrator permissions.
● Email Security module: Assigned Super Administrator permissions.
Note
In deployments that include Forcepoint appliances, access
to the command-line interface (CLI) is controlled with a
separate password.
The permissions given to a Global Security Administrator within the individual
Security Manager modules cannot be modified.
The admin account does not appear in the list of administrators for the Super
Administrator role. It cannot be deleted and its permissions cannot be modified.
You can add additional Global Security Administrators as needed. Creating multiple
Global Security Administrators ensures that if the primary Global Security
Administrator is not available, another administrator can access all Security Manager
policy and configuration settings.
Security Manager administrators
Security Manager Help | Web, Data, and Email Protection Solutions | June 18, 2021
When a Security Manager administrator account is created, the administrator is given
access to one or more Security Manager modules.
Administrators can be given either simple “access” or “access and account
management” permissions for a module. By default, the following permissions are
allocated:
● Web Security module
■ Access: The administrator is not added to any roles and can only access the
pages Status > Dashboard and Status > Alerts.
■ Access and account management: The administrator is added to the Super
Administrator role with unconditional permissions.
Administrator permissions can be changed in the Web Security module on the
page Policy Management > Delegated Administration.
● For the Data Security module, regardless of which option is selected, the
administrator is assigned the Default access role, with access to the pages
Incidents & Reports, Dashboard, and My Settings.
Administrator permissions can be changed in the Data Security module on the
pages Settings > Authorization > Administrators and Settings >
Authorization > Roles.
● Email Security module
■ Access: The administrator is assigned the default Reporting permissions.
■ Access and account management: The administrator is assigned Super
Administrator permissions by default.
16 Forcepoint Security ManagerConfiguring Global Settings
Administrator permissions can be changed in the Email Security module on the
page Settings > Administrators > Delegated Administrators.
Administrators with account management permissions can also edit and delete other
administrator accounts in the Security Manager, subject to the limitations of their
permissions.
Administrators who log on to the Security Manager with a local user account can also
change their own password (see Viewing your account information, page 12).
Once shared administrator accounts have been configured, an administrator logged on
to one Security Manager module (for example, the Data Security module) can use the
Security Manager toolbar to switch to a different module without needing to log on a
second time.
Enabling access to the Security Manager
Security Manager Help | Web, Data, and Email Protection Solutions | June 18, 2021
Use the page Global Settings > General > Administrators to create and manage the
accounts that administrators use to access the Security Manager.
Note
This page is available only to Global Security
Administrators and administrators who have permission to
manage at least one Security Manager module.
In deployments that include a combination of web, email, and data solutions,
administrator accounts can be given individual or joint access to the available Security
Manager modules.
Next to the User Name column, the Type column displays the type of each
administrator account:
● Local accounts are created specifically for use within the Security Manager.
● Network accounts are accounts from a supported directory service that have been
granted access to the Security Manager (see Setting email notifications, page 25).
To add an account, click either Add Local Account or Add Network Account (see
Adding a local account, page 18, and Adding a network account, page 20).
Note
If RSA SecurID authentication is enabled on the page
General > Two-Factor Authentication, any
administrator accounts added on this page are used only as
a fallback if the RSA Authentication Manager cannot be
reached. See Configuring two-factor authentication, page
26.
Forcepoint Security Manager Help 17Configuring Global Settings
If an administrator account has an exclamation mark icon next to the name on this
page, the account does not have an email address associated with it. This means the
administrator will not receive notifications of password changes or permission
updates. Edit the administrator details to add an email address.
If you are viewing this page as a Security Manager administrator with permission to
manage at least one Security Manager module, you can manage and delete only
administrator accounts for those modules.
Global Security Administrators can manage and delete any existing accounts. To
delete an account, mark the check box next to the account name and click Delete.
Important
If you delete an administrator account, actions performed
by this administrator will no longer appear in the
Forcepoint DLP incident history. To preserve administrator
actions, it is recommended that you do not delete the
account, but instead limit the administrator’s role in the
Data Security module.
Adding a local account
Security Manager Help | Web, Data, and Email Protection Solutions | June 18, 2021
Related topics:
● Enabling access to the Security Manager, page 17
● Adding a network account, page 20
● Editing a local account, page 22
To add local administrator accounts:
1. Navigate to the page Global Settings > General > Administrators and click
Add Local Account.
The Add Local Account page displays.
2. Enter a unique User name.
■ The name must be between 1 and 50 characters long, and cannot include any
of the following characters:
* < > ' ‘ { } ~ ! $ % & @ # . " | \ & + = ? / ; : , ^ ( )
■ User names can include spaces and dashes.
3. Enter a valid Email address for the user.
This email address is used to send account information to the new administrator.
4. Enter and confirm a Password for this user.
The password must be 8–255 characters and include at least one of each of the
following:
18 Forcepoint Security ManagerConfiguring Global Settings
■ uppercase letter
■ lowercase letter
■ number
■ special character (such as hyphen, underscore, or blank)
Note
If certificate authentication is enabled and password
authentication is disabled on the page General > Two-
Factor Authentication, password logon is not available
for the local account.
5. To create an administrator with full permissions across all Security Manager
modules and functions, mark the check box Global Security Administrator.
Note
Only Global Security Administrators can create other
Global Security Administrators.
6. To send account information and access instructions to the new administrator via
email, mark the check box Notify administrator of the new account via email.
To send administrator emails, you must set up SMTP details on the Notifications
page. Optionally, also customize the contents of the email message on the
Notifications page (see Setting email notifications, page 25).
7. To require the administrator to change the account password the first time he or
she logs on to the Security Manager, mark the check box Force administrator to
create a new password at logon.
8. If certificate authentication is enabled on the page General > Two-Factor
Authentication:
a. Click Certificate Authentication.
b. Browse to the location of the certificate to use for administrator authentication
for this account.
c. Click Upload Certificate.
For more information, see Configuring two-factor authentication, page 26.
9. If this account is not a Global Security Administrator, in the section Module
Access Permissions, select the permissions to give to the new administrator.
■ Choose a setting under each of the available options (Web, Data, Email) to
give the new administrator permissions to manage one or more of the Security
Manager modules. The options available depend on the modules in your
subscription.
For each module, choose whether the new administrator has:
○ No access to that module
○ Only access to the module
○ Both access and the ability to manage other administrators in that module
Forcepoint Security Manager Help 19Configuring Global Settings
For more information see Security Manager administrators, page 16.
Note
Administrators can assign access permissions only for the
Security Manager modules for which they have
management permissions.
10. When you are finished making changes, click OK.
The changes are saved.
Adding a network account
Security Manager Help | Web, Data, and Email Protection Solutions | June 18, 2021
Related topics:
● Setting email notifications, page 25
● Adding a local account, page 18
● Editing a network account, page 23
To add users defined in a supported directory service as Security Manager
administrators:
1. Navigate to the page Global Settings > General > Administrators and click
Add Network Account.
2. In the field Search, enter keywords to search on to find the accounts to add as
Security Manager administrators. By default, the search query already includes a
wildcard so there is no need to include an asterisk (*) in a search.
By default, the search context for your search is the default domain context from
the Directory Service page (see Setting email notifications, page 25). To edit this
context, click Refine search and enter a new search context. To revert to the
default context, click Restore default.
For users, the following attributes are searched in the selected context.
■ Active Directory: Email Address, Logon Name, and Display Name
■ Novell eDirectory, Oracle Directory Service, or Lotus Notes/Domino:
Email, Display Name, Username, and Common Name (CN)
For groups, the CN field is searched for all directory services.
Search results display in the Search results list on the left-hand side. The search
results list both users and groups that match the specified keywords, and that
include both user name and email address in the directory service.
3. To add a user or group as an administrator, mark the check box next to the account
name in the Search results list, then click the right arrow (>) to add the account to
the Selected accounts list.
To remove a user from the Selected accounts list, mark the check box next to the
account name, then click the left arrow (Configuring Global Settings
4. If certificate authentication is enabled on the page General > Two-Factor Auth
(see Configuring two-factor authentication, page 26), click Certificate
Authentication to upload or import the certificate used to authenticate the
selected administrators during Security Manager logon.
■ Click Import from LDAP to import the certificate from your user directory.
■ Click Upload Certificate to browse to the location of the certificate and
upload it.
When the certificate has been imported or uploaded successfully, the certificate
name, expiration date, issuer, and source information display in the Certificate
Authentication section of the page.
5. Once you have added one or more accounts to the Selected accounts list, mark
the check box to indicate whether to Notify administrator of the new account
via email.
To send administrator emails, you must set up SMTP details on the Notifications
page. You can also customize the contents of the email message on the
Notifications page (see Setting email notifications, page 25).
6. Next, select the access permissions for the new administrators.
■ Mark the check box Global Security Administrator to create an
administrator with full permissions across all Security Manager modules.
Note
Only Global Security Administrators can create other
Global Security Administrators.
■ If the accounts are not Global Security Administrators, in the section Module
Access Permissions, select permissions for the new administrators.
■ Choose a setting under each of the available options (Web, Data, Email) to
give the new administrator permissions to manage one or more Security
Manager modules. The options available depend on the modules in your
subscription.
For each module, choose whether the new administrator has:
○ No access to that module
○ Only access to the module
○ Both access and the ability to manage other administrators in that module
For more information see Security Manager administrators, page 16.
Note
Administrators can assign access permissions only for the
Security Manager modules for which they have
management permissions.
7. After configuring administrator accounts, click OK.
The settings are saved.
Forcepoint Security Manager Help 21Configuring Global Settings
Editing a local account
Security Manager Help | Web, Data, and Email Protection Solutions | June 18, 2021
Use the page Global Settings > General > Administrators to edit the access and
authentication permissions for existing local accounts.
1. From the page Administrators, click the name of an administrator account.
The Edit Local Account page displays.
2. To change the user name, enter a unique name up to 50 characters in the field
User name.
■ The name must be between 1 and 50 characters long, and cannot include any
of the following characters:
* < > ' { } ~ ! $ % & @ # . " | \ & + = ? / ; : ,
■ User names can include spaces and dashes.
3. To change the administrator email address, enter a valid address for the user in the
field Email address.
This email address is used to send account information to the administrator.
4. To reset the administrator’s password, enter and confirm a password in the fields
Change password and Confirm password.
The password must be 8–255 characters and include at least one each of the
following:
■ uppercase letter
■ lowercase letter
■ number
■ special character (such as hyphen, underscore, or blank)
Note
If certificate authentication is enabled and password
authentication is disabled on the page General > Two-
Factor Auth, password logon is not available for the local
account.
5. To give the administrator full permissions across all Security Manager modules,
mark the check box Global Security Administrator.
Note
Only Global Security Administrators can create other
Global Security Administrators.
22 Forcepoint Security ManagerConfiguring Global Settings
6. To send account update information to the administrator via email, mark the
check box Notify administrator of the account changes via email.
Note
Selecting this option notifies the administrator only of the
current changes being made. If you return to make further
edits to this or another administrator’s details, you will
need to mark the option again.
7. To require the administrator to change the account password the next time they
log on to the Security Manager, mark the check box Force administrator to
create a new password at logon.
8. If certificate authentication is enabled on the page General > Two-Factor Auth:
a. Click Certificate Authentication.
b. Browse to the location of the certificate that the administrator will
authenticate against when logging on to the Security Manager.
c. Click Upload Certificate.
For more information, see Configuring two-factor authentication, page 26.
9. If this is not a Global Security Administrator account, use the section Module
Access Permissions to update permissions for the administrator. Choose a setting
under each of the available options (Web, Data, Email) to give the administrator
permissions to manage one or more of the Security Manager modules.
For each available module, choose whether the administrator has:
■ No access to that module
■ Only access to the module
■ Both access and the ability to manage other administrators in that module
For more information, see Security Manager administrators, page 16.
Note
Administrators can assign access permissions only for the
Security Manager modules to which they have
management permissions.
10. When you are finished making changes, click OK.
The settings are saved.
Editing a network account
Security Manager Help | Web, Data, and Email Protection Solutions | June 18, 2021
Use the page Global Settings > General > Administrators to edit the access and
authentication permissions for existing network accounts
1. On the page Administrators, click an account user name.
Forcepoint Security Manager Help 23Configuring Global Settings
The Edit Network Account page displays.
2. If certificate authentication is enabled on the page General > Two-Factor Auth
(see Configuring two-factor authentication, page 26), click Certificate
Authentication to upload or import the certificate that the administrators will
authenticate against when logging on to the Security Manager.
■ Click Import from LDAP to import the certificate from your user directory.
■ Click Upload Certificate to browse to the location of the certificate and
upload it.
When the certificate has been imported or uploaded successfully, the certificate
name, expiration date, issuer, and source information are displayed in the
Certificate Authentication area of the page. To import a new certificate from your
user directory, replacing the existing certificate, click Import New from LDAP.
To delete the certificate from this network account, click Remove Certificate. If
you remove the certificate, this network account cannot use two-factor
authentication.
3. To change the access permissions for the network account:
■ Select Global Security Administrator to give the administrator full
permissions across all Security Manager modules.
Note
Only Global Security Administrators can create other
Global Security Administrators.
■ If this is not a Global Security Administrator account, use the Module Access
Permissions options to update permissions for the administrator. Choose a
setting under each of the available options (Web, Data, Email) to give the
administrator permissions to manage one or more of the Security Manager
modules.
For each available module, choose whether the administrator has:
○ No access to that module
○ Only access to the module
○ Both access and the ability to manage other administrators in that module
For more information, see Security Manager administrators, page 16.
Note
Administrators can assign access permissions only for the
Security Manager modules to which they have
management permissions.
4. When you are done editing administrator permissions, click OK.
The settings are saved.
24 Forcepoint Security ManagerConfiguring Global Settings
Setting email notifications
Security Manager Help | Web, Data, and Email Protection Solutions | June 18, 2021
Use the page Global Settings > General > Notifications to set up the SMTP server
used for all email notifications from the Security Manager, and to configure the
notification email messages sent to administrators.
Note
This page can be viewed and edited only by Global
Security Administrators.
To establish a connection with an SMTP server so that email notifications can be sent:
1. Enter the IP address or host name and Port of the SMTP server machine.
2. Enter the Sender email address to use in notifications.
3. Enter a Sender name to appear with the From: email address. This is useful to
make it clear to administrators that the email is related to the Forcepoint Security
Manager.
4. Next, in the section Email Notification Templates, review the templates used for
administrator notifications. There are three available templates:
■ New Account: Notifies an administrator of their new Security Manager
account. Typically, this template includes the new logon name and password,
and a summary of the permissions allocated to the administrator.
■ Edit Account: Notifies an administrator of any changes to their Security
Manager account. Typically, this includes any information that might be
changed and would need to be communicated to the administrator, such as
their logon name, password, and permissions.
■ Forgot Your Password: Confirms to an administrator who has clicked the
“Forgot Your Password” link on the Security Manager logon page that their
password has been reset. Typically, this includes the temporary password and
expiration details for that password.
Each template contains default text that can be used or modified, and includes
some available variables. At the time the email is sent to the administrator, these
variables are replaced either with user-specific data or with values configured
elsewhere in the system. Variables are always surrounded by percentage symbols,
such as %Username%.
To modify a notification message:
a. Select one of the Email Notification Templates tabs: New Account, Edit
Account, or Forgot Your Password.
b. Enter a suitable subject header for the email message. For example, for a new
account, you might use “Welcome to Forcepoint Security Manager” or “Your
new Forcepoint Security Manager account.”
Forcepoint Security Manager Help 25Configuring Global Settings
c. Modify the message body as required. To add a variable, click Insert
Variable and select from the drop-down list:
Variable Description
%TRITON URL% The URL used to access the Security Manager.
%Username% The administrator’s Security Manager user name.
%Password% The administrator’s Security Manager password.
This may be the temporary password assigned to an
administrator who used the “Forgot Your Password” link.
This password is valid for 30 minutes; an administrator
logging on during that time is prompted to enter a new
password.
%Permissions% The permissions allocated to the administrator.
Note
If you are using all or part of the default notification text,
you can only include variables at the end of the default
message.
d. To return to the default notification text at any time, click Restore Default,
then click OK to confirm.
5. Click OK.
The settings are saved.
Configuring two-factor authentication
Security Manager Help | Web, Data, and Email Protection Solutions | June 18, 2021
Use the page Global Settings > General > Two-Factor Auth to manage the use of
two-factor authentication for administrator logons.
Note
Only Global Security Administrators can access this page.
Two-factor authentication requires administrators to provide two forms of
identification when logging on to the Security Manager.
Access to Forcepoint Mobile Security is not covered by two-factor authentication; you
must log on to the cloud-based console using your regular user name and password.
The following methods are available:
26 Forcepoint Security ManagerConfiguring Global Settings
● RSA SecurID® authentication (see How RSA SecurID authentication works, page
29)
● Certificate authentication (see How certificate authentication works, page 31).
If you choose to enable RSA SecurID authentication:
● Use RSA Authentication Manager 6.1.2 or higher.
● Create a custom agent for the Forcepoint Security Manager in the RSA
Authentication Manager (see Creating a custom agent for RSA SecurID
authentication, page 29).
● Certificate authentication is automatically disabled. If you have previously
enabled certificate authentication, and then enable RSA SecurID authentication, a
warning message appears.
If your Forcepoint management server has more than one network interface controller
(NIC), use the following steps to configure RSA authentication to use the proper IP
address for communicating with the RSA Authentication Manager:
1. Open rsa_api.properties located at \Websense\EIP Infra\tomcat\
wbsnData\rsaSecurID.
2. Locate the line RSA_AGENT_HOST=
3. Add the IP address of the server that is configured for the installation:
a. RSA_AGENT_HOST=x.x.x.x
b. x.x.x.x=IP address for management server
4. Save the rsa_api.properties file.
5. Restart the Websense TRITON Unified Security Center service in
Services.
To set up Security Manager RSA SecurID authentication:
1. In the section RSA SecurID Authentication, mark the check box Authenticate
administrators using RSA SecurID authentication.
2. Enter a valid User name and Passcode for RSA SecurID logon.
The user must be able to authenticate with RSA Authentication Manager but does
not have to be a Security Manager administrator.
3. Click Test Connection to RSA Manager.
The connection test must be successful before the Security Manager allows
changes to be saved on this page. The results of the test are displayed next to the
Test Connection button; for more information on these results, see Test connection
to RSA Manager results, page 30.
4. To allow administrators to log on to the Security Manager if RSA authentication is
unavailable, mark the check box Fall back to other authentication mechanisms.
This means that any administrators configured on the page General >
Administrators can log on using their local or network credentials as a fallback.
If you do not select this option, RSA authentication is the only option for all
administrators except the “admin” account created during installation.
5. Click OK.
Forcepoint Security Manager Help 27Configuring Global Settings
The settings are saved.
To set up Security Manager certificate authentication:
1. In the section Certificate Authentication, mark the check box Authenticate
administrators using client certificate authentication.
2. To enable attribute matching, in the section Certificate Matching, mark the check
box Use attribute matching as a fallback method and select whether it applies
to all administrators or only to administrators without certificates in the Security
Manager.
To configure the attributes used for matching, click Configure Attribute
Matching, then see Setting up attribute matching, page 32.
3. To import certificates from your user directory for network administrators, click
Import Administrator Certificates.
When certificates are successfully imported, a success message is displayed at the
top of the page. If any of the certificates are not imported correctly, you can
upload a certificate for each network administrator on the page General >
Administrators > Edit Network Account.
4. In the section Root Certificates, click Add to add a root certificate for signature
verification. There must be at least one root certificate in the Security Manager for
two-factor authentication to operate.
■ Browse to the location of the root certificate file, then click Upload
Certificate.
5. Whenever a root certificate is added or changed, create a new master certificate
file and copy it to the “Websense TRITON Web Server” service. Click Create
Master Certificate File to create the new file, then see Deploying the master
certificate file, page 32, for further information.
6. In the section Password Authentication, to enable password authentication as a
fallback method, mark the check box Allow password authentication to log on
to the Security Manager for: and select whether it applies to all administrators
or only to administrators without certificates in the Security Manager.
Note
The “admin” account created during installation can
always log on from the Forcepoint management server
machine using password-based authentication.
7. Click OK.
The settings are saved.
28 Forcepoint Security ManagerYou can also read