Systems User Guide - Illinois State Board of Education
←
→
Page content transcription
If your browser does not render page correctly, please read the page content below
ILLINOIS SCIENCE ASSESSMENT
                                 2020

Systems User Guide
February 2020

Updates Include:

   •   Updates to Student Testing - pulling access codes for multiple test sections. (p. 45
       and Appendix C)

       New for the 2020 ISA - Students will be required to complete three (3) different
       test sections to complete the entire ISA exam. The test sections will appear as three
       tests on the Assigned Tests page, and students will need a unique access code to
       take each test section. To maintain test security, only print and distribute the set of
       access codes for the current test section to students at a time. Students within a
       class/session must start the section together, work at their own paces to finish, then
       start the next section together if testing more than one section in the same day.
       Students cannot be issued all codes at once.

Copyright © 2020 by the Illinois State Board of Education (ISBE)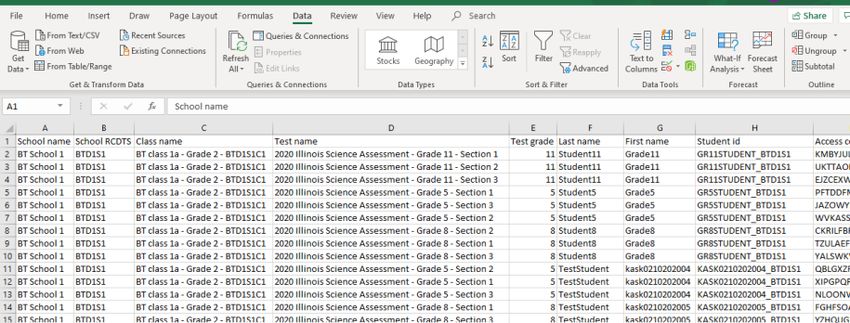
TEST MANAGEMENT ....................... 35
Contents                                                   Reviewing test status ........................ 35

                                                           Cancel a test ................................... 36
ABOUT THIS GUIDE ........................... 3
                                                           Restore a test .................................. 37

ADS USER ROLES .............................. 4            Reset a Student Login ....................... 38

                                                           Student Test Status Reports ............... 40
INTRODUCTION TO ADS ................... 5
                                                           Submit Tests in Paused or In Progress
Overview .......................................... 5
                                                           Status............................................ 42

Logging into ISBE Teach ...................... 6
                                                           TAKING TESTS .................................. 45
Navigating in ISBE Teach ..................... 7
                                                           Printing and Downloading Test Access
                                                           Codes (Test Tickets) ......................... 45
ISA PREPARATION CHECKLIST ... 10
                                                           Logging in to take the test ................. 48
WORKING WITH USERS.................. 11
                                                           Test screen layout ............................ 50
User types ...................................... 11
                                                           Taking tests .................................... 51
User Roles ...................................... 11
                                                           Using accessibility features ............... 54
Setting up and maintaining user accounts
..................................................... 14   ADMINISTERING TESTS.................. 57
Adding Individual Users ..................... 14
                                                           Before the test ................................. 57

Uploading Users in Bulk .................... 16
                                                           During the test ................................ 57
Editing user information .................... 20
                                                           After the test ................................... 61
Assigning Test Admins to Classes ....... 22
                                                           APPENDICES...................................... 62
WORKING WITH STUDENTS AND                                  Appendix A: Form to Report a Testing
CLASSES ............................................. 25   Irregularity or Security Breach ............ 63

Students, tests, and classes ............... 25            Appendix B: Creating an Excel PivotTable
                                                           .................................................... 64
ISBE ISA Import Wizard ..................... 25
                                                           Appendix C: Pulling test access codes by a
Creating and maintaining student profiles                  single test section ............................ 66
..................................................... 31
                                                           Appendix D: Current ISA Safe Exam
Adding walk-in students .................... 32            Browser (SEB) Versions .................... 68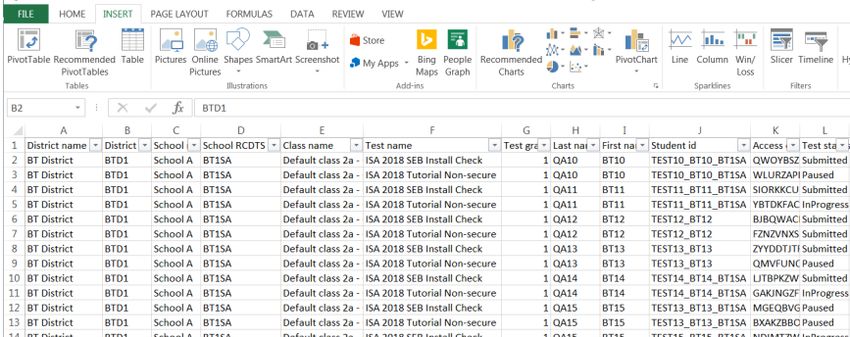
About this guide
Welcome to the ISBE Assessment Delivery System User Guide. This guide provides overview
information and step-by-step instructions to help you use the Assessment Delivery System (ADS),
ISBE Teach, ISBE Management, and ISBE Learn, to administer online assessments.

You will interact with components: ISBE Teach and ISBE Management for administrators and ISBE
Learn for students.

3

ADS User Roles
There are two roles in ISBE Teach and one for ISBE Learn.

ISBE Teach

    •      Organization Administrator
    •      Test Administrator

ISBE Learn

    •      Student

The goal of this guide is to provide necessary information and instructions for people in the title
role.

The Organization Administrator (Org Admin) is a staff member who is granted access at either
the district or the school level. Org Admins with district-level permissions have access to the
district as well as all schools within the district. Org Admins with school-only permissions cannot
view district users, classes or students outside of their assigned school.

The Org Admin maintains schools in the district, as well as user accounts and access at the
district or school levels or both. Org Admins manage user accounts, student records, and classes,
as well as work with student data and test assignments. Local policy will determine if student and
class management is coordinated at the district or school level.

As an Org Admin, it’s important for you to be familiar with the features of ADS used by the staff
members you interact with and support.

A Test Administrator is a school staff member who administers or proctors online test delivery
in the ADS. As a test administrator, you may need to be familiar with other features of the ADS
that other staff members use, such as your school’s test coordinator.

There is another role for ADS: the student who takes tests in ISBE Learn. While students are not
officially set up as users, you should understand how they interact with the system.

Actions are often performed by multiple user roles. To make it clearer whether a particular role
can perform an action, you will find a role bar like this at the top of each procedure.

                      Org Admin              Test Admin              Student

When a role is highlighted (all of the roles are highlighted above) that user can perform the
procedure described. If a procedure is not available to a user role, it will be dimmed in the role
bar as shown below.

                      Org Admin              Test Admin              Student

4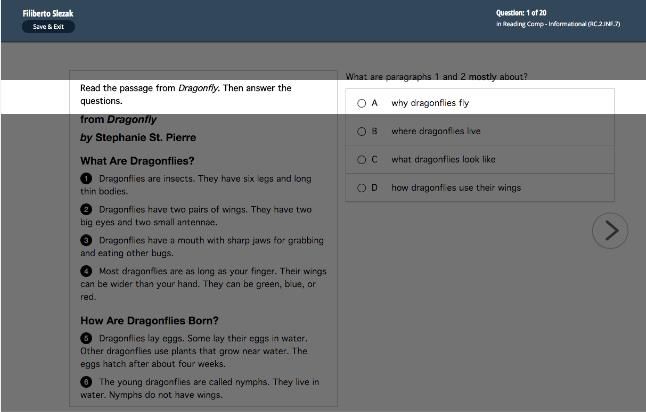
Introduction to ADS
Overview
The Illinois School Board of Education (ISBE) uses the Assessment Delivery System (ADS) to
administer the Illinois Science Assessment (ISA).

This section introduces you to the components of ADS that administrators and educators use to:
set up organizations, users, and students; review test assignments; and administer tests; and
review score reports for the diagnostic test version.

As a District or School Organization Administrator or Test Administrator, you will primarily work
with ISBE Teach, where you will set up and maintain the tests. Test Administrators will also work
with ISBE Learn which is used to deliver the ISBE ISA online assessment to your students.

Components of the Assessment Delivery System
The Assessment Delivery System (ADS) consists of two unique parts that administrators and
educators use to develop, assign, and administer ISBE online assessments.

                       ISBE Teach                      Administrators:
                                                Manage districts, schools, classes,
                                                      students and users

                       ISBE Learn                           Students:
                                                        Take online tests

ISBE Teach
The bulk of a school’s preparation work occurs in ISBE Teach.

For the Illinois Science Assessment, ISBE will set up the organizations (districts and schools)
across the state as well as the District Organization Administrator(s) and School Organization
Administrators (per ISBE Entity Profile System (EPS)). In turn, Organization Administrators (Org
Admins) at the district will create additional school-level Organization Administrators and all Test
Administrators (Test Admins); Org Admins will also assign Test Admins to classes. Org Admins
(district or school depending on district policy) will set up classes and students by using the
integrated ISBE ISA Import Wizard (ISBE Management Tool) that is embedded in ISBE Teach and
connects to the ISBE SIS. Test assignments will be automatically assigned to students by the
student grade level.

ISBE Learn
Test Administrators will work closely with ISBE Learn. Students will not know what ISBE Learn is
even though they use this platform to take the test. Each student will enter a unique access code,
found on the student’s test ticket, into a browser on a school device that meets technical
requirements.

5
Logging into ISBE Teach
To use the features described in the next several sections, you must log into ISBE Teach. If you
do not have a user login, contact your Org Admin (usually your Superintendent/Director or
Principal).

 To access ISBE Teach

       Org Admin            Test Admin              Student

    1. Click the link below or
       open your browser and
       type the ISBE Teach URL
       into the address bar:

       https://teach-
       isa.ileducates.org

       The Log In page opens.

    2. Enter your E-mail
       address or username
       and password.
    3. Click Log in under the
       password field.

    4. The ISBE Teach
       Dashboard opens. This
       serves as your home
       page for ISBE Teach.

 Note: This dashboard will vary
 depending on the User Role
 assigned to you. The parts of
 the dashboard are explained in
 the next section of the guide.

6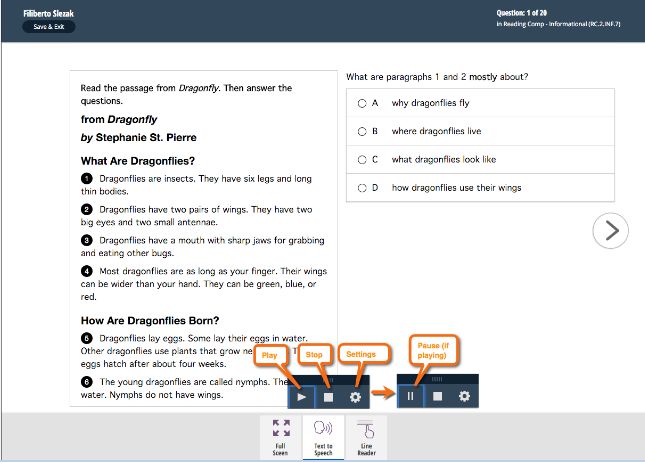
Navigating in ISBE Teach
The dashboard displays a gallery of tiles that link to all the information and actions available to
you in ISBE Teach. The links will vary, depending on the number of schools assigned to you and
your role in the system. A Test Administrator, for example, typically sees only the tiles and menus
for Students and Assigned Tests.

Parts of the ISBE Teach Dashboard

 Org Admin Dashboard (District Permissions)

 Org Admin Dashboard (School Permissions)

 Test Administrator Dashboard

7
Tiles – on the center of the dashboard are tiles that link you to the orgs, users, and students
 assigned to you.
    •   Schools (District Org Admin only) – view schools in your district
    •   Users (Org Admin only) – view, add, or upload users (Setting up and maintaining user
        accounts).
    •   Students – view, add, or upload students (Creating and maintaining student profiles).
    •   Assigned Tests (School Org Admin and Test Admin) – view tests assigned to your
        classes and students
 Navigation Dashboard Menu – Each tile type is associated with an item located in the left
 side Dashboard navigation. These menus are available to you anywhere in ISBE Teach.
 Org Admins
    •   Districts (State Org Admin only) – view districts
    •   Schools (District Org Admin only) – view schools
    •   Users – view, add, or upload users at districts or schools
    •   Students – view all students or by class for permitted schools; show assigned tests;
        generate access code by student; add single student to a class
    •   Tests – list of assigned tests by Class; Generate Access Codes by class; list of student
        test assignments, shows test status, provides test support actions, download student
        test status report.
    •   Help – Provides help information for the Test and Test platform

 Test Administrator
    •   Students – view students for assigned classes; show assigned tests; generate access
        code by student
    •   Tests –list of assigned tests by Class; Generate Access Codes by class; list of student
        test assignments, shows test status, provides test support actions.
    •   Help – Provides help information for the Test and Test platform

Parts of an ISBE Teach information page

ISBE Teach data is generally displayed in a list format, as shown below.

                                      Page Name                    Organization Name

                       Page Buttons

                                            Org Filters

8
Page Name – Displays the name of the page.

Organization Name – Displays the name of the highest organization (State, District, School) to
which a user is assigned. If you belong to multiple orgs of that same level, this field will show a
drop down filter.

Org Filters – Use the drop down filters to select the District, School, Class information displayed
in the table. The filters shown will vary based on your organization permission level

Page Buttons – Select buttons to initiate the described action.

Operations – Select from the buttons on each row to take action on a specific user, student or
assignment.

Search List – Enter a term in the field to display only items containing your term.

Sortable Columns – Click the header of a list column to sort.

Page Navigation – Click a number to move through multiple pages of information.

Sorting and filtering lists in ISBE Teach
You can more quickly locate an item in a very long list by using the sort or filter functions.

To filter lists, enter your search term in the Search field that appears above ADS lists. Entries
that do not include your terms will be hidden. For example, filtering a list of students for “10” will
return all students in Grade 10 plus any that have “10” in any other field.

Click on the table header of the column to sort entries in a list. Click again to toggle between
ascending and descending order.

Getting help
ISA program support is provided through the various online resources and through the ISBE
Student Assessment and Accountability Division.

    •   For additional information about ISA, visit the ISBE Science page at
        https://www.isbe.net/Pages/Illinois-Science-Assessment.aspx

    •   Support telephone number: 866-317-6034

9
ISA Preparation Checklist
The following checklist provides a summary of the high level steps that need to be completed
prior to the start of the test window.
Test Operation Set up
Completed by ISBE Assessment Team
Load Organizations (uses state RCDTS code)
Roster Students into default classes (5-default, 8-default, 11-default) (using ISBE
Management Tool)
Load initial set of District Organization Administrators (Org Admins) based on data in
ISBE’s Entity Profile System (EPS)
Completed by Districts/Schools Org Admins
Load Additional District and School Org Admins
Review Student Roster and Classes; Move students to new classes (optional)
Load Test Administrators (Test Admins)
Assign Test Administrators to Classes
Test Preparation & Management
Completed by Districts/Schools Org Admins
Install Secure Exam Browser (SEB) on testing devices
Guide students through ISA Tutorial (optional)
Review Student Test Assignments (Org Admins/Test Admins)
Generate/Print Test Access Codes for Classes/Students (Org Admins/Test Admins)
Manage Student Test (Org Admin / Test Admin)
Download Student Test Status Report (Org Admin)
10Working with users User types ISBE Teach administration-level users (district, school and test) must have accounts to access ADS features. Most user accounts provide access to ISBE Teach for the purpose of working with organization records, student data, and test assignments. Those who administer or work with tests must also have user accounts, so that they can access the student test assignments, testing status and other records in ISBE Teach. Students do not have assigned user accounts for ISBE Learn. They get an access code for their test specified for their organization level, as discussed in Taking Tests. User Roles 11
12
13
Setting up and maintaining user accounts
Each staff member in the districts and schools who will work with ISBE Teach must have a user
account. Users may be added in bulk with the User Upload Template or individually using the Add
User feature. Use the User Upload Template to enter the information into a comma-separated (.csv)
file, and then upload the file through ISBE Teach. ISBE will pre-populate your district Organization
Administrators who are listed as ISA administrators and test coordinators in EPS. It will then be
the responsibility of the Org Admins to create accounts for additional District or School Org Admins
and all Test Administrators.

Note: Users may be added individually using the Add User feature or in bulk with the User Upload
Template.

Adding Individual Users
Using the Add User Feature

        Org Admin           Test Admin              Student

  1. Access the Add Single User
     feature through two different
     paths:

      a. Click the    button on the
         Users Dashboard menu bar
         in ISBE Teach to access the
         Upload Users Page.
         Select the Add Single
         User Button at the top of
         the page.

         The Add User page will
         open.

     b. Click on Users in the left
        navigation to open the Users
        summary page. Select the
        Add Single User Button at
        the top of the page.

        The Add User page will
        open.

14
2. Enter or select the following
information to create a new
user
a. Email address
b. First name
c. Last name
d. Organization
e. User Role
Select Save to create the
user and return to the Users
summary page.
3. The new user is visible on the
Users Summary Page and will
be emailed a welcome
message with further
instructions.
4. To use the Add User feature
to add multiple new users,
select the Save and add
another button once you
have entered the first new
user’s information. The new
user will be emailed a
welcome message and the
screen will refresh to an
empty Add user form.
Notes:
• The organization selection on the Add User page defaults to the primary organization to which
you have permission. If you have district permissions and a school was selected prior to
accessing the Add User page, the selected school will be shown in the Organization drop down
fields for the new user.
• The Add User feature assigns users to a single organization. If new users should be associated
with multiple organizations, edit their user accounts to associate additional organizations after
their initial creation.
• Upon creation, new users will receive email messages confirming their new accounts and a
time sensitive password creation URL prompt (this email is valid for 72 hours). These emails
contain the URL for ISBE Teach.
• Creating Test Administrators: After uploading new test administrators, you should assign
them to classes. In order for Test Admins to see students and rostered classes, they must first
be assigned to classes. See Assigning users to classes for details. It is not required to assign
Org Admins to classes as they have access to all classes at their permitted schools.
15Uploading Users in Bulk
Preparing the user template for uploading
To download and prepare the user template for upload
Org Admin Test Admin Student
1. Open the Upload Users page.
Click the button on the
Users tile in ISBE Teach or
click the Upload Users button
at the top of the Users Page.
The Upload Users page opens.
2. Click the link Tap User
Template to download the
template file. You will use the
template to set up the schools
or other organizations.
3. Open the file
tapuser_template.xlsx in Excel
or another spreadsheet software
program.
NOTE: Make sure to keep the column headers as is in row 1, but delete the examples in rows 2-4 of the
User Upload Template.
164. Enter each user’s information on a separate row:
• First name and Last name - the full name of the staff member to add as an ADS user.
• Email - the person’s business Email address.
• Roles - indicates the staff member’s functional role. May either be: organization administrator
or test administrator (All lowercase, no CAPS)
• State Code - two-letter postal code for the user’s state. (use IL)
• Organization Identifiers – Use the RCDTS code for the organization. To assign more than
one org to a user, separate RCDTS codes utilizing a comma in the appropriate cell on the
spreadsheet.
Note:
• Assigning a user to a district will automatically grant that user permission to see all schools
within the selected district.
User Upload Template Tips
• Keep the column headers in the User Upload Template. You may delete the sample data.
• The Roles field can be either: organization administrator or test administrator (All lowercase,
no CAPS)
• The State Code should be: IL
• The Organization Identifier is the full 15-digit RCDTS code for the LEA or school level
organization
o Ensure that the leading zeros of the RCDTS are captured in the sheet or the upload
will fail. Change the Cell format to Custom; highlight general, replace that word
(general) with 15 zeros, then save.
• If you copy/paste information into the form, make sure to remove any extra spaces after the
information in the field.
• Save your completed template as a CSV file prior to uploading it.
o If you use a Mac, use the Windows Comma Separated (.csv) option to save your
file.
175. Save the file in Windows
Comma Separated values
format (.csv).
NOTE: A .csv file does not
support multiple tabs. Your
computer displays a
message asking how you
want to save the file.
a. If the data tab was the
active sheet when you
saved the file, click Save
Active Sheet or OK.
b. Follow the on-screen
prompts to save the file.
Uploading user information
To upload user information
Org Admin Test Admin Student
1. Click the button on
the Users Dashboard
menu bar in ISBE Teach,
or click the Upload
Users button at the top
of the Users Page
The Upload Users page
opens.
2. Add the .csv file with
user information in one
of two ways:
a. Drag the .csv file with
user information into
the box.
b. Click Add files,
locate and select the
.csv file with user
information, and then
click Open.
183. You will briefly see a “Processing…” message. 4. If the upload completes with no errors you will see Create User Accounts Confirmation. 5. If Teach encounters problems with the upload, a page appears that lists the errors. Correct your .csv file and try the upload again. 6. When you have successfully uploaded users, the number of users visible to you on the ISBE Teach dashboard will increase. Notes: Upon upload and creation, new users will receive email messages confirming their new accounts and a time sensitive password creation URL prompt (this email is valid for 72 hours). These emails contain the URL for ISBE Teach. Uploading Test Administrators: After uploading new test administrators, you should assign them to classes. In order for Test Admins to see students and rostered classes, they must first be assigned to classes. See Assigning users to classes for details. It is not required to assign Org Admins to classes as they have access to all classes at their permitted schools. 19
Editing user information
Edit your own user account

 Users are able to edit their own email address
 or create a new password by selecting the My
 account link from the account icon in the upper
 right corner of the page.
 Note: The email address used in the ISBE Teach
 must match the email address associated with
 the ISBE SIS system in order to roster or
 update classes.

Editing another user’s account
As an Org Admin, you can edit another user’s information if the user is either a peer or a subordinate
within your organization. I.e. if you have district level permissions, you may edit other district or
school users within your district. If you have school level permissions, you may edit other school
users within your school.

 To edit another user’s account

       Org Admin             Test Admin               Student

 1. Select the Users tile from
    the ISBE Teach Dashboard
    or select Users from the
    left Navigation Menu.

 2. Use the Org Filters above
    the table to select the
    organization of the user you
    wish to edit.

     For District Org Admins:
     To see all the users at the
     district level, select the –
     Select School- option.                Note: if you belong to multiple districts or multiple
                                           schools, use the Organization Name filter to select the
                                           desired organization.

20
3. Click the edit link under the
Operations column for the
user you want to change.
Note: Be sure you are
displaying the correct
district or school if you
cannot find your user.
4. The user page for your user
opens with the Edit tab
selected.
5. Beneath the Edit tab are
two additional tabs:
Account – used to edit the
user’s information.
Organization - used to
edit the user’s
organizational assignments.
6. Click the Account button to
edit account information.
You can edit the following:
• Email Address
• Current password
• User Status
• User Role
• User Full Name
Note: To prevent a user from
accessing ISBE Teach, update
their Status to Blocked.
7. Click Save to save your
changes.
218. Click the Organization tab
to edit a user’s
organizational information.
Use the drop down fields to
define the user’s state,
district, and school.
Select Add to save a new
organization to the user’s
profile.
Select Remove to remove
an assigned school.
9. Click Save to save your
changes.
Assigning Test Admins to Classes
Test Administrators must be assigned to classes before they can view rostered students, generate
test access codes (test tickets) for students, or manage student tests.
To assign a user to a class
Org Admin Test Admin Student
1. Select the Users tile
from the ISBE Teach
Dashboard or select
Users from the left
Navigation Menu.
2. Use the Org Filters
above the table to select
the organization of the
user you wish to assign to
a class.
For District Org Admins: To see all the users at the district level, select the -Select School-
option.
Note: If you belong to multiple districts or multiple schools, use the Organization Name filter to
select the desired organization.
223. You may view the classes
currently assigned to a
Test Admin by selecting
the View Classes button
under the Operations
column in the User list
table
4. Select the user(s) you
want to assign to a class
by checking the box to
the left of their name(s)
in the Users list.
5. Click the Assign to Class
button under the Org
Filters.
6. A list of classes appears.
Click the box to the left of
each class name you want
to assign to the user(s).
7. Click Next
8. If successful, a
confirmation message
appears
23To Unassign/Remove a Test Admin from a class
Org Admin Test Admin Student
1. Select the Users tile from the
ISBE Teach Dashboard or select
Users from the left Navigation
Menu.
2. Use the Org Filters above the
table to select the organization
of the user you wish to unassign
from a class.
For District Org Admins: To see all Note: If you belong to multiple districts or multiple schools,
of the users at the district level, select use the Organization Name filter to select the desired
the -Select School- option. organization.
3. Select the View Classes button
under the Operations column in
the User list.
Note: If the View Classes button
is not visible, it indicates that
Test Admin is not assigned to
any classes
4. Select the check boxes next to
classes you wish to remove from
the Test Admin.
5. Select Unassign Class to
complete the action or Cancel
to leave the class assignments
as is.
Note: Once removed/unassigned from a class, a Test Admin will no longer be able to view the rostered
students in that class or their associated test assignments.
24Working with students and classes
Students, tests, and classes
Just as schools are related to districts, students must be linked to classes before a student can be
assigned to take a test. So, just like users and schools, students and classes must be created.
As a District or School Administrator, you will use the ISBE ISA Import Wizard to select the
students and classes for the Illinois Science Assessment.
Note: If you are unable to access the ISA Wizard, verify that the email address associated with
your ISBE Teach account matches your account in SIS.
ISBE ISA Import Wizard
To use the ISA Import Wizard
Org Admin Test Admin Student
1. Log into ISBE Teach.
2. Select ISBE
Management button
located below the
Dashboard tiles. The ISA
Import Wizard will open.
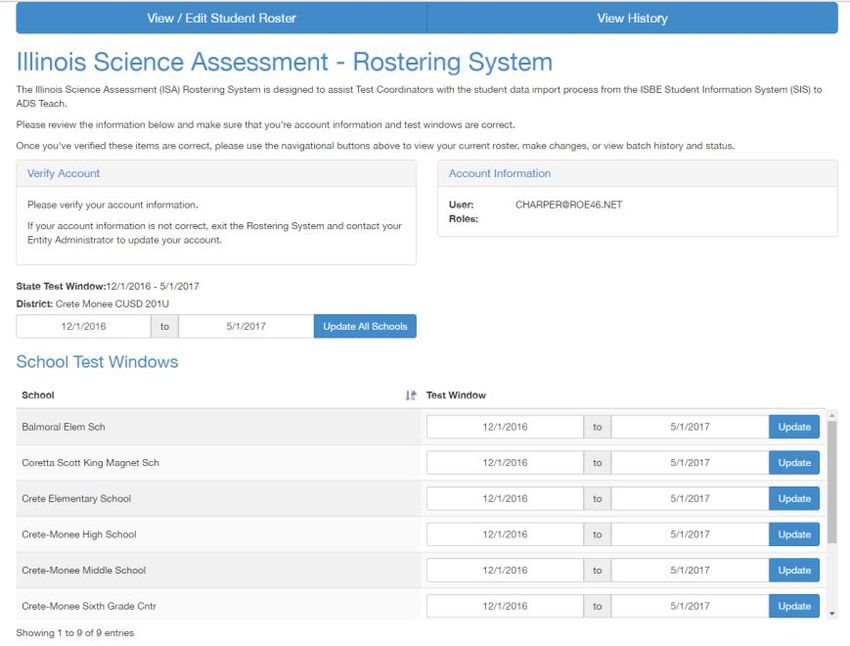
253. Verify your account
information.
4. Review/update test
window date range
a. Update for all schools,
enter the date range in
the top set of text
boxes. Click Update All
Schools.
b. Update an individual
school, enter the date
range next to the
school. Click Update
5. Select View/Edit Student
Roster to see the current
student roster.
6. Select View History to see
activity related to prior
batch submissions.
7. Review and Edit Roster
a. The current roster is
displayed in the grid on
the main roster page.
b. To make changes, use
either the CSV Editor or
the Online Editor
26Editing Student Roster using the CSV Editor
1. To edit by CSV, click CSV
Editor from the Roster
home screen.
2. You can update student
rosters at either the
district or an individual
school level. Download
the file from the preferred
level.
3. Once the file has
downloaded, open it in an
editing program such as
Excel and make the
necessary changes. Save
the updated file.
4. Select the Modified File
a. Click Choose File and
browse to the edited file
to add it to the wizard.
5. Click Upload Student
File to upload the file.
276. Once complete you will
see a success message
stating the number of
successfully uploaded
records.
7. From here, you can exit
this screen by selecting
buttons to View Batch
History or Keep
Working.
Editing Student Roster using the Online Editor
1. To edit the roster online,
click Online Editor
from the Roster home
screen.
2. A student grid will open.
3. Use the onscreen filters
and search tools to
identify the subset of
students and data you
wish to update.
Note: Filter the selection
before you update the
records. Filters may be
applied by name, DOB,
grade level, section name
and test location.
4. Click the column
headers to sort the table
by that column.
285. Update Records: Once the
subset of data is
identified, enter the new
Section Name and Test
Location in those fields.
Select Update Rows to
apply the changes.
6. Once the data update is
complete, you will see the
following message
7. Select Submit Changes
to send the updates to the
ADS Teach.
Note: If you do not select
submit changes, none of
your changes will be
saved.
8. Once complete, you will
see a confirmation screen
of the successful batch
submission.
299. View Batch History shows
the history and record
counts for previously
submitted batches.
10.Exit the ISBE Import
Wizard and return to ISBE
Teach by closing the
window.
30Creating and maintaining student profiles
Before you can assign and administer ISBE online assessments to students in your district, a record
for each student must exist in ISBE Teach. To upload students, use the ISBE ISA Import Wizard
described above. The ISA Import Wizard will search SIS for exits and enrollments and automatically
remove/add students from/to your roster if they have not started testing. However, if a previous
district has not exited a student, please contact the district/school contact and work to complete
the exit and new enrollment process in SIS. If time does not allow for this process (testing has
started in your district), then school administrators can follow the manual process detailed in the
next section to add the student to ISBE Teach. As always, as time allows, complete the work to
keep SIS updated.
Editing student information
To edit student information
Note: At the completion of the test, ISBE will use the student data as it is entered in SIS to
compile the final ISA results. If you make updates in ISBE-Teach to a student’s record, these will
not be captured unless you also update the record in SIS.
Org Admin Test Admin Student
1. Select the Students tile
from the ISBE Teach
dashboard or select
Students from the left
Navigation Menu.
The Students page will
open
2. Use the Org Filters
above the table to select
the organization of the
student you wish to edit.
3. Select the State
Identifier of the Student
you want to edit. The
Student Profile page
opens.
314. Click Edit Student to
make the profile editable.
5. Make the changes in the
student’s profile.
Note: fields marked with
an asterisk (*) are
required.
6. Click Save Student Data
at the bottom of the page.
Note on changing the State Student ID
Even though the State Student ID is editable, remember that it is a unique identifier of your
student.
Adding walk-in students
The ISBE ISA Import Wizard tool will search SIS for exits and enrollments and automatically
remove/add students from/to your roster if they have not started testing. However, if a previous
district has not exited a student, please contact the district/school contact and work to complete
the exit and new enrollment process in SIS. If time does not allow for this process (testing has
started in your district) then school administrators can follow the manual process detailed below
to add the student to ISBE Teach. As always, as time allows, complete the work to keep SIS
updated.
Adding a walk-in student
Note: The new student will automatically be assigned a test based on their grade level.
Org Admin Test Admin Student
321. Select the Students
tile from the ISBE
Teach dashboard or
select Students from
the left Navigation
Menu.
The Students page will
open
2. Use the Org Filters
above the table to select
the organization to which
you plan to add a walk-
in student.
If you have permissions
to more than one school,
ensure you add students
to the correct school.
333. Select the +Add
Single Student
button. The Add
Student Page will open.
4. You will be required to
enter or select the
following information:
• State Student
ID
• Class
• Grade
• First Name
• Last Name
• Gender
• Date of Birth
5. Click Save Student
Data at the bottom of
the page.
6. If the save was
successful, ISBE
Teach displays a
confirmation
message.
Notes:
The new student will automatically be assigned a test based on their grade level.
The State Identifier for students entered as walk-in students is appended with the Org
ID (RCDTS code) for tracking purposes.
34Test Management
Tests will automatically be assigned to students based on the student’s grade level. All students
will have access to the following two test accessibility features: Text to Speech and Line Reader.
Each student taking the 2020 ISA will have three (3) test sections assigned to them which means
that they will have three (3) unique test access codes assigned to them.
The titles of these test assignments follow this format (where X is 5, 8 or 11):
• 2020 Illinois Science Assessment - Grade X - Section 1
• 2020 Illinois Science Assessment - Grade X - Section 2
• 2020 Illinois Science Assessment - Grade X - Section 3
Reviewing test status
You will be able to see the test status for each student once a test is assigned to them.
In its initial state, the test status will be “Scheduled” When a student has completed
testing, the test status will change to “Submitted”.
To review the test status for students in a class
Org Admin Test Admin Student
1. Select the Assigned
Tests tile from the
ISBE Teach
dashboard or select
Tests from the left
Navigation Menu.
2. Select the Tests
Assignments tab.
3. Use the Org Filters
above the table to
select the school and
class for the student
or class whose test
status you want to
know.
354. To search for a
specific test
section in the list of
tests, use quote
marks around the
section name (e.g.
“section 1”) in the
search field.
The standard codes for test status are:
• Scheduled – a test has been assigned and not yet begun
• In progress – a student has navigated to the first question of the test
• Paused – a student has exited the test, or the test has been unlocked for them
• Canceled – the test has been canceled
• Submitted – the test has been submitted.
Cancel a test
If a student is no longer eligible or required to take the ISA, you may cancel their test.
To cancel a student’s test
Org Admin Test Admin Student
1. Select the Assigned
Tests tile from the ISBE
Teach dashboard or
select Tests from the
left Navigation Menu.
2. Select the Tests
Assignments tab.
3. Use the Org Filters
above the table to select
the school and class for
the Student whose test
you want to cancel.
364. To search for a
specific test section in
the list of tests, use
quote marks around the
section name (e.g.
“section 1”) in the
search field. You may
also search for specific
students by name.
5. Select the Cancel Test
button under the
Operations column in the
student’s row.
Follow the instructions on
the verification screen to
complete cancelling the
test.
6. Upon success, the
following banner will be
displayed.
Restore a test
In the event that a student’s test was accidentally cancelled, you may restore their test
assignment.
To restore a student’s test
Org Admin Test Admin Student
1. Select the Assigned
Tests tile from the ISBE
Teach dashboard or
select Tests from the left
Navigation Menu.
372. Select the Tests
Assignments tab.
3. Use the Org Filters
above the table to select
the school and class for
the Student whose test
you want to restore
4. To search for a specific
test section in the list of
tests, use quote marks
around the section name
(e.g. “section 1”) in the
search field. You may
also search for specific
students by name.
5. Identify the row with the
specific test to update
and select the Restore
Test button under the
Operations column.
Follow the instructions on the
verification screen to
complete restoring the test.
6. Upon success, the
following banner will be
displayed.
Reset a Student Login
In the event that a student receives an error message indicating that their test has been locked,
Org Admins have permission to reset a Student Login. This unlocks a student’s test and enables
the student to resume the test from their most recent item.
Warning: Using this button while a student is actively taking a test will cause the student’s test
to display an error. You should only use the reset student login if the student receives a test-
locked error message. Repeated clicking of this function could cause multiple errors. Once an
Org Admin has successfully completed the reset, the test status of the student will change from
In Progress to Paused.
38To restore a student’s test
Org Admin Test Admin Student
1. Select the Assigned Tests
tile from the ISBE Teach
dashboard or select Tests
from the left Navigation Menu.
2. Select the Tests
Assignments tab.
3. Use the Org Filters above the
table to select the school and
class for the Student whose
test you want to reset.
4. To search for a specific test
section in the list of tests, use
quote marks around the
section name (e.g. “section
1”) in the search field. You
can also search for specific
students by name.
5. Identify the row with the
specific test to update, select
the Reset Student Login
button under the Operations
column in the student’s row.
6. Follow the instructions on the
verification screen to complete
restoring the test.
Once an Org Admin has successfully completed the reset, the student’s test status on
the Test Assignment page will change from In Progress to Paused.
39Student Test Status Reports
Organization Admins have the ability to download a report of a student test status in their
organization(s) once tests have been assigned to students. This is a particularly helpful tool at
the end of the test to verify that all students have submitted their completed tests.
Appendix B provides instructions on creating an Excel PivotTable to summarize and analyze the
data in the Student Test Status Report
To download the Student Test Status report.
Org Admin Test Admin Student
1. Select the Assigned
Tests tile from the
ISBE Teach dashboard
or select Tests from
the left Navigation
Menu.
2. Select the Tests
Assignments tab.
403. If you have District The following fields are included in the downloaded .CSV files
permissions, you will
see two links: District Report School Report
a. All district Student School name
District name
report School RCTDS
District RCTDS
b. All School report Class name
(for the selected School name
Test name
school) School RCTDS Test Grade
4. If you have School Class name Last name
permissions, you will Test name First name
see a single link for all Test Grade Student ID
of the students in the Access Code
Last name
selected school. Test Status
First name
Student ID
Access Code
Test Status
Notes:
• Once the download CSV link is clicked, the file download will be managed by the
browser you are using.
• All students with assigned tests, regardless of their test status, will be shown in
these reports. Each student test assignment will be on a unique row. Each student
taking the 2020 ISA will have three (3) test sections assigned to them which means
that they will have three (3) unique test access codes assigned to them.
• The titles of these test assignments will follow this format (where X is 5, 8 or 11):
o 2020 Illinois Science Assessment - Grade X - Section 1
o 2020 Illinois Science Assessment - Grade X - Section 2
o 2020 Illinois Science Assessment - Grade X - Section 3
• Tip: This report can also be used to download all the access codes for your district or
school at one time. Appendix C shows how to organize the data into separate Test
Sections
41Submit Tests in Paused or In Progress Status
Once all students in your district and or school have completed testing, tests left in Paused or In
Progress may be submitted by Org Admins using the Submit Test feature. First, ensure the
student in fact finished engaging with the test (even if not all items were attempted), then use
the Submit Test feature to place the student record(s) into “Submitted” status for scoring.
Once a test is submitted, it is not possible for the student to continue working on that section of
the test.
To submit tests in Paused or In Progress status
Org Admin Test Admin Student
1. Select the Assigned
Tests tile from the ISBE
Teach dashboard or
select Tests from the left
Navigation Menu.
2. Select the Submit
Student Tests tab. Only
tests in Paused or In
Progress status will be
shown on the displayed
table.
3. Use the Org filters to
select the school and/or
class of the student(s)
test(s) to be submitted.
4. To search for a specific
test section in the list of
tests, use quote marks
around the section name
(e.g. “section 1”) in the
search field. You may
also search for students
by name.
Note: In Progress student tests will not appear on this page until their status has not changed
for 3 hours.
42Submit a single test
1. Select the Submit Test
button in the operations
field of the student test
that is to be submitted.
2. Follow the instructions on
the verification screen to
complete the test
submission.
3. Upon success, the
following banner will be
displayed.
Note: The displayed status will not update immediately. Depending on system traffic, it could
take up to 5 minutes for the updated status to be shown in ISBE Teach.
Submit multiple tests
1. To submit multiple tests,
select the check box to
the left of the student
test in the table.
To submit all entries in
the table, select the
check box in the header
row.
2. Once the tests to submit
are checked, select the
Submit selected tests
button
433. A confirmation message
listing the number of
selected tests and the
student name(s) will
appear. Follow the
onscreen prompts to
complete the bulk
submit.
4. Upon completion, a
success banner will be
shown.
Note: The displayed status will not update immediately. Depending on system traffic, it
could take up to 5 minutes for the updated status to be shown in ISBE Teach.
44Taking Tests
Before taking the Illinois Science Assessment, a student must have an access code (a unique
code that provides one student with access to one specific test) and access to a school computer
that meets the technical requirements of the Assessment Delivery Platform. See the section
“Printing Test Access Codes” section below for details.
Access codes (test tickets) are generated for each student and assessment combination after test
assignments are made. Check with your school Org Administrator to find out how these access
codes are provided to the students. Depending on local policy, you may be required to provide
these codes to students at test time.
Tests will be administered using a Safe Exam Browser (SEB) which locks down the device,
preventing the student from navigating away from the test mid-assessment. Ensure that the SEB
is properly deployed and installed on all testing devices prior to initiating student testing. SEB
information for the ISA can be found on the ISBE Website. Current versions are listed in Appendix
D. The ISA SEB has a unique configuration applied to it, and the ISA will only work with the
official ISA SEB.
New for the 2020 ISA - Students will be required to complete three (3) different test sections
to complete the entire ISA exam. The test sections will appear as three tests on the Assigned
Tests page, and students will need a unique access code to take each test section. To maintain
test security, only print and distribute the set of access codes for the current test section to
students at a time. Students within a class/session must start the section together, work at their
own paces to finish, then start the next section together if testing more than one section in a
session. Students cannot be issued all codes at once.
The titles of these test assignments will follow this format (where X is 5, 8 or 11):
• 2020 Illinois Science Assessment - Grade X - Section 1
• 2020 Illinois Science Assessment - Grade X - Section 2
• 2020 Illinois Science Assessment - Grade X - Section 3
Printing and Downloading Test Access Codes (Test
Tickets)
Before a student can take a test, you must generate an access code (test ticket), which is a
unique code that provides one student with access to one assessment. ISBE Teach generates
access codes for each student and assessment combination. Access codes may be downloaded as
.PDF or as .CSV files. Appendix C shows how to group the access codes provided on the CSV
download link found on the of Test Assignment page by test sections.
IMPORTANT: If you download the access codes as .CSV files, this data is editable. It is your
responsibility to ensure data integrity. Be especially careful if sorting the data to ensure that
assigned access codes remain associated with the correct students.
To Generate a Test Access Code for a Class
Org Admin Test Admin Student
451. Select the Assigned Tests tile
from the ISBE Teach dashboard
or select Tests from the left
Navigation Menu.
2. Select the Tests Overview tab.
3. Use the Org Filters above the
table to select the school and
class for which you want to
generate access codes.
Note: Test Administrators must be assigned to a class before they can generate access
codes.
4. In the Test Name column, find
the Test Section to be tested.
5. Click Generate Access Codes
in the Operations column of that
Test Section.
Note: If your class contains
students in multiple grades, you
will see a row for each of grade
levels. Generate access codes
for each grade level.
6. The Print access codes for a
class page shows the class and
test battery information for the
codes.
• If the information is not correct, close the page.
• If the information is correct: Select the Print button for a formatted PDF of the access
codes -Or – Select the Download CSV button to download this list as a .CSV file
• Follow the on-screen prompts to complete this step.
Note: Access codes generated via the Test Overview page will only show codes for student test
assignments that are in the following status: Scheduled, In Progress, Paused. Test assignments
that are in Cancelled or Submitted status will be excluded from these lists.
46To Generate a Test Access Code for an individual student
Org Admin Test Admin Student
1. Select the Students tile
from the ISBE Teach
dashboard or select
Students from the left
Navigation Menu.
2. Use the Org Filters above
the table to select the school
and class for the student for
whom you want to print the
access code.
3. Use the search field as
needed to find the student
and test section assignment.
4. Click Generate Access
Codes in the Operations
column for the Test Section
assignment list.
5. Select the specific Test
Section by clicking on the
name.
6. The Print access codes
page shows the test
battery information for the
student.
• If the information is not
correct, close the page.
• If the information is
correct, click Print
access code and go to
the next step.
47Logging in to take the test
When a student is ready to take the assigned assessment, he or she accesses ISBE Learn in a
testing room under the direction of a Teacher, proctor, test monitor, or other educator.
To log into a test
Org Admin Test Admin Student
1. On the ISBE Learn start
page, click Start.
2. The Login page opens.
Enter your access code.
Click Submit.
3. Next, ISBE Learn displays
your name, school, and
grade to confirm your
identity. Click Yes to
proceed, or No to start
over.
4. The test verification screen
shows the name of the test
and the test section. If this
is the correct test, click Yes.
If the wrong test is
displayed, click No and
speak to the Testing
Administrator or proctor
about the issue.
485. ISBE Learn displays the
Start Test page with basic
information and test
instructions.
To start the test, click Start
Test.
Instructions text:
Welcome! Today you will be taking the Illinois Science Assessment. Read each passage and/or
question carefully and then choose the best answer(s) for each question. You may look back at
the passage as often as necessary. If you have questions, raise your hand and a test
administrator will help you. You may now begin by clicking on the “Start Test” button.
49Test screen layout
On each ISBE Learn page you will find the following items:
A. Your name
B. Question number and total number of questions in the test or section
C. Test name, in case of multiple sections in the test, this will also indicate the Section
Name
D. Pause & Logout (see Pausing, logging out, and resuming a test)
E. Full Screen toggle
F. Buttons for accessibility features (see Using accessibility features).
G. Next and Back buttons
50Taking tests
Each assessment is composed of one section. A test section may include related material or
questions of the same type.
Navigating in ISBE Learn
To navigate in ISBE Learn
Org Admin Test Admin Student
1. Log into ISBE Learn, enter
your access code, and click
Start Test. (See Logging in
to take the test for detailed
instructions.)
2. The Section Start page
provides you with the
section number or name, the
number of questions, and
any instructions.
3. Click the Click Here to Go
On button to view the first
question.
4. Several types of questions
may appear on a test.
• To answer a multiple-choice
question, click the correct
answer.
• To answer a short answer
question, enter the response
in the field provided.
• To enlarge the test window
to full screen, click Full
Screen.
• To reduce the window to its
original size, click Full
Screen again.
• To navigate between
questions, click Next ( ) or
Back ( ).
51Pausing, logging out, and resuming a test
To pause, logout, and resume a test
Org Admin Test Admin Student
1. To save your work so you
can return to it at a later
time, click Pause & Logout
at the top left of your page.
2. ISBE Learn will display a
message to let you either
confirm that you want to
save your work and exit or
go back to the test.
3. To resume a test, log in with
your original access code.
ISBE Learn will confirm your
name and test. Click
Resume Test to return to
the place you exited the test.
52Submitting a test and exiting ISBE Learn
To submit a test and exit ISBE Learn
Org Admin Test Admin Student
1. When you reach the end of a test,
ISBE Learn displays an End of the
Session page. From this screen, to
review your answers, select Go
Back. If you are ready to submit
your test, select Click Here to Go
On to go to the final screen in order
to Submit your test.
2. ISBE Learn displays a final end of
test screen. Select Submit Test
and Exit to submit your test.
Note: Completion of this step is
REQUIRED in order to submit tests
and have tests count toward the
ISA.
3. ISBE Learn displays a message
allowing you to confirm that you
are ready to submit your test. Click
Yes to submit your test, or No to
return to the test.
Note: You cannot return to review
items on the test once you select
Yes.
4. A final screen appears confirming
that your test has been submitted.
5. Click Return to Log In to return to
the ISBE Learn home page. From
there, you can close the ISBE Learn
page in your browser.
Note: Students taking the ISA on a Windows
machine might see the following screen after
clicking Return to Log In. This is ok and
does not impact your test. Click Resend to
return to the ISBE Learn home page.
53Using accessibility features
Accessibility features are tools that help you read and understand
test questions. Accessibility features are available to all students
that want to use them. Examples of accessibility features currently
available in ISBE Learn are:
• The Text to Speech feature, which reads the question text and answer choices out loud
to the student.
• The Line Reader feature, which students can use to focus on one line at a time.
When a feature is in use, a dark blue bar appears at the bottom of the tool button. In the picture
above, the Line Reader tool is currently in use.
To use the Line Reader
Org Admin Test Admin Student
1. Click the Line Reader
icon at the bottom of the
page. A gray shadow
appears over the page,
with a line highlighted to
help you focus on your
reading.
The highlight will move as
you scroll up or down the
page.
2. To stop using the Line
Reader, click the Line
Reader icon again.
NOTE: For iPad users, tap
to move the line.
To use Text-to-Speech
Org Admin Test Admin Student
Note: If you intend to use the Text to Speech feature, ensure that the volume on your
testing device is turned on/up prior to launching the SEB.
541. To listen to a voice read
the text on the page, click
the Text to Speech
button. You see three
controls—Play, Stop, and
Settings.
2. Text to Speech will begin
reading at the beginning of
the text.
3. Click the Play icon to start
reading the lines on the
screen. The line being read
is highlighted in yellow,
and the blue highlight
moves from word to word
as they are read.
4. Click Pause to stop the
reading. Click Play to
begin again where you left
off.
5. Click Stop to stop reading
and return to the
beginning of the text
block.
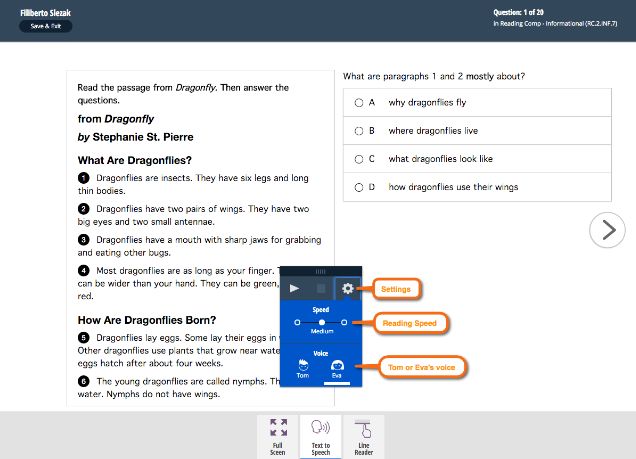
556. Click the Settings icon, to
change the speed at which
the text is read or the
voice that reads text.
• Set the speed to slow,
medium, or fast.
• Listen to a male voice
(called Tom) or a female
voice (called Eva).
7. To exit Text to Speech,
click the TTS icon at the
bottom of the page.
56Administering Tests
Org Admin Test Admin Student
Before the test
Before the testing session, you should verify a number of items:
• The computers are ready (i.e. that the SEB has been installed).
o Current SEB versions are listed in Appendix C
• The students have been assigned to the correct class and test.
• All the access codes have been generated and prepared to present to students.
During the test
Students log into ISBE Learn using the access codes you provide. There is nothing you need to do
to start the test for them.
Handling unexpected conditions
Here are some basic things to do when unexpected conditions interrupt testing.
• Students’ access codes are incorrect. Log into Teach to verify the correct student access
codes.
• Student is unable to complete the test. The student should save and exit the test, then
log back into ISBE Learn with the same access code to resume testing where the individual
left off.
• Power outage, technology failure, or computer crash. ISBE Learn locks tests when these
conditions occur. Once power is restored an Org Admin must complete the following steps:
1. Log into ISBE Teach.
2. Select Tests.
3. Click the Test Assignments tab.
4. Click the Reset Student Login link for the interrupted test assignments to make the
tests available again.
The student can then log back into ISBE Learn with the same access code and resume
testing.
• Any other issues. If a student receives an error code while testing, please use the table
posted below to troubleshoot the issue and attempt to resolve it yourself. If you are unable to
resolve the issue on your own, you may need to call ISBE Customer Support 1-866-317-
6034. If the issue involves the ISBE Teach or ISBE Learn software, be sure to write down any
error codes that appear (they will be in the format ADP-xxxx) as these codes will help
Customer Support identify and resolve your issues.
57Below is a list of more commonly encountered codes, what they might mean, and
the possible actions to take.
Error Error Description Recommended Action
Code
None There was a problem This error message appears if ISBE Learn cannot
logging in because the communicate with the server while a student is
server cannot be trying to log in.
reached.
Check that the student computer has internet
connectivity and that the Secure Exam Browser is
up-to-date.
TD-1000 There was a problem This error message appears if ISBE Learn is
starting your test unable to communicate with the server or if
content is unable to be downloaded.
First, check the network internet connectivity the
student’ computer. If possible, attempt to save &
exit the test, and then log in again.
If the error persists, contact the ISBE ISA
support desk.
ADP-1206 The Access Code does This error message appears when the access
not match our records. code used by the student doesn’t exist in the
system.
Verify the student’s access code in ISBE Teach
and try again.
ADP-1210 The test you are trying This error message appears if the student
to take requires the use attempts to enter the access code using a non-
of the Secure Browser secure browser rather than the SEB
Check that the student computer has an SEB
installed
ADP-1228 Test is already in This error message appears when the student
progress. attempts to open another tab using the same
browser/different browser.
Verify the student’s access code in ISBE Teach
and try again. If a student receives an error
message that their test is locked, follow the steps
to Reset a Student Login
58You can also read