LCL.Net Version 2.1

Hands-On Technical Training

   Participant Workbook
←
→
Page content transcription
If your browser does not render page correctly, please read the page content below

LCL.Net Version 2.1 Hands-On Technical Training Participant Workbook

Education & Training Interim Release: October, 2010 2
Class Attendees,

We here at the Education and Training Department of Moose International wish to take
this time to welcome each of you to the 2-Day hands on Technical Training (2-HOTT)
Class.

Training plays such an important role in the accurate record keeping at our Fraternal
Units and through training we learn the record keeping processes that Moose
International would like for “ALL” Fraternal Units to use. Whether the Records are for a
Lodge, Chapter, or Moose Legion, the Data Entry and processing of Membership and
Financial Records and information is performed, for the most part, the same way.
Having said that, we must add that there are a few processes that are handled slightly
differently in the Chapters and Moose Legions.

While the attendees at these classes typically are a mix of New Technical Trainers,
Lodge Administrators, Chapter Recorders and Moose Legion Secretaries, any Officer or
Member is encouraged and welcome to attend. The materials used in this class are
Lodge oriented, but keep in mind that we are not teaching actual entry of data, we are
teaching the Data Entry process which is the same for all three (3) Fraternal Unit types.

The Technical Trainer(s) instructing this class are Volunteers and give many hours to
the Fraternity to help us pass this training on to those in need of it. Any Registration
Fees for attending this Training is to help pay the Out of Pocket Expenses of the
Trainer(s) such as Travel, Lodging, Materials, Etc. They should not be bearing these
expenses on their own. We here at Education & Training are quite proud of the 200
plus Technical Trainers across the United States and Canada who give of themselves
and their Time and Resources to take this training to Lodge, Chapter and Moose Legion
personnel throughout our Fraternity. It goes without saying that we could not get the job
done without them.

As you go through the training, we ask that you give the instructor(s) the respect and
attention they deserve and your fellow learners the courtesy of holding conversations
and distractions to a minimum. When taught correctly and thoroughly, this class is two
full days of training and must be kept on schedule.

In closing, thank you for your interest in this training. We are confident you will learn
many correct processes that will assist you in maintaining your FRUs records accurately
and in a timely manner. Listed in the back of this workbook are options available to you
should you need additional help with or instruction in using LCL.net or QuickBooks.

Education and Training Department
Moose International

Education & Training         Interim Release: October, 2010                      3
Education & Training Interim Release: October, 2010 4
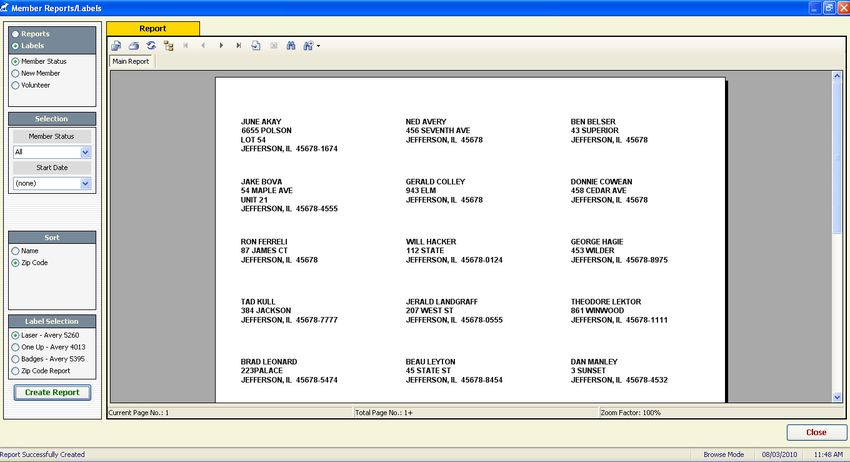
Table of Contents
Accessing LCL.net ....................................................................................................................... 7
Logging into LCL.net.................................................................................................................... 7
The FRU Information Screen ..................................................................................................... 8
  Editing Information on the FRU Information Screen ........................................................... 9
    Entering Officers on the FRU Information Screen .................................................. 10
    Entering Rates on the FRU Information Screen............................................................ 11
       To add a new Dues Rate to the FRU Information Screen: ................................ 11
    Categories ........................................................................................................................... 12
    Entering Activities on the FRU Information Screen ...................................................... 13
       ***Exercise*** - Editing FRU Information.................................................................... 13
The Member Screen .................................................................................................................. 14
  Member Information Tab ....................................................................................................... 14
    Editing Name Information ................................................................................................. 15
    Editing Current and Alternate Addresses ....................................................................... 15
    Editing Contact and Employment Information ............................................................... 15
    Viewing and Editing Member Notes ................................................................................ 16
    Editing Status ...................................................................................................................... 16
    Editing Member Information (Mail Preferences) ............................................................ 17
    Viewing Sponsor Information ........................................................................................... 17
    Editing User Defined Info .................................................................................................. 17
    Editing Dates ....................................................................................................................... 18
    Viewing Life Member Information .................................................................................... 18
  Payment Tab ........................................................................................................................... 19
  Family Tab ............................................................................................................................... 19
    Editing and Removing Spouse Information.................................................................... 20
    Adding, Editing and Removing Children Information.................................................... 21
  Activities Tab ........................................................................................................................... 22
    Adding Activities for a Family Member ........................................................................... 22
    Removing Activities for a Family Member ...................................................................... 22
       ***Exercise*** - Editing Member Information ............................................................. 23
Entering Out of Lodge Sponsors ............................................................................................. 24
  To access the Out of Lodge Sponsor Screen: ............................................................. 24
  Entering Our of Lodge Sponsor Information ...................................................................... 25
       ***Exercise*** - Entering an Out of Lodge Sponsor.................................................. 25
The Application Screen ............................................................................................................. 26
  Entering Applications ............................................................................................................. 27
       ***Exercise*** - Entering Applications ......................................................................... 28
       ***Exercise*** - Enter a Code 2 – Re-Enroll Application.......................................... 29
       ***Exercise*** - Enter a Code 5 – Transfer In............................................................ 30
       ***Exercise*** - Enter a Code L – Comp Member Application ................................ 30
       ***Exercise*** - Enter a Code 3 – Reinstate Application ......................................... 31

Education & Training                          Interim Release: October, 2010                                                      5
Transmitting .............................................................................................................................. 32
  Member Search ..................................................................................................................... 33
    To perform a Member Search by Member ID: .......................................................... 34
      ***Exercise*** - Member ID Search ............................................................................. 35
  Transmitting Applications ................................................................................................. 36
    Active Applications Tab ................................................................................................. 37
    Selecting Applications.................................................................................................... 38
    Transmitted Applications Tab ...................................................................................... 38
    Received Applications Tab............................................................................................ 39
  Daily Transmit ....................................................................................................................... 40
    Fraternal Unit and Member Data Transfer ................................................................. 41
    Send Tab............................................................................................................................. 41
    Receive Tab ....................................................................................................................... 42
    Messages Tab ................................................................................................................... 42
    Connecting to Moose International ............................................................................. 42
  Get Awards and Degrees ................................................................................................... 43
    To Run “Get Awards and Degrees”: ........................................................................... 43
  Inactivating and Deleting and Application .................................................................... 44
    To Inactivate and Delete an Application: ................................................................... 44
  Enrolling Applicants............................................................................................................ 45
  Get Member Information .................................................................................................... 47
  Export ...................................................................................................................................... 48
Reports and Labels ................................................................................................................. 49
  Address Change Reports and Labels............................................................................. 50
  Activities Reports and Labels........................................................................................... 52
  Applicant Reports and Labels .......................................................................................... 53
  Arrears Reports and Labels .............................................................................................. 54
  Deposit Report ...................................................................................................................... 55
  Member Payment Report ................................................................................................... 56
  Officer Reports and Labels ............................................................................................... 57
  Member Reports ................................................................................................................... 63
  Member Labels ..................................................................................................................... 64
  Zip Code Report ................................................................................................................... 65
  Volunteer Report .................................................................................................................. 65
  Active Roster Report ........................................................................................................... 66
  Special Dates Reports and Labels .................................................................................. 67
  Miscellaneous Code Report .............................................................................................. 68
  Deceased Report .................................................................................................................. 69
  Paid as of Date Report ........................................................................................................ 70
       ***Exercise*** - Creating Reports ................................................................................ 71
Backup ........................................................................................................................................ 72
Restore........................................................................................................................................ 74
To Find a Technical Trainer................................................................................................... 76

Education & Training                           Interim Release: October, 2010                                                        6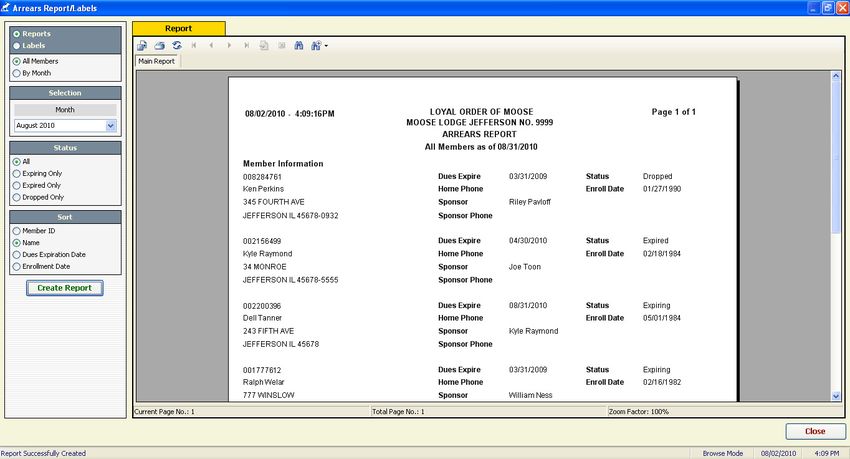
Accessing LCL.net
Refer to Chapter 1, Overview and Navigation, of the LCL.net Resource Manual under
Accessing LCL.net
To access the LCL.net double-click the program Icon. The Icon for LCL.net is
found on your computer’s desktop.
Desk Top Icon
Will not say “Training”
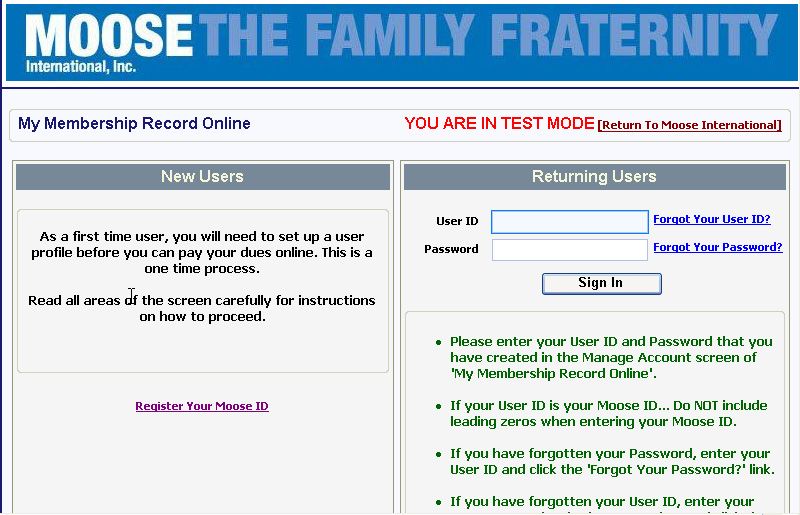
The LCL.net Version: v2.1 Login Screen will appear:
Note: Your version will not say Training.
LCL.net Login Screen
If the LCL.net software Icon is not displayed on the Windows desktop, then follow
these instructions:
1. Click the Start button on the Windows task bar.
2. Scroll the cursor up to All Programs.
3. Right-click LCL.net.
4. Scroll to Send To in the menu box.
5. Click Desktop (create shortcut).
The LCL.net Icon will appear on your Desktop.
Logging into LCL.net
Refer to Chapter 1, Overview and Navigation, of the LCL.net Resource Manual under
Logging into LCL.net.
To Log into LCL.net:
1. Type your User Name in the User Name field. (level3)
2. Type your Password into the Password field. (Lodge, Chapter, Legion)
3. The Fraternal Unit field must match the type of FRU you entered as a
Password.
Use the Drop Down Menu to find Lodge, Chapter, or Legion.
4. In the Organization field, choose Student for training, Moose for live FRU
Data.
Education & Training Interim Release: October, 2010 7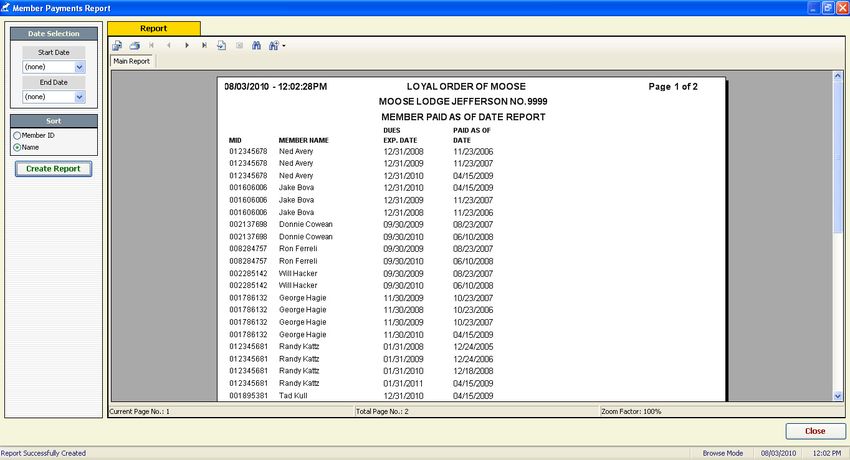
The FRU Information Screen
Refer to Chapter 2, the FRU Information Screen, of the LCL.net Resource Manual.
LCL.net has four main areas that are based on functionality:
FRU Information, Members, Applications and Sponsors
The FRU Information screen is broken down into individual information boxes.
Each of these boxes contains a specific type of FRU Information such as:
Mailing Address Last Examination
Physical Address Control Dates
General Information Last Changed Date
Phone Information Last Backup Date
Member Spare Dates Labels Period End Date
Officers Categories
Lodge Totals Activities
Rates
Education & Training Interim Release: October, 2010 8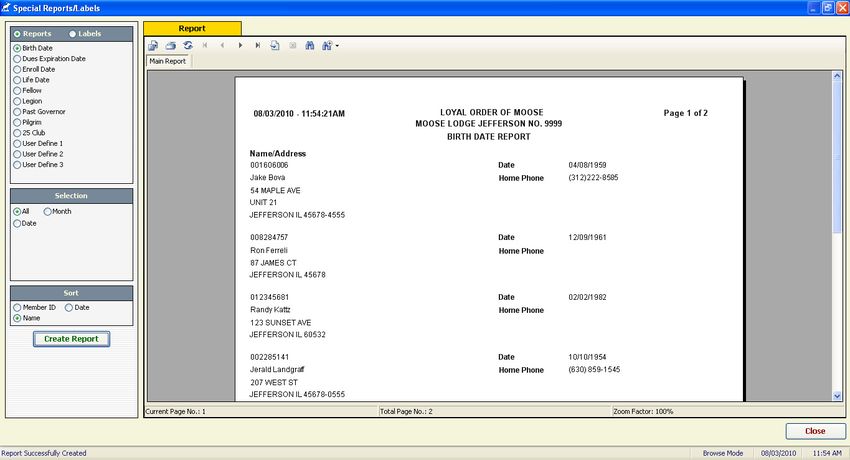
Editing Information on the FRU Information Screen
To edit information on the FRU Information Screen:
        1. Click the Edit option located in the upper right corner of the box you wish to
           edit.
                                                               Click Here

        2. Enter the new information in the available fields.

        Save, Reset &
        Close Buttons

        3. Click the Save Button to enter these changes into the system.

Education & Training          Interim Release: October, 2010                       9
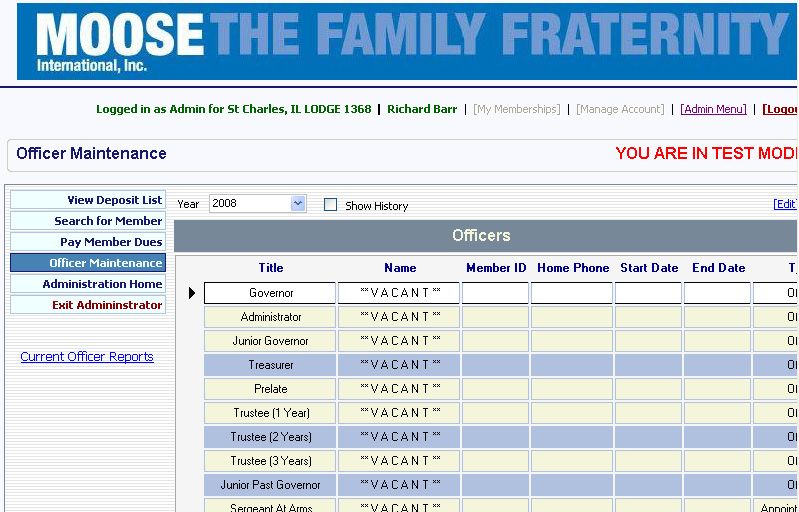
Entering Officers on the FRU Information Screen

NOTE: As of May 1, 2008, the FRU Officers must be entered each year on the Moose
International Website using the Officer Maintenance function accessed from the “My
Record Online” screen of “MMMS Online”.

If an Officer or Chairman resigns or is removed during the Moose Year, the Officer or
Chairman Position must be edited in MMMS Online.

For Step-by-Step instructions for using the MMMS Online function, you may print the
“MMMS Online User Documentation” booklet from the Education and Training Portal
of the Moose International Website under Printable Educational Materials.

Officer entry and maintenance is addressed later in this Workbook and is covered when
the Training gets to the Topic “Officer Reports and Labels”.

Education & Training        Interim Release: October, 2010                     10
Entering Rates on the FRU Information Screen
Refer to Chapter 2, The FRU Information Screen, of the LCL.net Lodge Resource
Manual under Rates.

        The Rates box is used to Add, Edit and Remove Dues Rates for the FRU.

To add a new Dues Rate to the FRU Information Screen:
        1. Click the Add button in the upper right corner of the Rates Box.
           The Add Rate Screen opens.

        2. Choose “Dues” as the Rate Type.
        3. Enter the Effective date for the new Dues Rate.

NOTE: READ – IMPORTANT: The Effective date must be at least Ninety (90) days
following the date the new Dues Rate is entered into LCL.net v2.1 and transmitted to
Moose International.
(The effective date no longer must be the first day of a month) After approval of the new
Dues Rate by the FRU Membership, the FRU must add the Dues Rate in LCL.net v2.1
and transmit the change to Moose International via a Daily Transmit. The Lodges must
then send a letter stating the new Dues Rate and its effective date to the General
Governor. The Women of the Moose, after approval of the new Dues Rate by the
Membership, need only to enter the new Dues Rate into LCL.net V2.1.

        4. If the new Dues Rate is for a specified period of time, an End Date should be
           entered reflecting the date the Dues Rate ends.
           A Second Entry should then be made using the following day after the End
           Date of the previous rate as the effective date for the Second entry. This will
           assure that you have an active Dues Rate in place when the previous Dues
           Rate expires.
        5. Enter the Dollar Amount of the new Dues Rate in the Total Amount field.
           LCL.net v2.1 will automatically calculate the ABCD and the FRU amounts.
        6. Choose the Currency Type by clicking the drop down arrow.
        7. Click the Save button to enter the new Dues Rate into LCL.net v2.1.
Education & Training          Interim Release: October, 2010                      11
Categories
Refer to Chapter 2, the FRU Information Screen, of the LCL.net Resource Manual.
The Categories box is used to Add, Edit and Remove activity categories for the
FRU.
Categories are used to group your FRU Activities by Type.
NOTE: Selecting (Highlighting) a category in the Categories box will update the
activities displayed in the Activities box, located to the right of the Categories box. The
updated Activities box will show the activities that have been assigned to the selected
(highlighted) category.
Add a Category
To add Categories on the FRU Information Screen:
1. Click Add
2. Enter the Category Name in the Category field.
NOTE: You will want to enter the specific category name that you wish to create, such
as “Newsletter”. This type of entry would be useful for setting up who should receive a
newsletter.
3. Click the Save button to enter the Category into LCL.net v2.1.
Education & Training Interim Release: October, 2010 12Entering Activities on the FRU Information Screen
Refer to Chapter 2, The FRU Information Screen, of the LCL.net Resource Manual.
The Activities box is used to Add, Edit and Remove activities for the FRU.
Activities are grouped into categories based on the type of activity. For Example,
the Activities Bridge, Rummy and Poker are grouped under the category “Cards”.
To add Activities on the FRU Information Screen:
1. Click “Add” in the Activities box on the FRU Information Screen.
2. Enter the activity name in the Activity field.
NOTE: You will want to enter the specific activity name you wish to create, such as
“School Board”.
3. Click the Save button to enter the activity information into LCL.net v2.1.
***Exercise*** - Editing FRU Information
Enter the following information. Use this Workbook, as well as, the referenced
section of the Resource Manual if you have questions:
1. Enter a new Mailing Address for the FRU: PO Box 3429
Jefferson IL 60539
2. Enter the following Spare Date Label Information: Preferred Member
Charter Member
3. Enter the following new Dues Rate: $50.00 – Use the default effective date
4. Enter the following new Categories: Newsletter
Community Involvement
5. Enter the following new Activities:
Enter under the Category – Newsletter
1. Does get Newsletter
2. Does not get Newsletter
Enter under the Category – Community Involvement
1. School Board
2. Little League Coach
3. City Council
Education & Training Interim Release: October, 2010 13The Member Screen
Refer to Chapter 3, The Member Screen, of the LCL.net Resource Manual.
Clicking the Members Tab accesses the Members screen. This chapter will
demonstrate how to access, edit, add and delete FRU Member Information using
the Members Screen.
To access and update a Member’s Information you must open the member
record in the Member Information window. The Member Information window
contains four tabs to view and edit specific member, family and activity
information, or to view payment history information.
Member Information Tab
Refer to Chapter 3, The Member Screen, of the LCL.net Resource Manual
The Member Information window is broken down into individual information boxes.
Name Information
Address Information (Current and Alternate Address Information)
Contact and Employment Information
Member Notes
Status
Member Information
Sponsor Information
User Defined Information
Dates
Life Member Information
Education & Training Interim Release: October, 2010 14Editing Name Information
Refer to Chapter 3, The Member Screen of the LCL.net Resource Manual
The Name Information box is where you would edit the Member’s first name,
middle name, last name and any name suffix such as “Sr.” or “Jr.”
To edit Member Name Information:
1. Click the Edit button located at the bottom of the Member Information
window.
NOTE: The Data fields that are not shaded can be edited.
2. Edit the Member’s Name Information in the available fields.
3. Click the Save button to enter these changes into LCL.net v2.1.
Editing Current and Alternate Addresses
Refer to Chapter 3, The Member Screen of the LCL.net Resource Manual.
The Current Address and Alternate Address Tabs are used to enter and select
the active address for the selected member. For Members with more than one
mailing address, you can enter the second address by clicking the Alternate
Address Tab. The Active Address checkbox allows you to select an address as
the Member’s current active address. This is very useful for those FRUs with
“Snow Bird” Members that move between two addresses.
To edit Current and Alternate Address Information:
1. Click the Edit button located at the bottom of the Member Information
window. The data fields will no longer be shaded and the bottom status bar
will display Edit Mode.
2. Enter your Member’s Current or Alternate Address information in the available
fields.
3. Click the Save button to enter any changes into LCL.net v2.1.
Editing Contact and Employment Information
Refer to Chapter 3, The Member Screen of the LCL.net Resource Manual
The Contact Information and Employment Information tabs are used to enter contact
numbers and employment information for the selected Member. The Employment
Information tab has a Volunteer checkbox that allows you to produce a report to identify
those Members who are willing to donate their skill or expertise to the FRU.
To enter or Edit Contact and Employment Information:
1. Click the Edit button located at the bottom of the Member Information
window.
2. Enter the Member’s Home Phone Number, Cell Phone Number, Fax Number
and E-mail address information in the available fields.
3. Click the Employment Information tab and enter the Member’s Occupation,
Employer and Business Phone Number in the available fields.
4. Select the Volunteer checkbox, if this Member volunteers his services to the
FRU.
5. Click the Save button to enter these changes into LCL.net v2.1.
Education & Training Interim Release: October, 2010 15Viewing and Editing Member Notes
Refer to Chapter 3, The Member Screen of the LCL.net Resource Manual.
The Member Notes tabs are used to view and add any specific notes that apply
to that Member.
The Member Notes tab contains a text box that allows up to 100 characters to be
entered.
To edit or add Member Notes:
1. Click the Member Notes tab.
2. Click Edit and enter or edit the Member Notes.
3. Click the Save button to enter any changes into LCL.net v2.1.
Editing Status
Refer to Chapter 3, The Member Screen of the LCL.net Resource Manual.
The Status box is where you enter the Member’s current status in the FRU. The
Membership Status and Individual Status allow you to select the current status
from a drop down list.
The Available Membership Status selections include:
Active
Resigned
Transferred
The available Individual Status selections include:
Deceased
Member
To edit Membership Status:
1. Click the Edit button located at the bottom of the Member Information
window.
2. Click the Membership Status drop down arrow.
3. Select the Member’s current Status from the drop down list.
4. Click the Individual Status drop down arrow.
5. Select the member’s current Status from the drop down list.
6. Click the Save button to enter any changes into LCL.net v2.1.
Education & Training Interim Release: October, 2010 16Editing Member Information (Mail Preferences)
Refer to Chapter 3, The Member Screen of the LCL.net Resource Manual.
The Member Information box is where you enter or Edit the members Mail
Preferences. The Moosehaven Resident field will indicate if the Member is
residing at Moosehaven and may only be edited by Moose International.
To edit Member Information (Mail Preferences)
1. Click the Edit button at the bottom of the Member screen.
2. Click the No Mail check box if desired.
3. Click the Do Not Solicit check box if desired.
4. Click the Save button to enter any changes into LCL.net v2.1.
Viewing Sponsor Information
Refer to Chapter 3, The Member Screen of the LCL.net Resource Manual.
The Sponsor Information box shows the Member Name, Member ID and FRU
number of the person that sponsored the member.
NOTE: Sponsor Information cannot be edited.
Editing User Defined Info
Refer to Chapter 3, The Member Screen of the LCL.net Resource Manual.
The User Defined Info box is used to enter or edit specific user-defined dates for
FRU Members such as Preferred Member Dates.
The Miscellaneous Code Number field is used to enter a number that may be
assigned to Members for tracking purposes.
To enter or edit User Defined Info:
1. Click the Edit button located at the bottom of the Member Information
window.
2. Enter the Miscellaneous Code Number, if needed.
3. Click the User Defined field 1 drop down arrow and select the date from the
Calendar or manually enter the desired date.
4. Click the User Defined field 2 drop down arrow and select the date from the
Calendar or manually enter the desired date.
5. Click the User Defined field 3 drop down arrow and select the date from the
Calendar or manually enter the desired date.
6. Click the Save button to enter any changes into LCL.net v2.1.
Education & Training Interim Release: October, 2010 17Editing Dates
Refer to Chapter 3, The Member Screen of the LCL.net Resource Manual.
The Dates box is used to view important dates in the Member’s record. The only
date that may be edited at the FRU is the Member’s Birth Date.
NOTE: All other changes to the Dates in LCL.net v2.1 are made at Moose International.
To enter or edit the Birth Date:
1. Click the Edit button at the bottom of the Member Window.
2. Click the Drop down arrow in the Birth field.
3. Select the Member’s Birth Date from the Calendar or manually enter the Birth
Date.
4. Click the Save button to enter any change into LCL.net v2.1.
Viewing Life Member Information
Refer to Chapter 3, The Member Screen of the LCL.net Resource Manual.
The Life Member Info box contains a Member’s Life Membership Information
data, if applicable.
NOTE: Life Member Information is entered by Moose International and cannot be entered or
edited from the Member Screen.
The Life Member Types that display are:
Paid – The Life Membership was purchased.
50 Year – The Member has been awarded a Life Membership for 50 Years
Service.
250 Sponsor – The Member has bee awarded a Life Membership for
sponsoring 250 Members into the Lodge or Chapter. (This does not apply to
the Moose Legion)
Education & Training Interim Release: October, 2010 18Payment Tab
Refer to Chapter 3, The Member Screen of the LCL.net Resource Manual.
The Payment window is used for reference purposes only. This screen will
display all payments made to Moose International through the Lock Box by the
Member.
NOTE: This screen will be populated with information after the Member payment is
received through the Lock Box at Moose International and the Member’s Record will be
updated during the Daily Transmit process.
Family Tab
Refer to Chapter 3, The Member Screen of the LCL.net Resource Manual.
The Family Information boxes and fields are where you will enter, update or
view the Member’s family information in LCL.net v2.1.
Spouse
Information
Box
Children
Information
Box
Education & Training Interim Release: October, 2010 19Editing and Removing Spouse Information
Refer to Chapter 3, The Member Screen of the LCL.net Resource Manual.
The Spouse Information box is used to enter and edit spouse information for
the selected Member.
To Edit Spouse Information:
1. Click the Edit option located in the upper right corner of the Spouse Box.
2. Click to Select the Married (Y/N) checkbox.
NOTE: All data fields will now be activated for data entry and the Last Name field will
automatically populate with the Member’s Last Name. This field may be edited if
necessary.
NOTE: To remove existing spouse information for the Member, simply click to uncheck
the Married (Y/N) checkbox. The spouse information fields will be cleared.
3. Enter the spouse’s first name in the First Name field.
4. Change the Spouse’s Last Name field if needed.
5. Click the Birthday drop down arrow and select the spouse’s Birth Date from
the Calendar or manually enter the correct date.
6. Click the Wedding Anniversary drop down arrow and select the correct
Anniversary Date from the Calendar or manually enter the correct date.
7. Click to select the WOTM (Y/N) checkbox if needed.
This option should be checked, only if the spouse is an Active WOTM
Member.
8. Enter any additional Notes for the spouse in the Notes field.
9. Click the Save button to enter these changes into LCL.net v2.1.
To Remove the Spouse Information:
1. Click the Edit option located in the upper right corner of the Spouse box.
2. Click to uncheck the Married (Y/N) checkbox.
Education & Training Interim Release: October, 2010 20Adding, Editing and Removing Children Information
Refer to Chapter 3, The Member Screen of the LCL.net Resource Manual.
The Children Information box is used to Add, Edit or Remove child information
for the selected Member.
To Add Children Information:
1. Click the Add option located in the upper right corner of the Children box.
NOTE: The Add Child window will open and the Last Name field will automatically
populate with the Member’s last name. This may be changed if necessary.
2. Click the Gender drop down arrow and select the gender of the child to be
added.
3. Enter the child’s first name in the First Name Field.
4. Change the last name for the child in the Last Name field if necessary.
5. Click the Birthday drop down arrow and select the child’s birth date from the
Calendar or manually enter the correct date.
6. Enter any additional Notes for the child in the Notes field.
7. Click the Save button to enter the information into LCL.net v2.1.
To Edit Children Information:
1. Click to select (Highlight) the child with information to be edited in the children
list.
2. Click the Edit option located in the upper right corner of the Children box.
3. Click the Gender drop down arrow and edit the gender of the child if
necessary.
4. Edit the child’s first name in the First Name field, if necessary.
5. Edit the child’s last name in the Last Name field, if necessary.
6. Edit the Child’s Birthday by clicking the Birthday drop down arrow and
selecting the child’s birth date from the Calendar or manually enter the correct
date.
7. Enter or Edit the notes for the child in the Notes field.
8. Click the Save button to enter any changes into LCL.net v2.1.
To Remove Children Information:
1. Click to select (Highlight) the child to be removed from the children list.
2. Click the Remove button located in the upper right corner of the Children box.
Education & Training Interim Release: October, 2010 21Activities Tab
Refer to Chapter 3, The Member Screen of the LCL.net Resource Manual.
The Activities window is broken down into four main information boxes. The
Activities box in the upper right contains all the activities specific to the
Category selected (Highlighted) in the Categories box in the upper left. The
Selected Activities for Family Members box in the lower right contains
activities specific to the Family Members selected (Highlighted) in the Family
Member Selection box in the Lower left.
Adding Activities for a Family Member
To Add Activities for a Family Member:
1. Click to highlight the desired family member in the Family Member Selection
box.
2. Click the desired Activity Category in the Categories box.
3. Click the desired activity in the Activities box.
4. Click the Add Activity button to add the highlighted activity for the selected
family member.
5. Continue to select and add categories and activities for the selected family
member as needed.
NOTE: To choose a different family member and add activities, simply click to highlight
another family member in the Family Member Selection box.
Removing Activities for a Family Member
To Remove Activities for a Family Member:
1. Click the desired family member in the Family Member Selection box.
2. Click the desired activity to remove in the Selected Activities for Family
Member box.
3. Click the Remove button in the upper right corner.
4. Click the Yes button to remove the activity of the NO button to cancel.
NOTE: The removed activity will be deleted from the selected activities for that family
member.
Education & Training Interim Release: October, 2010 22***Exercise*** - Editing Member Information
Edit Dan Manley’s record using the following information. Use the previous
pages of this Workbook as the reference if you have questions.
Dan Manley: MD
Birth Date: 5/15/1965
E-mail address: drdan@comcast.net
Alternate Address: 12 South Beach Road
South Padre Island, TX 79854
Occupation: Doctor
Employer: Methodist Hospital – Phone #630.987.4125
Miscellaneous Code No.: 382
Wife: Sylvia – Birth Date: 09/22/1968
Children: Jimmy – Birth Date 08/12/1995
Sara – Birth Date 05/05/1997
Tim – Birth Date: 10/22/1999
Dan’s Activities: Golf, Ritual, Fishing, Little League Coach
Sylvia’s Activities: Bridge, Bowling, Fishing
Jimmy’s Activities: Football, Amusement Parks, Fishing
Sara’s Activities: Swimming, Ice Skating, Fishing
Timothy’s Activities: Fishing, Soccer
Education & Training Interim Release: October, 2010 23Entering Out of Lodge Sponsors
Refer to Chapter 5, The Sponsor Screen of the LCL.net Resource Manual
The Out of Lodge Sponsors screen is used to retrieve real time information
from Moose International about sponsors that are not a Member of your FRU, but
are Members of another FRU. They must be saved into the Sponsor’s List
before they may be entered on the Application screen as the Sponsor.
To access the Out of Lodge Sponsor Screen:
1. Click the Sponsor Tab.
2. Click the New Sponsor button in the upper right corner of the Sponsor List
screen.
The Out of Lodge Sponsor screen opens.
Education & Training Interim Release: October, 2010 24Entering Our of Lodge Sponsor Information
To enter out of lodge sponsor information:
1. Click the Sponsors Tab
2. Click the New Sponsor button in the upper right corner of the Sponsor List
window.
3. Enter the Sponsor’s MID number in the Member ID field.
4. Click Find.
The current information on the Member Sponsor will be retrieved from the
Moose International Computer.
5. Click the Save button to save the current information to the Sponsors List and
allow you to enter the Sponsor’s MID or select the Sponsor from the
Sponsors List.
NOTE: Clicking the Reset button will cancel entry of the Out of Lodge Sponsor.
***Exercise*** - Entering an Out of Lodge Sponsor
Enter the following Out of Lodge Sponsor information. Use this Workbook as a
reference if you have questions.
1. Enter MID#: 17970266 in the Member ID field.
2. Click “Find”.
Find Button
Enter MID#
3. Click Save to add the sponsor to your Sponsor List.
Education & Training Interim Release: October, 2010 25The Application Screen
Refer to Chapter 4, The Application Screen in LCL.net Reference Manual.
The Application Screen is broken down into different sections for entry.
Applicant Code Selections:
Code 1 – New – For Applicants that have never been a Moose Fraternity Member.
Code 1 – Multiple Membership – For Members of another FRU applying for Multiple
Membership in your FRU.
Code 2 – Re-Enroll – For previous Moose Fraternity Members in arrears for 12
months or more from the expiration date of the member’s last Membership Dues
Record. The Former Member would have a Status of Dropped or Terminated.
Code 3 – Reinstate – For previous Moose Fraternity Members dropped for non-
payment of Dues for more than 12 months, but less than 24 months from the
expiration date of the Member’s last Membership Dues Record. Back Dues must
accompany the Application in an amount sufficient to bring the Member’s Dues Date
to a current Status. The Former Member would have a Status Dropped.
Code 5 – Transfer In – For Members transferring to your FRU from another FRU.
The Member’s Dues Date must be current.
Code L – Comp Member – For Members who are not a member of your FRU that
are entered so labels can be printed (ex. To receive your FRUs Newsletter).
NOTE: All references to Tax ID Type, Tax ID and Social Security Number have been
removed from the Application Screen.
Education & Training Interim Release: October, 2010 26Entering Applications
To Enter an Application:
1. Click the Applications Tab near the top of the LCL.net Workspace screen.
2. Click the New Application button on the upper right side of the Applications
screen to open a new Application screen.
3. Enter the Application Date in the Application Date field by clicking the drop
down arrow to access the Calendar or manually type in the date. If no date is
entered the date will default to the current date after pressing the Tab Key.
4. Press the Tab key to move to the Application Code field.
5. Click the drop down arrow to the right of the Application Code field.
6. Select and click Application Code 1 – New.
NOTE: The Status field defaults to Active and cannot be changed at this time.
7. Click in the box next to Fees Paid to indicate all fees have been paid.
8. Click in the box next to Dues Paid, if applicable.
To Enter Name Information on the Application Screen:
1. Enter the Applicant’s First Name.
2. Enter the Applicant’s Middle Name.
3. Enter the Applicant’s Last Name.
4. Enter a Suffix, if applicable, by clicking the drop down arrow and selecting the
appropriate suffix by scrolling through the selections.
To Enter Address Information on the Application Screen:
1. Enter the Applicant’s Street Address, City, State and Zip Code.
2. Enter the Applicant’s Country, only if different from the Country of the FRU.
3. Enter the Applicant’s Date of Birth
To Enter Contact Information on the Application Screen:
1. Enter the Applicant’s Home Telephone Number.
2. Enter the Applicant’s Cell Phone Number.
3. Enter the Applicant’s E-mail Address.
To Enter Family Information on the Application Screen:
1. If the Applicant is married, click in the box next to Married which will open the
Spouse Name information area.
2. Enter the First Name, Middle Name and Last Name of the spouse.
3. If the Applicant has children, enter the number of children in the box.
To Enter Employment Information on the Application Screen
1. Enter the Applicant’s Occupation.
2. Enter the Applicant’s Employer Name.
3. Enter the Applicant’s Business Telephone Number.
Education & Training Interim Release: October, 2010 27To enter Sponsor Information on the Application Screen:
1. Click Select in the Sponsor area to open the Sponsor selection screen.
2. Click on the Members or Sponsors tab and select the Sponsor by entering
an MID# or Last Name of the Sponsor in the Find box or scroll down in the
list until you find the Name of the Sponsor.
3. Double click the name of the Sponsor in the Members or Sponsors list. The
Sponsor’s information will populate the Sponsor area of the Application
Screen.
***Exercise*** - Entering Applications
Enter a New Member Application (Application Code 1 – New).
A Code 1 – New Member Application is for an Applicant that has never been a
member of the Moose Fraternity.
Enter the following Code 1 – New Application:
Name: John Davis
Address: 1938 Belt Line Road
Jefferson, IL 60532
Date of Birth: 08/21/1962
Telephone: 630.897.7412
E-mail Address: jdavis@sbcglobal.net
Wife: Brenda
Children: (3) three
Occupation: Nurse
Employer: Rush-Copley Hospital
Business Telephone: 630.216.5698 ext 563
Sponsor: Brad Leonard
Paid: Fees
Paid: Dues
Education & Training Interim Release: October, 2010 28Entering a Former Member “Re-Enroll” Application (Application
Code 2 – Re-Enroll)
An Applicant for Re-Enrollment is a Former Member of the Moose Fraternity
whose Dues have been expired for longer than 12 months. He/She may Re-
Enroll into any FRU of the same Unit type in the Fraternity.
Remember: When entering a Re-Enroll or Reinstate Application, you must enter
the Applicant’s MID# in the Member ID field after selecting the Application Code
– or- if the Applicant is a Former Member of your FRU, you may click the Don’t
Know ID button and select the Former Member from the drop down list.
NOTE: If the Application is a Re-Enroll, the drop down list will contain Former Members
with a Status of “Dropped” or “Terminated”. If the Application is a Reinstate, the drop
down list will contain only Former Members with a Status of “Dropped”.
If the Former Member is listed in the drop down list, the information from the
Applicant’s previous Membership Record will populate the Application screen.
This information should be edited for any changes before saving the Application.
If the Application is a Re-Enroll, the Sponsor’s MID# must be entered or the
Sponsor selected from the Member or Sponsor list on the select Sponsor screen.
If the Sponsor is from another FRU, the Sponsor must be added to the Sponsor’s
list prior to entering him/her as the Sponsor of that Application, if he/she has not
been previously added.
***Exercise*** - Enter a Code 2 – Re-Enroll Application
Enter the following Code 2 – Re-enroll Application:
1. Enter: MID# 09400405
2. Click: Tab
Verify and Edit the Following Information:
Name: David Smith
Address: 3592 Nottingham Circle
Jefferson, IL 60539
Date of Birth: 06/30/1950
Telephone: 630.857.6925
E-Mail Address: dsmith50@aol.com
Wife: Sharon
Children: (2) two
Occupation: Produce Manager
Employer: Jewel Food Store
Business Telephone: 630.914.2585 ext 332
Sponsor: Brad Leonard
Paid: Dues and Fees
Education & Training Interim Release: October, 2010 29Enter a Life Member Transfer-In Application (Application Code 5 –
Transfer in):
When an Application Code 5 – Transfer-in is selected, you will enter the MID#
of the Member and press the Tab Key. An LCL.net Question Box will appear
asking “Would you like to connect to Moose International to retrieve this
Applicant’s information? Connect to the Internet and then click “Yes”. The
Application screen will populate with the information retrieved from Moose
International. Life Member and Sponsor Information will be downloaded form
Moose International.
***Exercise*** - Enter a Code 5 – Transfer In
Enter the following Code 5 – Transfer In:
1. In the MID # field, type 17970266
2. Click the Tab Key
3. Click Yes in the Question Box.
Verify and Edit the Following Information:
Name: William Tell
Address: 658 Lakeview Street
Jefferson, IL 60539
Date of Birth: 06/21/1945
E-Mail Address: wtell@yahoo.com
Occupation: Retired
4. Click Fees Paid
5. Click Save.
6. Click Close.
Enter a Comp Member (App Code L – Comp Member):
A Comp Member is someone that you enter into your Inactive Member List that is
not a member of your FRU for the purpose of producing mailing labels.
***Exercise*** - Enter a Code L – Comp Member Application
Enter the following Code L – Comp Member:
Charlie Brown
1221 Hickory Creek
Sugarland, TX 77852
Click Save.
NOTE: The L-Comp Member will move to your Inactive Member List when saved
without transmitting the information to Moose International.
Education & Training Interim Release: October, 2010 30Enter a Reinstate Application (Application Code 3 –
Reinstate):
An Applicant for Reinstatement must be a Former Member of your FRU that has
been dropped for non-payment of dues at least 12 months prior to applying for
reinstatement, but not more than 24 months prior to applying. The Former
Member “MUST” Reinstate into his/her Former FRU.
You may enter the MID of the applicant for Reinstatement or Click the Don’t
Know ID button and select the Applicant from the drop down list.
***Exercise*** - Enter a Code 3 – Reinstate Application
1. Enter: MID# 1777612
2. Press: Tab
3. Check Dues Paid
NOTE: An amount equal to one (1) or two (2) years Dues, whichever brings the Dues
Date back to a current status must accompany the Reinstate application.
Verify and Edit the Following Information:
Name: Ralph Weller
Address: 102 Oak Point
Jefferson, IL 60539
Date of Birth: 01/15/1961
Telephone: 630.259.2489
E-Mail Address: ralphw@comcast.net
Wife: Karen
Children: (2) two
Occupation: Machinist
Employer: Wright’s Machine Shop
Business Telephone: 630.975.8521
Paid: Dues
NOTE: Applicant’s original enrollment date will appear.
NOTE: No Sponsor is required on a Reinstate Application.
The Original Sponsor will be downloaded from Moose International.
Education & Training Interim Release: October, 2010 31Transmitting
Refer to Chapter 6, Transmit Functions of the LCL.net Resource Manual
This Chapter will demonstrate how to use the Transmit Functions to transfer and
receive Fraternal Unit, Member and Application Data with Moose International.
NOTE: The Moose Legion GO To menu includes an option named Get Lodge
Information that retrieves the Moose Legion Member’s Lodge number from Moose
International when performed.
Transmit Functions
NOTE: You are required to perform an Application Transmit each day before the
system will allow you to perform a Daily Transmit. It is strongly suggested, but not
required, you perform the Application Transmit and Daily Transmit together each time
you transmit.
Education & Training Interim Release: October, 2010 32Member Search
The Member Search function is helpful when a known Member of your FRU
does not appear in your Membership Records or as an alternate means of
locating a Member Record. This function allows you to search for the Member
using the Member ID number or Name and if found to View, Print, Edit and Save
the Member’s Record Information. Information details will be given for you to
relay to the Help Desk when trying to rectify a problem with the Member Record.
The Member Search function is located under the Go To menu.
Click Here
The following screen will appear when you click Member Search.
Member ID
Name
Search
Fields
Search
Button
Education & Training Interim Release: October, 2010 33To perform a Member Search by Member ID:
1. Click the Radio Button in front of By Member ID in the selection box.
By Member ID Radio Button
2. Enter the Member ID in the Member ID Search field.
Member ID Field
3. Click Search.
Search Button
The following screen will appear with the Member listed.
Click (+) to expand Record
4. Click the (+) sign to the left of the Line Item to expand the Record.
The following screen will appear with the Record expanded.
Education & Training Interim Release: October, 2010 345. Double-click the Line Item to open the Member Record.
The Member Screen will open.
6. Print Screen, Edit, Save, Reset or Close the Member Record.
***Exercise*** - Member ID Search
1. Click the By Member ID Radio Button.
2. Enter Member ID #2137698
3. Click Search
4. Expand the Record
5. Double-click the Line Item to open the Member Record
6. Click Edit
7. Add Phone # 630.859.2000
8. Click Save
9. Click Close
NOTE: A Member Search By Name is performed in the same manner by clicking the
Radio Button in front of By Name, entering the First Name, Last Name or Both Names
of the Member and clicking Search.
You may narrow a Member Search By Name by selecting a State/Province.
Education & Training Interim Release: October, 2010 35Transmitting Applications
Refer to Chapter 6, Transmit Functions in LCL.net Resource Manual
The Application Transmit function is located under the GO To menu.
Click Here
The Transmit Application window opens.
Transmit Applications with Moose International is displayed under three tabs.
Active Applications
Transmitted Applications
Received Applications
Active Applications Received Applications
Tab Tab
Transmitted Applications
Tab
Education & Training Interim Release: October, 2010 36Active Applications Tab
Refer to Chapter 6, Transmit Functions in the LCL.net Resource Manual
The Active Applications Tab displays a list of Applications with a Status of
Active and allows you to individually select the Applications or select All
Applications to be sent to Moose International.
Selected Status
Check Box
Select the Applications to be transmitted by clicking the Selected check box(es)
to the left of the App ID numbers of the Applications you wish to transmit. If you
wish to transmit all of the Active Applications in the Active Applications List, click
the Select All button.
Education & Training Interim Release: October, 2010 37Selecting Applications
Refer to Chapter 6, Transmit Functions of the LCLnet Resource Manual
Applications can be individually selected for transmission to Moose International
by selecting individual check boxes beside each name
If you wish to send all active Applications to Moose International, click the Select
All button to add check marks to all Applications.
Select to
Transmit
Select All Deselect All Transmit Button
Clicking the Deselect All button will remove the checkmarks from all
Applications.
When all Application selections have been made and you are ready to transmit
them to Moose International, click the Transmit button.
NOTE: Your computer must be connected to the Internet for a connection to be made
between your LCL.net v2.1 Software and the Moose International Server.
Transmitted Applications Tab
Refer to Chapter 6, Transmit Functions of the LCL.net Resource Manual
The Transmitted Applications Tab displays a list of Applications that have been
transmitted to Moose International. They will have a Status of Transmitted.
This list only contains those Applications that have been transmitted, but have
not been processed by Moose International. Once they have been processed
and you have done another Application Transmit, the Applications will display
under the Received Tab with an updated Status of Accepted or Rejected.
NOTE: Any transmission to Moose International must be initiated by clicking the
Transmit button. Moose International cannot initiate a data transmission with your FRU.
Education & Training Interim Release: October, 2010 38Received Applications Tab
Refer to Chapter 6, Transmit Functions of the LCL.net Resource Manual
The Received Applications Tab will display a list of all Applications processed by
Moose International and will list the updated Status for that Application.
Updated
Status
The Received Applications tab displays a list of Applications processed by
Moose International that have been returned to your FRU for processing. They
will have either an Accepted or Rejected Status.
Applications with an Accepted Status are ready for enrollment in your FRU and
will be discussed in a subsequent chapter. Applications with a Rejected Status
have a problem that must be addressed, corrected and re-transmitted to Moose
International. The Messages Column will indicate what the problem is that kept
the Application from being accepted. The problem will also be displayed in the
Notes box on the Application screen.
Any Rejected Application that has been corrected must be re-transmitted to
Moose International for re-processing. Once the problem with the Application
has been corrected, the Application Status must be changed back to Active
before LCL.net v2.1 will allow you to re-transmit it.
To Change an Application Status from Rejected to Active:
1. Open the Application Record.
2. Click the Edit button.
3. Click the Status drop down.
4. Select Active.
5. Edit the Application Information that has caused the problem, if allowed.
6. Click Save to enter the changed information and Status change into LCL.net
v2.1.
Education & Training Interim Release: October, 2010 39Daily Transmit
Refer to Chapter 6, Transmit Functions of the LCL.net Resource Manual.
The Daily Transmit window will open after each Application Transmit or by
selecting Daily Transmit from the Go To menu, allowing you to view the FRU
information changes or Member information changes to be transmitted to Moose
International. If no FRU information or Member information changes have been
made, the information areas will be blank. The Daily Transmit should still be
performed because Moose International may have information to download to
your FRU.
The Connect to Moose International button is used to initiate a data transfer
session that will upload your FRU and Member information and will download
any changes received at Moose International to your system. Downloaded
information will be displayed under the Receive tab.
Education & Training Interim Release: October, 2010 40Fraternal Unit and Member Data Transfer
Fraternal Unit and Member data transfer with Moose International is displayed
under three (3) Transmissions tabs.
Send
Receive
Messages
Send Tab
The Send tab displays three (3) information areas, Fraternal Unit, Member and
Fraternal Unit Rates. The Fraternal Unit information area will list all Fraternal
Unit changes to be uploaded to Moose International. The Member information
area will list all Member changes to be uploaded to Moose International. The
Fraternal Unit Rates information area would contain any information pertaining
to a Dues increase or decrease to be recorded with Moose International.
NOTE: To view the Fraternal Unit Rates area, you will need to scroll down in the
window.
Education & Training Interim Release: October, 2010 41You can also read