Kaspersky Security Center 9.0 - Getting Started APPLICATION VERSION: 9.0
←
→
Page content transcription
If your browser does not render page correctly, please read the page content below
Kaspersky Security Center 9.0

Getting Started

APPLICATION VERSION: 9.0
Dear User!

Thank you for choosing our product. We hope that this document will help you in your work and will provide answers
regarding this software product.

Attention! This document is the property of Kaspersky Lab ZAO: All rights to this document are protected by the copyright
laws of the Russian Federation and by international treaties. Illegal reproduction and distribution of this document or
parts hereof result in civil, administrative or criminal liability by applicable law.

Reproduction or distribution of any materials in any format, including translations, is allowed only with the written
permission of Kaspersky Lab.

This document, and graphic images related to it, may only be used for informational, non-commercial, and personal
purposes.

Kaspersky Lab reserves the right to amend this document without additional notification. You can find the latest version
of this document at the Kaspersky Lab website, at http://www.kaspersky.com/docs.

Kaspersky Lab shall not be liable for the content, quality, relevance, or accuracy of any materials used in this document
for which the rights are held by third parties, or for any potential or actual losses associated with the use of these
materials.

                                                                                        Document revision date: 06.03.2012

                                                                          © 2012 Kaspersky Lab ZAO. All Rights Reserved.

                                                                                                   http://www.kaspersky.com
                                                                                                http://support.kaspersky.com

                                                               2
CONTENT
ABOUT THIS GUIDE .....................................................................................................................................................5
In this document .......................................................................................................................................................5
Document conventions .............................................................................................................................................6
ADDITIONAL SOURCES OF INFORMATION ...............................................................................................................8
Information sources for further research ...................................................................................................................8
Discussing Kaspersky Lab applications in the web forum ........................................................................................9
Contacting the Technical Documentation Development Team .................................................................................9
KASPERSKY SECURITY CENTER ............................................................................................................................. 10
MANAGING KASPERSKY SECURITY CENTER KEYS .............................................................................................. 11
About the License Agreement ................................................................................................................................ 11
About Kaspersky Security Center licenses ............................................................................................................. 11
About keys .............................................................................................................................................................. 12
About key files ........................................................................................................................................................ 12
Activating the application ........................................................................................................................................ 13
Renewing your license ........................................................................................................................................... 13
APPLICATION INTERFACE ........................................................................................................................................ 14
STARTING THE APPLICATION .................................................................................................................................. 15
GETTING STARTED.................................................................................................................................................... 16
Deploying anti-virus protection ............................................................................................................................... 16
Deploying anti-virus protection within an organization ...................................................................................... 17
Deploying anti-virus protection in an organization's network ............................................................................. 18
Installing Kaspersky Security Center components ............................................................................................ 18
Creating administration groups ......................................................................................................................... 19
Installing Kaspersky Security Center Web-Console .......................................................................................... 20
Creating a virtual Administration Server ............................................................................................................ 20
Defining an Update Agent. Configuring Update Agent ...................................................................................... 20
Configuring Network Agent installation package for deployment across the organization ................................ 21
Installing an anti-virus application remotely....................................................................................................... 21
Verifying downloaded updates .......................................................................................................................... 22
Configuring notifications .................................................................................................................................... 23
Testing notification distribution .......................................................................................................................... 23
Working with reports ......................................................................................................................................... 24
Configuring automatic installation of applications ............................................................................................. 24
Daily tasks .............................................................................................................................................................. 24
Viewing the current status of anti-virus protection............................................................................................. 25
Viewing the report on detected viruses ............................................................................................................. 25
Viewing information about events ..................................................................................................................... 26
Periodic tasks ......................................................................................................................................................... 26
Configuring policies for application ................................................................................................................... 26
Viewing and changing local application settings ............................................................................................... 27
Printing and saving reports ............................................................................................................................... 27
Backing up Administration Server data ............................................................................................................. 28
3GETTING STARTED
UPGRADING FROM KASPERSKY ADMINISTRATION KIT 8.0 TO KASPERSKY SECURITY CENTER 9.0 ............ 29
CONCLUSION ............................................................................................................................................................. 30
CONTACTING THE TECHNICAL SUPPORT SERVICE ............................................................................................. 31
KASPERSKY LAB ZAO ............................................................................................................................................... 32
TRADEMARK NOTICES .............................................................................................................................................. 33
4ABOUT THIS GUIDE
This document describes the basic steps that allow you to quickly start using Kaspersky Security Center 9.0 (hereinafter
referred to as Kaspersky Security Center), and to deploy Kaspersky Lab anti-virus applications in an organization's
network.
This Guide is aimed at corporate network administrators responsible for anti-virus protection in organizations and SaaS
providers (hereinafter referred to as service providers).
This document describes in detail a simple Kaspersky Security Center installation scenario, in which an anti-virus
application is deployed (without the use of a hierarchy of Administration Servers) on several computers running the
Microsoft® Windows® operating system, in an organization's network.
In cases when steps sequence for the service provider differs from the sequence for the administrator, the steps for the
service provider are described separately.
This document also includes the procedure for upgrading the application from 8.0 to 9.0.
You can find more details on Kaspersky Security Center in the Implementation Guide and Administrator's Guide of
Kaspersky Security Center.
IN THIS SECTION
In this document ................................................................................................................................................................ 5
Document conventions ...................................................................................................................................................... 6
IN THIS DOCUMENT
Kaspersky Security Center Getting Started contains an introduction, sections that describe typical tasks that Kaspersky
Security Center performs, and a conclusion.
Additional sources of information (see page 8)
This section explains how to get information about the application apart from the documentation included in the
distribution package.
Kaspersky Security Center (see page 10)
The section contains information on the purpose of Kaspersky Security Center, and its main features and components.
Managing Kaspersky Security Center keys (see page 11)
This section describes the licensing features of Kaspersky Security Center.
Application interface (see page 14)
This section describes the main features of the Kaspersky Security Center interface.
5GETTING STARTED
Starting the application (see page 15)
This section describes the start of Kaspersky Security Center.
Getting Started (see page 16)
The section describes the main features that provide for anti-virus protection of an organization.
Upgrading Kaspersky Administration Kit from 8.0 to Kaspersky Security Center 9.0 (see page 29)
This section describes the procedure of upgrading the 8.0 version of Kaspersky Administration Kit to the Kaspersky
Security Center 9.0 version, as well as basic actions to take when performing the initial setup of the application in the
updated version.
Conclusion (see page 30)
This section summarizes the information in this document.
Contacting the Technical Support Service (see page 31)
This section explains how to contact Technical Support Service.
Kaspersky Lab ZAO (see page 32)
This section provides information about Kaspersky Lab ZAO.
Trademark notice (see page 33)
This section contains registered trademark notices.
DOCUMENT CONVENTIONS
Document conventions described in the table below are used in this document.
Table 1. Document conventions
SAMPLE TEXT DOCUMENT CONVENTIONS DESCRIPTION
Warnings are highlighted in red and enclosed in frames. Notifications contain
Note that... important information connected with critical actions related to computer security.
Notes are framed in dotted-line boxes. Notes contain additional and reference
We recommend that you use... information.
Example: Example blocks have a yellow background, and the heading "Example".
...
6ABOUT THIS GUIDE
SAMPLE TEXT DOCUMENT CONVENTIONS DESCRIPTION
Update is... New terms are italic.
ALT+F4 Names of keyboard keys are bold and are all uppercase.
Names of the keys connected by a plus sign (+) indicate a combination of keys.
Enable Names of interface elements are bold: for example, input fields, menu
commands, and buttons.
To configure task schedule: Procedure headings are italic.
help Text in the command line and text of messages displayed on the screen have a
special font.ADDITIONAL SOURCES OF INFORMATION
This section explains how to get information about the application apart from the documentation included in the
distribution package.
If you have any questions regarding purchasing, installing, or using Kaspersky Security Center, answers are available
from a variety of different sources.
Kaspersky Lab provides various sources of information about the application. You can select the most suitable
information source, depending on the level of importance and urgency of the issue.
IN THIS SECTION
Information sources for further research ........................................................................................................................... 8
Discussing Kaspersky Lab applications in the web forum ................................................................................................. 9
Contacting the Technical Documentation Development Team .......................................................................................... 9
INFORMATION SOURCES FOR FURTHER RESEARCH
You can view the following sources of information about the application:
Application's page on Kaspersky Lab's website
The application's page on the Technical Support Service's website (in the Knowledge Base)
Help system
Documentation
The application's page at the Kaspersky Lab website
http://www.kaspersky.com/security-center
This page will provide you with general information about the application's features and options.
The application's Knowledge Base page at the Technical Support Service website
http://support.kaspersky.com/remote_adm
This page contains articles by the Technical Support Service.
These articles contain useful information, recommendations, and answers to frequently asked questions (FAQ). The
articles cover purchasing, installing, and using Kaspersky Security Center. The articles are grouped by subject, for
example, "Working with key files", "Updating databases", or "Troubleshooting". The articles may contain answers to
questions related not only to Kaspersky Security Center, but to other Kaspersky Lab products as well, and may
contain general Technical Support Service news.
Online Help
The application installation package includes Full Help files.
They contain step-by-step descriptions of the application's features.
8ADDITIONAL SOURCES OF INFORMATION
To open the Full Help file, select Help Topics in the console Help menu.
If you have a question about a specific application window, you can use context-sensitive Help.
To open context-sensitive Help, in the corresponding window press the F1 key.
Documentation
The documentation supplied with the application aims to provide all the information you will require. It includes the
following documents:
Administrator's Guide – Describes the purpose, basic concepts, features, and general schemes for using
Kaspersky Security Center.
Implementation Guide – Contains a description of the installation procedures for the components of Kaspersky
Security Center as well as remote installation of applications in computer networks that have a simple
configuration.
Getting Started – Gives step-by-step explanations that allow anti-virus security administrators to start using
Kaspersky Security Center quickly, and to deploy Kaspersky Lab's anti-virus applications across a managed
network.
The documents are included in .pdf format in the distribution package of Kaspersky Security Center.
You can download the documentation files from the application's page at the Kaspersky Lab website.
Information about the application programming interface (API) of Kaspersky Security Center is displayed in the
klakaut.chm file, which is in the application installation folder.
DISCUSSING KASPERSKY LAB APPLICATIONS IN THE WEB
FORUM
If your question does not require an immediate answer, you can discuss it with the Kaspersky Lab experts and other
users in our forum at http://forum.kaspersky.com.
In this forum you can view current threads, leave comments, create new threads, and use forum search.
CONTACTING THE TECHNICAL DOCUMENTATION
DEVELOPMENT TEAM
If you have any questions about the documentation, or you have found an error in it, or would like to leave a comment,
please contact our Technical Documentation Development Team.
Click the Leave Feedback link located in the top right part of the help window to open the computer's default mail client.
In the email message form that opens, the email address of the Technical Documentation Development Team
appears (docfeedback@kaspersky.com) in the address line, and in the subject line, "Kaspersky Help Feedback:
Kaspersky Security Center" appears. Write your comment and send your message without changing the subject line.
9KASPERSKY SECURITY CENTER
The section contains information on the purpose of Kaspersky Security Center, and its main features and components.
The application is supplied in two versions:
Kaspersky Security Center 9.0 (hereinafter also referred to as Kaspersky Security Center) is supplied for free
with all Kaspersky Lab applications included in the Kaspersky Open Space Security (box version). You can also
download it from the Kaspersky Lab website (http://www.kaspersky.com).
Kaspersky Security Center 9.0, Service Provider Edition (hereinafter also referred to as Kaspersky Security
Center SPE) is distributed under special conditions to Kaspersky Lab partners. For detailed information, please
refer to Kaspersky Lab's website, the http://www.kaspersky.com/partners page.
The previous version of Kaspersky Security Center is Kaspersky Administration Kit.
Kaspersky Security Center provides a centralized solution for managing corporate network anti-virus security systems
based on Kaspersky Lab applications included in Kaspersky Open Space Security products. Kaspersky Security Center
supports all network configurations that use the TCP/IP protocol.
The Kaspersky Security Center application is aimed at corporate network administrators and employees responsible for
anti-virus protection in organizations.
The SPE version of the application is designed for SaaS providers (hereinafter referred to as service providers).
Using Kaspersky Security Center you can:
Create virtual Administration Servers to ensure the anti-virus protection of remote offices or networks of client
organizations.
The client organization is an organization, whose anti-virus protection is ensured by service provider.
Create a hierarchy of administration groups to ensure anti-virus protection. Administration groups allow similar
types of computers to be managed as a single unit.
Remotely install and uninstall Kaspersky Lab applications.
Centrally administer all installed Kaspersky Lab applications across the network, from a single computer.
Centrally receive and distribute, on client computers, database updates and updates to application modules of
Kaspersky Lab applications.
Receive notifications about critical events in the operation of Kaspersky Lab applications.
Receive statistics and reports about the operation of Kaspersky Lab applications.
Manage keys for installed Kaspersky Lab applications.
Centrally manage files put in Quarantine or Backup by anti-virus applications, and objects for which disinfection
has been postponed.
Centrally manage any third-party applications installed on the client computers.
10MANAGING KASPERSKY SECURITY
CENTER KEYS
This section describes the licensing features of Kaspersky Security Center.
For Kaspersky Security Center licensing, the following concepts exist:
license agreement (see section "About the License Agreement" on page 11);
license (see section "About Kaspersky Security Center licenses" on page 11);
key (see section "About keys" on page 12);
key file (see section "About key files" on page 12);
application activation (see section "Activating the application" on page 13).
These concepts are inextricably linked and form a single licensing scheme.
IN THIS SECTION
About the License Agreement ......................................................................................................................................... 11
About Kaspersky Security Center licenses...................................................................................................................... 11
About keys ...................................................................................................................................................................... 12
About key files ................................................................................................................................................................. 12
Activating the application................................................................................................................................................. 13
Renewing your license .................................................................................................................................................... 13
ABOUT THE LICENSE AGREEMENT
The License Agreement is a contract between an individual or a legal entity, which lawfully possesses a copy of the
application, and Kaspersky Lab ZAO. The agreement is included in each Kaspersky Lab application. It provides detailed
information about the rights and restrictions on using the application.
According to the license agreement, when you purchase and install a Kaspersky Lab application, you have the right to
use your copy indefinitely.
ABOUT KASPERSKY SECURITY CENTER LICENSES
License is the right to use the application and related services provided by Kaspersky Lab and its partners.
The Kaspersky Security Center license allows you to create virtual Administration Servers. Licenses with the following
restrictions are provided:
License that allows to create up to 50 virtual Servers.
11GETTING STARTED
License that allows to create up to 100 virtual Servers.
Each license is defined by its validity date and type.
License validity period – The time period during which you have access to the application features and have rights to use
additional services. The services you can use depend on the type of the license.
The following license types are provided:
Trial – A free license intended to acquaint users with Kaspersky Security Center.
A trial license allows you to create virtual Administration Servers. You cannot contact Technical Support Service
if you only have a trial license. On license expiry, the capability to create virtual Administration Servers is
blocked.
The trial license cannot be renewed. The application cannot be used under the trial license after it was used
under the commercial one.
Commercial – A commercial license offered upon purchase of Kaspersky Security Center.
A commercial license allows you to create virtual Administration Servers and to contact Technical Support
Service. Upon expiration of the validity period of a commercial license, Kaspersky Security Center notifies the
administrator about the license expiration within a specified period (15 days). If you do not renew the license
during this period, the abilities to create virtual Servers and contact Technical Support Service will be blocked.
ABOUT KEYS
A key is a sequence of characters that confirms the right to use the application.
Active key is a key used at the moment to work with the application.
Additional key is a key that verifies the use of the application but is not used at the moment.
To verify a license you can add two keys. In this case, one key is active and the other is additional.
ABOUT KEY FILES
Key file is a tool used to add the key to which it is attached to the keys repository.
The key file is supplied with the application if you purchase it from a Kaspersky Lab distributor, or is sent by email if you
purchase it from Kaspersky Lab's eStore.
The key file contains the following information:
License validity period
Type of license (trial, commercial)
Licensing restrictions (for example, the number of computers it can be used for)
Key file expiration.
When this key file period expires, the key file becomes invalid and cannot be used to add the corresponding key to the
keys repository. Key file validity period starts as soon as the key file is created.
12MANAGING KASPERSKY SECURITY CENTER KEYS
ACTIVATING THE APPLICATION
To gain access to the full range of features and services provided by the license, you should activate the application.
To activate Kaspersky Security Center:
1. Acquire a license.
2. Get key file or activation code provided on terms of this license.
3. Use a key file or activation code to specify key attached to license as active key on the master Administration
Server in one of the following ways:
Add a key by using the Quick Start Wizard.
Add the key to the Repositories folder of the master Administration Server, to the Keys subfolder.
In the properties window of the master Administration Server select the Keys section and add the key in the
Active key settings group.
4. Restart Administration Console.
RENEWING YOUR LICENSE
When you add keys to the repository, one of them becomes active, the other is an additional one.
After the license period specified in the active key file expires, you can use the additional key to renew the license.
The key specified at the application activation becomes active.
An additional key becomes active automatically upon the license expiry.
If the key file selected to add the active key is found in the black list of key files, Kaspersky Security Center notifies you
about this, and then performs the following actions:
If there is an additional key, its status is changed to active.
If there is no additional key, the ability to create virtual Administration Servers and to contact Technical Support
Service is blocked.
The key file validity is checked every time the updates for Kaspersky Security Center Administration Server are
downloaded.
13APPLICATION INTERFACE
This section describes the main features of the Kaspersky Security Center interface.
Viewing, creation, modification and configuration of administration groups and centralized management of Kaspersky
Lab applications installed on client computers are performed from the administrator's workstation. The management
interface is provided by the Administration Console component. It is a specialized stand-alone snap-in that is integrated
with Microsoft Management Console (MMC); so the Kaspersky Security Center interface is standard for MMC. For
details, please see the Kaspersky Security Center Administrator's Guide.
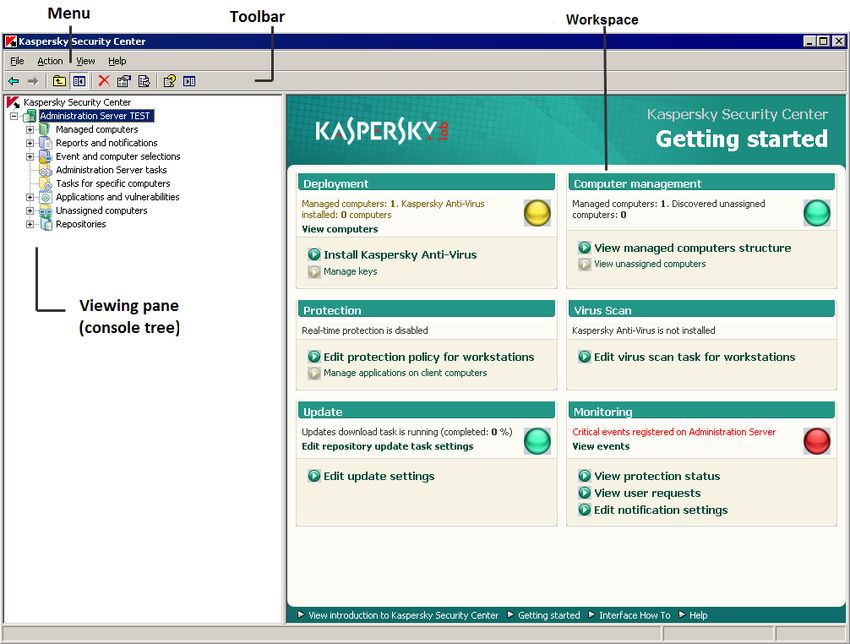
The main application window (see the figure below) consists of a menu, a toolbar, a console tree, and a workspace.
The menu bar allows you to use the windows and provides access to the Help system. The Action menu duplicates the
context menu commands for the current console tree object.
The console tree displays the namespace of Kaspersky Security Center in a tree view.
The set of toolbar buttons allows direct access to some items of the menu. The set of buttons available on the toolbar
changes depending on the current node or folder that is selected in the console tree.
The appearance of the workspace of the main window depends on which node (folder) of the console tree the area
relates to and what functions it has.
Figure 1. Kaspersky Security Center main window
14STARTING THE APPLICATION
This section describes the start of Kaspersky Security Center.
Kaspersky Security Center starts automatically when you start Administration Server.
To access the application's features, select the Kaspersky Security Center item in the Kaspersky Security Center
program group of the standard Start Programs menu. This program group is created only on administrator
workstations during installation of Administration Console.
15GETTING STARTED
The section describes the main features that provide for anti-virus protection of an organization.
Using Kaspersky Security Center, you can ensure anti-virus protection either for a single organization, or for several
client organizations, by using the SPE version of the application.
To ensure anti-virus protection of an organization's network:
deploy anti-virus protection on the computers in the network;
perform daily tasks that allow you to track the current status of anti-virus protection;
periodically perform additional tasks to keep anti-virus protection up-to-date and to respond in a timely manner
to problems as they arise.
Subsequent sections of this document contain more-detailed descriptions of the actions listed above.
IN THIS SECTION
Deploying anti-virus protection ........................................................................................................................................ 16
Daily tasks ....................................................................................................................................................................... 24
Periodic tasks .................................................................................................................................................................. 26
DEPLOYING ANTI-VIRUS PROTECTION
This section describes two possible scenarios for deploying anti-virus protection of network:
deploying anti-virus protection within an organization;
deploying anti-virus protection of client organization's network (when working with SPE version).
If you are required to deploy anti-virus protection within an organization that includes remote offices that are not in the
organization's network, you can use the anti-virus protection deployment scenario for service providers.
This section further describes actions in these scenarios of protection deployment.
16GETTING STARTED
IN THIS SECTION
Deploying anti-virus protection within an organization .................................................................................................... 17
Deploying anti-virus protection in an organization's network ........................................................................................... 18
Installing Kaspersky Security Center components .......................................................................................................... 18
Creating administration groups ....................................................................................................................................... 19
Installing Kaspersky Security Center Web-Console ........................................................................................................ 20
Creating a virtual Administration Server .......................................................................................................................... 20
Defining an Update Agent. Configuring Update Agent .................................................................................................... 20
Configuring Network Agent installation package for deployment across the organization .............................................. 21
Installing an anti-virus application remotely ..................................................................................................................... 21
Verifying downloaded updates ........................................................................................................................................ 22
Configuring notifications .................................................................................................................................................. 23
Testing notification distribution ........................................................................................................................................ 23
Working with reports ....................................................................................................................................................... 24
Configuring automatic installation of applications ............................................................................................................ 24
DEPLOYING ANTI-VIRUS PROTECTION WITHIN AN ORGANIZATION
To deploy anti-virus protection across the corporate network:
1. Install and configure Administration Server and Administration Console.
2. Create administration groups and add client computers to them.
3. On selected client computers, remotely install Network Agent and Kaspersky Lab anti-virus applications, which
will ensure protection of an organization's computers.
4. If necessary, update the databases of Kaspersky Lab applications on client computers.
5. Configure notifications about events in the anti-virus protection on client computers.
6. Run the on-demand scan task and verify that event notifications about anti-virus security on client computers
are operating correctly.
7. View reports and configure automatic distribution of required reports by email.
8. Configure automatic installation of anti-virus applications on computers that are new to the network.
After you perform the above steps, the anti-virus protection system will be deployed across the corporate network.
17GETTING STARTED
DEPLOYING ANTI-VIRUS PROTECTION IN AN ORGANIZATION'S
NETWORK
To deploy anti-virus protection across an organization's network:
1. Install Administration Server and Administration Console on the administrator's workstation.
2. Install Kaspersky Security Center Web-Console on the administrator's workstation.
3. Configure Administration Server for work with Kaspersky Security Center Web-Console.
4. Create and configure virtual Administration Server, which manages the client organization's network.
5. Define and configure Update Agent in the organization's network.
6. Configure the installation package of Network Agent that you are planning to use to install Network Agent on the
computers in the organization's network.
7. Install Network Agent and required Kaspersky Lab applications on client computers in order to ensure anti-virus
protection.
8. If necessary, perform additional configuration of installed applications.
After you perform the above steps, the anti-virus protection system will be deployed across the organization's network.
INSTALLING KASPERSKY SECURITY CENTER COMPONENTS
To install Administration Server and Administration Console:
1. Select the computer on which Administration Server and Administration Console will be installed. We
recommend installation of the components on a computer that is in the domain.
You can install Kaspersky Security Center 9.0 Administration Server and Administration Console on the
computer where 8.0 Administration Server and Administration Console are running.
We also recommend that the installation be performed by using the domain administrator's rights. This allows
the automatic creation of the KLAdmins and KLOperators user groups, and provides the necessary rights to
the account under which Administration Server will be running.
2. Run the setup.exe file and follow the instructions of the Setup Wizard.
3. Select the Standard type of installation. Most of the settings are determined automatically.
Custom installation is described in detail in the Kaspersky Security Center Implementation Guide.
The following applications required for application operation will be installed, if they were not installed earlier:
Microsoft Windows Installer 3.1;
Microsoft Data Access® Components (MDAC) 2.8;
Microsoft .NET Framework 2.0;
Microsoft SQL Server® 2005 Express Edition.
These additional applications do not require any maintenance or administration.
18GETTING STARTED
During the next step of the Wizard, the application files will be copied to the computer, and the database will be created
in which Administration Server centralizes information about the network anti-virus protection.
After the Wizard completes, you can start Administration Console and perform initial configuration by using the Quick
Start Wizard.
CREATING ADMINISTRATION GROUPS
The hierarchy of administration groups is created in the main application window of Kaspersky Security Center, in the
Managed computers folder. Administration groups are displayed as folders in the console tree (see figure below).
Immediately after Kaspersky Security Center installation, the Managed computers folder only contains the
Administration Servers folder, which is empty.
The user interface settings determine whether the Administration Servers folder appears in the console tree. To make
this section displayed, go to the View Configuring interface and in the Configuring interface window that
opens select the Display slave Administration Servers check box.
When creating the hierarchy of administration groups, client computers and nested groups can be added to the
Managed computers folder. You can add slave Administration Servers to the Administration Servers folder.
Each created group - as the Managed computers group - first only contains a blank folder named Administration
Servers intended for handling slave Administration Servers from that group. Information about policies, tasks of
the group, and the client computers included in it is displayed on the corresponding tabs in the workspace of this group.
Figure 2. Viewing the hierarchy of administration groups
To create an administration group:
1. In the console tree, open the Managed computers folder.
2. If you want to create a subgroup of an existing administration group, in the Managed computers folder select
the nested folder that corresponds to the group, which should include the new administration group.
If you create a new top-level administration group, you can skip this step.
3. Launch the process of administration group creation in one of the following ways:
using the New Group command from the context menu;
by clicking the Create subgroup link located in the workspace of the main application window, on the
Groups tab.
4. In the Group name window that opens, enter a name for the group and click the OK button.
19GETTING STARTED
As a result, the console tree will be expanded with a new administration group folder with the specified name.
INSTALLING KASPERSKY SECURITY CENTER WEB-CONSOLE
To install Kaspersky Security Center Web-Console on the administrator's workstation,
run the setup.exe file included in the Kaspersky Security Center Web-Console distribution.
The Kaspersky Security Center Web-Console Setup Wizard will start, and guide you through the installation. Follow the
Wizard's instructions.
CREATING A VIRTUAL ADMINISTRATION SERVER
To add a virtual Administration Server to the selected administration group:
1. In the console tree, in the administration group folder, select the Administration Servers node.
2. Start the process of virtual Administration Server creation in one of the following ways:
in the context menu of the Administration Servers node, select New Virtual Administration Server.
click the Add a virtual Administration Server link in the workspace.
The New Virtual Administration Server Wizard starts. Follow the Wizard's instructions.
DEFINING AN UPDATE AGENT. CONFIGURING UPDATE AGENT
To designate a computer in an organization as the Update Agent:
1. Create a stand-alone package for Network Agent. Perform the following actions:
a. In the console tree, select a virtual Administration Server to manage the organization's network.
b. In the Repositories folder of the virtual Administration Server, select the Installation packages subfolder.
c. In the folder's workspace, select or create a Network Agent installation package.
d. Open the properties window of the Network Agent installation package.
e. In the Connection section, the Server address field verify the address of the virtual Administration Server.
The address must be in the following format:/.
f. Start creating a stand-alone package for this installation package in one of the following ways:
in the context menu of the installation package, select Create standalone installation package;
click the Create stand-alone installation package in the workspace of the selected installation
package.
g. Open the list of existing stand-alone installation packages for Network Agent in one of the following ways:
on the final page of the stand-alone Installation Package Creation Wizard, select the Open the list of
installation packages check box;
in the context menu of the installation package, select Show the list of stand-alone packages.
20GETTING STARTED
h. In the list of stand-alone packages open the context menu of the created stand-alone package and select
the method of package delivery to the client organization's administrator.
2. Contact the client organization's administrator to install Network Agent locally on the client computer designated
as the Update Agent.
After Network Agent is installed on the client computer designated as the Update Agent, this computer is
displayed in the Managed computers folder of the virtual Administration Server.
Kaspersky Security Center automatically designates this computer as an Update Agent and configures it as a
connection gateway on the first connection with Administration Server.
If you need to designate a computer as an Update Agent manually:
a. Open the properties window of the Managed computers folder of the virtual Administration Server.
b. In the Update Agents section, select a client computer that will act as Update Agent by clicking the Add
button.
c. Open the Network Agent properties window and perform the following actions:
Configure network polling by Update Agent in the Network discovery section.
Select the Advanced section and select the Connection gateway check box, which enables use of
Update Agent as the connection gateway in the network of the organization.
As a result, the selected client computer will become Update Agent for the organization and subsequently will be
used in this organization as the connection gateway for connecting to virtual Administration Server.
CONFIGURING NETWORK AGENT INSTALLATION PACKAGE FOR
DEPLOYMENT ACROSS THE ORGANIZATION
To configure the Network Agent installation package before installing Network Agent on an organization's
computers:
1. In the console tree, select a virtual Administration Server to manage the organization's network.
2. In the Repositories folder of the virtual Administration Server, select the Installation packages subfolder.
3. In the workspace select or create a Network Agent installation package that will be used to install Network
Agent on the organization's computers.
4. Open the properties window of the Network Agent installation package.
5. In the properties window, customize the following settings of the installation package:
In the Connection section, the Server address string, specify the address of the same virtual
Administration Server that was specified during local installation of Network Agent to Update Agent (see
section "Defining an Update Agent. Configuring Update Agent" on page 20).
In the Advanced section, select the Connect to Administration Server using connection gateway
check box. In the Connection gateway address string, specify the Update Agent address. You can use
either the IP address or computer name in the Windows network.
INSTALLING AN ANTI-VIRUS APPLICATION REMOTELY
Some Kaspersky Lab applications that can be managed through Kaspersky Security Center can only be locally installed
on client computers (for more details, please refer to the Guides for Kaspersky Lab applications).
21GETTING STARTED
To install an anti-virus application on client computers remotely:
1. In the console tree, go to the Administration Server folder that manages client computers.
2. In the workspace of the Deployment section, click the Install Kaspersky Anti-Virus link to go to the Setup
Wizard.
The Remote Installation Wizard starts. Follow the Wizard's instructions.
The Remote Installation Wizard creates and runs the remote installation task for the selected application. Depending on
the set of computers or administration group you selected, the created task is placed in the Tasks for specific
computers folder or in the workspace of the selected administration group on the Tasks tab.
After the created task completes, the anti-virus application is installed on selected client computers.
You can view information about the application installation on client computers on the Computers tab, in the group
workspace. You can view information about the application installation on client computers in the workspace of the
Unassigned computers folder. In the computers list on the Computers tab and in the workspace of the Unassigned
computers folder, the Agent/Anti-Virus column displays information about whether Network Agent and anti-virus
application are installed on computers. If a backslash is followed by a plus sign (+), the anti-virus application is
successfully installed.
VERIFYING DOWNLOADED UPDATES
To make Kaspersky Security Center verify downloaded updates before distributing them to client computers:
1. In the workspace of Administration Server tasks folder, select the Download updates to the repository task
in the task list.
2. Open the task properties window in one of the following ways:
From the context menu of the task, select Properties.
By clicking the Change task settings link in the workspace of the selected task.
3. In the task properties window that opens, in the Updates verification section, select the Verify updates before
distributing check box and select the updates verification task in one of the following ways:
Click Select to choose an existing updates verification task.
Click the Create button to create an update verification task.
This starts the Update Verification Task Wizard. Follow the Wizard's instructions.
You can create an updates verification task for a selected administration group or a set of computers.
Computers on which the updates verification task is running, are called test computers.
It is recommended to use computers with most reliable protection and most popular application
configuration in the network. This approach increases the quality of scans, and minimizes the risk of false
positives and the probability of virus detection during scans. If viruses are detected on the test computers,
the update verification task is considered unsuccessful.
4. Click OK to close the properties window of the downloading updates to the repository task.
As a result, the updates verification task is performed with the task of downloading updates to the repository. The
Administration Server will download updates from the source, save them in temporary storage, and run the update
verification task. If the task completes successfully, the updates will be copied from the temporary storage to the
Administration Server shared folder (\Share\Updates) and distributed
to all client computers for which the Administration Server is the source of updates.
22GETTING STARTED
If the results of the update verification task show that updates located in the temporary storage are incorrect or if the
update verification task completes with an error, such updates will not be copied to the shared folder, and the
Administration Server will keep the previous set of updates. The tasks that have the When new updates are
downloaded to the repository schedule type are not started then, either. These operations will be performed at the
next start of the Administration Server update download task if scanning of the new updates completes successfully.
A set of updates is considered to be incorrect if one of the following conditions is met on at least one test computer:
update task error has occurred;
status of real-time protection of an anti-virus application has changed after applying updates;
infected object was found during a scan task;
functional error of a Kaspersky Lab application has occurred.
If none of the listed conditions is true for any test computer, the set of updates is considered to be correct and the update
verification task completes successfully.
CONFIGURING NOTIFICATIONS
Kaspersky Security Center allows you to configure the notification of the administrator of events occurring on client
computers and select a notification method:
email;
net send;
executable file to run.
To configure notifications of events occurring on client computers:
1. Open the properties window of the Reports and notifications folder in one of the following ways:
Select Properties from the context menu of the Reports and notifications folder of the console tree.
In the workspace of the Reports and notifications folder, on the Notifications tab open the window by
clicking the Modify notification delivery settings link.
2. In the Notifications section of the properties window of the Reports and notifications folder configure
notifications of events.
As a result, the re-adjusted notification settings are applied to all events occurring on client computers.
You can configure the notification of an event in the properties window of that event. You can obtain quick access to the
settings of events by clicking the Configure Kaspersky Endpoint Security events and Modify Administration Server
event settings links.
TESTING NOTIFICATION DISTRIBUTION
To verify distribution of event notifications:
1. Stop the task of real-time file system protection on the client computer, and copy the EICAR test "virus" to the
client computer. Now re-enable the real-time file system protection task.
2. Run the scan task of client computers for an administration group or for a set of computers, one of which has
the EICAR "virus" on a client computer.
If the scan task is configured correctly, the test "virus" will be detected. If notifications are configured correctly,
you will be notified that a virus has been detected.
23GETTING STARTED
In the console tree, expand Event and computer selections, expand Events, and note that in the Recent
events subfolder a record about virus detection will be displayed.
The EICAR test "virus" IS NOT A VIRUS, and does not contain any code that can harm your computer. However, most
manufacturers' anti-virus applications identify this file as a virus. You can download the test file from the official EICAR
website.
WORKING WITH REPORTS
Reports in Kaspersky Security Center contain information about the condition of the anti-virus protection system. Reports
are generated based on information stored on Administration Server. You can create reports for the following types of
objects:
for a selection of client computers;
for computers of a specific administration group;
for a set of client computers from different administration groups;
for all the computers on the network (available for the deployment report).
The application includes a set of standard report templates; it also supports creation of user-defined report templates.
Reports are displayed in the main application window, in the Reports and notifications folder of the console tree.
You can also create custom report templates (for more details see the Kaspersky Security Center Administrator's Guide).
CONFIGURING AUTOMATIC INSTALLATION OF APPLICATIONS
To configure automatic installation of applications on new computers as they are added to an administration group:
1. In the console tree, select the required administration group.
2. Open the properties window of this administration group.
3. In the Automatic installation section, select the installation packages to be installed on new computers by
selecting the check boxes for the installation packages of the required applications. Click OK.
Group tasks will be created that will run on the client computers immediately after they are added to the
administration group.
If some installation packages of one application were selected for automatic installation, the installation task will be
created for the most recent application version only.
DAILY TASKS
This section describes daily tasks related to tracking the anti-virus protection status on client computers.
24GETTING STARTED
IN THIS SECTION
Viewing the current status of anti-virus protection ........................................................................................................... 25
Viewing the report on detected viruses ........................................................................................................................... 25
Viewing information about events ................................................................................................................................... 26
VIEWING THE CURRENT STATUS OF ANTI-VIRUS PROTECTION
You can monitor the anti-virus protection status of client computers managed by the Administration
Server in the workspace of the Administration Server. The management blocks of the workspace display
general information about the following components of the application:
deployment of protection on networked computers (the Deployment block);
creation of the structure of administration groups, which contain managed computers (the Managed computers
block);
operation of protection on client computers (the Protection block);
scan client computers for viruses (the Virus Scan block);
updating of application databases and software modules (the Update block);
monitoring and operation of notifications (the Monitoring block).
You can evaluate the status of anti-virus protection by using the stop-light icons in the management blocks. If the icon is
green, the required tasks related to this area of functionality have been completed. If the icon is yellow or red, this area of
functionality requires attention, and action may be required.
In addition to the color indication, each section contains a short description of the anti-virus protection status or new
problem, as well as links that you can use to execute the main tasks of the block.
For more detailed information about the status of anti-virus protection, please refer to the Reports and notifications
folder.
VIEWING THE REPORT ON DETECTED VIRUSES
To view a summary report on detected viruses:
1. In the console tree, select the Reports and notifications folder.
2. In the folder's workspace on the Statistics tab, select the Anti-virus statistics page.
A summary of activity during the preceding 24 hours will be displayed in the information panes of this page by default:
a history of virus activity;
the most frequently occurring viruses;
which computers were infected most often;
users on whose computers most viruses are detected.
25You can also read