SIOS PROTECTION SUITE FOR LINUX: MYSQL WITH DATA REPLICATION EVALUATION GUIDE
←
→
Page content transcription
If your browser does not render page correctly, please read the page content below
SIOS Protection Suite for Linux:
 MySQL with Data Replication

       Evaluation Guide
SIOS Protection Suite for Linux
                                                                               Evaluation Guide

This document and the information herein is the property of SIOS Technology Corp. Any
unauthorized use and reproduction is prohibited. SIOS Technology Corp. makes no warranties
with respect to the contents of this document. SIOS Technology Corp. reserves the right to
revise this publication and make changes to the products described herein without prior
notification.

SteelEye Technology, LifeKeeper and DataKeeper are registered trademarks, and SteelEye is a
trademark of SIOS Technology Corp.
DB2 Universal Database and IBM Director are trademarks of International Business Machines
Corporation.
IBM is a registered trademark of International Business Machines Corporation in the U.S. and
other countries.
Microsoft, Windows, Windows Server 2008, Windows Server 2003, Windows 2000, Windows
NT, SQL Server and Exchange are trademarks or registered trademarks of Microsoft in the U.S.
and other countries.
Other brand and product names used herein are for identification purposes only and may be
trademarks of their respective companies.
It is the policy of SIOS Technology Corp. to improve products as new technology, components
and software become available. SIOS Technology Corp. therefore, reserves the right to change
specifications without prior notice.
To maintain the quality of our publications, we welcome your comments on the accuracy,
clarity, organization and value of this document.
Email correspondence to:
evalsupport@us.sios.com
Copyright © 2007-2014
By SIOS Technology Corp.
San Mateo, CA U.S.A.
All Rights Reserved Worldwide
© by SIOS Technology Corp. All rights reserved worldwide.

                                              2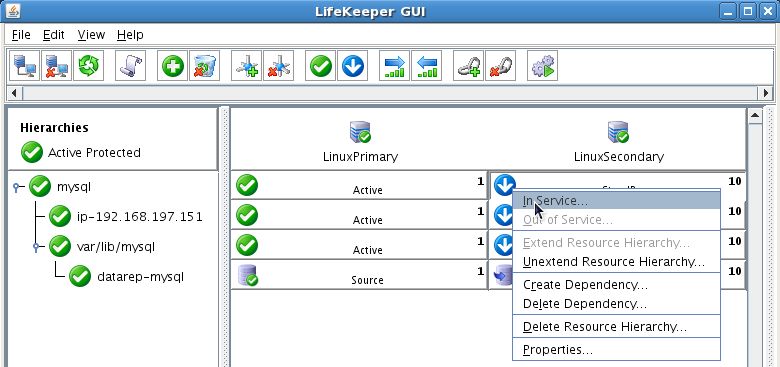
SIOS Protection Suite for Linux
                                                                                                                                 Evaluation Guide

                               SIOS Protection Suite for
                                       Linux:
                                  Evaluation Guide

                                              Table of Contents
Objective ....................................................................................................................................................... 5
Terms to Know .............................................................................................................................................. 5
The Evaluation Process ................................................................................................................................. 7
Phase 1 – Prepare to Install .......................................................................................................................... 8
   Hardware Requirements ........................................................................................................................... 8
       Primary and Secondary Servers ............................................................................................................ 8
       Client ..................................................................................................................................................... 8
   Software Requirements ............................................................................................................................ 8
       Primary Server and Secondary Server .................................................................................................. 8
   Network Requirements ........................................................................................................................... 10
       Primary Server and Secondary Servers ............................................................................................... 10
       Client ................................................................................................................................................... 11
Phase 2 – Configure Storage ....................................................................................................................... 11
   Before You Begin..................................................................................................................................... 11
   Partition local storage for use with SIOS Data Replication ..................................................................... 11
       Primary Server..................................................................................................................................... 11
       Secondary Server ................................................................................................................................ 13
Phase 3 – Install, Configure, and Start MySQL ............................................................................................ 13
   Primary Server......................................................................................................................................... 13
   Secondary Server .................................................................................................................................... 15
Phase 4 – Install SIOS Protection Suite for Linux ........................................................................................ 16
   Download Software ................................................................................................................................ 16
   Run the SIOS Protection Suite Installer Script ........................................................................................ 16
   Install the Evaluation License Keys ......................................................................................................... 17
   Start the SIOS Protection Suite for Linux ................................................................................................ 17
Phase 5 - Configure the Cluster .................................................................................................................. 18

                                                                                 3
SIOS Protection Suite for Linux
                                                                                                                            Evaluation Guide

   Primary Server......................................................................................................................................... 18
      Access the LifeKeeper GUI .................................................................................................................. 18
      Create Communication (Comm) Paths ............................................................................................... 19
      Verify the Communications Paths....................................................................................................... 24
   Create the LifeKeeper Hierarchy ............................................................................................................. 25
      Create and Extend an IP Resource ...................................................................................................... 25
      Create a Mirror and Begin Data Replication ....................................................................................... 29
      Create the MySQL Resource Hierarchy ............................................................................................... 33
      Create the MySQL IP Address Dependency ........................................................................................ 34
Phase 6 –Test Your Environment ................................................................................................................ 35
   1. Manual Switchover of the MySQL Hierarchy to Secondary Server .................................................... 36
   2. Manual Switchover of the MySQL Hierarchy back to Primary Server ................................................ 38
   3. Simulate a network failure on the Primary Server by failing the IP resource ..................................... 39
   4. Hard failover of the resource from the Secondary Server back to the Primary Server ...................... 40
   5. Bring Failed Server back on line .......................................................................................................... 41
   6. Verify Local Recovery of MySQL Server .............................................................................................. 42

                                                                             4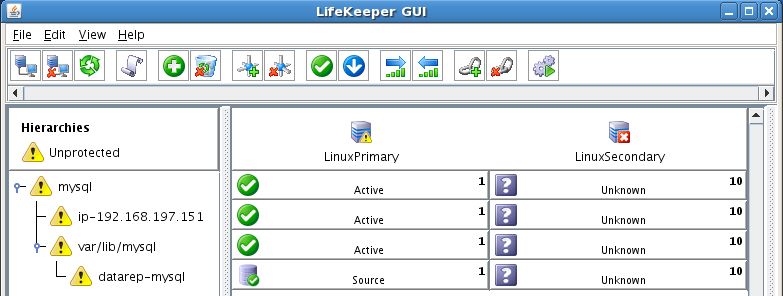
SIOS Protection Suite for Linux
Evaluation Guide
Objective
This document is intended to aid you in installing, configuring and using the SIOS Protection Suite for
Linux evaluation product, to make MySQL highly available. If MySQL is not already installed, please
allocate some time to install it on your servers. Once this task has been completed, you may install and
configure SIOS Protection Suite for Linux.
There are five phases in this process:
Phase 1 – Prepare to Install
Phase 2 – Configure Storage
Phase 3 – Install and Configure MySQL
Phase 4 – Install SIOS Protection Suite for Linux
Phase 5 – Configure your LifeKeeper Cluster
Phase 6 – Test Your Environment
Terms to Know
The following terms are used throughout this document and, while some may be familiar to you, it may
be helpful to review how SIOS defines and uses these terms.
Network Communication Terms
Crossover cable – A cable used to directly connect computing devices together, instead of
being connected to a network switch, hub or router. This cable creates an isolated, private
network to allow cluster-related and data replication traffic to flow between systems.
Types of LifeKeeper Servers
Server – A computer system dedicated to running software application programs.
Active Server – This is the server where the resource hierarchy is currently running (IN SERVICE).
Standby Server – This is the server where the resource hierarchy is defined, but is not currently
running. This server is available to bring the resource hierarchy into service should something
happen to the resource hierarchy on the Active Server.
Primary Server – This is the server in a LifeKeeper configuration with the highest priority for a
given resource hierarchy. It is the server that provides services for the resource hierarchy under
normal circumstances.
Secondary Server – This is the server in a LifeKeeper configuration with the 2nd highest priority
for a given resource hierarchy.
Source Server - In a LifeKeeper cluster, using data replication, this is the Active Server. It is
where the resource hierarchy is currently running and the replicated partition (Source Partition)
is accessible for writes.
5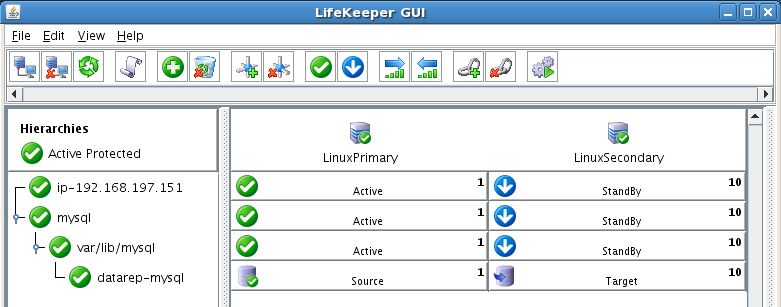
SIOS Protection Suite for Linux
                                                                                          Evaluation Guide

          Target Server – In a LifeKeeper cluster, using data replication, this is the Standby Server. The
          replicated partition (Target Partition) is updated with writes from the Source Partition by the
          SIOS Data Replication system. This partition should not be accessed/modified manually.

SIOS Data Replication Terms

Replication – Transferring data from one partition to another via a sector-by-sector copy. During
replication, the target partition should not be accessed or modified assuring your data integrity.
Synchronous – A replication scheme in which the data is confirmed written and valid on the target
before the write operation occurs on the source disk through a series of information exchanges.
Synchronous mirrors should only be implemented on high speed (100Mbps+) networks due to the
network overhead involved.
 Asynchronous – A replication scheme in which the data is released for writing on the source
immediately and is sent to the target(s) simultaneously for writing as fast as the data can get there and
can be written on them.
Rate of Change – A measure of the amount of data which is changing over a set period of time.
Compression – An algorithm which is optionally implemented to reduce the amount of traffic between
source and target nodes. Nine levels of compression are offered. Compression is turned off by default.
Throttling – An optionally implemented mechanism to limit the bandwidth used for replication.

LifeKeeper Product Terms

Communications Path – A mechanism supporting communication between nodes in a LifeKeeper
cluster. SIOS highly recommends implementing multiple communication paths between all servers in
the cluster to eliminate a single point of failure.
Heartbeat – A periodic message exchanged between nodes in a LifeKeeper cluster that provides server
health monitoring. A heartbeat message is one type of inter-node cluster communication sent over a
communications path.
Split Brain – A situation in which all communications paths between cluster members fail, but all
servers remain up and running. In this situation, both systems believe the other has failed and both
believe they should keep or bring resources into service.
Failover – The unplanned migration of a resource hierarchy to the Standby Server because of a system
or resource failure on the Active Server.
Switchover – The planned migration of a resource hierarchy from the Active Server to the Standby
Server.
Switchback – The setting that governs the recovery behavior of the server where the resource was in
service when it failed. If the setting is “intelligent”, the server acts as a possible backup for the given
resource. If the setting is “Automatic”, the server actively attempts to re-acquire the resource without
further notice.
Resource – A system asset that can be protected by LifeKeeper. Resources can be used to represent
disk partitions, virtual IP addresses, applications, etc.

                                                       6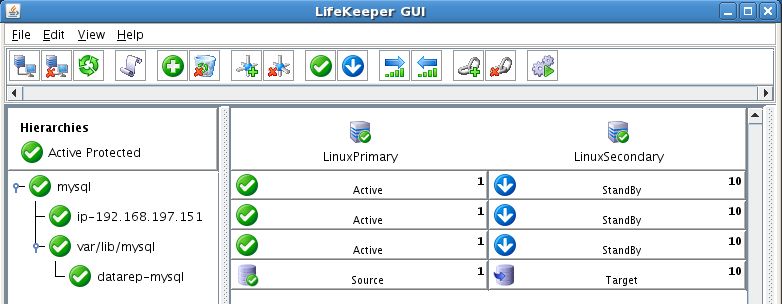
SIOS Protection Suite for Linux
                                                                                         Evaluation Guide

Extend a Resource – Create or define an already configured LifeKeeper resource onto another server in
the cluster and build an equivalency relationship that prevents the resource from coming in service on
both systems simultaneously.
Resource Hierarchy – A grouping of resources, in a predetermined order, from high to low. This may
also be referred to as simply a Hierarchy.
Shared Storage – One or more logical disk partitions that are physically attached to all nodes in a
cluster. LifeKeeper ensures that the volume is only accessible by one server at a time. This is formally
called I/O fencing.
Data Replication (Disk Mirroring) – The replication of logical disk partitions to separate physical hard
disks in real time to ensure continuous availability, currency and accuracy of data.
Source – The partition on the source server used for replication. The “gold” copy of the data.
Target – The partition on the target server used for replication.
Switchable IP Address – A unique IP address that may be moved between systems in the cluster.
Client systems connect to this address and the system where the virtual IP resource is active will
respond to requests.

The Evaluation Process
SIOS strongly recommends performing your evaluation of SIOS Protection Suite for Linux within a test
lab environment. SIOS is not responsible and cannot provide support for evaluation software installed
in a production environment.

All questions during the evaluation period should be directed to evalsupport@us.sios.com or your local
Pre-Sales Engineering contact. Pre-sales support will contact you by the next business day to answer
questions. Once you are a licensed customer on software maintenance, you will have access to 24 X 7
post-sales technical support.

        Important             Your evaluation license is valid for a limited period of time from the day
                              you receive the SIOS product evaluation package and licenses via email
                              from the SIOS sales team.

                                                     7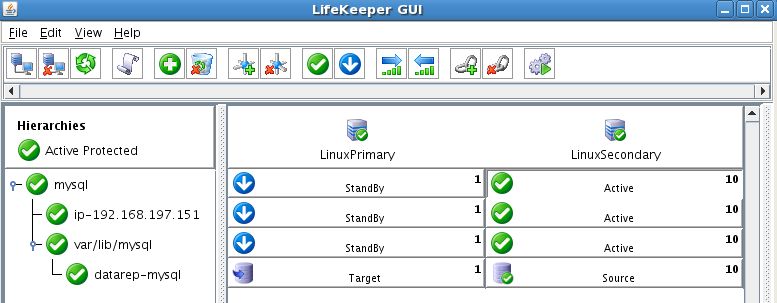
SIOS Protection Suite for Linux
Evaluation Guide
Phase 1 – Prepare to Install
Hardware Requirements
Primary and Secondary Servers
Systems must meet the minimum requirements for the Linux distribution to be used
during the evaluation.
512MB RAM minimum; 1GB RAM recommended.
2GB of available hard disk space recommended.
Multiple Network Interface Cards (NIC’s) are recommended.
Configure one or more additional partitions to be used for data replication. On the
primary server, these will become the source partitions. On the secondary server(s),
these will become the target partitions. In this evaluation example we will be
replicating MySQL data (which will be a partition mounted at /var/lib/mysql)
For replicated partitions, a target partition’s size must equal to or larger than the size of
its source partition.
The system ( / ) and boot (/boot) partitions are not eligible for replication.
Note: You may use more than one partition for replicated data, allowing for separation of
multiple database files and/or log directories for performance reasons.
Client
This system is not required but is recommended for testing the cluster environment.
A standard linux terminal running the MySQL client can be used to test the configuration.
Software Requirements
Primary Server and Secondary Server
Linux Distribution x86_64, AMD 64:
o RedHat Enterprise Linux 5 (5.4+ recommended) or 6.x
o CentOS Linux 5 (5.4+ recommended) or 6.x
o Oracle Enterprise Linux 5 (5.4+ recommended), 6.3, 6.4
RedHat Compatibility Kernel Only
o SuSE Linux Enterprise Server 10 or 11 (11 recommended)
o See http://docs.us.sios.com/Linux/8.3.2/LK4L/ReleaseNotes/ for a full list of
supported Operating Systems
Current patches / security updates are recommended.
Satisfied dependencies; especially if the Linux installation package selection was
base/minimal you will need to refer to the dependencies documentation at
8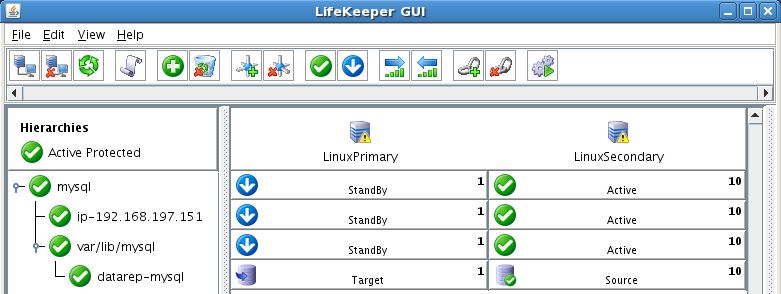
SIOS Protection Suite for Linux
Evaluation Guide
http://docs.us.sios.com/Linux/8.3.2/LK4L/AllTechDocs/Content/installation/Linux_Depe
ndencies.htm.
Its recommended that IPtables is disabled
o # /etc/init.d/iptables off
o # chkconfig iptables off
o See
http://docs.us.sios.com/Linux/8.3.2/LK4L/TechDoc/Content/user_guide/using_li
fekeeper_linux/maintenance_tasks/running_lifekeeper_firewall.htm for
information regarding the ports SIOS Protection Suite for Linux uses.
Disable SELinux :
o Edit /etc/selinux/config
o Set SELINUX=disabled (note: permissive mode is also acceptable)
Check the configuration of your /etc/hosts file
o localhost.localdomain and localhost are the only entries that can be on
127.0.0.1
o Create a separate entry for your hostname with a static address
GUI Authentication with PAM
o SPS for Linux now leverages the Pluggable Authentication Module (PAM)
provided in the Linux Standard Base (LSB).
o Users are identified and authenticated against the system's PAM configuration.
Privilege levels are determined from group membership as provided through
PAM.
o In order to access the GUI, a user must be a member in one of the three
LifeKeeper groups: lkadmin, lkoper or lkguest.
o See the following URL for more information on this topic:
http://docs.us.sios.com/Linux/8.3.2/LK4L/AllTechDocs/Content/user_gu
ide/using_lifekeeper_linux/gui/preparing_run_gui/configuring_gui_user
s.htm
9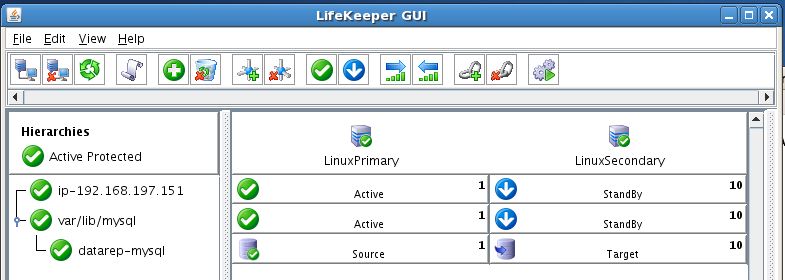
SIOS Protection Suite for Linux
Evaluation Guide
Network Requirements
For your evaluation, we recommend configuring your machines similarly to the following example.
LinuxPrimary and LinuxSecondary are multi-homed, between two LAN segments (the second NIC in each
server could even be connected via a cross-over cable if a second physical network is not available). The
second NIC is optional in this configuration, but highly recommended in production environments to
avoid a single point of failure.
In this example evaluation scenario we will be leveraging local, replicated storage.
Network Configuration Example
Primary Server and Secondary Servers
Configure the Host file with entries for all LifeKeeper protected servers. This is typically
/etc/hosts.
Example:
192.168.197.101 LinuxPrimary
192.168.197.102 LinuxSecondary
See your Network Administrator to obtain an unused IP Address to be used as the
switchable IP Address. This switchable IP Address will be created later in the
configuration process.
Public Network connection(s) configured with:
10SIOS Protection Suite for Linux
Evaluation Guide
o Static IP address
o Correct subnet mask
o Correct gateway address
o Correct DNS server address(es)
Private Network connection(s) configured with:
o Static IP address (on a different subnet from the public network)
o Correct network mask
o No gateway IP address
o No DNS server addresses
Client
Must be able to communicate on the same subnet/network as the servers Public
interface addresses. In our example, this is the 192.168.197.0/24 network.
Phase 2 – Configure Storage
Before You Begin
Ensure the following:
You have an extra disk/partition on both servers that can be used for data replication. A target
volume’s size must equal to or larger than the size of its source disk/partition.
Partition local storage for use with SIOS Data Replication
Primary Server
On your Primary server, perform the following actions:
1. Identify an existing free, unused disk partition to use as our Apache repository. Alternatively,
create a new partition. Use the “fdisk” utility to partition your disk appropriately. In this
example /dev/sdb is an unused disk where we will create a single partition
a. fdisk /dev/sdb
b. Press “n” to create a new partition
c. Press “p” to create a primary partition
d. This example uses a new disk, so we will use all default values (Partition 1, entire disk)
Hit Enter twice to confirm these parameters
e. Press “w” to write the partition table and exit fdisks
[root@LinuxPrimary ~]# fdisk /dev/sdb
Example
Command (m for help): n
11SIOS Protection Suite for Linux
Evaluation Guide
Command action
e extended
p primary partition (1-4)
p
Partition number (1-4): 1
First cylinder (1-256, default 1):
Using default value 1
Last cylinder or +size or +sizeM or +sizeK (1-256, default 256):
Using default value 256
Command (m for help): w
The partition table has been altered! Calling ioctl() to re-read partition table.
Syncing disks.
[root@LinuxPrimary ~]#
[root@LinuxPrimary ~]# df /var/lib/mysql
Filesystem 1K-blocks Used Available Use% Mounted on
/dev/sdb1 253855 11083 229666 5% /var/lib/mysql
2. Format the newly created disk partition
# mkfs.ext3 /dev/sdb1
3. Mount the partition temporarily at /mnt
# mount /dev/sdb1 /mnt
4. Move any existing data from /var/lib/mysql/ into this new disk partition (assumes a default
MySQL configuration)
# cd /var/lib/mysql
# mv * /mnt
5. Remount /dev/sdb1 at /var/lib/mysql
# cd /root
# umount /mnt
# mount /dev/sdb1 /var/lib/mysql
6. Note: there is no need to add this partition to /etc/fstab. Lifekeeper will take care of mounting
this automatically.
12SIOS Protection Suite for Linux
Evaluation Guide
[root@LinuxPrimary ~]# df /var/lib/mysql
Filesystem 1K-blocks Used Available Use% Mounted on
Result
/dev/sdb1 253855 11083 229666 5% /var/lib/mysql
Secondary Server
7. On your Secondary server, only perform Step #1 above, where you partition the disk. The size of
the Target disk/partition needs to be the same size, or greater, than our Source disk/partition.
Phase 3 – Install, Configure, and Start MySQL
Primary Server
On your Primary server, perform the following actions:
1. Install both the “mysql” and “mysql-server” rpm packages if they do not exist on your system.
Apply any required dependencies as well
# yum install mysql mysql-server
2. Verify that your local disk partition is still mounted at /var/lib/mysql via the “df” command
3. If this is a fresh MySQL install, initialize a sample MySQL database:
# /usr/bin/mysql_install_db --datadir="/var/lib/mysql" --user=mysql
4. Ensure that all files in your MySQL data directory (/var/lib/mysql) have correct permissions and
ownership
# chown –R mysql:mysql /var/lib/mysql
# chmod 755 /var/lib/mysql
5. Finally, manually start the MySQL daemon from the command line. Note: Do Not start it via the
“service” command, or the /etc/init.d/ scripts
# mysqld_safe --user=root --socket=/var/lib/mysql/mysql.sock --port=3306 --
datadir=/var/lib/mysql --log &
6. Verify MySQL is running by connecting with the mysql client:
[root@LinuxPrimary mysql]# mysql
Welcome to the MySQL monitor. Commands end with ; or \g.
Your MySQL connection id is 2
Server version: 5.0.77-log Source distribution
13SIOS Protection Suite for Linux
Evaluation Guide
Type 'help;' or '\h' for help. Type '\c' to clear the buffer.
mysql> exit
Bye
[root@LinuxPrimary mysql]#
7. Update the root password for your mysql configuration. In this example we set the MySQL root
password to “SteelEye”
# echo "update user set Password=PASSWORD('SteelEye') where User='root'; flush
privileges" | mysql mysql
8. Verify your new password:
# mysql mysql –u root –p
(Enter “SteelEye” as the password)
#exit
9. Create a MySQL configuration file. We will place this in the same shared directory
(/var/lib/mysql/my.cnf)
# vi /var/lib/mysql/my.cnf
# cat /var/lib/mysql/my.cnf
[mysqld]
datadir=/var/lib/mysql
socket=/var/lib/mysql/mysql.sock
pid-file=/var/lib/mysql/mysqld.pid
user=root
port=3306
# Default to using old password format for compatibility with mysql 3.x
# clients (those using the mysqlclient10 compatibility package).
old_passwords=1
Example
# Disabling symbolic-links is recommended to prevent assorted security risks;
# to do so, uncomment this line:
# symbolic-links=0
[mysqld_safe]
log-error=/var/log/mysqld.log
pid-file=/var/run/mysqld/mysqld.pid
[client]
user=root
password=SteelEye
14SIOS Protection Suite for Linux
Evaluation Guide
10. Delete the original MySQL configuration file, located in /etc
# rm /etc/my.cnf
Secondary Server
On your Secondary Server:
1. Install both the “mysql” and “mysql-server” rpm packages if they do not exist on your system.
Apply any required dependencies as well
# yum install mysql mysql-server
2. Ensure that all files in your MySQL data directory (/var/lib/mysql) have correct permissions and
ownership
# chown –R mysql:mysql /var/lib/mysql
# chmod 755 /var/lib/mysql
3. There is no need to perform any of the additional steps taken on the Primary Server
15SIOS Protection Suite for Linux
Evaluation Guide
Phase 4 – Install SIOS Protection Suite for Linux
For the ease of installation, SIOS has provided the SIOS Protection Suite for Linux with an installation
script. Towards the end of the script, the desired Application Recovery Kits (ARKs) should be selected
for installation. The software will be installed to the following locations:
SPS for Linux Component Install Location
LifeKeeper Software /opt/LifeKeeper
LifeKeeper Config File /etc/default/LifeKeeper
Perform the following actions on both Primary and Secondary server.
Download Software
1. Open the SIOS Protection Suite evaluation email you received from SIOS.
2. Download the SIOS Protection Suite Software from the link provided in your email. It is generally
easiest to use “wget” to recursively download all files. Example:
a. # cd /root
b. # wget -r
c. After successful download you will have downloaded contents similar to the follow
directory listing:
[root@LinuxPrimary ~]# ls -l
total 63680
-rw-r--r-- 1 root root 23163 May 30 14:03 EULA.pdf
-rw-r--r-- 1 root root 536 May 30 14:03 readme.txt
-rw-r--r-- 1 root root 65179648 May 30 14:03 sps.img
3. Download your Evaluation license key from the link specified in your evaluation email. Save the
license file to an easy to remember location on both servers.
a.
Run the SIOS Protection Suite Installer Script
1. Loopback mount the sps.img file previously downloaded, which is an ISO9660 image file. Run
the “setup” script inside:
# mount -o loop sps.img /mnt
# cd /mnt
# ./setup
2. During this procedure, you will hit Enter in most cases to accept default values and continue to
the next screen. Note the following exceptions:
16SIOS Protection Suite for Linux
Evaluation Guide
a. On the screen titled “High AvailabilityNFS” you may select “n” as in this particular eval
guide we will not be creating a highly available NFS server cluster configuration.
b. If you have plans to create a highly available NFS service, adjust your response
accordingly.
3. Towards the end of the setup script, you can choose to install a trial license key now, or later.
We will install the license key in the next step, so you can safely select “n” at this point
4. In the final screen of the “setup" select the ARKs you wish to install from the list displayed on
the screen.
5. The following RPMs should be be installed:
a. steeleye-lkSQL-.noarch.rpm
b. steeleye-lkDR-.noarch.rpm
6. Un-mount the Distribution Enabling disk image:
# cd /root
# umount /mnt
Install the Evaluation License Keys
The last phase of the setup process installs the licensing keys. You must install the evaluation license key
file (".lic") that you downloaded with your evaluation software before starting the SIOS Protection Suite
for Linux.
1. To install your trial license key, run the “lkkeyins” command on both Primary and Secondary
Server. This command is located at /opt/LifeKeeper/bin/lkkeyins . Example:
# /opt/LifeKeeper/bin/lkkeyinsSIOS Protection Suite for Linux
Evaluation Guide
# /opt/LifeKeeper/bin/lkstart
Phase 5 - Configure the Cluster
Primary Server
Complete the following steps on the primary server to configure the cluster:
Create TCP Communication (Comm) Path(s)
Verify the Communication (Comm) Path(s)
Before you begin, SIOS recommends at least two TCP communications paths between each server within
the cluster to each remote server for heartbeat redundancy.
Supported configurations require that you define redundant comm. paths, so that
Important the failure of a single communication line will not cause a split brain where
resource hierarchies may come in-service on multiple servers simultaneously.
Access the LifeKeeper GUI
The LifeKeeper Graphical User Interface (GUI) is a Java based application that can be run as a native
Linux application, or as an applet within your Java-Enabled Web Browser.
The LifeKeeper GUI is based on Java RMI with callbacks. Hostnames must be resolvable or you may
receive a Java 115 or 116 error.
1. Verify that both short and fully qualified hostnames of all cluster nodes resolve to the proper
locations
# ping LinuxPrimary
# ping LinuxPrimary.domain.com
# ping LinuxSecondary
# ping LinuxSecondary.domain.com
2. To start the LifeKeeper Linux GUI Application:
a. /opt/LifeKeeper/bin/lkGUIapp &
3. To Connect to the LifeKeeper GUI Applet from a Web Browser, go to:
a. http://:81
18SIOS Protection Suite for Linux
Evaluation Guide
4. Enter the name of the server you wish to connect to (this field will be populated with the name
of the server you are on, if you are running the GUI from a server with LifeKeeper installed)
along with your root credentials and click OK.
Create Communication (Comm) Paths
5. Within the LifeKeeper GUI, from the File menu, select Connect. Enter the name of your
Secondary server, login and password when the Cluster Connect window displays.
19SIOS Protection Suite for Linux
Evaluation Guide
6. Within the LifeKeeper GUI, click the Create Comm Path button on the toolbar. You can also
right click one of the servers and click Create Comm Path from the pop-up menu as well.
7. Select your Local and Remote Server(s) from the list box. If a server does not appear in the list
box, you may enter it by typing its name and clicking the Add Server button. When using the
Add Server procedure, you must make sure that the computer names for both network
interfaces on the servers respond correctly when you ping them (from all of the partner
server(s)) using the ping –a IP ADDRESS syntax. If they do not, this must be corrected prior to
continuing. Click Next.
20SIOS Protection Suite for Linux
Evaluation Guide
21SIOS Protection Suite for Linux
Evaluation Guide
8. Select TCP for Device Type and Click Next.
9. Provide all the required information and click Next for the following series of dialog boxes. For
each field in the dialog box you can click Help for further information or refer to the table below
for an explanation or recommendation.
Field Tips
For TCP/IP Comm Path...
Choose the IP address to be used by the local server for this comm
path. Select both interfaces so that the wizard creates multiple
comm. paths during this operation
Local IP Address
Choose the IP address to be used by the remote server for this
Remote IP Address comm path
22SIOS Protection Suite for Linux
Evaluation Guide
.
Enter the priority for the comm path on the local server. The priority
will be used to determine the order that the comm paths between
two servers will be used. Priority 1 is the highest; 99 is the lowest.
Priority
10. After entering data in all the required fields, select Create. A message will display indicating the
network communication path is successfully created. Click Next.
23SIOS Protection Suite for Linux
Evaluation Guide
If you selected multiple Local IP Addresses or multiple Remote Servers and the Device Type was
set to TCP, then the procedure will return you to the setup wizard the next Comm Path.
11. Select Done in the last dialog box.
Repeat this process until you have defined all the communication paths you plan to use. SIOS strongly
recommends that you define at least two communication paths for redundancy.
Verify the Communications Paths
1. Verify that the communications paths are configured properly by viewing the Server Properties
dialog box. From the LK GUI, select Edit, Server, Properties and then the Comm Paths tab.
24SIOS Protection Suite for Linux
Evaluation Guide
2. Note the State displayed is ALIVE. You can also check the server icon in the right, main pane of
the GUI. If only one comm path has been created, the server icon shows a yellow warning icon
on the server icon, indicating that one comm. path is ALIVE, but there is no redundant comm
path. The server icon will display a green heartbeat checkmark when there are at least two
comm paths configured and ALIVE.
Create the LifeKeeper Hierarchy
Create and Extend an IP Resource
In LifeKeeper, create an IP resource and extend it to the secondary server by completing the following
steps. This Virtual IP will have the ability to move between cluster nodes along the application that
depends on it.
25SIOS Protection Suite for Linux
Evaluation Guide
1. From the LifeKeeper GUI toolbar, click Create Resource Hierarchy.
The Create Resource Wizard dialog box will appear with a drop down list box displaying all
recognized Recovery Kits installed within the cluster.
2. Select IP Address and click Next.
3. Enter the appropriate information for your configuration. The table below contains a list of the
fields that display and additional information to assist you as you complete this procedure.
Recommended values are also show below. You can also click the Help button for further
26SIOS Protection Suite for Linux
Evaluation Guide
information. Press Next to continue after entering the required information.
IP Creation Field Definitions
Field Tips
Resource Type Select IP Address as the resource type and click Next.
Switchback Type Select Intelligent and click Next.
Server Select the Server where the IP resource will be created. Select your
Primary server and click Next.
IP Resource Enter the virtual IP information and click Next
Example: 192.168.197.151
Note: This is an IP address that is not currently in use anywhere on
your network. This is the address that all clients will use to connect to
the protected resources.
Netmask The IP subnet mask that your TCP/IP resource will use on the target
server. Any standard netmask for the class of the specific TCP/IP
resource address is valid.
In our sample configuration 255.255.255.0 is used for a subnet mask on
both networks.
Note: The subnet mask you choose, combined with the IP address,
determines the subnet that will be used by the TCP/IP resource and
should be consistent with the network configuration.
Network Connection This is the physical Ethernet card that the IP address is interfacing with.
Chose the network connection that will allow your virtual IP address to
be routable. Select the correct NIC and click Next.
IP Resource Tag Accept the default value and click Next. This value only affects how the
IP is displayed in the GUI. The IP resource will be created on our
Primary server.
4. LifeKeeper will create and validate your resource. After receiving the message that the resource
has been created successfully, click Next when the following dialog box appears so that you can
complete the process of Extending the IP Resource to our Secondary server, below.
27SIOS Protection Suite for Linux
Evaluation Guide
28SIOS Protection Suite for Linux
Evaluation Guide
Extending the IP resource will start automatically after you have finished creating an IP address resource
if you clicked Next in the dialog box displayed above. You can also start this from an existing IP address
resource by right clicking on the active resource and selecting Extend Resource Hierarchy.
Refer to the table below to complete the Extend IP Resource procedure.
Field Recommended Entries or Notes
Switchback Type Leave as “intelligent” and click Next
Template Priority Leave as default (1)
Target Priority Leave as default (10)
Network Interface This is the physical Ethernet card that the IP
address is interfacing with. Chose the network
connection that will allow your virtual IP address
to be routable. The correct physical NIC should be
selected by default. Please verify and then click
Next.
IP Resource Tag Leave as default.
Target Restore Mode Select Enable and click Next.
Target Local Recovery Select Yes to enable Local Recovery for the SQL
resource on the Target server.
Backup Priority Accept the default value.
5. After receiving the message Hierarchy extend operations completed, click Finish and then click
Done
6. Your IP resource (192.168.197.151) is now fully protected and has the ability to “float” between
cluster nodes as needed. Looking at the LifeKeeper GUI you will notice that the IP resource is
Active on the Primary cluster node and Standby on the Secondary cluster node
Create a Mirror and Begin Data Replication
In this section we will setup and configure the Data Replication resource, which be used to synchronize
our MySQL’s data between cluster nodes. The data we will replicate resides in the /var/lib/mysql
partition on our Primary cluster node
Please note:
29SIOS Protection Suite for Linux
Evaluation Guide
The source volume to be replicated must be mounted on the Primary server
The target volume, which will received replicated data, must NOT be mounted on the Secondary
server.
The target volume’s size must equal to or larger than the size of its source volume.
1. From the LifeKeeper GUI toolbar, click Create Resource Hierarchy.
The Create Resource Wizard dialog box will appear with a drop down list box displaying all
recognized Recovery Kits installed within the cluster.
2. Select Data Replication and click Next.
30SIOS Protection Suite for Linux
Evaluation Guide
3. Follow the Data Replication wizard, and enter the following values:
Field Recommended Entries or Notes
Switchback Type Intelligent
Server LinuxPrimary (Primary Cluster Node, i.e. Mirror
Source)
Hierarchy Type Select: “Replicate Existing Filesystem”
Existing Mount Point At this step you will select the mounted partition
to replicate. In our example, select
“/var/lib/mysql”
Data Replication Resource Tag Leave as default
File System Resource Tag Leave as default
Bitmap File Leave as default (Note: if using high speed SSD
storage you will want to create a small partition
and use it for bitmap placement, i.e. /bitmaps)
Enable Asynchronous Replication Leave as default (Yes)
4. Click Next to begin creation of the Data Replication resource hierarchy. Status will be displayed
in the GUI as follows:
5. Click Next to begin the process to Extend the Data Replication Resource. Select all default
settings. When it asks for the target disk, select a free partition on your Target server which is
the same size (or greater) than the Source Volume we are replicating. This partition should NOT
be mounted on the Target system.
31SIOS Protection Suite for Linux
Evaluation Guide
6. Continue through the wizard, and you will be prompted to select the network you would like
replication to take place over. In general, it’s a best practice to separate your user/application
and your replication traffic. In our example setup we will replicate over our backend network,
192.168.198.X
32SIOS Protection Suite for Linux
Evaluation Guide
7. Click Next and continue through the wizard. Once completed, your resource hierarchy will look
as follows
Create the MySQL Resource Hierarchy
Create a MySQL resource to protect the MySQL database and make it high available between cluster
nodes.
33SIOS Protection Suite for Linux
Evaluation Guide
At this point, MySQL needs to be already running on the Primary Server. It should
NOT be running on the Secondary Server. See section titled “Install, Configure, and
Important
Start MySQL” above to review the process to configure and start MySQL as
needed.
1. From the LifeKeeper GUI toolbar, click Create Resource Hierarchy.
2. Select MySQL Database and click Next.
3. Proceed Through the Resource Creation wizard, providing the following values
Field Recommended Entries or Notes
Switchback Type Intelligent
Server LinuxPrimary (Primary Cluster Node)
Location of my.cnf Enter “/var/lib/mysql”. Note that earlier in the MySQL configuration
process we created a my.cnf file in this directory.
Location of MySQL Leave as default (/usr/bin) since we are using a standard MySQL
executables install/configuration in this example
Database tag Leave as default
4. Select Create to define the MySQL resource hierarchy on the Primary Server
5. Click Next to Extend the File System Resource to the Secondary Server
6. In the Extend Wizard, select “Accept Defaults”
7. As a result the MySQL resource is now protected on both cluster nodes. Click Finish to exit the
Extend wizard.
8. Note: LifeKeeper will automatically identify that the MySQL resource has a dependency on the
FileSystem (Data Replication) resource (/var/lib/mysql). The Filesystem Resource will appear
underneath the MySQL resource in the GUI
9. Your resource hierarchy should look as follows:
Create the MySQL IP Address Dependency
34SIOS Protection Suite for Linux
Evaluation Guide
In this step will define an additional dependency: that MySQL depends on a Virtual IP (192.168.197.151)
so that the IP address follows the MySQL database as it moves.
1. From the LifeKeeper GUI toolbar, right-click on the “mysql” resource
2. Select “Create Dependency” from the right-click context menu
3. In the Child Resource Tag dropdown menu, select “ip-192.168.197.151”
4. Click Next
5. Click Create Dependency
6. Click Done
7. The Virtual IP address resource (192.168.197.151) will now appear underneath the MySQL
resource in the LifeKeeper user interface. This ensures that resources move together, and are
started/stopped in the proper order.
8. Your resource hierarchy should look as follows
At this point in the Evaluation, we have fully protected MySQL, and its dependent resources: IP
addresses, and replicated storage.
Phase 6 –Test Your Environment
The following test scenarios have been included to guide you as you get started evaluating SIOS
Protection Suite for Linux. Before beginning these tests, make sure the data replication resources are
in the mirroring state.
Note: For these test examples, the Primary Server is referred to as LINUXPRIMARY. The Backup or
Secondary Server is referred to as LINUXSECONDARY.
35SIOS Protection Suite for Linux
Evaluation Guide
1. Manual Switchover of the MySQL Hierarchy to Secondary Server
Procedure:
From the LifeKeeper GUI, right click on the MySQL resource on the Secondary Server
(LINUXSECONDARY) and choose IN SERVICE.
Click “In Service” in the window that pops up
Expected Result:
Beginning with the MySQL resource, all resources will be removed from service on the Active
Server (LINUXPRIMARY).
Beginning with the dependent resources (IP and Replicated Volume), all resources will be
brought in service on LINUXSECONDARY.
During this process, the direction of the mirror reversed. Data is now transmitting from
LINUXSECONDARY -> LINUXPRIMARY
At this point, all resources are now active on LINUXSECONDARY.
36SIOS Protection Suite for Linux
Evaluation Guide
Tests/Verification:
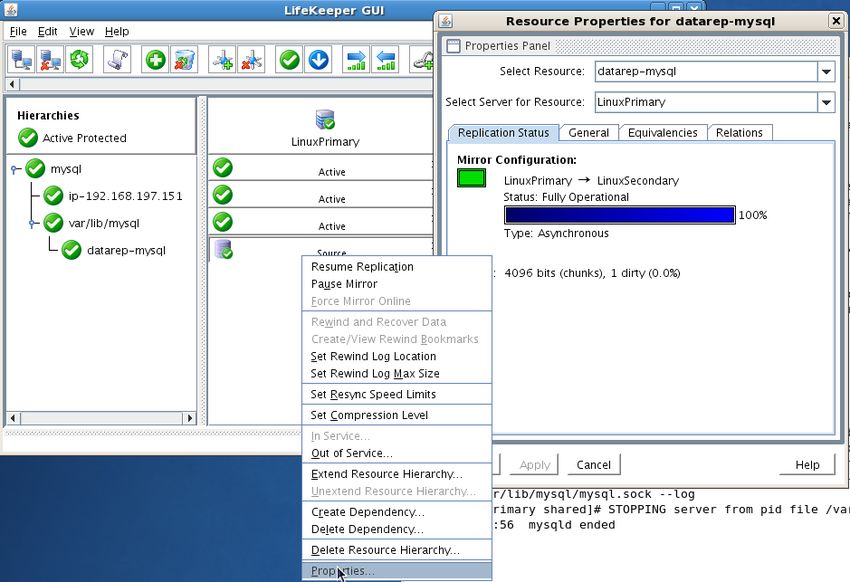
Using the LifeKeeper GUI, verify that the MySQL and dependent resources are active on
LINUXSECONDARY.
Using the LifeKeeper GUI, verify the mirror is now reversed and mirroring in the opposite
direction. Right click on the “datarep-mysql” resource and select Properties
Run “ifconfig –a” on LINUXSECONDARY to validate that the IP Address 192.168.197.151 is
active on LINUXSECONDARY
Run “df –h” to verify that the /var/lib/mysql replicated filesystem is mounted as an “md” device
(example: /dev/md0”) on LINUXSECONDARY
Verify the MySQL services are running on LINUXSECONDARY by running “ps –ef | grep –i
mysql”
On LINUXSECONDARY run the following command to verify client connectivity to the
MySQL database:
o # mysql –S /var/lib/mysql/mysql.sock –u root –p
o (enter password “SteelEye”)
37SIOS Protection Suite for Linux
Evaluation Guide
2. Manual Switchover of the MySQL Hierarchy back to Primary Server
Procedure:
From the LifeKeeper GUI, right click on the MySQL resource on the Primary Server
(LINUXPRIMARY) and choose IN SERVICE.
Click “In Service” in the window that pops up
Expected Result:
Beginning with the MySQL resource, all resources will be removed from service on the Active
Server (LINUXSECONDARY).
Beginning with the dependent resources (IP and Replicated Volume), all resources will be
brought in service on LINUXPRIMARY
During this process, the direction of the mirror reversed. Data is now transmitting from
LINUXPRIMARY -> LINUXSECONDARY
Tests/Verification:
Using the LifeKeeper GUI, verify that the MySQL and dependent resources are active on
LINUXPRIMARY.
Using the LifeKeeper GUI, verify the mirror is now reversed and mirroring in the opposite
direction. Right click on the “datarep-mysql” resource and select Properties
38SIOS Protection Suite for Linux
Evaluation Guide
Run “ifconfig –a” on LINUXPRIMARY to validate that the IP Address 192.168.197.151 is
active on LINUXPRIMARY
Run “df –h” to verify that the /var/lib/mysql replicated filesystem is mounted as an “md” device
(example: /dev/md0”) on LINUXPRIMARY
Verify the MySQL services are running on LINUXPRIMARY by running “ps –ef | grep –i mysql”
On LINUXPRIMARY run the following command to verify client connectivity to the MySQL
database:
o # mysql –S /var/lib/mysql/mysql.sock –u root –p
o (enter password “SteelEye”)
3. Simulate a network failure on the Primary Server by failing the IP resource
IMPORTANT NOTE: Only perform this test if you have more than one
communications path configured.
If you perform this test and have only one communications path configured, your
system will enter a split-brain scenario as described in the LifeKeeper Administration
Guide found here. Refer to this document for more information or contact SIOS pre-
sales technical support for assistance in resolving this condition.
Procedure:
39SIOS Protection Suite for Linux
Evaluation Guide
On LINUXPRIMARY, pull the network cable attached to the NIC that the virtual IP address is
configured on
Expected Result:
The IP Resource should fail first.
The entire hierarchy should failover to LINUXSECONDARY
Tests/Verification:
Check the LifeKeeper Log to verify the IP resource failed – “/opt/LifeKeeper/bin/lk_log log”
Using the LifeKeeper GUI, verify the MySQL and Apache resource hierarchies fail over
successfully to LINUXSECONDARY
4. Hard failover of the resource from the Secondary Server back to the
Primary Server
Procedure:
Pull the power cord on LINUXSECONDARY, as this is the server with all resources currently
In Service.
Expected Result:
After failure has been detected, beginning with the dependent resources (IP and Volume), all
resources will be brought in service on LINUXPRIMARY.
Tests/Verification:
Using the LifeKeeper GUI, verify the mirror has reversed and is in a Resync Pending state
waiting for LINUXSECONDARY to come back on line.
Verify the Apache and MySQL Server services are running on LINUXPRIMARY.
Verify that the client can still connect to the Webserver and database running on
LINUXPRIMARY.
40SIOS Protection Suite for Linux
Evaluation Guide
Verify you can write data to the replicated volume, /var/lib/mysql on LINUXPRIMARY.
5. Bring Failed Server back on line
Procedure:
Plug the power cord back into LINUXSECONDARY and boot it up.
Expected Result:
Using the LifeKeeper GUI, verify that LINUXSECONDARY is coming back up and has
become the Standby Server.
Tests/Verification:
Verify the mirror performs a quick partial resync and moves to the Mirroring state
Verify the Apache and MySQL Hierarchy are in service on LINUXPRIMARY and standby on
LINUXSECONDARY.
41SIOS Protection Suite for Linux
Evaluation Guide
6. Verify Local Recovery of MySQL Server
Procedure:
Kill the MySQL processes via the command line:
# ps –ef | grep sql
# killall mysqld mysqld_safe
run “ps –ef | grep sql once again to verify that the processes no longer exist
Expected Result: (Assumes Local Recovery for MySQL resource is set to YES)
The MySQL Server service should stop.
The MySQL quickcheck process will automatically restart the MySQL Server Service when it
runs periodically.
No failure of MySQL should occur.
Tests/Verification:
Execute “ps –ef | grep sql” once again to verify that the mysql processes have been restored
locally on LINUXPRIMARY.
Verify connectivity to the MySQL database by running:
# mysql –S /var/lib/mysql/mysql.sock –u root –p
(Enter password “SteelEye”
If you inspect the LifeKeeper logs, you will see information indicating that LifeKeeper
dectected the failure of the MySQL service and recovered it locally. Run
/opt/LifeKeeper/bin/lk_log log for more information.
42You can also read