Policy Compliance Getting Started Guide - July 28, 2021
←
→
Page content transcription
If your browser does not render page correctly, please read the page content below
Policy Compliance
Getting Started Guide

July 28, 2021

         Verity Confidential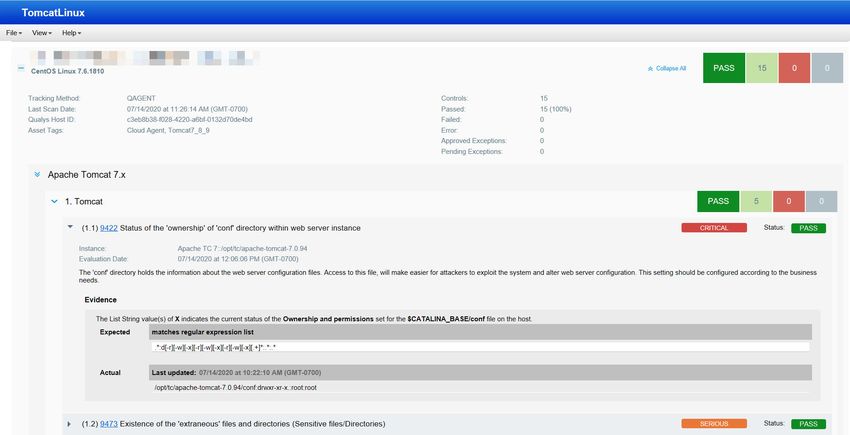
Copyright 2011-2021 by Qualys, Inc. All Rights Reserved.
Qualys and the Qualys logo are registered trademarks of Qualys, Inc. All other trademarks
are the property of their respective owners.

Qualys, Inc.
919 E Hillsdale Blvd
Foster City, CA 94404
1 (650) 801 6100
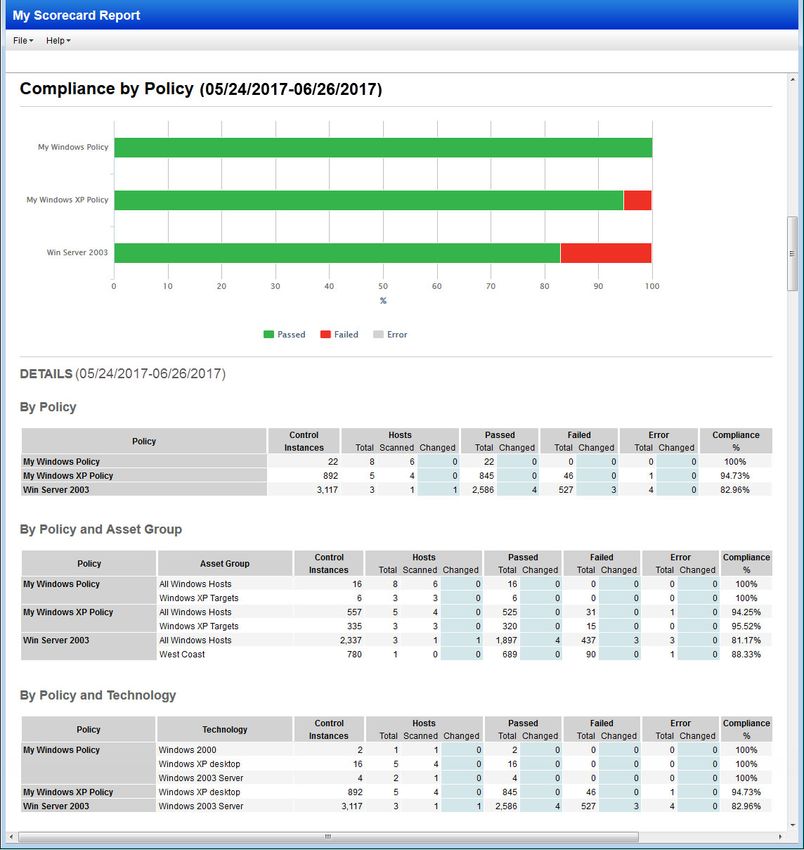
Table of Contents
Get Started ........................................................................................................ 5
Set Up Assets............................................................................................................................ 6

Start Collecting Compliance Data ............................................................... 8
Configure Authentication....................................................................................................... 8
Launch Compliance Scans ................................................................................................... 10
We recommend you schedule scans to run automatically .............................................. 12
How to configure scan settings............................................................................................ 12
Install Cloud Agents .............................................................................................................. 17
Evaluate Middleware Assets by Using Cloud Agent .......................................................... 17

Define Policies ................................................................................................. 21
Create your first policy .........................................................................................................          21
Add User-Defined Controls ..................................................................................................                26
Database User-Defined Controls .........................................................................................                    29
Edit User-Defined Controls...................................................................................................               33
Import and Export User-Defined Controls..........................................................................                           33
Qualys Custom Controls in Library Policies .......................................................................                          34
Manage Your Policies ............................................................................................................           35
Mandates ................................................................................................................................   36

Reporting Overview ...................................................................................... 37
Dashboard ..............................................................................................................................    37
Policy Summary.....................................................................................................................         38
Control View ..........................................................................................................................     39
Policy Compliance Reports ...................................................................................................               40
Authentication Report ..........................................................................................................            40
Policy Report ..........................................................................................................................    41
Mandate Based Reports ........................................................................................................              42
STIG Based Reports ...............................................................................................................          45
Compliance Scorecard Report..............................................................................................                   46
Control Pass/Fail Report .......................................................................................................            50
Individual Host Compliance Report ....................................................................................                      52
Managing exceptions ............................................................................................................            53

Tips and Tricks................................................................................................ 55
Add Auditor Users .................................................................................................................         55
Customize Frameworks for the Subscription.....................................................................                              55
Customize Technologies for the Subscription ...................................................................                             56
Review & Customize Control Criticality .............................................................................                        57

                                                                         3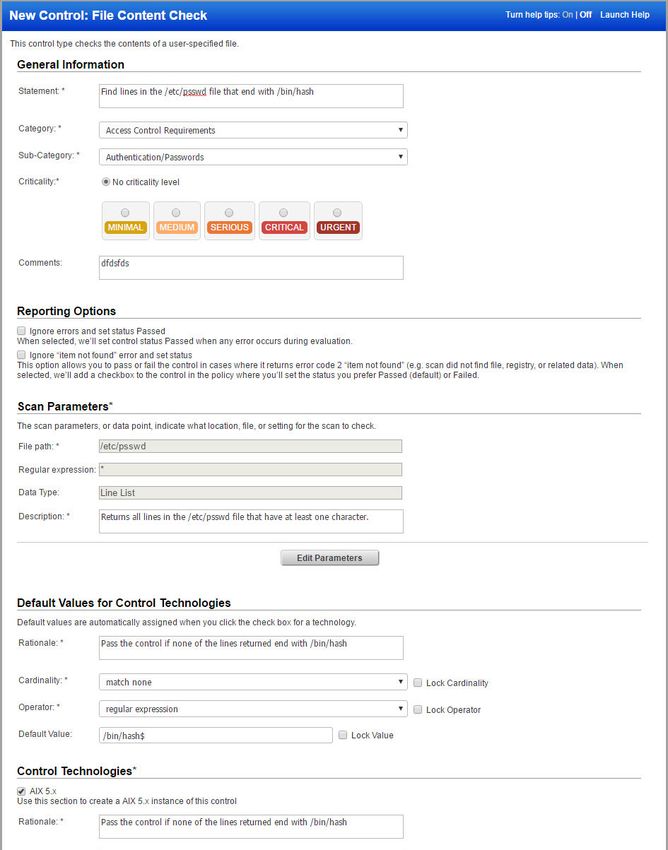
Contact Support............................................................................................. 57

                                                        4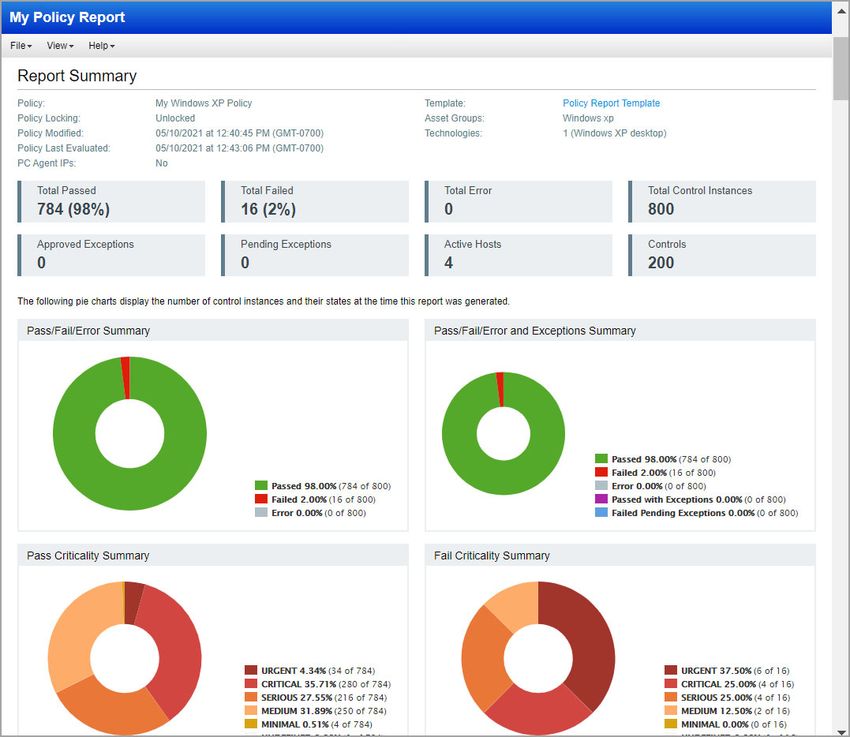
Get Started

Get Started
Welcome to Qualys Policy Compliance. We’ll help you get started quickly so you can
understand the compliance status of your host assets.
Policy Compliance is available in your account only when it is enabled for your
subscription. If you would like to enable Policy Compliance for your account, please
contact Technical Support or your Technical Account Manager.
Let’s take a look now at the user interface. Log into your account and choose Policy
Compliance from the application picker.

Once in the PC application, you’ll see these options along the top menu:

                                            5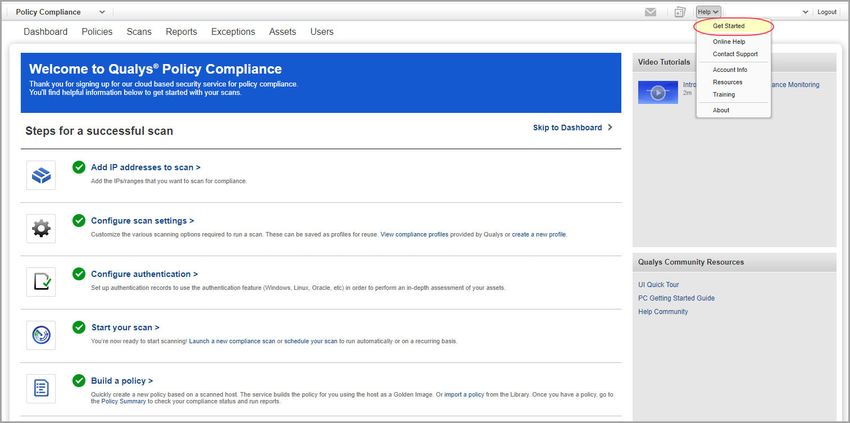
Get Started
                                                                               Set Up Assets

Go to Help > Get Started for some helpful first steps.

Next we’ll walk you through the steps so you can get started with running compliance
scans, building policies and creating reports.

Set Up Assets
You can run compliance scans and create compliance reports on hosts (IP addresses) that
have been added to your PC account. Select Assets on the top menu and then click the
Host Assets tab. You’ll see the hosts already in your PC account.

How do I add new hosts to PC?
From the New menu, select IP Tracked Hosts, DNS Tracked Hosts or NetBIOS Tracked
Hosts. The tracking method you choose will be assigned to all of the hosts being added.

In the New Hosts wizard, first review the number of hosts you can add on the General
Information tab. Then go to the Host IPs tab and enter new IP addresses/ranges in the IPs
field. To add the new IPs to your PC account, select the Add to Policy Compliance Module
check box. Note that you can add the same IPs to other modules in your subscription by
selecting additional module options.

                                             6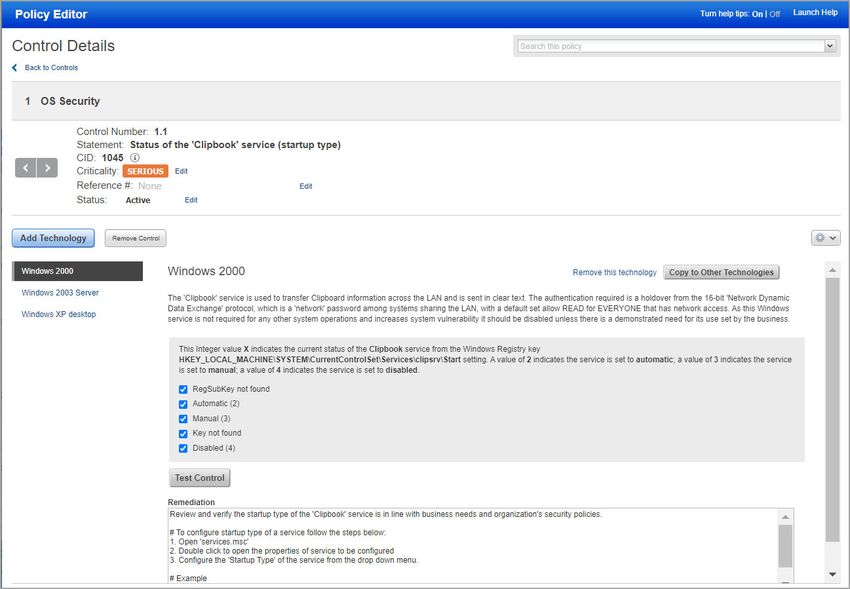
Get Started
                                                                             Set Up Assets

When you’re done making your selections, click Add. Then click OK when the
confirmation appears.

                                          7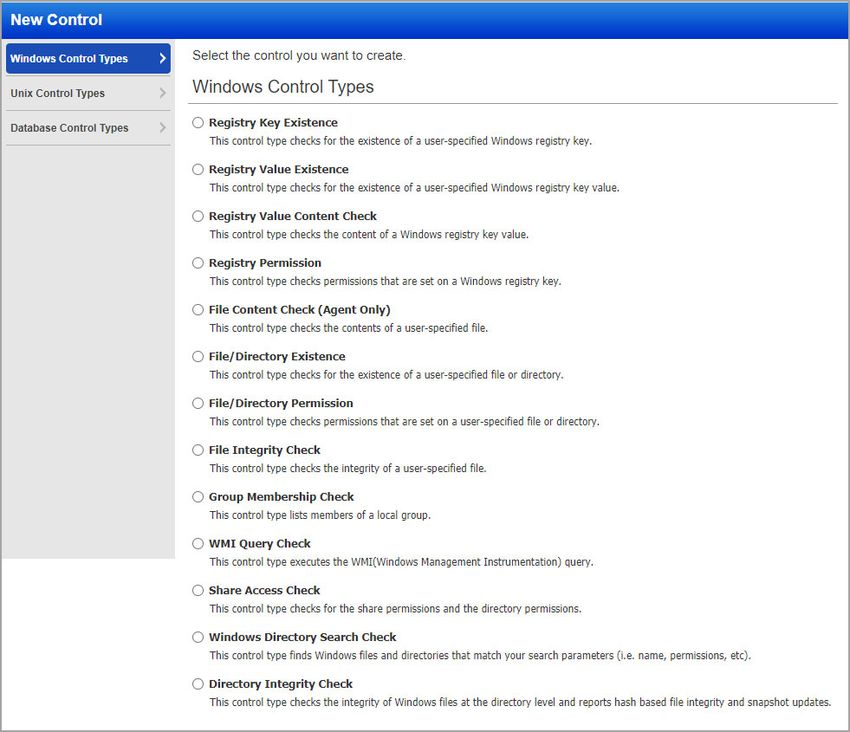
Start Collecting Compliance Data
                                                                         Configure Authentication

Start Collecting Compliance Data
Qualys sensors collect compliance data from your assets and beams it up to the Qualys
Cloud Platform where the data is analyzed and correlated. You can choose to launch
scans with scanner appliances and/or install Cloud Agents.
The Scans section is where you manage your compliance scans and your scan
configurations.

Configure Authentication
Authentication to hosts is required for compliance scans using our trusted scanning
feature. For Windows compliance scanning, an account with Administrator rights is
required.
The service performs authentication based on authentication records you define for your
target hosts. Each authentication record identifies an authentication type (e.g. Windows,
Unix, Oracle, Apache Web Server, Docker, MS SQL, and many more), account login
credentials and target IP addresses. Multiple records may be defined. The service uses all
the records in your account for compliance scanning.
You’ll see the authentication records in your account by going to Scans > Authentication.
To add a new record, select the record type from the New menu. The online help within
each authentication record describes the required inputs and setup instructions.

Authentication Vaults
We support integration with multiple third party password vaults. To use vaults, you’ll
need to first configure vault records. From the New menu, choose Authentication Vaults.
Then choose your vault type. When the vault record appears, you'll need to provide vault
credentials to securely access sensitive information stored in the vault. Review the help
for your vault type (just click Launch Help in the vault record) to understand the types of
credentials that can be stored in the vault and how to retrieve them at scan time. Each
vault has their own set of requirements.

                                             8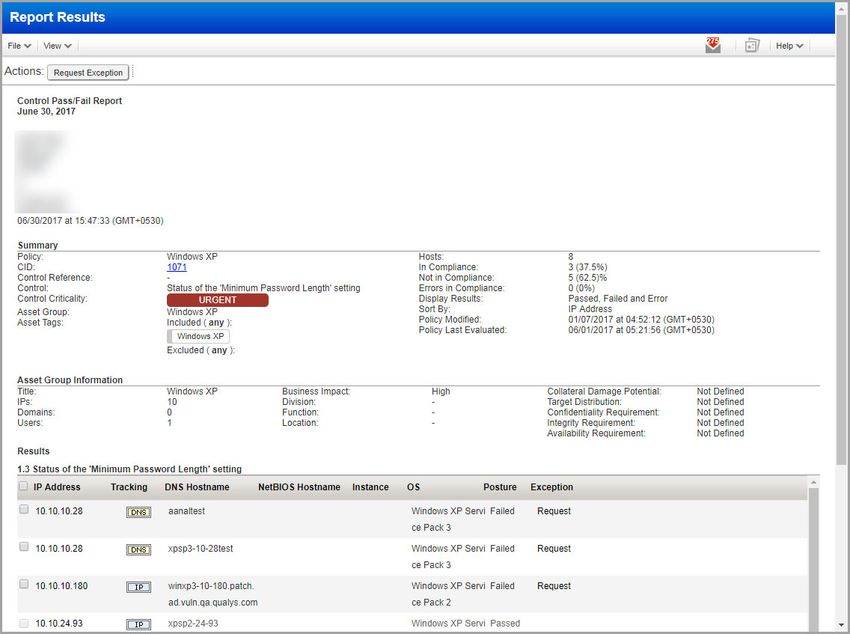
Start Collecting Compliance Data
                                                                           Configure Authentication

Once your vault record is saved, you’ll be ready to configure authentication records. In the
record, you'll choose the Authentication Vault option (or Get password from vault: Yes).
Then choose the vault type and select the vault record you already created. For each vault
type there will be additional information required. The information required depends on
the vault type. Please refer to the help for your vault type. At scan time, we'll authenticate
to hosts using credentials retrieved from your vault.

System Authentication Records
For several server applications you can have authentication records created for you
automatically. Instance discovery and auto record creation is supported for multiple
technologies, including Apache Web Server, IBM WebSphere App Server, JBoss Server,
Tomcat Server and Oracle. See System Authentication Options to learn how to create
compliance profiles in order to perform instance discovery and then include system
created records in your scans.
Auto created authentication records have the owner “System”. These records cannot be
edited by users. (For Oracle, you do have the option to Save a system created record as a
user record in order to edit it.)

Perform Compliance Assessment of Oracle Multitenant Databases via
Container Database
Customers have the option to assess their Oracle multitenant databases for compliance
via the container database (CDB). For this, customers simply select the option “Is CDB” in
the Oracle authentication record. There is no need for customers to create individual
records for each pluggable database in the CDB.

How it works
When “Is CDB” is selected in the Oracle record, the compliance scan will auto discover and
assess all accessible Pluggable Databases (PDBs) within the container database (CDB). The
assessment is performed through the CDB, which means there is no need for the scanner
to connect directly to individual PDBs. This saves customers from having to create
separate Oracle records for each PDB instance. Identifying the Oracle database as a CDB in
the Oracle record also ensures the right compliance checks are performed for multitenant
technologies. We’ve written compliance controls in order to assess the pluggable
databases via the CDB. See the online help to learn more about this feature.

                                              9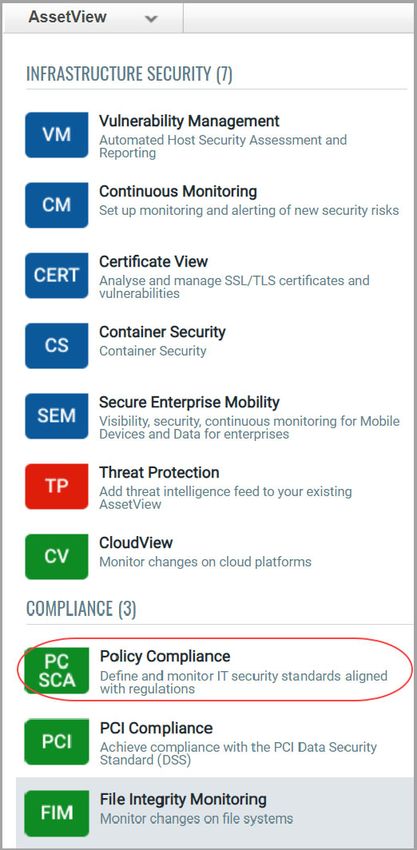
Start Collecting Compliance Data
                                                                    Launch Compliance Scans

Launch Compliance Scans
Now you’re ready to start scanning using scanner appliances. Compliance scans can be
launched on demand or scheduled to run at a future date and time.
Select Scans from the top menu and click the PC Scans tab. Then go to New > Scan (or
Schedule Scan). Depending on your subscription settings, you may see additional scan
options like EC2 Scan and Cloud Perimeter Scan. In the following example, these options
are not available.

The Launch Compliance Scan window appears, prompting you to enter scan information.

                                           10
Start Collecting Compliance Data
Launch Compliance Scans
Title — The title helps you identify the scan within the application. The title you enter
appears in the scan summary email and the scan results report.
Compliance Profile — This profile contains the various scan settings required to run a
compliance scan. We recommend Initial PC Options to get started.
Network — (Visible only when the Network Support feature is enabled.) Select the
network you want to scan. Only one network may be selected at a time.
Scanner Appliance — In case your account has scanner appliances, then you can select a
scanner option from the menu: External, scanner appliance name, All Scanners in Asset
Group, All Scanners in TagSet, Build my list, or Default. You can select one or more
scanner appliances for your internal compliance scans. (These same options are available
for vulnerability scans.)
Choose Target Hosts from — Select the hosts you want to scan. You can enter
IPs/ranges/FQDNs and/or asset groups. When Asset Tagging has been added to your
account then you also have the option to identify target hosts by selecting asset tags.
Notification — Want to be notified when the scan is done? Just select the option “Send
notification when this scan is finished” and tell us who should be notified by selecting
distribution groups, and enter a custom email message.
After providing your scan settings, click the Launch button. The Scan Status will appear
in a new window.
The Scan Status report is updated every 60 seconds until all targeted hosts have been
analyzed, allowing you to view results in real time. The scan task runs in the background,
so you can safely close the status window and return to it from the scans list.
You can easily track a scan and its status from the scans list. The indicator appears
next to a scan when the scan is finished and the results from the scan have been
processed. When results are processed it means posture evaluation for the scanned hosts
is updated and the results are available for reporting.
11Start Collecting Compliance Data
We recommend you schedule scans to run automatically
Tips:
No data found — If you run a compliance scan and it returns the status “Finished” with
the message “No data found” it’s most likely that authentication was not successful on the
target hosts. Be sure to create authentication records for the systems you want to scan.
Also check that the credentials in the records are current.
Authentication Report — The Authentication Report helps you identify where
authentication was successful and where it failed for compliance hosts. For each host,
authentication status Passed, Failed or Passed with Insufficient Privileges (Passed*) is
provided.
More Information — The online help (Help > Online Help) and the Resources section (Help
> Resources) describe trusted scanning setup requirements and best practices. This
information details the account requirements for each authentication type.
We recommend you schedule scans to run automatically
You can schedule the compliance scan to run at a future date and time, just as you can for
vulnerability scans. Select Scans from the top menu and click the Schedules tab. Go to
New > Schedule Scan > Compliance.
The New Scheduled Compliance Scan window appears where you can add the task.
You’ll notice the schedule settings are similar to a vulnerability scan schedule, except you
enter a compliance profile instead of an option profile.
How to configure scan settings
Compliance profiles contain scan configuration settings that can be fine tuned and saved
for future use. To see the compliance profiles in your account, go to Scans > Option
Profiles. To add a new compliance profile, go to New > Compliance Profile.
Below you’ll see a sample compliance profile with initial settings provided by the service.
12Start Collecting Compliance Data
How to configure scan settings
Scan Options
The Scan tab of the profile includes settings that affect how the service gathers
information about target hosts and how the service performs compliance assessment on
target hosts.
Performance
The performance level selected in the profile determines the number of hosts to scan in
parallel, the number of processes to run in parallel against each host, and the delay
between groups of packets sent to each host. Click Configure to change the performance
level or customize performance settings.
Scan restriction using Scan by Policy
When you run a compliance scan we scan for all controls in the controls list (except
special control types listed in Control Types section - you must explicitly select these). The
Scan by Policy option allows you to restrict your scans to the controls in selected policies.
You can choose up to 20 policies, one policy at a time. Once you’ve selected a policy, all
controls in that policy will be scanned including any special control types in the policy.
This is regardless of the Control Types settings in the profile.
Database Controls Types
You can set a limit on the number of rows to be returned per scan for the user-defined
database controls. By default, we’ll return up to 5000 rows for Oracle and up to 256 rows
for all the other control types listed. Select any control type listed to edit the limit.
13Start Collecting Compliance Data
How to configure scan settings
Integrity Monitoring
If you’ve created File Integrity Check controls with the option “Use scan data as expected
value” enabled then choose the “Auto Update expected value” option in the profile. This
allows us to automatically update the control value after a valid file change. Be sure to
also select “File Integrity Monitoring controls enabled” under Control Types in the profile.
Control Types & Dissolvable Agent
There are some additional control types you can check during scanning. These are not
included in scans by default and require additional steps to set up. For example, to
perform file integrity monitoring you must add user defined controls that specify the files
you want to track. To scan for password auditing controls, to enumerate Windows shares
on your hosts, or to perform a Windows directory search, you must enable the Dissolvable
Agent. The online help describes these features in detail.
Which ports are scanned?
When “Standard Scan” is selected, all ports in the standard ports list are scanned (about
1900 ports) in addition to any custom ports specified in Unix authentication records. You
can click the “View list” link to see the standard ports list. When “Targeted Scan” is
selected, the service targets the scan to a smaller set of ports. This is the recommended
setting, and it is the initial setting for a new compliance profile.
System Authentication Options
On the System Authentication tab, you can allow the system to create authentication
records automatically using the scan data discovered for running instances. Then choose
whether to include system-created authentication records in scans. Instance discovery
and auto record creation is supported for several technologies, including Apache Web
Server, IBM WebSphere App Server, JBoss Server, Tomcat Server and Oracle.
To use this feature, you’ll create 2 compliance profiles. One profile for instance discovery
and record creation, and one profile for using system created records for compliance
assessments. These options cannot be selected in the same profile. First a discovery scan
14Start Collecting Compliance Data
How to configure scan settings
finds instances of the server applications that you have chosen to scan, consolidates
instance data, and creates/updates authentication records in your account. Then an
assessment scan uses the records saved in your account for control evaluations. Please
refer to the online help for complete details on this feature.
Additional Options
Click the Additional tab in your profile for configuration settings that affect how the
service performs host discovery and how the service interacts with your firewall/IDS
configuration. The initial settings are best practice in most cases.
What is host discovery?
This is the first phase of a scan when the service sends probes to attempt to discover
whether the hosts in the scan target are alive and running.
Important: By changing the default settings the service may not detect all live hosts and
hosts that go undetected cannot be analyzed for compliance. These settings should only
be customized under special circumstances. For example, you might want to add ports
that are not included in the Standard port list, remove probes that will trigger your
firewall/IDS, or only discover live hosts that respond to an ICMP ping.
15Start Collecting Compliance Data
How to configure scan settings
Instance Data Collection Options
On the Instance Data Collection tab, you can select database technologies as well as other
OS-based applications and technologies for which you want to enable data collection
without creating an authentication record for respective technologies. Data collection for
the selected technologies happens on host assets by using the underlying OS
authentication records.
Databasess
In case of database technologies, only OS-dependent database controls are used in data
collection and evaluation. To see the list of available OS-dependent database controls, go
to Policies > Controls > Search and then, in the Search dialog box, select the Instance
Data Collection box for DB OS CIDs. The search returns the system-defined controls only.
For data collection on MongoDB, Oracle, and MySQL instances, you need a Unix
authentication record (with Sudo as root delegation).
For data collection on MSSQL instances, you need a Windows authentication record.
Applications and Other Technologies
To select OS-based applications and other technologies, first select the Applications and
Other Technologies box. Then pick from the applications/technologies listed.
For data collection on Oracle JRE instances, you need a Unix authentication record (with
Sudo as root delegation) or Windows authentication record depending on the host
operating system. For data collection on IBM WebSphere Liberty instances, you need a
Unix authentication record (with Sudo as root delegation).
For the supported versions of databases as well as OS-based applications and other
technologies, see the “Authentication Technologies Matrix” in the online help.
These technologies are auto-discovered by Cloud Agents for Policy Compliance (PC). To
know more, see “Middleware Technologies Auto-discovered by Cloud Agents for PC” in the
online help.
16Start Collecting Compliance Data
Install Cloud Agents
Install Cloud Agents
Qualys Cloud Agent is our revolutionary platform that supports security assessments in
real time, without the need to schedule scan windows and manage credentials for
scanning. You can choose to install cloud agents instead of scanner appliances for
continuous compliance data collection. These lightweight agents can be installed
anywhere - any host such as a laptop, desktop, server or virtual machine - in minutes.
All agent installations are managed in Qualys Cloud Agent. We'll help you create activate
keys, download and install agents, and activate your agents for Policy Compliance (PC).
Log into your account and choose Cloud Agent from the application picker.
The Cloud Agent Platform Quick Start Guide provides helpful information to get started.
Select Quick Start Guide below your user name at any time to see this guide. You’ll find
helpful links to Cloud Agent free training and user guides.
Evaluate Middleware Assets by Using Cloud Agent
Evaluate compliance posture on your assets by assessing the middleware technologies
installed in your environment using your PC agents. You can dynamically discover and
assess middleware technologies like web servers in your environment. We provide you
with two ways to quickly get started. You can either choose to enable all your agents to be
activated for middleware assessment by default or you can activate assets individually.
If you choose to enable by default, it will take away your need to monitor the asset list and
then activate the asset. As soon as supported technology instances are discovered on the
assets, they will be activated for assessment. As a part of activation process Middleware
manifest will be installed on your agent.
In case you choose to activate each asset individually, the manifest is installed on the
agent once you choose to activate the asset for assessment.
17Start Collecting Compliance Data
Evaluate Middleware Assets by Using Cloud Agent
The middleware assets and technologies installed on the assets are identified using cloud
agents and are listed in the PC > Assets > Middleware Assets tab. There’s no need to
create duplicate controls - the controls you’ve already defined in your PC account for
compliance scanning will also be evaluated by cloud agents with no action from you. You
can continue to use your scanner to discover middleware technologies in your
environment.
Prerequisites
- Qualys Policy Compliance must be enabled for your subscription
- Qualys Cloud Agent must be enabled for your subscription
- Cloud Agents must be activated for the PC module
- Windows Cloud Agent 4.0.x or later
- Linux Cloud Agent 2.8.x or later
See the online help to learn more about the Middleware Technologies auto-discovered by
Cloud Agent in Policy Compliance.
Identify Middleware Assets
Set up Cloud Agent on the assets you want to scan for assessment of middleware
technologies. Once the assets are scanned by the agents the middleware technology
details of assets are listed in the Middleware Assets tab.
Here you can view details like number of instances of the technology on your asset, OS,
Status, Update Date, etc. There could be a delay in displaying the discovered details in the
list depending on intervals set on your Cloud Agent scans.
Status types:
Not Activated - The asset is not yet activated for middleware assessment. When a
technology is identified by agent for first time on the asset, it is listed as Not Activated.
Successful Activation - The asset is activated for middleware assessment. You can run
policy compliance reports on this asset for middleware.
Successful Deactivation - The asset is temporarily deactivated for middleware assessment
and will be eliminated from upcoming policy reports.
18Start Collecting Compliance Data
Evaluate Middleware Assets by Using Cloud Agent
Activate assets for middleware assessment
When a technology is identified by the agent for the first time on an asset, it is listed as
Not Activated. To activate the asset, select the asset and from the Action menu choose
Activate Middleware Assessment. You can activate multiple assets at the same time.
Once an asset is activated, the Middleware manifest is assigned to the agent and status is
set to Successful. You can now create policies and run compliance reports on these assets
for the middleware technologies.
Similarly, you can deactivate an asset for assessment using the Deactivate Middleware
Assessment option. Once deactivated, the data for technologies on assets will no longer
be assessed and will not be displayed in the policy compliance report. However, data
collected before deactivation can still be viewed in the report. You can reactive
assessment on an asset any time using the Activate Middleware Assessment option.
Activate assessment on assets by default
You can set the assets to be activated for assessment by default as soon as they are
discovered. Go to Assets > Setup, click Middleware Assessment and select the Enable
Middleware Assessment by default option.
19Start Collecting Compliance Data
Evaluate Middleware Assets by Using Cloud Agent
Sample Middleware Assessment Report
Here is a sample Middleware Assessment report for CentOS Linux 7.6.1810
20Define Policies
Create your first policy
Define Policies
Create a compliance policy based on your organization’s compliance needs, and assign
relevant assets to the policy. You can easily import policies directly to your account from
our Compliance Policy Library. The library includes policies that are based on popular
compliance frameworks, including SOX, HIPAA, CoBIT and more. You can also import a
compliance policy from an XML file. The XML file may be one that was exported from your
account or one that was shared with you by another security professional.
The imported policy appears in your policies list where you can assign assets to the policy
and customize the policy settings. By default, we’ll only import the service-provided
controls in the policy. Choose “Create user defined controls” to also import UDCs.
Once the compliance policy is in place, you can apply the policy to saved compliance scan
results to identify whether hosts are meeting compliance requirements. The next few
sections will guide you through the process of creating your first policy.
Create your first policy
Go to PC > Policies > New > Policy.
Get started using any of these methods:
Create from Scratch — Follow the wizard to select policy technologies, assign assets to the
policy, and give your policy a name. When the Policy Editor appears you can add controls
to your policy and set control values.
Create from Host — You’ll select a host that has already been scanned for compliance,
give your policy a name, and click Create. We’ll build the policy for you based on the latest
compliance findings for the host. We’ll add controls to the policy and organize them into
sections.
Import from Library — We provide many policies in our Library, including CIS-certified
policies. Find the policy you want, click on it and then click Next to import it to your
account.
Import from XML File — Follow the wizard to choose the XML file you want to import and
give your policy a name.
21Define Policies
Create your first policy
Here’s a sample policy for the Windows XP technology.
Can I search the policy?
Yes. Use the search feature in the top, right corner to jump directly to any section or
control in the policy. Search by keyword or control ID.
How to assign assets to the policy
Tell us the hosts that you want to test for compliance with each policy. You can do this by
adding asset groups to the policy (all hosts in the specified asset group are included) or by
adding asset tags in the include list (hosts that match any or all of the specified tags are
included). You can also specify the asset tags that you want to exclude. Hosts having all or
any of the tags in the exclude list are excluded from policy compliance assessment.
22Define Policies
Create your first policy
Do you have PC Agent?
You'll also see the option to include all hosts in your PC Agent license. Click Edit to edit the
policy assets. Then select the Include all hosts with PC agents check box.
When you run policy reports, you’ll be able to identify the agent hosts in the policy by
looking for the tracking method AGENT.
How do I add controls to a section?
Drill-down into a section from the home page (double-click on the section), and then click
the Add Controls button to search for and add controls to the section. Note that you can
only select controls that have not already been added to the policy, and the controls must
be applicable to the global technologies list set for the policy.
Copy controls from another policy or technology
Save time by copying controls along-with their settings already defined in another policy.
Click Copy Controls in a new section or existing section in your policy. Tell us which policy
has the controls you’re looking for. Select the controls you want to copy, and click Copy.
23Define Policies
Create your first policy
Similarly, when you add a new technology to your policy, you can copy control settings
from another technology in the same policy, another policy in your account or a policy in
the Library. For example, let’s say you’re adding Windows 10 to your policy and you choose
to copy settings from another technology like Windows 8. We will apply settings from all
applicable Windows 8 controls to Windows 10 controls.
How do I reorder controls?
From the controls list, you can reorder controls using these methods: 1) Click the Reorder
button and then type over any control number. This is an easy way to move controls from
one section to another, for example change control 2.1 to 1.1 to move it from section 2 to
section 1. 2) Simply drag and drop a control to a new position. Click the far left edge of the
control row to move it.
How do I edit control details?
Drill-down into a section from the home page (double-click on the section), and then
double-click on any control (or click Edit) to see control details. From here you can change
the control value for any technology, add/remove technologies for the control, add an
external reference number and customize remediation details. Use the left and right
arrows to quickly scroll through the controls in a section.
24Define Policies
Create your first policy
Copy control settings from one technology to other technologies
Drill-down into the control details for any control in your policy and pick a technology on
the left side to see the control settings for that technology. Then click the Copy to Other
Technologies button to copy the settings from the selected technology to all other
technologies listed in the policy for the same control.
Note that if the control criteria is different between the technology that you've selected
and another technology for the control (e.g. different cardinality, operator or fixed value
options), then only the remediation value will be copied. Other control settings will not be
copied in this case. You’ll get a message on the screen that lets you know which
technologies could not get all control settings.
How do I add a control reference?
You can add a reference to any control by either clicking the Add Ref # link from the list of
controls or clicking Edit next to Reference # in the Control Details. The text you enter will
appear in your policy reports under Control References. Note that Managers and Auditors
can still add references (documents, URLs and text) by editing a control from the controls
data list (go to PC > Policies > Controls).
25Define Policies
Add User-Defined Controls
Add User-Defined Controls
Managers and Auditors have the option to add user-defined controls (UDC) to the
subscription making them available for compliance scanning and reporting. The service
supports Windows, Unix and Database control types.
When defining a UDC, you must 1) provide general information for the control like a
control statement and category, 2) specify the scan parameters that define the data point
check to be performed by the scanning engine, and 3) identify the technologies that the
control applies to and set the default expected value for each technology.
To add a UDC, go to Policies > Controls and pick New > Control.
In the New Control window, select Windows Control Types, Unix Control Types or
Database Control Types.
Click on the type of control you want to create. Provide details for the control, including
General Information, Scan Parameters, Control Technologies and References. (See the
online help for complete information.) Click Create to save the new control.
Once saved, the UDC appears in the controls list with the service-provided controls. The
service automatically assigns the new custom control a unique CID (Control ID) starting at
100000. Subsequent CIDs are incremented by one — 100001, 100002, 100003, etc. The new
control is automatically included in all future compliance scans and may be added to
policies.
26Define Policies
Add User-Defined Controls
Sample Control: Unix File Content Check
This control checks the contents of a user-specified file on a Unix system. A Unix File
Content Check control includes 2 regular expressions. The first regular expression is
entered in the Scan Parameters section and is used to filter results on the target
file/directory at the time of the scan. The second regular expression is entered in the
Control Technologies section and is used to perform the pass/fail evaluation of the
returned results.
Example:
This sample control can be used to find lines in the /etc/passwd file that end with
/bin/bash. The settings in the Scan Parameters section instruct the scanning engine to
first return all lines in the /etc/passwd file that have at least one character. The settings in
the Control Technologies section instruct the scanning engine to pass the control if none
of the lines end with /bin/bash. If at least one line in the file ends with /bin/bash then the
control will fail.
27Define Policies
Add User-Defined Controls
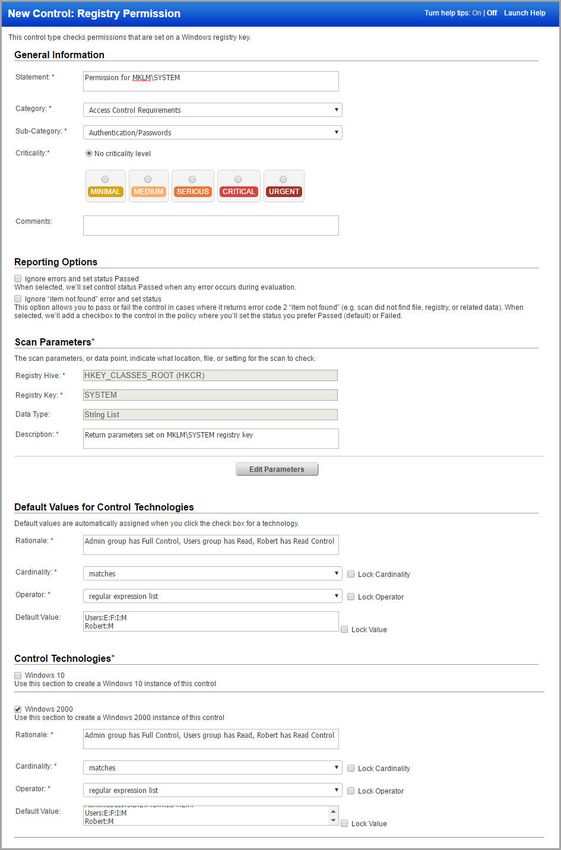
Sample Control: Windows Registry Permission
A Windows Registry Permission control checks permissions that are set on a Windows
registry key for different user groups and individual users.
To maximize space, the Policy Compliance application assigns each permission a letter
(A,B,C,D,...) and displays the letter instead of the full permission name. You must use the
same mapping when setting the default expected value for the control. (See “Registry
Permissions” in the online help for a table that maps each permission to the letter it
represents.)
Example:
This sample control checks that the registry key HKLM\SYSTEM has the following
permissions:
The Administrators group has Full Control permission (D:E:F:G:H:I:J:K:L:M)
The Users group has Read permission (E:F:I:M)
A user named Robert has Read Control permission (M)
28Define Policies
Database User-Defined Controls
Database User-Defined Controls
Use the database UDC type to create custom checks by executing SQL statements on
databases. You can also use these checks to create policy reports on databases. We
support several databases, including MS SQL, Oracle, Sybase, PostgreSQL/Pivotal
Greenplum and SAP IQ. We’ll walk you through the steps.
Step 1 - Add database controls
Go to PC > Policies > Controls > New > Control. Select Database Control Types and then
click the type of control you want. In each control you'll define the SQL statement that you
want to execute on your database. This value can have a maximum of 32000 characters.
Note - Only SELECT statements are supported for the database controls. For example, you
can use the following SQL statement to list all fields from “Customers” where country is
“Germany” AND city is “Berlin”:
SELECT * FROM Customers WHERE Country='Germany' AND City='Berlin'
Step 2 - Add database controls to a policy
Add your database controls to a compliance policy. Tip - Make sure your policy has the
database technologies selected in the control. If you haven’t scanned yet, you won’t see
any actual data from your database in the policy when you view the control.
Time Efficient Tip: Run a
compliance scan without any
policy restrictions and then add
database controls to the policy.
This way you already have data
from the scan to build a policy
and set criteria.
Step 3 - Launch a compliance scan
Launch a compliance scan on the host running the database. First, edit the compliance
option profile you’ll use for the scan to set the max number of rows you want the check to
return. Select any control type to edit the limit.
29Define Policies
Database User-Defined Controls
Step 4 - Return to your policy to set control criteria
Edit your policy using the Policy Editor to see the actual data returned by your scan.
Select a column and define the expected value. This is how you set the criteria that will
determine pass/fail status for the control. To ensure you get accurate results, make sure
you provide appropriate Expected value for the selected Data-type. For example: If you
select the data-type as List String then in the Expected Values field provide text value.
Note - The first check box “Set status to PASS if no data found” and Criteria 1 use OR for
control evaluation. This cannot be changed.
Click “Add another column” to add more criteria. You can add up to 5 criteria, i.e. Criteria
1, Criteria 2, Criteria 3 and so on.
You can choose AND or OR between each criteria. If you choose AND then both criteria
must match to Pass. If you choose OR then at least one criteria must match to Pass.
30Define Policies
Database User-Defined Controls
Click Test Control to verify the criteria you set. Then save your policy.
31Define Policies
Database User-Defined Controls
Step 5 - Run a report
You’ll see PASS or FAIL status in your report like with any control. If the columns returned
by the most recent scan are different than previous scans then you’ll want to edit your
policy to modify the criteria selected for the control.
In this sample
report, the expected
value matches the
actual value,
resulting in status
PASS.
Common Questions and Sample Queries
Please refer to the online help for answers to common questions as well as sample queries
and the results from those queries for each of the database control types.
32Define Policies
Edit User-Defined Controls
Edit User-Defined Controls
Managers and Auditors can edit controls. Unit Managers may be granted permission to
edit user-defined controls (UDC). Go to PC > Policies > Controls, select a control and
choose Edit from the Quick Actions menu.
For a user-defined control (UDC), you can edit the control statement, category, comments,
reporting options, scan parameters and their description, control values (which are used
to calculate the expected values), control technologies, and references. When Control
Criticality is enabled for your subscription, you can change or remove the criticality level
assigned to the control. (To know more about control criticality, see the online help.)
After you edit a UDC, to use the modified values in data collection and evaluation, run a
fresh scan and generate a new report.
Import and Export User-Defined Controls
Manager and Auditor users have the option to import and export user-defined controls in
XML format. Other users can export user-defined controls if they have the “Manage
compliance” permission; these users do not have permission to import controls.
Tip: The schema ImportableControl.xsd is used to import and export user defined
controls. You can find a description of this schema in the online help.
Export User Defined Controls
To export user defined controls:
1 Go to PC > Policies > Controls.
2 Use the check boxes to select user defined controls you’d like to export.
3 Select Actions > Export.
The selected controls will be saved in an XML file named “control_export_yyyymmdd.xml”
using the schema ImportableControl.xsd. A maximum of 500 controls can be exported.
Import User Defined Controls
To import user defined controls:
1 Create user defined control(s) using the schema ImportableControl.xsd.
2 Go to PC > Policies > Controls.
3 Select New > Import from XML file and select the XML file with your user-defined
controls.
Note: If a control exists in your account with the same scan parameters as control(s) being
imported, the service assigns the DESCRIPTION parameter of the existing control to the
DESCRIPTION parameter of all imported controls with the same scan parameters.
33Define Policies
Qualys Custom Controls in Library Policies
Qualys Custom Controls in Library Policies
Library policies provided by Qualys may include a control type called Qualys Custom
Control (QCC). With this new control type we can quickly provide to users new controls
that are similar to user-defined controls (UDC). Once added to your account you can copy
any QCC to make your own UDC that you can customize the controls to meet your needs.
Import a Policy from the Library
Go to Policies > New > Policy > Import from Library. Choose a policy and click Next. If the
selected policy includes QCCs you’ll see the option Include Qualys Custom Controls. This
option is selected by default and is recommended. Click Create to import the policy and
the add the QCCs. Simply uncheck the option if you don’t want the QCCs to be imported.
The QCCs added from the policy appear on your controls list. The Type column shows QCC
for each Qualys Custom Control. You can make a copy of any QCC to create a UDC that
you can customize to meet your exact needs. Just choose Copy from the Quick Actions
menu and then confirm the action. The new UDC appears on the controls list where you
can edit it.
Export a Policy with QCCs
When you export a policy you will see the option Include UDCs and QCCs. By default we
include all service-defined controls in the policy. Select this option to also include user-
defined controls and Qualys custom controls in the policy.
34Define Policies
Manage Your Policies
Manage Your Policies
Go to PC > Policies to see all the policies in your subscription. From here you can view and
edit policies, export policies, and change the policy status (active/inactive).
How do I export a policy?
Choose Export from the Quick Actions menu and select a format (CSV or XML). You can
include user-defined controls (UDCs) along with the service-provided controls when you
export a policy from your account to CSV or XML. Exporting a policy lets you quickly and
easily share it or compare it with other policies you may have.
How do I import a policy?
You can import a policy from an XML file including user-defined controls (UDCs) or
directly from the Compliance Policy Library. Once a policy is imported, you can customize
the policy to suit your needs (unless it is locked). Just go to New > Policy, select either
Import from XML File or Import from Library and we’ll walk you through the steps.
How do I lock a policy?
You can lock a policy so that you can restrict other users from updating it. Simply,
navigate to Policies > Policies and select the policy you want to lock. Select Lock from the
Quick Actions menu. You can use the Actions menu to lock multiple policies in one go.
Similarly, you can unlock a locked policy. Policies must be unlocked to enable editing.
Tell me about locked policies
Locked policies may be imported for certification purposes. For example, the service
provides locked policies for testing compliance against specific CIS benchmarks. These
policies have been reviewed and certified by CIS (the Center for Internet Security). You can
import a CIS-certified policy from the library into your account, assign relevant assets to
the policy and then use the policy to certify that you are meeting all requirements
outlined in the CIS benchmark.
Tell me about policy status
Every policy in your account will either be active or inactive . Inactive policies
will not be scanned or reported on. You can make a policy inactive by simply choosing
Deactivate from the Quick Actions menu. (Then activate it later by choosing Activate.)
35Define Policies
Mandates
Why make a policy inactive? You may want to hide a new policy while you’re working on it
and then publish it at a later time. Or let’s say a policy has become out of date and you
want to edit the policy before republishing it. In such cases you mark the policy inactive
and make the required changes. Then activate it when you’re done.
How do I evaluate policy?
Policies are evaluated when new scan results are processed for the hosts in your policy.
You can also start policy evaluation when saving changes to a policy or anytime from the
policies data list. Simply select the Evaluate Now check box before you click Save in the
Policy Editor. From the policy data list, select any policy and choose Evaluate from the
Quick Actions menu. To evaluate multiple policies at one go, select the policies and choose
Evaluate from the Actions menu above the list.
Mandates
Mandates are regulatory or good practice standards, compliance frameworks etc. designed
by government organizations. We provide a set of pre-defined mandates which you can
use to generate mandate based reports. To view mandates, go to PC > Policies > Mandates.
What all can I see in the mandates?
A mandate has a set of requirements which may include one or more levels of sub-
requirements. These requirements contain control-objectives and the control-objectives
have sub-control-objectives or controls.
Can I edit mandates?
No, the mandates are pre-defined and cannot be edited. However, you can download the
mandate or view the mandate.
Download a mandate
Go to PC > Policies > Mandates choose New and select Download. Select the download
file format and click Download.
Report on mandates
You can easily generate a report directly from the Mandates tab. Simply select one or
more mandates and from the Actions menu select Generate Report. See Mandate Based
Reports.
36Reporting Overview
Dashboard
Reporting Overview
A policy compliance dashboard and specialized policy compliance reports provide
compliance status information for the hosts in your account, based on the results
returned from the most recent compliance scans. These reports help you determine
whether hosts are compliant with the policies in your account.
Dashboard
The policy compliance dashboard provides a summary of your overall compliance status
across all policies in your account. It displays the top failing policies broken down by
technology or by criticality so you can prioritize your compliance efforts. From the
dashboard, you can drill-down into a policy summary report for any policy listed, make
changes to upcoming schedules, view compliance reports and more. To view the
dashboard, select Dashboard on the top menu.
You can also view all your Policy Compliance Summary for an asset in the Compliance tab
of Asset View. You can see the compliance policies each asset is associated with and how
the policies are doing in terms of secure configuration controls on each asset.
Simply navigate to AssetView > Assets tab, select an asset and click View Asset Details.
Locate the Compliance tab to view a detailed compliance summary for that asset.
37Reporting Overview
Policy Summary
Policy Summary
The Policy Summary provides a one-page summary of your compliance status for a
specific policy in your account. You can view the Policy Summary from the Reports section
(Reports > Policy Summary) or link to it from the PC Dashboard (double-click any policy
title under Top 5 passing policies or Top 5 failing policies).
At the top of the page, select the policy you’re interested in from the Policy menu. When
you link to this page from the Dashboard the policy is selected for you. You can change the
policy selection at any time to report on a different policy in your account. You can also
change the trend duration selection. Your selection determines the number of days (7-90)
included in the trend graphs. Note that trend graphs may show aggregate data when a
longer time frame is selected.
Did you know?
You can run interactive compliance reports directly from the Policy Summary.
Select the IP address for any host listed under “Top Failing Hosts” to run the Individual
Host Compliance Report for the selected host/policy.
Select the control title for any control listed under “Top Failing Controls” to run the
Control Pass/Fail Report for the selected control/policy.
38Reporting Overview
Control View
Control View
You can view and search for information, across all controls in your subscription making
it easier for you to navigate your compliance data. Create and save search queries as per
your requirement.
Note:
- Records will be displayed in Control View when there is some search criteria.
- You’ll need to run compliance scan to view history for control status changes.
What are the steps?
Go to Reports > Control View and do one of the following:
Option 1 - Start typing search criteria [Posture, Technology, Criticality, etc] in the text box.
Option 2 - Click the expand button, select search criteria and click Search.
Can I save my search filters?
Yes, click Save in the top right corner to save the search filter. You can even mark your
most commonly used search filters as Favorite. Favorites are displayed in the Saved
Searches list. A yellow star is shown to identify if a saved search filter is marked as
favorite.
How do I share my saved searches?
When you save a search filter you can choose to share it with other users. You can also
share a saved filter later from Search Action in the top-right corner. A shared search is
identified with a blue share icon.
39Reporting Overview
Policy Compliance Reports
Can I edit my saved searches?
Yes, you can easily add or remove criteria from a saved search. You can either save
changes to the same search or click Save As in the top-right corner to create a new search
filter.
Tell me about the columns that show history for control status changes
First Fail Date - The first scan date when the control was reported as Fail. If the previous
status was Pass then this is the date the status changed from Pass to Fail.
Last Fail Date - The most recent scan date when the control was reported as Fail.
First Pass Date - The first scan date when the control was reported as Pass. If the previous
status was Fail then this is the date the status changed from Fail to Pass.
Last Pass Date - The most recent scan date when the control was reported as Pass.
Previous Posture - The compliance status (Pass or Fail) for each control before the most
recent compliance scan.
Policy Compliance Reports
All policy compliance reports are based on the most recent compliance scan for each host.
There are template based reports and interactive reports. Once generated, template based
reports are saved to your reports list. Interactive reports are not saved.
To create a new compliance report, select Reports from the top menu, click the Reports
tab and select the report you want to run from the New menu.
Authentication Report
The Authentication Report indicates whether authentication was successful for scanned
hosts. If authentication to a host is not successful, then no controls can be evaluated for
the host and no compliance data can be collected for the host. If authentication to a host
40Reporting Overview
Policy Report
is successful, then the host can be evaluated for compliance. The Authentication Report
uses a hidden report template provided by the service. This template cannot be viewed
from the report templates list.
To run the Authentication Report, go to New > Compliance Report > Authentication
Report. Select a report format, report source (certain business units or asset groups), and
choose whether to display the Summary and/or Details section. Click Run.
Sample Authentication Report:
Policy Report
The Policy Report provides compliance status and trend information for a specific policy.
The Policy Report requires a policy report template. The template settings determine the
layout and organization of your report, the trend duration for trend graphs, and the list of
frameworks that may appear in the report. The service provides the “Policy Report
Template” to help you get started. You can use this template as is or customize the
settings.
To run the Policy Report, select New > Compliance Report > Policy Report. In the New
Policy Report wizard specify your policy report template in the Report Template field.
Choose the policy you want to report on. Under Asset Groups you have the option to run
the report on all asset groups in the policy or to select specific asset groups in the policy.
Click Run.
Sample Policy Report:
41Reporting Overview
Mandate Based Reports
This sample shows the Report Summary section of a Policy Report. The report lists hosts
relevant to the policy with the controls tested on each host and the passed/failed status
for each control. For each control, you can expand details to see the expected value as
defined in the policy and the actual value returned when the host was last scanned.
Mandate Based Reports
The Mandate Based Report helps you view the compliance posture of the organization in
terms of the underlying Security baseline against selected Mandates. You get a
harmonized report on one or more compliance policies and mandates.
You can choose any mandates/standards you want to comply with (or even the sub-
requirements from multiple mandates to create a Union of the total requirements) and
get a view of compliance posture in terms of their selected policies.
The Mandate Based Report requires a Mandate template. The template settings identify
the sections you want to include in the report. To create a custom Mandate Based
Template, go to Reports > Templates and select Mandate Template and configure the
report template settings.
42You can also read