SupportAssist for Home PCs Version 3.6 - User's Guide - Dell
←
→
Page content transcription
If your browser does not render page correctly, please read the page content below

SupportAssist for Home PCs Version 3.6
User’s Guide

July 2020
Rev. A00
Notes, cautions, and warnings

     NOTE: A NOTE indicates important information that helps you make better use of your product.

     CAUTION: A CAUTION indicates either potential damage to hardware or loss of data and tells you how to avoid the
     problem.

     WARNING: A WARNING indicates a potential for property damage, personal injury, or death.

© 2020 Dell Inc. or its subsidiaries. All rights reserved. Dell, EMC, and other trademarks are trademarks of Dell Inc. or its subsidiaries. Other trademarks may
be trademarks of their respective owners.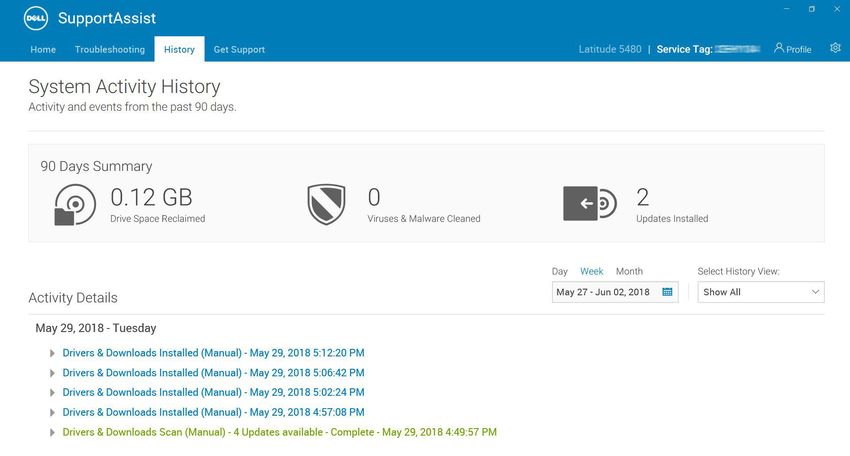
Contents

Chapter 1: Introduction................................................................................................................... 5
  Key features........................................................................................................................................................................... 5
  Document purpose................................................................................................................................................................ 5
  Audience................................................................................................................................................................................. 5
  New features in this release.................................................................................................................................................5
  Supported PCs.......................................................................................................................................................................5
  SupportAssist capabilities and Dell service plans...............................................................................................................6

Chapter 2: Getting started with SupportAssist for Home PCs.............................................................8
  Minimum PC requirements...................................................................................................................................................8
  Install SupportAssist.............................................................................................................................................................. 9
  SupportAssist user interface................................................................................................................................................9
  Change language setting......................................................................................................................................................11
  Create SupportAssist profile...............................................................................................................................................12
      Create Dell My Account................................................................................................................................................ 12
      Sign in with social media account.................................................................................................................................13
  Update contact and shipping information.........................................................................................................................13
  Use different SupportAssist profile....................................................................................................................................13
  Configure Internet settings................................................................................................................................................. 14
  Scheduled scans and optimizations................................................................................................................................... 14
      Schedule automatic scans and optimizations............................................................................................................. 14
  Manually upgrade SupportAssist........................................................................................................................................15
  Notifications..........................................................................................................................................................................15
      Notifications on SupportAssist user interface............................................................................................................15
      Notifications on taskbar or Windows Action Center................................................................................................. 16
      Banners on SupportAssist home page.........................................................................................................................16
      Disable SupportAssist notifications.............................................................................................................................. 17
  Uninstall SupportAssist .......................................................................................................................................................17

Chapter 3: Dell Migrate overview.................................................................................................... 18
  Migrate data from source to target PC............................................................................................................................ 19

Chapter 4: Drivers and downloads overview..................................................................................... 21
  Severity categorization of updates.................................................................................................................................... 21
  Install driver updates............................................................................................................................................................ 21
  Uninstall driver updates...................................................................................................................................................... 22
  Get Drivers and Downloads tile notifications................................................................................................................... 22

Chapter 5: Scanning PC hardware.................................................................................................. 24
  Scan specific hardware component..................................................................................................................................24
  Run quick hardware scan................................................................................................................................................... 24
  Run stress test.....................................................................................................................................................................25
  Scan Hardware tile notifications........................................................................................................................................25

                                                                                                                                                                Contents                   3
Chapter 6: Optimizing your PC....................................................................................................... 27
      Clean files..............................................................................................................................................................................27
      Tune PC performance........................................................................................................................................................ 28
      Optimize network................................................................................................................................................................ 28
      Remove viruses and malware............................................................................................................................................ 28
         Remove potentially unwanted programs....................................................................................................................29
      Run all PC scans and optimizations.................................................................................................................................. 29

    Chapter 7: Creating support request............................................................................................... 31
      Create support request for issue detected by a scan..................................................................................................... 31
      Manually create a support request....................................................................................................................................32
      Issue details page.................................................................................................................................................................32
      Issue summary page ...........................................................................................................................................................33
      Dispatchable parts...............................................................................................................................................................33

    Chapter 8: Troubleshooting overview..............................................................................................34

    Chapter 9: History overview...........................................................................................................35

    Chapter 10: Getting support.......................................................................................................... 36
      Send files to Dell technical support................................................................................................................................... 37
      Send log files to Dell technical support............................................................................................................................. 37
      Start Dell RemoteAssist session........................................................................................................................................ 38

    Chapter 11: Frequently asked questions.......................................................................................... 39

    Chapter 12: Additional resources.................................................................................................... 42

4   Contents
1
                                                                                                       Introduction
SupportAssist automates support from Dell by proactively and predictively identifying hardware and software issues on your PC.
SupportAssist addresses PC performance and stabilization issues, prevents security threats, monitors and detects hardware failures, and
automates the engagement process with Dell Technical support. Depending on your Dell service plan, SupportAssist also automates
support request creation for issues that are detected during a scan. For information on the SupportAssist capabilities for different service
plans, see SupportAssist capabilities and Dell service plans on page 6.

    NOTE: In this document, the term PC refers to Dell laptops, desktops, gateways, and embedded PCs.

SupportAssist enables you to optimize your PC by removing unwanted files, optimizing network settings, tuning-up PC performance, and
removing virus and malware. It also identifies driver updates available for your PC.
SupportAssist collects and sends the required PC information securely to Dell Technical Support. The collected information enables Dell to
provide you an enhanced, efficient, and accelerated support experience.

Key features
•   Predictive and proactive issue detection and notification.
•   Manually or automatically check for driver updates available for your PC.
•   Manually or automatically scan your PC hardware to identify issues.
•   Automatically create a support request for a hardware issue detected in your PC.
•   Manually create a support request for an issue in your PC.
•   Clean temporary files, optimize network connectivity, fine-tune PC performance, and remove viruses and malware.
•   Manually send files to Dell technical support.

    NOTE: SupportAssist capabilities available for a PC vary depending on the Dell service plan of the PC.

Document purpose
This document provides information about using SupportAssist on PCs running Windows 8 or Windows 10 operating systems.
For information about using SupportAssist on PCs running Windows 10 in S mode operating system, see the SupportAssist for Home PCs
User's Guide for Windows 10 in S Mode available at https://www.dell.com/serviceabilitytools.

Audience
This document is intended for users who monitor their PCs running Windows 8 or Windows 10 operating system using SupportAssist for
Home PCs. This document also caters to employees of organizations that do not have an IT administrator and allow the employees to
monitor their PCs by themselves using SupportAssist.

New features in this release
•   Provision to enable or disable temporary suspension of data encryption to install updates on a BitLocker enabled PC.
•   Added notification to check the status of an open support request online.
•   Removed notification that is displayed before a scheduled scan is initiated.
•   Security and other bug fixes.

Supported PCs
SupportAssist is supported on the following Dell PCs:
•   Laptops and desktops:

                                                                                                                     Introduction          5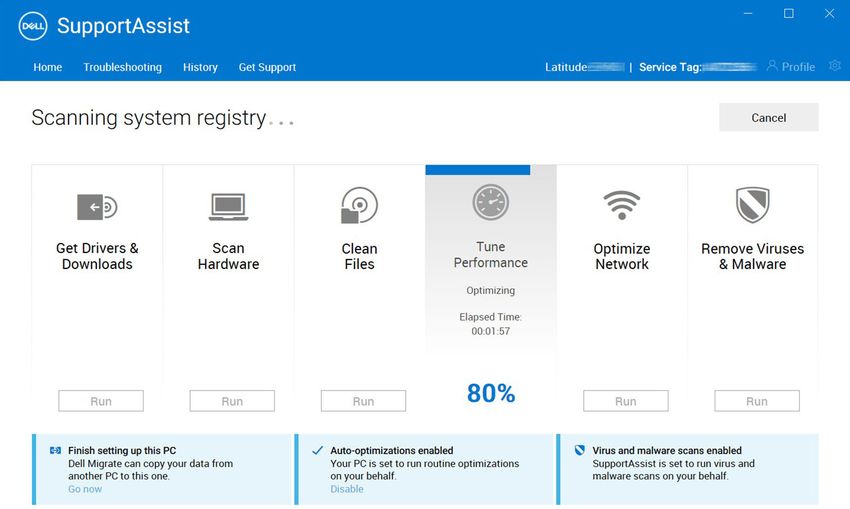
○   Inspiron
    ○   XPS
    ○   Alienware
    ○   Vostro
    ○   Latitude
    ○   Precision
    ○   OptiPlex

    NOTE: SupportAssist is not supported on virtual machines.

SupportAssist capabilities and Dell service plans
SupportAssist proactively and predictively detects and notifies you about hardware and software issues that may occur on your PC.
Depending on your Dell service plan, SupportAssist automates and facilitates your engagement with Dell Technical Support.
The following table summarizes the SupportAssist capabilities for PCs with an active Basic, Premium Support, ProSupport, ProSupport
Plus, and Premium Support Plus service plans:

Table 1. SupportAssist capabilities and Dell service plans
SupportAssist         Description                                                           Dell service plans
capabilities
                                                                        Basic   Premium ProSupport        ProSupport      Premium
                                                                                Support                   Plus            Support
                                                                                                                          Plus
Schedule hardware You can schedule hardware and software
and software scans scans depending on your preference.
                   SupportAssist performs the scans based on
                   the schedule.
Clean files manually You can clear temporary, redundant, and
                     other unwanted files from your PC.
Tune PC               You can adjust the power settings, registry
performance           files, and memory allocations to fine-tune your
manually              PC performance.
Optimize network      You can optimize network connectivity by
connectivity          adjusting the settings to have an efficient and
manually              reliable network.
Troubleshoot          You can fix common PC issues by using the
issues manually       step-by-step instructions and video tutorials
                      that are available on the troubleshooting
                      page.
Scan and update       You can manually scan and install the driver
drivers manually      updates that are available for your PC.
Self-dispatch parts   If an issue is detected for in-warranty parts
through manual        during manual scans, you are prompted to
scans                 confirm your shipping address for dispatching
                      the replacement part.
Self-dispatch parts If an issue is detected for in-warranty parts
through automated during automated scans, you are prompted to
scans               confirm your shipping address for dispatching
                    the replacement part.
Request onsite        You can request a service technician to visit
assistance for        you to replace a self-replaceable part at your
replacing a self-     location.
replaceable part1
Automated support If an issue is detected during a scheduled
request creation  scan, a support request is automatically

6        Introduction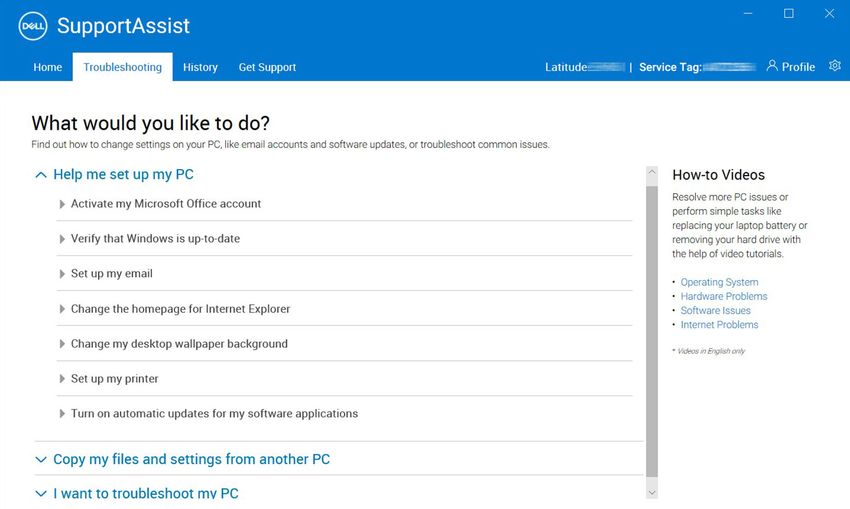
Table 1. SupportAssist capabilities and Dell service plans (continued)
SupportAssist           Description                                                                Dell service plans
capabilities
                                                                           Basic      Premium ProSupport          ProSupport       Premium
                                                                                      Support                     Plus             Support
                                                                                                                                   Plus
                        created and a Dell Technical Support agent
                        contacts you about the solution.
Create support          You can manually create a support request if
request manually        you are experiencing an issue that is not
                        detected by SupportAssist.
Remove viruses          Isolate, remove, and restore files that are
and malware             corrupted by viruses and malware to keep
manually2               your PC secure.
Predictive issue        If a part is identified for possible failure, an
detection and           alert is sent to you. SupportAssist opens a
support request         support request, and a Dell Technical Support
creation for failure    agent contacts you to ship the replacement
prevention3             part.
Notify PC               Depending on your operating system, a
optimization issues     notification is displayed on your task bar or in
that are detected       Windows action center about PC optimization
during scheduled        issues that are detected during scheduled
scans                   scans.
Automated PC            SupportAssist automatically optimizes your
optimizations2          PC during automated scans.
Specify preferred       You can provide your preferred contact time.
contact time4           A Dell Technical Support agent contacts you
                        only during the specified hours.

1 Onsite assistance for replacing a self-replaceable part is available only in certain regions.
2 The virus and malware removal capability is not available in certain regions, for example, China.
3 Predictive analysis failure detection includes hard drives, solid-state drives, batteries, thermals, and desktop fans.
4 Only customers in US or Canada can provide preferred contact time.

                                                                                                                           Introduction      7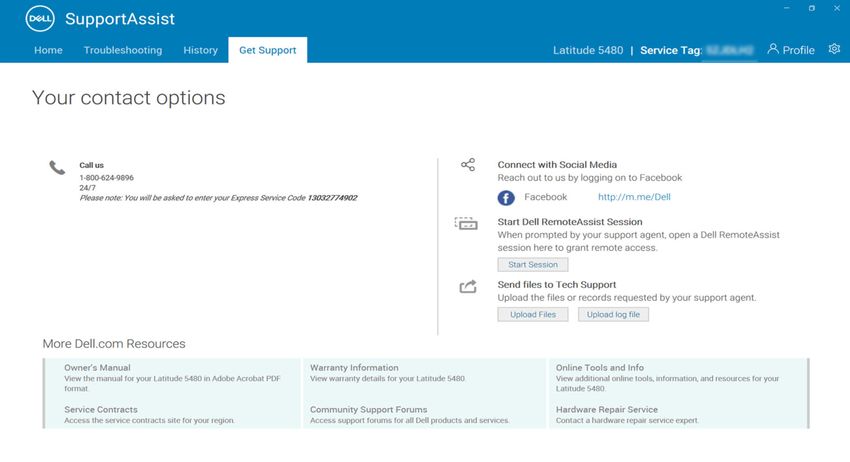
2
    Getting started with SupportAssist for Home
                                            PCs
SupportAssist is preinstalled on all PCs shipped out of the Dell factory. If SupportAssist is not preinstalled, follow the instructions in this
section to install, configure, and use SupportAssist.

Minimum PC requirements
The following table lists the minimum PC requirements for installing and using SupportAssist:

Table 2. Minimum PC requirements
Particulars                                  Requirements
Operating system                             Laptops and desktops:
   NOTE: SupportAssist is
                                             •   Microsoft Windows 8
   supported on both 32-bit and
                                             •   Microsoft Windows 8.1
   64-bit operating systems.
                                             •   Microsoft Windows 10
                                             Edge Gateways:
                                             •   Microsoft Windows 10 IoT Enterprise 2015 LTSB (only 64-bit)
                                             •   Microsoft Windows 10 IoT Enterprise 2016 LTSB (only 64-bit)
                                             Embedded Box PCs:
                                             •   Microsoft Windows 10 Professional (only 64-bit)
                                             •   Microsoft Windows 10 IoT Enterprise 2015 LTSB (only 64-bit)
                                             •   Microsoft Windows 10 IoT Enterprise 2016 LTSB (only 64-bit)

Software                                     Microsoft .NET Framework 4.6.1
                                                 NOTE: If you do not have Microsoft .NET Framework 4.6.1, SupportAssist installs
                                                 the latest Microsoft .NET Framework on your PC.

Web browser                                  Microsoft Edge, or Internet Explorer 10 or later
Hardware                                     •   Memory (RAM)—2 GB
                                             •   Hard drive free space—1 GB

Network                                      Internet connectivity
Ports                                        •   5700—to open the SupportAssist user interface
                                             •   9012—to communicate with Dell SupportAssist service
                                             •   8883, 8884, 8885, or 8886—to communicate with Dell support website
                                             •   28283—to pair your Dell PC to any other PC for data migration
                                             •   28100–28700—to migrate your data to your Dell PC from any other PC
                                             The PC must be able to connect to the following destinations:
                                             •   https://apidp.dell.com
                                             •   https://fuslite.dell.com
                                             •   https://cs-is.dell.com
                                             •   https://techdirect.dell.com/
                                             •   https://api.dell.com
                                             •   https://downloads.dell.com
                                             •   https://www.dell.com

8        Getting started with SupportAssist for Home PCs
Table 2. Minimum PC requirements (continued)
Particulars Requirements
• https://dl.dell.com
• http://content.dellsupportcenter.com
Install SupportAssist
Prerequisites
• The PC must meet the minimum PC requirements for installing and using SupportAssist. See Minimum PC requirements on page 8.
• You must have administrator rights on the PC.
About this task
By default, SupportAssist is installed on all PCs shipped from the Dell factory. If SupportAssist is not installed on your PC, you can manually
download and install SupportAssist.
Steps
1. Go to www.dell.com/supportassistforpcs.
2. Click Download Now.
The SupportAssistInstaller.exe file is downloaded.
3. Double-click the SupportAssistInstaller.exe file.
The SupportAssist installer package is downloaded, and SupportAssist is automatically installed and a shortcut icon is created on the
desktop.
NOTE: On PCs with operating system build number 16299 or later, the shortcut icon is not created.
4. In the SupportAssist installer window, click Launch.
The SupportAssist user interface is displayed.
SupportAssist user interface
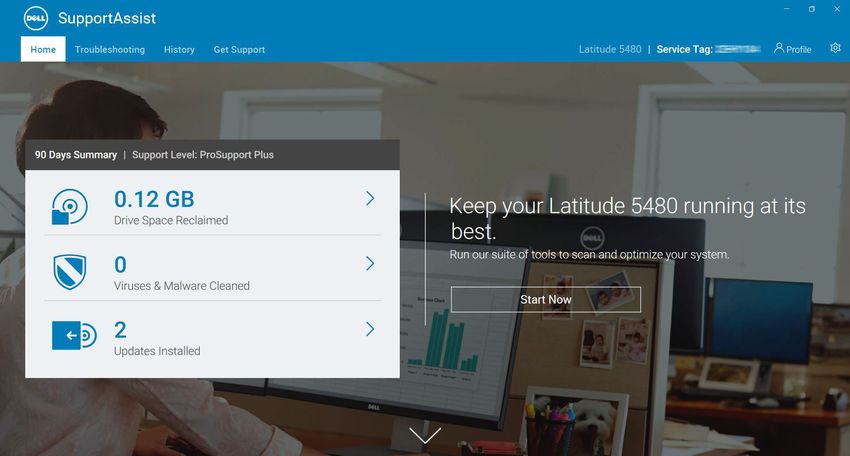
Click Start Now to run all the scans and optimizations from the Home page.
NOTE: If there is a pending notification or SupportAssist requires you to perform an action, only the tiles view is
displayed when you open SupportAssist.
Figure 1. Home page
Getting started with SupportAssist for Home PCs 9After the scans and optimizations are complete, the following details are displayed on the Home page:
• Amount of hard drive space reclaimed
• Number of driver updates installed
• Number of viruses or malware removed
NOTE: The Home page displays the details of the scans and optimizations that were performed during the last 90 days.
Figure 2. Home page—summary view
To go to the tiles view, click .
Depending on your service plan, the following tiles are displayed on the Home page. For information on the SupportAssist capabilities for
different service plans, see SupportAssist capabilities and Dell service plans on page 6.
• Get Drivers & Downloads
• Scan Hardware
• Clean Files
• Tune Performance
• Optimize Network
• Remove Viruses & Malware
NOTE: If you do not have administrator rights on the PC, only the Scan Hardware tile is enabled.
10 Getting started with SupportAssist for Home PCsFigure 3. Home page—tiles view
NOTE: Figures 1, 2, and 3 are for illustrative purpose only. Individual features such as header color, buttons, and so on,
are different on Alienware PCs.
NOTE: If a critical hardware issue is detected on your PC, all the PC optimization tiles are disabled until you create a
support request.
When you hover over the PC model or Service Tag displayed in the SupportAssist user interface, the PC image and its details are
displayed. The following table describes the PC details displayed:
Table 3. PC details
Field Description
PC model The PC model. For example, Latitude E7440
Service plan type The Dell service plan type and its expiry date.
NOTE: When your service plan expires, the service plan type
and the expiry date are displayed in red color.
Service Tag The unique identifier of the PC. The Service Tag is an alpha-numeric
identifier.
Express Service Code The numerical sequence that can be used during automated phone
help. For example, 987-674-723-2.
Memory The amount of RAM installed in the PC. For example, 16 GB.
Processor The type of processor installed in the PC. For example, Intel Core i5
6200U.
Operating System The operating system installed in the PC. For example, Microsoft
Windows 10 Pro.
Change language setting
About this task
SupportAssist is available in 25 languages. By default, SupportAssist is set to the same language as that of the operating system. You can
change the language according to your preference.
Getting started with SupportAssist for Home PCs 11Steps
1. On the top-right corner of the SupportAssist user interface, click the settings icon and click Select language.
The list of languages is displayed.
2. Select your preferred language.
3. Click Yes to restart SupportAssist in the selected language.
SupportAssist restarts in the selected language and is displayed next to the selected language.
Create SupportAssist profile
Prerequisites
You must have administrator rights on the PC.
About this task
A SupportAssist profile enables you to receive the automated support capabilities available for your PC service plan. You can create a
SupportAssist profile by using your Dell My Account or your social media account.
Steps
1. On the top-right corner of the SupportAssist user interface, click Profile and click Complete Profile.
• If you have not accepted the SupportAssist terms and conditions, a message is displayed indicating that you have not accepted
the SupportAssist terms and conditions. Click the Read SupportAssist terms & conditions link, accept the terms and
conditions, click Save, and then try again.
• If SupportAssist is unable to connect to the Internet, an appropriate message is displayed. You can click the troubleshooting links
displayed below the error message to fix the issue and try again.
2. On the Dell My Account Sign In page, perform one of the following steps:
• If you already have a Dell My Account, enter your Dell My Account credentials, and then click Sign In.
• If you do not have a Dell My Account, create an account to sign in. For instructions on creating an account, see Create Dell My
Account on page 12.
• Sign in with your social media account. For instructions on using your social media account, see Sign in with social media account
on page 13.
3. On the Contact and Shipping Address page, enter your contact information and shipping details.
4. Select your preferred contact method and preferred contact time.
NOTE: The preferred contact time is applicable only for PCs with an active Premium Support or Premium Support
Plus service plans in U.S. or Canada.
5. If you want to add a secondary contact, select the Add secondary contact and enter the details.
6. If you do not want SupportAssist to automatically create a support request, clear Automatically create Support Requests.
NOTE: The automatic support request creation capability is available and enabled only for PCs with an active
ProSupport, ProSupport Plus, Premium Support, or Premium Support Plus service plan.
7. Click Done.
• If the shipping details are incorrect, a message is displayed to update the details. Click Update and Finish to update the details.
• If the shipping details are correct, the first name and last name are displayed on the top-right corner of the SupportAssist user
interface.
Create Dell My Account
Prerequisites
You must have administrator rights on the PC.
12 Getting started with SupportAssist for Home PCsSteps
1. In the Create an Account section of the Dell My Account Sign in page, enter the first name, last name, email address, and password
in the appropriate fields.
NOTE: The password must contain eight through 20 characters, and must include 1 uppercase letter, 1 lowercase
letter, and 1 number.
2. Re-enter the password.
3. Click Create Account.
A new Dell My Account is created, and you are signed in to SupportAssist.
Sign in with social media account
Prerequisites
• You must have administrator rights on the PC.
• You must have a valid account with any of the following social media platforms:
○ Google Plus
○ Facebook
Steps
1. On the Dell My Account Sign In page, click the appropriate social media icon.
2. On the corresponding social media login page, enter the user name or email address and password in the appropriate fields.
3. Click Sign in.
A new Dell My Account is created with the credentials that you entered for signing in to your social media account.
Update contact and shipping information
Prerequisites
You must have administrator rights on the PC.
Steps
1. On the top-right corner of the SupportAssist user interface, click the user name and click Profile Details.
The Contact and Shipping Address page is displayed.
2. Update the required details and click Done.
• If the shipping details are incorrect, a message is displayed to update the details. Click Update and Finish to update the details.
• If the shipping details are correct, the Home page is displayed.
Use different SupportAssist profile
Prerequisites
You must have administrator rights on the PC.
Steps
1. On the top-right corner of the SupportAssist user interface, click the username and click Use a different profile.
2. Click Continue.
NOTE: When you click Continue, SupportAssist deactivates the current profile and removes access to the saved
contact information and shipping details.
The Home page is displayed and the link to create a profile is displayed on the top-right corner of the SupportAssist user interface. For
instructions to create a profile, see Create SupportAssist profile.
Getting started with SupportAssist for Home PCs 13Configure Internet settings
Prerequisites
You must have administrator rights on the PC.
About this task
Your PC must be connected to an active Internet connection to experience the automated support capabilities of SupportAssist. You can
configure SupportAssist to connect to the Internet directly or through a proxy server.
Steps
1. On the top-right corner of the SupportAssist user interface, click the settings icon, click Settings, and then click Internet.
2. If you want SupportAssist to directly connect to the Internet, select Connect directly.
3. If you want SupportAssist to connect to the Internet using a proxy network, perform the following steps:
a. Select Connect using proxy.
The proxy settings fields are displayed.
b. Enter the address, port number, username, and password details.
NOTE: You can enter a maximum of five digits for the port number.
4. Click Save.
The Home page is displayed.
Scheduled scans and optimizations
By default, SupportAssist scans your PC to detect hardware issues, driver updates, and the required PC optimizations. The default
frequency of the scans depend on your PC service plan.
If an urgent driver update, hardware issue, or a virus or malware is detected during the scan, a notification is displayed. The type of
notification depends on the operating system that is installed on the PC. See Notifications on taskbar or Windows Action Center on page
16. If your PC has an active ProSupport Plus or Premium Support Plus service plan, SupportAssist automatically optimizes your PC after
the scan.
Schedule automatic scans and optimizations
Prerequisites
You must have administrator rights on the PC.
About this task
SupportAssist automatically scans your PC for driver updates, hardware issues, and the required optimizations. You can select the
preferred time, frequency, and day when you want SupportAssist to scan your PC.
Steps
1. On the top-right corner of the SupportAssist user interface, click the settings icon, click Settings, and then click Schedule scans
and Optimizations.
2. Enable automatic PC scans and optimizations.
3. Select the time, frequency, and day when you want to run the scan.
The date of the next scheduled scan is displayed.
4. Click Save.
The Home page is displayed.
14 Getting started with SupportAssist for Home PCsManually upgrade SupportAssist
Prerequisites
• You must have administrator rights on the PC.
• You must be signed in to SupportAssist.
About this task
Upgrading SupportAssist enables you to receive the latest features and ensures that your PC is running at its best. If a newer version is
available, SupportAssist automatically upgrades to the new version. You can also manually check and upgrade SupportAssist.
NOTE: SupportAssist upgrades are not available for PCs running Windows 7 operating system.
Steps
1. On the top-right corner of the SupportAssist user interface, click the settings icon, and then click About SupportAssist.
SupportAssist automatically checks if a newer version of SupportAssist is available.
• If no update is available, and a message indicating that the latest version of SupportAssist is installed are displayed.
• If a newer version of SupportAssist is available, and the Update Now link are displayed.
2. Click Update Now.
Results
The latest version of SupportAssist is downloaded and installed on the PC.
Notifications
By default, SupportAssist displays notifications about hardware and software issues, driver updates, open support requests, service plan,
and so on.
Notifications on SupportAssist user interface
The following table provides a summary of the notifications that are displayed when you open SupportAssist:
Table 4. Notifications on the SupportAssist user interface
When the notification is displayed Action
A SupportAssist profile has not been created. • Click Complete Profile to create a SupportAssist profile. See
Create SupportAssist profile on page 12.
• Click Remind Me Later to view the notification when you
reopen SupportAssist after 24 hours.
• Click Never Remind Me to stop SupportAssist from displaying
the notification again.
Dell technical support is still working on a support request that is • Click Check status online to view the status of the support
created for your PC. request online.
• Click Dismiss to hide the notification.
If you have not optimized your PC in the last 28 days • Click Run all to run all the scans and optimizations on your PC.
• Click Remind Me Later to view the notification when you
reopen SupportAssist after 24 hours.
• Click Cancel to hide the notification.
Service plan of the PC is about to expire, or has expired. • Click Renew to renew the PC service plan.
• Click Remind Me Later to view the notification when you
reopen SupportAssist after 24 hours.
Getting started with SupportAssist for Home PCs 15Table 4. Notifications on the SupportAssist user interface (continued)
When the notification is displayed Action
• Click Never Remind Me to stop SupportAssist from displaying
the notification again.
You renewed your PC service plan. Click OK to hide the notification.
Notifications on taskbar or Windows Action Center
Depending on the type of operating system installed on your PC, SupportAssist displays notifications on the taskbar or in the Windows
Action Center:
• On Microsoft Windows 8, or 8.1, notifications are displayed on the taskbar.
• On Microsoft Windows 10, notifications are in the Windows Action Center.
The following table provides a summary of the different types of notifications that are displayed on the taskbar or in the Windows Action
Center.
Table 5. Taskbar or Windows Action Center notifications
When the notification is displayed Action
You deferred migrating your files and settings using Dell Migrate Click the notification to go to the Dell Migrate home page.
service.
During a scheduled scan, an urgent driver update is detected. Click the notification to see the driver details page. For instructions
to install driver updates, see Install driver updates on page 21.
A support request must be created for a hardware issue that is Click the notification to see the issue details page. For instructions
detected during a manually initiated or a scheduled scan. to create a support request, see Create support request for issue
detected by a scan on page 31.
A support request is automatically created for a hardware issue No action required.
that is detected during a manually initiated or a scheduled scan.
Potentially unwanted programs (PUPs) are detected during a Click the notification to review and remove the PUPs that were
manually initiated or a scheduled scan. detected by the scan. For instructions to remove the PUPs, see
Remove potentially unwanted programs on page 29.
Viruses or malware is detected during a manually initiated scan or a Click the notification to see the details of the viruses or malware
scheduled scan. that was detected during the scan.
Service plan of the PC is about to expire, or has expired. Click the notification to open SupportAssist. A link to renew the
service plan is displayed on the SupportAssist user interface.
Status of the support request that is created for your PC was Click the notification to open SupportAssist and view the status of
recently updated. the support request online.
NOTE: The notification is not displayed when the
support request is closed.
Banners on SupportAssist home page
When the service plan of your PC is nearing expiry or has expired:
• A notification is displayed on the SupportAssist user interface.
• Depending on the operating system installed on your PC, a notification is displayed on the taskbar or in Windows Action Center.
• A banner is displayed on the SupportAssist Home page.
You can renew or upgrade your service plan by using the links that are provided in the notification or banner. For information about the
notifications that are displayed on the SupportAssist user interface, see Notifications on SupportAssist user interface on page 15. For
information about notifications that are displayed on the taskbar or Windows Action Center, see Notifications on taskbar or Windows
Action Center.
The following table describes the banners that are displayed on the Home page:
16 Getting started with SupportAssist for Home PCsTable 6. Banners on SupportAssist home page
When the banner is displayed Action
If you have purchased Dell Migrate service and not Click Yes to go to the Dell Migrate home page.
migrated your files and settings within 90 days
You have not logged in as an administrator into the PC Log in as an administrator to migrate your files and settings.
on which the Dell Migrate service is enabled.
0 to 60 days before the service plan expires. Click Renew to renew the service plan online.
The service plan has expired and is within the Click Renew to renew the service plan online.
renewable period.
The service plan has expired and is not within the Click Contact Dell to extend or upgrade the service plan.
renewable period.
NOTE: The online renewal capability is available only for PCs in the United States.
Disable SupportAssist notifications
Prerequisites
You must have administrator rights on the PC.
About this task
You can disable SupportAssist from displaying notifications on your PC. However, SupportAssist displays notifications about hardware
issues and urgent driver updates that are detected during a scan even if you disable the notifications.
Steps
1. On the top-right corner of the SupportAssist user interface, click the settings icon, click Settings, and then click Notifications.
2. Clear the I want to receive notifications about hardware and software issues, driver updates, Support Requests, and other
alerts for my PC check box and click Save.
The Home page is displayed.
Uninstall SupportAssist
Prerequisites
The SupportAssist user interface must not be open on the PC.
Steps
1. Click Start, go to Control panel > Programs, and then click Programs and Features.
The Uninstall or change a program page is displayed.
2. Right-click Dell SupportAssist, and click Uninstall.
3. When you are prompted to confirm the uninstallation, click Yes.
Results
SupportAssist is uninstalled.
Getting started with SupportAssist for Home PCs 173
Dell Migrate overview
Dell Migrate is a service that enables you to securely migrate your personal files and settings to your Dell PC from any other PC running
Windows operating system.
NOTE: The Dell Migrate service is available only for Inspiron, XPS, and Alienware PCs in U.S.
In this document, the term source PC refers to the PC from which you want to migrate your files and settings. The term target PC
refers to the PC to which you want to migrate your files and settings.
Dell Migrate enables you to migrate your personal files such as documents, photos, music, videos, and so on.
The following table lists the type of settings that can also be migrated from your source PC using Dell Migrate:
Table 7. Type of settings that can be migrated using Dell Migrate
Type Settings
Date and time • Additional calendar and clocks
• User locale
Personalization • Background
• File Explorer Options
○ General
○ Folder views
○ Advanced
• Taskbar
• Colors
Hardware • Phone and Modem
• Fax options and accounts
Bookmarks • Favorites in Internet Explorer
• Bookmarks saved in Google Chrome and Mozilla Firefox
User Control • Mouse properties
○ Primary and secondary buttons
○ Pointer schemes
• Keyboard
○ Character repeat delay
○ Character repeat rate
○ Cursor blink rate
• PC sound
○ Playback
○ Communications
○ Sound theme
Accessibility • High contrast
• Magnifier
• Color filters
• Toggle keys, sticky keys, and filter keys settings for keyboard.
18 Dell Migrate overviewMigrate data from source to target PC
Prerequisites
Ensure the following:
• The operating system that is installed on the source PC is Windows 8 or later.
• The operating system that is installed on the target PC is Windows 10.
• The source and target PCs are connected to an electrical outlet.
• You are logged in to source and target PCs as an administrator.
• The source and target PCs are connected to the same local network.
• Sufficient disk space is available on the target PC.
• No applications are running on the source and target PCs.
• The language in SupportAssist is set to English. For instructions to change your language setting, see Change language setting on
page 11.
Steps
1. On the source PC, perform the following steps:
a. Go to www.Dell.com/DataAssistant.
b. Download and run Dell data assistant.exe.
Dell Data Assistant checks for a target PC that is connected to the same local network. If a target PC is detected, a verification
code is displayed on the source PC.
2. On the target PC, perform the following steps:
a. Open SupportAssist and click .
b. Perform one of the following steps:
• On the bottom-left corner of the SupportAssist home page, click Go now.
• Go to Troubleshooting > Copy my files and settings from another PC, and then click Go now.
c. On the Dell Migrate home page, click Get started.
d. Click Connect.
• Dell Migrate checks for a source PC that is connected to the same local network.
• The Troubleshooting, History, and the Get Support tabs are disabled.
e. Enter the verification code that is displayed on the source PC.
If the code is verified successfully:
• The accounts used to log in to the source and target PCs are verified. If you used different accounts, a message is displayed to
confirm if you want to continue the migration. Click Continue to perform the migration.
NOTE: During migration, only the files and settings of the current user profile in the source PC are migrated
to the current user profile in the target PC.
• The source and target PCs are paired.
• Dell Migrate scans the source PC for your files and settings that can be migrated.
3. By default, all your files and settings that can be migrated from the source PC are selected. If you want to select your files and settings
that must be migrated, select Let me choose what to move. For more information on the files and type of settings that can be
migrated, see Change language setting on page 11.
The files and settings that are detected on the source PC are displayed.
4. Optionally, if you want to manually select the drive to which your files and settings must be migrated to, perform the following steps:
a. On the left pane, click Change.
b. Select the required drive, and click Apply.
5. Click Migrate now.
After the migration is completed, a summary is displayed with the following information:
• Size of the files migrated
• Time taken to migrate the files and settings
• Number of files and settings that were migrated
• Number of files or settings that were not migrated
• Number of files that were backed up or replaced
6. Perform one of the following steps:
Dell Migrate overview 19• If all your files and settings were migrated successfully, click OK.
• If some of your files or settings were not migrated, click Show skipped files to view the details or click Retry to migrate your files
or settings again.
7. Optionally, click to view the migration summary or click to provide your feedback to Dell.
NOTE: For any assistance on migrating your files and settings using Dell Migrate, contact Dell technical support. The
support options available for your PC are displayed on the Get Support page. See Getting support on page 36.
8. Click Home.
The SupportAssist home page is displayed.
20 Dell Migrate overview4
Drivers and downloads overview
By default, SupportAssist scans your PC every week to detect updates available for drivers and Dell applications that are installed on your
PC. If required, you can configure the frequency in which SupportAssist performs the scan. See Scheduled scans and optimizations on
page 14. Updating the drivers helps improve PC performance and patch security risks.
NOTE: In this document, the term driver refers to BIOS, drivers, firmware, and Dell applications installed on your PC.
Figure 4. Notifications on Get Drivers & Downloads tile
Severity categorization of updates
SupportAssist categorizes the updates based on their severity as follows:
• Urgent—updates that can prevent potential security threats to your PC.
• Recommended—updates that can improve the performance of your PC.
• Optional—updates that you can choose to install, if necessary.
NOTE: If an urgent or recommended update is available, a notification is displayed. For information on the types of
notification that are displayed by SupportAssist, see Notifications on page 15.
Install driver updates
Prerequisites
You must have administrator rights on the PC.
About this task
SupportAssist scans your PC and proactively suggests updates available for your PC drivers and Dell applications that are installed on your
PC. Before installing a driver update, SupportAssist automatically creates a restore point. You can use the restore point to uninstall the
driver update and return the PC to its previous state. At a given time period, SupportAssist can retain only three restore points. If a new
restore point must be created, the oldest restore point is automatically removed.
Drivers and downloads overview 21By default, SupportAssist is authorized to temporarily suspend data encryption to install some updates on a BitLocker enabled system. To
disable this authorization, go to Settings > Privacy, and then clear the appropriate permission.
CAUTION: You cannot uninstall a BIOS update.
NOTE: By default, the setting to create a restore point is disabled. You must enable the setting to allow SupportAssist
to create a restore point.
Steps
1. Open SupportAssist and click .
2. On the Get Drivers & Downloads tile, click Run.
• If updates are available for your PC, the update type and the number of available updates are notified on the Get Drivers &
Downloads tile.
• If SupportAssist cannot detect updates available for your PC, an appropriate message is displayed.
NOTE: The notification on the tile depends on the severity of the update. For information about the type of
notifications that are displayed on the tile, see Get Drivers and Downloads tile notifications on page 22.
3. Click Update Now.
The drivers page is displayed.
4. Select the updates that you want to install and click Install.
NOTE: Certain driver updates must be installed along with one or more other drivers to function correctly. You must
select all those dependent drivers and then click Install.
• For updates that are automatically installed, and Done status are displayed in the Status column.
• If the update must be manually installed, an Install link is displayed in the Status column after the download is complete. The
update can be installed by clicking the Install link.
NOTE: You may have to restart your PC to complete the installation of certain drivers.
5. Click Finish.
The home page is displayed. The number of drivers that are installed is displayed on the home page and History page.
6. If an update requires restart, click Restart Now to restart the PC immediately.
You are prompted to save your files and close all applications before you restart.
7. Click Restart.
The PC restarts automatically to complete the installation.
Uninstall driver updates
Prerequisites
You must have administrator rights on the PC.
About this task
If you encounter problems with your PC after updating a driver, you can uninstall the update and return the PC to its previous state.
Steps
1. Open SupportAssist and click History.
2. On the History page, click the required Restore System link.
A message is displayed stating that the PC will be restored to the state when the restore point was created.
3. Click Restore.
The PC restarts automatically to uninstall the update.
Get Drivers and Downloads tile notifications
The following table describes the different status notifications that are displayed on the Get Drivers & Downloads tile:
22 Drivers and downloads overviewTable 8. Get Drivers & Downloads tile notifications
Update icon Tile icon Update type Description
No icon is displayed. Optional or no update available No update is available or an optional
update is available.
Recommended Only recommended type of updates
are available.
Urgent Only urgent or multiple types of
updates are available.
Drivers and downloads overview 235
Scanning PC hardware
Running a hardware scan enables you to detect hardware issues on your PC. By default, SupportAssist scans your PC hardware once a
month to detect hardware issues. You can also manually perform the following to identify a hardware issue:
• Scan a specific hardware component
• Run a quick hardware scan
• Run a stress test
NOTE: If SupportAssist is minimized and an issue is detected during a scan, a notification is displayed on the Scan
Hardware tile. The notification is retained on the tile for up to seven days. If you do not create a support request for the
issue within seven days, the notification is automatically removed.
For certain hardware issues, the issue title is displayed above the tiles and a notification is displayed on the Scan Hardware tile. The
notification that is displayed on the tile depends on the severity of the issue. For information on the type of notifications that are displayed
on the tile, see Scan Hardware tile notifications on page 25.
Scan specific hardware component
About this task
SupportAssist enables you to scan a specific hardware component that is installed in your PC. The steps to run a scan depend on the
hardware component that you select.
The following steps are applicable for scanning the hard drive.
Steps
1. Open SupportAssist and click the Troubleshooting tab.
2. Click I want to troubleshoot my PC and then click I want to check a specific piece of hardware.
The list of hardware components that are available in your PC is displayed.
NOTE: To update the list of hardware components displayed, click Refresh hardware list.
3. In the Storage Devices section, click Hard Drive.
4. Select the test type, and click Run Test.
Results
• If no issue is detected, Passed status and are displayed.
• If an issue is detected and it does not require creating a support request, Failed status and are displayed.
• If an issue is detected and requires creating a support request, the issue details page is displayed. For instructions to create a support
request, see Create support request for issue detected by a scan.
Run quick hardware scan
About this task
A quick scan on your PC detects issues in hardware components such as the hard drive, processor, memory module, and so on.
NOTE: You must have administrator rights on the PC to create a support request for an issue that is detected during the
scan. For instructions to know your user account type, see the operating system documentation at Microsoft.com/
support.
24 Scanning PC hardwareSteps
1. Open SupportAssist and click .
2. On the Scan Hardware tile, click Run.
Results
• If no issue is detected, an appropriate notification is displayed on the tile.
• If an issue is detected and it requires creating a support request, the optimization tiles are disabled and the issue details page is
displayed. For instructions to create a support request, see Create support request for issue detected by a scan on page 31.
• If an issue is detected and it does not require creating a support request, the issue title is displayed above the tiles, a notification is
displayed on the Scan Hardware tile, and the optimization tiles are disabled. If you want to enable the tiles, click Skip.
Run stress test
About this task
A stress test detects issues in components such as the PC board, optical drives, and camera. It also detects issues in components
scanned during a quick scan.
CAUTION: During a stress test, you can see flashes on your screen and you may not be able to use your PC.
Steps
1. Open SupportAssist and click the Troubleshooting tab.
2. Click I want to troubleshoot my PC and then click I want to scan my entire PC.
3. Click Start.
A message is displayed prompting you to save your files and to close all applications.
4. After you save your files and close all the applications, click OK to run the test.
During the test, the name of the task that is running is displayed above the tiles and the scan progress is displayed on the Scan
Hardware tile.
Results
• If no issue is detected, an appropriate notification is displayed on the tile.
• If an issue is detected and requires creating a support request, the optimization tiles are disabled and the issue details page is
displayed. For instructions to create a support request, see Create support request for issue detected by a scan on page 31.
• If an issue is detected and does not require creating a support request, the issue title is displayed above the tiles, a notification is
displayed on the Scan Hardware tile, and the optimization tiles are disabled. If you want to enable the optimization tiles, click Skip.
Scan Hardware tile notifications
The following table describes the different status notifications that are displayed on the Scan Hardware tile when an issue is detected
during a quick hardware scan or a stress test on the PC:
Table 9. Scan Hardware tile notifications
Status icon PC icon Status Description
No icon is displayed. Normal No hardware issues have been
detected.
Warning A hardware issue has been detected
NOTE: If a warning type issue in some component, other than the
is detected, the PC memory or hard drives.
optimization tiles are
disabled. Click Skip to enable
the tiles.
Critical A hardware issue has been detected
in the memory module or hard drives.
Scanning PC hardware 25Table 9. Scan Hardware tile notifications (continued)
Status icon PC icon Status Description
NOTE: If a critical hardware
issue is detected, the PC
optimization tiles are
disabled until you create a
support request.
26 Scanning PC hardware6
Optimizing your PC
SupportAssist helps you optimize your PC by running a series of diagnostics to identify modifications to files and settings of your PC.
SupportAssist optimizations helps you improves your PC speed, storage space availability, and PC stability by performing the following on
your PC:
• Cleaning temporary files
• Tuning PC performance
• Optimizing network
• Removing viruses, malware, and potentially unwanted programs (PUPs)
Figure 5. PC optimization
Clean files
About this task
SupportAssist removes redundant files, temporary folders, and other unnecessary clutter from your PC.
Steps
1. Open SupportAssist and click .
2. On the Clean Files tile, click Run.
During the optimization, the name of task that is running is displayed above the tiles and the progress of scan is displayed on the tile.
CAUTION: If you cancel the optimization while it is in progress, the changes that were performed are not reversed.
Results
The amount of hard drive space that is saved is displayed on the Clean Files tile, the Home page, and the History page.
Optimizing your PC 27Tune PC performance
About this task
SupportAssist adjusts the power settings, registry, and memory allocation to maximize your PC processing speed.
Steps
1. Open SupportAssist and click .
2. On the Tune Performance tile, click Run.
During the optimization, the name of task that is running is displayed above the tiles and the progress of scan is displayed on the tile.
CAUTION: If you cancel the optimization while it is in progress, the changes that were performed are not reversed.
Results
After the optimization is complete, an appropriate notification is displayed on the tile.
Optimize network
About this task
SupportAssist updates your PC settings keep your network efficient and reliable.
Steps
1. Open SupportAssist and click .
2. On the Optimize Network tile, click Run.
During the optimization, the name of task that is running is displayed above the tiles and the progress of scan is displayed on the tile.
CAUTION: If you cancel the optimization while it is in progress, the changes that were performed are not reversed.
Results
After the optimization is complete, an appropriate notification is displayed on the tile.
Remove viruses and malware
About this task
SupportAssist isolates and removes the files that are infected by viruses and malware to keep your PC secure. It also detects potentially
unwanted programs (PUPs) installed on your PC.
NOTE: The virus and malware removal capability is available only for PCs with an active ProSupport Plus or Premium
Support Plus service plan.
NOTE: The virus and malware removal capability is not available in certain regions, for example, China.
Steps
1. Open SupportAssist and click .
2. On the Remove Viruses & Malware tile, click Run.
During the optimization, the name of task that is running is displayed above the tiles and the progress of scan is displayed on the tile.
CAUTION: If you cancel the optimization while it is in progress, the changes that were performed are not reversed.
28 Optimizing your PCYou can also read