FONTEXPERT 2018 USER GUIDE - VERSION 15 - PROXIMA SOFTWARE
←
→
Page content transcription
If your browser does not render page correctly, please read the page content below
FontExpert 2018
User Guide
Version 15

             Proxima Software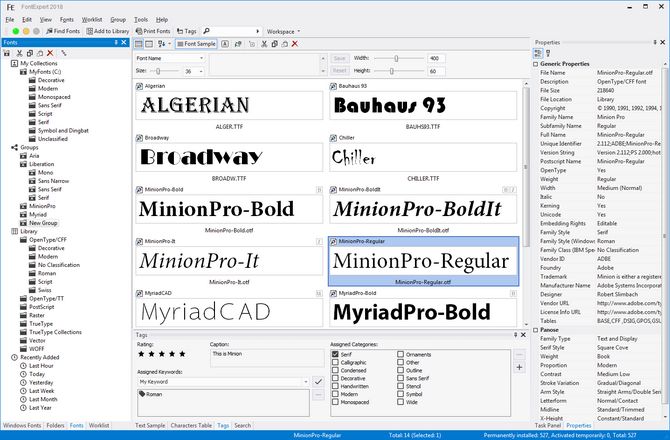
FontExpert 2018 User Guide
Contents
Contents ....................................................................................................................................................................... 2
Welcome....................................................................................................................................................................... 4
Features ........................................................................................................................................................................ 4
Learning FontExpert Views ........................................................................................................................................... 5
Windows Fonts View .................................................................................................................................................... 7
Folders View ................................................................................................................................................................. 8
Worklist View.............................................................................................................................................................. 10
Fonts View .................................................................................................................................................................. 10
Adding Fonts to Library .............................................................................................................................................. 18
Database Maintenance............................................................................................................................................... 20
Main View ................................................................................................................................................................... 22
Properties View .......................................................................................................................................................... 27
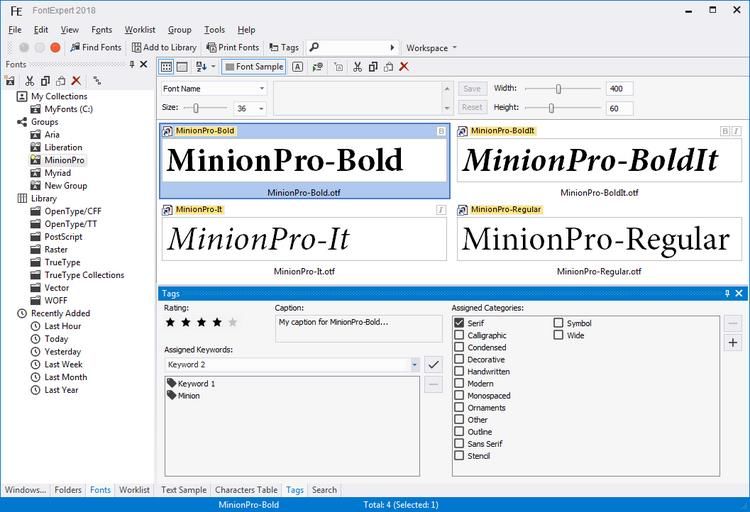
Tags View .................................................................................................................................................................... 29
Search View ................................................................................................................................................................ 31
Text Sample View ....................................................................................................................................................... 35
Kerning.................................................................................................................................................................... 35
Characters Table View ................................................................................................................................................ 37
Installed Fonts Window .............................................................................................................................................. 39
Find Fonts Window ..................................................................................................................................................... 40
Installing Fonts............................................................................................................................................................ 42
Embedding Fonts ........................................................................................................................................................ 43
Activating Fonts Temporarily ..................................................................................................................................... 44
Uninstalling or Deactivating Fonts ............................................................................................................................. 45
Copying and Deleting Fonts ........................................................................................................................................ 46
Floating Samples......................................................................................................................................................... 46
Printing Fonts ............................................................................................................................................................. 48
Printing Large Number of Fonts ............................................................................................................................. 50
Printing Multipage Document as Several Printing Jobs ......................................................................................... 51
Printing to PDF File ................................................................................................................................................. 51
Renaming Font Files ................................................................................................................................................... 53
Editing Font Properties ............................................................................................................................................... 54
-2-
FontExpert 2018 User Guide

Web Album ................................................................................................................................................................. 55
   Using and Customizing Web Album Templates...................................................................................................... 57
   TUTORIAL: How to Create New Web Album Template .......................................................................................... 59
Detecting Font Problems ............................................................................................................................................ 61
Font Substitutions ...................................................................................................................................................... 63
Detecting Problems with Font Substitutions.............................................................................................................. 64
Backup and Restore .................................................................................................................................................... 66
Keyboard Shortcuts .................................................................................................................................................... 67
Special Utilities ........................................................................................................................................................... 69
   AfmToPfm ............................................................................................................................................................... 69
Missing Fonts Loader Plug-in for Adobe InDesign ...................................................................................................... 70
   Installing the Plug-in ............................................................................................................................................... 70
   Using the Missing Fonts Loader Plug-in.................................................................................................................. 71
Frequently Asked Questions....................................................................................................................................... 75
Technical Support ....................................................................................................................................................... 76

                                                                                     -3-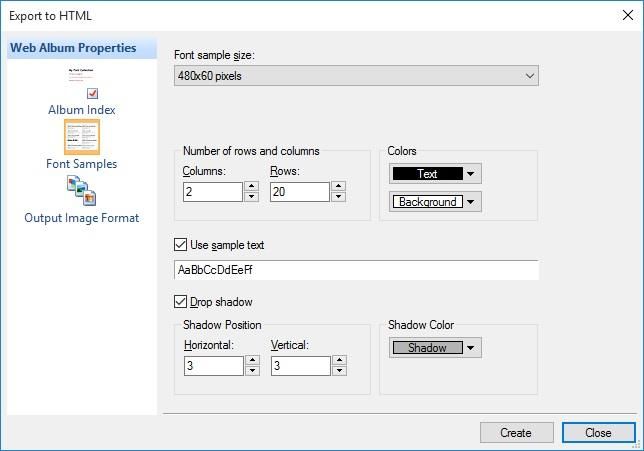
FontExpert 2018 User Guide
Welcome
Welcome to Proxima Software’s FontExpert!
FontExpert is a powerful font manager for Windows which will help you organize your TrueType, OpenType,
PostScript, and raster fonts. With FontExpert you can easily control font installation and dynamically activate
fonts used in third party applications, such as Adobe InDesign.
Features
Manage TrueType, OpenType, PostScript Type 1 fonts, and raster fonts
Preview fonts as font faces (thumbnails), as text samples, or in character tables
Group fonts for easier activation and deactivation
Search for fonts on local disks, CD/DVD drives, and network drives
Assign keywords, ratings, and categories to fonts for quick font searching
Search for duplicate fonts and corrupted fonts
Detect and resolve font problems
Print font reports
Dynamically activate missing fonts in third party applications
-4-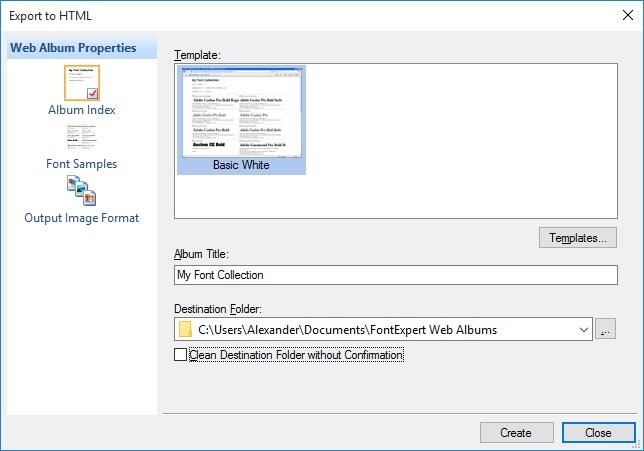
FontExpert 2018 User Guide
Learning FontExpert Views
The main FontExpert window has several views. Switch between views using tabs along the bottom of the
window.
Main view displays files and folders. For font files, this view displays font samples ("thumbnails").
Windows Fonts view shows the list of currently installed and loaded Windows fonts. These fonts are
currently available for all applications. To preview the font, select it from the list.
Folders view shows the list of folders. Use this view to browse for font files in your computer’s drives and
folders.
Fonts view allows you to preview and manage fonts in My Collections, Library, and to organize fonts into
Groups. My Collections node of Fonts view provides easy access to your favorite folders with your font
collections. Library node of Fonts view is a powerful feature that allows you to preview your font library
as a hierarchy of folders. (See also Adding Fonts to Library.)
Worklist view allows you to create temporary sets of fonts and save them as simple xml text files.
Task Panel displays the commands and titles linked to common tasks.
Properties view shows the properties of the currently selected item in the main view.
Text Sample view shows a sample of text formatted with the font selected in the main view. This view has
a toolbar with the list of predefined samples.
-5-
FontExpert 2018 User Guide
Characters Table view uses the font selected in the main view to display a table of characters formatted
with the selected font. Use the formatting toolbar to choose a font size, zoom in, or zoom out. In the
Options area, you can customize the table, specify the number of columns, and change other parameters.
Tags view allows you to assign keywords, ratings, and categories to selected fonts. You can then search
for fonts by tags using the Search view.
Search view allows you search for fonts located in Library, Groups, and My Collections.
-6-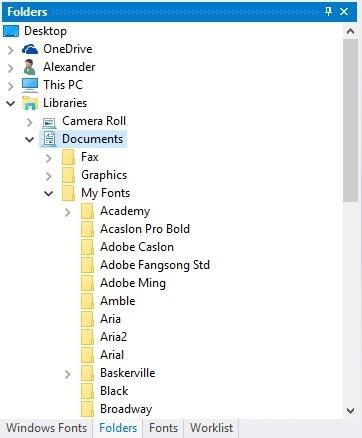
FontExpert 2018 User Guide

Windows Fonts View

The Windows Fonts view displays the list of currently installed (activated) Windows fonts. These fonts are
available for all running Windows applications.

The fonts displayed in this view are also known as installed Windows fonts, although one font appearing in this list
can be installed permanently or activated temporarily. See Installing Fonts for more information.

In this view, fonts are grouped by family. For example, the Arial family usually includes 4 files for Regular, Bold,
Italic and Bold Italic typefaces. If you select Arial, the main view shows all 4 typefaces included in this font.

To uninstall the selected font, choose the Uninstall... command from the popup menu. See Uninstalling Fonts.

                                                         -7-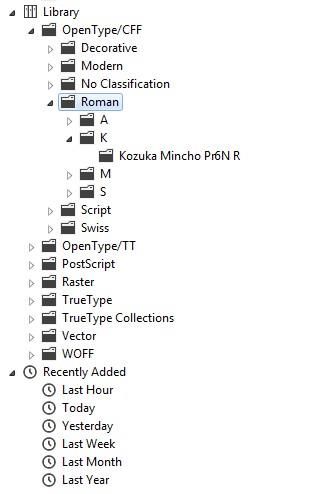
FontExpert 2018 User Guide

Folders View

Use this view to explore drives and folders on your computer.

In Folders view you can easily add fonts to Library from selected folder and subfolders.

Select a folder containing fonts, right click on the folder name and open context menu. Choose menu command:
"Add Fonts to Library...". FontExpert will open Adding Fonts to Library window, search for fonts in selected folder
and add unique fonts to Library.

                                                        -8-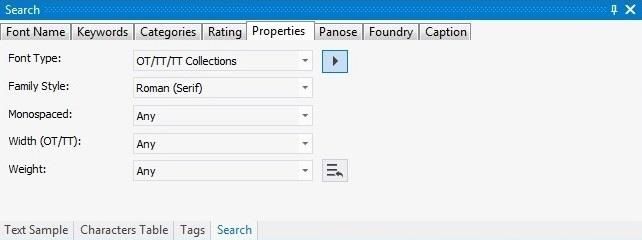
FontExpert 2018 User Guide

-9-
FontExpert 2018 User Guide

Worklist View

You can select and copy fonts in the Worklist view and then paste them into any folder in the Folders view or into
any font group in the Fonts view.

To print the selected font or fonts, choose File/Print... or File/Print Preview... from the main menu. To select the
report type for printing, choose File/Report Settings... (See Printing for more details.)

Fonts View
The Fonts view allows you to organize fonts into groups, preview and manage fonts in Library. Fonts view includes
My Collections, Groups, and Library.

My Collections
My Collections is usually a set of your favorite folders with fonts, or in other words, your personal font collections,
located in folders on a hard disk or on a network drive. Personal collection can be a folder which you have on
some cloud service and which is synchronized with a folder on hard disk of your computer. When you add this

                                                        - 10 -
FontExpert 2018 User Guide
folder to My Collections node of the Fonts view, FontExpert searches all subfolders and fonts in the collection
folder and adds information about fonts to FontExpert database.
For example, if you have a folder “C:\MyFonts” and you have added this folder to My Collections, it appears on
the top level as “My Fonts (C:)”. FontExpert provides you a set of standard edit commands to allow you to
manage folders in your collections: Cut, Copy, Paste, Delete, Create Folder, Rename. You can also drag and drop
folders within My Collections and between My Collections and Groups.
Be careful when you Delete folders within My Collections. Delete here means that you really delete selected
folder and place it to Recycle Bin.
Synchronization
FontExpert “thinks” that My Collections is a set of folders whose contents can be changed by third party
application. For example, it is possible that you open Windows Explorer and delete or rename folders within your
“C:\MyFonts” collection or delete or add fonts. To let FontExpert know about changes in your collection you must
use Synchronize command. FontExpert will synchronize the contents of your collection in My Collections node
with actual contents. If you work with your collection using FontExpert edit features (Copy, Delete, etc.) no
synchronization is needed as FontExpert automatically keeps database synchronized with actual folders in your
collection. Synchronization is needed if you know that you changed anything in your collection using third party
applications, such as third party file manager.
Imagine that your collection is a shared folder on a network drive (or a folder linked to remote “cloud” folder) and
its contents are managed by your font administrator. When you run FontExpert and you know that the contents
of your collection may be changed, than do Synchronization. Select the collection folder and choose Synchronize
menu command from right-click menu.
- 11 -FontExpert 2018 User Guide
If the collection folder becomes unavailable (for example, shared network drive was temporarily disconnected, or
if you deleted collection using third party file manager), then the collection is displayed with a special icon that
shows that the folder is not connected to actual physical folder (it is “unlinked”).
If shared network drive with your collection becomes connected again, then the collection will be displayed again
with normal icon and you will be able to preview fonts in it.
NOTE
There is an important difference between Delete command and Hide this Collection command. Delete command
actually deletes selected folder from your collection. FontExpert also removes information about fonts from the
database and its fonts will not appear in the results of Search. Hide this Collection command does not delete
folder physically, but just removes it from My Collections node (hides it). Hidden collection folder remains in
FontExpert database and the fonts from this collection will appear in the results of Search. You can add the
hidden folder to My Collections again and FontExpert will synchronize it quickly. But if you do not plan to add the
collection folder to My Collections and want to remove the collection folder also from the database (to tell
FontExpert to “forget it forever”), then go to Tools, Database Maintenance, find the collection folder and choose
“Remove this Folder” command.
TIPS
To refresh Fonts view, click to it and choose View/Refresh menu command, or press F5.
- 12 -FontExpert 2018 User Guide
While dragging files, hold the Ctrl key to copy source folder or source files to the selected folder in My Collections.
Hold the Shift key to move source folders or files.
Groups
Each group is a logical folder with fonts that refer to fonts in Library. Groups allow you to activate and deactivate
fonts as font sets and to see the state of your fonts. If all fonts in a group are permanently installed, this group is
shown with green circle. If all fonts in a group are temporarily activated, then the group is shown with yellow
circle. If some fonts in a group are permanently installed, some are temporarily activated, and/or some fonts
remain uninstalled, then this group is shown with gray circle.
To create a new font group, choose Group/Create Group from the main menu, or right click Groups node or a
group in the Fonts view and choose Create Group from the popup menu.
You can copy folders in My Collections (or in Windows Explorer) and paste them into a group within the Fonts
view. You can also copy a group folder and paste it to a selected My Collection folder.
You can drag files from Windows Explorer and drop them into a selected group folder in the Fonts view.
TIPS
While dragging folders or files, hold the Ctrl key to copy folders or fonts to the selected group. Hold the Shift key
to move the items.
You can create groups using Group/Create Groups from Folder Structure... menu command.
To export all groups as a hierarchy of physical folders, use Group/Create Folder Structure from Groups... menu
command.
- 13 -FontExpert 2018 User Guide
Toolbar Button Description
Install permanently.
Activate temporarily.
Uninstall or Deactivate.
Permanently installed fonts will be uninstalled; temporarily activated
fonts will be deactivated.
Colored Item in
Description
the main view
The font is installed permanently (font is active).
Windows will load this font again after restart.
The font is activated temporarily (font is active).
Windows will NOT load this font automatically after restart.
To install a group of fonts, select the group folder in the Fonts view and choose Install... from the main menu.
To uninstall a group of fonts, select the group folder in the Fonts view and choose Uninstall... from the main
menu.
To print the selected font or fonts, choose File/Print... or File/Print Preview... from the main menu.
To select a report type for printing, choose File/Report Settings... from the main menu. (See Printing for more
details.)
Library
Library is a powerful feature that allows you to preview your font library as a hierarchy of folders without actual
rearranging files in the font storage.
- 14 -FontExpert 2018 User Guide
FontExpert keeps fonts as storage of font files and the database. When you add fonts to Library, only unique font
files are added to font storage. For example, if you have two identical font files and try to add both to Library,
only one font will be added, and another file will be ignored. Thus, font library does not contain font duplicates. It
is safe to try to add fonts to Library many times - if fonts are already in Library, then no fonts will actually be
added to Library on the second attempt.
NOTE: If you have two versions of the same font and the files are different (for example, they are having different
file size of having different font properties, for example, at least one symbol in copyright string), then both files
will be included to Library. These files are not considered as full duplicates.
The Fonts view allows you to preview font library by many different ways - to choose Library Display Levels. The
Library font storage remains unchanged while the Library node in the Fonts view shows different representations
of the font Library.
Each folder in the Groups and Library nodes of Fonts view is not a regular folder, but just a virtual folder. Click to a
folder to search for fonts in your library. For example if you click to "A" folder in the "TrueType/Swiss/A" node,
then the Fonts View will display all TrueType fonts with Swiss style and with family names beginning on A.
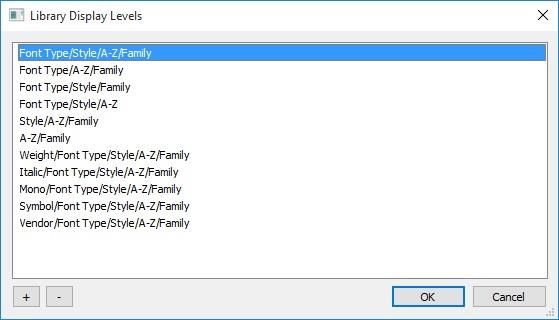
To customize Library tree node, select Library item in the tree and click to Library Display Levels button on the
Fonts view toolbar. (Or open context menu and choose "Library Display Levels..." menu command.)
- 15 -FontExpert 2018 User Guide
Library Display Levels window appears.
There are almost 1 million combinations of Library Display Levels, thus you can preview your font library storage
by a 1 million different ways. By default, FontExpert includes in list no more than 10-20 combinations of levels
and you can add your own custom levels.
The default view is Font Type/Style/A-Z/Family. It means that the fonts are displayed in Library node of Fonts
view at first grouped by Font Type (on the first level) in the tree, then on the second level the fonts are grouped
by Font Style (Roman, Swiss, etc.), then on the next level fonts are grouped by alphabet (A-Z), and at last fonts are
grouped by Family.
Press "+" button to customize Library node of Fonts view by adding your own combination of levels in the folders
tree.
- 16 -FontExpert 2018 User Guide
There are almost 1 million combinations of levels.
TIP: You can use some combinations to preview fonts in your library according to a given criteria. For example,
Weight/Font Type/Style/A-Z/Family is a combination useful for previewing all fonts in your library having given
font weight.
To assign keywords, ratings, and categories to Library fonts use the Tags view.
NOTE: You only can assign tags to fonts that are in Library. It is not possible to assign a tag to a font that was not
added to Library.
- 17 -FontExpert 2018 User Guide
Adding Fonts to Library
To add your fonts to FontExpert font Library, choose Tools/Add Fonts to Library... command from the main menu.
(Or press Add to Library button on the main toolbar.)
By default the window includes root folders of all local drives on a computer.
Press "+" and "-" buttons to add or remove folders where to search for fonts.
Press Start button.
To add fonts from selected folder, open Folders view, select a folder, and choose "Add Fonts to Library...
command from context menu.
- 18 -FontExpert 2018 User Guide
Add to Library feature will copy fonts from selected folder to font storage called Library. Only unique fonts will be
copied and added to Library. If some font file is already in Library, it will not be copied. See Fonts View for more
information about font Library.
- 19 -FontExpert 2018 User Guide
Database Maintenance
When you delete a folder with fonts from local disk, the database keeps references to this folder, but the deleted
folder appears in the database as "unlinked" folder (referencing non-existing folder).
Choose Tools/Database Maintenance... menu command. The Database Maintenance window appears.
This window displays folders in the database. Some folders are marked as unlinked folders. You can do one of the
following:
1. Select unlinked folder and choose Remove this Folder command. The folder will be removed from the
database. Notice that all references to fonts that were located will be also removed from the database. All
keywords, categories, captions and ratings assigned to these fonts will be also removed and cannot be restored.
This command is useful if you want to remove a reference to folder and you know that you did not assign any
important tags to the fonts in this folder, or you do not need these tags anymore.
2. Select unlinked folder and link it to existing folder using Link to Existing Folder command. This command is
useful if you moved some actual font folder in Windows Explorer (outside FontExpert) and unlinked folder
appeared in FontExpert database. Then you can re-link unlinked folder to a new existing folder. All font
information, keywords and categories assigned earlier to font files will be restored and reassigned to actual files
located in new place.
- 20 -FontExpert 2018 User Guide
NOTE
When you remove folder item from the database you only remove reference to actual folder and references to
fonts from the database. Actual folders and font files on local disks item are NOT deleted. If you preview these
font files in FontExpert, folder reference will appear again in the database.
- 21 -FontExpert 2018 User Guide
Main View
By default, files are displayed in the main view as thumbnails:
In the main view, each font is drawn with its typeface. You can choose and customize the text to be drawn in this
view for every font face. Custom text can include Unicode symbols.
You can preview typefaces of installed fonts listed in the Windows Fonts view, typefaces of fonts listed in the
Worklist view, or you can select any folder in the Folders view or Fonts view and preview all typefaces located in
the selected folder.
You can select each font face and its corresponding font will be displayed in the Characters Table view and in the
Text Sample view.
To install the selected font, choose the Install... command from the popup menu or click the green button on the
toolbar. See Installing Fonts.
- 22 -FontExpert 2018 User Guide
To print the selected font or fonts, choose File/Print... or File/Print Preview... from the main menu. To select a
report type for printing, choose File/Report Settings... from the main menu. (See Printing for more details.)
- 23 -FontExpert 2018 User Guide
Fonts can also be displayed as a report:
Column Name Description
Filename The name of file or folder
Location Path to folder were the file is located
Size File size in kilobytes (1 KB = 1024 bytes)
File Type The description of the file type
Modified Date The date and time when the file was last modified
Font Name The name of font face (shown for font files only)
Family The name of font family
Font State The state of the font file: Installed or Uninstalled
Family Style Family style of the font (for example, Decorative).
Foundry The name of font creator (for example, Adobe).
Vendor ID The font foundry signature (for example, "ADBE" stands for Adobe).
Is Unicode Font encoding is Unicode.
(Windows platform & Unicode Basic Multilingual Plane encoding).
Embedding Font embedding licensing rights for the font. See Embedding Fonts for more information.
Character Set The name of the character set shown in the font
ID The identifier of the character set (0 - Western, 161 - Greek, 204 - Cyrillic, etc.)
Total Number of character sets in the font
- 24 -FontExpert 2018 User Guide - 25 -
FontExpert 2018 User Guide

Icon or picture

Description

                                      The font is installed permanently (font is active). Windows
                                      will load this font again after restart.

                                      The font is activated temporarily (font is active). Windows
                                      will NOT load this font automatically after restart.

                                      Check mark is set for the font. (See Check Marks context
                                      menu commands.)

                                      Font Type: TrueType, OpenType, PostScript, Raster (or
                                      Bitmap) Font, Vector Font (a scalable font that was
                                      introduced in early versions of Windows).

                                      Font Style or Weight: Italic, Thin, Ultra Light (Extra Light),
                                      Light, Normal (Regular), Medium, Semi Bold, Bold, Ultra
                                      Bold (Extra Bold), Heavy, Regular (the same as Normal).

TIP
Press and hold Shift key when applying Add Fonts to Worklist command.
If you hold Shift key, PFB, AFM, and INF files with be added to Worklist with selected PFM files.

                                                        - 26 -
FontExpert 2018 User Guide
Properties View
The Properties view shows the list of properties of the currently selected font in the main view. The list of
properties depends on the type of font selected.
The set of properties also depends on the view where you select the font.
- 27 -FontExpert 2018 User Guide
To uninstall one font face of an installed font family (such as Normal, Bold, Italic, Bold Italic), select the font in the
Windows Fonts view. Then open the Properties view and expand the Source Files property. Right click the face
name you want to uninstall. Choose Uninstall Source File... from the popup menu.
NOTE
In the main view, Worklist view, and Fonts view, you can open the standard Properties window for every file or
folder. Select any file or folder and press Alt+Enter. The Properties window that appears is the same as the
window opened from Windows Explorer.
The set of properties is different for fonts of different types. For example, Panose properties are displayed for
TrueType and OpenType fonts only.
Tip 1
You can see if a TrueType font (.TTF) file is in Unicode format.
Select the .TTF file in the main view and look at its properties. Find the IsUnicode property. If the value of this
property is Yes, then the font is in Unicode format.
Tip 2
You can see if the resolution of a raster font (.FON) is Small or Large.
Select the .FON file in the main view and look at its properties. Find the VertRes and HorzRes properties. If the
property value equals 96, the font is Small.
- 28 -FontExpert 2018 User Guide
Tags View
IMPORTANT NOTE: You only can assign tags to fonts that are in Library. It is not possible to assign a tag to a font
that was not added to Library.
When the Main View displays fonts from Library, you can assign tags to one or more selected fonts. Use Fonts
View or Search in Library window to display Library fonts in the Main View. Then select fonts and assign tags to
them in the Tags View.
The Tags view allows you to assign captions, keywords, ratings, and categories to the fonts selected in the Main
view. Then you can search for fonts by tags in the Search in Library window.
To assign ratings to selected fonts:
1. Select a font (or several fonts) in the main view.
2. Choose a rating in the Tags view.
To assign keywords to selected fonts:
- 29 -FontExpert 2018 User Guide
1. Select a font (or several fonts) in the main view.
2. Type a keyword in the Assigned keywords: edit box and press Enter.
Note: a "keyword" is actually a keyword phrase; it may consist of one or more words.
To assign categories to selected fonts:
1. Select a font (or several fonts) in the main view.
2. Check a box for the desired category in the "Assigned Categories:" list.
- 30 -FontExpert 2018 User Guide
Search View
Quick Search
Quick Search edit box on the main toolbar is equivalent to the Name or part of the name: edit box in the Search
view.
The Search View allows you to search fonts by font name, keywords, categories, ratings, by font properties
(Width, Weight, etc.), by Panose properties (TrueType and OpenType fonts only), and by Foundry. The results of a
search are displayed in the main view.
Assign keywords, ratings, and categories to fonts in the Tags view.
NOTE
The Search feature finds fonts that were previously added to Library or to My Collections. See Add to Library.
To search for fonts by font name or partial font name:
1. Type a font name or partial font name (for example, "Narrow") in the Name or part of the name: edit box and
press Enter.
2. The fonts that match the search phrase appear in the main view.
By default, FontExpert tries to match any font name from the Family, Full Font Name, PostScript font name, and
Windows Name fields. If any font name matches the criteria, the font appears in the results in the main view. For
TrueType and OpenType fonts "Windows Name" and "Family" are the same.
To search for fonts by a keyword:
1. Select a keyword in the Keywords list.
- 31 -FontExpert 2018 User Guide
If this list is empty, it means that no keywords were assigned to fonts. You can assign new keywords to selected
fonts in the Tags view.
To search for fonts by a category:
1. Select a category in the Categories list.
Notice that clicking a category or keyword name clears the previously selected keywords and categories. To select
several categories and/or keywords without clearing previous selections, click the check boxes near the category
and keyword names. Your selection is indicated by the green dot in the check box.
To search for fonts by rating:
1. Select a rating in the Ratings list. To select several ratings, click the check boxes near the rating names.
NOTE
There is a special item in the ratings list called "Not rated". If you select this item, FontExpert will return all fonts
having no rating. If you try to select this option before you assign any ratings to your fonts, the search may take
some time, because almost all fonts from the database will be included in the results.
To search for fonts by properties:
1. Select desired font properties such as font type, family style, font width, font weight and press Search button.
- 32 -FontExpert 2018 User Guide
Example: Searching for condensed fonts
Select "Condensed" in Width (OTT/TT Fonts) selection box and set other properties to "Any". Press Search button.
FontExpert will find all condensed fonts in your collection.
To search for fonts by Panose properties:
1. Select desired Panose properties and press Search button.
NOTE
The PANOSE Typeface Matching System was developed by Benjamin Bauermeister and is licensed to Hewlett-
Packard Corporation (see www.panose.com). Panose classification numbers are used by font designers in
TrueType and OpenType fonts to specify family class of the font. Panose classification is optional. Well known font
foundries assign Panose classification numbers in their fonts, but there are TrueType fonts with all Panose
numbers assigned to zero.
Example 1: Searching for fonts with undefined Panose numbers
Set all Panose property selection boxes to "Any" (it means the corresponding Panose number is zero) and press
Search button. FontExpert will find all TrueType or OpenType fonts referenced in the database and having
undefined Panose properties (set to zero by font designer).
Example 2: Searching for fonts similar to some selected font
Press Pick from Font button, browse to desirable font in one of FontExpert views and select the font. FontExpert
will pick Panose numbers from selected font and set appropriate selection boxes in Panose group of DB Search
view. Press Search button. FontExpert will find all fonts having the same Panose numbers, thus fonts similar to
selected font.
To search for fonts by Foundry:
1. Select the name of desired font foundry and press Search button
or:
2. Type vendor id in the Vendor ID field and press Enter.
- 33 -FontExpert 2018 User Guide
NOTE
Vendor IDs are case sensitive.
To search for fonts by font foundry, FontExpert uses vendor id field defined for TrueType and OpenType fonts.
The font foundries in the list are the foundries whose vendor id was registered by Microsoft, but it is possible to
search for fonts with any vendor id (up to 4 characters).
- 34 -FontExpert 2018 User Guide
Text Sample View
The Text Sample view view shows a sample of the currently selected font in the main view.
Choose the type of sample text from the drop down list on the toolbar: Alphabet, Text Sample, Symbols,
Numbers, etc.
To customize the text of the sample, choose Tools/Options... from the main menu.
To load a text sample from a text file, choose the text file in Options and select "Text File" in a drop down menu
on the toolbar.
Kerning
Kerning is the process of improving font appearance and legibility by adjusting the white space between certain
paired characters, such as 'To', 'Te', or 'VA', which are known as kerning pairs. Many fonts include a kerning table
with predefined, font-specific kerning pairs.
Select View/Text Sample/Draw Text with Kerning (Read Only) from the main menu to turn on or off kerning in
the Text Sample view. Or click the button on the Text Sample toolbar.
Choose Show Kerning Pairs... from the popup menu to display all kerning pairs defined in the selected font:
- 35 -FontExpert 2018 User Guide - 36 -
FontExpert 2018 User Guide

Characters Table View
The Characters Table view shows the selected font in the main view. This view displays the table of characters
formatted with the currently selected font. Using the formatting toolbar, you can choose font size, zoom in, or
zoom out. In the FontExpert Options area, you can customize the table and specify the number of columns and
other parameters.

Each font character is shown in its own cell. The code of the character is shown in the upper left corner of the cell.
For example, the code for the Ω character is 8486. Click any symbol and hold the left mouse button to enlarge the
symbol.

All new TrueType fonts, for example Arial, Courier New, and Times New Roman, are in Unicode format. Unicode
format maps character codes from 32 to 65536. In theory, a font can consist of up to 65 thousand different

                                                        - 37 -
FontExpert 2018 User Guide
characters. The whole range of characters (32-65536) is divided into shorter ranges of character codes. For
example, the Currency Symbols Unicode range maps the characters with the codes 8352-8399.
Older TrueType fonts (used in Windows 3.1) are not in Unicode format. Older fonts consist of characters with
ANSI codes 32-255 (also called the ANSI Character Set or Windows characters).
By default, the All Defined Characters option is selected.
For the new TrueType fonts, such as Arial, you can look at any Unicode range of characters for the font.
For example, select a Unicode TrueType font (e.g. Arial) in the main view.
Select the name of a Unicode range (e.g. Currency Symbols) in the drop-down list on the main tool bar to see the
font characters with the codes: 8352-8399.
Combo Box Selection Description
Displays all symbols defined in the selected font.
Useful Tip: Look at the "Letterlike Symbols" tool tip in the bottom left
* All Defined
corner on the picture above.
Characters
When the Unicode Range combo box selection is "* All Defined
Characters", FontExpert displays the Unicode Range to which the
enlarged symbol belongs.
Displays symbols with ANSI codes from 32 to 255 (ANSI Character Set).
The set of symbols depends on the country and code page options
* Windows Fonts
selected in Control Panel, Regional and Language Options. An ANSI
code is a one-byte number less than or equal to 255.
Unicode Range. Displays symbols with Unicode codes from 32 to 255.
Latin-1
Unicode code is a two-byte number.
Unicode Range. Displays symbols with Unicode codes from 8352 to
Currency Symbols
8399.
... ... other Unicode Ranges...
- 38 -FontExpert 2018 User Guide
Installed Fonts Window
Choose Tools/Show Installed Fonts... menu command. The Installed Fonts window appears.
Installed Fonts window shows the list of fonts permanently installed in Windows or temporarily activated by
FontExpert.
The Known Font Comment column displays the text that gives an idea about the font origin. For example, "Comes
with Windows 7" means that the font was installed with Windows 7 operating system. "Comes with MS Office"
means that the font was installed with Microsoft Office.
If you do not see any comment in the Known Fonts Comment column it is probably means that the font was
installed by a third-party application.
FontExpert keeps information about known fonts in the FontExpertKnownFonts.xml file. Experienced users can
edit this file and add custom "known font comment" text for their fonts.
In Windows 7 this file is located in the FontExpert application data folder:
C:\Users\\AppData\Roaming\Proxima Software\FontExpert\15.0\FontExpertKnownFonts.xml
- 39 -FontExpert 2018 User Guide
Find Fonts Window
In the Find Fonts window, you can search for font files on your local or network drives.
Choose Tools/Find Fonts... from the main menu, or press Ctrl+F, to see the Find Fonts window. Choose the drive
or path you want to search for font files and click the Start Search button.
FontExpert automatically detects corrupted and incomplete fonts. To search for duplicates, check the Detect
duplicate fonts box. FontExpert will set the color of duplicates to yellow or green.
You can copy, move, delete, and hide fonts displayed in the list.
Check marks can help you to manage long lists of fonts. To set check marks depending on the font status, use the
Set Check Marks by Status... option. Then you can apply other menu commands to the marked fonts or to
selected fonts.
- 40 -FontExpert 2018 User Guide
To save a list of fonts to a text file, click the Save to File button on the toolbar.
To include all fonts in the Worklist view, click the Replace Worklist button. The fonts that were found will be
added to the Worklist view.
- 41 -FontExpert 2018 User Guide
Installing Fonts
To install a font, select it in the main view. Right click on the font file name and select Install… from the popup
menu to open the Installing Fonts dialog box. Click the Install button.
You also can choose Install Now instead of Install…. The Install Now option is equivalent to Install…, but it
doesn’t display the window with the list of fonts.
The Install… and Install Now commands activate (install) a font permanently. Windows will load this font at every
Windows restart.
To install a group of fonts, select it in the Fonts view. Right click the group folder and select Install… from the
popup menu.
Toolbar Button Description
Install permanently.
Activate temporarily.
Uninstall or Deactivate.
Permanently installed fonts will be uninstalled; temporarily activated
fonts will be deactivated.
Colored Item in
Description
the main view
The font is installed permanently (font is active).
Windows will load this font again after restart.
The font is activated temporarily (font is active).
Windows will NOT load this font automatically after restart.
- 42 -FontExpert 2018 User Guide
Embedding Fonts
The value in Embedding column of Find Fonts window indicates font embedding licensing rights for the font.
FontExpert uses "OS/2 and Windows Metric table" of a TrueType or OpenType font to define embedding rights
granted by font vendor. The table below describes embedding rights according to OpenType Specification version
1.6:
Installable Embedding Fonts with this setting indicate that they may be embedded and
permanently installed on the remote system by an application. The
user of the remote system acquires the identical rights, obligations
and licenses for that font as the original purchaser of the font, and is
subject to the same end-user license agreement, copyright, design
patent, and/or trademark as was the original purchaser.
Restricted License embedding Fonts must not be modified, embedded or exchanged in any manner
without first obtaining permission of the legal owner. Caution: For
Restricted License embedding to take effect, it must be the only level
of embedding selected.
Preview & Print embedding The font may be embedded, and temporarily loaded on the remote
system. Documents containing Preview & Print fonts must be
opened read-only; no edits can be applied to the document.
Editable embedding The font may be embedded but must only be installed temporarily
on other systems. In contrast to Preview & Print fonts, documents
containing Editable fonts may be opened for reading, editing is
permitted, and changes may be saved.
No subsetting When this bit is set, the font may not be subsetted prior to
embedding.
Bitmap embedding only Only bitmaps contained in the font may be embedded. No outline
data may be embedded. If there are no bitmaps available in the font,
then the font is considered unembeddable and the embedding
services will fail.
The four levels of embedding rights (indicated by gray color) are defined as mutually exclusive in OpenType
specification versions from 1.2 to 1.6 (in "OS/2 and Windows Metric table" versions 2, 3, and 4).
In TrueType specification versions 1.5 and 1.66 (in "OS/2 and Windows Metric table" versions 0 and 1) the four
levels of embedding rights were not defined as mutually exclusive. If multiple levels of embedding rights are
assigned to a font, the least restrictive license granted takes precedence.
- 43 -FontExpert 2018 User Guide
Activating Fonts Temporarily
To activate font temporarily, select it in the main view. Right click on the font file name and select Activate
Temporarily Now from the popup menu.
The Activate Temporarily command activates the font temporarily. It will be active until you deactivate it or until
Windows is restarted. Windows will not load this font after restart. If you need this font after restart, you will
have to activate it again.
To activate a group of fonts, select it in the Fonts view. Right click the group folder and select Activate
Temporarily Now from the popup menu.
Toolbar Button Description
Install permanently.
Activate temporarily.
Uninstall or Deactivate.
Permanently installed fonts will be uninstalled; temporarily activated
fonts will be deactivated.
Colored Item in
Description
the main view
The font is installed permanently (font is active).
Windows will load this font again after restart.
The font is activated temporarily (font is active).
Windows will NOT load this font automatically after restart.
- 44 -FontExpert 2018 User Guide
Uninstalling or Deactivating Fonts
To uninstall and/or deactivate a font, select it in the Windows Fonts view. Right click the font face name and
select Uninstall or Deactivate… from the popup menu to see the Uninstalling or Deactivating Fonts dialog box.
Click the Uninstall or Deactivate button.
This command uninstalls and/or deactivates the font depending on its current state (whether it was installed
permanently or activated temporarily). The font will not be loaded at the next Windows restart. Also this
command tries to unload this font from the current Windows session. There are cases when it is not possible to
unload fonts. Such fonts will remain loaded until the next restart of Windows.
FontExpert makes a backup copy of uninstalled font files that were located in the standard Fonts folder (usually
Windows\Fonts). You can specify the backup folder in FontExpert Options.
To uninstall or deactivate a group of fonts, select it in the Fonts view. Right click the group folder and select
Uninstall… from the popup menu.
To uninstall one font face (such as Normal, Bold, Italic, or Bold Italic) from an installed font family, select the font
in the Windows Fonts view. Then open the Properties view and expand the Source Files property. Right click the
face name you want to uninstall and select Uninstall Source File… from the popup menu.
Colored Item in
Description
the main view
The font is installed permanently (font is active).
Windows will load this font again after restart.
The font is activated temporarily (font is active).
Windows will NOT load this font automatically after restart.
- 45 -FontExpert 2018 User Guide
Copying and Deleting Fonts
In the main view, Folders view, Fonts view, and Worklist view you can cut, copy, paste, and delete files and
folders. Use popup menu commands or buttons on the toolbar.
To open the popup menu, right click on any area of the view.
You can also drag and drop files and folders between FontExpert views and Windows Explorer (and other
programs that work with files).
Important note:
Be careful when you delete files in the standard Fonts folder (usually c:\Windows\Fonts or c:\Winnt\Fonts).
Deleting a font file that is located in this folder permanently deactivates this font. It is recommended not to
delete font files from this folder unless you are an experienced user.
Floating Samples
Floating samples feature allows you to try a font sample over the window of another application, such as word
processor or graphics editor.
Customize text, width, height, and font size of the sample on the Face Sample bar and press Floating Sample ( )
button.
- 46 -FontExpert 2018 User Guide
Floating font sample appears, drag it with a mouse and place it over your favorite application.
- 47 -FontExpert 2018 User Guide
Printing Fonts
Select the fonts you want to print and choose Tools/Print Fonts... or File/Print Preview... from the main menu:
Use page navigation bar to preview pages before printing.
Full Page report is very flexible if you want to customize it. For example, you can hide the title and the character
table on top of the right column, and print several text samples at different point sizes in two columns. Or hide
the left or right column and print text samples in one column. You can use Unicode text as text sample. To
customize the way the text sample is printed, choose options like Draw with kerning, Draw with external leading,
print all lines of text or limit number of printed lines in one sample. You can use similar options for text samples
printed on Full Page and Layout reports.
There are three types of reports: Full Page, Layout and Character Table. To select the type of printed report,
select a report tab on the left pane.
With Layout report you can print text samples or font names in several columns. The Layout report replaces
former "Text Samples" and "Font Names" reports known by users of earlier versions of FontExpert:
- 48 -FontExpert 2018 User Guide
Character Table report allows you to print fonts as a character table:
- 49 -FontExpert 2018 User Guide
There are two special options for Unicode range. The "* Windows Characters" option allows you to print the ANSI
set of characters with character codes 32-255. This set of characters depends on the language and code page
selected in Windows Control Panel.
The "* All Defined Characters" option allows you to print all characters defined in a font by it's designer.
IMPORTANT NOTE
With "* All Defined Characters" option FontExpert will calculate the total number of pages in a document more
slowly, than with other Unicode range options. If you want to print large number of fonts with this option,
temporarily select another Unicode range option, customize page format, set margins, set header and footer
indents, and finally, when you a ready to print, select the "* All Defined Characters" option and print the
document.
You can customize page format and settings for title, subtitle, header, footer, margins for all types of reports.
IMPORTANT NOTES AND TIPS
Printing Large Number of Fonts
When you print large number of fonts, for example, using Layout report, the success of printing usually depends
on the printing options of selected printer. Many printers have a default setting in a printer driver that allows
substitution of printed fonts by a device fonts built-in printer. This option may be incorrect for printing fonts in
FontExpert when you want to print actual font and not a device font that comes with printer.
- 50 -FontExpert 2018 User Guide
Also, some printer drivers may encounter problems when print large number of fonts in one job. In this case try to
experiment with setup options provided by printer driver. In many cases selection of an option that sounds like
"Print TrueType fonts as graphics" leads to success.
(See an example below, "TrueType Font" option of PDF995 virtual printer).
Printing Multipage Document as Several Printing Jobs
If you want to print a 200-pages document, you can print the first 100 pages (the first job), and then print pages
101-200 (the second job). Notice the Number of the 1st page box on page navigation bar. To continue page
numeration, set the page number of the 1st printed page to 101 before printing the second job (pages 101-200).
Printing to PDF File
There are many PDF virtual printers that allow you to print documents to PDF file. One good example is PDF995
virtual printer (see www.pdf995.com).
We recommend the following settings to print large number of fonts (more than 500) to one PDF file:
Important settings are "TrueType Font" and "TrueType download Option", you may want to experiment with
printer setup to achieve best results.
NOTE
- 51 -FontExpert 2018 User Guide
When you print 500 fonts using Character Table report with "* All defined characters" an Unicode range option,
each font may take several pages, and total number of pages in resulting document could be 1000-2000 pages.
Printing 1000-2000 pages on PDF virtual printer may take several minutes.
- 52 -FontExpert 2018 User Guide
Renaming Font Files
You can rename font files according to full font name of the corresponding font.
Select fonts in FontExpert and choose Fonts/Rename Font Files... menu command,
or press the button on a toolbar. Renaming Font Files window appears:
Press Rename button.
With the default option "Rename files in their original location" FontExpert will rename font files. For example,
"calibriz.ttf" file will be renamed to "Calibri Bold Italic.ttf".
With another option FontExpert can copy files to another folder and rename them. Original font files will remain
unchanged.
- 53 -FontExpert 2018 User Guide
Editing Font Properties
You can change font name or other properties like font version string or trademark. If you edit a font, make sure
you are not violating the rights of its author. Refer to the License Agreement that comes with font.
Select OpenType or TrueType font in the Main view, right click on it and choose Edit Font Properties... menu
command. Below you see the properties of the Aria.ttf font located in the FontExpert installation folder.
Edit desired properties, press Save as… button, and save the file under new file name.
- 54 -FontExpert 2018 User Guide
Web Album
To create web album from selected fonts choose Fonts/Export to HTML... from the main menu:
Choose the template for your web album ("Basic White" is the default template included in FontExpert), type the
album title, choose destination folder for album files and press Create button.
To customize the number of rows and columns on web album page, the size and colors of output font samples,
choose Font Samples options page:
- 55 -FontExpert 2018 User Guide
To change the file format of the images that will be displayed on created web pages, choose Output Image
Format options page.
By default, we recommend the JPEG file format, as it is an image format supported by all web browsers.
FontExpert creates the web album index page linked to the A-Z pages, where fonts are displayed in alphabetical
order:
A-Z pages display the navigation bar with links to neighboring pages and font samples:
- 56 -FontExpert 2018 User Guide
Using and Customizing Web Album Templates
This topic is recommended to users familiar with Web design and HTML markup language.
FontExpert comes with "Basic White" web album template. ("White" stands for the background color of web
pages created with this template.) If you are familiar with HTML language, you can easily customize FontExpert
Web Album template and create your own templates. FontExpert web templates are located in FontExpert folder:
Each template includes images folder and several files:
- 57 -FontExpert 2018 User Guide
The folder containing images used on web pages. You can place your
images own images to images folder and FontExpert will copy them to
generated folder with your web album.
index.html.txt The template page for web album index (the album contents page).
page.htm.txt The template page for web album category pages (A-Z pages).
styles.css Styles used in web album HTML files .
120 x 90 pixels preview image for web album, this preview image is
preview.jpg displayed by FontExpert in Fonts/Export to Html.../Album
Index/"Template:" window.
You can customize template pages and styles.
Here is an example of album index template file (index.html.txt from "Basic White") opened in Notepad:
The template includes some special fields substituted by real paths, file names, page counter numbers when
FontExpert generates web album:
- 58 -You can also read