TURNITIN WORKSHOP 2018 - eLearning Systems and Support - www.elearning.uq.edu.au
←
→
Page content transcription
If your browser does not render page correctly, please read the page content below

TURNITIN
WORKSHOP 2018
eLearning Systems and Support

                    www.elearning.uq.edu.au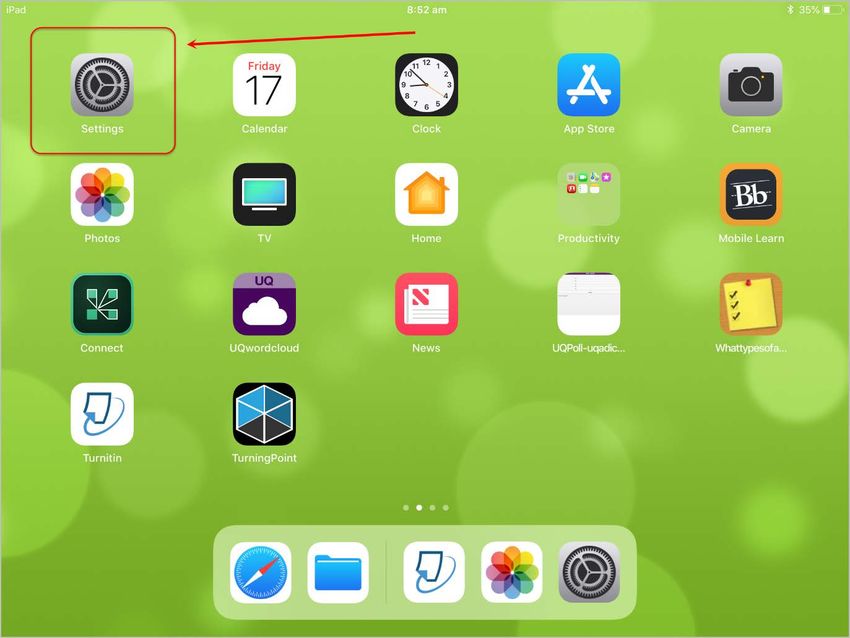
Table of Contents
Overview ......................................................................................................................... 5
   How Turnitin works ..................................................................................................... 5
   File Types .................................................................................................................... 6
   Online marking ............................................................................................................ 6
Creating a Turnitin Assignment ...................................................................................... 7
   Setting up your assignment ........................................................................................ 7
     Content Folder Information .................................................................................... 8
     Availability .............................................................................................................. 8
   Add an Item for instructions ....................................................................................... 9
Create a Turnitin Assignment (Text-based) .................................................................. 11
   Originality report options .......................................................................................... 11
   Setting up your assignment ...................................................................................... 11
   Creating the Turnitin assignment submission .......................................................... 12
   Optional Settings ...................................................................................................... 14
   Attach a rubric .......................................................................................................... 19
      Example ................................................................................................................ 19
      Adding a rubric ..................................................................................................... 19
   Submit the Turnitin assignment ............................................................................... 23
   Edit settings .............................................................................................................. 24
   Use of rubrics by other staff ..................................................................................... 24
     Export rubrics ....................................................................................................... 24
     Importing a rubric ................................................................................................. 26
Student Submission View ............................................................................................. 28
Assignment Inbox ......................................................................................................... 34
   View .......................................................................................................................... 35
   Submitting multiple assignments ............................................................................. 35
   View a submitted assignment .................................................................................. 37
   View Originality Report ............................................................................................. 37
   Download an individual assignment ......................................................................... 37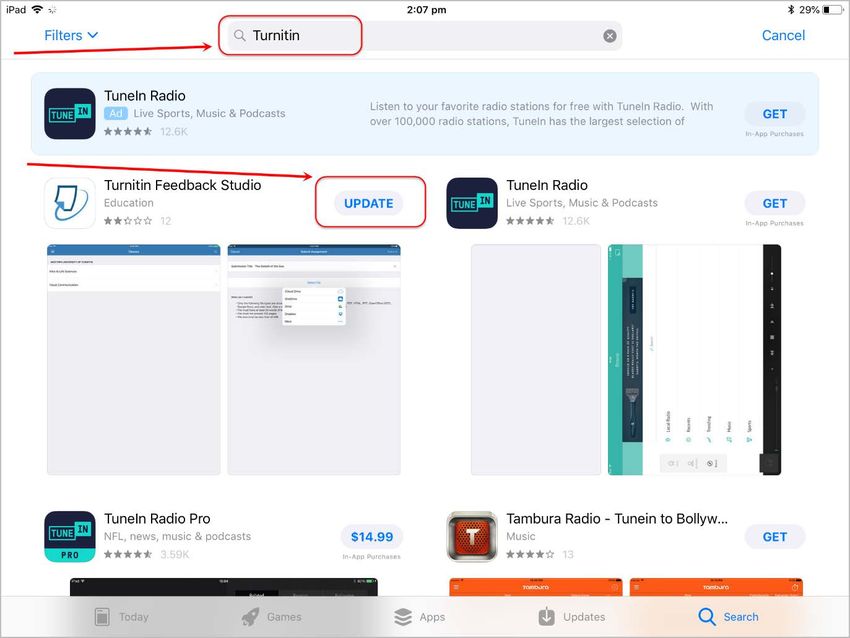
Downloading all assignments................................................................................... 38
Interpret Originality Report ............................................................................................ 40
   Introduction .............................................................................................................. 40
      Indices .................................................................................................................. 40
   Report Sections ........................................................................................................ 40
   The detail of the matching ........................................................................................ 41
   Example 1 ................................................................................................................. 41
   Example 2 ................................................................................................................. 42
   Example 3: Public Information .................................................................................. 44
Marking Online .............................................................................................................. 45
   Submitted assignments ............................................................................................ 45
   Changing the size of the text .................................................................................... 45
   Navigating between student assignments ............................................................... 47
   Text comments ......................................................................................................... 48
     Moving text comments ......................................................................................... 48
     Editing text comments .......................................................................................... 49
     Deleting text comments ....................................................................................... 49
   Bubble Comments .................................................................................................... 50
     Editing bubble comments ..................................................................................... 51
     Deleting bubble comments ................................................................................... 52
     Linking bubble comments to highlighting ............................................................ 53
   QuickMark comments............................................................................................... 53
   Create your own QuickMark comment set ................................................................ 55
     Create the set ....................................................................................................... 55
     Add marks (comments) ........................................................................................ 56
     Adding comments from other QuickMark sets ..................................................... 57
     Deleting comments from QuickMark sets ............................................................ 59
     Adding bubble comments to QuickMark sets....................................................... 59
     Renaming QuickMark sets.................................................................................... 60
     Deleting QuickMark sets....................................................................................... 62
     Downloading a QuickMark set .............................................................................. 62
     Uploading a QuickMark set................................................................................... 64
   General comments.................................................................................................... 66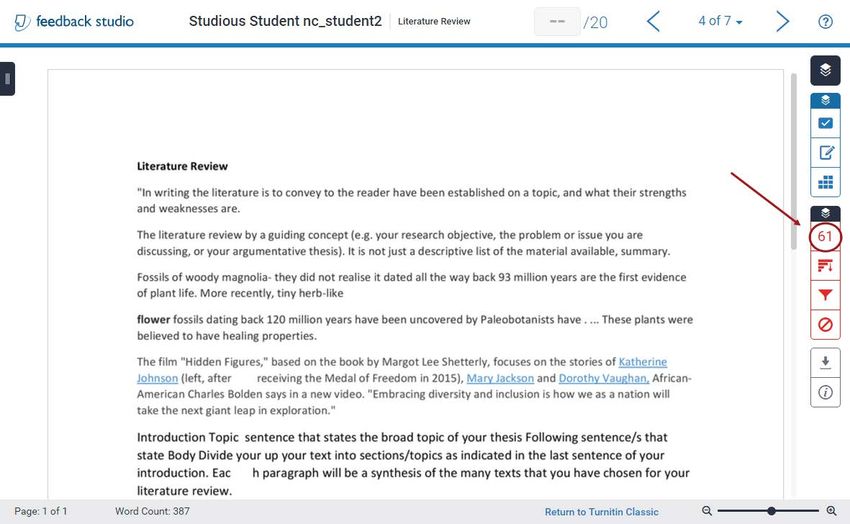
Add a general comment........................................................................................ 66
       Delete a general comment .................................................................................... 66
   Voice Comment ........................................................................................................ 67
     Recording ............................................................................................................. 67
     Replaying the recording ........................................................................................ 68
   Marking with a rubric ................................................................................................ 68
Access assignments on your iPad ................................................................................ 70
   Download the iPad app ............................................................................................. 70
   Generate access code............................................................................................... 71
   Setup the iPad app.................................................................................................... 73
Further Resources ......................................................................................................... 80
   Technical Support ..................................................................................................... 80
   eLearning Solutions Service ..................................................................................... 80
   ITaLI UTeach ............................................................................................................. 80
   Faculty Educational Designers ................................................................................. 80
   eLearning Resources ................................................................................................ 80
   eLearning Newsletter ................................................................................................ 81
   Pedagogical Resources ............................................................................................ 81
   Student Resources.................................................................................................... 81
   eLearning Workshops ............................................................................................... 81
   ITaLI Workshops ....................................................................................................... 81
   Custom Workshops .................................................................................................. 81
   Prepared by: Ailsa Dickie .......................................................................................... 81
Appendix 1: Originality Report File Types...................................................................... 82
   Allow any file type ..................................................................................................... 82
      Constraints ........................................................................................................... 82
   Allow only file types that Turnitin can check for originality ...................................... 82
   Turnitin Assignment: File Types Checked for Originality .......................................... 82
Appendix 2: GradeMark File Types Displayed in the Document Visewer ...................... 85
   GradeMark Overview ................................................................................................. 85
   Turnitin GradeMark: File Types Displayed in the Document Viewer ......................... 85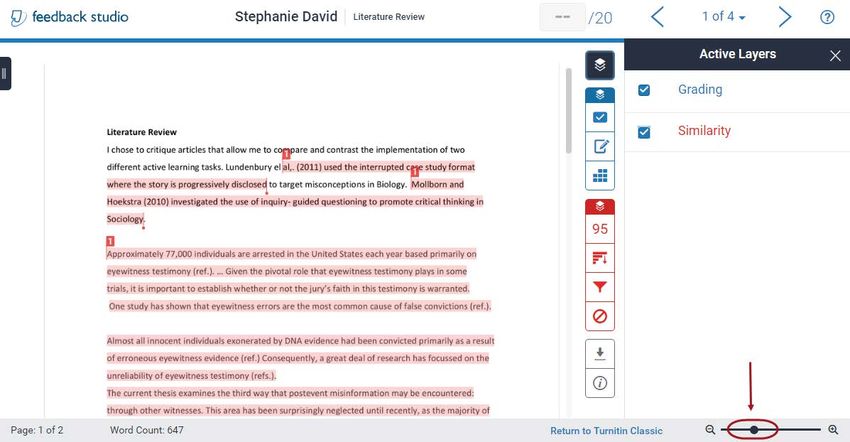
Overview
Turnitin is online web-based text-matching software that works by comparing electronically
submitted papers to billions of pages of content located on the Internet and proprietary
databases as well as the work of other students whose papers have also been submitted into
the system.

How Turnitin works

(from Lovelock, R. (2010), iParadigms: presentation to Indooroopilly High School, ALDIS Associates P/L
Melbourne, Australia)

Originality Report: the output of pattern matching against all items in the Turnitin database
GradeMark: online marking module of Turnitin assignments.
PeerMark: peer review of submissions.
File Types
Turnitin accepts all file types though an Originality Report is only produced for the
Following:
     •   Microsoft Word® (DOC and DOCX)
     •   PowerPoint
     •   Corel WordPerfect®
     •   HTML
     •   Adobe PostScript®
     •   Plain text (TXT)
     •   Rich Text Format (RTF)
     •   Portable Document Format (PDF)
The file size may not exceed 40 MB. Files of larger size may be reduced in size by removal of
non-text content. Files that are password protected, cannot be uploaded or submitted to
Turnitin.
See Appendix 1 for a comprehensive list of file types that Turnitin can create an Originality
Report.

Online marking
GradeMark the online marking tool allows you to annotate student assignments (PDF, Word,
PowerPoint, Excel and image files only), give feedback using a rubric (all file types) and return
marked assignments to students electronically.
You can also use this tool to give feedback on assignments that do not require a file
submission, such as oral presentations. The students' marks are also automatically
transferred to the Grade Centre in Blackboard.
See Appendix 2 for a comprehensive list of file types that Turnitin can display in the Document
Viewer and can be annotated.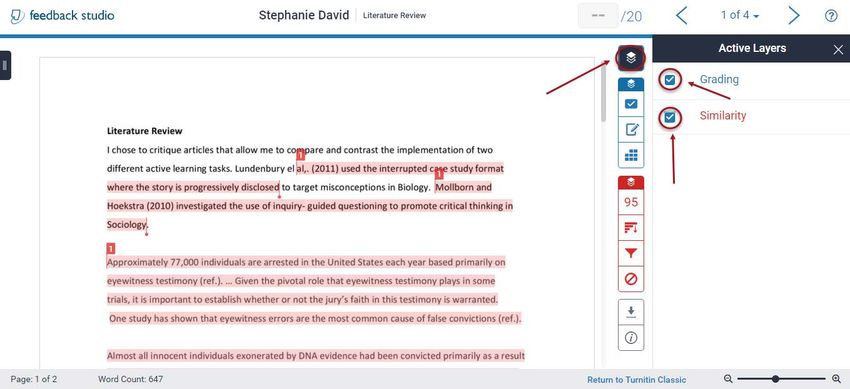
Creating a Turnitin Assignment
Setting up your assignment
Turnitin assignments would normally be added to the Assessment Content Area. Best practice
is to create a folder for all required assessment information. To save confusion for students,
the assignment should be given exactly the same name as in the
Electronic Course Profile (ECP).
     •   From the Course Menu select a Content Area (Assessment).

     •   Click on the             (Build Content) button.
     •   Select Content Folder from the drop down menu.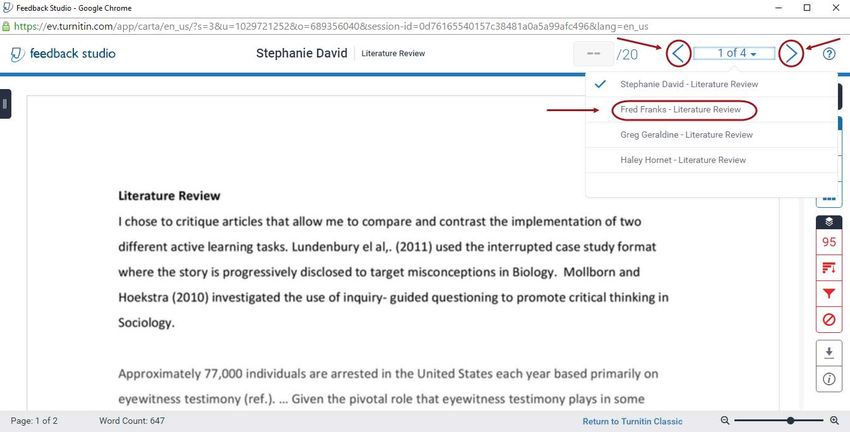
Content Folder Information
     •   Enter the Name of the assessment item (same as in the ECP).

Note: A descriptive Name is an essential field.
     •    Option extras are the:
           o   Font colour of the folder name.
           o   Type a concise description in the Text field.

Availability
     •   Optionally, if you have not completed organising the content, select the No Permit
         Users to View this Content radio button.
     •   Optionally, set Date and Time Restrictions: i.e. This could be the date the assignment
         is published until the date late assignments can be submitted up to.

           o   If required, select the Display After checkbox and enter the date using the
               (Date Selection Calendar) and enter the time using the      (Time Selection
               Menu).
           o   If required, select the Display Until checkbox and enter the date using the
               (Date Selection Calendar) and enter the time using the      (Time Selection
               Menu).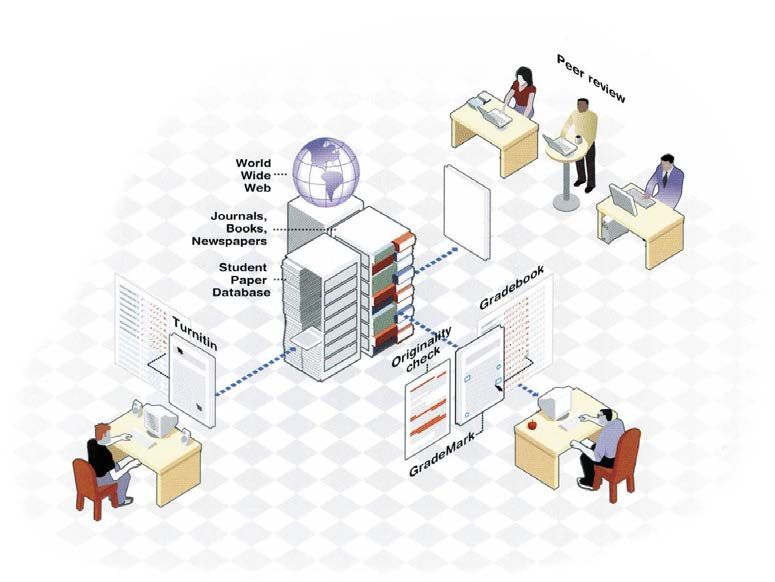
•   Click on the          (Submit) button.

     •   Click on the folder link to open the folder.

Add an Item for instructions
Add an Item inside the folder with instructions for students regarding assignment submission
and links to all relevant documents such as the assignment question and marking scheme.

     •   Click on the            (Build Content) button.
     •   Select Item from the drop down menu.

     •   Add clear instructions and link any relevant documents.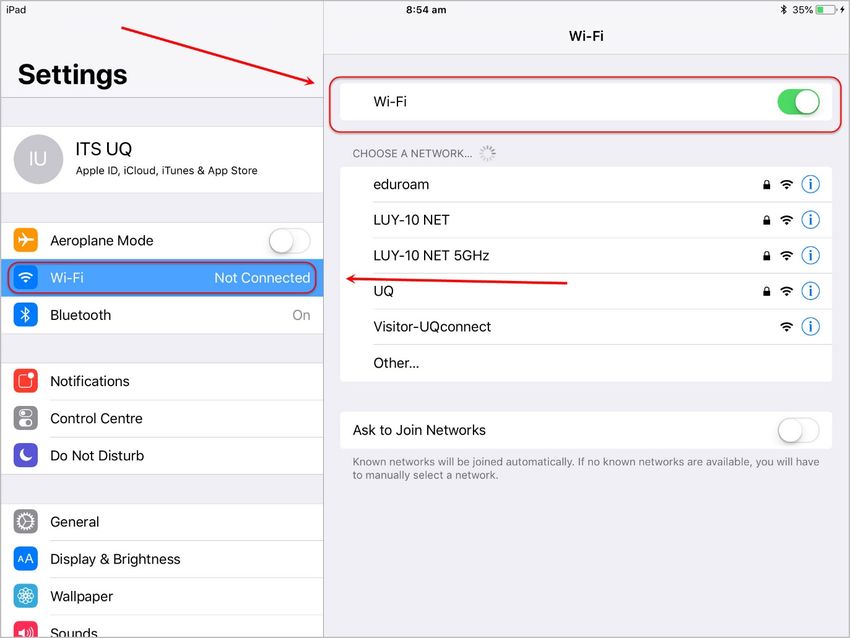
• Click on the (Submit) button.
Create a Turnitin Assignment (Text-based)
The following instructions give you information on setting up a Turnitin Assignment for the
submission of text based assignments. i.e. PDF, Word and PowerPoint files.
An Originality Report can be produced that highlights any text in a student’s assignment that
matches sources in the Turnitin database, including web content, previously submitted
assignment and subscription-based journals and publications.
Turnitin only allows the submission of one file. Turnitin does not allow the submission of
group assignments, consider using the Blackboard Assignment tool for group assignments
(refer Assignment Tool page).

Originality report options
    1. Students submit assignments and cannot see their Originality Report.
    2. Student can see their Originality Report but have no opportunity to revise their
        assignments.
    3. Student can see their Originality Report and can revise and resubmit their assignments
        as many times as they want until due date BUT only one Originality Report is generated
        in each 24 hour period.
Note: This last option is considered best practice, with the Originality Report used as a tool to
teach student how to properly acknowledge sources as well as highlighting possible
plagiarism issues. The recommend settings in this guide are for this option.

Setting up your assignment
Turnitin assignments would normally be added to the Assessment Content Area. Best practice
is to create a folder for all required assessment information. To save confusion for students,
the folder should be given exactly the same name as the assignment in the ECP.
Refer the Create a folder guide on the Content Area tool page.
Add an Item inside the folder with instructions for students regarding assignment submission
and links to all relevant documents such as the assignment question and marking scheme (if it
is not online).
Refer the Add an Item guide on the Content Area tool page.

 Tip: The following information should be included in the assignment instructions:

      •    How the file should be named.
      •    The file type/s students may submit.
      •    Not to include animated text/images in PowerPoint files.
      •    Whether students can view the Originality Report and if can resubmit and obtain a new report.
      •    What to do if they have problems uploading their assignment. i.e. Email the assignment to the course coordinator,
           continue to try to upload the assignment until they are successful and contact AskUS for help if needed.
      •    That late assignments may be submitted and that all assignments automatically have a time/date stamp of when
           they are submitted. (if you set the assignment up to allow late submissions).
• Include a link to the AskUS instructions on Turnitin:
https://web.library.uq.edu.au/library-services/it/learnuq-blackboard-
help/learnuq-assessment/Turnitin-assignments
• Assignment submission is a three step process and it is the responsibility of the student to check the assignment
preview and confirm that the assignment has been successfully submitted. Students need to keep a copy of the
Submission ID as proof they have submitted the assignment.
Creating the Turnitin assignment submission
• Click on the (Assessments) button.
• Select Turnitin Assignment from the drop down list.
• Click on the (Next Step) button.
• Enter the below information
Setting Recommendation Comments
Assignment title Should match the title of the assessment
task in the ECP (Electronic Course Profile).
Points value The mark the assignment is out of
(optional). Refer to the Marks / Rubrics /
Grading form overview guide for information
on options.
Allow only file types that Yes This setting allows only text based
Turnitin can check for assignments (PDF, Word, PowerPoint) to be
originality submitted.
Allow any file type No This setting allows assignments of any file
type to be submitted (PDF, Word,
PowerPoint, images, Excel, audio).
Start date Students are only able to submit
assignments after the Start date has
passed.
Due date Students are blocked from submitting
assignment after the Due date/time unless
late assignment submission is enabled.Setting Recommendation Comments
Post date The date when marked assignments and
grades are available to students in Turnitin
(initially set well after the due date to give
plenty of marking time and to cater for
extensions).
It is possible to leave the date fields empty. The resulting behaviour is:
- Start Date: no date entered, the students can commence the assessment item
immediately
- Due Date: no date entered, the students can submit at any date in the future
- Post Date: no date entered, the students can view their mark when the matching
Grade Centre column is set to “Show marks”.Optional Settings
• Click (plus) button and open Optional Settings.
Setting Recommendation Comments
Enter special instructions Text box for adding instructions for students.
Click on the link below
to submit your
assignment. Note: The text displayed is difficult to see
(small font and grey) and it is recommend that
you create an item with instructions for
students regarding assignment submission and
links to all relevant documents such as the
assignment question and marking scheme (if it
is not online).
Allow submissions after Yes This will cater for students with extensions or
the due date? students who have difficulty submitting the
assignment.
All assignments are time/date stamped and
late assignments are labelled late in the
Assignment box.Setting Recommendation Comments
Generate Originality
Yes
Reports for submissions?
Generate Originality immediately (first report is final)
immediately (can
Reports for student Originality Reports for all submissions will be
overwrite reports until
submissions generated immediately. Students cannot
due date)
resubmit assignments. Submissions must be
deleted by the instructor to enable
resubmission.
immediately (can overwrite reports until due
date)
Originality Reports for the initial submission by
each student user to this assignment will be
generated immediately. Students may resubmit
as often as the student wishes until the
assignment due date. Originality Reports for
the second or subsequent submission will
require a 24 hour delay before the Originality
Report begins processing.
Note: This option is considered best practice,
with the Originality Report used as a tool to
teach student how to properly acknowledge
sources as well as highlighting possible
plagiarism issues.
Only the latest submission is available to the
instructor or student. No resubmissions is
available after the due date and time of the
assignment.
on due date
Originality Reports will not be generated for any
submission until the due date and time of the
assignment. Students may resubmit as many
times as needed until the due date and time
without receiving reports. Resubmissions may
not be made after the due date and time of the
assignment.
Exclude bibliographic
Yes This option allows you to control whether
materials from Similarity
bibliographical material will automatically be
Index for all papers in this
excluded from the Originality Reports.
assignment?
Note: Selecting No will increase the percentage
match in the Originality Report.
Bibliographic materials can also be included
and excluded when viewing the Originality
Report. This setting cannot be modified after
the first assignment has been submitted.Setting Recommendation Comments
Exclude quoted materials
No This option will allow you to check quotations
from Similarity index for all
(with quotation marks) as their source will be
papers in this assignment?
highlighted.
Note: Selecting No will increase the percentage
match in the Originality Report.
Quoted materials can also be included and
excluded when viewing the Originality Report.
This setting cannot be modified after the first
assignment has been submitted.
Exclude small matches? No This setting allows you to automatically
exclude small matches from all Originality
Reports.
It may be useful to turn this setting on in
disciplines that have many common phrases
such statistics.
Small matches can also be included and
excluded when viewing the Originality Report.
Allow students to see Yes This setting gives you the option to control if
Originality Reports? students can view the Originality report.Setting Recommendation Comments
Reveal grades to students
Yes This setting allows you to determine when
only on post date?
feedback and marks are revealed to students.
Note: You set the post date when you started
setting up the assignment (refer p2).
Note: Students can also view their mark that is
returned to Grade Centre through My Grade.
You need to ensure the assignment column is
also hidden to students in Grade Centre (refer
Show/Hide column to students guide on the
Grade Centre tool page.
Submit papers to: Standard paper Selecting this option means the assignment
repository will be submitted to the Turnitin assignment
bank.
All assignments submitted to Turnitin, in any
course anywhere in the world are compared to
assignments in this bank.
You may not wish to submit a papers to this
bank if they are only a drafts (which will be
submitted to another Turnitin assignment link
in the future) or if you wish to submit a draft
research paper.
Search Options Select all options This allows an instructor to disregard a source
type if the comparison against this type of
source is not needed.Attach a rubric
Turnitin in rubrics are different to Blackboard rubrics. It is not possible to use a Blackboard
rubric in Turnitin.
The availability of rubrics is based on who is logged on, not what Blackboard course the
Turnitin is accessed from (refer to Exporting a rubric p53).
Example
Note: The below rubric is an example of how a rubric may be structured.
Settings F-1 P–2 C–3 D–4 HD - 5
Abstract 10% All major Some majors One major One minor All major
aspects missing. aspects missing aspect missing aspect missing. aspects
presented
Hypotheses 20% Important Some important Some minor Most details All important
experimental details missing. details missing. covered. details covered.
details missing.
Results 30% Misleading, Some Very good Excellent figures, Outstanding
confusing and or misleading, figures, graphs graphs and/or figures, graphs
incorrect confusing and or and/or tables tables and/or tables
information. incorrect
information.
Conclusion 40% No conclusion Conclusion Very good Excellent Outstanding
contain little conclusion conclusion conclusion
detail
Adding a rubric
• Click on the Launch Rubric Manger link in Optional settings.
• Click on the (menu) button.
• Select Create new rubric from the drop down list.• Enter a name for the rubric.
• Click on the Criteria (plus) icon to add additional criteria.
• Click on the Scales (plus) icon to add levels of achievement (scales).
• To delete criteria or scales, hover over the area, click on the (rubbish bin) icon.
• Click on each Scale title; enter a title for the level of achievement (i.e. Fail, Pass,
Credit, Distinction, High Distinction).
• Click on each Scale value, enter the required number.
• Click on each Criterion title, enter the criteria title.
• If required, click under the criteria title and enter a description of the criteria.
• Click on the Criterion weighting, enter the required percentage.• Enter an achievement description in each Criteria / Scale textbox. • Click on the (SAVE) button. • Click on the (close) button.
•   Select the required rubric form the Rubric drop down list.

Note: Turnitin in rubrics are different to Blackboard rubrics. It is not possible to use a
Blackboard rubric in Turnitin.
Note: The availability of rubrics is based on who is logged on, not what Blackboard course the
Turnitin is accessed from. Your tutors will be able to use the rubric you attached for marking
though it will not be available to them from the rubric list.
Submit the Turnitin assignment
Setting                        Recommendation       Comments
Would you like to save these
options as your defaults for   Yes                  This allows you to save these settings as the
future assignments?                                 default for all assignment you set up in Turnitin
                                                    in the future.

     •    Click on the               (Submit) button.

     •    Click the              (OK) button to close the warning about the post date.

     •    Click the              (OK) button to return to the Assessment page.
Note: Turnitin assignments only contain the list of students who were in your course when the
assignment was created. If more students have enrolled after you create your assignment you
will need to update the class list so those students can submit their assignments (refer Roster
Sync guide).
Edit settings
• Click on the double arrows to the right of the assignment title.
• Select Edit from the drop down list.
Use of rubrics by other staff
Note: The availability of rubrics is based on who is logged on, not what Blackboard course the
Turnitin is accessed from. To pass a rubric onto another staff member, you need to export the
rubric and they will need to import it into Turnitin (when they are logged onto Blackboard).
Export rubrics
• Edit the Turnitin assignment (refer to above instructions).
• Click on the Launch Rubric Manger link in Optional settings.• Click on the (menu) button. • Select required rubric from the drop down list. • Click on the (Export/Import) button. • Select Export from the drop down list. • Click on the (OK) button. • A zip file of the rubric will be saved to Downloads. • Give a copy of the zip file to your tutors
Importing a rubric
Note: It is only possible to import rubrics that have been created in Turnitin (refer above to
Exporting a rubric).
      •   Tutors will need to login to the course using their own login and password.
      •   Click on the Launch Rubric Manger link in Optional settings.

      •   Edit the Turnitin assignment (refer p17)
      •   Click on the     (Rubric) button in GradeMark.
      •   Click on the      (Rubric Manager) icon.
      •   Click on the     (Export/Import) button.
      •   Select Import from the drop down menu.

      •   Click on the          (Select files) button.
      •   Browse to and select the required zip file.

      •   Click on the             (Open) button.
      •   Click on the          (View) button to open the rubric.
• Click on the (menu) button. • Select imported rubric from the drop down list.
Student Submission View
We recommend you go through the process of submitting as a student to understand what is
seen from their point of view.

Creating a test assignment
   • Open up a blank word document and copy from the internet into the document:
          1. A Wikipedia article
          2. An article from today’s newspaper
          3. Text from a website of your choice
   • Save this file somewhere on your computer

Submitting the test assignment
   • Access your Learn.UQ course
   • Go to the Assessment tab

   • Click on the ‘View/Complete’ link under the assignment
• Ensure the Author is set to Non-enrolled student • Enter your first name and last name • Add a submission title • Click on the Choose from this computer button and navigate to the required file
•   Click the            (Open) button.

   • Once you have chosen the file, click on the            (Upload) button.

Note: First years in particular, will think they have submitted their assignment at this point,
however there are more steps before the submission process is complete

Note: It is the student’s responsibility to use the arrows to preview each page and ensure they
have submitted the correct assignment.

   • Once you have checked the preview and file information, click on the              (Confirm)
      button.
• The students will receive a Congratulations message and should receive a submission receipt via email with their submission ID.
Note: If students do not receive this email, their assignment was not submitted. If you are
suspicious about a student’s submission ID, log a job with help@learn.uq.edu.au

   •   Click on the                     (Go to assignment inbox) to return to the list of
       assignments.
IMPORTANT: If you mark a student assignment online using GradeMark, that was submitted by teaching staff, the mark will NOT be transferred to the Grade Centre in Blackboard (you have to enter it).
Assignment Inbox
Instructors can view the assignment submitted and their Originality Reports using the Turnitin
Assignment Inbox.
     •   From Control Panel select from Course Tools > Turnitin Assignments.

     •   Click on the required assignment link.

     •   The Turnitin Assignment Box will display as shown.
View
• Use the Viewing drop down menu to change which assignment are displayed.
Submitting multiple assignments
This function is useful if you need to upload assignment submission for the ‘whole class’ for
some reason.
• Click on the (Submit) button.
• Select Multiple file upload from the Choose a paper submission method drop down
list.
• Click on the (Choose File) button.
• Navigate to and open the required file.
• Select the name of the required student from the Student drop down list.
• Repeat this process for all assignments you need to upload.• Click on the (Upload All) button. • Click on the (Submit) button. • The file will be available in the Assignment Inbox.
View a submitted assignment
   •   Click on the assignment name in the Title column to access the Feedback studio.

View Originality Report
   •   Click on the link in the Similarity column.

Download an individual assignment
   •   Click on the file icon in the File column.

   •   Click on the link of the required file format.
Downloading all assignments
You can download both the Original file (submitted assignments) and if you marked the
assignments online using GradeMark the GradeMark Paper (marked assignments).
     •   Select the checkboxes of the required files.
     •   Click on the (Download) button and select Original File, Original File as PDF or
         GradeMark paper.

     •   Click the       (OK) button.

     •   Click on the Messages tab.

     •   Click on the hyperlink under message.
• Click on the hyperlink to download your zip file. • Click on the hyperlink to download your zip file and navigate to the required location. • Click on the (Save) button.
Interpret Originality Report
Introduction
A typical submission made to an assignment on Turnitin generates an Originality Report. The
Originality Report is the result of pattern matching between the text of the submission against
the search targets. The Originality Report is useful because it:
     •    Saves time in the investigation of the originality of student work
     •    Helps students to learn what is and is not valid and fair citing of others works
     •    Deters plagiarism before it happens
     •    Allows for efficient citation verification
     •    Provides documentation of any alleged plagiarism
     •    Provides resources to assist in teaching, research, and writing skills including proper
          citation

Indices
     •    blue - no matching text
     •    green - one word to 24% matching text
     •    yellow - 25-49% matching text
     •    orange - 50-74% matching text
     •    red -75-100% matching text
Warning: The originality report and the percentage of matching text found by TII do not tell you
whether a paper has been plagiarized or not. In depth examination of both the submitted paper
and suspect sources (in accordance with the standards of the class and institution) are
required for determining plagiarism (see examples below).

Report Sections
The Originality Report is separated into three main areas:
     •    document viewer frame - shows the Overall Similarity Index for the report and the
          title and author of the paper
     •    paper text - the submitted paper text in its original formatting. Matching text is
          highlighted in a colour that corresponds to the matching source listed on the right
          side of the Originality Report
     •    matching sources/sidebar - the list of matching sources for the highlighted areas of
          the paper text to the left. The sidebar also displays the Filter and Settings (exclusion
          options) and the Exclusion List
The detail of the matching DO NOT ASK: How much matching? Or what percentage of matches? DO ASK: What kind of matching has been found? Example 1 61% matching – need to look more closely at the text being matched.
•   small or large matches, cut and pasted from internet/Wikipedia are not acceptable.

Example 2
33% matching. Is it okay?
(Lovelock, R. (2010), iParadigms: presentation to Indooroopilly High School, ALDIS Associates P/L
                                      Melbourne, Australia)

•   Small matches using commonly used phrases are acceptable.
•   Properly referenced quotes are acceptable.
•   If much of document is bona fide quotes, this is poor writing but not plagiarism.
Example 3: Public Information • public information – need to quote website e.g. http://www.brisbane.qld.gov.au/ • commonly used phrases, addresses, information all acceptable.
Marking Online
Submitted assignments
   •   Click on the icon in the Grade column of the required student. OR

Changing the size of the text
   •   Click on the zoom slider and drag until text is the required size.
Navigating between student assignments
   •   Click on the    (previous arrow) button and       (next arrow) button to navigate
       between student assignments. OR
   •   Click on the Paper drop down list and select the required student.
Text comments • Click anywhere on the page and click on the (Text comment) button. • Type your comment. Moving text comments • Mouse over the text comment and drag the comment to the required position.
Editing text comments
     •   Click inside the textbox.
     •   Edit the comment as required.

Deleting text comments
     •   Hover over the text comment.
     •   Click on the     (rubbish bin) icon.
Note: The font, font colour and font size cannot be changed.
Bubble Comments
• Click on the student paper.
• Click on the (Comment) button.
• Enter the required comment.
• Click out of the bubble comment anywhere on the paper and your comment will be
saved.
• Optionally, you can insert a link to your required comment.
• Click on the (Insert a link) button.• Put in the required Link Text and Link URL.
• Select the (Ok) button.
• They hyperlink is available in blue writing.
Note: To view your comment, the student hovers over the bubble icon.
Editing bubble comments
• Click on the (bubble comment) to edit.• Edit the comment as required.
• Click on the page to save the comment.
Deleting bubble comments
• Click on the required (bubble comment).
• Click on the (rubbish bin) icon.
Note: You will get a confirmation that the comment has been deleted and will have to option to
undo.Linking bubble comments to highlighting
• Highlight the required text.
• Click on the (bubble comment) icon.
• Enter the required comment.
• Select the required highlight colour by clicking on the highlighter box.
• Click on the page to save the comment.
QuickMark comments
GradeMark has sets of standard comments with drag and drop functionality in student
assignments.
• Click on the (QuickMark) icon.
• Click on the drop down menu to select the required QuickMark set.• Select the required comment, which will open on the student assignment. • Click on the comment to view the comment and add any further comments if required. Note: Any comments made in the Add comments field is used for student feedback for a particular assignment and the comment will not save to your QuickMark set.
Create your own QuickMark comment set
You can create your own QuickMark comment set that will be available to you in all courses
that you teach.
Note: The availability of QuickMark sets is based on who is logged on not what Blackboard
course the Turnitin is accessed from (refer to Exporting a QuickMark comment set).

Create the set
     •   Click on the    (QuickMark) icon.
     •   Select the     (Manage QuickMark) button.

     •   Click on the Menu drop down.
     •   Select Create New Set.
• Give you set a name and click the (Save) button. Add marks (comments) • Click on the Menu drop down and select the QuickMark created.
•   Click on the                    (Create QuickMark) link.

     •   Enter a descriptive Title and add a Description for your comment in the textbox.
     •   Click on the        (Save) button.

Adding comments from other QuickMark sets
You can copy some or all of the comments from one QuickMark set (including the standard
built in QuickMark set) and add them to another QuickMark set.
Tip: Combine all you favourite comments into the one set so you do not have to swap between
QuickMark sets when marking.
Tip: Combine the QuickMark sets of all of your teaching staff.

     •   Click on the    (QuickMark) icon.
     •   Click on the drop down and select the      (QuickMark Manager).
• Click on the page drop down and select the set you want to add comments from. • Select the comments you wish to copy. • Click on the (Add to set) button. • Select the set you wish to add the QuickMarks to from the drop down list.
Deleting comments from QuickMark sets
It is not possible to delete comments from the standard Turnitin QuickMark.
     •   Click on the set from which you want to delete the comment.
     •   Select the comment your wish to delete.
     •   Click on the             (Archive) button.

Adding bubble comments to QuickMark sets
     •   Create a bubble comment.
     •   Click on the Convert to QuickMark link.
• Enter a descriptive title for the comment in the Title textbox.
• Select the set you wish to add the comment to, from the Set drop down list.
• Click on the (Save) button.
Renaming QuickMark sets
It is not possible to rename the standard Turnitin QuickMark sets.
• Click on the required set in the Manage QuickMarks area.
• Click on the (pencil) next to the set name.• Enter the new name and click out of the box to save.
Deleting QuickMark sets
     •   Select the required set in the Manage QuickMarks area.
     •   Click on the            (Delete Set) button.

Downloading a QuickMark set
The availability of QuickMark set is based on who is logged on, not what Blackboard course
the Turnitin is accessed from. To pass a QuickMark set on to another staff member (i.e. tutor
for your course), you need to download the QuickMark set and they will need to upload it into
Turnitin (when they are logged onto Blackboard).
Tip: Combine the QuickMarks sets of all your teaching staff.

     •   Click on the    (Manage QuickMark) icon.

     •   Select required QuickMark set from the         (Menu).
• Click on the (Download Set) from the drop down menu. • Save the .qms file and you will be able to email it to other staff. • Click on the (Save) button.
Uploading a QuickMark set
    •   Select required QuickMark set from the     (Menu).
    •   Select the          (Upload Set) from the drop down menu.

    •   Click the (Or browse) button or drag and drop your QuickMark set.
• Browse to and select the required qms file. • Click on the (Open) button. • You will get a tick if the upload was successful. • Click on the (close) button.
•       Click on the        (close) button.
   •       Your quick mark comment bank should now be available from the QuickMark drop
           down list

General comments
Add a general comment
       •    Access the required student’s assignment in the Feedback studio.
       •    Click on the   (Feedback Summary) icon.
       •    Enter your comments under the Text Comment area.

Note: To edit a general comment retype in the text box and when you click anywhere outside
the textbox your changes will be saved automatically.

Delete a general comment
       •    Click on the   (Feedback Summary) icon.

       •    Click on the   (rubbish bin) icon.
Voice Comment
Note: You can create one voice comment with a maximum length of 3 minutes.
• Click on the (Feedback Summary) button.
Recording
• Click on the (Record) icon to start the recording.
• If you need to pause the recording, click on the (pause) icon, click on the
(resume recording) icon to restart the recording.
• Click on the (stop recording) icon to end the recording.
• Click on the (Save recording) icon to save the recording. OR
• Click on the (discard voice comment) icon to delete the recording.Replaying the recording
• Click on the (Play recording) icon.
• Click on the (Discard voice comment) icon to delete the recording.
Marking with a rubric
• Click on the (Rubric/Form) button in the Feedback studio.
• Scroll on the required mark for each criteria.
• Alternatively, click on the (four arrow) button to view the rubric in full size in a
new window.
• Click on the Apply to Grade to convert the percentage to the final mark. This will be
displayed in the top right corner of the page.
Note: When you hover over each criteria/mark the criteria description is shown in the bottom of
the panel.• Use the arrows in the top right of the page to navigate to the next student submission
(refer Access and navigate assignments guide).Access assignments on your iPad Assignments can be accessed on your Turnitin iPad app by generating an access code in Turnitin (accessed through Blackboard) and entering it into the app. Note: The access codes are for one time use only. All markers will need to generate their own access code. If you log out or “unlink” iPad from Turnitin, you will need to generate a new access code for the class by repeating the steps below. Download the iPad app • Download the iPad app from the App Store. • Search for the app by entering Turnitin. • Download the app Turnitin Feedback Studio.
Generate access code
   •   Login in to your Learn.UQ (Blackboard) course through a browser (iPad, PC or Mac).
   •   From Control Panel select from Course Tools > Turnitin Assignments.

   •   Click on the required assignment link.
   •   Click on the Roster Sync link to ensure the class list is up to date.
   •   Click on the pencil icon of any student.
•   Click on the Submission Information button
•   Enter your UQ email into the Email and Confirm Email fields, then click on the Email
    me button.

•   Go to your email inbox and click on the link Add class button. It will redirect you to the
    Turnitin app.
Setup the iPad app • After clicking the link, the course will appear in the Turnitin app. Access assignments • Open the Turnitin app on your iPad. • In Classes, click on the course under learn.uq.edu.au.
• Click on the required assignment under Assignments.
Download all assignments
Note: You can download all student assignments or select individually which
student assignments to download.
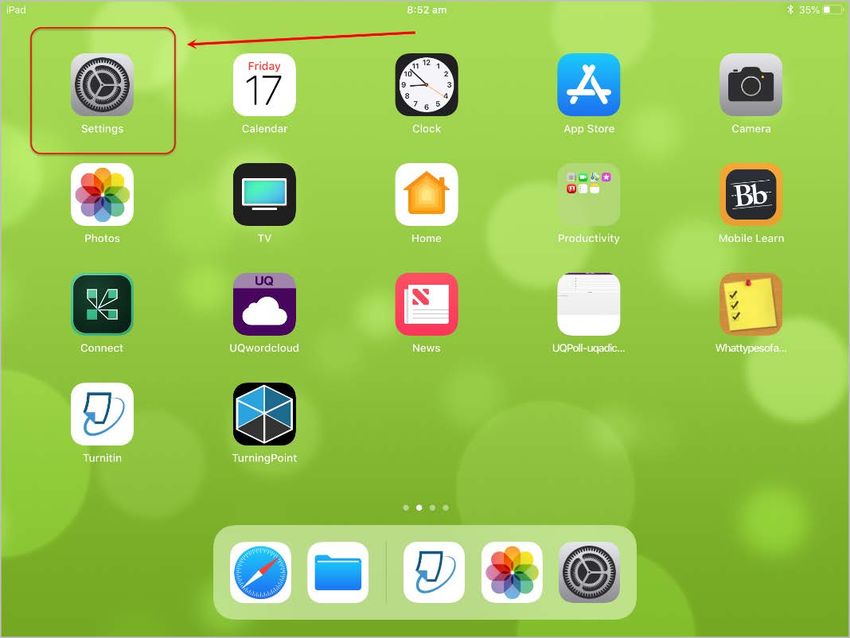
• Ensure your iPad is connected to the internet (Settings in the home screen > Wi-Fi is
turned on)• Click on the Information button. • Turn on Download All to view all assignments.
Download individual assignments
  •   Ensure your iPad is connected to the internet (Settings in the home screen > Wi-Fi is
      turned on)
• Click on the download icon of a student’s assignment you need to download.
View an assignment
 •   Click on the name of the required student.
Further Resources
Technical Support
Helpdesk staff – Gary Smith, Paul Dutton and Michael Luyten.
help@learn.uq.edu.au or Ph 336 56000

eLearning Solutions Service
The eLearning Systems and Support team provide an eLearning Solutions Service to help staff
implement eLearning solutions for the most common teaching and learning problems, using
centrally supported eLearning tools.

ITaLI UTeach
UTeacht is provided by ITaLI for the UQ community to offer support for their teaching and
learning. If you are considering changing your curriculum, its delivery or assessment,
evaluating your teaching or perhaps even educational research then get in contact through
the ITaLI UTeach website.

Faculty Educational Designers
 Faculty      Educational Designer   Email                         Phone
 BEL          Christy Patton         c.patton@business.uq.edu.au   334 66978
              Corene Crossin         c.crossin@uq.edu.au           334 68180
              (Business)
 EAIT         Joe Nagy               j.nagy@uq.edu.au              336 53637
              Pablo Riveros          p.riveros.uq.edu.au           344 31087
 HABS         Jessica Tsai           j.tsai@uq.edu.au              336 56641
 HASS         Chris Frost            c.frost1@uq.edu.au            334 61632
              Inge Matt                                            336 51333
                                     i.matt@uq.edu.au

 MBS          Kym Ward               k.ward1@uq.edu.au             334 64620
              (Medicine)

 Science      Marnie Holt            m.holt2@uq.edu.au             336 58869

eLearning Resources
A range of resources are available on our eLearning website, including self-help text based
guides, self-help videos, teaching and learning quick-guides and information on known
technical issues. Additionally, updates are also available on the progress of eLearning projects
such as the implementation of new tools and upgrades to current systems.
eLearning Newsletter
The eLearning newsletter is published fortnightly and includes articles on eLearning tips for
the start and end of semester, promotion of new tools, tool functionality and how tools could
be used to improve teaching and learning. Other relevant communications on policy updates,
tool upgrades and outages are also included in the newsletter.
Pedagogical Resources
The Institute for Teaching and Learning Innovation (ITaLI) provides leadership, engagement
and advocacy in educational innovation, teaching excellence and learning analytics.
Student Resources
Library Services provides AskUS a help and information service for students. They also offer
face-to-face help, provide online Learn.UQ student guides and run workshops for students.
eLearning Workshops
A range of technical eLearning workshops are offered throughout the year. For descriptions of
the workshops, dates and to enrol, visit the Teaching and Learning Technologies series on the
Staff Development website.
ITaLI Workshops
A range of pedagogical eLearning workshops are offered throughout the year. For descriptions
of the workshops, dates and to enrol, visit the Teaching, Learning and assessment series on
the Staff Development website.
Custom Workshops
Custom workshops for schools can be provided by the eLearning Systems and Support team
and ITaLI.
• eLearning technical workshops: elearningtraining@uq.edu.au
• eLearning pedagogical workshops: itali@uq.edu.au
• combined technical and pedagogical workshops: elearningtraining@uq.edu.au or
itali@uq.edu.au
Prepared by: Ailsa Dickie
Contributions: Julie McCredden, Stephanie David & Iliria Myrteza
Last modified: [11 October 2018]Appendix 1: Originality Report File Types
Allow any file type
Constraints
File Size is less than 40 Mb
File contains highlightable text has at least 20 words
File contains pages is less than 400 pages
Allow only file types that Turnitin can check for originality
Turnitin Assignment: File Types Checked for Originality
Turnitin will
Extension File Type Caveat Check for
Originality
Common
Adobe PDF
.pdf see below
Google Docs via Google Drive see below
Microsoft Word
.doc .docx
Plain text
.txt
Rich text format
.rtf
UncommonHangul Word Processor file (.hwp)
.hwp
HTML
.html .htm
Microsoft Excel
.xls .xlsx see below
.ppt .pptx .ppsx Microsoft PowerPoint
.pps
see below
OpenOffice Text
.odt
PostScript
.ps .eps
Corel WordPerfect
.wpd
Password protected files
Microsoft Works
.wps
Microsoft Word 2007 macros-
.docm
enabled files
OpenOffice Text files created and
.odt downloaded from Google Docs
online
Document files created using
.doc OpenOffice, as they are not 100%
Microsoft Word equivalent
Apple Pages
.pages
Spreadsheets created outside of
.ods
Microsoft Excel
Text with visual effects
.docx .pptx
Google Docs via Google Drive™
If submitting with Google Drive™, third party cookies must be allowed in your browser,
otherwise, any attempts to sign into Google to upload from Google Drive will fail. Note that
Google Drive functionality is not supported with IE8 or below. Do not upload Google Doc
(.gdoc) files directly to Turnitin; a .gdoc file does not store the document, but contains a
reference to it online, in Google Docs.Adobe® PDF Turnitin will not accept PDF image files, forms, or portfolios, files that do not contain highlightable text (e.g. a scanned file - usually an image), documents containing multiple files or files created with software other than Adobe Acrobat®. Microsoft Excel® The version of the file that can be viewed in the Document Viewer will look the same as it would if the Excel® file had been saved as a PDF and submitted to Turnitin. We highly recommend that users pay attention to the image preview provided in the single file submission to verify that the file is presented in an acceptable manner. Users can adjust the way the file looks by editing the page setup and print area settings for the file prior to saving it and submitting it to Turnitin. Microsoft PowerPoint® Turnitin converts the PowerPoint® slide deck into a static PDF, leaving all text and images in their original format but leaving out features such as presenter notes, embedded video, and animations. Text with visual effects is not supported, and it is recommended that any visual effects such as shadows and 3D be removed prior to submitting to Turnitin. It is recommended that any visual effects such as shadows and 3D be removed prior to submitting to Turnitin.
Appendix 2: GradeMark File Types
Displayed in the Document Visewer
GradeMark Overview
The document viewer is able to display the following file types in GradeMark. Turnitin converts
all documents into PDF format. To view hyperlinks, transitions and animations in a file, the
original file is available for download in its original format.
Turnitin GradeMark: File Types Displayed in the Document
Viewer
Turnitin will
Display in
Icon File Type Caveat
Document
Viewer
Common
Adobe PDF
.pdf
Microsoft Word
.doc .docx
Plain text
.txt
Rich text format
.rtf
Portable Document Format
.pdf
Hangul Word Processor file
.hwp
HTML
.html .htm
.ppt .pptx .pps Microsoft PowerPoint
.ppsx
Adobe PostScript
.ps .eps
Corel WordPerfect
.wpd
BMP
.bmp GIF
.gif
JPEG
.jpeg
PICT
.pict
PNG
.png
TIFF
.tiff
File Type Mismatch
The file types that can be used to create Originality Reports does NOT match the fiel types that
can be displayed in the Document Viewer and presumably annotated. For example: Microsoft
Excel can be uploaded and generate an Originality Report but it is not listed as a document that
can be displayed in the Document Viewer.You can also read