Advanced Dynamics: nCloth & Hair - Animating Mitosis
←
→
Page content transcription
If your browser does not render page correctly, please read the page content below
Advanced Dynamics: nCloth & Hair - Animating Mitosis
This tutorial is designed to introduce several approaches to animating various cellular process
using advanced dynamic systems such as nCloth and Hair.

Maya dynamics are powerful but take some time and practice to master. This is mostly because
their implementation in Maya is less than intuitive. To understand why the various dynamic
systems are set up the way they are you have to understand that historically, as each version of
Maya has been introduced, additions have been made to the dynamics. Particles and rigid body
dynamics have only changed a little since Maya version 4. Maya 8 introduced the nucleus
dynamic system which is used for nCloth and is rumored to replace the current particle system in
upcoming versions of the software. Nucleus is a more advanced particle system that, unlike the
standard Maya particle dynamics, has a built-in system for calculating particle interactions (the
nucleus solver), which is like a much more advanced and accurate version of Maya particle
springs. Currently the Hair solver is self-contained and not attached to nucleus however it is very
similar to the nucleus nCloth system. Maya Hair was introduced before nCloth.

nCloth and hair are extremely powerful and surprisingly easy to use depending on the
requirements of the scene. You can create some interesting dynamic movements to the objects in
your scene without the need for complex expressions and connections. nCloth and hair systems
can also interact with Maya particles and fluids as well, layering such dynamic simulations is
sometimes required to create the very specific and unusual dynamic motions we frequently see in
scientific animations.

It’s important to understand however that although the nucleus system is powerful it is not always
appropriate for every situation and in some cases old-fashioned particles and soft-body surfaces
and curves may serve you better. When approaching a particular problem you should consider
and test all options and not assume that just because a technique or tool is newer that its going to
be more appropriate for all situations.

Creating and nCloth Cell
To introduce the nCloth system we’ll create a
very simple animation that simulates the
rounding up of the edges of a cell during
prophase. nCloth is not just for simulating
clothing. By adjusting settings on the nCloth
object and the nucleus solver you can simulate
anything from water balloons to chain mail. One
of the nicest aspects of this system is that, when
using lower resolution objects, the interaction is
fast enough that you can experiment with
combinations of settings while the simulation is
running and fine tune them to get the type of
motion you want.

You’ll start this exercise by creating a very
simple cell with polygons and then convert it to
an nCloth object.

     1. Start a new scene in Maya by going to
        File -> New Scene. Maya.
     2. Switch to the polygon menu set and                Smoothing a cube creates a nice polygon sphere with out
                                                          poles at the top and bottom.
        create a polygon cube. Create>Polygon

advTutorial 5: nCloth & Hair – Animating Mitosis                                                 Spring ‘08
                                                   1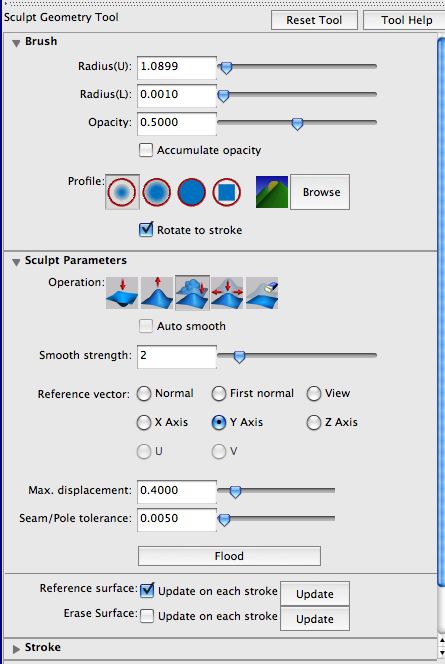
Primitive>Cube. Make sure the cube
        only has 1 subdivision in height, width
        and depth.
     3. Set the cube’s scale to 8 units in X, Y,
        and Z.
     4. Smooth the cube. Mesh>Smooth. Select
        the polySmoothFace1 node in the
        channel box and set the divisions to 4.
        This creates a nice polygon sphere.

The advantage this method has over a
conventional polygon sphere is that the smooth
cube does not have poles at the top and bottom.
The poles that are created when you make a
standard poly sphere can sometimes pinch or
distort when using the sphere for dynamic
simulations.

     5. Name the cube “cell” and delete history
        on it.
     6. Set the Y scale of the cube to 1 to
        squash it down.

To create the “fried egg” look of the cell you’ll
use the Artisan paint brush tools.
                                                        The settings for the sculpt geometry tool.
     7. Select the cell and choose Mesh>Sculpt
         Geometry> Options. In the options set
         the operation to “pull”. Set the max
         displacement to .3 and the opacity to .5.
     8. Set the Reference Vector to Y axis.
     9. You can set the size of the brush by
         holding it over the cell model. Drag the
         mouse while holding the “B” key. Once
         you have a brush radius you like, brush
         across the surface of the cell to raise a
         small bump.
     10. Switch the bush operation to smooth to
         even out any lumps.
     11. To create an uneven look to the shape          The sculpt geometry tool is used to create the lump at the
         of the cell you can add a lattice              center of the cell.
         deformer and adjust the points on the
         lattice. To keep the lattice smooth, turn
         off the “local” check box on the ffd1 tab
         in the lattice’s attribute editor.
     12. When you’re happy with the shape of
         the cell, delete history on it to commit
         the lattice changes.

     The beauty of nCloth is that any polygon
     object can be converted into nCloth with no
     additional preparation. Higher resolution
     meshes will take longer to calculate however
     you can always test out your settings on a
     lower resolution mesh and then apply those

                                                        A lattice deformer is used to shape the cell.

advTutorial 5: nCloth & Hair – Animating Mitosis                                                        Spring ‘08
                                                    2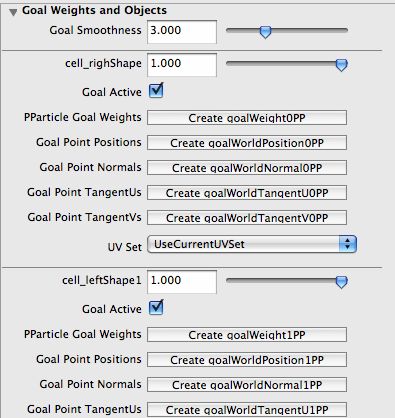
settings to a higher resolution version later
     on.

     13. Select the cell and switch to the nCloth
         menu set. Choose nCloth>Create
         nCloth. The default settings should work
         just fine.
     14. Save the scene as cell_v01.ma

Passive nCloth Objects
Passive objects are non cloth objects that can
interact with nCloth objects. They are very easy          A simple polygon plane set as a passive object keeps the cell from
to set up.                                                falling in space.

     1. Rewind and play the animation.
        Immediately you’ll see why you need a
        passive object. The cell starts to fall.
        The nucleus solver has a gravity field on
        by default.
     2. Create a polygon plane, position it just
        below, but not intersecting the cell. The
        plane can have any number of
        subdivisions, even just a single
        subdivision in width and length. Since
        this is a very simple scene you can
        increase performance by keeping the
        geometry simple.
     3. Select the plane and choose                       The yellow volume around the plane indicates the collision
                                                          thickness
        nCloth>Create Passive. Again the
        default options are fine.
     4. Play the animation, you’ll see the cell
        drop down and collide with the plane.

nCloth properties can be painted onto a surface
as a texture or directly on the vertices of an
object using the artisan tools. If you want to
make one part of the surface, such as the
nucleus of the cell, less deformable than other
parts of the cell, select the nCloth object and
choose Edit nCloth>Paint Vertex Properties. The
menu has a list of the properties you can paint
onto the nCloth object. This works similar to
painting goal weights on a soft body object. The
main difference between painting a texture and
a per-vertex map is that the per-vertex map
does not require UV coordinates to be assigned
to the object.

     When working with collision objects you
     have several options for balancing the
     speed and accuracy of the simulation. If you
     select the plane and open its attribute editor
     to the nRigidShape1 node, under Quality

advTutorial 5: nCloth & Hair – Animating Mitosis                                                        Spring ‘08
                                                      3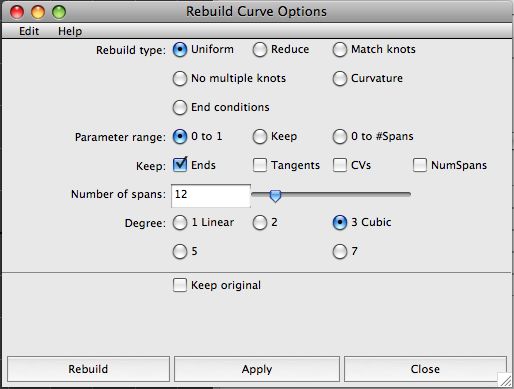
settings you’ll see the collision flag option.
     This can be set to Face, Vertex, or Edge.
     The face setting is the most accurate and
     slowest to calculate. To get an idea of how
     collisions are calculated, scroll up and set
     the solver display to Collision Thickness.
     The plane turns yellow if the collisions flag is
     set to face. In fact if you switch to the side
     view, you’ll see that a yellow collision
     volume has surrounded the plane, the size
     of which is determined by the Thickness
     slider. Set the collision flag to vertex and
     you’ll see spheres drawn around the vertices
     pf the plane. Set the collision flag to Edge
     and you’ll see a collision volume surrounds
     the triangulated edges of the face.

     At the moment, if you play the simulation           The collision attributes in the rigidShape1 node
     while changing the collision flag from face to
     vertex to edge, you’ll notice that the cell
     seems a little wobblier when vertex is
     chosen over face. If you turn off the “trapped
     check” flag the cell falls through the plane
     when the collision flag is set to vertex, it
     becomes draped over the triangulated edge
     of the plane when its set to edge, and it
     continues to collide with the plane properly
     when set to face. When Trapped Check is
     on, the solver tries to push any vertices of
     colliding objects over to one side to prevent
     interpenetration problems.
                                                         Collisions on the cell have been set to “vertex”, collisions on the
     5. Set the collision flag to face. Keep             plane have been set to “face”.
        “trapped check” on.
     6. Switch to a side view, with the plane
        selected and the Solver Display set to
        “collisions”, adjust the thickness slider
        so that the collision with the plane is a
        little more accurate. A setting of .018
        should work fine.
     7. You’ll notice that the cell still hovers
        above the plane, this is because the cell
        nCloth object also has a thickness
        setting. You can select the cell, open the
        nClothShape1 tab in the attribute editor
        and display the cell’s thickness as well.
        Set the thickness slider to .027.
     8. If you’d like to speed up the calculation
        a little you can set the cell’s collision flag
        to vertex.
     9. Turn off the visibility of the collision
        volumes for the cell and the plane and
        save the scene as cell_v02.ma

advTutorial 5: nCloth & Hair – Animating Mitosis                                                         Spring ‘08
                                                     4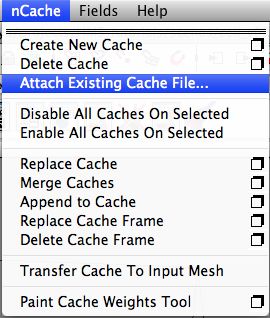
Initial State
At the start of the animation you’ll want the cell to be relatively motionless as it sits on the plane.
Currently it drops down and then collides with the plane, which is somewhat odd. To prevent this
from happening you’ll create an initial starting state.

     1. Set the timeline length to 400.
     2. Play the animation from the beginning and let it run until the cell collides with the plane
        and then settles down (about 100 frames).
     3. Select the cell and choose Edit nCloth>Initial State, Set from Current. When you rewind
        and play the animation, the cell starts resting on the plane. If you decide you want to
        remove or reset this later on, you can always choose Edit nCloth>Initial State>Clear
        Initial State.

Pressure
At this point you’re ready to animate the
rounding of the cell. This will be accomplished in
an extremely simple manner. You’ll edit the
settings on the nCloth shape, nucleus will then
apply these settings and the animation will occur
automatically as nucleus interpolates between
the initial state and the applied settings.

     1. Select the nCloth shape. Open the               Increasing the value of the pressure slider causes the cell
        attribute editor for the nClothShape1           to inflate
        tab.
     2. Play the animation. As the animation
        plays, raise the pressure slider. You’ll
        see the cell actually inflate. If you set the
        slider to 1 it will actually leap off the
        plane and bounce. Not very cellular but
        very entertaining.
     3. Raise the pressure damp to 1; this will
        tone down the inflation effect for a more
        controllable animation.
     4. Rewind and play the animation with
        these new settings.

There are two ways to calculate pressure. The
current method is set to manual, which is very
simple – the pressure slider and pressure               The rounding up of the cell is accomplished by increasing
damping sliders are the only two controls. These        the pressure settings
can be keyframed to tune the effect. If you set
the pressure at 0 and create a keyframe, then
play the animation to frame 100, set pressure to
1 and set another keyframe, you’ll get a very
nice rounding of the cell, it might be all you need
for the animation. If you set the out tangent on
the first keyframe to flat, the animation will look
smooth and elegant.

The second method is the volume-tracking
model. The settings on this model offer more
precise control as this model calculates the
                                                        The volume-tracking model simulates air being pumped
                                                        into the volume.

advTutorial 5: nCloth & Hair – Animating Mitosis                                                       Spring ‘08
                                                    5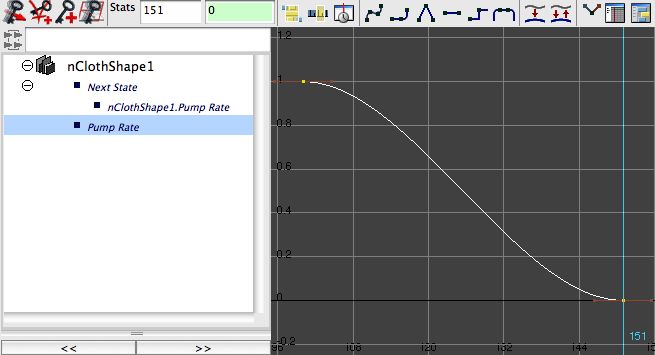
volume of the cloth combined with the inflow and
outflow of air. The pump rate value determines
the rate at which air is added within the volume.
Positive values continue to pump air into the
volume, negative values suck the air out. The
start pressure value sets the initial pressure of
the air inside the volume at the start of the
animation.

The Air Tightness value determines the
permeability of the nCloth object. Lower settings
allow the air to escape the volume. The
incompressibility setting refers to the air within
the volume. A lower value means the air is more
compressible which slows down the inflation
effect of the cell.

Whichever method you choose depends on
what you intend for the final animation. The
Volume-Tracking model will continue to inflate
the cell until its almost perfectly round which
may work well if you want the animation to show
the transition from prophase to prometaphase.            The pump rate of the pressure can be keyframed.

     5. Set the pressure method to volume
         tracking model, set the pressure
         damping to 1, the start pressure to 0,
         the pump rate to 1, the Air Tightness to
         1, and the incompressibility to 5.
     6. Rewind the animation and play to about
         frame 100. Stop the animation and set a
         keyframe on pump rate.
     7. Play the animation to 150. Set the pump
         rate to 0 and set another keyframe.
     8. Open the Graph Editor; select the
         nClothShape1 node in the outliner so
         that you can see the keyframes set on
         the pump rate.
     9. Flatten the in and out tangents of the
         keyframes.
     10. Play the animation and save it if as
         cell_v03.ma if you’re happy with the
         animation.
     11. If you find that the cell tends to move
                                                         The cell is completely inflated.
         about on the plane after it has been
         inflated you can scroll up to the surface
         properties section of the nClothShape1
         tab and increase the friction and mass.
         Set the Friction to 1 and the Mass to 10.
     12. You can also try removing the
         keyframes from the pump rate, set it to 1
         and set the air tightness to .95 so that
         some air is lost from the volume as it
         reaches its maximum inflation level.            Presets can help you get started creating a look for the simulation.
                                                         Maya 2008 has a large number of presets, Maya 8.5 does not.

advTutorial 5: nCloth & Hair – Animating Mitosis                                                        Spring ‘08
                                                     6
nCloth Presets
As you can see from taking a look at all the settings on the nClothShape1 node, there are many
different attributes which work together to create the quality of the nCloth simulation. The
pressure settings are just a small section. You can achieve a very high level of control by
adjusting the settings, keyframing them or creating expressions, you can also create & assign
textures to control the surface properties of the nCloth so that some parts have more mass than
others or wrinkles, etc. It takes some time and experimentation to master all of these settings.
Many Maya nodes come with a number of presets, which can help you quickly create an initial
quality for the node. From there you can adjust the settings until you get what you would like. The
Presets button on the upper right of the Attribute Editor will contain a list of presets (if there’s an
asterisk next to “presets” then the presets are loaded). Maya 8.5 does not ship with nCloth
presets, Maya 2008 has a large number of presets from silk to rubber to water. You can also save
your presets; they will be available for any Maya session as long as your preferences are loaded.
Presets can also be blended together to create original nCloth qualities. nCloth presets can be
downloaded form the Autodesk AREA in the "Bonus Tools" section (all the way at the bottom):
http://area.autodesk.com/index.php/misc/bonus_tools/
Create an nCloth Cache
As with all dynamic simulations, it’s a good idea to create a cache file once you are happy with
the simulation. Cache files can easily be deleted or replaced so you don’t have to wait until
everything is perfect before creating one.
1. Select the cell object and choose nCache>create new nCache>options.
2. In the options you can choose a location for the file as well as the name. You can also
decide to make a single file or a file for each frame. There may not be much of a
difference however if you decided you wanted to create an interesting cloth effect that
goes backwards you can try making a cache file for each frame and then use a file
renaming program to reverse the order of the cache file names.
3. You can set the frame range for the cache, for now leave it as the time slider.
4. Create the cache. As the cache is created Maya will play through the scene file. When
its finished you’ll see that the scene plays much faster. Any changes you make to the
nCloth surface or nucleus will not be be seen in the simulation until you delete or replace
the cache.
Dynamic Curves
Maya’s dynamic hair system can be used for much more than character hairstyles. The most
useful property of the system for the purpose of creating scientific animations is the ability to turn
a regular NURBS curve in to a dynamic curve. This is similar to creating a softbody curve
however, like cloth, the interactions and collisions between curves are much more realistic and
easier to set up. Like nCloth, once you convert a curve into a dynamic curve, you can adjust its
quality by changing the parameters on the hair node, this can be done while the animation is
playing allowing you to experiment with the settings until you get something you like.
In this section you’ll see how dynamic curves can be used to create chromatin loops hanging off
of the arm of a chromosome. You’ll also see how deformers can be used to manipulate a cached
hair system.
1. You’ll start by creating a curve to
represent the position of the
chromosome arm. Start a new scene n
Maya. Switch to the side view and turn
on grid snapping.
advTutorial 5: nCloth & Hair – Animating Mitosis Spring ‘08
72. Select the Create EP curve tool. Click
once at the origin and then again 10
units to the right.
3. Switch to the Surfaces Menu set.
Rebuild the curve so that it has 12
spans (Edit Curves>Rebuild Curve).
Rename the curve “armCurve”.
4. Select the Pencil Curve Tool from the
Create menu and draw one long looping
curve starting from the origin and
moving down towards the end and back
to the origin.
5. Hit enter when you’ve finished drawing
the curve.
6. Switch to the perspective view, right-
click over the curve and choose “control
vertices”. Use the move tool to randomly
The Options for curve rebuild
position the CVs away from the center
line so that the loops have some
dimension. You can do this quickly
without fussing over precision.
7. Select the looping curve and rebuild it
so that it has 100 spans. This will
smooth the edits that you have made to
the curve.
8. Save the scene as chromatin_v01.ma.
Create a Dynamic Curve
The looping curve will be converted into a hair
and the dynamics will be adjusted so that it has
a nice turbulent motion.
A Long looping curve is drawn around the original curve using the
1. Switch to the Dynamics menu set, Pencil Curve Tool.
choose the curve and select Hair>Make
Selected Curves Dynamic.
2. Play the animation. You’ll see the
original curve motionless and a
duplicate that is moving. In the Outliner
you’ll see a hair system node, a follicle
group and the output curve group.
The curve has been duplicated. The follicle
curve is similar to a duplicate goal curve that you
create when making a softbody curve. The
follicle has attributes related to the hair curve
and can also be used as an attractor to the hair
curve. The hair system node contains many of
the attributes you’ll use to adjust the settings on
the hair.
3. Expand the follicle node and select the
follicleShape1 node, open the attribute
editor. Set the Point Lock drop down The move tool is used to add dimension to the loops
advTutorial 5: nCloth & Hair – Animating Mitosis Spring ‘08
8menu to “No attach”. Set the timeline
length to 200. Play the animation, you’ll
see the hair curve drop and fly off into
space.
4. Rewind the animation and set the Point
lock to “base”. When you play the
animation only one end of the curve is
attached, the other is free to fly off
depending on the dynamics. If you set
the point lock to “tip” then the opposite
end will be attached. The curve’s U
direction determines which end is the tip
and which is the base. Set the Point lock
back to “BothEnds”. You can use the flip
option to reverse the tip and base.
5. Select the hairSystemShape1 tab in the
Attribute editor. In the Forces section set
the gravity to 0 so that the hair no longer Creating a dynamic curve creates several sets of nodes.
drops.
6. Set the Stiffness to 0. The stiffness
scale adds a springy quality to the curve
which can exaggerate the dynamics.
You want a nice fluid motion to the hair
so you can lower this to 0. In some
cases you can use the Stiffness scale to
fine-tune the stiffness along the length
of the curve. This scale curve works
only works when stiffness is at a non-
zero value.
7. Set the drag value to .2. When you play
the animation the motion of the hair has
pretty much ceased. This is because
there are no forces acting upon the hair.
8. Expand the Turbulence tab. Play the
animation and slowly raise the
turbulence, you’ll see the hair now starts
to move. Set the intensity to .08 and the
frequency to 1. Set the speed to 2.
9. Set the Start Curve Attract value to .027.
The start curve is the original curve
shape as represented by the follicle
curve. Increasing this value cause the
hair to conform to the shape of the
follicle curve. Raise the Turbulence
intensity to .5.
10. Select the follicle1 node. Play the
animation and raise the sample density
value. This increases the detail in the
hair curve. Set this value to 10.
11. Adjust these settings until you have a
nice turbulent motion that does not
cause the hair to move too far from the
original position. Select the Follicle node When the Point lock attribute is set to Base only one
and hide it so that you can clearly see end of the hair curve is attached to the Follicle.
the motion of the hair curve.
advTutorial 5: nCloth & Hair – Animating Mitosis Spring ‘08
912. Save the scene as
chromatin_loops_v02.ma
Create a Hair Cache
When you create a hair cache the dynamics of
the curve are stored in a file or a series of files.
Not only does this ensure that the animation will
be correct when its time to render, it also allows
you to add deformers to the hair curve. You’ll
take advantage of this so that the hair and the
original chromosome curve can be animated
together.
1. Select the hair curve and choose
Hair>Create Cache. You can use the Increasing the sample density adds detail to the hair
options to determine the frame range of dynamics.
the cache, you can leave this set to
“Time Slider”.
2. The animation will play through and the
hair dynamics will be written to disk.
Playing the animation should now be
somewhat faster, you can also scrub
through the timeline and the hair will
update correctly.
3. Remember that if you change settings
on the hairSystems node or the follicle
node you won’t see a change unless the
cache is deleted.
Deform the Curves The dynamic hair output curve and the original curve are grouped.
A chain of 10 joints is added along the center line.
As long as the cache is available and properly
linked, the dynamic curve can be animated
using deformers.
1. Rewind the animation, Select the hair
curve and the original chromosome
curve and group them.
2. Select the group, switch to the side
view, switch to the animation menu set.
3. Turn on grid snapping and select the
joint tool. Create a chain of 10 joints
each one unit long that follows the
armCurve created at the start of the
lesson.
4. Select the Group and the joint chain and
choose skin>smooth bind.
5. Try rotating some of the joints and play
the animation, the looping curve should
still move even after being deformed by
the joints.
Thanks to the cache, the dynamic curve will animate
even while it is being deformed by joints.
advTutorial 5: nCloth & Hair – Animating Mitosis Spring ‘08
106. Undo changes to the joint rotation and
save the file as
chromatin_loops_v03.ma
Use Hair as an IK Spline Curve
The joint chain can be controlled using a spline
IK, to add another level of dynamic motion you
can convert the spline IK curve into a dynamic
hair curve.
The IK spline has been converted to a dynamic curve but the joints
1. Switch to the animation menu set and do not follow its motion.
choose Skeleton>IK Spline handle
tool>Options. In the Options, turn on
“Auto Create Curve and set the spans to
4.
2. Click on the first joint in the chain at the
origin and then the last joint to create
the IK spline. A third curve (curve4) will
be created in the Outliner.
3. Select curve4 and switch to the
dynamics menu set. Choose Hair>Make
selected curves dynamic.
4. A new hair system will be created
named hairSystem2. Select the
associated follicle and in the attributes,
set the point lock to base.
5. If you play the animation you’ll see the
new hair curve droop but the joints do
not follow. This is because when the
curve is converted to a dynamic curve a
duplicate is made of the original (the
original becomes the follicle curve). To
make the joints follow the motion of the
dynamic curve you’ll need to rearrange
The dynamicIKSplineShape node needs to replace the connection
some connections in the Hypergraph. between the iKHandle node and the curveShape3 node.
6. Expand the hairSystem2Output curves
group in the outliner, you’ll see a curve
named curve5. To reduce confusion,
rename this curve “dynamicIKSpline”.
7. Select the dynamicIKSplineShape node
in the Outliner, Ctrl/Command select the
IkHandle1 node and open the
Hypergraph
(Windows>Hypergraph:Connections).
8. You’ll see that curveShape4 (which is
the follicle for the dynamicIKspline
curve) is connected to the ikHandle1
node. If you hold your mouse over the
arrow it shows that the worldSpace
attribute of curveShape3 is connected to
the incurve attribute of the iKHandle.
9. Select the dynamicIKSplineShape node
and MMB drag it on top of the ikHandle Middle Mouse Button drag the dynamicIKSplineShape
node on top of the ikhadle1 node and choose “Other”
advTutorial 5: nCloth & Hair – Animating Mitosis Spring ‘08
11node, form the pop up menu, choose
“Other” to open the Connection Editor.
10. Find the World Space attribute on the
left of the connection editor and select it.
Scroll down and find the In Curve
attribute on the right - it will be in italics
and grayed out indicating it already has
an input connection. Select In Curve,
this will update the IK spline so that now
the dynamicIKSpline curve controls the
joints. Rewind and play the animation.
11. Select the hairSystem2 node and The World Space attribute on the left needs to be connected to the
experiment with the dynamics, try these In Curve attribute on the right
settings:
Stiffness=0
Drag=.136
Mass=0
Gravity=0
Start Curve Attract = 0
Turbulence Intensity=.091
Frequency = .582
Speed =1.072
In the follicleShape2 tab set the Sample
Density to 2.
12. Play the animation and adjust the
settings to your liking. Save the scene as
chromatin_loops_v04.ma.
Add Paint Effects Strokes to the
Curves
The final step is to add Paint Effects strokes to
the curves you need to render.
1. Select and hide all of the nodes except
the grouped curves in group1.
2. Open the Visor (Windows>General
Editors>Visor). From the Paper folder,
select the Confetti brush.
3. Switch to the rendering menu set.
4. Select armCurve in group1. Choose
Paint Effects > Curve Utilities > Attach
Brush to Curves. The confetti brush will
be attached to the main curve; this will
be the chromosome arm.
5. Set the following settings in the confetti1
shape node tab of the Attribute Editor:
Adding Paint Effects strokes to the curves allows them to be
rendered.
advTutorial 5: nCloth & Hair – Animating Mitosis Spring ‘08
12Creation:
Tubes Per Step = 100
Segments = 2
Length Min = .163
Length Max = .273
Tube Width 1 = .066
Tube Width 2 = .079
Width Rand = .364
Width Bias = .982
Tube Direction: Along Path
Azimuth Min = -1
Azimuth Max = 1
Shading:
Set color 1 to a nice purple/blue
Under Tube Shading set Color2
to purple
Set Hue Rand to 0
Sat Rand to .054
Val Rand to .145
Illumination:
Turn on Illuminated and Real
Lights
Under Shadow Effects set Fake
Shadows to 3D cast.
Select the StrokeShape1 tab
and turn on “Use Normal” this
will keep the stroke from twisting
erratically as the curve moves.
Do some test renders and adjust the settings
until you are satisfied. Apply a similar stroke to
the looping curve but lower the tubes per step to
10 and the Global Scale to .18. Set the colors to
something that contrasts with the purple and
blue of the chromosome arm, try a green/blue.
Add a light to the scene.
When you like the look of the arm and the loops,
create a hair cache for the IK spline curve and
render a sequence.
Constrain Cloth to Hair
It’s fairly simple to attach an nCloth object to a hair curve indirectly using a locator and an
nConstraint. In this exercise you’ll see how you can use this technique to animate the separation
of chromosomes during anaphase. This section will go through setting up just part of the
animation, completing the animation is simply a matter of expanding the techniques so that both
sets of chromosomes are animated. First you’ll create the spindles using hair.
advTutorial 5: nCloth & Hair – Animating Mitosis Spring ‘08
131. Start a new scene in Maya.
2. Create a polygon cube and use the
smooth operation and set the divisions
to 2 to create the now familiar pole-less
rounded cube. Rename the cube
“roundCube”.
3. Scale the roundCube up so that the
radius is about 3 units.
4. Switch to the Dynamics menu set.
5. Right-click over the roundCube and
choose face, drag a selection over the
entire cube to select all of the faces.
6. Choose Hair>Create Hair>Options. In
the options choose to create hair at
selected points/faces. Set the output to
NURBS curves, set the length to 15.
7. Press the Create Hairs button to create Hairs are attached to the faces of the smoothed cube.
the hairs. Hairs now appear attached to
the center of each face.
8. Set the length of the timeline to 300 and
play the animation, you’ll see the hairs
drop due to gravity.
9. In the Outliner, select the hairSystem1
node, set Gravity to 0.
10. Set the Drag to 2. Set stiffness to 1.
11. Select the roundCube and set a
keyframe on the translateX channel.
12. Play the animation to frame 100, set
translate X to 50 and set another key
frame.
13. Open the graph editor for the
roundCube and flatten the tangents on
the animation curve.
14. Play the animation.
The hairs are dragged by the animated cube.
Model a Simple Chromosome
The next step is to create a very simple
chromosome model and convert it to nCloth.
1. Select the roundCube and hairs and
hide them.
2. Create a polygon cube and name it
“chromosome1”.
3. Set the height to 9 and the subdivisions
in height to 9 as well.
4. Right-click over the cube and choose
“face”, select the faces at the center
section of the cube.
5. Perform a extrusion and pull these faces
out a little to form the centromere.
advTutorial 5: nCloth & Hair – Animating Mitosis Spring ‘08
146. Select the faces above and below the
centromere, scale these down in X and
Z.
7. Perform and smooth operation on the
chromosome, set the divisions to 2.
8. Duplicate the chromosome twice for a
total of three chromosomes.
9. Unhide the roundCube and hair system
10. Position the chromosomes near the end
of three of the hairs. Choose hairs that
are closer together so that you can test
the collision properties of the nCloth
objects. Make sure the chromosomes
are on the side of the roundCube
opposite from where it travels when the
animation is played. The chromosome is modeled from a simple cube
11. Save the scene as anaphase_v01.ma.
Convert the Chromosome to
nCloth and Add Constraints
Multiple objects can all be assigned to the same
nucleus node so that their dynamics are shared.
nCloth objects cannot be constrained directly to
the hair curves, however a locator can be
attached to each hair and then each
chromosome can be constrained to a locator.
1. Select the three chromosome objects,
switch to the nCloth menu and choose
nCloth>Create nCloth.
2. Select any one of the chromosomes and
open its attribute editor. Switch to the
Smoothing the cube twice
nucleus tab and set the gravity to 0 and
finishes the model
the air density to 25.
3. If you play the animation now, not much
will happen since there are no forces
acting upon the nCloth.
4. Rewind the animation and create three
locators to act as constraint objects.
5. Select the locator1 and the hair curve
closest to chromosome1. Switch to the
Animation menu set, choose
animate>Motion Paths>Attach to Motion
Path.
6. By setting the curve as a motion path to
the locator you are essentially
constraining the locator to the curve. Of
course it currently moves along the
curve as the animation plays. Select the
curve and open the motionPath1 node
in the channel box. You’ll see the U
Value channel is orange indicating that it The chromosome is duplicated and placed near
has a keyframe. Right-click over the U the end of some of the curves.
advTutorial 5: nCloth & Hair – Animating Mitosis Spring ‘08
15Value channel and choose “Break
Connections” to remove the keyframe.
7. Set the uValue channel to 1 so that the
locator is at the end of the curve next to
the chromosme.
8. Play the animation; you’ll see the locator
is attached to the curve as it travels
through space.
9. Rewind the animation. Right-click over
chromosme1 and choose “Vertex” to
switch to vertex selection mode.
Carefully select all the vertices of the
centromere.
10. Hold the ctrl/command key and select
locator1 in the channel box. You want
A locator is attached to the curve
both the locator and the vertices of the using a motion path.
centromere to be selected at the same
time.
11. Switch to the nCloth menu set and
choose nConstraint>Transform. This will
constrain the selected vertices to the
locator. (Note that nConstraints are not
the same as the constraints found in the
animation menu set, these are specific
to nCloth objects).
12. Play the animation, you’ll see the
chromosme is dragged along by the
dynamic curve.
13. Repeat these steps for the other two
chromosomes so that they are attached
to the other curves.
14. Try experimenting with settings on the
nCloth chromosome. Set bend
resistance to 70, stretch resistance to 10
and compression resistance to 10.
15. Select all of the follicle nodes in the
Outliner and set their sample density to The vertices of the centromere are selected
2. This increases the detail in the hair
dynamics by double the number of
points on the dynamic version of the
curve. A setting of 1 causes the dynamic
hair to have the same number of points
as the original CV curve.
16. Select the hair node and in the attribute
editor, set the turbulence intensity to 1
and the frequency to .5.
17. At this point the animation will be a bit
slow so you may need to create a
playblast to see how it will look at the
proper speed. Notice that the
chromosomes will collide and interact if
they get close to each other.
18. You can add more chromosomes to the
scene if you’d like although it will get
increasing computational intensive so The vertices are constrained to the locator using
save frequently. Remember that before a transform nConstraint.
advTutorial 5: nCloth & Hair – Animating Mitosis Spring ‘08
16rendering you’ll need to make a cache
for both the hair system and the nCloth
chromosomes.
When the animation is played the hair curves drag the
chromosomes.
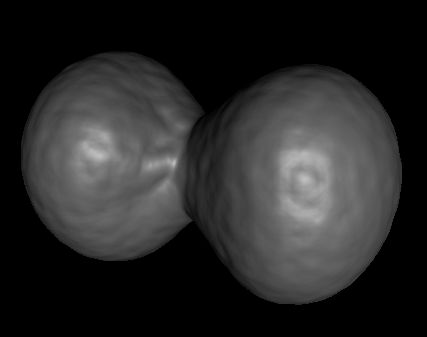
nCloth Cell Division
There are numerous approaches for creating
believable cell division animation in Maya. In this
section you’ll see some of the possibilities
offered by nCloth. The goal of this lesson, as
well as the others in this section, is to make you
aware of the many choices you have and inspire
you to create your own solutions to the problems
posed by scientific visualization.
In the first part of this lesson you’ll use nCloth to
animate one side of the cell division. Later on
you’ll create a cache and duplicate the right side
of the cell to create the left side of the cell. By
using applying a cache to both halves of the cell
you’ll only have to create a nCloth simulation for
one side of the cell.
1. Create a new scene in Maya. The vertices on one side of the cube are scaled
down.
2. Create a polygon cube and scale it up
10 units in X, Y, and Z.
3. Switch to the polygon menu set, select
the cube and perform a smooth
operation, leave the divisions at 1.
4. Switch to the front camera. Right-click
over the cube and choose “Vertex”.
Drag a selection marquee around all of
the vertices on the left side of the origin.
advTutorial 5: nCloth & Hair – Animating Mitosis Spring ‘08
175. Use the scale too to scale these down
roughly 30%. This will cause the cell to
be squished out towards the right in the
final simulation.
6. Select the cube and perform another
smooth operation, set the divisions to 3.
7. Name the cube “cell_right”
8. A rigid body object will cleave the cell.
Create a polygon Pipe (Create>Polygon
Primitives>Pipe).
9. Rotate the pipe 90 degrees in Z.
10. Set the X and Z scale to 12, set Scale Y
to .25
11. Set the thickness to .5, subdivisions axis
to 36, subdivisions height to 2, and
subdivision caps to 1. You can increase
the rings around the flat area of the pipe
by raising the subdivisions of the caps,
however, as you saw in the first part of
this chapter, increasing the subdivisions
on the passive geometry is not always A polygon pipe will be used to cleave the cell.
necessary.
12. Right Click over the pipe and choose
vertex. Select all the vertices at the
center of the pipe, use the scale tool to
scale the center along the Y axis so that
the center of the pipe is thinner than the
outside edge. This will create a wedge-
like profile in the pipe. This may or may
not be necessary depending on the final
nCloth settings.
13. Delete history on the pipe. Freeze
transforms on the pipe (modify>Freeze
Transformations)
14. Rewind the animation to the start, set a
key frame on the pipe’s X, Y, and Z
scale.
15. Set the time line to frame 100. Scale the
pipe down in X, Y, and Z to .05 in X, Y,
and Z.
16. Save the file as cellConstrict_v01.ma
nCloth Settings As the pipe scales it collapses the nCloth cell.
Creating the quality of the cell as it divides
involves some experimentation with the nCloth
settings.
1. Open the cell_v01.ma file or continue
with the scene from the previous
section.
2. Select the cell_right object and switch to
the nCloth menu set. Choose
advTutorial 5: nCloth & Hair – Animating Mitosis Spring ‘08
18nCloth>Create cloth, the default settigs
are fine.
3. Select the pipe and choose
nCloth>Create Passive.
4. Select the cell and switch to the nucleus
tab in the Attribute Editor. Set Gravity to
0.
5. Play the animation,. It will be somewhat
slow but you’ll see the pipe clamp down
on the cell. The settings need to be
adjusted so that the cell is squished out
to the right side.
6. Use these values for the settings, if a
setting isn’t mentioned you can leave it
at the default value. The name of these Adjusting the settings of the nCloth node creates
settings are fairly self-explanatory and a quality to the cell which allows it to be squished
out one side of the pipe.
the values were determined through
experimentation. I found that a high
compression and bend resistance
allowed the cell to successfully escape
from the clamping action of the pipe,
use these settings as a starting point to
create the type of motion you want:
Friction = 0
Stretch Resistance = 1.82
Compression resistance = 200
Bend Resistance = 120
Tip : When you have settings you like, or
even close to what you like, use the preset
button in the upper right of the attribute
editor to save your own presets. If you need
to replicate the settings in another scene,
you can apply them directly from the nCloth
attribute editor without having to reopen the
original scene.
7. Hide the pipe object and create a
playblast of the animation, the cell half
should squish out to the right, however it
keeps traveling after it resumes it’s
shape, to stop the cell you can add a
drag field. Rewind the animation, select
the cell_right object and choose
fields>drag.
8. Select the drag field and open its
attribute editor, set the Volume shape of
the field to Cube.
9. Scale the cube up to 4.5 in X, Y, and Z,
move the field to the right of the cell (set
the translate X to 7.15).
10. Set the Attenuation to 0 and the
magnitude to1. Higher magnitudes can
even act as a barrier to the cloth
The settings in the nClothShape1 node
advTutorial 5: nCloth & Hair – Animating Mitosis Spring ‘08
19causing in to deform as it presses
against the drag field.
11. Create another playblast. The drag field
should halt the cell’s momentum so that
it stops after the division is complete.
You can increase the air density in the
nucleus settings if you want the cell to
appear more like its in a fluid medium.
12. Save the scene as cellConstrict_v02.ma
Tip: You can try keyframing the pressure
settings to make the cell grow into a spherical
shape after it divides, experiment with manual
settings and the volume tracking method. The
pressure should start increasing after the cell
divides and then stop once it has settled. A drag field keeps the cell from drifting after it divides.
Using nCaches
Once an nCache is created it can be applied to
a duplicate of the original object to create the
other half of the cell.
1. Select the cell_right object. From the
nCloth menu set choose
nCache>Create New nCache. You can
use the options to name the cache, set
the directory and the time range. You
can choose to either create one file of
one file per frame, in this case, choose
to create a single file. If a cache already
exists, a dialog box will open asking you
if you want to replace or rename the
existing cache. Make a note of where
the cache file is stored, it should create
a directory in the project’s data folder by
default.
2. The scene will play through as it creates
the cache, once it is finished rewind and
play the scene. It should play at full
speed.
3. Rewind the animation and select the
cell_right object and duplicate it, name
the duplicate “cell_left”. In the outliner,
set the display to show shape nodes,
expand each of the nodes for the two
halves of the cells and make sure the
shape nodes have different names,
rename them cell_rightShape and
cell_leftShape.
4. Select the cell_left object and choose
nCache>Attache existing nCache. A
dialog box will open up; by default it Rename the shape nodes of the cell to ensure that
should open to the data folder by Maya does not become confused when dynamics are
applied.
default. Find the directory created by the
advTutorial 5: nCloth & Hair – Animating Mitosis Spring ‘08
20cache. In the dialog box, set the file type
to best guess. Select the file ending in
.mc.
5. Rewind and play the scene, you’ll see
both cell halves have the same
animation applied.
6. Select the cell_left object and set its Y
rotation to 180. Rewind and play the
scene, you’ll see the two cell halves now
move in opposite direction.
7. If you find that one side of the cell pokes
through the opposite half as it divides
you can move one or the other slightly in
X. Try setting the cell_left’s translate X
value to -.587. In this case, moving the
left side a little actually improves the
look of the division.
Tip: Its possible to delete all of the nCloth nodes
and fields except for the original geometry and
apply the cache to each of the duplicate cell
halves, this can speed up playback of the scene, A cache can be attached to a similar, non-cloth object
to duplicate its motion.
just male sure you have a version of the scene
with the nCloth nodes saved in case you want to
go back and make changes.
Tip: as long as the cache file exists and is
properly linked you can add animation and
deformers to the cached geometry, if you want
to add an additional level of variation to the cell
objects you can add a lattice on top of the
geometry and adjust the lattice point positions.
To add even more dynamic motion you can
experiment with making the lattice a softbody
object or even create soft body duplicates of the
cell geometry.
Coat the Geometry with Particles
To create the look of a single cell object dividing
into two cells, you can use coat each cell half
with a single particle object set to the blobby
surface render type. This works almost as well
as metaballs in other leading 3D packages such
as Houdini.
1. Continue with the scene from the
previous section, create a particle
emitter. Set the emitter type to omni, the
rate to 500, and the speed to 1.
2. Select the particle object in the Outliner.
Ctrl (Command) select the cell_right
object. Switch to the dynamics menu set
The duplicate cell with the cache applied adds the
other half of the cell to the division.
advTutorial 5: nCloth & Hair – Animating Mitosis Spring ‘08
21and choose particle>Goal>options. In
the options, set the goal weight to 1.
3. Repeat step 2 for the cell_left object,
you want both of the objects to be goals
for the cell.
4. Set the particle render type to blobby
surface. If you play the animation you’ll
see the particles get stuck between the
two halves of the cell, this is because
each goal is exerting an equal force on
the particle.
5. Open the attribute editor for the
particleShape node. Expand the goal
weights and objects section. Click on
the createGoalWeight0PP button and The particles are stuck between the two goal surfaces
the createGoalWeight1PP. This creates
a per particle goal weight for each goal
object. Each goal has a designated
index number. The cell_right object is
goal0 and the cell_left object is goal1
because of the order in which the goals
were added to the particle.
6. Scroll down to the per-particle array
attributes. Right click over the
goalWeight1PP field and choose
“creation expression”.
7. In the expression editor, add the
following expression:
If (particleId % 2 == 0 )
{
goalWeight0PP=1;
goalWeight1PP=0; Attributes to control per-particle weights for each goal
} can be created in the Goal Weights and Objects
else section of the particle’s attribute editor.
{
goalWeight0PP=0;
goalWeight1PP=1;
}
8. This expression simply states that if the ID
number of a particle is even then set the goal
weight of goal0 to 1 and the goal weight of goal1
to 0, otherwise set the reverse (so odd numbers
go to goal1). The % sign stand for modulus,
particleId % 2==0 says that the Id number can
be divided by 2 without leaving a remainder,
thus it is even. Note that you must use the
double equals sign in this expression. A double The expression divides the particles evenly between
equals sign is an evaluation, a single equals the two goals.
sign is an assignment.
9. Click on the Create button in the expression
editor to make the expression. Play the
advTutorial 5: nCloth & Hair – Animating Mitosis Spring ‘08
22animation, you should see that both cell
halves are coated with particles.
10. Currently the particles continue to be added
to the cell halves, you can set a limit on the
number of cells generated by the emitter. If
you set the Heads Up display to show the
polygon count and select the two cell halves,
you’ll see that the total vertices is 3076.
Select the particle shape node and in the
Attribute Editor under Emission attributes,
set the max count to 3076. You can raise
the emitter’s rate to 10,000 so that the cells
are coated in particles within the first couple
frames of the animation. A Blinn shader is assigned to the particles, when
11. Select the particle shape. In the Attribute rendered the cells appear to be one object split into two.
editor click on the Add Attributes for current
render type button. Raise the threshold to .8.
12. Select the original cell geometry and hide it
or assign a transparent lambert shader so
that it does not show up in the render.
You may notice that the divided cells are rather
lumpy . This is because for each half of the cell
only half the vertices are being covered – the
particles are attracted to the goal based on their
particle Id number so some vertices are left
open because the corresponding particle is on
the opposite half of the cell. The easiest way to
remedy this is to perform a smooth operation on
each of the cell halves and then raise the max
particle count on the particle shape node so that
enough particles are created (about 12292
particles will need to be created to cover the
cells). Then raise the radius and threshold of the
blobby surface particles. This will smooth the
surface of the cells somewhat but it’s not a
perfect solution.
The reason you would use a single particle
object as opposed to two particle objects is that
the metaball quality of blobby surfaces can’t be
shared between two separate particle nodes.
You may notice that it takes a few frames at the
start of the animation before the cells are coated
with particles. You can either cut these out of the
final render sequence or play the animation up
to the frame where the cells are coated but
before the cells start to move. Then set an initial
state on the particles (Solvers>Set Initial State
for Selected).
Tip: Before rendering the scene, make sure you
create a particle cache!
advTutorial 5: nCloth & Hair – Animating Mitosis Spring ‘08
23You can also read